Transcripts
1. Introduction: Do you have the cutest pet in the world with the most
awesome personality? Would you like to
make a piece of art that's guaranteed to put a smile on your face every
single time you look at it? Whether you're
looking to celebrate your own pet
uniqueness or looking to make the perfect
gift for pet lover, join me in the slightly
upbeat pet portraits and procreate class and let's give our furry friends this
portraits they deserve. Hi, I'm Thais. I'm a designer, artists and curious creator who can't seem to focus on only one thing, play backgrounds
and fashion design specializing in children's wear. In the past 10 years,
I've worked with apparel and printed
pattern design. I love digital
illustration and I really enjoyed drawing portraits
and making gifts for people. Eddie over here is a
rescue from Brooklyn, currently living
in Rio de Janeiro, who enjoys long walks on the
beach and absolutely couch. He's always by my
side and has even started my custom portraits
and Adobe Fresco class. Every pet has your own
quirks and preferences and in this class will make a portrait like no other thing. If your pet suddenly
became a human, would he be more like a punk, always getting in trouble? A hipster, a grumpy old
man or a spoilt princess? Would they be super athletic, running marathons or
more of a couch potato? We're going to create a
portrait that highlights your pet's unique
personality and style. Keeping your traits in mind, we'll start by choosing a
great reference photo and combining it with accessories that really represent your pet. Then we'll sketch and
color and I'll share my favorite procreate tips
throughout the whole class. At the end, we'll turn it into your cell phone paper so you can take them anywhere with you. I saved mine on my phone and no joke it makes me
smile every single time. [LAUGHTER] It's so awesome, but my whole family
asked me to share with them and let me tell you, it has the same
effect on them too. This class is for
all pet lovers, crazy cat people,
dog people, unique. You can even draw your
goldfish if you like. Or maybe you have
somebody in your life that's crazy about their pets and
wanted to give them an awesome gift. This
is the place for you. To help get you started, check out the resources for
a fun pet personality quiz filled with ideas
of accessories to go with different types
of personalities. We'll draw from a photo, so all skill levels
are welcomed. I'll guide you through
the whole process even if you're totally new
via procreate or a dry, they'll still get a
pretty full portrait while learning some procreate
tips along the way. I'll be making this
portrait on the iPad Pro, using procreate, but feel free to use any other
medium you prefer. Ready to draw some rather unique pet portraits
that are guaranteed to put a smile on your
face? Let's get started.
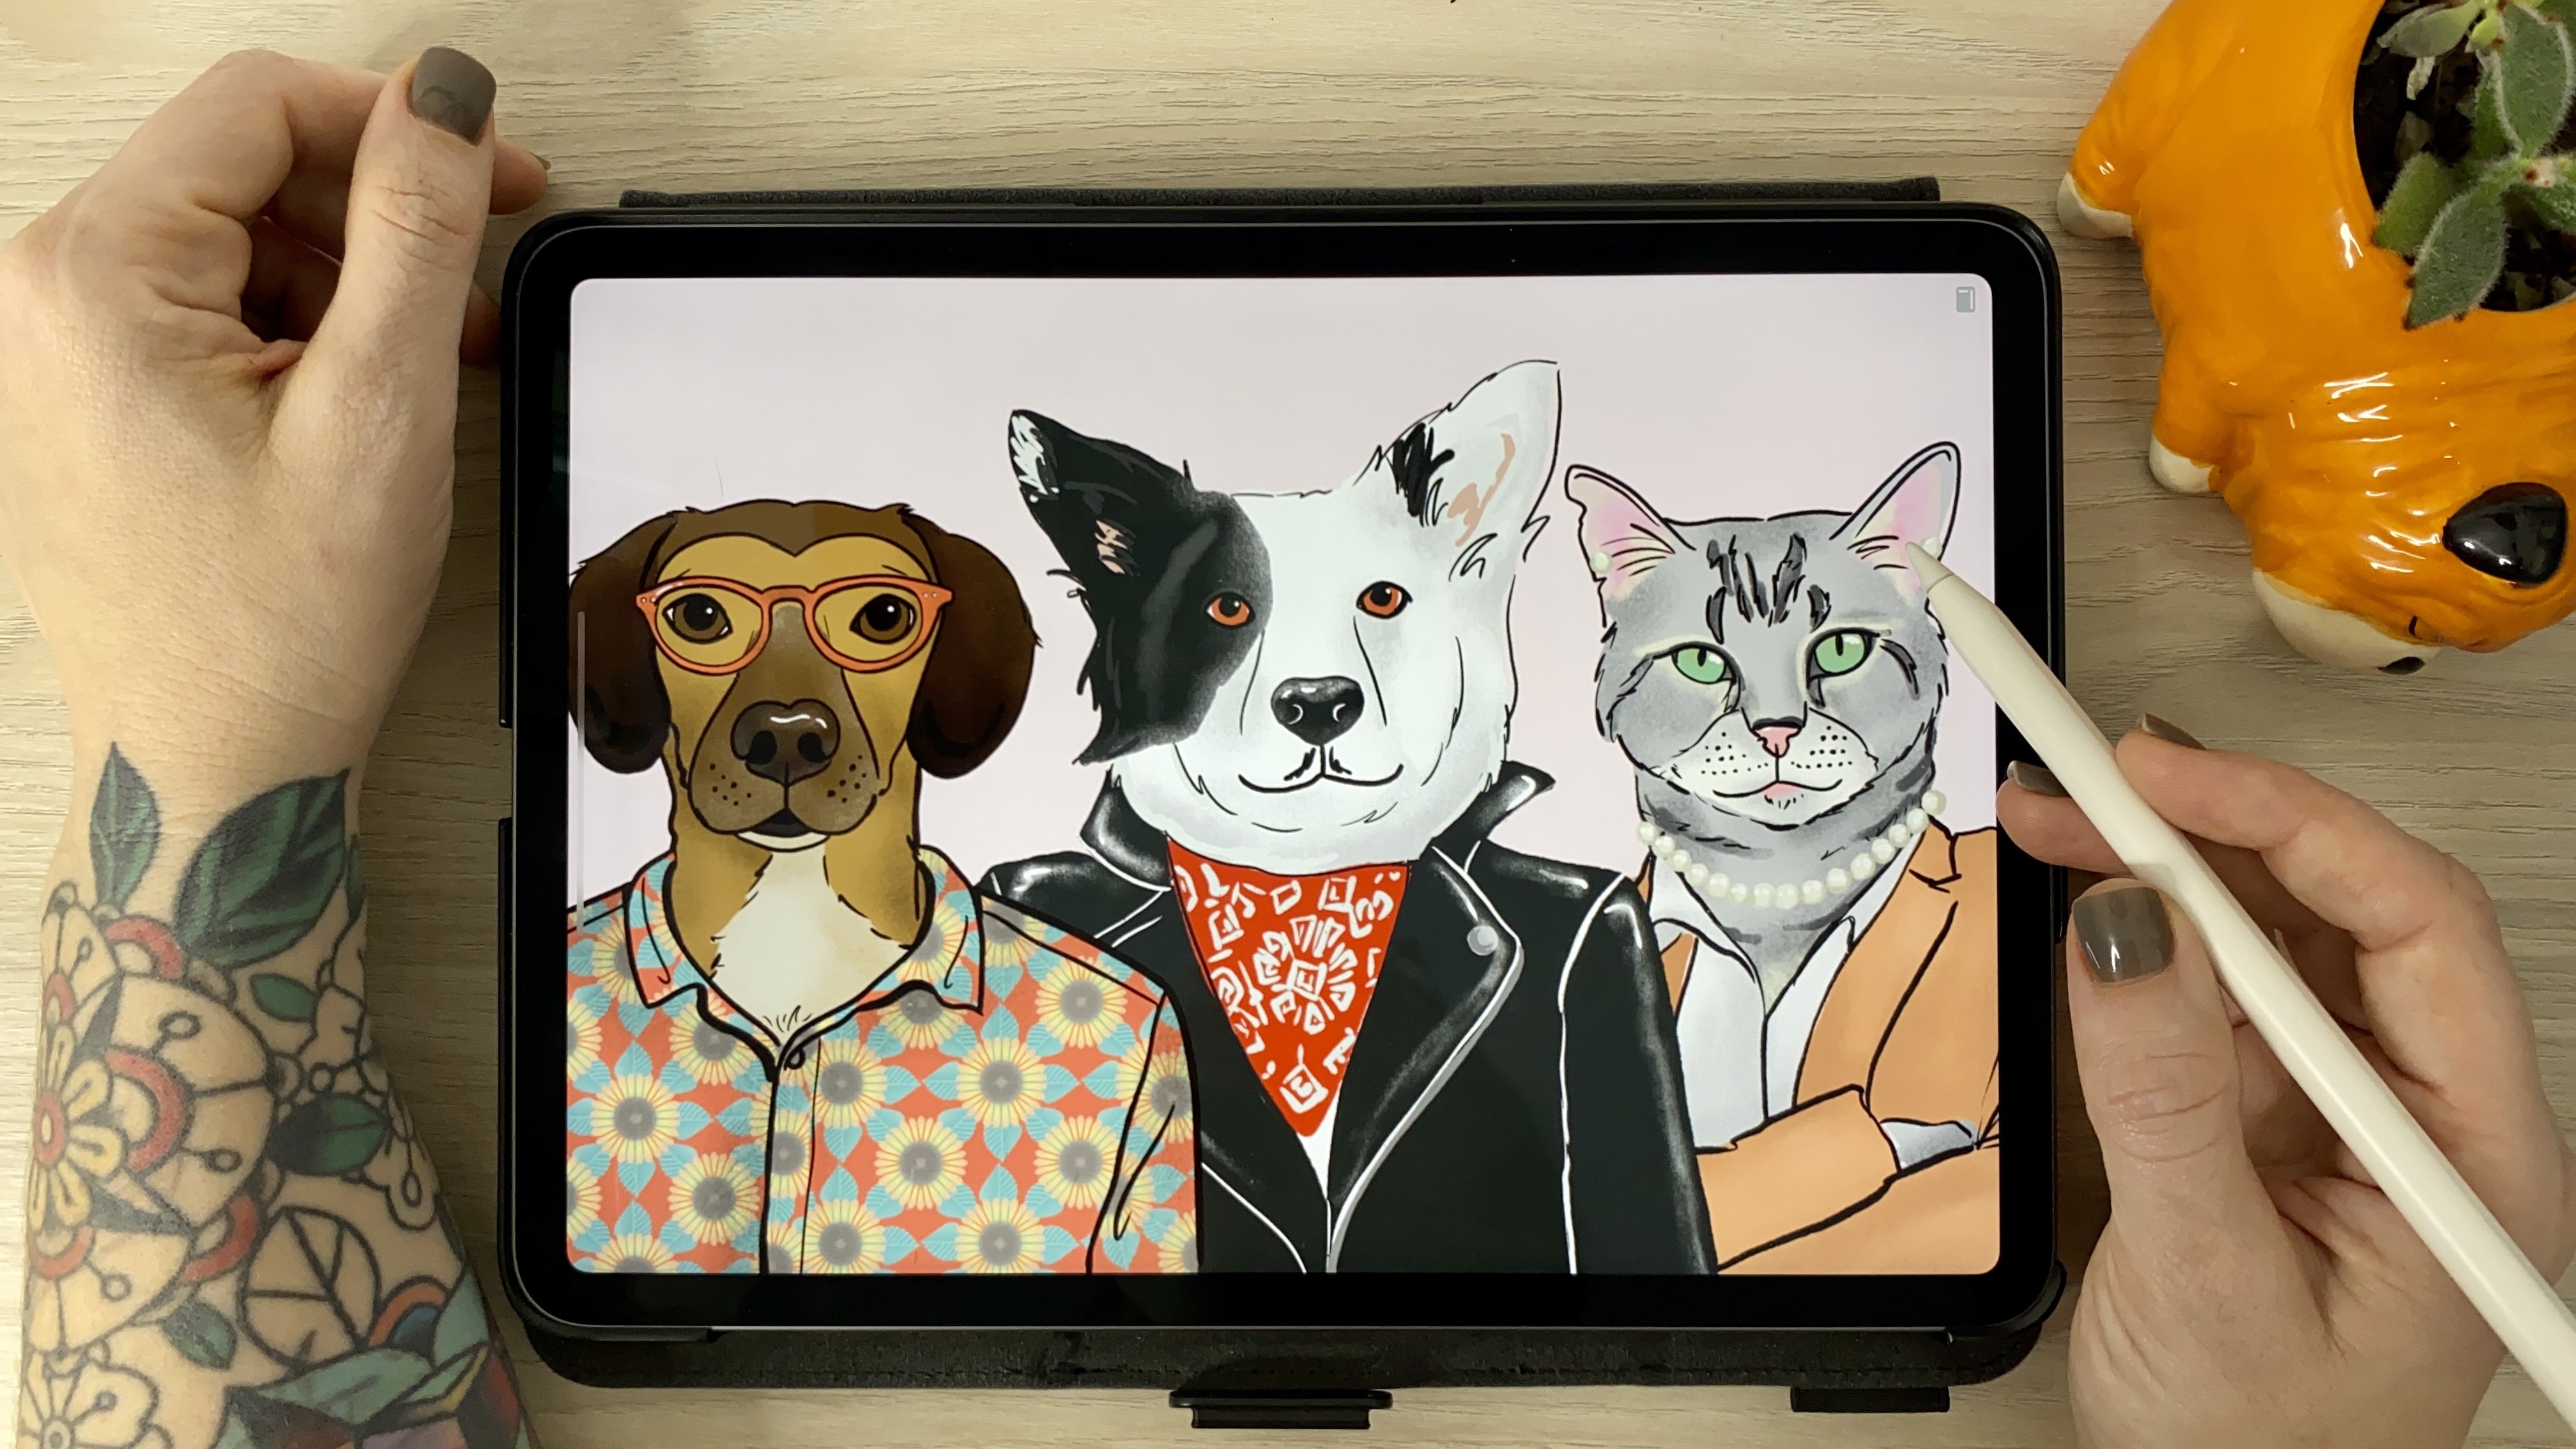
2. Class Project: [MUSIC] Our project
for this class is to make a stylized pet portrait using your pet's
unique personality as a guide for
choosing accessories. We'll pick a photo and a few reference images for
the accessories. You can use the pet
personality quiz from the class resources to help
you get your ideas flow. Then we'll make a color palette
from the picture as well. After that we'll sketch
it out and add color. I'll show you some tips on how to simplify your
drawing to achieve a stylized look and show you the techniques I use when it comes to coloring in Procreate. When the portraits done, we'll
resize it and export it, to turn our portrait into a phone wallpaper that's
guaranteed to make you smile. The last step is sharing your
process and wallpaper in the class gallery so everyone can see how
awesome your pet is. I'm going to start here with
three very important tips to make sure you get the
most out of this class. Don't worry about perfection. Enjoy the process.
Don't take yourself too serious and have fun. [MUSIC]
3. Reference Photos: The first thing we'll need for this project is a
photo of your pet. And I had an eager assistant for this part where you can do
this on your own as well. Whether you're taking
a photo specifically for this project are
already happened, makes sure the lighting is good in a photo is
taken up close. Ideally, it will be at your pets level because it will be a lot easier to
add accessories. Have you treat usually helps my dog to look at the camera. If you want to learn more
about reference photos, make sure to check out
my custom portraits in Adobe Fresco class. That's on a different software. It has a whole lesson on choosing reference photos
that's really useful. Next, let's look at accessories. Pinterest is a pretty good
place to look for ideas, search for dark costumes, and if anything, you should get a few labs at some
of these photos. I know I probably spent way more time than I
should look at these, but come on, they're
pretty awesome. But enough procrastinating. I decided I wanted my
portrait to be a bit more humanized rather than
a pet and costume. So I did a quick search for male portraits on unsplash.com. I use this website a lot as the photos are available for personal and
commercial projects. I definitely recommend
browsing it for a bit. So here's something to think
about for the project. Do you want your pet to appear more like you would
if he was a human? Or do you want something
cute and funny, like your pet to
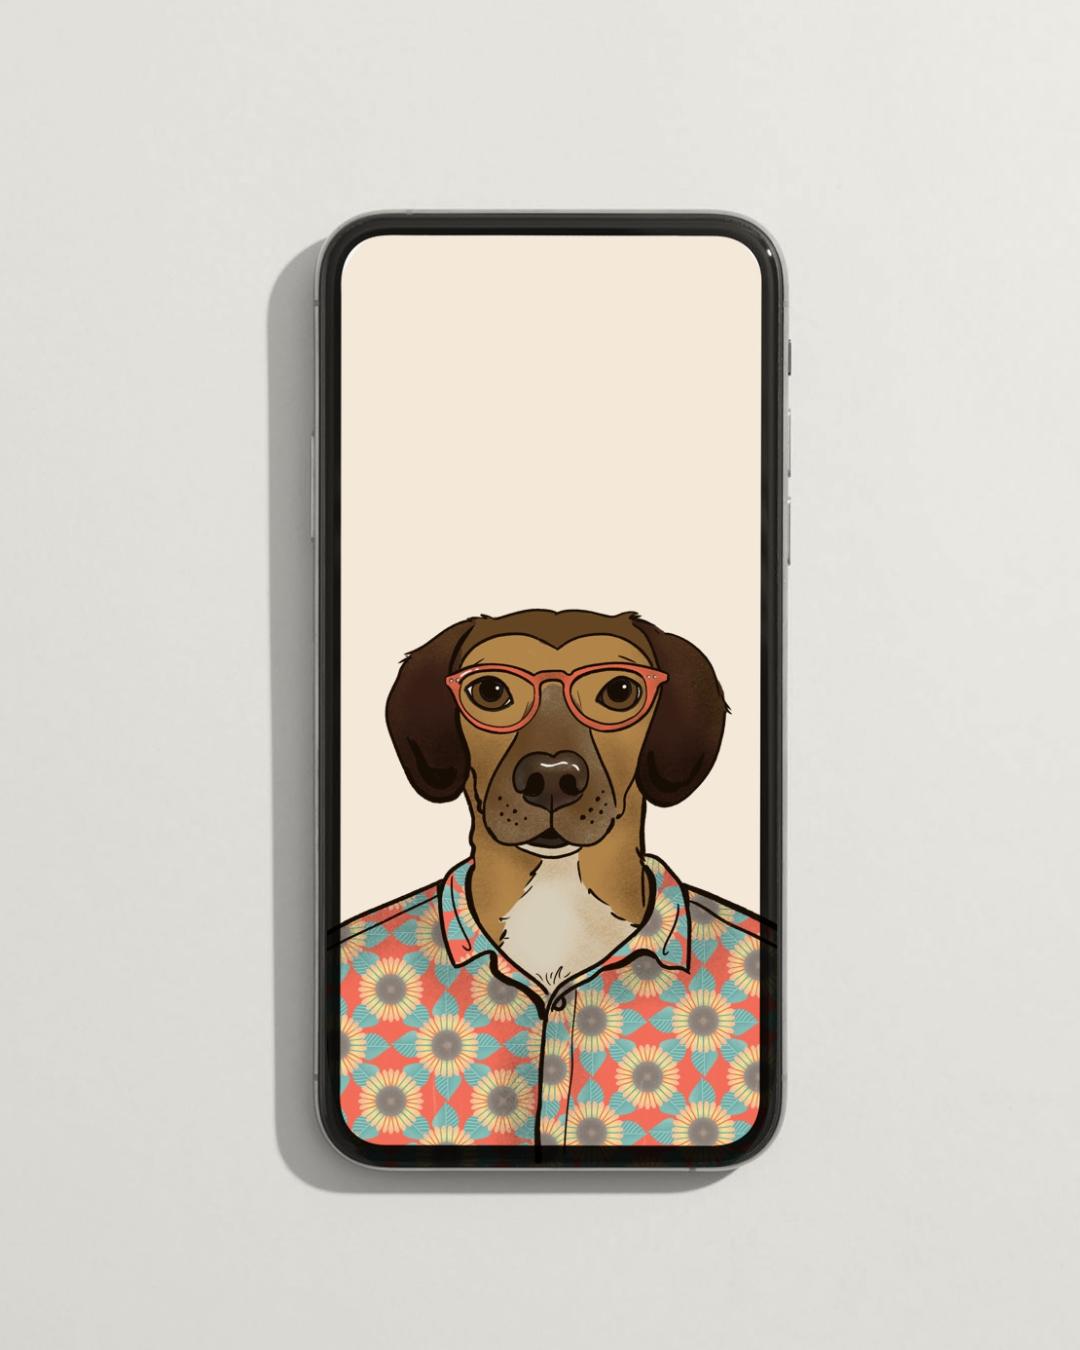
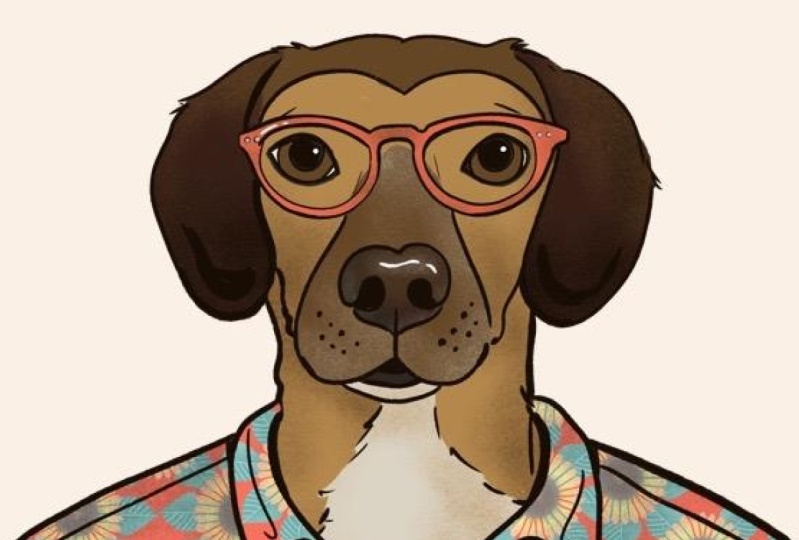
do or something? When I came across
this portrait, I could really picture ag. I could totally see a u and a casual button up
shirt and glasses. Kinda hipster, kind of nerdy. So pick according to
your pet's personality. If he was a person, would he be more of a punk, offensive diva? Make sure whatever
accessories you pick. Pilot his personality. If you don't have a
photo of a specific dog, you'd like to draw. I recommend looking
here for one as well and just creating a
personality as you sit fit. But I'll show you the
photo I'm using incase. You'd rather follow along.
4. Sketch: Let's create a new screen
by clicking the plus sign. And then you canvas. Mine is gonna be 5 thousand
by 5 thousand pixels at 300 DPI. I like using the size
because it's big enough to print and I can use it for most of the
projects that I do, but feel free to
make it a little bit smaller if you'd prefer, like 3 thousand by 3 thousand, the bigger the size, the least amount of layers
you're going to have. But remember that
you can always make the image smaller
but not bigger. To insert the photo, I'm gonna go to
Actions this little wrench over here
and insert a photo. Procreates is a time-lapse
video of your process. A little sped up video
of everything that was already on Canvas
from start to finish. If you don't want the photo
to appear on the time-lapse, you can slide the
Insert Photo button to the left and insert
a private folder. You can also do this
for private files or to take a private
photo as well. Since I'm only using
this photo to trace, it's okay to make
it bigger here. If it was gonna be
part of the art, I wouldn't recommend
sizing it up this much. You can transform it on this
little arrow over here, make sure it's a uniform
and make it bigger. Now I'm going to insert
a picture I chose for the accessories
in the same way. In this case the
shirt and glasses. I like to duplicate
this layer in case I need to refer
back to the original. So I'm going to drag it to
the side and hit Duplicate. Then I'll deselect this
box so it's hidden. Now I'm going to mask this
image so that all I see, it's the shirt and
it's easier for me to see how it fits on achy. I'm gonna do this by clicking on the layer and selecting mask. And how the mask works is everywhere I draw with the
color black will be mask, which means it will be hidden. If I need to unmask it, I draw it in white and then
it appears again. Grab a brush with good coverage. And let's mask it. I'm going to do his shirt
and his glasses separate. I'm going to start
with only their shirt and then I'll go back
for the glasses. So now I can get a nice
picture backup and resize the shirt so the neck
opening matches his neck. Then transform. I'll select free-form
this time since the proportions will
be different anyway, this way I can adjust it to whatever proportions
I think looks good. It's all going to
depend on how wide or narrow you want
the shoulders to be. Once you're happy,
Let's trace them. I'm going to hide the
shirt for a little bit to start tracing achy. And I'll turn down the opacity a little bit so it's easier
to see what I'm drawing. I'm using the Procreate
pencil for this part, which is my favorite pencil, and it comes with
procreate brushes. I'd like to exaggerate
the corners of his mouth a little bit, so it makes him smile a little. And I think it
works really well, especially since
we're humanizing him. So let's draw the shirt next. And I'm going to do this
on a separate layer. Now I'm going to select
the accessories layer again and choose white
to unmask his glasses. Again, black to mask
everything else. What I'm looking for
here when I size the glasses is that
the nose area makes sense with the snout
and the side of the frames fit well
with his years. Also that his eyes
are in the middle of the frame, at least
in this case. So now I'm gonna make a
new layer for the glasses. Select the Procreate pencil
again and start tracing. I think this looks
pretty good and I can totally see a tube
like this as a human. So now let's select all those sketch layers
and make it a group. I'm going to rename it sketch
to keep things organized. Let's make a color palette. Now. I'd like to create a
new layer to make sure the colors work well
together first, to then make a new palette. So I'm going to bring
a nice picture back up and take the colors
directly from his picture. To do so, I just hold down with my index finger to get
the selection tool. I'm looking for a sample
of his main colors, some light and darker
tones as well. If you can't get it
exactly from the photo, you can always tweak
these colors a little bit on the color menu. To create a new palette, I go to the color menu,
the Palettes Tab, and to save the colors
into the new pallet, I just select the colors and touch the blank
squares on the palette. You erase a color. I just hold it down and then the
delete button appears. We're done with
this part. So next, let's color our portrait.
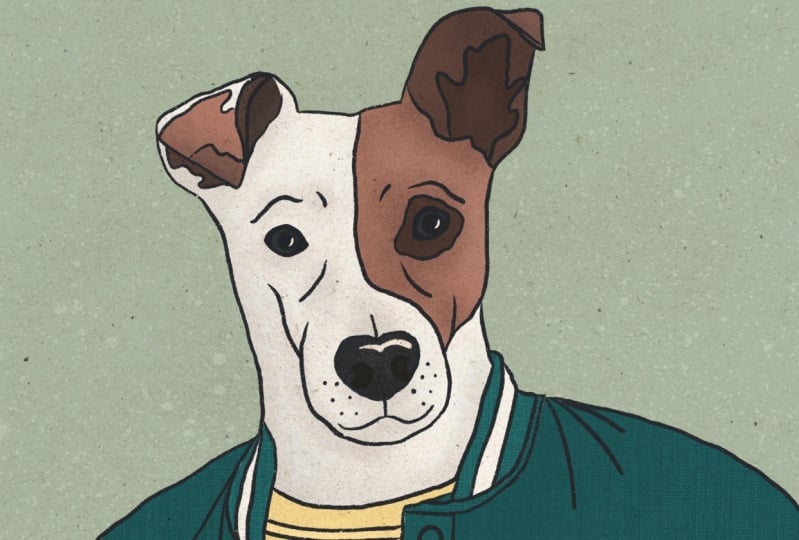
5. Color: I'm going to ink
this portrait in the darkest color
for my palette. And just like this sketch, I'll ink each part in
a separate layer, one for Ag, one for his
glasses, and one for his shirt. Starting with ag, I'm going
to use the dry paintbrush, but I'm going to modify
it a little bit. So I drag it to
the left and click Duplicate so that a
copy of yours on top. But this little mark,
when I click on it, the brush studio comes up. The dry brush is one of my favorite brushes because
they really like its texture. But for the outlines, I'd like
to make it a bit steadier. So click here on the
stabilization tab to adjust the settings. You can see as soon as
I move the slider here, you get a preview of how
the brush will look. And you can test it
out on the side like those paper pads to try
out pens that are sore. Streamline will smooth
out shaky lines. And it's really good for inking. Stabilization will
ever do stroke, making it smoother
and straighter. And it's good for longer lines. But you have to
drop pretty slow. Otherwise, it just gives
basically a straight line. Motion. Filtering is a
bit of a combination of both the streamline
and the stabilization. These settings will depend
on what brush you're using and your own
drawing style. So play around with these until you find what
works best for you. Hit the drawing pad
button on top to clear it and to change
the brush size and color. Here's a tip. If you tap the plus sign on the
burst size menu, you can mark the brush
size you are using. Another gesture to remember, quick pinch the canvas
to fit the screen. So I'm done with inking and
now I'm going to color it. So for that, I'm going to
pull up a reference photo. And you can do that actions,
canvas and reference. When the reference
window pops up, I select Image and then I just dropped the image
directly from my layers. I'd like to make separate
layers for colors in areas like the neck and one layer and a face
and a separate, even if they're the same color. Because that makes
it easier to add texture and shadows later on. The only problem is
that I end up with a bazillion layers at the end. When you have to
select a specific one, it can be hard to find. Now, I know that keep
your layers organized. It's super important. And I try, but I do have a hard time
with that sometimes. So a shortcut here
that has really been helpful lately is
a layer select. You enable that
setting, go to Actions, Preferences, Gesture controls,
and then layer select. Then just choose how you prefer
to activate the shortcut. Mine is set to activate
whenever I hold the square between the brush
and the opacity and tap with the Apple Pencil. That way, whenever
I tap on the Layer, menu comes up allowing me to select the
layer I just tapped. Like I said, I do try to
keep my layers organized. So I'm going to
group these before moving on to color the rest. And to do that, I drag
the layers to decide, select multiple
layers and hit group. Don't forget to add the outlines of the group as well
if you have one. Okay, moving on
with the glasses. Here's a quick way to fill a layer separately
from the outline. Click on the layer
with the drawing. Make sure it's a closed
shape and hit reference. Then choose the color
you want to fill. Create, and select the layer right above the one you
picked his reference. Then drop the color in the area. Now you have a fill in one layer and the outline under letter, which makes it much
easier in case of decides to change
colors of the fail, for example, for his shirt, I want to add a floral print that I also designed
in Procreate. And I'm going to make
it part of the shirt by making clipping masks. So the first step here is to color in the parts
where the parental b. And I'm going to do
a separate layer for each of the
pieces of the shirt. One for left sleeve, one for the left panel. One for the right
piano and so on. And the reason I'm doing
this is that the fabric falls in different directions
when it's cotton zone. If we just drop a French
for the entire shirt, it's going to look very flat. May print it here in
the Procreate gallery. So I'm going to copy and
paste it into my portrait. You can also add
one by inserting an image directly
to your Canvas, where I skipped the
step altogether. If you want to keep it
solid or dried separately. Here, I'll resize it so it fits the biggest
panel and duplicate it so that I have one copy of the Print above each
part of the shirt. Now to fill in the shirt, I click the Print and select
Clipping Mask on the menu. It helps to hide all
the other layers so that you can actually
see what you're doing. And now you can see the
prince is inside of the left sleep with
a clipping mask. You can actually move it around. I'll rotate the
prints. It's a little more on the diagonal here. To follow this leaf. I'll
do the same with the rest. Select the Print, clipping
mask, adjust the placement. Just realized, I don't need two separate pieces
for the color. So I'm going to merge these
two by pinching the layers. New layer for the highlights. And this one I usually do rename because it's hard to find by just
looking at the layers. So touch, hear on the news, the reflection on the eyes, a little bit on glasses. And there you go. My shadows here are
going to double this texture by sliding two fingers to the right
on top of the layer. I'm going to select this layer
and activate Alpha Lock, which allows me to
draw only on inside of the color areas within
the selected layer. Here I'm going to
choose a darker color and add the shadows. Then I repeat the step with
all the other colors as well. Some areas will get
a lighter color for texture to blend in the colors, or to just show his grains
snout, for example. I mean, he's nine. That's kind of old in dog years. To match shadows to the shirt. I'll add a layer on
top of the print. Tap Clipping Mask and
the notch shadows. Just like I did with the print. After that play around
with the opacity. If you feel it's too dark. This is the final step. Now
I go back to the dry brush, the one I used for
the outlines and play around with the weight of the outlines for a little bit. I love this last step
because it makes your eyes move throughout
the illustration. Hello, add a lateral chest here, just because the portraits done.
6. Wallpaper: Okay, So it's the wallpaper. The first thing here is
to duplicate the file. So slide to the left, duplicate and then
open the image. We're going to make this
final a lot smaller for the wallpaper and
merge all the layers. And we don't want to
lose the main one with all the separate layers
and good printing quality. Next, let's delete the layers
we don't need anymore. Then with a pinching gesture, you can merge all the
other ones together. Now hide the background and don't forget
to do this stuff. Otherwise, this is what happens. So again, hide the background
and then go to Add, then Copy Canvas, back
to the Actions menu, go to Canvas, then
crop and resize. 640 by 960 pixels is a pretty standard cell
phone wallpapers size. Since this file
won't be printed, you can lower the DPI to 72. The standard for screen. Keep the Resample canvas off, otherwise you won't be able
to change the proportions. And then done. Now we
can go to Actions, Add, Paste, and there's a yoga. Can adjust your pet
portraits placement, delete the layer that is cropped and add a background color. Let's export it by
going to Actions Share, Save Image. And we're done.
7. Conclusion: [MUSIC] Thank you so much
for taking this class. I'm not exaggerating
when I say that this project makes me
smart every single time. As a matter of fact, I think I've Googled through
the whole thing from selecting the photos to the final so I really hope
you enjoyed it as well. If you enjoyed it, please
consider leaving a review. These reviews are
super important because it helps more
people find this class, it helps keep the class
live here on Skillshare, and it also helps me
improve as a teacher so I can create even better
classes next time. Thank you again for going
on this ride with me. Don't forget to post
your project in the class gallery and if
you post it on Instagram, please share @ByThaisQ so I can repost and comment. I'll
see you later [MUSIC].
 Thais Queiroz, Designer/ Artist/ Curious Creative