Transcripts
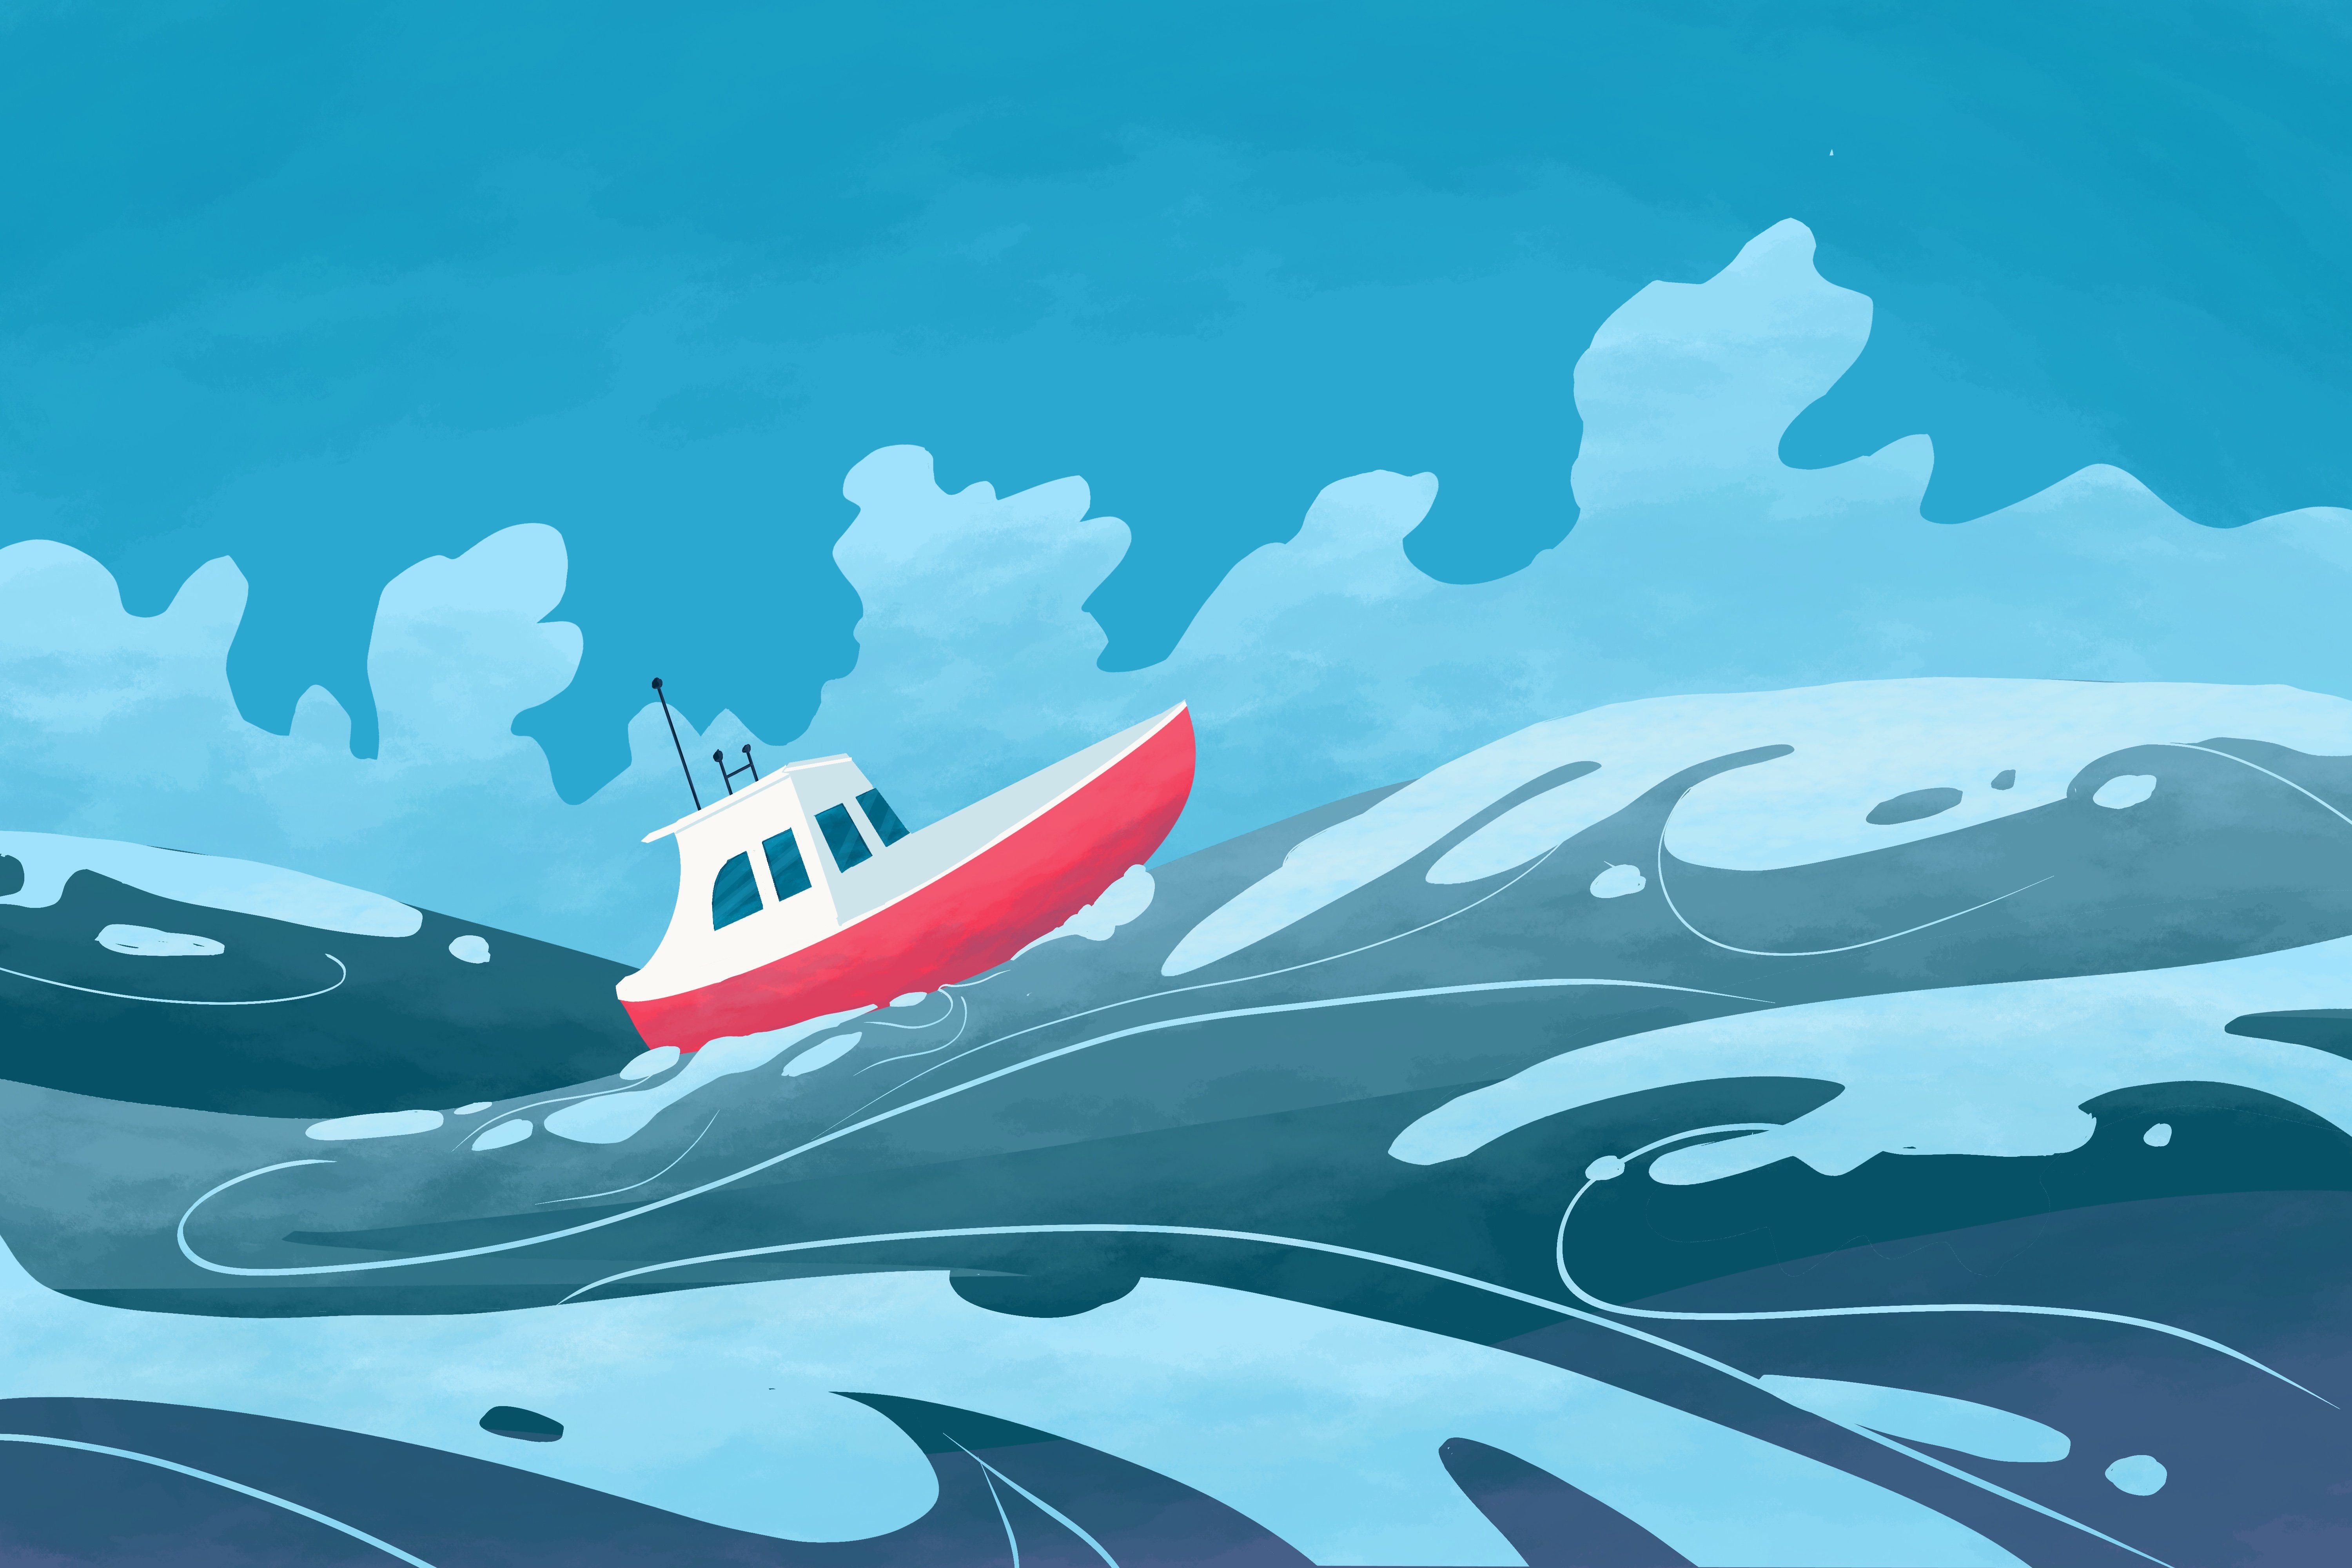
1. Welcome: Hello and welcome to another beautiful class where
you will learn how to make this wonderful
illustration of a landscape with a bear. This beautiful artwork is
specifically designed for beginners to learn about the Procreate app and
about illustration. It teaches you about
color harmony, about textures, about shapes, and, of course, about colors. Everything while having a lot of fun and making this
wonderful project. Hi, my name is
George, and I've been a professional artist
for over 11 years. Five years ago,
I've fallen in love with teaching both online and in person classes with over 20,000 wonderful students
all over the world. I've developed this wonderful
way of teaching that focuses on the project
and on having fun. For this class, you will
need the Apple Pencil, the iPad, and the Procreate App. Go on the resources page and download the free brush and
the free color palette. Let's go into the class.
2. How to install the brush and color palette: Before you start this
wonderful landscape class, let's go over here on the plus sign and again on
the plus sign below it, and we should create
a Canvas that is 6,000 by 4,000 pixels, a DPI of 250. And depending on what
kind of iPad you have, this will give you about
18 layers or more or less. It doesn't really matter
how many layers you have. If you have more than
five, that's perfect. Let's create the Canvas and on the project and
resources page of this course, you will find this beautiful
brush called silky. And to import it, you need to go to
brushes over here onto the plus. Go Import. And wherever you've downloaded the brush on your iPad,
you need to click on it. Once you click on it, you
should click on Done. I'm going to click on Cancel, just so I don't create
another beautiful brush. And for the color palette, you will need to go
on the colors over here on the color palette
over here on the plus, and new from file, you will find the file
and the color palette on the project resources page of this class and click on
it and you will have it. It will be named Landscape. This is how it's going to
look after you import it. And that's all you need in order to start this wonderful class.
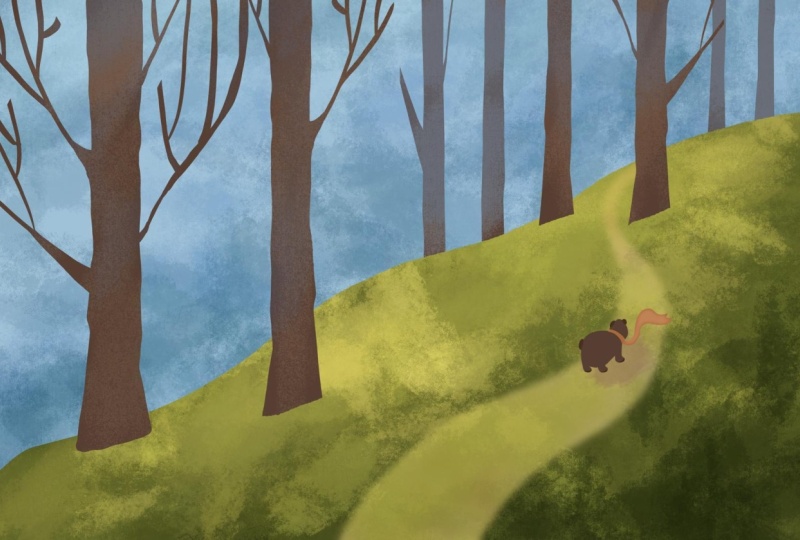
3. Shape of the ground: The first step of this class, make sure you have a
beautiful layer over here. Go on the silky brush, the beautiful silky brush. Let's zoom out a little bit. And with the darkest
green over here selected, let's create another beautiful
line just going this way. I think that's way too
small, the brush size. So let's put it at
22% just so you can see the things
that we are doing. Now, let's create and
drop this color on top. The way you drop the color
is by let's undo that. So you press two fingers to undo and then select
the color from here. Oh, no, I changed it. Let's select it again, drop
it and put it over the area. In case everything fills up, there is two problems. One is that you haven't connected the line over
here or over here. So when you do this,
everything fills up. The other way that it can happen is even if
you go like this, if you have the
threshold too big, notice how at 100%,
it fills everything. So you should move the threshold
by dropping the color, holding the pencil, the
threshold will appear, and you can increase
or decrease. This is very, very useful. Okay. I'm going to undo
until we have the other one. I don't have the other
one, so I'm going to recreate it over like this. Perfect. I think
that's a bit too high. So let's move it. Let's learn about this
movement tool, the arrow tool. And on this tort, actually, let's use Warp. Let's move this a bit higher
and this one a bit lower, this one a bit higher, just so it's a bit
more wavy and nice. You can play around
with it as much as you want until it feels beautiful. Okay. Make sure that
if you zoom out, you're not going to see
any white on the edges. Notice how I've already
increased the size of the corners so that I can have the beautiful line and the beautiful color just
going outside of the canvas. And that's all you
need for this step.
4. Adding texture to the ground: This next beautiful step, all you need to do is
go onto the layer. You're going to learn
about the Alpha lock. Click on the layer. Click on Alpha Lock. And now let's go onto the
brushes onto Artistic. You already have this
brush because it's included with the Procreate app. It's called Leatherwood
under Artistic. Perfect. Now, let's go and select this beautiful
color over here, this green, this green yellow. Let's decrease the opacity to about 16% and the size
to about 16%, as well. And let's add some of this
color onto this green. Just a few times creating these rolling hills
with some brush marks all over And if you want, you can also increase
the size of the brush. Perfect. Now let's go to a yellow and add some of this yellow on top,
creating some textures. Let's increase the opacity. Let's go back to the
dark green and go over it with some nice,
beautiful colors. Also, you can add
some of this oh, no. Let's delete it.
Delete the swatch. And you can also go with
this beautiful orange. Let's decrease the opacity to about 12% and add
some of this orange. Notice how it's creating
a beautiful warm effect. You can go back
to the yellow and the greens until
you feel satisfied. Let's decrease the
size to about 17%, increase the opacity
to about 36. Let's go with a few brush marks. Now with the dark one, it's going back and forth until you are happy with the results. Let's undo that because
it was too much. Perfect. Just a few
textures to create a wonderful,
beautiful background. Well, ground for
the illustration. And now let's go
into the next step.
5. Color and texture of the sky: The next step, you
will need to add another beautiful layer and drop it down below the first layer. Okay. Once you've done that, you can go onto the
colors and select this wonderful color and
drop it onto the white. Perfect. Now, with
the brush selected, the artistic leatherwood brush, let's select this
color over here. And once you've selected it,
let's see how big it is. It's a bit small, so let's increase the
size to about 25% and opacity to about maybe 19%. Once you've done that,
you can create some big, nice, beautiful, abstract
shapes into the background. These might be some
trees or some foliage. You can also undo and do them
a bit nicer if you want. Like, notice if we increase the size of
the brush to about 30, we can go with one fell swoop. This will look much nicer. Okay. And we are
controlling these shapes. Perfect. And notice
how at the bottom, it's a bit darker,
and at the top, it starts to become
a bit lighter. We can increase that effect
by selecting with the finger, selecting the color of the sky. And going with some
more lighter versions of this color on top, so it gets a bit more diffused. Going back to the
darker color and adding another layer will increase
the textures. Perfect. And that's all you
need for this step.
6. First tree and duplication: For the next beautiful step, you will need to add
another wonderful layer. This time, click
on the first layer on top and add a plus. Go onto the brushes, onto the inking brush, the silky, beautiful,
smooth brush. And let's select this
wonderful brown over here. You can select any
of these browns. It doesn't really matter. I'm going to select this one, just so you can
see a bit better. Now let's make it a bit bigger. And from over here, let's create a straight
line just going this way. And another one next to it. Perfect. You might have
already guessed it. These will be the trees. Let's drop in the color. I've closed the shape over here and then dropped
in the color. Now, to make it a bit
more interesting, so it's not so straight, trees tend to have a bottom
that is a bit more White. And then over here,
another wide bottom. Okay. Perfect. Notice
how it looks much nicer. And also, you can go
very slowly right next to the edge and make
these small little bumps. Just wiggle a little bit the
shape, the beautiful Pencil. Okay. This will be perfect for the next thing
that you're going to do, which is to decrease
the size to about 12%. We never know if it's
the right percent. But let's go and add
another beautiful branch. Let's go and add it again,
and again, perfect. It's quite okay, and let's
connect it better to this wonderful,
beautiful branch. It needs a bit less size, and let's go with
another one over here. Notice out now it's much better. Let's go and divide
this one as well. Maybe a bit smaller, 5% and divide it perfectly. And over here, let's do another
one right from over here. Okay. Notice how it's
very, very thin. That's okay because you can
double it and also control this nodule or however it's
called, the tree bump. And you can increase the size by going back and forth on it. And then over here, we can also go out. In case you have some
areas like this, you can go onto the eraser, erase everything, and go onto the brush once again and
connect them together. Perfect. Okay. And let's do
a bit more size, 8%, and do one from here. Okay. And let's divide
it right about here. Perfect. And I think it
needs more thickness. Let's add some thickness
by going like this slowly. Until the end well, until the middle of the brush. And by brush, I mean the
beautiful branch. Super simple. That's one tree over there. And, of course, the cool little
trick that you are going to learn is that you can go
over here onto the layers, duplicate it, and then onto
the move tool, go on uniform. Move it, and now on distort. So you can make it thinner, can also flip it horizontally, make it a bit smaller and
change the perspective of it. And you can go on
to uniform once again and place it somewhere
around, let's say, here. We can also go on distort
and make it taller. Notice how they don't
look almost the same, but it needs a bit more work, and we're going to
do that a bit later. Let's now merge these
two layers by pinching, duplicate it once again. Once you've
duplicated the layer, you can go onto the move tool. And on the stored, let's make them even thinner. Okay. Another cool trick that you can do is
go onto the S tool, select only the
tree that you want. This one, then go on to
the move tool and you have only the
beautiful small tree, flip it, and let's put it over on this side
right over here. And for this one, let's select it like this. Let's move it over here. With the eraser, let's
erase the bottom. Let's increase the size to maximum and erasing the bottom. Perfect. Now notice now that this can be
a bit on a slope. Let's merge the layers, and we can cut this tree a
bit on a slope, on an angle, just so it fits the angle
of the beautiful hill. Okay. And once you've done that, we can go into the next step.
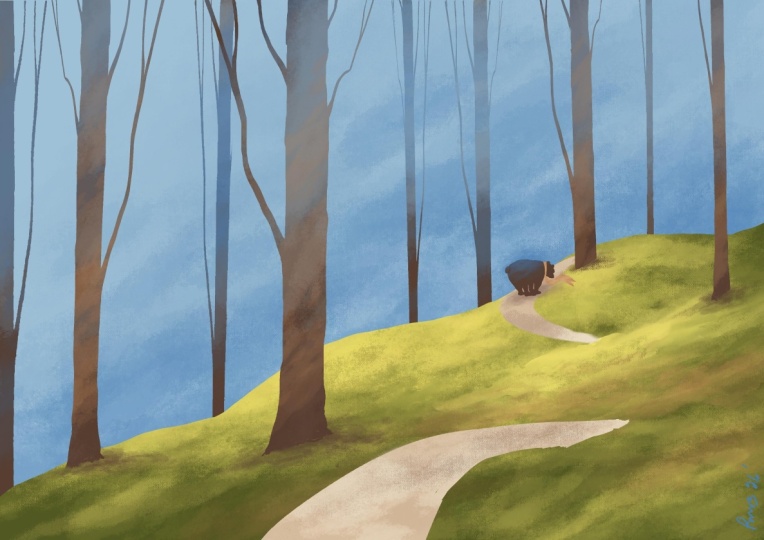
7. More trees and Atmospheric perspective : For this beautiful step, you are going to
need to duplicate this wonderful layer by clicking
over here, duplicate it. Once you have it duplicated, you can select it and move
it right below the ground. Perfect. And now let's
move it around a bit. Also, we need to
distort it quite a bit. So we make it very, very
thin and also a bit longer. And we can find a
position for it right about let's hide the smaller one over here and make it like that. Maybe we distort it a bit more, making it a bit
more interesting. Perfect. Now, let's
duplicate it once again. And let's flip it around by going onto the move,
flip it horizontal, and we need to distort
it once again, making it bigger and taller so we can hide it
right over here. Okay. We also need to erase some of the
ones onto the left. So I've moved this outside so that we can hide and make
the trees more interesting. Another cool trick
that you can do is go onto the selection tool, select only this tree. Over here and select it and move it right
where you want it. In my case, right over
here on the edge. Once you have these
trees selected, you can go ahead and
merge the layers. The background trees are much, much thinner and longer. Once you've done
that, let's select the color of the sky,
this one over here. Let's alpha lock the layer, the layer and the other layer, the layers with the trees, and going on the layers
in the background, let's undo the foreground trees so you can see what's going on. Going on the brush,
artistic leather wood, and let's go and add some of
this color onto the trees, making them a bit more Oh making them a bit more
part of the background. Notice how beautiful
and nice they look now. And you can also add
some of this blue, as well over top of them. And that brown will
look very, very nice. Combined with these colors. Okay, just a few touches. And now let's do the colors, the beautiful foreground
trees once again. For these trees,
you're going to need this color or this color
depending on what you've chosen. Going onto the brush, make sure you are on
the correct layer, which is this one over here
with the foreground trees. And let's add some of this
color over top of them. Perfect. And now let's
add some of this blue. Try to add the blue at
the top of the trees. And also, let's go on to the lighter
version of that blue. Okay. We can go back to the brown and add some
of the brown on top, maybe at the bottom. You can also go with
some orange if you want. I don't selected it. Let's select it again. Perfect. Okay. That
looks wonderful. And that's all you
need for this step.
8. Recap of what you’ve learned so far: Go over what you've
learned so far. You've learned how to create this beautiful line
of the foreground, this one over here,
and then drop the color in by dragging
the color down. You've also learned
a bit about how to import brushes as well
as color palettes. And of course, you've
learned how to create textures by using the
alpha lock of the layer, alpha locking the layer. After that, you've
learned how to duplicate this one
single tree into many, many trees by using the
duplicate layer function over here and also by merging
the layers together, and then changing the size
by doing the distort and the warp and all kinds of
positioning shenanigans. Also, you learned about the selection tool with
the free hand over here, and you've selected
this wonderful tree or this wonderful
tree and moved it around by circling it
and then going onto the movement tool in order
to move it beautifully. Okay, now it's time to go
in another beautiful step.
9. Creating the road: Select it and add
another beautiful layer. Select the right brush, which is the silky brush
that you have imported. And now let's select
this wonderful Color, once you've selected
that beautiful color, you're going to notice
that if you zoom in, it's going to draw
behind the trees. That's because the layer
is beneath the trees. Let's increase the size of
the brush to about 46%. And let's make a pathway
just going this way. Okay? Behind this
beautiful tree, if you don't have
it, you can move one of the trees by
just going like this. In fact, let's just
move this one a bit more to the left. Oh, no. I'm on the wrong layer. Let's go on the layer
with the trees and then move it a bit more
to the left. Just a bit. Okay. Now going back on
the layer that is empty, let's go behind
this with a bath. Okay. Perfect. Now, this bath should go something like this. Okay. Perfect. You can also go on
the movement tool, the arrow and on warp
and warp it a bit. So it's a bit nicer. Okay. Right where it
starts to hit this shadow, we can also erase
some of it like this. Perfect. Now, it needs to be a bit thicker as it
comes towards you. So let's add a bit of thickness
over here and over here. And let's go ahead
and fill it in. Mm erase the end just so we create this effect that it goes into
the background, into the hill side. Perfect. Now, let's create another one. Let's imagine that it
goes something like this. Oh, I'm not on the brush. Let's imagine that it
goes something like this. Okay. You can actually
draw it if you want. So let's go like this and
going down like this. Okay, I think it needs
a bit more arching. Perfect. And then
you can drop in the color I think
this is beautiful. Let's erase that end over there. And that's just perfect. And now we can erase this
over here just to about here. Just so it fits in, maybe a bit more
erasing for this one, and a bit more warping. Let's select it and make
it a bit more flat. Okay, smaller and flatter. Perfect. That's
just about right. Okay. Now, notice that here, we need something that
closes that beautiful edge. So in order to do
that, let's go on to the layer with the background. Then let's go and make
a beautiful selection, just going right over here
with the free hand selection. Let's make it a bit more curvy. Okay, and going down
and closing it up. Now, this needs a bit of yellow, this beautiful yellow green, and with the brush, selecting the artistic leatherwood brush. Let's decrease the size
of it to about maybe 9%, hitting this edge over here. Notice it coming to life. Okay? If it's too straight, you can go ahead and select the darker color and go over it once again
with some patches, and then going back to the same green and going
back to the darker version, you can also add some of this beautiful orange,
darker orange. Okay, and some darker green. Perfect. Notice now it looks
a bit more interesting. You can also go over some of the edges just like
this to blend them in. Perfect. Just creating a
bit of an effect so that the wonderful pathway just goes behind that and then
comes over this side. Okay. Now, let's go onto
the layer of the pathway. And alpha lock it so
that you can create some beautiful textures because you already have the
leather wood brush. Let's go a bit
darker by going with this color over here,
increase the size. Then let's add some
beautiful textures on top and you can also add some orange Perfect. Decrease the size to about six, increase the opacity
to about 67%. And let's go back to
this lighter color. Let's delete this
color over here. And let's add some light. That's way too small
and way too opaque. So let's do 30%. Perfect. 30%, but only on this path over here and maybe
onto the distance as well. Going a bit darker this time. Let's create some more darkness, just a few touches
here and there, and it looks perfect. Okay, now let's go
into the next step.
10. Simple bear drawing Thank you: This next wonderful step, you are going to need to add another layer on top of
this wonderful pathway. Zoom in quite a bit on
this path over here. Select the brush, the silky, beautiful brush,
this one over here, and the darkest brown this one over here,
the darkest brown. Now let's make a beautiful, nice circle by making
the brush to about 5%. Let's make a potato. Let's not make it perfect. Let's make a potato like that. And we can make it a
bit bigger and nicer. Just make it a bit bigger
on this side and a bit smaller on the
front of it. Okay? Don't worry too much
about the positioning. Okay. Now, let's make this potato have a
little bit of a tail. Just going this way. A
wonderful tail like that. Okay. And in the front, let's make a beautiful, nice potato on top. This potato needs
some tails, as well. And by tails, I mean,
of course, ears. And by now, you know what it is. It's some wonderful uh a snail. It needs a few legs. So let's add a leg over here, going this way, this way, and this way, simple
little stumpy legs. And another one just over here. This one will have
a little bit of a front. It's like a boot. And this one as well, has a little bit of a boot, and it's a bit thicker. Perfect. Let's make
this one with a boot, as well, but let's embrace it. First, let's make
it with a boot. Looks nicer if it has a boot. It's the bear with a
boot with a boutique. Perfect. And now let's integrate this beautiful bear with
a wonderful I integrate, I mean just make another
interesting thing, which is a scarf. Let's add a circle and another
circle right next to it. Once you've added this circle, you can go ahead and
make a wavy line like this and straight up just going with another
one just going like this, and then at the end a V shape. Perfect. Now, it needs
a bit more thickness. Remember, this beautiful
scarf needs to be a bit thinner as it starts and it
gets a bit thicker. Okay. It's just like the pathway, just so it creates a bit of
a nice, interesting effect. Okay. Now, with the
selection tool, let's select the beautiful
bear with the automatic tool. Select the bear, just the bear. So let's select it. Hold the pencil down and drag the threshold until it selects just the
bear and the head. Perfect. Now onto the brush, let's go on to artistic
artistic leather wood. And let's add a bit of that blue of the sky on top of
the beautiful bear, opacity at about 10%, size at about four. Let's add some blue
on top of him. Okay? Can also add
by making it very, very small size to about
1%, opacity to 50. Let's make the tail
a bit more visible. Notice how it's a bit
more visible now. Perfect. Okay. Now
that you've done that, let's select the
scarf this time. And going on to the brush, let's go on to a lighter
version of this orange, this one over here, and
opacity to about 19%, size to about 3%. Let's add some light onto
the beautiful scarf. Okay. Perfect. Now, notice how this bear doesn't
look really perfect. So we can do
something nice to it, which is distorted a bit, make him a bit more thick. And also by going on uniform, we can make him bigger and also rotate a little bit so
that he walks on the bath. Okay, perfect. Once we zoom in, we can see that the bear looks
wonderful in the distance, and all it needs right
now is a bit of a shadow. So let's go onto the pathway. And on the pathway, we need this
beautiful brown over here on the brush
leatherwood Opacity, 10%, size to about three. And let's do it in
one pass first. Okay. Let's do it again. I
think it's alpha locked. Let's undo the Alpha lock, just so we can add this
shadow a few times. That's two times three
times four, five, six. We can increase the opacity, lower the size, 3%. And let's add this shadow. Maybe a darker brown, just a little bit,
one pass, perfect. Now let's see how it looks. Let's pinch. It's perfect. All it needs, it's a bit
of erasing of this shadow. Maybe it's too much. Let's
delete a bit of this shadow. Perfect. And that's all you
need for this wonderful, beautiful illustration
to be done. Of course, you've
learned how to make this wonderful bear
by making a potato with beautiful socks and
also a head and a scarf. Illustration doesn't need to
be very, very complicated. You can keep it as
simple as you want. Or make it as
complicated as you want. Notice how digital
illustration makes you have this freedom
where you can just go back and forth in between layers and duplicate
one single tree into multiple trees so you
don't have to work for each individual object
in the illustration. Notice how easy it is to just go back to a layer and
do something else. You can basically
go on other tools. The more tools you learn about, the more freedom you have. But don't overcomplicate things. Just remember a few brushes and a few objects can make a
wonderful illustration. Thank you for watching. And
if you are gracious enough, please leave a review. It will really help others know that this course is
for them as well.
 George-Daniel Tudorache, Together we will create amazing things.