Transcripts
1. Welcome: And welcome to another
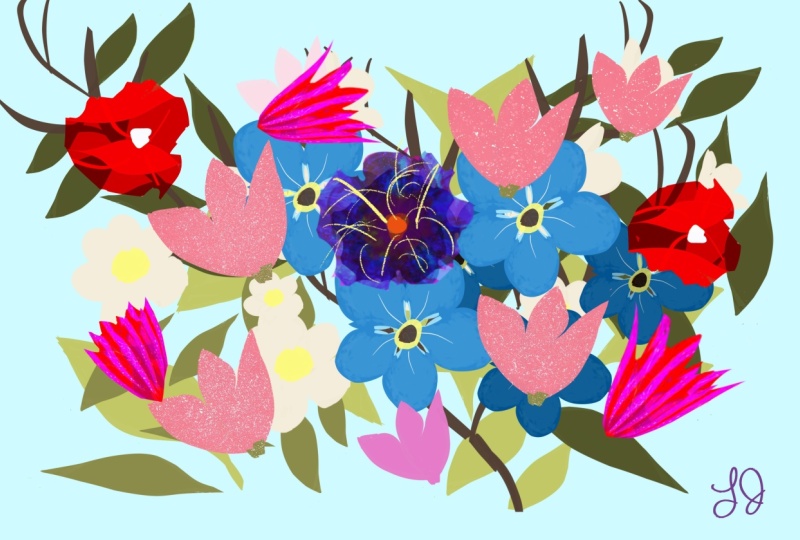
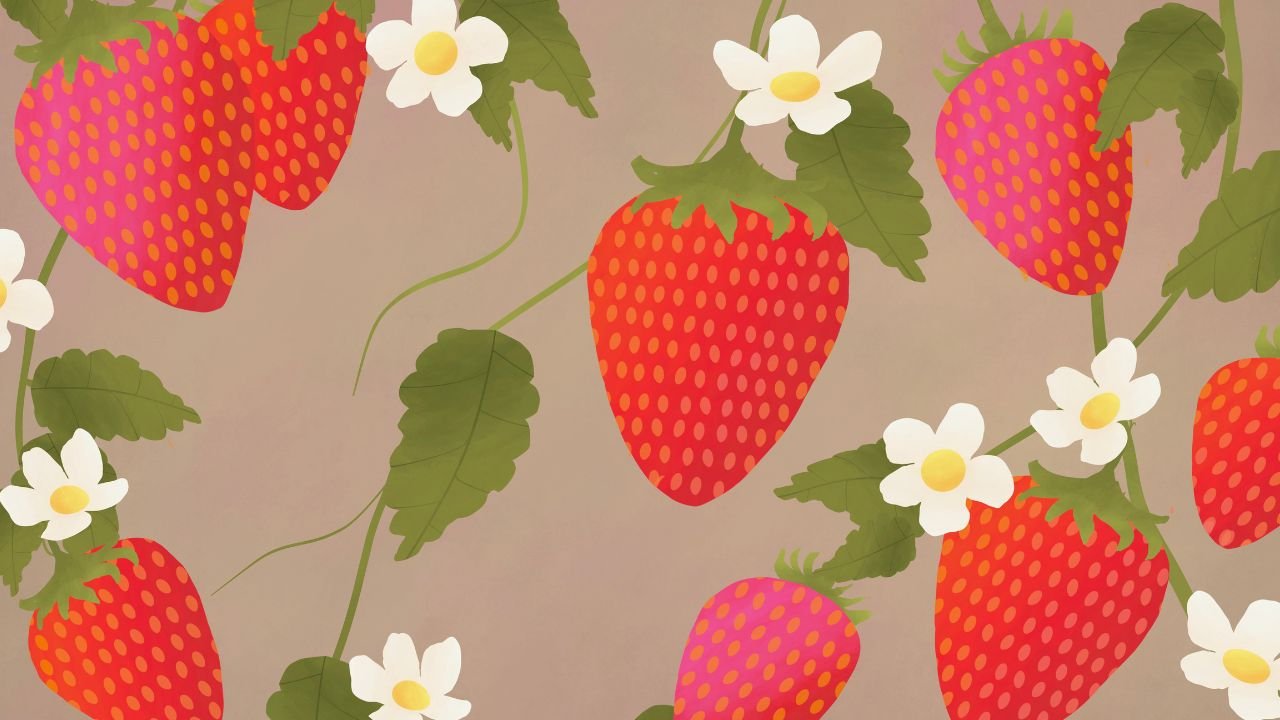
gorgeous Procreate class. Today, you will
learn how to make this wonderful
flower composition. Not only that, but
you will learn about how to play with shapes, colors, duplicate layers,
and all kinds of other tools that you
can find in Procreate. All of that while
having fun, laughing, and, of course, making
this beautiful project. Hi, my name is
George, and I've been a professional
artist for 11 years. Five years ago, I've fallen in love with
teaching with over 20,000 students all over
the world, children and adults, I've developed
this interesting way of teaching that focuses on the
project and on having fun. This artwork might
seem complicated. However, it's very simple
and you get step by step guidance in the class so that you can have
a successful result. All you need for this
class is the Apple Pencil, the iPad, the Procreate app, and of course, you will
find a free brush and a free color palette in the
resources page of this class. Let's jump into it.
2. Color palette Brush and Canvas: Before you start this
beautiful class, you will need a Canvas. Let's press here on the plus, and again, down on
the plus again. And you will need
6,000 by 4,000 pixels. And a DPI of 250. Depending on what kind
of iPad you have, this will give you
about 18 layers. You don't need more than ten. Let's create the Canvas. Perfect. Once you've
created the Canvas on the project resources
page of this course, you will find a beautiful brush. This brush will be called silky, and this is how you import it. You click on brushes, and
then you click on Plus and you navigate where you
click on Import over here. And you navigate wherever
you saved the brush, and then you click on it,
you will be over here, and then you click Done. I'm going to click Cancel just because I don't want to
create another brush. And for the color palette, you will find the color palette. Let's rename it to Flowers. That's going to be the
beautiful color palette. Let's This is going to be
the beautiful color palette. And you will find
this color palette, the flowers color palette on the resources and projects
page of this class. Let's go on plus over here. Go on from New File, and you will have to
click and navigate exactly where you saved the
beautiful color palette. And that's all you
need for this class.
3. First leaves : For the first step of this
beautiful illustration, you will need to go
here on the layer, go on background color, and go on palettes. Perfect. Let's move towards this color and select
this one right over here. Perfect, this beautiful brown. Now, going on the first layer and on this beautiful
color over here, this green Make sure you have the silky brush selected,
and let's draw. Let's zoom out a bit. And let's draw one
beautiful leaf by doing an S shape just like that and going back and connecting
them together. In case you can't see, let's increase the size of the brush. Okay, and let's do it
like this. Perfect. So one s and then going and
connecting them together. Make sure they are
connected together. And then drop in the color
by selecting it from here. I forgot to select
select it from here, and then drop it down. Now you have a beautiful leaf. As you can see,
this leaf is huge. So let's go on the
movement tool, which is this one
right over here, and on uniform, let's
make it smaller. Perfect. Once you've created
this wonderful leaf, you can go ahead and
click on the layers. Swipe to the left
and duplicate it. Now let's move it once again
with the movement tool. You can distort it. I prefer to flip it horizontal
and then distort it, just a tiny bit, so
it looks different. Let's rotate it as well, creating two leaves from one. Now pinch together the layers and duplicate them once again. Wonderful. Now, let's go on
to the movement tool and on Warp and make these
leaves even more different. Flip them vertically and click
on Uniform to move them. Okay. Perfect. Let's do it once again, and then we're going to pinch afterwards and merge the two
layers. Click on movement. Move, Warp. And let's create these
beautiful leaves like this. Perfect. Okay. Now, let's
merge the three layers, and that's all you need
for the first step.
4. Duplicating leaves: For this next step, you will do the same trick but add a
few more things to it. So let's duplicate the layer. Okay. And then move the
layer with the uniform tool. Let's rotate it and place it right over here where all
the leaves are visible. Okay. Now it's going to become
so much more interesting. Let's go on this green, and let's start adding, let's undo the first layer
so that it's visible and drop the colors in over
here and over here. And also on this one, let's not forget
about the small one. Now you can do the
layer once again and see that now you have
many more leaves. Don't worry about
the placement yet. The placement will become very, very nice in the next step. Well, step after that. In the step after the next step and now let's duplicate
this layer once again. Okay. Let's make it a
bit smaller this time. Let's undo the first two
layers going onto the green, the darker one this time, and let's drop the color
on each individual leaf. Perfect. And last one. And now let's do them again. Notice how beautiful it is just a bed of leaves over here, and that's all you
need for this step.
5. Arrangements of leaves : Go over some of the things
that you've learned. You've learned how
to import a brush. You've learned how to
import a color palette. You've learned how to make from one single leaf by duplicating the layer by going to the left and
duplicating the layer, you've learned how to
make so many more leaves. Not only that, but once you have a certain
pattern of leaves, you can duplicate it and change all the colors and make many, many more leaves,
creating and really adjusting the illustration
in the way that you want. You've learned about
this too over here, the uniform, the Worp
and the distort. Let's remember that uniform just makes it
smaller and bigger. Notice how everywhere I go, it makes them smaller or bigger. Distort makes it a
bit more interesting, maybe adds a bit
more perspective. Worp even more crazy. It's getting it much,
much different. Perfect. That's what you've
learned about that tool. You've also learned how to drop colors on top of
shapes like leaves. In the next step, you
will learn how to do some beautiful little sticks.
6. Branches: For this next step, you will
need another layer and undo the other three
layers just so you have a beautiful
background to work on. Don't worry too
much. Let's go on to the silky brush and onto the
darkest brown over here. Okay? Let's zoom out a bit. Let's see if the
brush is perfect. Yes, it is, and it's at 28%. Let's do a little bit of
a stick just going this way and do a bit of a
branch out going this way. Let's actually go the
opposite way this way, maybe. Now, let's decrease
the size to about 15%. Come on. 16. And let's go from here with another beautiful
stick and one over here. Notice how there are a
bit of imperfections, so let's zoom in quite a
bit so that we can play around with these
shapes and make some more interesting lines and shapes around the
beautiful branches. Okay. And just like you
did with the leaves, this time, you will
duplicate the layer. Okay, with the sticks and
go on the movement tool, go on uniform, flip horizontal. And now let's make
it way bigger, so we have some
thicker branches, just going this way. Perfect. Notice how
if we zoom out, let's zoom out a bit. We can actually make them seem like they sprout
out of each other. Perfect. Okay. Now, let's
merge the two layers, duplicate it once again. And let's move it. So you already have
another duplicated layer. Let's move it by flipping it horizontal and distorting
it quite a bit. Let's distort it
this way and warp it just so we can add
a few more branches. Okay. Perfect. Now, a cool trick that you
can do is something else. Look at this. Let's go onto the selection tool over
here and on freehand. And let's first see where
these branches meet. Let's go down with the
movement warp until this branch is completely separated from the
other branch over here. Let's go on the selection
tool. Let's select it. Okay. Once you've selected it, you can go onto the
movement tool on uniform, and you can position it another
beautiful way like this. Notice that if we distort it, we can make it nice
and beautiful. And of course, we
can go and select the other beautiful
branches from over here like this one. Okay. And selected. Let's make it more interesting. Also, if we are distorted, we can make it thinner. And on warp, we can
make it more wavy. And also thinner. Let's connect it
right over here. Let's play around until you find the right position and
the right width. Perfect. Now, that's an
unfortunate overlap, so let's overlap
it a bit higher. Okay, we need to erase
some of this over here. Wonderful. Now, let's merge them together and
duplicate it once again. Just to make a few
more branches. Now, let's flip it horizontal, make them quite smaller
by going like this. Okay. And let's
position them a bit higher so that they connect
with the other branches. Let's first notice that we can connect this one
right over here. We can also distort it to make
it much thinner, perfect. And also, you can go on warp and make it seem like it goes
from this branch over here. Notice that now
it goes this way. Perfect. Going onto
the selection tool and selecting only
these branches. Okay, let's go on uniform with the movement tool and the
selection already made. And we can create another
one just going from here. As you can see, these
branches are quite thick. So let's just take them away a bit from here and move
them out of the way. Perfect. Now, move these
branches a bit more, rotate them so that they
go upwards, perfect. And we can also erase this
big branch over here. Okay. And let's continue
this branch from over here so that it
doesn't just end like that. It can go like this
and then divide it. Okay, perfect. Now, let's merge the two
layers and into the next step. You will need to first do the leaves once again and we will position
them in proper order.
7. Positioning the leaves on branches: Next step, you will want to get this layer with the
beautiful leaves, the lightest leaves
of the branches. Just select it and
move it on top. Perfect. Let's undo
the beautiful leaves that are on the bottom, and going onto the
selection tool, you can select with
the free hand, select one leaf and position
it right over here. It doesn't matter
where you position it, put it on to a beautiful branch. Now let's go and select another beautiful
leaf from over here, go onto the movement,
rotate this leaf, maybe flip it horizontally. And put it over on this side. Okay. Now let's select another one with
the selection tool, the freehand selection
tool, and the movement. Now let's put it
over on this side, maybe give it a warp. Perfect. Don't worry too
much about the endings. We can go ahead and erase some
of the endings if we want. It's not really necessary. Okay. And let's select
this big one over here. And going on uniform, rotating it a bit. And maybe for this
one, we can erase. Okay. Let's go on the
next one over here, select it, rotate it a bit, and place it over here. Can also erase
some of that stem. And let's select the
last one from over here. And this one, let's
make it a bit bigger by distorting it and also
putting it outside, going outside of
the illustration. Another cool trick
that you can do is select the leaf that
you like the most. In my case, this
one, and you can go copy paste and then
straight on to the movement, and you have another
leaf that you can position just going
outside from here. Let's erase that stem. Perfect. And this one over here. And by doing that, let's first merge the two layers
because that's what happens when you copy paste one selection with
a leaf. Perfect. Now, going and doing the same on this layer,
the darkest layer. Let's select. Let's
make it a bit bigger. First, let's distort it
and make it a bit bigger. Perfect. Now, let's
select the first leaf, maybe this small one over here. Select it, rotate it a bit, and you can also do a bit
of overlapping if you want. Let's position it over here. Now notice how beautiful
that overlapping is. Now let's select the
next one from over here. Okay, and put it right
over on this side. We can also do some
overlapping over here. But you need to erase some of this stem if it goes outside
and maybe some of this. And let's do the last few ones. That one is
positioned perfectly. Okay, rotate it quite a bit, and let's put it over here. Notice how nice it
looks as a composition. Let's zoom out and notice that we kind of need another
beautiful branch. And by branch, I mean
leaf from over here, and let's position it over
on this side. Oh, no. Like that. And the last one. Let's do the last one and selection to make sure you
are on the right layer. I was not. Okay. And let's select the last one
from over here, selecting it, rotating it and placing it right
over on this side. Well, not there.
Let's do it this way behind this beautiful thing. And by thing, I mean branch. Now let's go and
select another one, this small one over here. Rotate it. Place it
right over here. Oh, no. Rotate it a bit more
and place it over here. Let's select another one. Maybe this one
over here. Oh, no. I cut a little bit of that one. Okay. Doing the selection again just because it was undone and going on
the movement tool, rotating this one, maybe flip it horizontally and
going this way. Let's select this
one over here and position it just over on
this beautiful branch, but making it like
this, perfect. And for the last one
that's upside down. Okay. Let's flip it horizontal and put it
over on this side. Okay. Notice how much more different they look
and much more organized. That's how easy it is to just
organize your illustration. And of course, let's
see that there is another one over on this
side that I forgot about. So let's move it and place it right over on
this side. Perfect. Oh, no. Let's move it again. I unfortunately did an undo. Perfect. Once you did that, the illustration just came
to life in a certain way, a beautiful, organized way. And now you can go ahead
and go into the next step, which will be creating
a few flowers.
8. White flowers: This next step, let's
undo all of the layers. And let's create another layer on top of the first
layer over here. Go on to the brush,
select the silky brush. Let's go on to this
color over here. Well, let's go with
the second one first. And let's make a
beautiful flower with five petals, one petal. Second petal. And another one. Don't worry about
the shape too much. Just make sure it
has five petals. Actually doing it
again on this one. And let's fill it in Okay, let's fill it in right over here and over here as
well. And over here. Let's drop it in until it is completely filled to the brim
with this beautiful color. Now notice how this one
needs a bit more roundness. Let's drop in the color over. Okay. And this next
beautiful flower will look something like this. So one petal, second
petal over here, and another one
over here maybe a bit smaller. Okay, perfect. Let's drop in the colors. Perfect. One, two,
three, and the last one. Great. Now, let's make a wonderful center of
this flower by going onto the yellow right over
here, the middle one. And let's create a circle. I don't know if you
can see it, so let's increase the brush
size a bit more. Perfect. Now you
can go over here on the ellipse and make it a
bit nicer and in the center, maybe a bit smaller as well. That's the perfect size. Now let's fill it in and lower the threshold until it's
filled just in the middle. Another beautiful selection
tool is the automatic. Then you will learn how to
use the automatic right now. Let's go on automatic,
select the yellow. If it's selected
the whole flour, let's go and move the threshold, press with the pen and move the pencil to the left until
it just selects the middle. Now going onto a darker
yellow over here, and going on to the artistic
brushes, the leather wood, and with the brush at about
9% and the opacity at 25, we can add some texture to
this beautiful yellow middle. Now, notice that if we
increase the opacity, we can add a bit more depth. You can also add a
bit of this orange, but decrease the
opacity to about 29. Okay. Perfect. Just one more dab, so it creates a bit more
texture in the middle. Okay. And now with
the selection tool, let's select this
flower and this flower. And with the brush,
click on the brush. Go on the darkest
color over here, and let's add into the middle some of
this beautiful color. And over here on this side, now let's go on to the
lightest color and add at the edges some
of this lightest color. This automatic selection
tool selects the flowers and nothing else is
really affected. Like, notice how the
background is not affected if I go and add some of
this white over here. Perfect. Let's add a bit
more texture to this flower. Okay. And now we can do the same trick with the
duplication. Let's duplicate it. Okay, let's move it a bit, flip it horizontal,
maybe warp it. Okay. And from here, now let's go on the movement
tool once again on uniform, make them a bit smaller. Okay, let's move them over here. And of course, let's
go onto this layer. Make them a bit smaller, so let's rotate them, just so you have a few
more flowers like that. And then we can merge
the two layers. Come on. Just pinch and merge. Perfect. Now, let's
duplicate it once again. And let's move it over here. Let's rotate it.
We can move one of the smaller flowers outside
so it gets deleted. We don't need as many. Let's duplicate this
layer once again. And now do the same with
the other small flower. Just move it outside the canvas. Notice how I'm moving
it outside the canvas. Let's press on the
movement and then move the flowers so
they don't overlap. Can also change the warp, just a tiny bit, just to make these flowers more different. Okay. And that's perfect. We can now merge all the
three layers and make them a bit smaller by using
the uniform too. I think that's just perfect. In the next step, you
will be positioning these flowers onto
the arrangement.
9. Compositional changes: This next step, you will need to redo the beautiful layers, just so you can
position these flowers. Remember the selection
tool with the free hand. Let's go and select
this first flower over here and position it
right over on this side. Okay. Now, let's position the biggest flower that we have. Okay. And we're just going to go on the
movement and rotate it. I think that's just
perfect where it is. Notice how they are kind
of perfectly aligned. Now, let's go ahead
and take this one over here because it's competing
too much with this one. Okay. Let's select
it once again. Perfect. And now let's move
it to somewhere around here. We can make it smaller.
That's wonderful. Now let's select this one. And move it just a
tiny bit towards here. Now, let's move this one
because it created a cluster. And now let's put it
over on this side, maybe rotate it a bit and put it outside the
canvas just a tiny bit. Perfect. Okay. And the last
one from over here, Oh, no. Let's select it once again. Selection tool, select it. And I think these two ones are quite nice the way
they are over there. Maybe make it like this. Perfect. Now, that's great. I don't like the shape of
this flower over here. So let's just go and
select it, go on warp. And let's undo that shape, maybe rotate it a bit. Now it's more interesting
and position it over here. Perfect. And that's all
you need for this step.
10. Blue flower: For the next step, you will
need another wonderful layer. Okay. In case you hit
the limit of the layers, you can merge the layers of the branches and the
leaves if you want. I'm not going to
do that because it might turn out useful. Okay. Let's go on the layer and undo the
other layers beautifully, just so you have a beautiful
canvas to work with. Once you've done
that, go ahead and select this wonderful
color over here. Okay. With the brush,
the silky brush, let's create one petal going this way and
going like that. It needs to be a bit
more thick on this side. Let's undo it and do it again. So going like this
and like this, sort of like a balloon. Let's close that shape
and put that color in. Perfect. Before you go and duplicate this
beautiful shape, let's do something else to it, which is Alpha Lock, the layer. Now, this is interesting
because it's basically just a selection of everything that you've drawn on this layer. Notice how if we go to artistic leatherwood and
select a lighter color, let's lower the opacity
to about maybe 16%, the size to about nine, and let's add some of
this color on top. Notice how beautiful
that texture is. Just a few more touches. Okay. Now going onto the inking
brush and with the same color, let's go with the
opacity at about 60%. Let's do a line like this. Perfect. Now going and adding some lines with a
thicker brush, 43%. Let's add some lines
going this way. Just on the edge. Notice how it's not going
outside of the shape. Perfect. Once you've done that, you can now go ahead and
duplicate the layer. Now, this is going
to be interesting. Go on the selection tool,
flip it horizontal. Oh, no, I have both of
them. Let's undo that. Okay. Let's select
just one of them, the one on top. Let's select it. Flip it horizontal,
and now we can move it right over here. Okay. We can also
warp it a bit to change the shape. Perfect. Don't worry too much about the middle over here,
where they overlap. Let's go on uniform
and rotate it a bit more. That's great. Now, let's duplicate
this layer once again. Actually, let's
merge the two layers just so we are making
the work a bit easier. The illustration a bit easier. If you can call that easy, let's duplicate the layer now. And move it, flip it vertical this time,
place it over here, and let's rotate it so
we have a placement for five beautiful petals. Let's warp it and change the beautiful petals a
bit more this time. Okay. Now we're going
to have a problem because we're going to need to select just this
petal over here. Okay, with the free
hand selection tool, once you've selected it, you can go on copy paste, go over here on
uniform, move it. Copy paste just creates another layer with the
selection that you've made. Let's warp it. Just like that. Warp it a bit more, make
it nicer and more organic. Okay, now you have a beautiful
flower in the middle. And let's merge all the layers. So you have this flower
on one single layer. Let's go ahead and select
this yellow over here. Well, actually, let's select this orange. It's
the background. No. This yellow is better. So let's go on the silky brush. We are on the correct layer. Notice that it is alpha locked. You can see the squares. So let's undo the Alpha Lock. Let's do a bit of a If we increase the opacity
of the silky brush, let's do a circle in the middle. Perfect. Once you do the circle, you can go ahead
and fill it in with this dark brown and fill it in again this time with a
little bit more threshold. Come on. You don't want to. Let's do it the manual way. Let's fill it in like this. Much easier than to fill
in the other things. But this means we have
to select the yellow. You can do that by pressing
with your finger or just going onto the yellow over here. I think
it's this one. And let's do another circle. Okay, let's go on ellipse
and move it right over here. We can actually make
the brown a bit smaller by doing another circle. Going on ellipse and moving it so that the brown is smaller. Perfect. Now going onto
the selection tool, automatic, select the brown, go on to the brush,
the artistic, the leather wood, and
let's go with some brown, some beautiful orangy brown. Let's go on the left side this
time because it's lighter. Okay. Let's go on
the yellow and do the same with the
selection tool, select the yellow and
do it with the same, but this time on the
left side. Perfect. Now, look at that
beautiful flower. Okay? In the next step, you will beautifully
duplicate this flower a few times and also do something
more interesting to it.
11. Blue flowers duplication: Okay, for this next step, you will need to duplicate the layer once
duplicate it twice. And let's go ahead and move it. By move it, I mean, make them all smaller by
selecting all of them. Go on movement.
This will just make things easier because
you make them smaller. Now, let's select the
first layer over here and move the flour
over on this side, rotate it, distort
it a bit, like that. Let's take this one. Go on uniform on movement
and then on uniform. And let's move it
right over here. Let's distort it by one corner and wrap
it from the middle, just a tiny bit,
so it looks nicer. Okay, now let's merge the
three beautiful flowers, make them a bit
smaller this time. Okay. Once you've done that, let's duplicate
the layer and move it just so you can
see it a bit better. It doesn't really matter if it's overlapping at this point. We do need to make
them a bit smaller, so we can move them over here. Go to this wand, this magic beautiful
wand right over here. Go on hue, saturation
and brightness, go on saturation
and lower it a bit, just to about 44%, and let's make them a
bit darker by going on the brightness to about 42, and the saturation needs
to be a bit lower as well. So 40%, let's go on
even 44 over here. And this layer actually needs to be on the bottom of that layer. Notice how it creates
this wonderful effect. Okay. Let's do the whole layers. Once again, let's select
them and move these flowers. Going on the first layer, the one with the
brighter flowers, going on the selection
tool on free hand, selecting the
biggest flower over here and placing it right
on top of this one. Perfect. Okay. Now, let's select the other
one from over here, the smaller one, and do
a bit of overlapping. I think it should have
been the other way, just moving this one. So let's move this big one. You will understand why. Let's put it over here.
Make sure it doesn't go outside or doesn't
overlap the outer flower. Let's go with this
one over here. Let's rotate it a bit, put it over on this
side, right over here. And now when you
select this one, it will sit on top of
everything that you've added. Like, notice we can
create a bit of overlapping in between
these flowers. That's super nice.
Let's rotate it a bit. Perfect. And now for
the last flower, let's select it from here and move it onto this
beautiful side, creating a bit of overlapping. That overlapping is
really, really nice. I cut this flower a bit, but it doesn't matter
because we can erase it and this one over here. Okay, now let's go on
to the darker flowers. Select this dark flower over here without
selecting the other one. Select this one,
beautifully move it towards this part over here. Okay. And now let's select
this one behind it. Oh, no. Let's first go on the brush
and then selection tool. Go over here, select this one, rotate it a bit, and put it behind this one. Let's make it a bit smaller, rotate it and put it over here. Notice how it's creating
a bit of depth. Let's add this one
to make it a bit more visible over on this side. Let's also distort it like that. And put it right over here. Okay. Another cool trick
that you can do is take another flower, select it, copy, paste it, and straight up, move it to wherever you want
if you need another flower. Now, this being on this
layer, this single layer, you can basically
put it underneath other things so that you can
create some overlapping, maybe not under the leaves, just under the flowers. And let's move it behind some of these flowers as well. Perfect. Now let's merge these flowers, the ones on top, and you can also merge
these ones as well, just so you create a bit
more interesting effects. In the next beautiful step, you will be creating
another beautiful flower. Let's erase some of this over here by going on to
the blue flowers. So you can see how easy it is
to do digital illustration. You can just duplicate things. You can make them nicer
and more beautiful. Let's erase some
of this as well. And you can create a
composition super fast by duplicating and
merging and positioning. And also, you've learned about the hue, saturation,
and brightness. You can change the colors
that way of some of the wonderful illustration
parts that you've added. Okay, let's go into
the next step.
12. Pink flowers Thank you: This next beautiful layer, you will need to
go on the brush, select the silky brush, go on to the colors,
this middle pink, go on layers, select
the beautiful leaves, the ones that are at the top, and add another layer. Let's undo all of the other beautiful layers just so you can see
exactly what's going on. Now, let's do a thick, beautiful leaf like this, make it a bit thicker. Let's let's drop the color. I've selected multiple
layers, unfortunately. Let's drop the color in perfect. Let's duplicate this layer
just because it's easier. Let's rotate it and make
it like this, perfect. Now let's add another one
by duplicating it again. Let's rotate it and
move it towards here. Okay, maybe add a bit
more rotation this way. Okay, perfect. Now, that's extremely nice. Let's merge the three layers. Of course, and let's
go onto the darker pink onto the artistic
brush called leatherwood. Don't forget to alpha lock the layer because we need
to add some opacity, 20%, maybe the size to about 20. And let's add some
darkness at the bottom of the flower and some lightness with the light pink at the edge. Of the flour at the tips. Perfect. Once you've done that, let's go on to the inking brush. Let's undo the Alpha Lock
and going onto the green, the middle one, let's
create a bit of a stem or however it's called. Just going over
here, filling it in. Perfect. You can
also add a few of these triangles just
so they look nicer. Notice how it's way too flat. So let's select and select
it with the automatic tool. And let's add a bit
of texture by going on artistic leatherwood
dark green. And let's add a bit of
dark green at the top. That's perfect. And, of course, let's duplicate this layer. Move the flour. Well, let's
duplicate it once again. Select all of them, make them smaller with uniform. Okay, even smaller. Perfect. And now we can move each individual layer and also flip it horizontal,
rotate it a bit. You can also distort it. And let's move another one, just so you know exactly
what's going on. You can warp this one, making it even nicer. You can also warp it
from this side so that you completely
change the flour. And for the last one, let's go and merge all three of them. Perfect. Once you've done that, let's go ahead and duplicate
the layer once again and let's move it with the
uniform tool, rotate it. And let's perfectly align these
beautiful little flowers. Let's undo and redo
all of the layers. Notice how they
need to be on top. So over here the last ones,
well, not these ones. Let's undo the bigger ones. We need the bigger ones on top. Let's select it and put it
on top of the blue ones. And now we can go ahead
and undo the last ones, the smaller ones and go and select with the selection tool, the freehand selection tool. Let's select this one and
move it, select it again. Move it right over on this side. That's perfect. Now let's
select another one, this one over here, and maybe it goes right
over on this side. Like right over here. We can also erase
some of that stem, just so it seems like
it's behind that flower. Okay? And I think this one
is perfect right over here if we erase some of
that stem, Perfect. Okay, another way you can do
that is by just going with the layer behind the blue
ones and over the white ones. Now, the last layer, this one, let's do it again. And let's move these ones over. And remember, these ones are I'm on another layer,
let's move this one. Remember, these ones are
behind the white ones, so we can do a bit of
overlapping that way as well. Notice how much
more interesting it looks if we add some
overlapping like this. It just creates a bit of depth. Okay, let's select another one. Maybe this one over here. No, this one, because that one is on
the other layer. Okay. And let's put it just
over here on this side, behind the white flower. So we are taking advantage
of that overlapping. Okay, and rotate it quite a bit and put it right over here, behind this one, maybe
right over here. Perfect. I think we need
a few more pink flowers. So let's go and
go on this layer. The ones that are on top. Let's select this
flower over here. Oh, no, let's first select it and copy paste it,
and then move it. Select it, copy, paste it. And now let's move
it somewhere around. Here, let's decrease the size and move it right over here. Perfect. Okay, and I
think we should merge it. Okay. Let's select another
flower, this time, this one, over here.
Let's select it. Perfect. And copy
base and then move. And let's move it right over on this side
coming from the bottom. What a beautiful composition. I think these need to
be a bit distorted. Let's see if that
happens to be so. Let's warp it, actually, and make these
flowers a bit bigger. Okay, perfect. Let's
see how it looks. Wonderful. We can
also turn it around, see how it looks this way. Perfect. I think it's missing a beautiful
flower over here, but we also need to merge these pink flowers and erase
that small little thing. It's on the other layer. Okay, it's missing a bit
of a flower over here, so I'm going to go onto
the white flowers, select this flower over
here, copy and paste it. Move it. Let's go on uniform. And let's move it
right over here. That's great. Okay. And another leaf
just around here. Let's select a leaf
from this layer. Let's select this
one, copy and paste. And let's put another
leaf over here, maybe distort it a bit. Perfect. We can also add it over the pink flowers,
like, right over here. No. It doesn't make sense. So it's perfect just like that. And that's all you
need for this class. You've created three types of flowers with different
hues, different colors. You've duplicated them. You've learned how
to overlap them and position them to create
a beautiful composition. Just imagine how
many compositions you can just create
with these elements. All you need is to select one of the beautiful flowers and
put it in another artwork or just take some of the
elements and then create these beautiful
compositions just playing around with
different flower patterns. Thank you for watching. And
if you are gracious enough, please leave a review. It will really help other people know that this
class is for them as well.
 George-Daniel Tudorache, Together we will create amazing things.