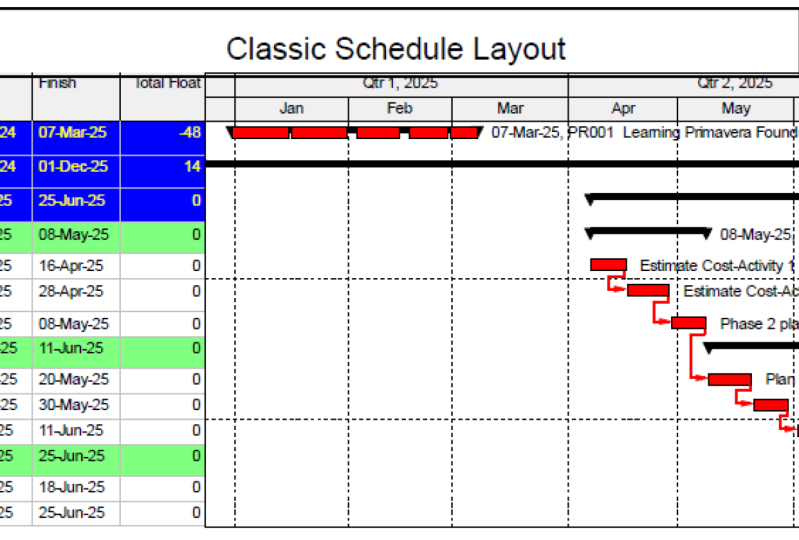
Transcripts
1. Course Introduction: Hello and welcome. My name is Beshara. I have several years of project management
expedience who fought on the IT and telecom projects in private and
government sectors. If you had another book or have no experience working with
watercolor parameter, there are B6 because you
feel that it's complicated, then this is the course for you. After finishing this course, you will feel comfortable using the basic functions of the article parameter that
are basics professional. First, we will start by
creating the new project. We'll create the work
breakdown structure and we will setup
calendar for our project. I will discuss an air, the project activities and we'll create the relationships
as needed. Then I will go through
the procedure, creating the resources and assign these resources
accordingly. After this, we will learn to
create the project expenses. Also, I will discuss about setting up and assigning
the project baseline. Finally, we'll discuss
about maintaining products, schedule, activities, monitoring, and printing
project reports. This course is ideal for the
students having no knowledge and absolute beginners in handling the Oracle
Primavera P6. This course is not for
the students who have some knowledge or experience already in the
Oracle Primavera P6. So if you are ready, then let's start
the course today.
2. Creating Project in Oracle Primavera P6: Welcome. In this very first lecture, we'll learn the
procedure to create outposts project In
the article primer that are B6 professional. Please note that most of
the time the EPS is created by the parameter up B6 system administrator
in your company. I assume that it's
created there already. If not, you can contact your primary therapies,
S6 system administrators. Germany in the brand
owner up B6 professional. Eps can be created
easily through the enterprise menu by selecting the enterprise project
structure option there. Okay, so let's start
and create our project. Now. Let's click on the
File menu from the top. I will select the
new option here. As you see, the new project
wizard is opened here. Now, I will select
the EPS through the select EPS option
is its enterprise, which is already created by V4 in the parameter
of B6 professional. Now, let's select
our assigned burden and the right side
of the window. And I will click next
the project ID as BG. The product name. Type the product name as
repeating the project budget. And I'm going to select Next. We can mention the project
start and finish date here. Let's leave it as
before. At this time. Also, I'll be leaving
other options such as responsible manager and
rape type as defaults. Now, I'll click on
Finish and you see the new project is
appearing under the EPS core enterprise. Now, I will select
the project by clicking on the product
ID, VGC to repo. And as you see in the
big Daily Farm below. Here, I'll click
on the Data tab. I didn't mention fifth
febrile as the plant started. I believe the anticipated start and finish dates as before. This time. That's it. We have created our
first project in the parameter of the six
professional already. In our next lesson, we'll certainly calendar for
the newly created product. See you in the next lesson.
3. Lets Create Project Calendar: Welcome In this lesson
of our task is to create a calendar and assign it to
our new project accordingly. Any calendar, we can define the available work hours
for each calendar day, such as holidays, working
and non-working days. Resource vacation days. From the main menu,
select Enterprise. And I will click here
on the calendar option. As you see the calendar
windows opened here already, we need to select the
project radio button. Since we are going to apply
calendar dollar project. I will click on Arab burden. Let's select Template
from the global Canada's. I'm going to select five
days Worksheet Template. Let's click Add
and a new calendar is showing the already
under their calendar name. I'm going to rename
it as a BG Z22, five days per week. I will click on
the Modify button. At the top, I will select
detailed work hours, part a. I'm going to click
on Work V contract side. Here. I'll make sure that such
a day Sunday is holiday. My timing for all the
other days is 04:00 PM, eight hours a day, every day. After select OK button
and closing this middle, the calendar named BG Z22, five days per week is created
for my project already. Now let's apply this calendar. We can click on our
project name, then. The detailed form below. Let's click on Default span. Here in the calendars option. Let's confirm if the newly created Belinda
is applied already. There's a double this lesson. Now, let's move to
our next topic now.
4. How We Create Project Work Break Down Structure (WBS): We have created and assign the calendar to our
project already. Our next step is to create the work breakdown
structure, or WBS. Wbs means that will break down our project
work into sections. Eq on the project
from the top menu. Then I will select WBS option. As you see, it's opening up the WBS window in front of us, which is showing the
project name that has start and finish dates displaying in the
gerund chart area. Next, we need to write most
Click on the WBS name. Then click Add. New WBS name is
appearing on the screen. Now, let's create two
more in a similar way. Please note that for now, we'll keep it simple and will limit ourselves to the
three WBS suddenly. Okay, so next, let's double-click
on the first WBS name. I will rename the first WBS
as phase one estimate costs. Second WBS element as
phase to plan Contingency. The loss. And the third WBS as
phase three get approval. If you see we have created all twbs elements
require if needed, we can sort them
out by clicking on the WBS ID in ascending
or descending order. In our next lesson, we'll add the project
activities under each WBS element. There circle. This lesson. Let's move to our
next lesson now.
5. Adding Project Activities in Primavera P6 Database: This lesson, we will create
the project activities under the WBS elements that we have created in the
previous lecture. Let us say we have three
phases in our project. The phase one and phase two. Each WBS element have three
activities respectively. While the last phase, phase three, we have two
activities created under it. That means our project comprises of total eight activities only. And in other to create
the project activities, please note that we have to switch to the activities window. Now, for this from
the main menu, let's select the activities
option from the project menu. I will right mouse click here on the phase one estimate cost. And then I will click on the arrow option to add
the activities here. As you know, in this phase, I will add three
activities for now. After this. And let's rename the activities to estimate cost activity one. Estimate cost activity to phase two planning. Similarly, we can add
three activities by right mouse click the
second WBS element. Phase to land contingency. Then I will rename these activities plan
contingency activity. Plan contingency activity for phase three planning. Next, let us add activities
for our WBS element. In a similar fashion, we will rename the activities
as get approval activity. Get approval activity is six. Now as you see, we have defined all
other project activities under each WBS
category as needed. That's it for this lecture. Let's move to our
next lesson now.
6. Defining Activities Relationships: We created our project
activities before. And now, let's define
the relationship between these
projects activities that we have created earlier. First, I will click
on the activity that I want to assign a
predecessor activity. As you see in this case, I will click on the estimate
cost activity to after. Let's click on the Assign button in the details from below. In this window, Let's select
estimated cost activity one. And let's click on the
Plus burden for assigning this activity as a predecessor of the estimate
cost activity to. As you see here, that the finish to start relationship is already appeared in the detail from below. Now again, it's similar
way I will click on the face to planning and assign, estimate cost activity to as a predecessor to the
selected activity. Then I will click on the plan Contingency duty and assign the phase two
planning as a predecessor. Now, I will click on the plan
contingency activity for. I will assign the plan
contingency activity as a predecessor
to this activity. Next, I will click on the
phase three planning. And I will assign plan contingency activity for as a predecessor
to this activity. Now, for the activities
in the phase three, I will click on the get
approval activity five. And we'll assign the phase three planning as a
predecessor to this activity. Lastly, I will click
on the category level, activities six, and
I will assign get approval activity five as a
predecessor to this activity. Since we have defined
the relationship between all the project
activities already. Our next step is to schedule these activities
in the grandmother of the six professional. For this, I will a blip on
the Tools menu from the top. And I need to select the
schedule option here. As you see, immediately
after this would see the finish to start relationship between
our project activities, the Gantt chart area. Normally this is how we can always define any
type of relationship, such as finish to start,
finish to finish, start to start, start to finish between our project
activities as needed. That circle of this lecture. Let's move to our
next lesson now.
7. Adding Resources in Primavera P6 Professional: This lecture will learn to add resources toward
project schedule. These projects resources can
be in the form of material, labor or nonliving resources. And after, will learn to assign these resources to the
different project tasks. Let's start from the top menu. I will select on the enterprise and click on the
Resources option. As you see, that will open up the resources window
in front of us. And after right mouse click. And then I am going
to select Add option to add resources to
the resources database. Here, I will enter Resource
ID as BJT zeros 01, resource name as
preparing project budget. In fact, that is
our project name. Now I'm going to select
resource type has labor. Then in the Details tab below, I will change the
default units per time as eight hours per day. And remaining settings I
will keep as defaults. Next, I will add resources under preparing
project budget. Let us add to labor resources under preparing
project budget for now. Now, let's right-click on this. And I will modify
the resource IDs as JC and GM respectively. Now, we can type
the resource name, can be any names such
as Chaco and Maria. Then the detailed step, I've achieved 34 unit per
time to eight hours per day. This is the procedure
that we use to add the sources to the project
resources database and the parameter a P6. The next video, we'll
learn to assign these resources to our
project activities as needed.
8. Lets Assign Resources to Project Activities: In our previous lesson, we have learned the procedure to create resources
for other projects. Now, we'll see that
how these resources can be assigned to the activities in our
project schedule. Now, to complete this task, let's click on
Open Project Menu. From the top. Here I will
click on activities option. And as you see, it will open up the activities
window in front of us. But now we have to
make sure and select the activity that we want
to assign the resource. And after, in the
dictate form below, we're going to use the resources tab for
resources assignment. Now I will click on the
estimate boss activity one, that is our first activity. And after, in the bottom, under Resources tab, I will select Add
Resource button here. It is opening up a
new window here. Now, I will assign Jacob to our first project activity by clicking the plus
icon on the right. Then I will click on
estimate cost activity to the Sources tab, I will select Add
Resource button. Similarly, again, I
will assign Jacob to our second project activity by clicking the plus
sign icon on the right. As you see, we have assigned
as a resource guard Jacob, activity one and
activity two already. Similar way, I will
assign Jacob to other activities in phase
two and phase three, except to activities
that are accord, phase to planning and
phase three planning. Since the required resource for these two activities is malaria. So that's why I will
assign Maria for planning phase and
planning phase three. In a similar way. This is how we
assign resources to project activities in the
primary route V6 professional.
9. Handling Project Expenses: Previously, we have already learned the procedure
to create and assign resources to
the project activities in primary that are
B6 professional. Now in this lesson, we are going to learn
the procedure to assign expenses to
a certain activity. For this project
activities window, Let's select the activity
called Facebook planning. After the detailed form, we will select the
expenses tab here. Now, let's click on the Add button to add
new expenses item. We'll click once more
to add another one. We have to rename the
first item as boarding and lodging and the second one
as car rental expenses. Now, in the budget cost field, we can enter the
budget available for every activity. In our case. Let us assume that the budget available for
boarding and lodging is US dollars two thousand
and forgotten rental. It is one hundred,
ten hundred dollars. Let's update these
expenses here. Let us say the actual
cost for the boarding and lodging is $1500. Actual cost for the
garden is $700 only. Now, if we update these
values in the actual costs. If you can observe that
the remaining cost is automatically updated by the parameter that
are B6 software. Please note there,
we can also view the various costs,
such as labor, non-labeled material,
or total costs and expenses details can also be seen and observed in the
summary tab if needed. That's it for this lesson. See you in the next lecture.
10. Create and Assign Project Baseline: This lesson, we're
going to learn the procedure that we can use to create and assign a certain baseline
to our projects. For this, I will click on the
project from the top menu. Here, I'm going to click on
the maintain baseline option. As you see, the maintain
baseline window is already displaying our
project name here. Now, I need to click
on the Add button on the right side and add new baseline window
is appearing here. We will confirm, save a copy of the current project
as a new baseline. And after, I will click
on the Okay button, we can see that the newly
created baseline B1 has appeared in
the baseline name. I will select Baseline die as a management
sign-up baseline. After, Let's press Close
button on the right side now, since our project
baseline is ready. So our next step is to assign this newly created
baseline to our project. Now, I will select the
project from the top menu. Here. I'm going to click on
the assigned baseline option. I will select project baseline as our newly created baseline. And similarly, I will select building project
budget be one option. The primary and the
user baselines. Then we'll click on
the Okay button. Now, if you observe this
in the Gantt chart area, and you see that in new blue bar has appeared
under each project activity, which is actually showing the project baseline that we have assigned to our
project already. The setup of this lecture. Let's move to our
next lesson now.
11. Learning to Update & Maintain Project Schedule: In the last lecture, we have learned the procedure to enter the related expenses to other project activities when using Oracle Primavera
P6 professional. Now in this lesson, we are going to learn
the procedure that we can use to update the
status of our schedule. And we can keep other projects at duties
up-to-date accordingly. As you know that once
a project work is in progress and it is
very important there, we should maintain and update double project activities
on regular basis. Now to update our project
schedule activities, It's status on regular basis. First, we need to be in
the activities window. The activities
window can be opened using the project
manual from the top. From here, we can open the activities window
if not opened already, by selecting the
activities option. After, we need to select the particular activity for which the status
update is required. Now, in our case, let's select the activity
called face to planning. Now, the detailed form below, we'll click on the status tab. As you see under this heading. We can update the status of
each project activity here. For example, when the
activity was started, when it was finished, the expected finish
date, duration. But simply it's complete, etc. Here we can update and
maintain all other project activities status according
to our project requirements. Now, please note
that we must update the project progress
regularly and entered a start and date as well as
expected finished date of every project activity
here in the status tab. That suitable this lecture. Let's move to our
next lesson now.
12. Activities Monitoring in Primavera P6: Let's understand the procedure
that we can use to report on the project activities in the article Primavera
P6 professional. So let's click on the product. From the main menu. I will select the
activities option here. And it's opening up
the activities window. Now, I haven't rightmost
click anywhere in the activities window and
select the filters option. As you see it's opening the Filters window
in front of us. Let's say in other projects, Scheduled, guard,
campaigning, project budget. If we want to show and see all the activities that has
constraints, they find. This. The select field, I will, mark has started constraint, has finished constraint
options in the filter window. And after, I will
click on OK button. As you see, it's displaying all the activities that
has constrained B, find the project schedule. Similarly, if we want to see all the milestone
activities in our schedule and then I will mark the milestone option
in the select column. Once we click OK button. As you see it displayed all
the bytes for an activity in other projects Scheduled.
The similar manner. We can also report and display the project
activities that are not started In Progress
have completed already. Also, we can define our own fear does as part of a product
recall adverts as needed. The right side of
the fetus window. We can utilize the new
button for this purpose. If we can click on
the New button, opening up the new
filter window here. In this window, we can
define our new filter name and add the specific area using the egg button
on the right side. As part of our project needs. Please note that we have
various filters that have defined already by default
in the article Primavera P6, such as completing
critical activities in progress and not
started activities, etc. If you don't find the period
that you're looking for, then you always
have the choice to define your own filters
as described earlier. This lecture. Let's move
on the next lesson.
13. Printing Reports: Predicting reports is easy and Oracle Primavera
P6 professional. Let's click on the File
menu from the top. And here I'm going to
select the preview option. As you can see here. It has open the print preview
window in front of us. Now, if you need to
do some adjustments, the page margin, header or footer
sections up your layout. And the upper-left corner. Select feed setup Eigen to
accomplish these tasks. As you see here, that by selecting the page
and margin dyads, we have the option to
select page orientation, paper size, and margin
settings as needed. I have the options to select
header and footer tags. Modifying the section settings. Once the required
changes are made. Then we can click OK button. On the right side, apply the changes through our
Leo per branding options. We can change the
star and end dates. Activity table, chart
settings if needed. Once the setup is complete and we're opinion with
all the settings, then we can click on rigged
icon on the upper left, god sent the layoff or predict. This is how we can
drink the reports and Oracle Primavera
P6 professional.
14. Thank You!: Okay, great. We have covered all the basic but important concept usually required to create
your project schedule using the article from
other OB six professional. Now, in order to make your
learning experience better, please feel free to come
and if you have any. And I'm sure you enjoyed
learning with me, I hope to see you in my next project management
course in the near future. Happy learning and thank
you for joining me in.
 Basharat Bhatti, MSc. Strategic Project Management, PMP