Transcripts
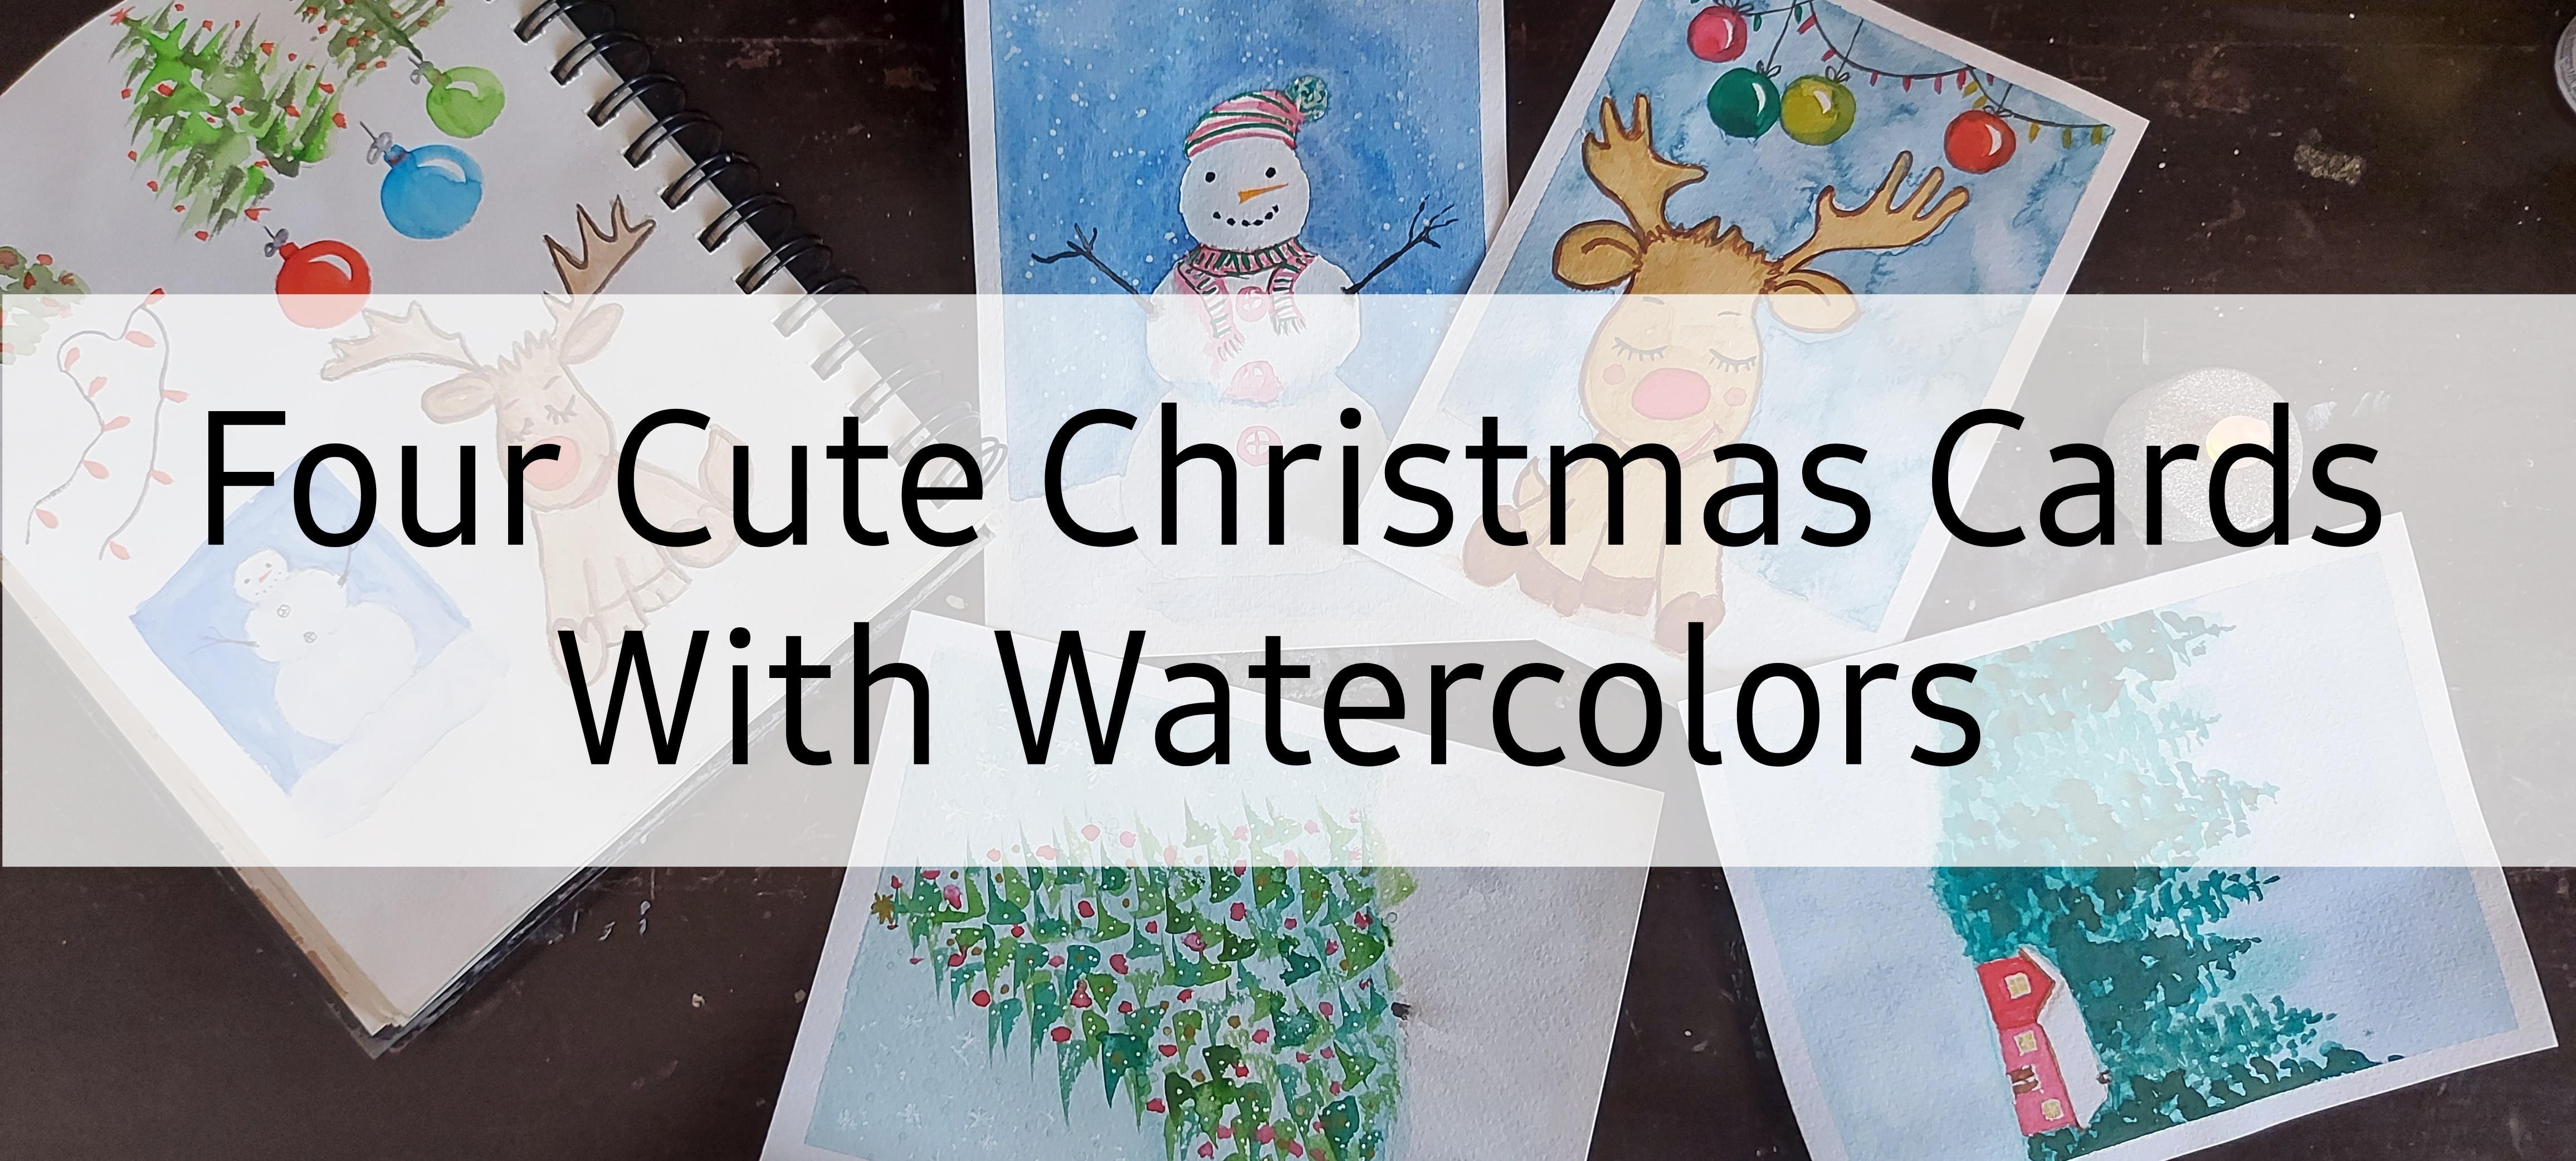
1. Welcome to the Class: Hello and welcome to the beautiful Colorful and wonderful class where we are going to create these cute rainbow themed postcards for you and your loved ones. We will first discuss about the materials and don't worry, they're very basic. And then I'll take you through the process of making the thumbnails. And then we will warm up a bit with the medium. And finally, we'll create these beautiful postcards together. Excited for this beautiful class? Now let us quickly see what all we need for this. So first of all, I will be using this postcard size watercolor paper, 300 GSM and a 100 percent cotton paper. I recommend using good-quality paper because we are going to use a lot of wet on wet. And you can also use a bigger size paper like this A5 or something. And then you can frame these Artworks and use them to decorate your walls or your desk. Totally up to you. After that, we will be using a sketchbook for basic composition practice and making thumbnails. Then we will be using a watercolor set, Artist grade or student grade watercolors. But make sure you have so many colors because we're going to use all the colors of the rainbow. Then we will be using just two brushes. A no. 5 or 6 round brush and very fine detailing brush. Mine is 0. Then we will be using some fine liner markers. I am using no. 3 and no. 1. Then a white gelly Roll. Basic stationary like pencil, eraser. Then for some decorations, we will need gold metallic brush markers, or you can use a gold gel pen. And the most important thing, you will be using a jar of water and a rough cloth or paper towel. I'll be using this colorful rag. You can use paper towel or tissue. So that's it. These are the supplies we need for this class. Just go grab your supplies and I'll see you in the next lesson.
2. Thumbnails: So let's begin with making the thumbnails. And for that, I'm going to divide the paper in small parts. I'm using the charcoal pencil so that. It's dark enough for you to see. You don't have to use that you can use the ordinary HB pencil. I am making some boxes. I am trying to make rectangle, but they look like squarish but that's okay its only for deciding the composition of the postcard. It's always better to decide the composition in thumbnails before you actually go ahead and make them. So, here we go. Let's begin with the first one. The first one, I'm going to keep the simplest. I want to make a rainbow and I wanted to make a heart down below. I'll paint the heart also in the rainbow colors. And then I want to make some little hearts here and there. And that this. Now for the second one. I think I will go with the bitterly wings. Rainbow butterfly, very loose watercolor style. But defined, we will be drawing the outline of the wings on both sides. Like that. I'm very bad at drawing symmetry. But for this one, it doesn't matter much. oh I'm really bad at it. And there is a girl wearing the butterfly wings. Her hands are stretched up from beneath the wings, and the legs you see. very abstract. So that's the second one. Now for the third one. I want the silhouettes of horses just to give an idea of the horses. And above the horses, I want to make or lose colourful, rainbow themed unicorn. Dont worry about the drawing. You can find this thumbnail page in the resources and also there is a page with the silhouettes of horses. just for you. If you find a drawing horse, difficult, you can just copy the silhouette from there. all right? So there are the horses. and in the center right above them. I will draw the unicorn. you can change the composition as per your liking, if you don't like the way I am placing the characters or subjects, you can change it according to your liking. In fact I encourage you to change, the composition and make these in your own way. there. we're done with this one. the unicorn is going to be in rainbow colors and the horses below it. I want it to be black for silhouette. Now. for fourth one, I'm going to have a mountainscape or a landscape with the mountains. A layer of mountains and a sunrise. But the twist is going to be in. the Sun. the rising sun. because the rays of the sun are going to be in rainbow colors. so there is the sun And these are the rays And I am going to paint them in rainbow colors Now, for the fifth one, I want to draw a bird cage so let us see. that's the bird cage. And I'm going to keep the door open so that the little birdies can fly away. so that's the door. Open. Like that. There. and I am going to draw some little birdies flying away, leaving the bird cage behind. Just like that in this direction. And underneath the birdies, I will make a shaft of rainbow again. Because rainbow, is the theme of the all the postcards in this class, the birdies are going to fly away on the path made by the rainbow. And here I'm going to make a chain that hangs the birdcage to a tree branch. just like that. I think I will add another tree branch at the bottom of the bird cage just for aesthetics. And that's going to be the rainbow. So there, we're done with this one also, and I'm happy with the composition. Let's move on to the other one. which is rather simple. I'm just going to draw a solitaire ring, which I'm going to color in all the colors of the rainbow. Like that. Very simple one. its my aim to keep the drawings from. And not complicated. so that the entire focus of the postcard is on the rainbow, all right? so that's the solitaire and that's the ring. And on top I'm going to write angayged with a Y. I'm not very good at hand lettering. if, you are you can write it with the brush also. And another option for this postcard can be a heart-shaped diamond in the ring instead of the plane one, let us see how it looks like that. So it's up to you, whichever you like you can choose to draw that. But I think I'm going to go ahead with the previous one. Now the compositions are ready. If you want, you can try out the colors Also, like I have done, he'll show you. But this is not compulsory at all. I just did it for my reference. You can completely skip this step. Okay, so here we are done with this lesson. Let's move on to the next lesson.
3. Warm Up: Now, let's do a little warm-up with the medium. So take some water, he brush and a scrap piece of paper, of the same quality that you are going to use for the final project and of course the rough cloth Or paper towel. If you are very comfortable with the medium, you can just skip this lesson. But if you're just starting out this lesson, can be really helpful to you. Because we're going to use lots of colors and with watercolors, a lot of color mixing is going to happen. its better You know, your colors beforehand. take some color in your red brush and dip the brush in the water and remove the excess like this. This is a step we are going to follow every time. We put the brush on the paper and try making this rainbow curve, with one color, then wash the brush off and take another color. And like that. You put the color next to the previous one. Again and wash the brush and put the third color. like that. And you see how the colors are blending with each other. Before we do the final project, we must know how the colors are going to react with each other. How the colors are going to react with the paper we're going to use. Otherwise, there are chances and bright chances that we are going to ruin our postcard paper. Alright, so before you start, I suggest, you should take this test. Even if you are comfortable with watercolor or you are a beginner, this test is very important for you. all right? And you see once, I have kind of ruined it. No matter what I do, I'm not being able to fix it so there, that's our washed off rainbow. I mean, it may look good for a specific kind of a painting, but this is not what we are aiming for in this class. all right. That the behavior of the color and the paper. Now we know how much water should we take how much paint and water ratio should be. We know our colors in we know our people and we know our brush now let us just try some random stroke using just the tip of the brush. some vertical and slanting stroke. Now take some color and using the belly of the brush. Try making some fat strokes. Dry brushing, effect Dip the brush in the water. wet the area, and lay some color over there for a wet on wet effect. Now, take some colors and put the same color at a dry area. to know the wet on dry effect. So then, with this little warm up exercise. Now we know everything about our colors and our paper. So with this, let's move on to the next lesson and make our very first postcard.
4. Rainbow Love: Welcome back. Let's begin our very first postcard. And keeping in mind what we learned in the warm up lessons. Let's start making a rainbow big enough as per the size of your paper. And here, as you see, my brush is not very loaded and not very dry. And I'm using just the tip of my brush to make to lay the colors one after the other next to each other. And like that, I am making. a Lose rainbow. So now I'm going to speed up the process. If you find the video, fast you can slow it down. I'm going with the sequence of colors that are actually there in the rainbows. And like that. Then finish making this rainbow with the seven colors. here I have to make the purple because I don't have it in my set. and there the rainbow is done Now lets make some little hearts, colorful hearts randomly here and there
00:01:29.870 --> 00:01:34.760
Don't be very specific about the shape of the heart. Just go loose and random. Your eyes. Make you see the heart. No matter how wrong you've made it. I mean, it can't be that wrong. the top part of the postcard is ready. You can even leave it like this and use the bottom part of the postcard to write a cute message. I mean, that can also be done. That said, I don't have to overload the postcard. That seemed a little too light. Now, I'm taking a pencil to draw a heart shape. If you are not good at drawing symmetries like me. You can also trace a heart shape over here. Drawn very lightly because watercolor is a transparent medium and we don't want to see the graphite mark from underneath the watercolor in the final postcard so draw very lightly. And if you have drawn dark, just rubbed with the help of an eraser. And here, let's paint the heart. I'm going for a rainbow heart. It's completely up to you how you want to paint it you can use just one color or you can also use all the rainbow colors. or you can just choose two or three colors totally up to you. And again, as you see, I don't have lots of water in my brush and at the same time, my brush is not dry. So just the right amount of water in the brush. And I'm using the belly of my brush to paint the heart like that. It's okay. If the colors bleed into each other. That's completely fine. I mean, I like that effect. If you don't like that effect, then what you can do is you can paint one stripe of color and then wait for it to dry. And then after one color is dry, you can then use the next color. So you can do that. But I completely like this lose watercolor effect where the colors are merging into each other. So I am going for it. And here I'm almost done. okay, a little bit of extra water here making a puddle And whenever there's a puddle we just touch it with the damp clean brush and sip it with that all right? now. Okay. I wanted those splatters not to fall on the heart, but then I thought otherwise that it's okay. One or two splatters will give a nice wet in wet blooms as you see here. so I'm splattering the bottom part as on the postcard, as on the top part we have little hearts and like that we finish the painting of this postcard. Now let it dry completely. Now it's dry. I'm using my gelly roll to write loves is love on top of the heart. If you don't want it, you can leave it like that. And again, forgive me for a bad hand lettering. I am not at all good at it. But I'm just trying to make this card and give you the idea of making it. If you're good at hand lettering just go for it. So this one is almost ready. I'm going to use this gold markers to decorate it further. If you are happy with it like this, you can just leave it like that. But I'm just adding a little golden stars over here. and there that's it a couple of stars on the heart also like that. And we're done. This is it, our first postcard is ready. Let's move on to the next lesson and make another postcard.
5. Solitaire: So the next one is really cute and really simple. As you remember this solitaire ring from the thumbnail practice session. So I have already drawn the ring over here. And let's begin with coloring it with the very fine detailing brush. I am here coloring different fragments of the solitaire, which I have marked as different triangles. So I have not gone for any particular division because it's an abstract ring. So I have just drawn the triangles here and there joining some lines randomly. And now I'm coloring all the triangles, with different colors. its a very fun and easy process. Let's do that. Just making sure that I'm not coloring right next to one triangle. Until and unless its dried so that the colors don't spill into each of each other because here I don't want that loose. Watercolor effect. I want the triangles to be defined. So that's why I'm coloring one triangle and then for another triangle I'm choosing the one which is distant from the previous one so that by the time I reach next to the previous triangle, it's already dry. And I'm not following any color pattern or any sequence. I'm just going ahead and painting. Just keeping in mind what colors look good next to each other. And keeping in mind that I should not be painting two adjacent triangles in the same color because they all need to look different. If I color many triangles together in the same color. They won't look like different triangles they will look like just one big part in one color. And I don't want that. So just keeping these two things in mind, I'm going ahead and painting all my triangles over the solitaire. And because this step is very, very repetitive and this is a rather cute and simple a postcard. So I have also taken a time-lapse. But if you find the video being two fast for you or you cant keep up with the speed because of course it's time-lapsed and you're painting along. So you can just slow down the video playback or you can pause it to finish your solitaire and then you can play it again all right. So please feel free to do that and don't get overwhelmed thinking, how can I paint so fast? And you cant? Because I am not, I have just taken a time-lapse. Now we've finished the solitaire, So with the slightly bigger brush now, I am taking yellow ocher. If you don't have yellow ocher, you can take any yellow for the ring because any ways, it's not very realistic. We're not aiming to create real Gold effect over here. That is going to give an impression of the gold ring. So here, Lift the extra water that my thirsty brush. And here for the background I'm wetting the paper, I'm dropping in some rainbow colors. So I'm being mindful of not touching the ring, with water or the color because some part of the ring may still be wet and they will bleed. Which I don't want. So just keeping that in mind, I'm randomly dropping in some rainbow colors here and there in the background. And bringing the background alive. As you see. As I go close to the ring, I am just removing excess water and I'm doing the same thing inside the band And now the ring is mostly dried. So I went close to it also. There. Now it's done. It's time to outline our triangles. with white gelly rool Let's do that. after the outline. It will really come to life. And you'll see once we finish. there! Like that. See. Now just one thing is remaining, the shadows and again with the finer brush I'm taking the dark brown. And I'm marking the shadow areas in the ring. Decide which direction the light is coming from. And on the opposite direction you have to give the shadow. So just make sure not to give. a continuous dark line throughout the ring just don't do that throughout the band. Not too much water in my brush anyways the brush is very fine. So it can't hold much water or much paint. And like that I'm giving some shadows here and there. And if you see it instantly gives more dimension to the ring. And it starts to look more real, doesn't it? Yeah, almost done with this Its done. Now I'm going to write engaged with my gold marker. And again, I'm not good at hand lettering. So forgive the hand lettering part, I am just trying to give you an idea of creating a beautiful and cute card to celebrate someone else's or even your own engagement. like that cute little heart there and another one there We're done with this one. And I think it has turned out really cute. Let's move on to the next lesson and make another postcard.
6. Wings: So moving on to the next one, and this is the rainbow butterfly wing. Here we start with lightly drawing the outlines just for the color. And again, try to draw as light as possible because you don't want to see the pencil marks from underneath the watercolor. And you don't have to be specific about, about the outline also because it's more of an abstract looking lose watercolor butterlfy. There. That's the little girl's hand stretched out in the sky she is embracing the world or embracing the sky above. and here are the legs showing bellow the wings very loosely to just give an expression of the shapes you don't have to be realistic. at all. just give an idea We're just trying to suggest the shape, right? So we're done with the outline, Let's start coloring. But for this one, I am going to do a wet on wet. So first I w et the first wing with clean water. Not so dripping water, just a light coat of water. And on top of that, I' start dropping in colors. water control is very important for this one, as you don't want to flood your page with a lot of water and paint so if you're in doubt, just try this out on a scrap piece of paper Use a little bit of water and little bit of color in your brush don't load it so much. And you good. It's not that difficult also. Alright. Like that, one after the other. And we are almost done with the first ring. And look how pretty it looks. Isn't that beautiful? Now let's move on to the other ring. And as you see, the colors are already trying to blend in that area. because I touched first wing with water. But that's okay. Let's add the colors now. And here. I tried to create a little center. I tried to connect the two wings with color. And you can go on. As per your choice. If you don't want to connect the wings, you can just leave them like that. And if you don't want to follow the sequence of rainbow, you can do that. Just enjoy the process, enjoy the celebrations, and make a beautiful card, that's the idea here, enjoy the process. And then we are done with this wing also. And as you see, I changed the sequence of the color a little bit, and that's okay. Now let's go on splattering some colorful splatters all over the postcard. And as you see wherever, the splatters are falling on the dry area. They are shaping up differently than when they are falling on the wet area. the two different effects we are getting at the same time and both are beautiful. Let this dry completely. And once it's dry, we'll move on, with detailing. It has dried and I think some marks with the white gelly roll will make it look beautiful. It's totally up to you to use this step or to skip it. If you want your abstract butterfly Just like that, you can leave it. I'm just giving you an idea. And here comes the golden marker from random curves and lines lines here and there. To make it more magical. Again, this step is also totally on You. whether you want to do it or not. very lightly. like so. And the white gelly roll. To make some marks, make it look like more of a butterfly. If you remember the practice sheet I showed you, I have made an abstract butterfly in that. absolutely nothing, no decoration no marks. And that turned out really nice too So that is the reason why I wanted to try something different and here with a finer brush. Let's make or lighter silhouettes of the girl. So I start with the head, like that. lets make the hands and another hand and the feet. just to give an idea some impression of the legs. No, realism at all. very, light brown I'm using. And now the choice of the colors also is up to you. If you want it to be a little darker, you can do that. I will show you both the versions. So this is the lighter version if you like it like this, you can leave it like that. If you want to make it darker you can go ahead with a darker color on top of this one. Here I'm tweaking the wing a little bit. I like it like this some more gold here and there, the gold effect won't be nicely seen on camera. I'm trying to show you if you can see the sheen. You see that. So there, that's the lighter silhouette of the girl. And now I'll show you how it looks if we make it dark and the choice is on you, you don't make it darker right away. You see the result. When I finish it. And then if you like it, only then you darken your silhouette All right? See if you like it, then do it. Nooo. I think I like the previous lighter version see? that's why I asked you not to darken it up right now. Now, the choice is yours. There! So that's the final look Let's move on to the next one.
7. Magic: Yay, we are going to make my most favorite postcard of the series. And this one is a little more detailed than the previous two. So I start with making a thin border around the postcard, with pencil. And then I make this basic sketch lightly, just how we made it in the thumbnail. So you can refer to the picture. we made in the thumbnail and finish drawing this before we start coloring. Now the time for the unicorn. Very lightly I'm just drawing, these figures just to mark the place where I want to color. So right now you may not be able to see what I'm drawing clearly. But you know what to draw because I have put the picture on top. Right there. We are done with the sketch and few details. This is the reason why I put a border in this postcard because there are silhouettes also. So now I will start with the unicorn and I'm going with wet on dry. So very little amount of color. And I start drawing these fine strips. Make sure you don't draw these lines very close to each other because then it will become one big blob of color. And we don't want that. We want the separation between the strips of colors. When we are making the mane. And wherever you think you are going to form a puddle go to the paper towel or the rough cloth for rescue. Very lightly. Little water and even less amount of color in your brush. And here I am not following any sequence of the rainbow colors. I'm just using all the colors. So wherever and however, I feel like very lightly, gently and slowly. So don't rush this step. take your time and go one stripe at a time. Try not to touch the other wet strips. Or you will end up ruining the postcard. Or if you're want, you can try doing that also. I mean, it will give a whole different effect. So to be more lose, more abstract. And if you like that effect, you can try it out on a scrap paper, as I always say. And if you like, that effect, where all the colors are merging into each other and you don't see the stripes. Because, as you must have heard that in watercolor, we often meet with happy accidents. So who knows what? step is going to bring? A happy accident or a disaster so. Don't be afraid of trying. You should always try. And see, what are you getting out of? what? here a little Strong value of the color for the ear, because I want it to stand out and the rear ear, I am making lighter. And with my clean, damp brush. I'm going to spread the color of the front ear inside. I found it a little too dark too dark. I lifted the color, Like that with the damp clean brush. Now is the time for the horn I'm making it wet and very lightly I'm touching it with some colours not all seven colours because it's a very tiny shape. Couple of colours that go in harmony. And now what I'm going to do is I'm going to wash my brush and with a clean damp brush I'm just going over the edges of the horn and making it smooth. We don't get jagged hard edges. Some more touch up because by this time. the colours have dried a bit. And again, a clean damp brush to fix any spills or any unwanted merging of colours. Like that. Very lightly. I'm giving it a n feeatural. Like that darken up a few spots. I mean, this is all very critical step. You don't have to overdo this. Now, I've washed my brush and whatever. colour or some gray effect is remaining in my brush. With that. I'm going for body of the unicorn. like that there's hardly any pigment. And now I'm just because unicorns in my view is white or, purplish white or pinkish white, or something like that. And now with just the tip of, my brush, I'm picking up a little Payne's gray. And touching very lightly, the edges of the wet face I just made. And you see I just touched area where the nose should be. And now I'm doing the same thing for the ear, but very lightly, very lightly I have to touch this area. And this will be the pace or the eye. Later we can detail it. We can make nice eyelashes and whatever we want to, and now. with a touch of pink let me give a cute blushy to the unicorn. Now it feels a little too dark, to me, rough cloth to the rescue. I'm blotting it and there it's perfect. Now. Let's do some splattering. Cover your unicorn with paper like this, or if you are confident about splattering, you can also do it without covering the unicorn. I will show you how. very controlled, splattering like that. And I'm ok with one or two dots of colour, falling on the unicorn as anyways its colourful. But yes its controlled splattering, so I won't have lots of dots of color on my unicorn and especially not on the face. Very controlled. If you're confident, do this, or if you're not confident, cover your unicorn first, let it dry, cover it, and then splatter it, right? Like that. Or if you are not okay with the splatters, at all you can make tiny little hearts, like we did in the first postcard. And now let's paint the silhouette of the horses. And here you can choose to paint the silhouette with a sketch pen or a brush marker, And why I'm not doing that is because I want to give a sense of depth. You see the horses which are in the background. They'll be a little lighter while the horses which are in the foreground are going to be a little darker. and that effect I can achieve with watercolor and not with the Brush markers or, sketch pens and there so the same way, I'm going to make the silhouette on the other side also, very quickly. See that effect? The horse in the front is darker and the one in the back is lighter. I can get only with the water c anolour not with the brush marker. or sketch pen. This card is so far my most favorite card. I really like it. I really love it. I wish the unicorns were true. I mean, I like to believe it. And the last one, stronger value of Payne's gray like that. And with this, we're done. we're done with the basic painting. Let's decorate. the postcard, a little bit. Like so. Now it's dried completely. And now I'm going to make the border golden using my metallic gold marker. Like so. You can do that without using the ruler scale. Also, it will make the postcard look all the more handmade and nice. You can do that .There. Now let's add a touch of gold to the unicorn as well, but please make sure you don't overdo this step. We don't have to cover it. entirely with gold, keep the lines broken and scattered just here and there. And that's just to add a little magic. All right, and we're done. Now. If you want, you can detail the eye of unicorn. I will show you how. So. Lots of Payne's gray and very little water in your brush. And with that, we make slight curve like this and draw some eyelashes. You can do this with the fine liner also or a sketch pen also. But I am not going to do that because I like my unicorn like this only. So it's up to you whatever you want to do the lashes or you're going to just keep it like that. There. We are done with our unicorn postcard. And I like the eye just like this. But it's up to you however you like it. So now let's move on to the next lesson and make another postcard.
8. Freedom: Now it's time to create this beautiful and liberating Postcard, and trust me, it's not as complicated as it seems to be. So I begin with making border, which is just L shaped. If you want, you can make full border and let the rainbow and the bird go out of it. That will also look pretty. But here I'm just going with an L shaped border and I'm outlining with my golden marker. And here starting from the left bottom corner, I am making the paper wet with water, in wavy style, depicting the rainbows, a shaft of rainbow, loosely flowing upward. I'm nicely wetting this area. Of course, not making up puddle, but yeah, it's quite wet Now I will start layering colors like red. And removing extra water from my brush, I spread the color upwards. And now I lay the next color. Right now, I make sure that my brush doesn't have lots of water because we've already got water on the paper. And I'm also wiping the edges of each. stripe of color with my slightly wet brush and like that we draw a rainbow on the paper. look at that it's almost done the rainbow part just one more color. And if you like it like this, as pastel you can leave it like that, but I'm going to intensify a couple of strips here and there because watercolor tends to dry lighter. So it's already very light. And when it dries, it will become all the more light. I'm just trying to intensify few colors like that. Adding some colors at the very beginning of the rainbow to depict the graded affect. Spread a little bit and now I will let it dry like this. And now when it's dried, I am drawing the bird cage as you remember from the thumbnail lesson, so very roughly I'm making this birdcage pencils and later. I will outline it with my fine liner marker. It's ready. so. Outline. It with the fine liner marker. Here. I have taken number 3. The door is open. It's exactly the same how we drew it in the thumbnail session. And there also you saw, I did not aim for perfection. It's rather a doodle style of bird cage. And anyways, if you find it difficult to draw, I have uploaded the, sketch in the resource section so you can just download it from there. And trace it or copy it freehand. However you like it. All right, so there goes the chain that holds the bird cage, to tree branch. And now with the fine liner marker only I'm coloring the knob. and now lets make the tree branch. Here. I'm giving a basic structure of the branch with the fine liner marker, but later I'll be switching to my brush markers. You can also use sketch pen for that step. So filling up the leaves and see, It already started looking beautiful. And that's the magical part of such paintings. the moment we add black, it just comes to life. there goes the top branch. And if you remember the thumbnail, we will also add a branch down below the cage. Here I am directly adding the branch, with the brush marker. This only speeds up the process like when you do it with a fine liner marker. It takes a little more time and than you're doing it with a brush marker or a sketch pen because the tip is broader, it takes less time than that. No other deference. So if you don't happen to have any sketch pen or a brush marker, you can completely do it with fine liner marker. Even you can use the brush and the watercolor to do this. And our first little birdy. Now this is a fun, but adding the birds, you don't have to copy exactly the way I'm drawing the birds or exactly the places I'm drawing the birds at. You can just listen, to your heart, and do it. Make the bird wherever you want to and make the words however you want to. Make sure that the birds are tiny. They're not overpowering the picture. Just this. And come on drawing bird is very easy. We all have done that. You all have drawn birds, ever since we were kids, Havent we? Tiny details not needed though we can completely do away with them. but still And we finish this one too. And again, if you're good at hand lettering, you can actually write a nice message on top. And with this, we are done with this beautiful postcard. I'll see you in the next lesson.
9. Hope & Final Thoughts: And we have reached the final postcard of this class. It's a very pretty postcard. I like it so much. And as you see, I have my sketch ready. Just like the thumbnail. It's a Sunrise with some layers of mountains. And as you see, I have already made a border around the Post. -card. but it is totally optional. If you want, you can avoid it. And now, let's start with the Sun raise the rays of the sun. And I think it should start here, touching the edge of the mountains. So there we go. Rays of the sun in all rainbow colors. And here comes the clean brush to blend the edges. Like so. Move on to the other ray. Again, blur the edges. And we keep doing that until we reached the other side of the sun. Beautiful rainbow colors I'm keeping them light only. But if you feel its too light, you can always intensify the colors, all right? And here comes the last ray. My favorite purple. And here, I am intensifying a couple of rays because they seem to dull. And light. There we go. The rays are done now moving on to the sun with bright yellow color. Like that. Right now, it's raining outside. While I'm painting a rainbow Sun Isn't that too interesting a coincidence? Here I drop in some orange in the center of the sun. And now just leave it to dry. And with a very little amount of gray, the gray that was already there on my palette. I am painting those mountains. And as you see, I started with the second mountain, Because I wanted the first mountain to be even lighter than this one. So as we proceed towards the front, we will keep in intensifying the gray. And you see this. And right now I have very little amount of water in my brush because I don't want the mountains to merge together. I want the crisp edges. So very little amount of water. Its almost working like a brush marker. And after every mountain, I'm intensifying the color. Like that. The front one will be the darkest. It will be almost black. Like that. This is my strongest. Gray. Very little water and lots of pigment. And do you feel the depth of field created by this difference in the strenghtsof colors? Right? Now. This is done lets touch up. the edges with white gelly Roll in case the color have come out of the border. And we fixed it. Now the last step, I w manty golden marker to add some magic to the sun. This is completely optional. If you like your postcard, the way it is, you can just leave it. And there. we're done. This magical sunrise postcard is ready and with this we have reached the end of this class. I hope you enjoyed making these lovely postcards. as much as I did. Here. have a final look at it. And let's share some final thoughts on this class. So this was it, look at all these beautiful postcards. I hope you enjoyed creating them as much as I did, and I will love to see your creations in the project gallery. So, don't forget to share them in the project gallery. And if you want, you can share it on social media and tag me. I go by the name, @Justwokeuptoart Thank you so much for joining my class. I'll see you in the next one.
 Manishaa Shriivastava, Artist, Art Educator, Author