Transcripts
1. Introduction: As a photographer, I'm
always interested in making connections with the people I photograph on a deeper level. In part, this is to limit
periods of awkward interaction, but most importantly, is to
enable me to make photographs that I believe portray
genuine emotions. But how does one do this, especially, if it's
your first meeting? I believe that the answer lies in the pre-production stage. Hi, my name is Chris
Dennis Rosenberg Kimbugwe, a Ugandan photographer based
in the Czech Republic. I've been practicing photography
for over four years now. My work has been published
in The New York Times, the Financial Times and I'm also a recipient of the Adobe Creative Residency
community fund, among other awards and grants. Welcome to pre-production
for portrait photography, a class to help you prepare for and find inspiration
before portrait shoot. In this class, we're going to explore the different
processes involved in the pre-production
stage and how one can effectively use them to have
a successful production. With our primary focus being
the creation of mood boards and storyboards we will
also explore tools, ideation and techniques,
which will help you learn how to better approach
making low budget portraits. Our goal for this
class is to help you develop a pre-production process that works for you
and prepares you to make the most out of
the production process. Although, all photographers at all levels are welcome
to participate, this class is perfect
for beginners who may or may not have
top-of-the-line equipment, but just love
making photographs. I can't wait to
see what you make, see you in our
class orientation.
2. Class Orientation: Hi, and welcome to our
class orientation. Here's a quick run through of
what we're going to cover. This class's primary focus is the first stage of production
known as pre-production. Therefore, we're
going to talk about idea, and concept development, as well as some of
the different tools, and techniques used during
the pre-production stage. We will also explore a few
of the possible products that can be created during
the pre-production stage, namely mood boards
and storyboards. Our assignment for this class is to create one mood board, and one storyboard in preparation
for a portrait shoot. This can either be
analog or digital, that is entirely up to you. But once you finish
working on them, please be sure to
share with us in the class project page
as digital files. While you're working,
please remember to prioritize the technical
aspects of your idea instead of your ability
to draw or sketch well. In the first lesson, which will start shortly, we're going to explore the different tools
at our disposal. But before we get into that, please be sure to download
the class resource document, and get familiar
with its contents. Good luck.
3. Tools: [MUSIC] I believe that one
of the most important things in navigating life is having a great
understanding of who you are and what tools you
have to work with. This also applies in
the creative world , certainly my practice. Over time, I have realized
that the more I feed my knowledge and understanding
of the what, how, where, and why of my
photography practice, the better and more
satisfied I have become, at least by my measure anyway. Therefore, in this lesson, we're going to look at the
different tools that we will use to create
our class project. Namely, for storyboards,
we will need a pen or pencil and
a piece of paper. For mood boards, we
will need a pen or pencil, a piece of paper, a tablet or computer
of any kind, software like Adobe Photoshop
or any that you use. The pen or pencil and
a piece of paper will be the most useful for
creating storyboards, but they can also be used
for creating mood boards depending on how you approach
the creation process. I have slowly realized
that mood boards can benefit from working
with found objects, and this can be photographs, stills from a film
or music video, a piece of fabric, a flower, and so many more. Basically, whatever
inspires you and informs your specific visual look
can go on a mood board. Here are some of
my tips for you. Remember that there's
a difference between inspiration, appropriation,
and plagiarism. Please make sure that whatever
you do on however you do it is respectful of
other artists work. One of the easiest
ways to ensure that you're respecting
other artists work is by crediting them
whenever you use their work or you're
inspired by their work. This is especially
important if you use any of their images in
any of your work. For example, with
the mood board, if it's to be published, makes sure that you
credit the people who created the work that you're
using in your mood board. You don't have to use
everything that is available to you
at the same time. Identify the tools
that enable you to create the work that
you need to create. Use those and changed things
up every now and then. To recap, we looked at some of the tools that we
can use to create storyboards and mood board during the pre-production stage. These range from
software to hardware, as well as made
and found objects. We're going to talk
about idea and concept development
in our next lesson. Come ready to brainstorm.
See you then. [MUSIC]
4. Ideas and Concepts: I invite you to close your eyes, and think about what you want your photographs to communicate, visualize that message and
write down what it looks like. It is this list
that we're going to use as our point of origin. Hi and welcome to this lesson on idea and concept development. To start, open your eyes
if you haven't already, take a look at your list and expand on the things
you have written down. In no particular order or
in very specific order, what is your first word that
you are going to expand? Mine is I see a woman standing or sitting alone
in a field of forest. She's surrounded by
trees and grass. There's light coming through,,
and touching her skin. She's wearing a monochromatic
juss, no patterns. The photographs will
be a mixture of candida and post photographs. Continue to do that for
all the other words. You can either write down your expanded thoughts,
sketch them out, or whatever else
comes to mind that can make this process
progress further. Once you've finished expanding
the words on your list, start to look for and
collect material that speaks to those words,
and expand the thoughts. At this point, however, I feel it is important
to mention that there is no right way to go
about this process. Sometimes ideas come
from being exposed to other material and then perhaps we write
our thoughts down. But other times ideas come from the process we just
started a few minutes ago. Let us now look at some of the other places we
can find inspiration and or collect the
material that best represents the thought
process we're in. Social media, examples include
Pinterest and Instagram. Pinterest is a primarily photo based social media platform where you can create
your own boards and pin the things that
you find interesting. For example, I have
a board where I save portraits that I find
interesting and inspiring. Films, television, and music. This is my most common source of inspiration for
images of all kinds. Regardless of
whether or not they become actual photographic work, certain scenes, lines, people, and the issues they briefly
touch on spark something in me which I then expand with
my own thinking and writing. Creative writing examples
include books and articles. Though I don't do
enough reading, I must say I like how
text inspires visuals. We have all had experiences where we read a
piece of writing and simultaneously build
up a world full of detail without even being asked. That is what writing does. Try to apply this into
your photography. The words you have written
down either come from images in your mind or now
have to become images. Here are my tips for you. Be mindful of how you
use other people's work. Do not copy or steal. If a particular body
of work inspires you, make sure that
whatever you create is your unique view
of the topics and issues that that
works so to address. Try to make a genuine
contribution. Being too aware of
what other artists are doing can also be a
double edged sword, especially on social media, so prioritize yourself and your mental well being while
looking for inspiration. To recap, we looked at
some of the ways we can initiate the idea and
concept development process. We also talked about some of the different sources
of inspiration, such as social media, films, books, and music. Get ready to explore some of the different
techniques used during pre-production. Don't miss out.
5. Pre-production: [MUSIC] In this
lesson, we're going to explore and experiment
with some of the different
approaches you can take during the pre-production stage. The main focus, however, will be on mood boards
and storyboards. Before we start, to ensure that
what you create is a genuine contribution
that furthers the conversation on
the subject you're exploring as well as the medium, start by expanding
your thinking about this particular topic and perhaps its relationship
to photography, your environment, and community. Please take the time to develop your own position
about certain things. This is extremely important
if your work deals with sociopolitical issues
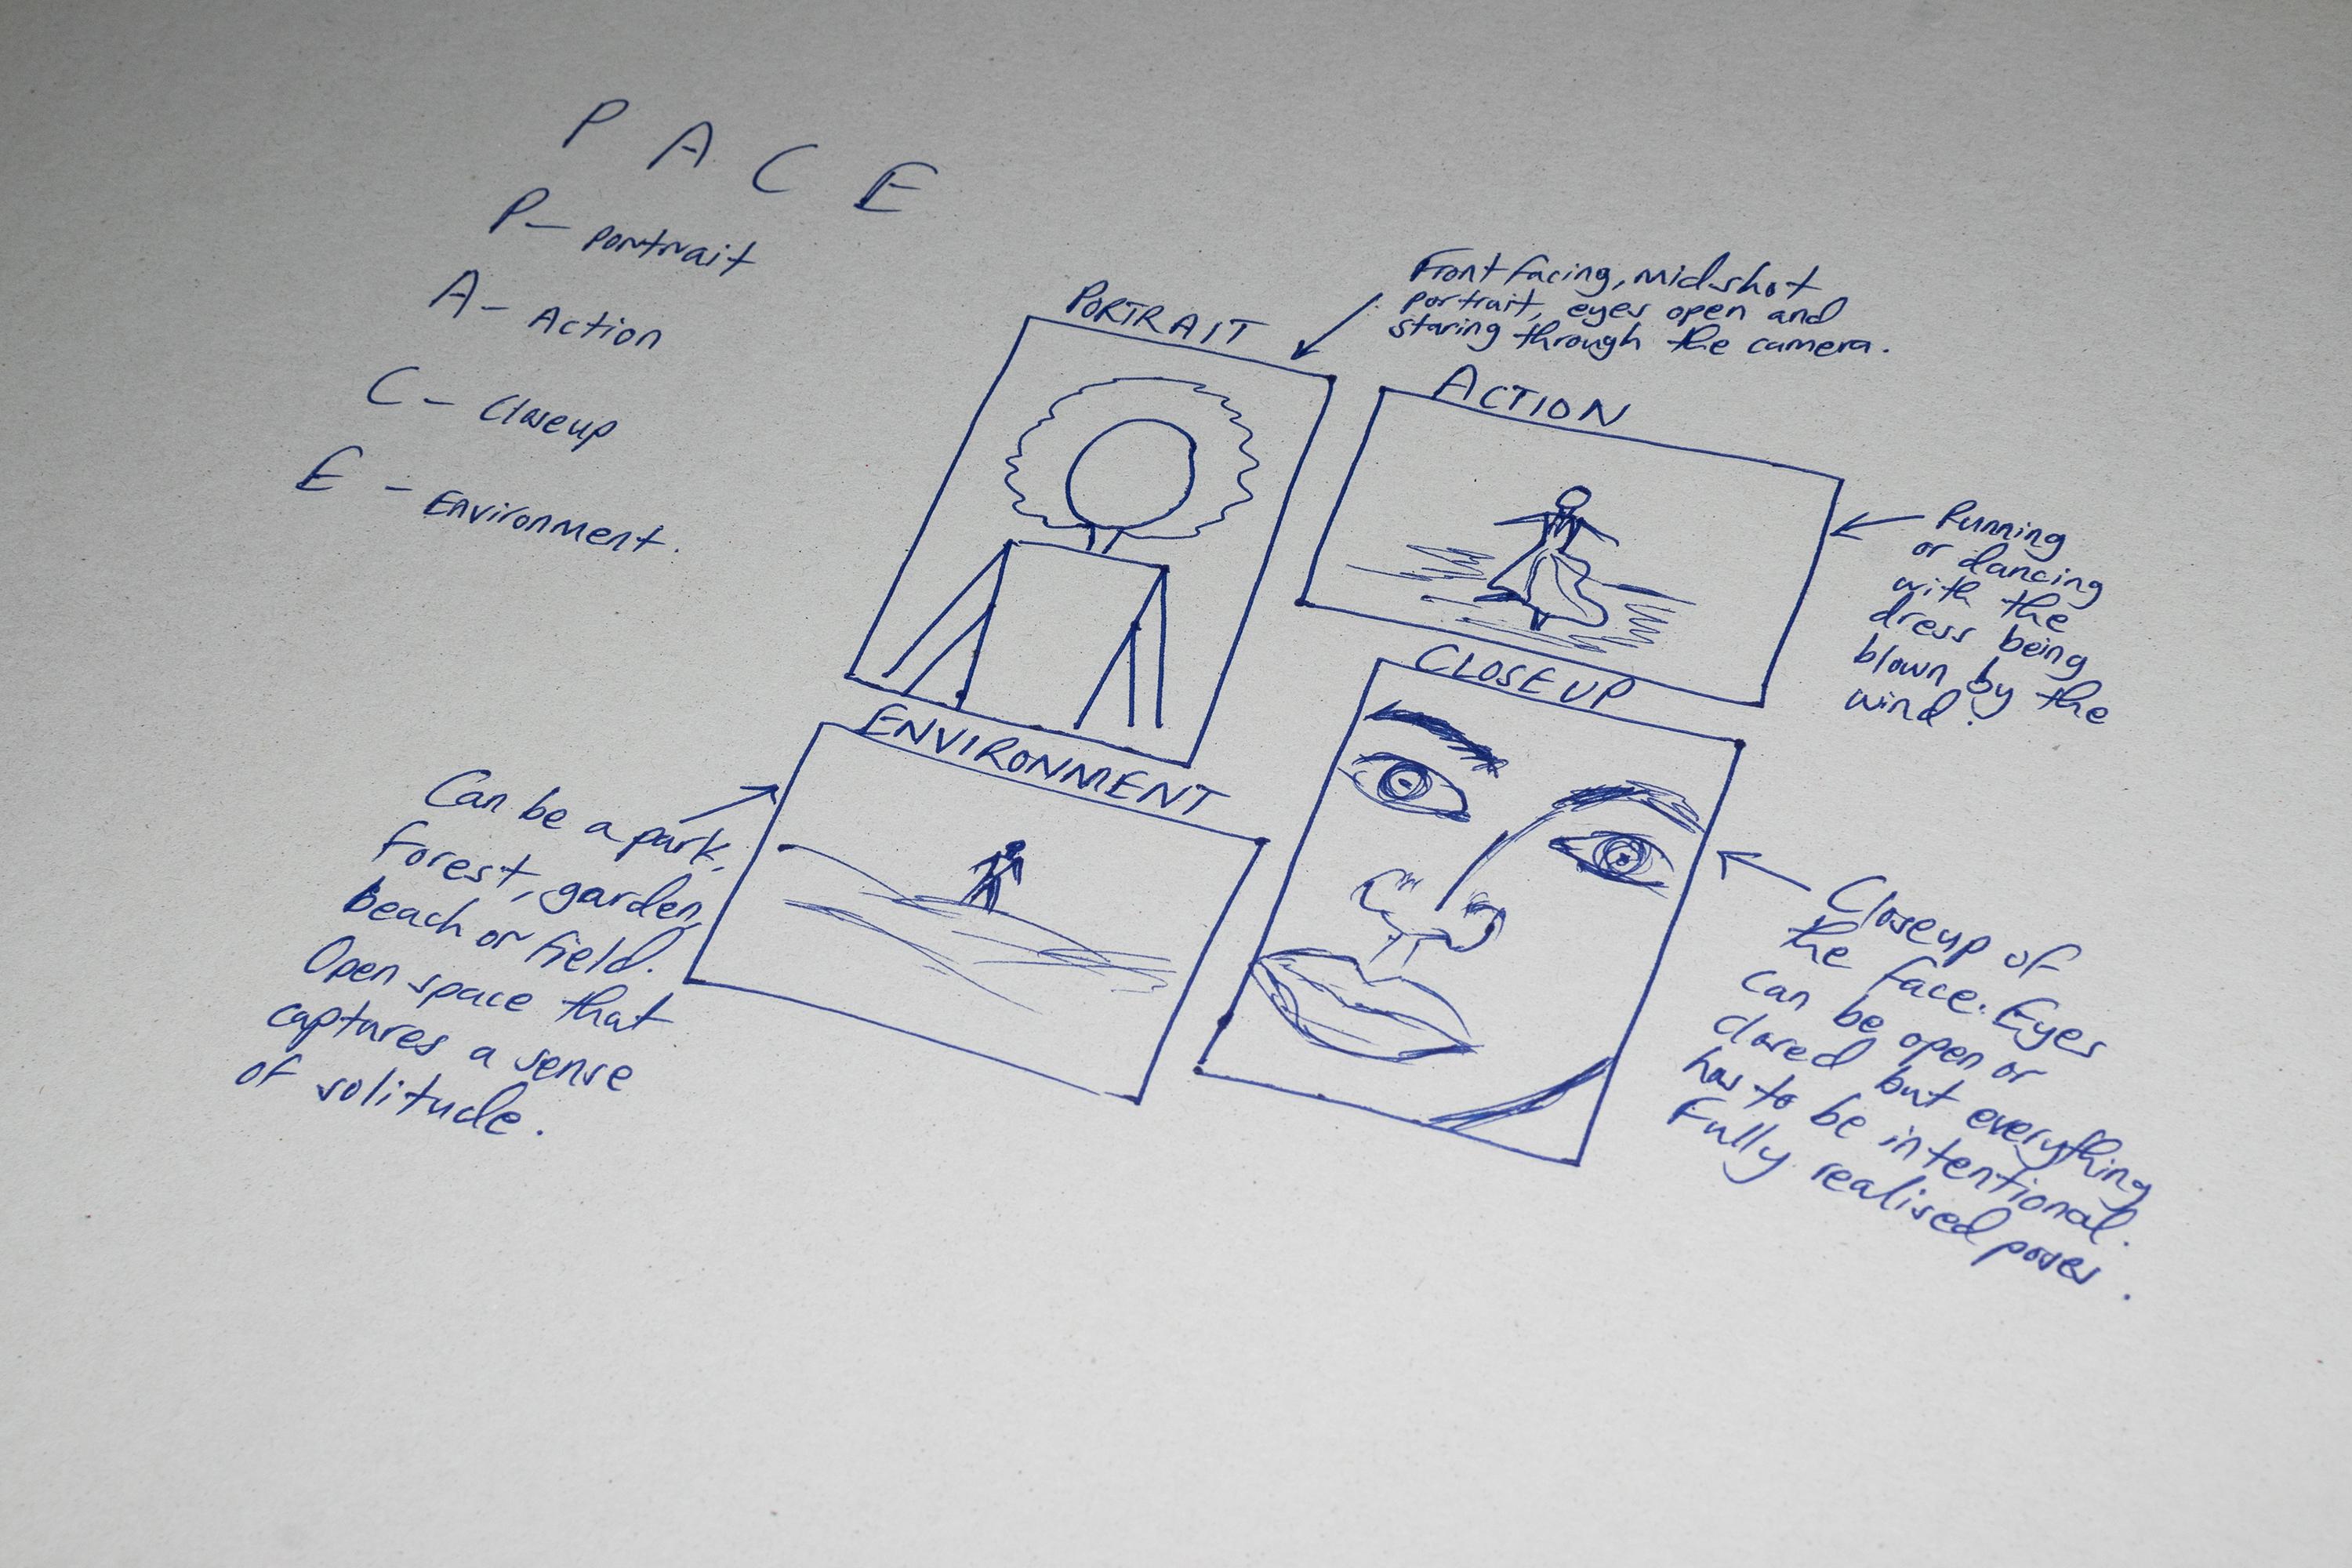
affecting minoritized groups. Let's get into it. There's this thing
that I learned called PACE in a
workshop in Uganda. The P is for portray, the A is for action, the C is for close-up, and the E is for environment. Basically, this is
something that was mainly told for people who
are working with news photography and
documentary photography. That's how I got
introduced to it, but I find that it
works and it helps you narrow down exactly what
you want to explore. You can use stick figures,
it doesn't matter. If you're able to draw, do it. The more detail the better for people who
are able to draw, but please don't obsess
over your ability to draw. With a portrait,
you basically show more of the person
in a portrait. You don't necessarily
have to show their face. It doesn't have to be extremely sharp or visible, any of that. It can be anywhere
from a mid-range shot. It can also be a full body shot, but it has to be clear
that the subject or the person is the subject
of the photograph, which is different from, let's say, action and
environment where there are a few more objects
to be observed, and these objects also play a huge role in reading
this photograph. With the action, you basically
get the person you're photographing to
perform some action. If they're a dancer,
they can dance. Even if they're not,
the person can dance. If they play instruments,
they can play an instrument. We can basically do what they do in this space
or in their space. Basically get the subject in movement or the
object in movement. If it's symbolic,
you can throw it in the air, or a piece of clothing, it can be thrown in the air and let it be blown by the wind and then that introduces
action to the photograph. A close-up shot of the
subject or the object. It can be their face,
it can be their hands. It can be a close-up
of the outfit they're wearing or a detail
from the outfit. Really, it can be anything, but it basically has to reveal something more of the
person you're portraying. Then the environment shot
is basically just to establish the environment or the scene where the person is. It's perfect if its
the person's space. If it's an artist, it's great if you can
go to their studio and then capture them in
their environment. That's it with the storyboard. Now that we have finished our
storyboard, put it aside, allow yourself to forget
those visuals for now so that the next
time you engage with it you are able
to be surprised and inspired in ways you couldn't
have imagined before. Let's move on to the mood board. First, we're going to
create the color scheme, and we can do this in two ways. The first option is using Adobe Photoshop and a
still from a movie, music video, or a photograph
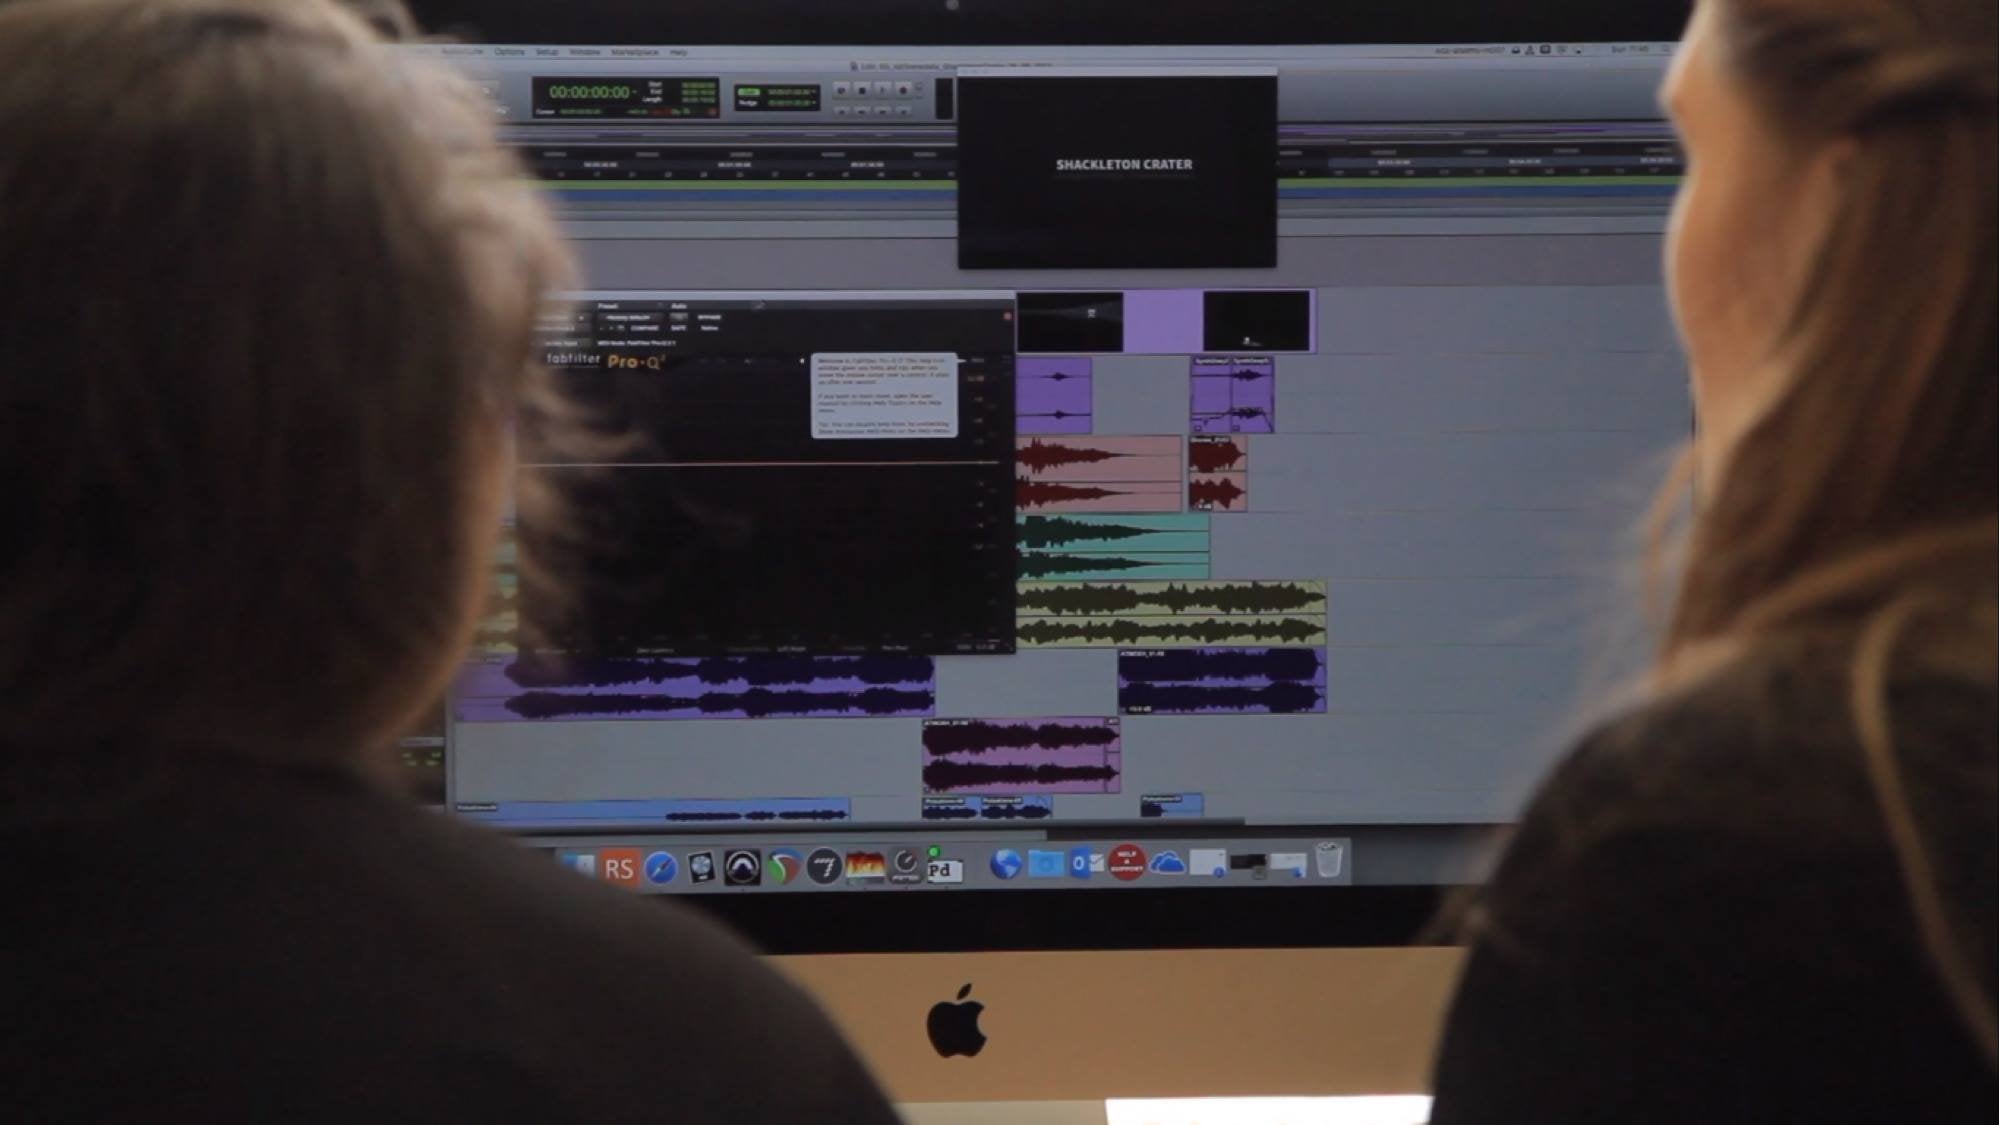
and here's how we do that. Now we're going to look at
how to create color palettes in Photoshop using an
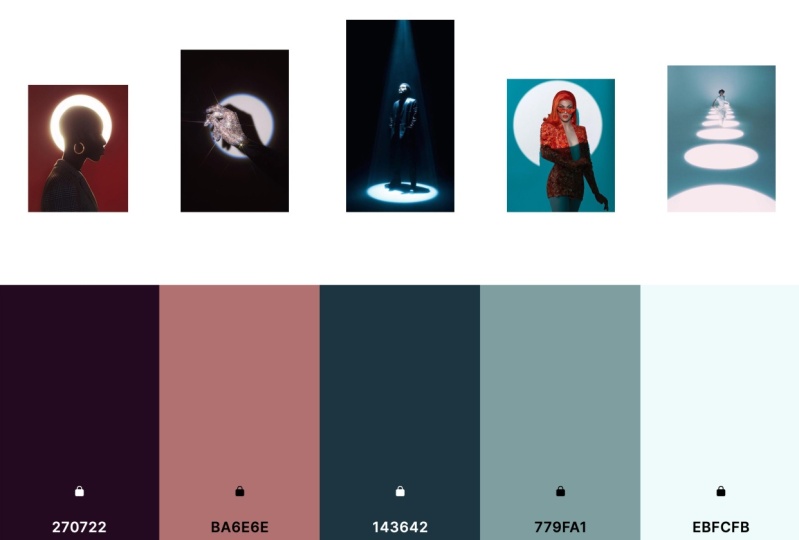
existing photograph. The photographs that
I've chosen to use today are stills from the
film Moonlight, which is one of my
favorite films. To start this process, you simply just
open a photograph in Photoshop and then
you press ''File'', ''Export'', ''Save for Web''. The things that we need
to focus on the most are the optimized file format and the color
reduction algorithm. The optimized file format
should stay the same GIF, and for the color
reduction algorithm, we change it from selective to custom because we don't need to turn up 256 colors,
we just need three. You change that from 256 to three and you can see here
we have three colors left. Then you go to the
color palette menu. Click on that, then go
down to Save Color Table. We're going to name
this Moonlight 1. I'm going to save
this on my desktop just so that we can save time, but I encourage you to
create a system for how you store your files
because it will be so much easier for you later
on when you're working. In this case, I'm just
going to save it on the desktop so that it's
easy for us to move along, but I will later on move this file to a
folder it belongs. We click ''Save'' and we're done with this window and we're also done with
this photograph. We can go ahead and close it. We're going to look at one more. This still is also
from Moonlight and it's just that it's
a warmer photograph, so we're going to experiment
with that as well. Same process, Save for Web, and then change the color
reduction algorithm to custom, remove 256, and replace
it with three colors. We have three colors here. Color palette menu,
Save Color Table, we'll name this Moonlight 2 and it's saved as an
Adobe color table file. Press ''Save'', "Done",
and we're done. That's how you create
color palettes in Adobe Photoshop using
an existing photograph. Now we're going to import
the color tables that we created from the film still
in Photoshop earlier, and we're going to do this in the document where we're going
to create our mood board. First, you import the
color tables into Photoshop and you do this by
importing them as swatches. I already have the window
for swatches here, but if you don't already have
the swatches window open, we go to the menu bar and
you click on the Window tab and you go down here and
you'll find swatches. If there's no tick
beside swatches, that means it's
not visible so you click on it and then
a tick will come, but it will also open swatches. Here we've disabled it
by clicking swatches. Again, we've enabled
it and it's feasible. Once you've done that, you go to the swatches
window and then you press this button right here and
you go to import swatches. Once you click on
import swatches, it will open up a window
where you'll be able to find your swatches
or color tables. Once this window is open, you should now
move to the folder where you saved
your color tables. In our case, we created
Adobe color table files. By default, the window would
be looking for swatches, and of course, we
didn't save swatches, so there will not be
available or visible. Come down here and
you change from swatches to color table,.ACT, which is Adobe color table
and they will show up here. You then click and load. You scroll down
here and you'll see moonlight color table, but we have to
import another one. Click on the button again. Click on ''Import Swatches''. It will open the exact
window where you saved your files or where
you picked your last file, but you still have to
change the file format from searches to color table. Then you find your
second color table, you double-click on
it and it will be loaded as well. Here we go. You have Moonlight Color Table 1 and Moonlight Color Table 2. You can now start to place
them on your mood board. Basically you create one layer, name it Color 1, and then you draw a shape. Hold on ''Shift''
for a perfect shape. Click on the color you
want from the color table, and then copy this layer and then select
the second color, and then copy that layer a third time and then click
on the third color, and then label these
layers Colors 1, 2, 3. Then I like to group these. Just to save time, we
will copy Moonlight 1, and we will move
Moonlight 2 away, and then we'll start to
change the colors and it will start with Moonlight 2 Color 1, Moonlight 2 Color 2, and then Moonlight 3 Color 3. See we have all the colors and we have access to the names of these colors
like hex values of these colors because
once you click here, you get all these
different values that you can use later on. We don't even have to label them here because once we click
and we get the color picker, we can immediately get
the color we want. Remember they're also
saved in the color tables. We didn't have to
worry about that. Don't forget to save your file. The second option is using
a service like Coolors. It's spelled C-O-O-L-O-R-S. This one is free to
use, which is great. Basically type coolors.co
and this is where we land. You can have a free account
and you can sign up. But for this demonstration,
I'm not going to login. We can just start
with a generator now. It just basically generates
different palettes for you or different colors
that work well together. Press the ''Space Bar'' and
it keeps switching them out. If you find a color that
you like, you can lock it. Let's say I liked the plum, I'm going to lock it down, and then I press the
space bar and then it keeps generating colors that
will work well with plum. Yeah, I love this
rich black for graph. You can look down the colors you want and keep
switching them out, you can look at the
shades and the tints, you can check the
contrast of the color, and you can copy the hex code
and you can enter that in Photoshop or in a
website builder or whatever you're using, export the file as any
of these file formats. You can export it as a URL. You can export it as
an image or a PDF. Let's save this as an image and you can name it
whatever you want. You can also create a color
palette from a photograph. You can upload a
photograph here, or you can use a URL to
that particular photograph, or you can use your camera, or you can just pick one of the stock photographs
provided by coolors.co. That's basically
it with Coolors. You can interact with
the website and see how it works for you and you can export your own different colors you would want to have
in the photograph. This can inform the
outfits you choose. They can inform the background
you choose, the makeup, and all the different things
that you want to work with. That's coolors.co. Our next step is to get
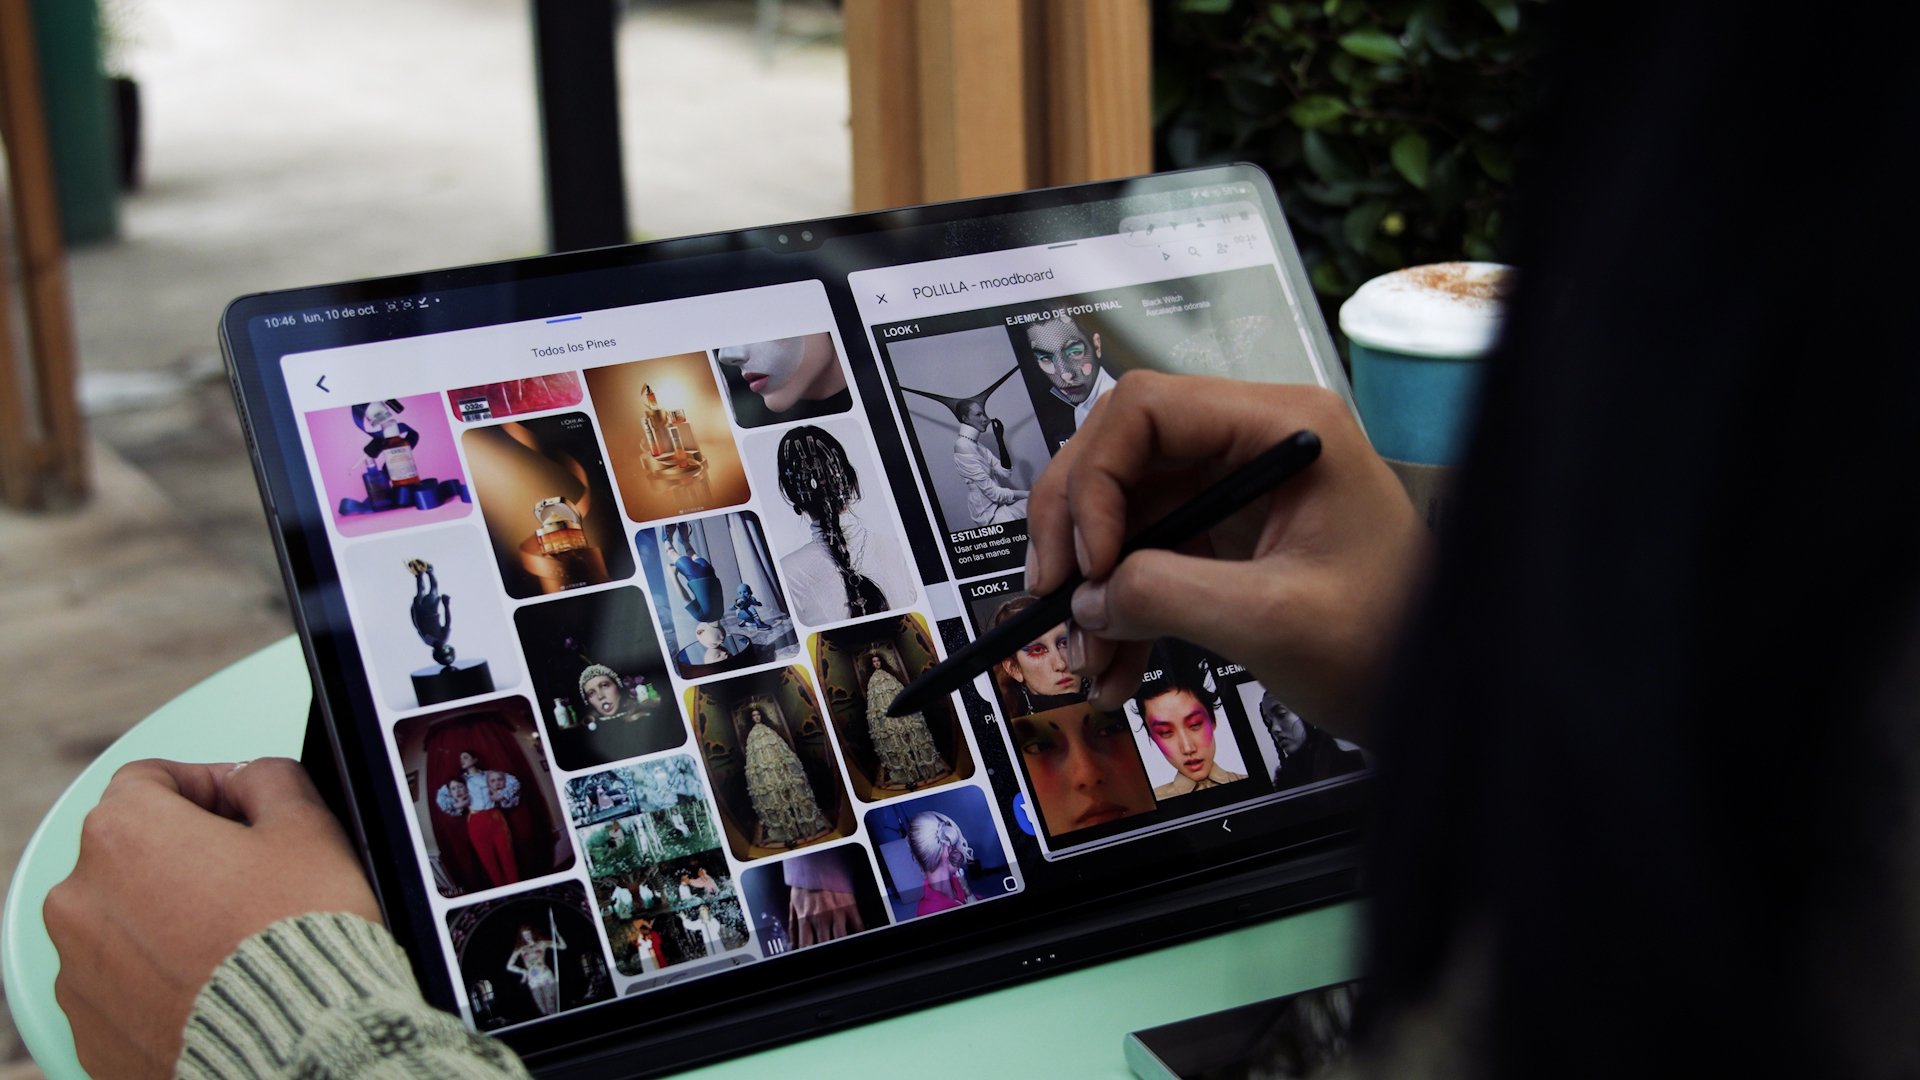
inspiration from Pinterest. Download image. Now we're going to import all the other elements in the mood board that
we haven't already. Remember we already started with the color palettes that we extracted from the film stills. That's what we have here, which is Moonlight
1 and Moonlight 2, and then we proceed by importing the other color palette
which we got from Coolors. You just import the photograph and you place it where you want. In this case, I prefer
to have mine here. It makes more sense to
me to have the colors on one side and all
the other elements taking up different space. We'll now import
the photographs. I already did this to save time. You import them into
Photoshop and then you place them anywhere that makes sense
to you or anyway you want. They're not attached. I felt placing some of them on top of each
other would bring a dynamic aspect to this
mood board that I like. Once you're done importing
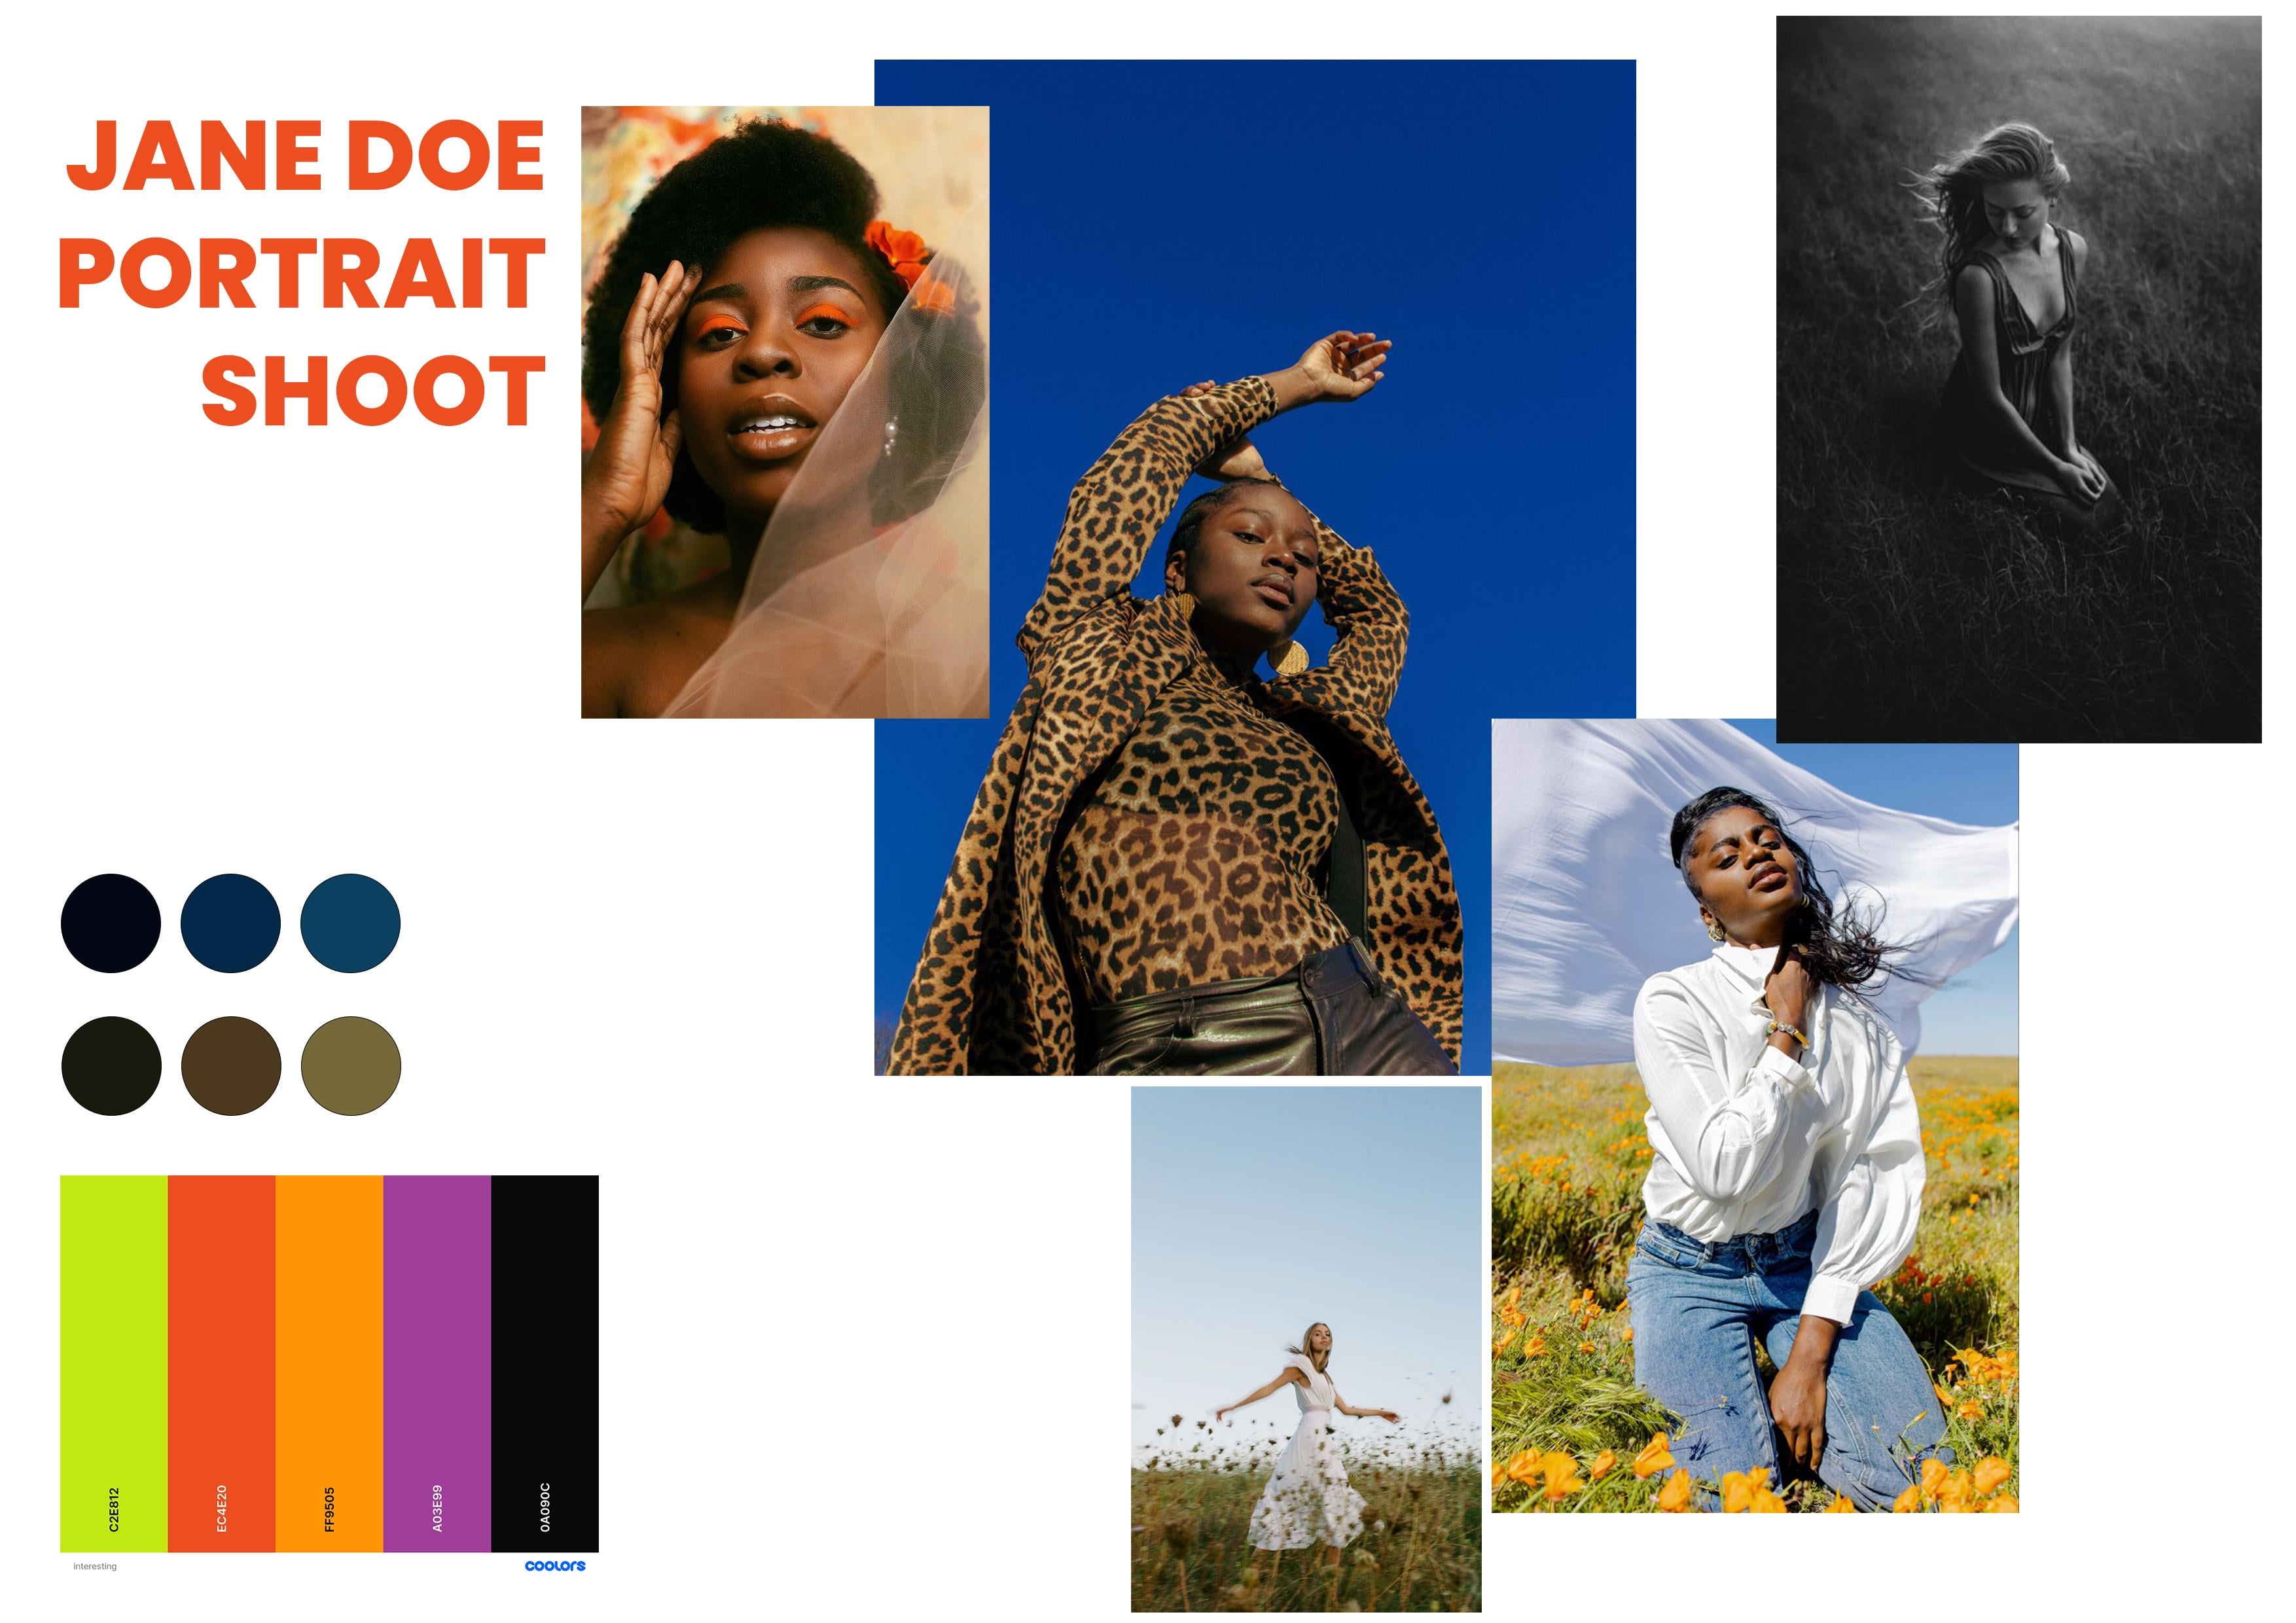
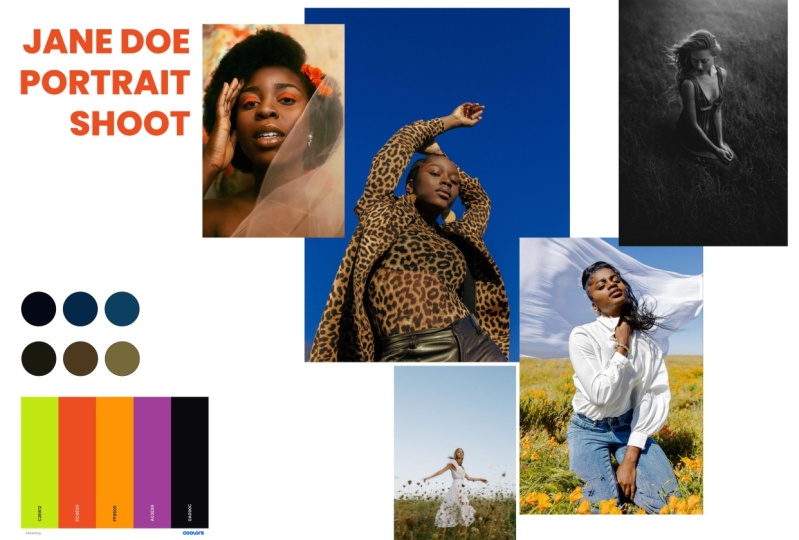
the photographs, it helps to have a bit of texts, and in this case I just named
it Jane Doe portrait shoot. But of course, this
would be the name of the person you're going
to photograph or the name of the editorial or shoot, and I believe having a name or title for the project guides even more
when you're working. That's how I
finished mood board. I hope you are able to follow
along up to this point. Don't forget to save. Here are my tips for you. Do your research and prepare before the actual work begins. That's the whole point
behind pre-production. Allow yourself to
experiment with different colors,
materials, and styles. Do it differently from how you
believe it should be done. Remember to be patient
with yourself. Creativity is the process
and not the result. To recap, we learned how to create mood boards
and storyboards. Just like that, you
have learned how to create mood boards
and storyboards. Wasn't that fun? I can't wait to see
what you'll created. See you in our final video where I'll tell you
how you can share your boards with me and the rest of your
classmates. [MUSIC]
6. Conclusion: Congratulations, I'm
so happy to tell you that you have made it to the
final video of this class. I hope you are able to develop your own pre-production process. But if you have any questions, feel free to write
them down in the discussion section below, or reach out to me
directly through one of my social media accounts. Feel free to tag
me on Instagram, @chrisdennisrosenberg or use the
#chrisdennisrosenbergxskillshare. If ever you create work inspired by something
from this class, I would love to see
what you create. Here are my tips for you. Remember to be respectful
of other people's work. Copying is not the same
thing as being inspired. What you create should
be your unique take in your own voice about a shared
topic or social issue. Be patient with yourself. The people whose work
you admire didn't just become who they are now, there are so many back stories
to every success story, and sometimes they
look just like yours, difficult and slow but
rewarding in the end. Prioritize your health
and well-being above any perceived success or
failure on and offline. Making use of something
should not mean exploitation,
create responsibly. Thank you so much
for your patience and for taking the time
to complete this class. I'm looking forward to seeing how you develop
your photography. Good luck on your journey. Bye.
 Dennis Kimbugwe, Photographer