Transcripts
1. Class Introduction: Hello, and welcome to
this poster design class. If you've ever
been captivated by the beauty of
topographic textures, the intricate lines and patterns that create depth
and movement and wondered how to incorporate that stunning aesthetic into
your poster designs, then you're in the right place. Topographic textures are
not just visually striking. They add an engaging
layer that can transform your posters from ordinary
to extraordinary. Whether you're
promoting an event or showcasing a product, these textures will give your designs a fresh
and organic look. So whether you're a season
designer or just starting out, stick around because this
class is going to help you infuse some incredible
topographic flare into your poster designs. So here I am an illustrator, and these are some fictional music festival posters
I created earlier. So this class is
divided into two parts. In the first part, we are
going to learn how to create a topographic
texture in Illustrator. And then in the second part, we are going to use it as part of a complete poster design. In this class, I'll demonstrate
how to use the tools of Illustrator to create this
poster design specifically, and later we will look at how we can make some variations. So let's get into it.
2. Create Topographic Textures in Adobe Illustrator: Hello, and welcome
to this tutorial. In the first video
of this class, I'm going to show
you how to create a topographic texture effect
in Adobe Illustrator. This is going to be the effect we use later in
the poster design. So before we get into that, it will help to understand how to generate
this effect first. Now, if you've ever
been mesmerized by topographic texture, those intricate lines
on maps and wondered how to bring that cool
aesthetic into your designs, then you're in the right place. Topographic textures are
not just visually stunning, they add depth and a unique
vibe to your project. Whether you're
working on branding, posters or even digital art, these textures can transform ordinary designs into eye
catching pieces of art. And the best part,
you can create them in just three simple steps, which can take you 5-10
minutes to create. So your task for this class is to follow along with
my technique in Adobe Illustrator and then have a go at creating
your own texture. And if you create
your own texture, be sure to share it in
the project section below so we can all
see your design. We would all love to see them. So whether you're a
beginner or a pro, stick around because
this tutorial is going to help
you get some cool, topographic texture
into your work. So let's get into it. So here I am in Illustrator, and these are some
topographic textures I have created earlier. Here I have a couple of examples of some different
approaches I have taken, where some are more
concentrated than others. Some have really dense
stroke lines and some have lighter strokes
with more space between. So at this point,
it's really important to mention that
there are other ways of doing this and some other tutorials online
using Photoshop. But what makes this one different is that we are
only using Illustrator, and this one gives
you maximum control of your creative outcome. For example, here we have an example with
letters where you can craft and make a
topographic texture out of bespoke shapes. This is a very versatile
technique we are about to use, where you can keep it
really dense or you can be quite light with it and
really control your shapes. So very flexible. Now, if I zoom into these, we can see the awesome textures. All of these strokes
are separate, so I can change
the stroke weight, add dashes, and change the
color and even edit them. So some really cool
topographic compositions here I have created from
scratch. Now, check this out. Secure is another
document demonstrating the steps that it takes in
order to create this effect. Unfortunately, you can't just click a button and
make this effect. It's going to take a
little bit of crafting, but thankfully not too much, which is actually quite
nice because you can make this your own and be
really creative with it. This is very easy to achieve
within five to 10 minutes, and it only takes three steps. In the first step, you will need to draw some organic shapes. This is where you get to
have maximum control. This can be random, or it
can be to your exact design. In the second step, you apply
the topographic effect, and in the third step,
you refine the strokes. So let's go ahead and create a topographic texture
using these steps. So the first step draw
some organic shapes. So I'll create a new document. Now you can choose whichever canvas size
you want to go with, but for this example, I'm just going to go with a
portrait canvas. And for this step, the
pencil tool is your friend. We can either come over
to the tools menu, click and hold and
select the pencil tool, or we can use the keyboard
shortcut N on the keyboard. To begin, we will need to
create our first shape. So I'll start by drawing
a large organic shape. Now, the trick here is to draw a shape that is not
too complicated, but with a bit of flair. You want to get some nice
smooth contours in your shape. Now, when using the pencil tool, you will start by
drawing a line, and when you come
back to the beginning of the line and release, with your mouse, it should snap to join the stroke together. Now, once you've drawn
your first shape, we can immediately begin
to draw the second, but a couple of tricks
here to keep in mind. If there is part of the line
that you're not happy with, there are a couple of things
you can do to smooth it out. With the direct selection
tool, you can click the line, and if you click and
hold on the pencil tool, you can select the
smooth tool and then draw over your
stroke to smooth it out. Personally, I love this one. I find this an excellent tool to help smooth
out my lines. Another way is to select
shape, come up to object, down to path and hit simplify or hit smooth and
toggle the values. So once you've got
your first shape, we're just going to
draw another shape. One technique to keep in mind here is for the next shapes, try and start next to the previous shape by
drawing close to it, imitating the contours
of the shape, and come away to
create the rest of it. The goal is to create
a connection between the shapes so they
loosely gel together. Now, depending on what
you want to achieve, you can keep these really close together or you can keep
them further apart. Keep in mind, the more organic you are and the more
spontaneous you are, the more interesting
your topographic effect is going to be. So to complete the first step, we need to fill this canvas
area with organic shapes. I'll continue drawing
my shapes, again, keeping in mind to draw
them similar to each other, creating a relationship
between them, and I can use the techniques
to smooth my lines, and after a couple of minutes, I'll have something
that looks like this. So to draw these shapes
just took me a few minutes. Once you have a composition
you're happy with, we can move on to
the next step where we can apply the
topographic effect. I'm not going to apply the topographic
effect to the shapes here because I want to use these shapes again later to create a different composition. So I'll come over
to the tools panel and click the artboard panel. I'll click on the
artboard, press and hold Alt plus shift on the keyboard and duplicate the artboard across
with its contents. So this is where
the magic happens. So I'll select all the shapes. In the tools menu, I'll set the stroke color to transparent, and for the fill color,
I'll just choose one of the light gray options
from the Swatches panel. I'll then come up
to effect down to three D in materials
and across to inflate. And this will add a three D
effect to all of our shapes, and you can see
here the shadows. In the settings, I'm
going to push up the depth all the way
up to max it out. I'll push the volume
up to max it out, and then I'm simply going to
come down to the bottom and click Expand as wire frames. And, boom, we have applied
the topographic effect. Awesome, right?
Well, that's great, but right now it's a
bit raw and dense. Next, I'm going to need
to do a little bit of finnessing to get
the effect I want. So now we're going to move
to the third and final step, which is to finness
these stroke lines and get them looking
just how we want them. I'm not going to edit
directly onto this mood board because there's
going to be a lot of changes I'm about to make, and I might want to refer
back to these samples later. So again, I'm going to come into the tools menu, grab
the artboard tool, click on this artboard, and
while holding Alt and Shift, I'm going to click and drag to the right to duplicate
the artboard. And with the selection
tool, I'm going to select over all
my new shapes. I'm going to come to the stroke panel and set the weight to one, and now I have some
very dense strokes. All we're going to
do here is spend the next couple of minutes
to just refine the strokes. And to do this, I'm going to use the direct selection tool. Going to zoom in with a
direct selection tool, I'll just click on a stroke
and with it selected, I'll just press Delete
twice to get rid of it. I'm now going to
repeat this process. I'll click on a stroke line, press Delete twice to remove, and I'll just go
around my shapes, deleting some of the strokes. A technique I find useful here is to delete every
other stroke line. The qualities of the
topographic effect is that there can be interesting
spaces between lines. If you want a complex effect,
you can leave the strokes. But if you want to
create a minimal effect, you can delete more strokes. So I'll spend the next
couple of minutes just going around
my composition. Now sometimes when
you use this effect, some of the stroke lines are
not particularly smooth. Sometimes you can
get random lines that are a bit more complicated. So keep in mind, if there are any stroke lines that
you're not happy with, you can use the
smooth techniques as demonstrated earlier. You can either use the
smooth tool or you simplify the smooth
feature in object path. So I'll continue to remove
some of the stroke lines and smooth out some of them until I have something that
looks like this. And it's starting
to look more like a classic topographic effect. Nice. So that's how you can
create a topographic effect. One of the best
reasons for creating this topographic effect like this is that every
stroke is editable. Now, if you want to go further, we can duplicate the
artboard across, create a solid shape,
send it to the back, select all the stroke lines, change them to white, and
with a direct selection tool, you can zoom in and click
on some of the lines, come into the stroke
panel, and some dashes. You can come to some of the stroke lines and
increase the stroke size, change the color to
your preference, and with a bit more crafting, you can create a
really interesting effect with more depth. Here are some more examples
I've created earlier, and you can see here there's quite a few effects
you can achieve. Also, I have a topographic
texture pack with a variety of topographic textures you can
use in your work. If you want to
take a closer look at this illustrator document, with all the samples,
you can acquire it in the project
section of this class. So that is how you can create a topographic effect in Adobe Illustrator.
Pretty easy, right? Well, in my next video, I
demonstrate how you can use this texture effect to create a vibrant music festival
poster design in Illustrator.
3. Dance Music Festival Poster Design In Adobe Illustrator: Hello, and welcome to the
second video in this class. In the previous video,
we learned how to create a topographic texture
in Adobe Illustrator. In this video, we're going
to take a look at how we can use it as part of a
complete poster design. This video, I'll demonstrate
how to use the tools of Illustrator to create this
poster design specifically, and later we will look at how we can make
some variations. Your task for this class is to follow along with
my poster design in Adobe Illustrator and then have a go at creating
your own design. Be sure to use the
content deck and the texture images
provided in your design. Feel free to try a completely
different design approach using different colors and
assets from the media kit. And if you do create
your own design, be sure to share it in the project section so we
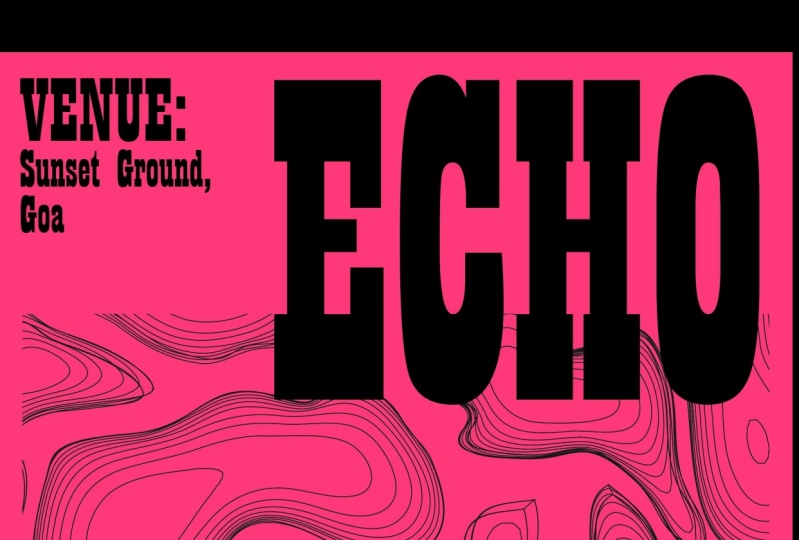
can all see your designs. We would all love to see them. So let's get into it. So here I am in Illustrator, and these are some posters
I created earlier. For these, I have gone with a really simple yet
striking approach. These poster designs are
for a music festival, so the use of
topographic texture works well to
symbolize sound waves. Here I'm working with flat,
high contrasting colors, where the black sits on top
of the solid luminous colors, which creates a really solid and impactful design aesthetic. This color scheme feels reminiscent of the
90s rave scene, and to add a more
dynamic quality to them, I have created a set of posters
with different content. And for the layout, I have used a simple six column grid
to align and contain my elements with a nice
thick margin space for all the elements to breathe and feel really
clear and legible. Going to take a look at
these poster designs, you can access the
illustrated document in the class project folder. Link is in the project
section of this class. So to begin, I'm going to
create a new document. I'll create an A three document, set the portrait with
a three mil bleed. With my new canvas set, I want to create a
decent margin space around the poster Canvas. I'll draw a shape to
fit my canvas area, come up to object, down to path, hit offset path, and type in -20. With my new shape,
I'll come back up to object, down to path, I'll hit split into grid and set the columns to six and the
gutter to ten and click Okay. My shapes still selected, I'll come up to view down
to guides and hit M guides. I'll come into the Layers panel, click on the layer
name, call this grid, and that's my grid sorted. Now, when I work
in poster design, I generally sketch on
paper first to get a rough idea of the sort of
layout I want to go with. However, it's not always
the case that I'll do this. And for those of you watching, you may or may not sketch your ideas first before
you design your posters. However, I still think
it's important to think through a layout before bringing in all the
visual elements. So if I have not thought about my layout before starting
on the computer, I'll begin with a
quick wireframe. Now, any of you familiar
with web design will know that this is a process a lot
of web designers will use. Wireframing is a very common
process in website design, where one will move shapes
around to get a feel of a composition before
committing to visual elements. This process could be equally beneficial for poster design. What I'll do here
is just push around some shapes just
to get a feel of where I can compose
my elements and get an initial impression
of a composition. This will create a
loose guide which can make the whole
process easier. So here I have placed in some rectangle shapes
within my column grid, and I've placed these in their own layer called wireframes. Now, I could spend a while creating lots of different
permutations here, but for the sake of this
tutorial, I'll keep it simple. Here I have just placed
some blocks down, and I feel this is working. In the background, I
have a large space where I want to
place my texture, and on top and around, I have some smaller blocks in the column grid of where I could place
some other content. So once I have a wireframe
I'm satisfied with, I can start thinking about
working with visual elements. And in this instance, I'm going to start with the typography. So looking back at my
final poster design, we can see how the type is composed and the
font choice I used. For this poster
design, I'm going to use the font tan deal. This is a really nice
San serv typeface. It's a condensed typeface. It looks great in all caps, and I find the quality of the numbers are visually
bold and interesting. Now, this is an Adobe font. If you have an Adobe account, you should be able
to sink this font, or in the content doc, you will see a page
with a link to sync it. This is a content
doc that has been created to help you follow
along with this tutorial. If you want to get hold of this content deck and
get access to the font, click the link in
the description. Now, if you don't have
an Adobe account, a really good alternative is
a font called Steel fish. This has the same condensed
quality of Tandil, and again, you can grab this
font from the content deck. And if you want to explore
some other condensed fonts, you can also check out the
GDS font book where I have curated a list of the best
free condensed fonts online. So first, I'm going to
come to the Las panel, click to add a new layer. I'll name this type, and I'll put this below
my grid layer. Into the content deck, I'll choose the first line of text, a magic sound journey, and back into Illustrator, I'll create a simple
text frame and place this piece of text
up in the top left corner. In the character panel, I
have the size set to 50, the leading set to 50, the tracking set to 40, and I have applied the
all capped button. So back into the content deck, for these poster designs, there is a range of words
that we can put on top. So to start, I'll just
choose one of them. I'll go with echo, and
back in Illustrator, I'll create another
simple text frame and place this piece of text in the top right corner
on top of my wireframe. For this piece of text,
I wanted it to be quite large to overlap
the texture below. This will just give it a
more visual dynamic crossing over the visual texture below. In the character panel, I
have the size setter 375, the tracking set at 20, and I have applied the
all caps button. So back into the
content deck, next, I'm going to place in
the paragraph text. I'll select all the paragraph
text in the content deck, and back into
Illustrator this time, I'll place the text into a paragraph frame and place
it in the bottom left. Now, for this paragraph, we can see there are two
types of formatting. For the header, I put
this in bold in all caps, and below, I have the text in lowercase in the regular font. For the paragraph text, in the character panel, I
have the size set to 25, the tracking set to
20, and this time, I have not applied
the all caps button. And for all the type, I
have the leading sector 30. When working with
paragraph text, make sure that there
is a nice balance between the title above and the paragraph text below for added contrast
and legibility. So next to the paragraph text, here we have this
wireframe block. My thinking here was I could fit the date and have it
quite nice and bold. So back into the content deck, I'll select the date
back into Illustrator, I'll create another
simple text frame and place this piece of text down here to fill this block space
across two columns. Now, to get a nice balance here, I'll bring down a
guide from the top and place it above the
paragraph type and adjust the type to
match the height of the paragraph block and fit
it nicely across two friends. The character panel, I have
the tracking set to 40, and here I've simply
scaled the type up to fit Snug inside the
two column width. If I zoom out and toggle
off the wireframe layer, we can see that this is
beginning to look quite neat. Now, if I turn the
wireframe back on, now I want to get some text
in the middle of this space. Back into the content deck, I'll select the words
vibes in the mountain, and back into Illustrator, I'll create a simple
text frame and place this piece of
text in the middle. Now, on this occasion, I'll be sure to place a hard return after the word the to put
mountain on a second line. The character panel, I
have the size set to 115, the leading set to 110, tracking set to 220, and I have applied
the all caps button. So now I just have
one more space to fill down in
the bottom right. For this, I wanted to add a
bit of fun to the poster. And since the theme is about
an electro music festival, I thought I'd bring in the
classic Acid House Ray face. So into the download folder, into the images folder, into the icons folder, I have four EPS files. On this occasion, I'll open the happy face EPS
icon in Illustrator, copy and paste it
into my poster. I'll position this
in the bottom right, align right to the column, and touch the guide above. So the height of
this icon is now matching the height of the
paragraph and the date. So if I zoom out and
turn off the guides, we can see this is
looking really neat. So the next thing
I'm going to do is bring in the
topographic texture. And for this, I'm going
to choose from a range of topographic textures I
have created earlier. So now we are going
to use the effect we learned how to create
in the first video. If you want to know
more about how to create this in Illustrator, then you can check back
to the first video to watch a more in
depth tutorial. So here I have some
topographic textures as part of an image pack you
can use in your own work, which is included in
the download folder. So into the download folder, into the texture pack folder, into the topographic folder, open the topographic
texture Illustrator file, and from here I can select
a topographic texture. This occasion, I'm
liking this one here, so I'll copy this
into my poster doc. In the as panel, I'll
click to add a new layer. I'll call this texture and place this below my type layer, and I'll paste in my
topographic texture. So this texture is
pretty organic. There's lots of
shapes, and right now it's overlapping
the canvas area. So next, I want to crop this. So I'll bring back the
visibility of the wireframes, and we can see
below the box area I had planned for my texture. I'll unlock the wireframe layer, select the rectangle
shape and copy. I'll lock the wireframe layer and toggle the visibility off. On my texture layer, I'll paste this rectangle shape and set
the fill color to white. Right now the texture
is made up of individual strokes and they
are currently grouped. So this is going to make
it easy to mask them all. With the white box selected and the stroke texture selected, I'll come into the transparency
panel and click Add mask. If I want to toggle the size of my texture within
the crop space, I'll click the lock icon between the left and right thumbnail
in the transparency panel. I'll click on the
left thumbnail, and this will allow me with a selection tool to
click my texture and move it around or scale up or down to fit inside the frame. Like so, once satisfied, I'll set the stroke
size to no 0.75, and I'll click the lock icon
in the transparency panel, click on the left thumbnail
and click off to deselect. If I press Command placer on
Mac or Control plceRon PC, we can fit the canvas
area to the height of the work area and get a good
look at the overall layout. And that's looking pretty
neat with everything sitting nicely inside
the column grid. So with my initial
composition sorted, I can now start to think
about working with color. So looking back at the
final poster designs, we can see that
the color approach for these is very
straightforward. For this design approach, I'm using a simple
background solid color to contrast really well with the black type and
texture above. Now, one practice I like
to do when working with poster design in Illustrator is to duplicate my artboards. This makes it easier to focus on new ideas and have something
to fall back to later. So in the Layers panel, I'll make sure that
every layer is unlocked. I'll come up to
view down to guides and make sure to unlock guides. I'll press Command plus colon on Mac or Control plus colon on PC to make sure I can see my
guide into the tools menu, click on the artboard tool, click on the artboard
and drag right while holding Alt and Chef
to make it duplicate. Come into my layers panel,
create a new layer. I'll call this base and
drag it to the bottom. I'll draw a solid
rectangle color from the top left hand bleed line to the bottom right
corner bleed line. And in the tools panel, I'll make sure that the stroke is set to transparent and I'll double
click in the fill color, and I'll set this to a
luminous yellow with the hex value of FFFF 19. This occasion, I'll also change the word in the
top right to Rave. I'll press Command zero
on Mac or Control Zero on PC to fit the canvas area to
the height of the work area. I'll press Command
plus colon on Mac or Control plus colon on PC
to toggle off the guides, and that's looking pretty neat. I'm liking this a lot. It looks very crisp, but I feel we could still add
another level of fun to it. Next, I'm going to add
some ink splat textures. So into the download folder,
into the texture folder, open the ink splat
texture Illustrator file, and you can see here I
have some fun textures. I'll pick one, copy, and
back into my document. I'll come to the base
layer in my layers panel, click to add a new layer
and call this splat. Paste in the texture.
I'll drag it onto my canvas
area, scale to fit. I'll change the color to white, and now I have this really eye catching poster
where we've got this interesting background with the black visual elements above contrasting really nicely. So once you have one layout
set up in Illustrator, it's so easy to create
other color variations. Looking back at my
final poster designs, you can see I have a
range of color choices. Now, I won't create
all of these, but I'll show you
how to create one. So using the same
technique as before, I'll make sure all the layers are unlocked in the lays panel. I'll toggle on my guides,
and with the artboard tool, I'll click and duplicate
it to the right, and upon release, I'll
have a new artboard. Here I can simply click the background and
change the color. In this instance, I'll set it to a luminous green color with a hex value of eight CF 80f. Back in my content deck, I'll go with another
title for the poster. This time, I'll go with base and type it into the top left. And here I have a
different version. So using this technique,
I could just duplicate the poster as many times as I like and change the
color background. Now, on this next version, I wanted to try something
a little different. Now I've got a
couple of examples I can now explore
different layouts. In this instance, I'm
going to click into the center type and
change this to the date. In the character panel, I
have the size set to 135, the tracking set of
400, and this time, I'll set the font to italics, just to add a little
bit more flair. Next, I'll click on the topographic
texture at the bottom. In the transparency panel, I'll unlock the two layers. I'll click on the
right thumbnail to access the mask layer. I'll drag this up a little
to create more space below. I'll duplicate the vibes in the mountains text from
the previous poster, and I'll place it down on one line and underneath
the texture. In this version,
I'm going to add a QR code to the bottom right. I'll also include more
icons down here to sit nicely in the bottom
corner as a slight detail. I can grab these
from the download folder in the icons folder, place them down comfortably, and this makes a
different version. Tell me which version you
prefer in the comments, guys. Do you prefer the first
version or the second version? Looking back at my
finished poster designs, you can see that below,
I have another row. This time, instead of using a square shape to crop the
texture, I'm using a circle. This can add a different
dimension to the poster design. So back into my document, again, with all the
layers unlocked, I'll press Command
plus colon on Mac or Control plus colon on PC
to toggle on the guides. With the Apo tool, I'll just
click on the first one, press Command A on Mac or
Control A on PC to select all, press and hold Shift
plus Alt and drag down, and that will copy
all of the artboards. I'll lock all of the layers
apart from the texture layer. I'll click and drag across every poster to select all
the textures and delete them. I'll come back into the
topographic texture pack and select another texture,
paste it into the poster. This time, I'll draw a circle in my canvas area where I want
the text to be placed. I'll set this to white,
and I'll use this as a layer mask to crop the texture using the same technique
I showed earlier. Once I'm happy with
my circle texture, I'll select the
circle texture and press Command X on Mac or
Control X on PC to cut, and then press Command
plus Shift plus V on Mac, or Control plus
Shift plus V on PC, and this will paste
it back in place. I'll click on each
poster artboard and press Command plus
Shift plus V on Mac, or Control plus
Shift plus B on PC, and this will paste a copy of the circle texture onto each
poster in the right place. Now, the last step
I'll take is to adjust the typography on the type layer to balance with the
circle texture. Soon, I'll have a new set of posters with circle
texture in the middle. So once you're happy
with your artwork and you want to export
ready for print, you can either export
the entire document or you can export just
one poster or a range. For this example, I just want to export the
second poster here. So when you're ready to export, simply come up to file and
click on Save as copy. I'll name this music
festival poster one. And down in the format,
I'll choose Adobe PDF. Now, you can export all,
but on this occasion, I'll click on Range
and type in two. I'll click Save and
Apple Pop another menu. Here, I'm going to make
sure that for PDF, PDF preset, high quality
print is selected. I'll make sure that view PDF
after saving is checked. I'll come over to the left
and click Marks and Bleeds. I'll click only on trim marks. For bleed, I'll set this to use document bleed settings
and then click Save PDF. Then Illustrator
will do its thing, and that will pop
Acrobat reader. I'll come up to view
Zoom fit to height, and now I can see the poster
design exported as a PDF, ready to send on to a printer. If you notice or on the outside, we can also see the trim marks, and this is where
the printer will trim the poster after printing to ensure a clean cut
with no white edges. Perfect.
4. Final Thoughts: So that's how you can
create a poster design using a topographic texture
in Adobe Illustrator. So this brings us to the end of another poster
design journey. I hope you enjoyed this
tutorial, and most importantly, I hope you gain some
valuable knowledge to harness your creativity, and you have something
to show for it. Setting up a poster in
this way in Illustrator offers so much flexibility to
change your colors quickly. So I hope that this process
inspires you to have a play with the topographic effect and experiment with
color combinations. Using this technique, you can get some really
interesting results. I hope this class helps you, and I look forward to seeing all your poster designs
in the project section. So until next time,
unleash your creativity, and I'll see you
in the next class.
 Gareth David, Graphic Design & Process