Transcripts
1. Introduction: Do you want to learn
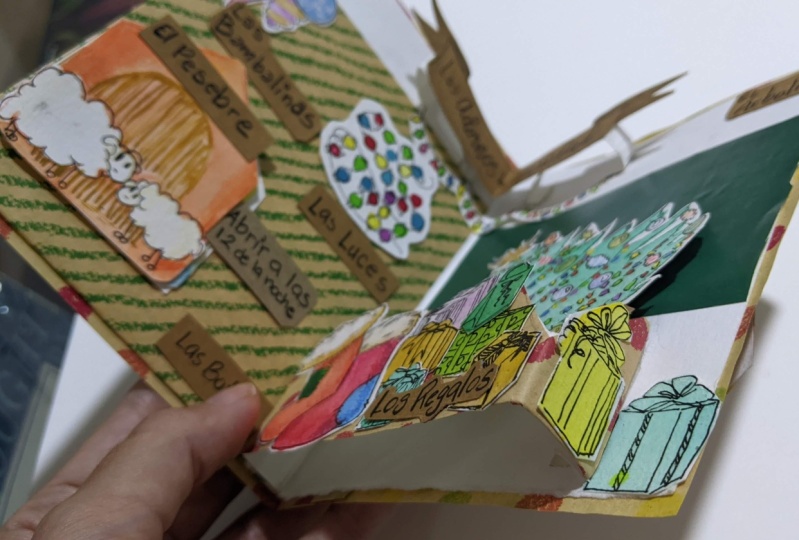
something like this? In this class, We're gonna break down the
different mechanisms that's happening in this book
into different food. First, we're going
to learn how to make a parallelogram by making different tofu dishes.
We will make something like this. Like this. We're going to learn how to make a rotating disk with
jalapeno dishes. We will make
something like this. a pull tab. With this. We will also learn
how to make a spiral. With this. Let's get started.
2. Preparation: Tools: To start, you will
need a cutting mat. Scissors, double-sided
tape ruler, a pen.
3. 1.1 Parallelogram 1: We're going to first make a
very simple parallelogram. First, we're going
to fold the base into how it helps. If you use nail to
reinforce the fold. Then we'll put this
one up, one side. And then we'll grab the pieces. This is pre-measured. You can choose your own
sizes as long as the middle two has the same width and the two adjacent to
it has the same width. That will work. And the tape area, we usually would
have a little bit of an angle to make it
easier to glue or tape. Now we're going to fold
along each of the lines. Now we're going to refer
this from the middle. Almost ready. Now we're going
to grab the base. And when a pod, it is going to be like this. So how do we know where
we're going to put a tape? So as you can see, this is a parallel Graham and this part is exactly
the same with this. So we're just going to
use this to measure. We're going to put this here. And you sell pants
to measure this one. So now all we need is to put
our tape here. And here. We're going to put some
tape on the first side. And then we're going
to put it inside here just to make sure that this thing
can close perfectly. Instead of putting this
part directly to here, we are going to put a piece
of tape here, right here. And then we're just
going to close this altogether and use the finger to press the
bar that has the tape. Now we can open this. Beautiful. As you can see. It's a very simple
parallelogram. The closest like this spike, this as well as this one equals this one and
this part equals this part. It will work.
4. 1.1 Parallelogram 1: Miso Soup: Here is an application of the mechanism
that we just made. This is the base of the top row, so we're going to hold
us to have put it aside. Then we're going to put a tofu. We're going to fold
along each of the lungs. Now. We're going to
put the TOEFL onto the blue one side first. Like here. A little bit of tape like that. Then this piece here, press it down really well. And then we're going to
put a piece of tape here. Now, you can just follow
this and press really hard on the area where there's
tape. Now we can open it.
5. 1.2 Parallelogram 2: Now we're going to make the
second type of parallelogram. To start, we're going
to fold the base into half and press the fault line really well and put
this on the side. And then this time we're
going to use to tap. And it will be easier if each of the section is the same
width, equal, equal, equal. And once again, let's
cut a little bit of angle for the tape area. Now we're going to follow
this along a line. It also need another
piece to be on the top. And this one can be any shape as long as it's
smaller than the base. We also need to fold this. All right. I'm going to bring
back the base. The placement of those two can be random as long as
you make them the same. So we're going to measure the
distance for one of them. I'm going to choose
half an inch. This will be we'll put one of them because it's symmetrical. The placements or
the other one should also be the same. All right. Now we got all measures ready. We're going to
tape it. This one. We're going to take this area on the other side of the line. So we're going to take
one of them first, put a little bit
of tape on this. And we're just going
to press it down. Now. We're going to put
a little bit tape here and press it down like this. So there are two sections
that's facing us. And here's the one
that's facing down. We're gonna do the same
thing for this side. Piece of tape here. And the tape is this side. I'm going to put a
piece of tape here. And fully like this. Now, it looks like this. Now we're going to put tape on the part that are facing us, this one and this
one only this one. The other side as well. Now, we're going to
put this one in. Here's the trick. We're going to lift
this. And like this. And right where these two meet, we're going to insert the
top piece right here. Or you can put this along the fault line
if that's easier. Here. Close it and press
where there's tape. This is a, so this is
another parallelogram. What's up on the top will
hide what's on the bottom. Use to lift any element that you want to be
elevated from the base.
6. 1.2 Parallelogram 2: Mapo Tofu: Here is an application
of what we just made. We're going to
first for the base is half the size. And you're going to
fold those strips. Do the same thing
for the other one. Now we're going to
fold the last piece. You have. As you can see, this one can be in any shape. Now we're going to
bring back the base. We're going to put
the first tab right here and upload a
little piece of tape. But a little bit of tape here. Two parts facing us and
the one facing down. You're gonna do the same
thing for the other side. Put some tape here, put some tape here. Now, we're about to
put this one on this. We're going to put
some tape on top. Now we're going to put
this one along this one. Press down so that the tape can be adhered
to the top piece. Close this, press it again.
7. 1.3 Parallelogram 3: Our third parallelogram is slightly different
from the first two. Instead of open fully. The swan performance. When you open only 90 degree, you probably have seen this in many pop-up greeting
cards and the store. So we'd have folded into hat. Now, we need, first, we need a piece that's
going to the base. First, going to leave
some areas for the tape, and then we're going to
fold a little bit out. So this is the area where
it's going to pop out. Afford another era, the
bottom part for the tape. Then we need another keys
to be take on top of this. Likewise, so we're
gonna have an area for the tape on the bottom. And this will be the amount
that this one steps. So first we're going
to grab the base, pop slide with dust. So in order to find out where we're
going to put the tape, I'm just going to use this
to measure this line, line up against this line. And this would be where we
put the tape, this area. So we're gonna put tape to the yellow paper because
this is a little bit bigger. A little bit more tape. And before. Now we're going to put this one
against this one. Now. We're going to put
some tape here, folders like this, and press down where the
tape meets the paper. Open, like this. Now we're going to put
the last piece here. First, we are going to
put some tape. This area. In order to find out. We're going to put
the tape here. And we're just going
to use this one to measure here in temporarily. Put us here. So this is where we're going
to put the tape. I'm gonna market. Now. I'm going to put the
tape right here. Almost ready. Now. Going to put
some tape, this part. Then we're going to fold it
like this and press down. We're just tape. Here we got this doesn't have to be a rectangle. It can be any random
shape this and also cut some areas here
saying was this part, it doesn't have to
be straight lines. You can be very
creative with this.
8. 1.3 Parallelogram 3: Fried Tofu: Now we're going to see an application of
what we just learned. First, you're going to
pull the base into half. Then we're gonna food. First, the one that's
attached to this. This is how much it's
going to pop up. The last one. So first, we're going to
move this one to the bottom. It's the opposite of
what we did last time, but it will still
work on tape. Here. You can see this
and this are equal. Now we're going to
put some tape here. Then we're going to follow
this like this tape here for this part. And then tape it. The first tofu is ready. Now we're going to
put a second one on. First. We are going to tape it here. And this is also
pre-measured, as you can see. This height equals this hot. Put some tape on
this one and put it here and press the
taper, the wall. Now, the last pallet ready. You can see this one doesn't
have the straight lines, so I used an angle. Structure is the same.
9. 2.1 Rotating Arm 1: Now we're going to
make rotating disk. First we need a base. We need a structure like this. First, you need to follow this. Like this. It's easier to afford a 45-degree angle for both sides to reinforce the folder that you can
flip it the other side too. Once you open that, you can press it
inside like this. And don't forget to leave on both sides where
you should tape. It. Also needs some strips. Now, to know where
we should take this, we're just going to
use this to measure. It will be like this. So we're going to put this, put this tape line against the fault line of the
base and mark the area where we're going to
take roughly here. We'll put a piece of tape here. We're going to tape it here. Now we're going to
take this area. We're going to fold
this like this. Without this, it's still the same parallelogram
structure. We're going to follow
this like this. Now we're going to
press this area in like this. Grab all strips. This, you can choose any
direction you want to go. So we're going to
try this side first. I'm going to put some tape here. Go this side. Put
some tape here. And you can go this side. Now we're going
to try this area. Maybe we'll go this direction. Notice this one is too
long. You can just close. It's not a real console. You can also trim it later.
10. 2.1 Rotating Arm 1: Pho: We're going to apply what
we just learned to this. First, we're going to go the
base into half and down. We're gonna grab the brisket. First. We're going to
fold this line down. We're going to fold
it 45-degree angle. To enforce the phone. We're going to fold
it both sides. Then we're going to fold
where it's going to be taped. Now we're going to first put
this part onto the base. Now we're going
to take this part and more bean sprouts so that they can rotate
when you open it.
11. 2.2 Rotating Arm 2: To make the effect
even stronger, we can add extra
element should the tip. We're going to use
some of the strips. A tape, a little piece here. It looks like this. We can do the same thing
to the other ones. We can't add bigger shape
to this structures. We're going to use those
at this. Like this. We can do the same
thing to all of those chemicals too big. So we're going to redo this.
12. 2.2 Rotating Arm 2: Pork Chop: We're going to use the pork
chop to show how it works. First, we're going to make, you're going to make
a fold in the middle. Then we're going
to print a base. First. We're going to
fold along the line. Now we're going to follow
the 45-degree angle. Open it and we're gonna fold where it's
going to be taped. And then we're going to
take this to the base. He just said, we're going to put the arm like this. We're going to use a
piece to cover this area. Now. We're going to
put the help menu on top of the tip of the rotating disk to
make this one load.
13. 3 Pull Tab: Because it's a poll
tab with do not need to fold the paper and to have, because the action only
happens when you pull the tab. First, we're going to cut
two holes on the paper. One is to make the action, the other is to pull. Then we're going to
have a strip of paper to get the strength that's
enough to pull anything. I highly recommend you for a
piece of paper into half so that it's much stronger than
just one layer of paper. Then we're going to slide
this into the first row. And we're going to fold. And we're going to
leave a little bit of space from the
food and the slot. A little strip of paper to stop this
from photo coming out. And we're gonna put this
right against the fault line. Now, we're going to
slide this into just hold. And then we're
going to solve it. This is how it looks like. Now we're going to add a
little piece here so that it looks even clear
what's happening. You're going to bring a piece
of paper folded into half, put some tape on both side.
14. 3 Pull Tab: Kimchi: Now we're going to use Kim to, to put the poll tab we've
just learned into action. First, we're gonna pre-calc
two holds for the tab. Then this time, to further
strengthen the paper, I'm actually going to fold the paper three times instead
of twice in the demo. And for this particular design, I have built in the stopper into one sheet of paper
so that we didn't have to put on a piece
of paper onto the tab. I'm going to fold this back first folders so that I can
slide it into the hole. And this one is the stopper. Now, I'm actually
going to take this, slide this into the hole. Now I'm going to
bring another piece of kimchi for this are to have the tape side.
15. 4 Spiral: Now we're going
to make a spiral. First. We're going to
pull the sheet into half. And then we're going to
call spiral all of a piece of paper like this. And the first thing
is to take one end, just the top was a
little bit of tape. Now while it's flood the paper and cross where
you put the tape on. And now go to the other
end of the spiral. So we'll just take the ulcer. So I'm going to go into
the very center and put a piece of tape
at the center. The other side of the sucrose.
16. 4 Spiral: Noodles: Now we're going to put
the spiral into action. As you can see, the spiral
doesn't have to be curves. They can be straight
lines to this time. First going to the table in the center and close it. Now we're going to put a
little tape on the top. Other than that, the spiral.
17. 4 Spiral Momo: The spiral can also go out and make another spiral as long as it is a continuous
strip, it will work. So we're gonna first
tape one end of the spiral, press it down. Now we're going to
tape the other end.
18. 5 Everything: Banh Mi: Now we're going to
apply everything we have learned so
far into one book. First, we have folded the bread. Now we're going to put
on the rotating disk. Now we're going to put
the parallelogram. Now we're going
to put the radish and carrots for the poll tab. First, we're going to put
the cars on the radish. Going to put this
part onto this side. Now we're gonna go this
part to the other side. Even though this is a poll tab, we're going to use the opening
of the book to pull it. Now we're going to add a spiral. So untrue. To decorate this one. You can put them
anywhere you want. One spiral. This part is a little bit empty, so we're going to put one. Maybe I'll put one on the top.
 Sherry Muyuan He, paper lover and foodie