Transcripts
1. Introduction: Are you looking for
unique way to showcase your favorite travels,
hobbies, and interests? Would you like to make a one-of-a-kind gift for a
family member or friend, or find a way to use a small
piece of your own art, but you have limited
time and space. Do you love to make
things by hand and enjoy upcycling and using what
you have for your projects. Then you'll love creating
your own mini box collage. I'm Betsy met and surface
pattern designer and educator. And I'd like to welcome
you to mini box collages. The beauty of this
project is that it's great for all
levels of experience. It works for any theme. The unique small size keeps the project interesting
and manageable, and it comes with a
built-in display. You probably have most of
the materials you'll want to use and the other
materials are easy to find, will even go on a scavenger
hunt around your home. There are no limits to themes. Your mini box collage
can celebrate a favorite place and
event, a special person, a beloved pet, a
garden, a flower, a holiday hobby,
or anything that interests you well know
drawing skills are necessary. You can also include
your own art. The small size of the
mini box means that even the littlest element
makes a big impact. Devote as much or as
little time as you have. You don't need art skills, but you'll enjoy this class most if you love to create
things with your hands. I've always loved making
things by hand and teaching. I graduated from the School of the Art
Institute of Chicago in textiles and fibers and later earned a
master's in education. I have decades of experience
designing and implementing art and nature programs in museums like the
chicago botanic garden, the Morton Arboretum,
the Field Museum, and public and private schools. In 2020, I taught
an online class for Bonnie Christine's surface
pattern design membership. Flourish. I fell in love with online teaching and
the possibilities. I use Adobe Illustrator and work digitally much of the time. And I also love to work with my hands and share
how to make things. I'm so excited that you're here. Thanks for joining me
for mini box collages. Meet me in the next
lesson and I'll tell you all about our fun
and creative project
2. Class Project : Welcome back. I'm excited to
share the steps to creating your own
mini box collage, a visual story around a
theme of your choice. From a favorite vacation place, a memorable event,
something you love. You get to decide. I loved this project because
of the uniqueness of the small box format and the flexibility of
collage for storytelling. It works for any theme. The size keeps the
project manageable. You probably already have most
of the materials and I've included suggestions for
low and no cost options. I love to up cycle. So those ideas are there too. It's an engaging project to
make and to give the gift. In this class, we'll cover
how to select a theme. I've included a
downloadable PDF, tips for choosing
a box upcycled or new basic materials
and additional options including free and low-cost
extra embellishments that give personality. I call this small
but mighty impact. How to design a visually
interesting collage with composition, layering, and using a variety of elements
which glues work best for the different materials
and finishing touches on the inside edges
and the outside decor. We'll finish with ideas
for gifting and display. I can't wait to see
what you create. Meet me in the next
lesson and we'll look at all the different options for
selecting your collage box. See you there?
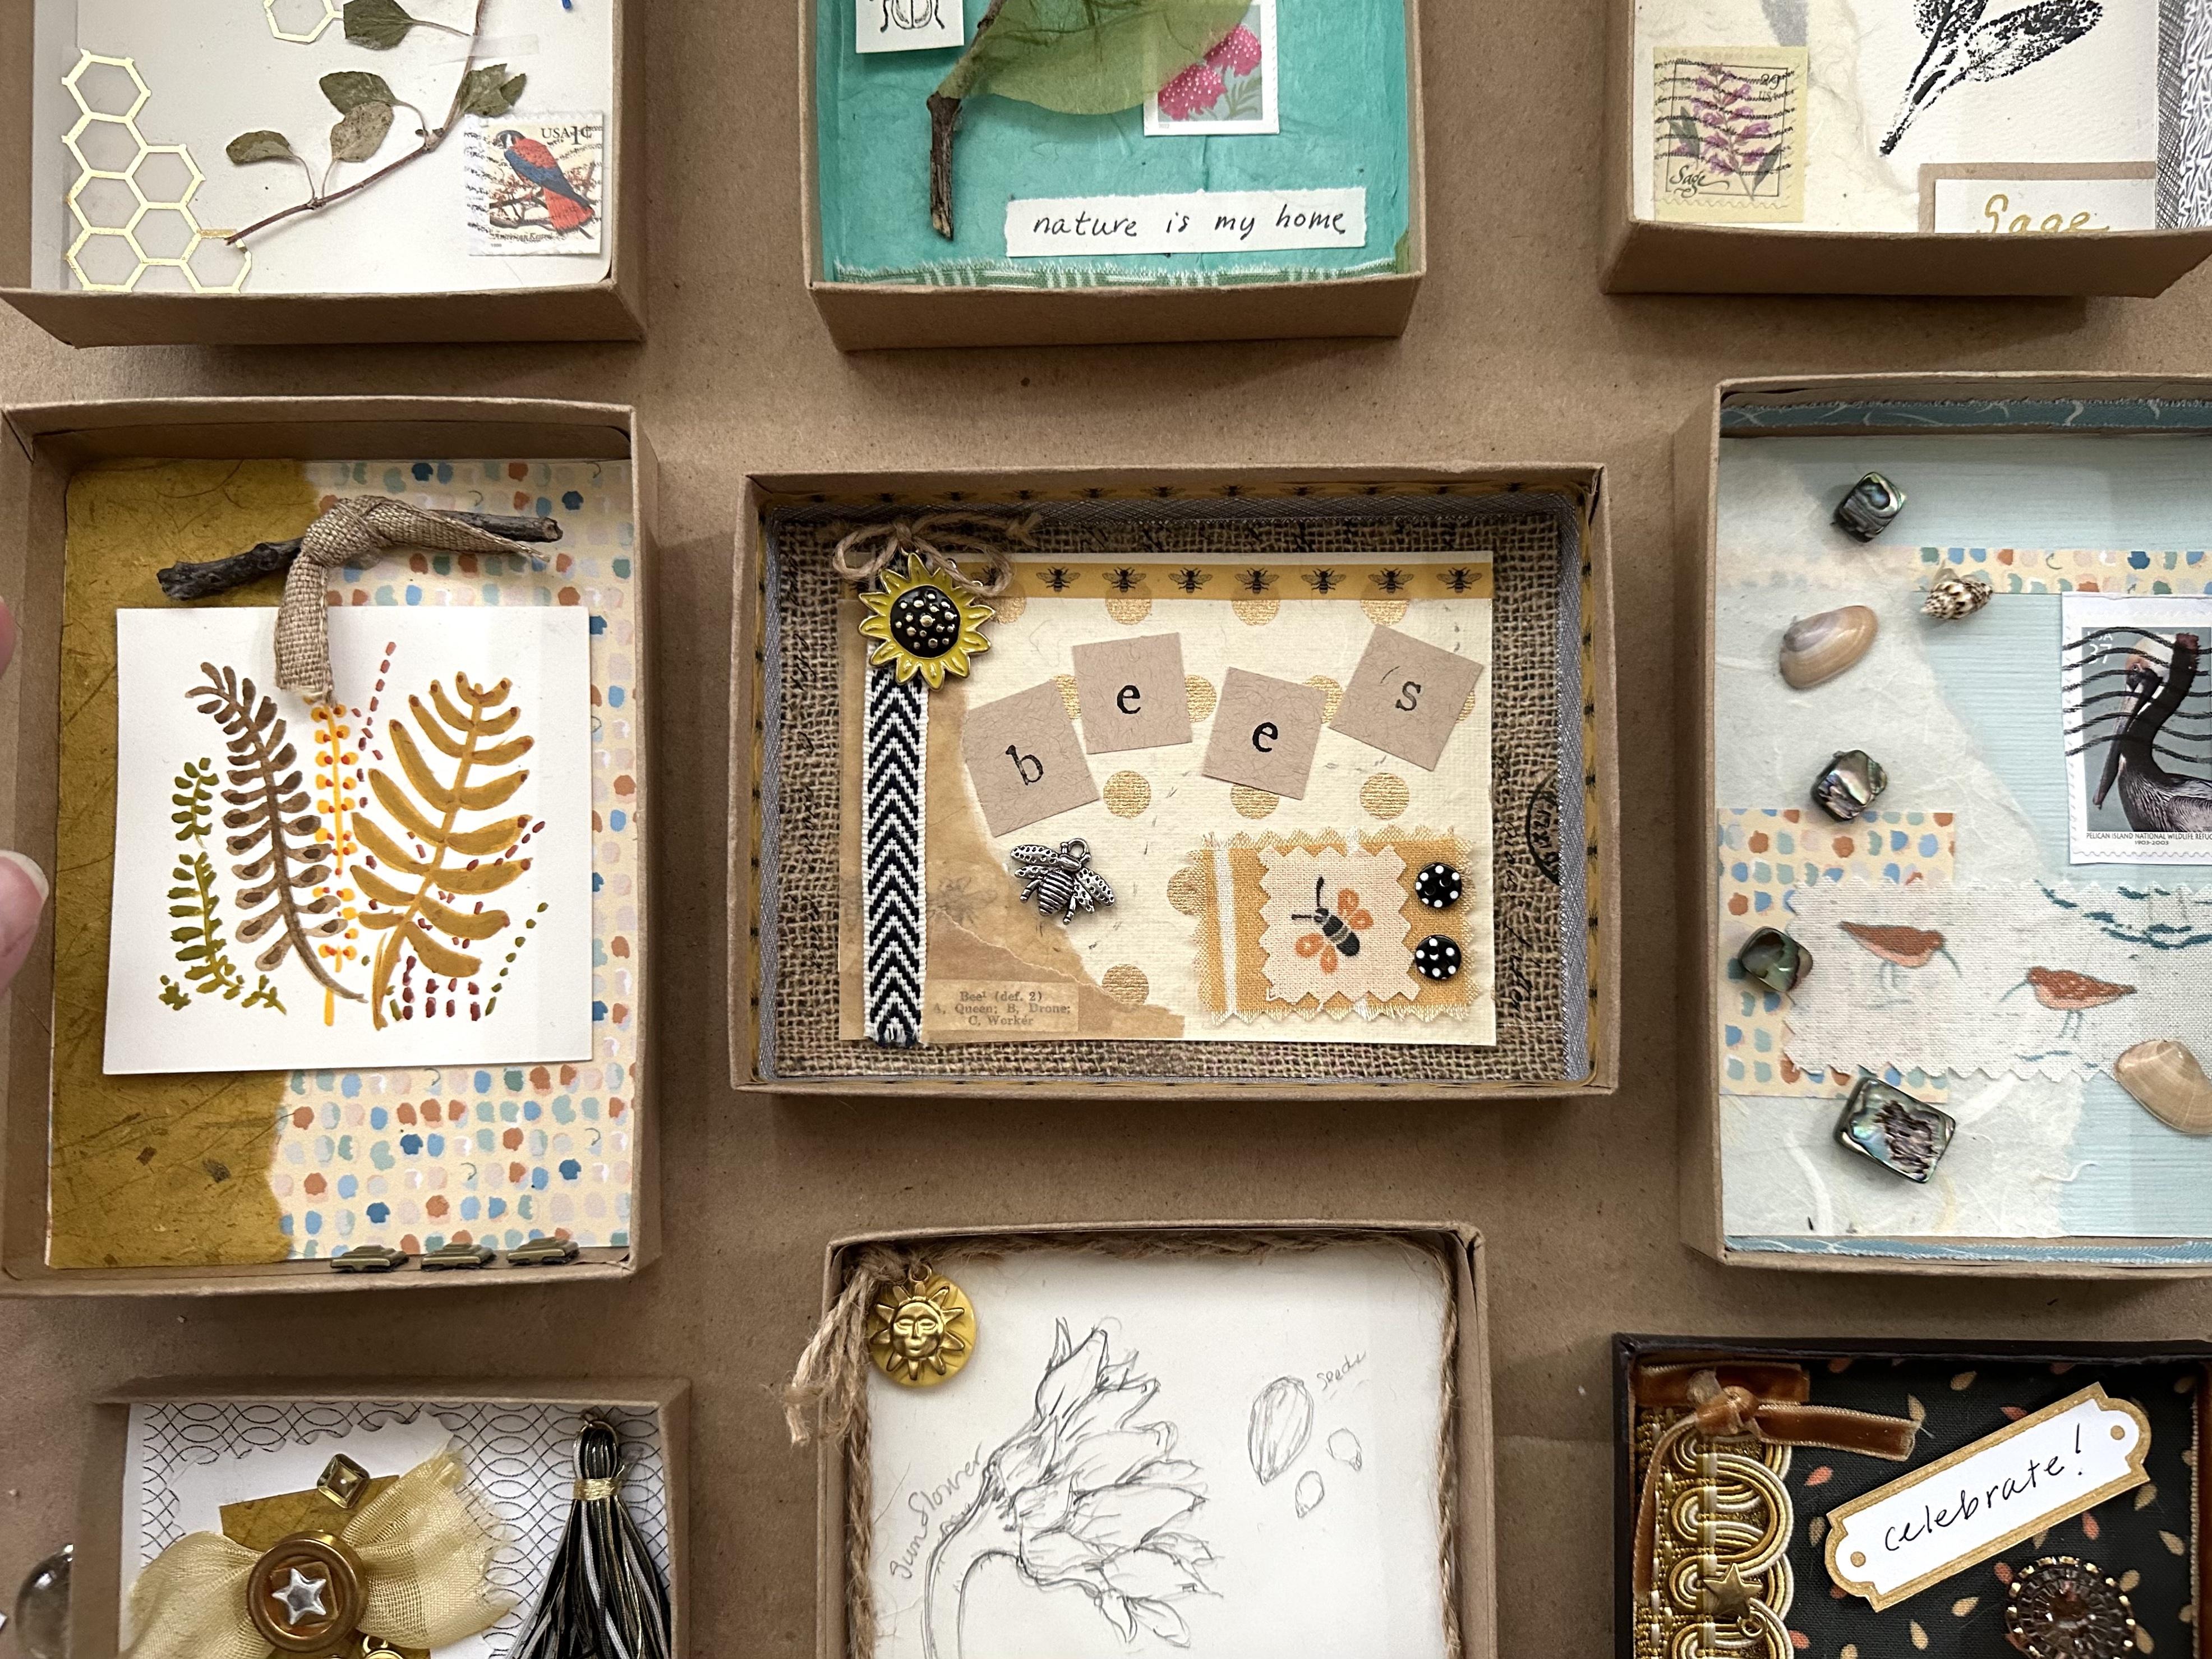
3. Picking a Theme: My first step in creating a
mini box collage is to choose a theme or idea for the box and think about what kind of story I wanted to tell. This step always gets
my creative juices flowing and helps with
gathering materials. A theme could be something
like butterflies, a favorite flower,
a trip to Paris, or collage for a friend. It's completely up to you. You might wonder how the theme
is connected to the story. This story helps you
decide what you want to highlight or emphasize
about your theme. It can be as simple as I loved the beach in ocean,
or it might be, I want to focus on a particular
beach we visit every summer and use a map and shells I've collected
on the beach walks. Maybe it's a birthday gift for a family member or
a special friend. And you want to reference meaningful moments your story as a way to hone in on what you might want to include
in your collage. You don't have to have this
nailed down at the beginning, but I do like to think about it. I've included a PDF
on themes with ideas and room for your notes and sketches that you can download. You can find it
under the resources. Any theme or idea for a collage, we'll work a favorite
vacation, a special memory, a trip and event, a person, hobby or interest,
holiday celebration, even a favorite food. These are just a few ideas and I know you'll come
up with even more. The theme and story can always change and evolve as you
create your collage. But this gives us
a starting point. In the next lesson, we'll look at options
for your collage box, including a fun scavenger
hunt around your house. Use whatever you have. I can't wait to share
these ideas with you.
4. Choosing a Box: In this lesson, we'll look at several ideas for
choosing a box. For your collage. I'm sharing places to
purchase a small box and ways to upcycled boxes
you already have. Choosing a box is another
area for fun and creativity. I'm going to show
you the two that I have used most often. But you can really use
anything that interests you. This box right here
is about four by 5 ". And here's what, here's
a little collage. You can kind of tell the size
by looking at the stamp. The box itself came with
the top and a base. And if we open the box, you have the dimension
of the bottom, which is four by five. And then you also
have the side edge. This is about
five-eighths of an inch. You can create a collage in
both the top and the bottom. Just remember the tops
is smudge bigger. So it will fit on
top of the bottom. And generally the edge
is not quite as tall. Now let's look at
this square box. This is always a fun shape to. This box, is about three-and-a-half
by three-and-a-half. But of course, any size that
you want to use is fine. The edge on this one's
a little bit deeper, It's about an inch. And again, you've got
the top and the bottom. Sometimes I reserve the top so I can give the collage
with a lid on it, but that's completely up to you. I bought these boxes from a
paper supply company online, but crafts stores
also carry them. Now let's look at some options you might
have around the house. I'm a big believer in
using what you have. So I went on a little
box scavenger hunt in my house and I'll just show you some of the things
I came up with. An Altoid Xbox could
be really fun. These are jewelry
boxes that I had. A matchbox could be super sweet. Sliding in and out. Band-aid box. Is there a good
size electronics? I re-did my
stationery drawer and this actually even has a plastic cover
that you could use. This is a corrugated
box that art came in. Tea boxes in the pantry or
kind of a hand you size. And here's one that I even cut down to show you
how it would work. And a scarf came in this box. This box that the stamps
came in could also use. I would encourage you to
take a little scavenger hunt around your house and see if you have anything
that would work. I can't wait to see which
box you choose to use. Meet me in the next
lesson and we'll look at the basic supplies
to get started. You probably have most of
them in your home already. See you there?
5. Basic Supplies: Welcome back. Let's look at these
basic supplies. I'm really excited
to show them to you. First, a box, whether
it's a box that you cut from one that you have
found in your pantry. A box you purchase
like these from a craft store or a supply place, or just a box you
may have had in one of your drawers or cabinets. Any of these will work. So you want to find some
kind of box than paper. And this is a place where
you can be super creative. And you know me, I'm always encouraging you to
use what you have. Right here. I had some
graph paper that would work in this paper is going to be the base of your collage, so it should have a
little bit of weight. But graph paper, this
is sketch paper. I just, and you can see
that I don't need it. I really don't even
need this much. So this is a great way to use up some of your scrap paper. Drawing paper. You could even use
watercolor paper. I love brown craft paper, so I actually have I
actually have pads of it. I just tore a page. But let's say you love
brown craft paper and you don't have that kind of pad. You can use a lunch
bag and cut it out of a lunch bag or even
a grocery store bag. Both of those work just great. Printer paper, this is computer
paper that would work, and this is newsprint. Okay, so what else do you need? Glue sticks are perfect for paper and very
light materials. And glue dots are a wonderful answer
for things like buttons are heavier
embellishments. You could also use craft glue if you have
time to let it dry, it just takes a
little bit longer. You'll need a pair of
scissors and a pencil. And of course you could use a bigger pair of
scissors if you wanted. If you have a paper
cutter that's handy to. And then I signed
a ruler helpful, especially if you are cutting
your paper with scissors. But I'm going to
show you a way that if you don't have a
ruler, you can do it. These are the basic
materials you need. A box, paper, glue, scissors, a pencil, and a ruler
can be handy for glue. I find glue dots
and a glue stick, very helpful to
have both of them. In the next lesson, I'm
going to be sharing my favorite free and
low-cost materials. See you there.
6. Free and Low-Cost Materials: Welcome back. In this lesson we're
going to look at my favorite free and
low-cost materials. I'd like to start with one of my absolute favorite and that
would be canceled stamps. Those are the stamps that
come on your letters and the time on what we
might consider junk mail. This was a solicitation
letter that I got. And it came with both this wonderful window
that I'm going to talk about. And with this gorgeous stand. Another thing that's great about male inside security envelopes, you'll see that there are
these beautiful patterns. These are just a few of the
ones that I've collected. You can also snag the gray translucent
little windows and we'll be talking about
how those can be used. One of my all-time favorite free or very low cost
things to use our maps, especially if I'm doing
a box about a place. This is a map that we
just had from a trip. I think it was actually free. Lots of times, rental car
places will give you free maps. You can also find them online. This is just a copy of a
map I have of Chicago. I live in the Chicago area. So I do a lot with that. And then this was part of a guide for chicago
botanic garden. And I just cut out the area
that I wanted to highlight. So old maps are a
wonderful way to add a little sense of place
to whatever you're doing. Speaking of old, I often will find out-of-print
are old books. And for example, this
was about flowers. So I copied a page. This definition and deal
came from an old dictionary. And if you want to
use old writing, you might have some letters are no cards that you've saved. Or sometimes my sister
loves to collect old postcards and often
sends them to me, especially if they
have something to do with a place that we love or some kind of
hobby that we have. Now let's take a look outside, depending on what
I'm doing my box about adding natural
elements can be really nice. These are stones and shells I collected on a beach
in California. These sticks came from my
backyard actually this morning. The thing to remember is the tiniest little element can make a big impact
in these boxes. You can always press. This is sort of a pressed or Revit piece that I think
is quite beautiful. And I'm going to press these little flowers that I pick this morning and include
them in one of my boxes. One of the things I want to mention about collecting though, is that there are
some rules about collecting and certain places
like nature preserves. Or for example, if
you're in a why it's against the law to
collect coral seaweed. Never wanna do that too. You always want to know
that you are following the rules of the rules of the road are the
rules of the land. I'm a surface pattern designer. In addition to being
an educator and I always have lots of paper. I've printed out samples of my fabric just to look at scale. And I actually have a lot
of fabric samples too. You can see this is
the same pattern, just a different scale
in a different color. And even a piece of fabric that small can
make a big impact. You might find that
you have a lot of chord or ribbon
around your house. So that's another kind
of free low-cost thing. Now the last thing I
wanted to talk about, I mentioned briefly
these wonderful windows that you can use in your boxes. There are other kind of translucent and
transparent papers. I happen to have just
from doing art projects, handmade paper you
might or might not, something else people
often have in their house. And it's quite an
expensive if you don't, is wax paper and that
makes it very cool. Sort of layering effect. Other things I love to
layer with our vellum. This came in a package
and I saved it. This is tracing paper. Tracing paper works great. And this is from a wax
paper see in which bag? And I just cut a
section out of it. We're going to be
talking more about layering in future lessons. But I wanted to point
out or encourage you to take another
tour around your house, checkout your cabinet,
and see what you have. You might be surprised at all of the materials you already have that are low cost and no
cost and that you can use. In the next lesson, we're going to look at all of the wonderful embellishments and things you can add to your box. See you there?
7. Small Supplies: Big Impact: Welcome back. In this lesson, we will look at
materials I often purchased when they'll have
a big impact on my collage. And I don't have them at home. Something like the super
cool flat glass beads. I'm going to show you
just the right charm. A rubber stamp that
matches my theme. Ribbon or decorative
papers are a few. Let's look at these options. My favorite is the
flattened glass bead. They're used for flower
arrangements and watch this, they work as magnifying glasses. You can purchase these
flattened glass beads at Floral shops or craft shops. They're really amazing. They come clear and in colors, handmade papers, even very small amounts
can make a real impact. Fabric scraps, small remnants. You can even make
ribbon from fabric. Here you can see how I did
that on the side here. I love buttons, beads, craft charms, fringe,
hoarding, ribbon, twine, even tassels were because the small size of the
mini box collage, even a very small
piece of material or embellishment can make
a really big impact while she is something
I love to use. Rebecca Jane Fulbright has a
washy class on Skillshare. This is actually
some of her washy. You can also find it at craft stores or
even office supply. But I really love using it, especially when I'm doing
the edges of the box. Rubber stamps are wonderful
to create images and layer. You can see how I printed on a little square of paper and then added it to the background. You could also stamp right onto the background
if you wanted. I use purchase
papers, as I said, handmade decorative
scrapbook papers, and also herbs and plants. I've purchased herbs and small
plants for an IRB collage. And this one right here, I use Sage and I use Kimberly cross birds
technique that she teaches in her Skillshare class with making images
from press plants. Now it's your turn with
your theme in mind, gather your materials
and let's get started. Meet me in the next
lesson when we talk about collage composition
and some easy steps to help you design
your mini collage
8. Design Tips: Welcome back. In this lesson, we'll look at easy design tips for
creating your collage. These include how your theme can influence your
design choices, sketching ideas and planning, simple steps to measure
and fit your base paper, composition tips for placement, varying materials
and layering plus how I keep it all
organized for glowing. Let's get started. Now you've got your
box in your theme. Of course, you can always modify your ideas as you
work in your collage. First, I consider my theme, my story, and the feeling I
want to convey is it calm, a celebratory,
encouraging gratitude, playfulness, you can decide. The next thing I do is I sketch out some ideas on a
piece of scrap paper, but you can just begin
designing right away. Now let's talk about
the base paper. You can either cut a
piece of paper to use as a base or you could work right
on the inside of your box. I tend to always want
to have a piece of base paper and it could even be a piece of decorative paper, doesn't have to be playing. It's really up to you. This is how I cut paper to size. If you have a paper cutter, you can measure the outside
of the box and then trim your paper about an eighth of an inch smaller in
height and width. There's a bit of trial and
error in the beginning, and that's perfectly normal. You can also use
the same process with a ruler and scissors. If you don't have a ruler, you can trace around the
outside of your box. You'll want to cut the
paper inside the lines. I usually move in at least an eighth of
an inch on each side. It's not unusual to have to trim the paper a few times
with this method. You want the paper
to fit in the box, but also to be able to
take it out easily. I use a toothpick just like
this to lift stuck paper. I like to build my
collage inside of my box and then glue last, but that's also a choice. I tried to use the
entire space so my viewers eyes move
around the buttocks. Here's an example. I avoid putting something
right in the middle. I vary colors, shapes, sizes, and the materials I choose, paper, fabric,
buttons, all of those. I try to leave some open space, but that's entirely up to you. Now you may wanna do something
with simply a drawing, or maybe you have a painting and a border and
that's fine too. You don't have to use lots
of different materials. The next tip is to add layers. Layering adds
interest, and here are my favorite ways to layer, and I'm sure you'll
think of even more. Let's look at the
translucent paper first. Velum, wax paper, tracing paper, those windows and invoices, they all work to add
another layer and it just, it adds some interests. You can also layer rubber
stamps by printing on another piece of paper
or by bordering images. There's some really fun choices you can make when you layer. And I just wanted
to point these out. When you layer
something you cut, you can vary the edges, the shapes, and the sizes. And this is true for
paper or fabric, whatever you're working with, Let's look at cut paper
versus torn paper. Then here with fabric, we have cut with
regular scissors. This I cut with pinky shares, and this piece I fringed
because these pieces are small, it really doesn't take a lot of time to add this extra detail. You can create
layers on top of one another or you can flip
things in so they peak out. I like to stay open to
surprises and changes. Now, I wait until the end to
glue everything together, but that's also a choice. If it's super involved, they take a photo or I
take it apart in layers, like I'm going to
show you right here. It's completely up to you. Now I'm happy with this design. In the next lesson, we'll talk glue and we'll
put it all together. See you there.
9. Putting It All Together: Welcome back. In this lesson, we're
going to glue our collage together and put on
some finishing touches. Before we get started, I wanted to point out the
different glues I use. And when I use them, we talked about glue sticks and glue dots and the
materials lesson. Craft glue or glue. Elmer's will also work
in place of glue dots. If you have time to
wait for it to dry. I don't use craft or Elmore's white glue on paper
because the paper wrinkles. My favorite glue stick
is the glue stick. It works best for me. But if you prefer something
else or have something else, use that glue sticks are
great for any kind of paper. And once in a while, a small fabric scraps. I can also show you how I've
used them for small herbs by putting the glue on the paper rather than
on the fragile herbs. Sometimes I find that a
little bit of craft glue actually does work better for some of the most fragile herbs. I use glue dots for
everything else. Buttons, charms,
ribbon, courting, glass beads, definitely
anything three-dimensional. They can be a little fuzzy for some things like a
shell and some buttons, if you find it,
the glue dot isn't sticking to the back of whatever you're trying
to adhere it to. You can actually peel
the glue dot off the clear backing of
the packaging and just put it onto whatever
you want to use. That happens quite often for
me if I'm using something, I don't know, that's
a little slippery or a little uneven. It's just a workaround. Sometimes I actually roll up the glue dot and push
it into the shell. You may have to fiddle with
them on some materials. And that's just the
nature of the glute up. I also wanted to show you
these adhesive squares. If you have something you want
to raise, these are cool. You can also get the
same effect with a small piece of cardboard
and the glue stick. We've talked about glues and I have my
collage right here. My biggest tip is to
take a quick photo on your phone so you can
reference it if you want to. So we built it from the
base up and we're going to take it apart from the
top down to the base layer. As I've mentioned, you do
not have to do it this way. And always, you can change
things around as you work. You can always glue as you go. But I liked the flexibility
of moving things around and trying
different arrangements right up to the end. So I wait to glue. You can glue layer by
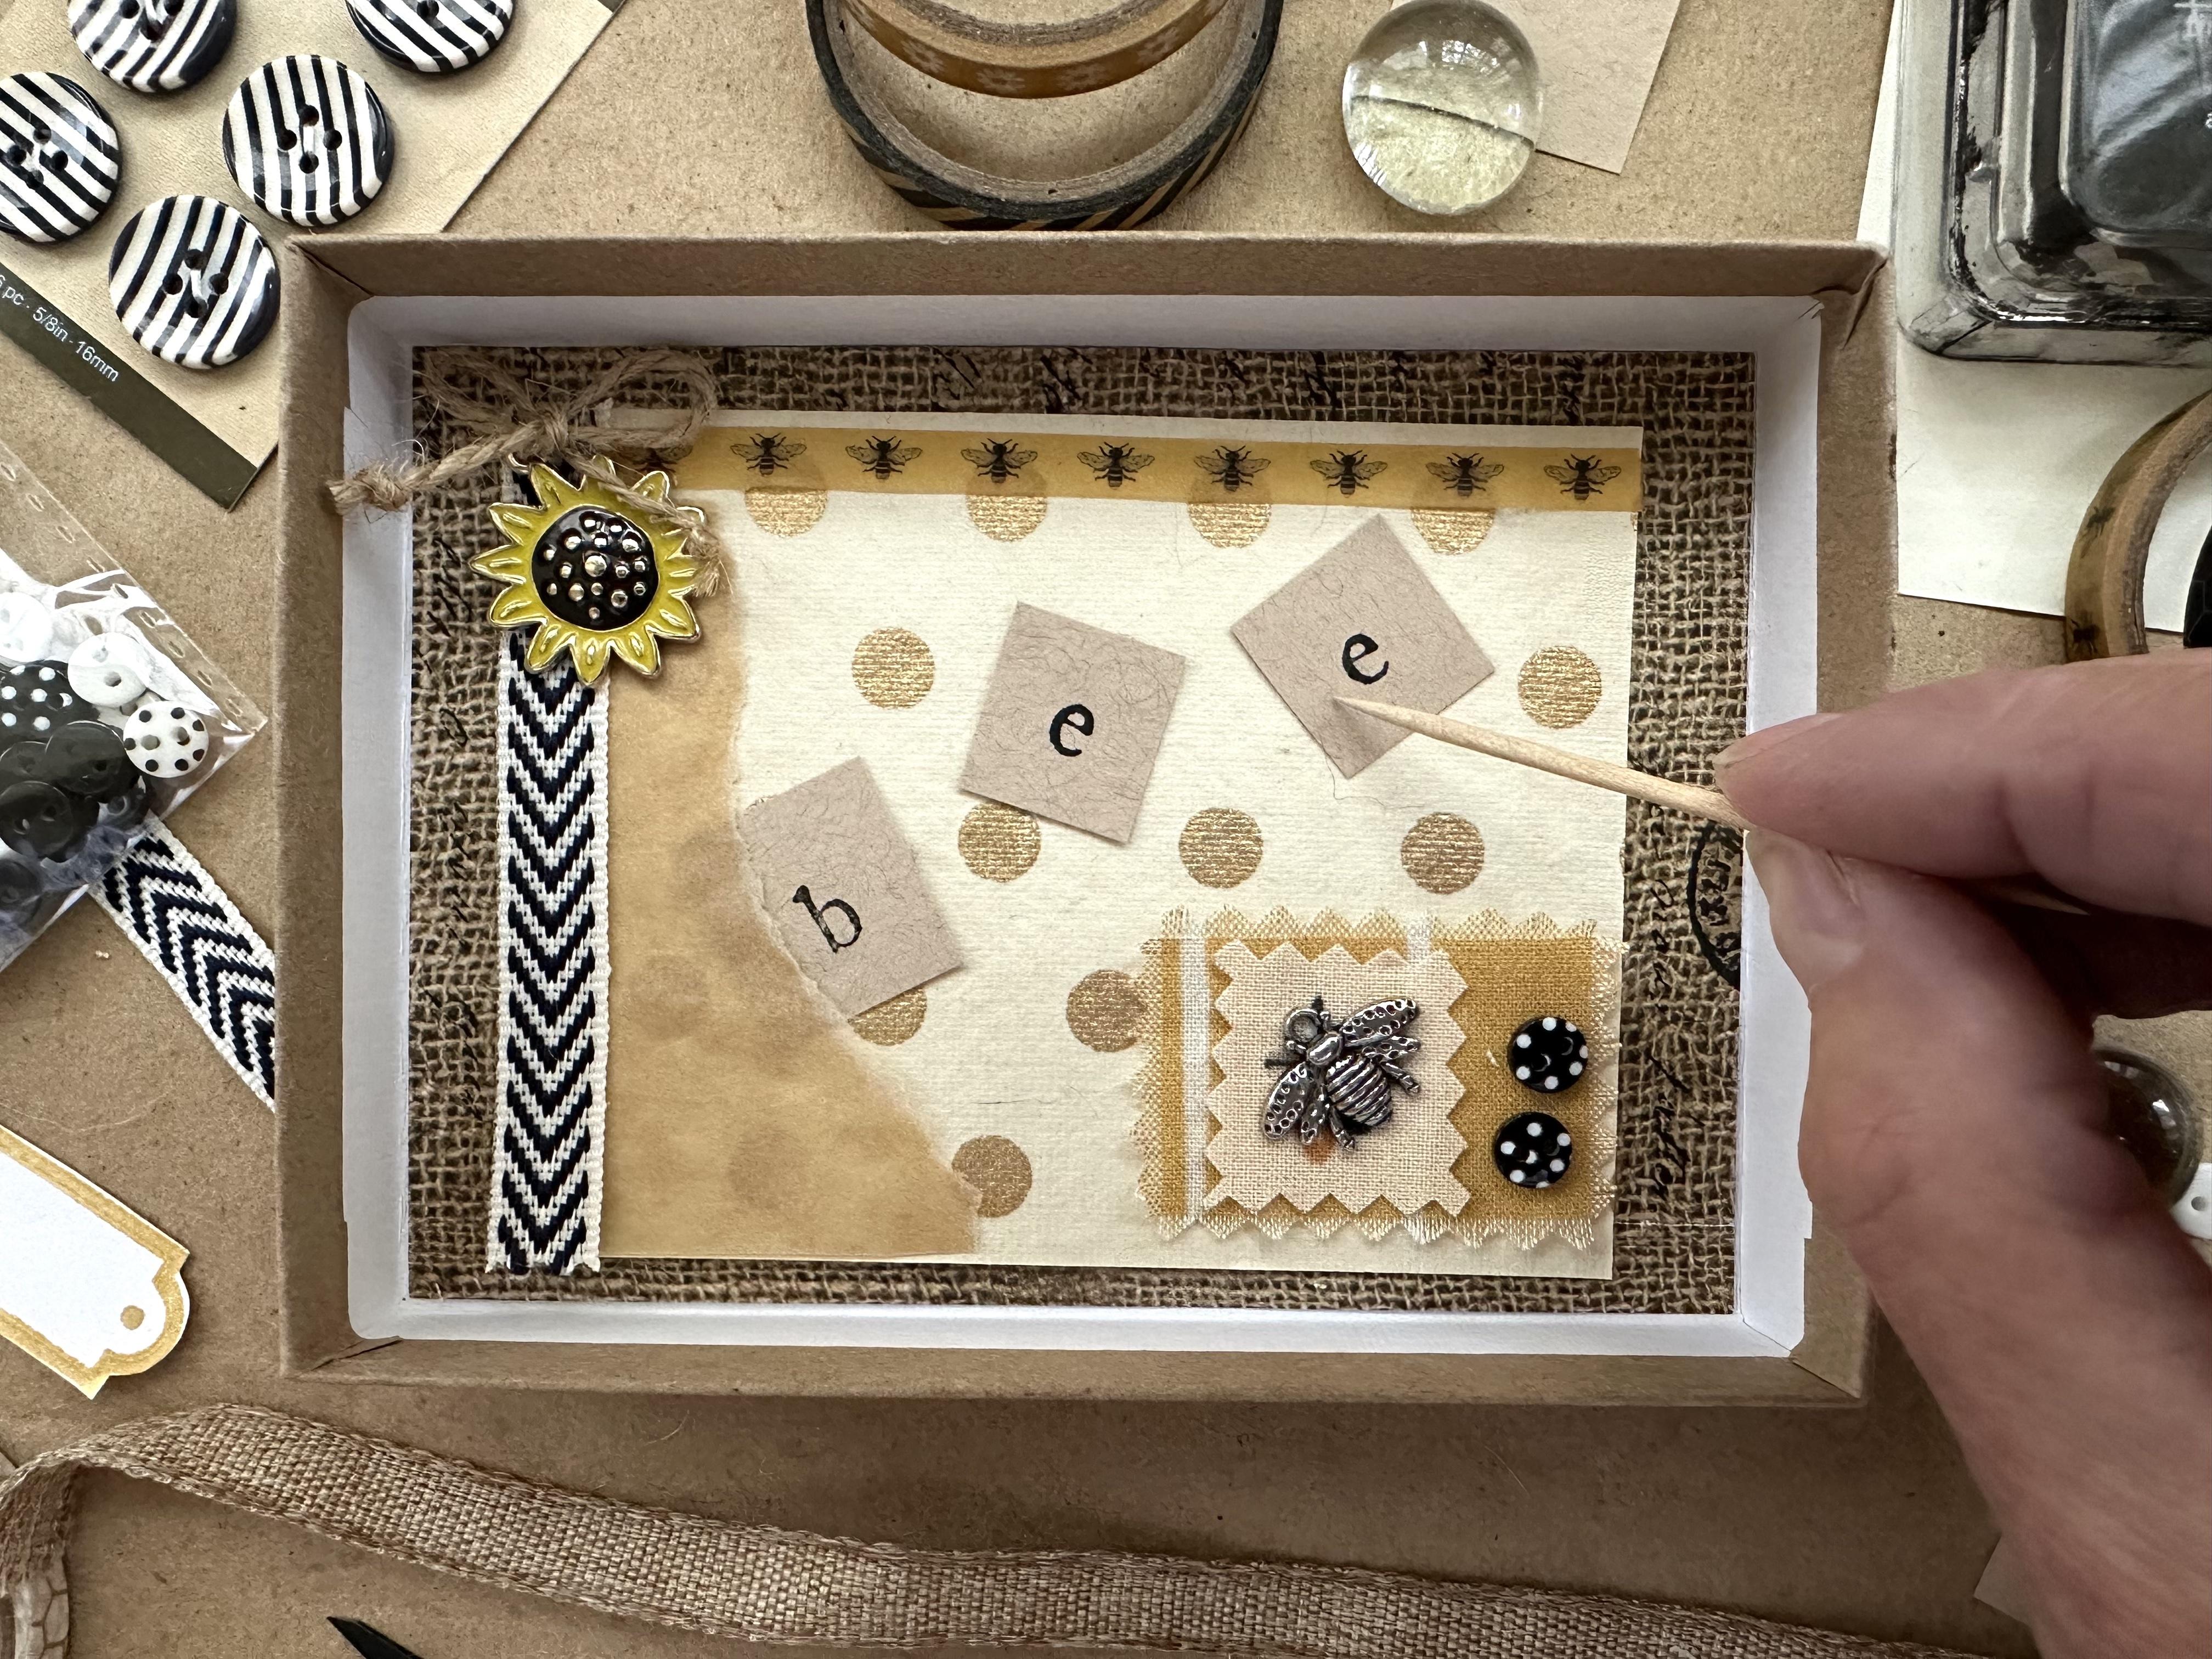
layer and, or by grouping. My theme is b's, we plant our garden
to attract bees. My daughter's junior
high class had beehives, and we have beehives
at the family farm. I love learning about
and observing bees. So I'm excited to
create this box. I've taken the collage apart in a combination of
layers and groups. I'm building it outside of the box so it's easier to film. And then I'll put
everything inside. I've got a bass paper, a layer of handmade paper with gold dots than a
strip of B washi. The torn brown wax paper was
glued in an earlier lesson, I'll add the stamped be letters, ribbon, the sweet charm. It seemed a little plane, so I added a Twine bot. Then we'll also have this
little arrangement of fabric from one of
my collections. The striped fabric is cut with pink and shares and fringed. And the b is also cut
with pink and chairs. Plus I have this
little beach charm. You can follow along while I
glue these pieces together, you may notice that I've
added an extra Stamp s. So it now says bees. I'm gluing layer by layer and using glue
dots on the ribbon. But a strong craft
glue would work. There's always a bit of
adjusting and fiddling. I like to use this
gluing time to check my design choices and
make any changes. I've added an extra glued on
to keep the ribbon secure. There are different brands
of adhesive or glue dots. They come in roll sheets and dispensers in different sizes. This charm is heavy, so I want to make
sure it's secure. I'm using my
strongest glue dodge. I'll adjust the bot
after it's glued down. This is a small piece of fabric. So the glue stick will work. I'm making sure I get glue right to the
edges of the fabric. You'll notice I've moved the B fabric around a bit
from the original design. I make a lot of tweaks and adjustments as I put
the materials together. These may include moving things, adding or eliminating
an element. While I used an adhesive
dot for the buttons, a bit of tacky
aircraft glue would do the job and might have
actually been easier. Now I'll glue this onto the
paper with a glue stick. Next, I'll glue the letters. I'll speed this up. My tip. I almost always use a piece of scrap paper under
whatever I'm gluing. It just makes it so much easier. I love how printing
the letters on squares of brown paper creates
a subtle layering effect. You can also print or write
your own letters and words. A toothpick makes a handy
tool to add a bit of glue from a glue stick or craft
glue in tight spots. I thought the lower left-hand
corner needed something. I slipped a photocopy
of some bees under the brown wax
paper sandwich bag, and I'm trimming off the excess. The corner still
seems plain to me. So I'm going to try
this definition. The contrast with the white
paper feels a bit bright. So I'm testing another piece of torn brown wax paper over it. I liked the way that looks. I've moved the beach arm
to under the letter B. And I'm testing
out a b dance idea with these dotted pencil lines. Before I commit to ink, I've always loved bee dances, so I'm leaning in
that direction. Let's talk about
the inside edges. You don't have to, but it's another
opportunity to decorate. You can decorate
the edges before, after you do the main collage, I've done it both ways. The paper might take
up a bit of space, so it's a consideration. The easiest way I
found to decorate these inside edges is to
measure the height of the edge. And then I cut the paper
the desired width. If you don't want
to use a ruler, you can do this by
tracing the edge, folding the paper to this line, and then cutting the
paper a bit thinner. Or you can do it by estimating. I use the inside of an
envelope and a lunch bag. So I had to cut several pieces. I spread the glue on the
back of the paper and then started at one and worked it around the
inside of the box. I spliced it on
the bottom where I didn't think it
would show as much. There is a bit of
fussing and fiddling, but we're all good at that. You can do the same thing
using washy either all by itself or as an additional layer while she has an adhesive back, but it's not as sticky
as regular tape. I apply the washy carefully and once it's
where I want it to be, I go back and apply pressure
to make sure it sticks. Now that we've put this
mini box collage together, Let's look at ways for
display and gifting. A minimax collage makes
a unique piece here, your home, and a fantastic
and heartfelt gifts. See you in the next lesson.
10. Display and Gifting Ideas: Congratulations. Now you've finished your
box and it's time to share. Display your box flat on a
mini ESA or in a grouping. Many boxes make great gifts
or super fancy cards. You can use the top of the box and extend your
theme to the ribbon. Outside decor and other
elements you tie onto the top. A mini ESOL is a super fun
way to display your box. I ordered mine useful online, but you can find them
at craft stores. You don't have to, but I decided to paint
the easels to match the decor or theme of my boxes. I used an inexpensive
Kraft acrylic paint. You could also get super
fancy and add embellishments. No box top, No problem. I slipped this mini
box collage into a wax paper sandwich bag and
added decor on the outside. And this is a recycled
cellophane slave from a fancy card. If you are shipping your
mini box path for safety. Just a few of the
ways you can display or gift your mini box collage. I'd love to know your ideas. Meet me in the next lesson
for some final thoughts, how to upload your project. An extra fun surprise, I added to the VBox. I can't wait to share
that with you and how to reach out to me if you
have any questions. See you there.
11. Final Thoughts: Congratulations on
completing the mini box Collage class to review, we've talked about picking a theme and the
story wants to tell, selecting a box,
gathering materials, designing your
collage composition, and the best glues and process for putting
it all together. Adding finishing touches plus ideas for displaying
and gifting. One thing I hope
you take away is how easy and creative
mini box collages are there great to
showcase themes you love and fun to make on
your own or in a group. Now I promised you one
more surprise if you are feeling like adding
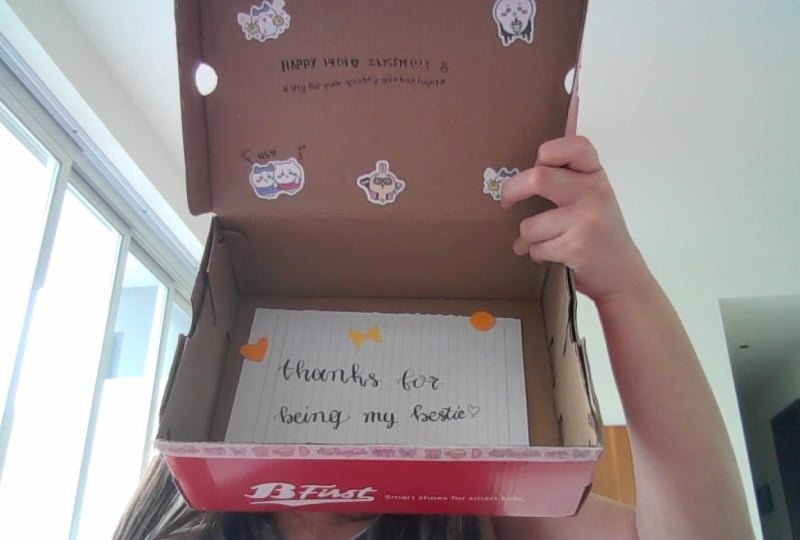
something extra special. Here's one more idea. You can see that I added washi
to the outside of the top, but the real surprise
is on the inside. Let's open up the box. Wait for it. That's right. You can decorate
the inside of the top two. How fun that, please share
your mini box collaged by uploading a photo to the
student project section, you'll find the green
Create Project button right under the class video. You can follow me on Skillshare and reach out
to me with questions. I've included my contact
information and where you can find me on social media
on a slide at the end, please feel free to
reach out if you have any questions about the
class or anything else. Thank you so much for joining
me in mini box collages. I can't wait to see
what you create.
 Betsy Mitten, Surface Pattern Designer, Artist