Transcripts
1. Introduction: Hello, creating and
experimenting and my art. And today I've got something
really fun to bring to you. It's not a new technique. It's been around
for a long time. It's not Vanessi
people use very often. I really like to see
him use a lot more. I'm Denise love and
I'm an artist and photographer out of
Atlanta, Georgia. And today we're gonna
talk about pinprick art. And this is basically
what it sounds like. We're going to take a pin sharp object and we're
going to ***** that through our paper and make holes
in our paper to create interesting and unique marks that maybe we've
never tried before. And we're gonna do that in some abstract atmospheric
landscape paintings just to kinda get our bearings and to create
something really cool. And I'll show you a
different pinprick patterns are things that you might
look at and consider. And then I'll show you a few other elements like
pinprick in your own art, or maybe taking old photos
or new photos that you've created and adding pin ****** into that for some interests. And what I really
like about doing that in photos is it turns it into a one-of-a-kind
piece that is less able to be replicated
over and over. It's not like a print. You can make 12 thousand times. It is a unique piece of art. At the point that you put
yummy pin ****** in and perhaps shine light behind it and look at the
light come through. So I'm pretty excited
about this technique. It's super easy. You don't need a
lot of supplies. The landscapes that we're
creating, our super cool. So if you like those, I can't wait to see
what you're creating. So definitely come
back and share those with me and I'll
see you in class.
2. Class Project: Your class project today
is to come back and show me some of your own very
pinprick landscapes. I'd really love to see those. And if you are adventurous
and you did pinprick going on any of your art or
some of your photography, which we kind of touch on in class is further inspiration. I would love to see any
of those that you did. I want you to take this
idea of pin pricking and use it as an extra extension
of your mark-making. It's a way to add a three-dimensional
element into your art. More so than just
layering on paints and pencils and crayons
and seeing what you get. So I hope you enjoy this class. I can't wait to see
what you're creating. So come back and share some of those with me and
I'll see you in class.
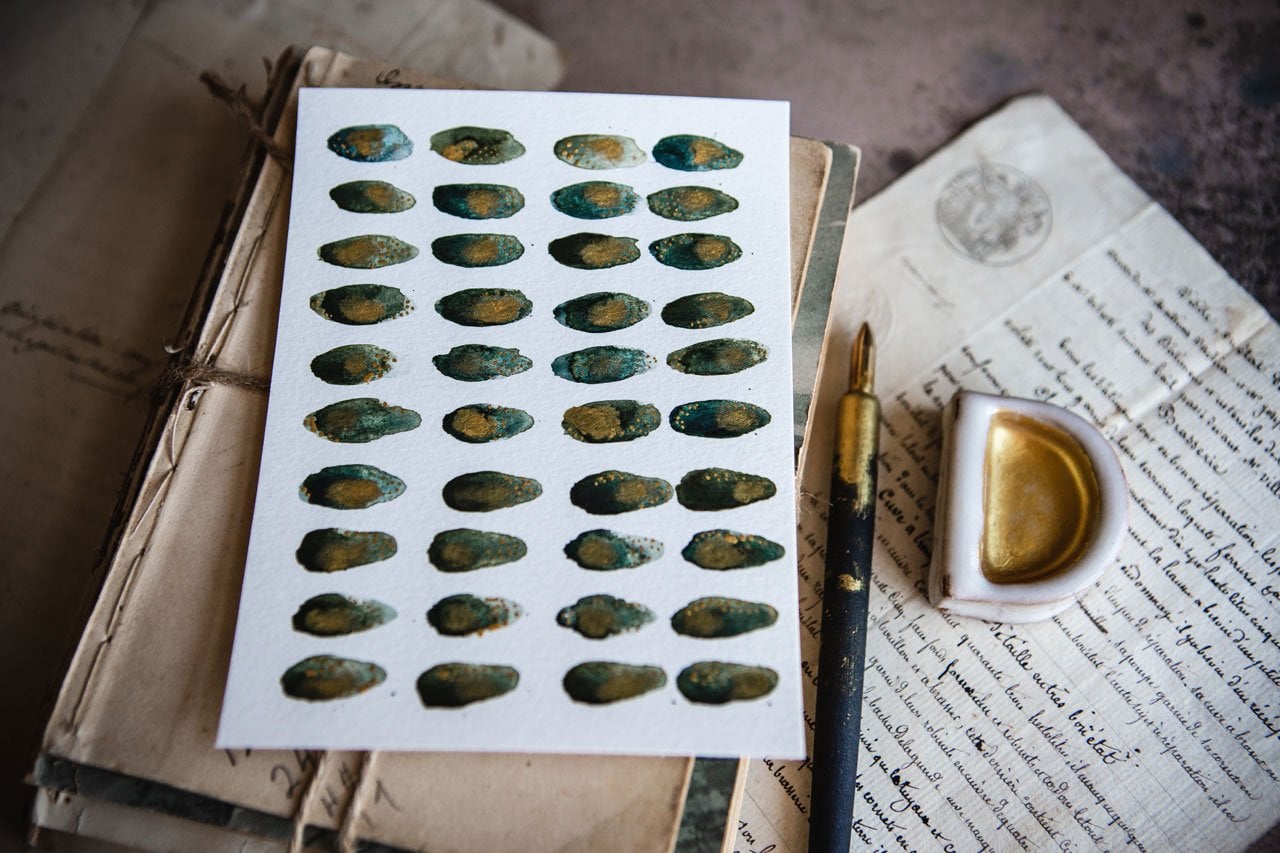
3. Supplies: Let's take a look
at the supplies that I'll be using in class. So I'm going to play
in watercolors. You could try doing this in some different
paints if you want. But the watercolors
turned out super fun. And I want to experiment
personally with some of these shrink, super
granulation watercolors. So I have a couple of
collections that I've collected and I'll be playing in
possibly the haze collection, the forest collection and
the tundra collection. And I really liked the way that these self granulate
and give you a little more texture in the
piece that you're doing. I particularly love them. So I want to play in
those personally. And they're just beautiful. So I liked the extra
little texture that we get going in there. In addition to the texture we're going to add
with our pin pricking. So I've got those also
possibly want to use a regular watercolor
because I have indigo here and I'm kind
of obsessed with indigo. It's so beautiful. So
I might play in that. I've got some other
just random watercolors here that I might
pull out and play in. So just leave yourself
some room to experiment. Because there's no one way, exact way to do this. You've got some options. Also have some painters tape, I want to tape these down so that I get a fun piece right
in the middle of my paper. I think it makes even
a bigger statement for a finished piece of art. One that has a fun
edge like that, but you certainly
don't have to do that. I played and experimented
plenty and did several without edges on it and just kinda gets
down to preference, but I want the taped edges. So I've got some
artist's tape here. And in playing in the tapes, what I discovered is
the artist's tape. I'm sticks really
nicely to the paper, but it also releases really nicely compared to
painter's tape, which sometimes grabs
your paper and tears it. And I didn't really realize
that artist's tape did that until I picked up this
role at the **** Blick. And then I've got some
other artist's tape that I've gotten off of Amazon. Then I'm hoping works the same, but we'll just have to see. But the artist's tape that the **** Blick caries
really releases the paper. It's really nicely,
It's not super sticky. So sometimes I don't
get it to stick down as easily as the painter's tape, but it does release
much nicer for this technique I'm going to
be using in all cotton paper. So I have some Canson
heritage or some of this ocher real
watercolor by Fabriano, that's a 100% cotton. You can certainly
experiment with the Canson cold press,
extra large watercolors. Those are, that's my favorite
watercolor paper to play. And when I'm just
looking for something economical and I'm practicing, that would be fine. You could also work
in a sketchbook. I've got sketch books
that I've done. Some of these
might've just got it. Here we go. That I got started when I was playing and just experimenting. So you can play in a
sketch book if you want. This is the mole skin sketchbook that I was playing
it and that paper is really nice and takes the watercolor beautifully
for this kind of technique. So grab whatever paper you feel comfortable
with to play in. It's not a big deal. I just like the way the
cotton paper reacts and it's such a nice vanished
paper any way to frame or give away or take to the gallery
for small pieces. This is fantastic. So I've got Canson Heritage. You could also use the Fabriano. I want the cotton paper. I've also got a couple of various watercolor
paint brushes. Because as you're painting, you might discover, oh, you like one versus the other. I'm going to be
painting these in a way that I want them to be an ombre finish when
they're, when they're done. I want it to look like a landscape going
off in the distance. And so as I'm painting, I might decide one of my paint brushes is given me a better
result than another. So I have a couple
of options here. This one is the Princeton
Neptune number ten, I'm kinda feeling like
that's probably gonna be the one that I like for this. This is my Raphael soft Aqua 0. And then this one is a half-inch Ruby
satin dagger striper. But it may it may give
me a look. I don't know. I may put this one back, but I just pulled out a few
brushes that I thought, hey, let's experiment
with these. And then I've also got
for our pin, making, our pin ***** part
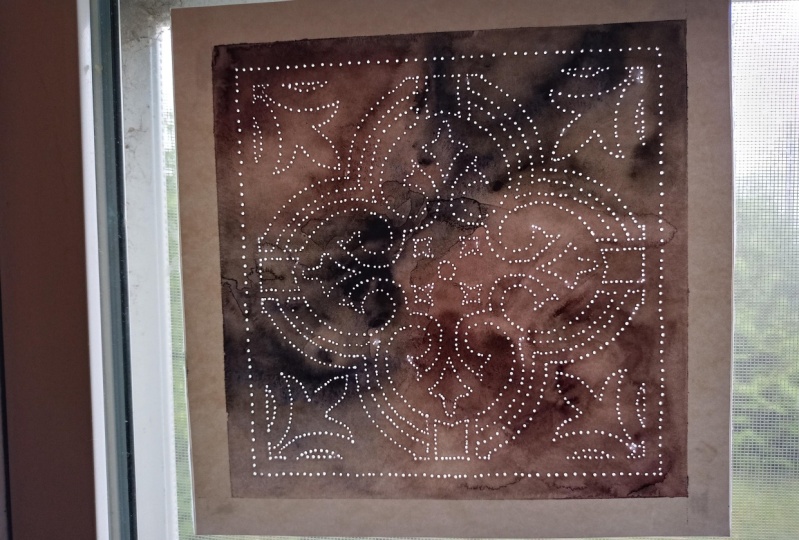
of this, I have. Architecture or stencil. And you gotta be
careful doing stencils with the pinprick techniques. Because what happens if it's, if it's a really
intricate stencil, like say you have a Mandela
or something with lots of swirls as your pin breaking, all those pinprick kinda
run together and you may not see that there is an
intricate design there. Whereas if you keep
your pinprick fairly simple and strategic and
maybe a very simple shape, it becomes really impactful then I want to
keep that in mind. And on some of these landscapes, I want there to be the
implication that there's a son or a moon or something in the sky that is perhaps
the light source. And so something round
is what came to mind. And then I was using the stencil for the roundness
because I'm not real good about making something perfectly round and
this was perfect. And then free handing the other shapes and lines and things that
I might have wanted. And it was also kind of
using my the edge of my stencil as a straight edge because I'm kinda see
through the stencil. And this is a
stencil that I have had for more than 20 years. We'll just say that.
So you may not be able to find this
particular circle pencil, but it's just an
architectural pencil that you'll find over there with
the drafting supplies if you decide that you want something
like that and there's plenty of stencils out there that you can
also experiment with. Just keep in mind
whatever stencil you pick you'll need to
be doing the edges. And if it's got
too much going on, you might not see that
there's a pattern there, but how are you going
to know unless you try? So try things and see what
works and what doesn't work. I also have some pushpins. That's what I'm gonna be
using as my pinprick or I like it because it's
got something for me to hold on and push with. You could also use
any kind of needle. Paperclip. Paperclip didn't
really have a strong enough like edge for me. So I almost feel like
a pin is better, a push pin or attack
or sewing needle. Or the pins that you use to pin Fabric azure sewing
any type of nice pen, would we be just fine? So I'm just using some
cheap offish push pins. And I've got a piece of foam and you can
use crackers foam, that would be perfect. But this foam is
packing material. My hand and it has
been fantastic. It's been the most
fabulous surface to put your paper on and
do your pin pushing in. You could also just
have some type of a rag or dish rag
that you smooth out. That could be your
surface to push on, so don't feel like you
need anything special. You could also use
a cardboard box. I've got some cardboard here
in my office that I could pull over if I've got a big piece of cardboard
is really nice. You just want some type of
surface that's going to allow you to push a
pin through the paper. And that's going to
have a soft surface to kinda stopped down into because if it goes
into the table, you may not get a good pin push. You're not allowing
the paper anywhere to go because the
surface is too hard. So this will allow
the paper to push through something like this. And this was just
some packing supplies in a box that I got. Then I have some
water, of course. And then we will be making some yummy watercolor
landscapes. And then we're going to be
doing some fun pin bricking as our mark-making to
add some extra yummy, fine, just amazing kind of
looking marks on our pieces. So I'm really excited
to get started. So I'll see you back in class.
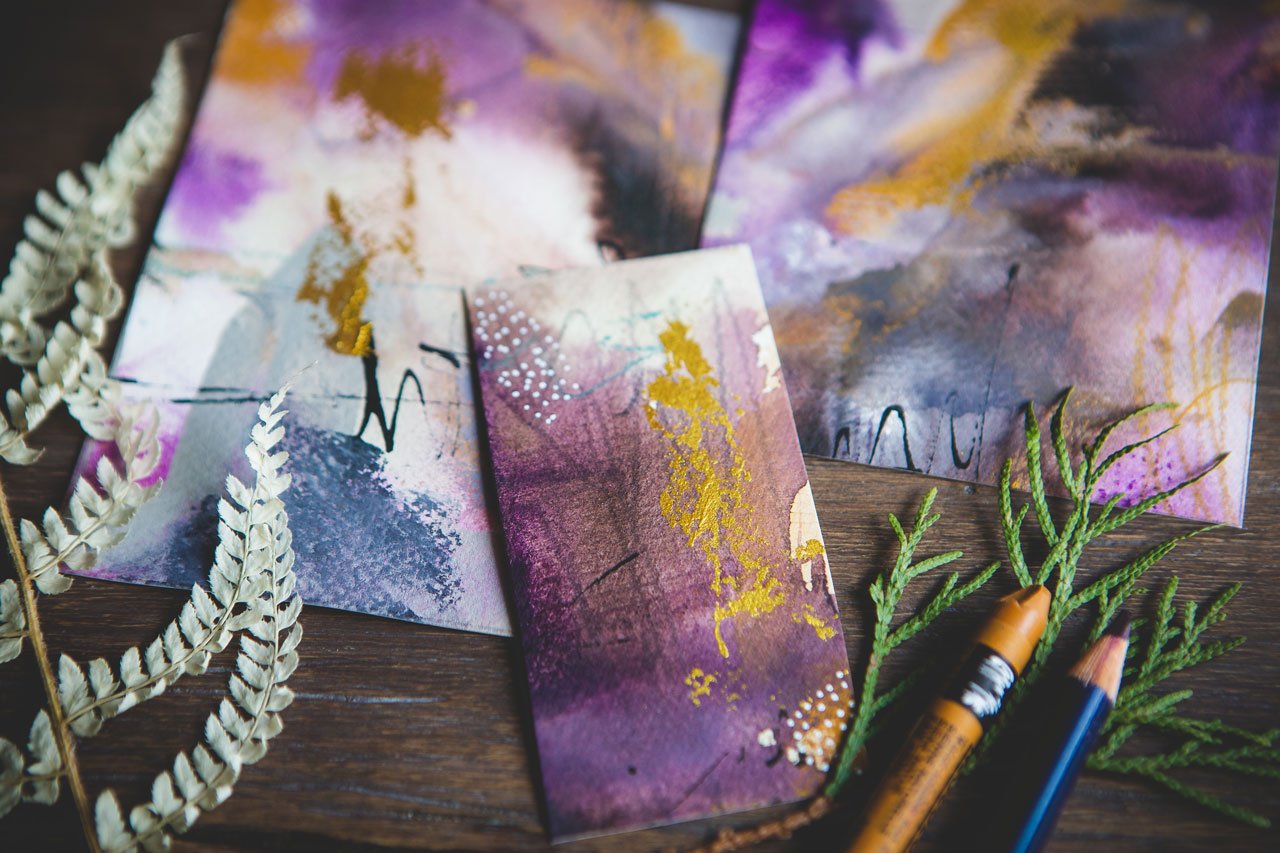
4. Painting Ombre Landscapes: All right, Here we go. So to get started, I've already taped
off a bunch of little pieces of paper
because I want to paint them. I want to put them on
the side and let them dry before we move on
to any other part. So I'm going to paint several. So I've just got a whole
bunch of paper prepped, taped it off so that I
have a nice center area. And I'm going to
have white edges. And then I've already got a paint palette with the
pinky colors already on it. So these four, sorry, these five colors right
here or the tundra color. And we've got tundra
orange under Rosa, tundra violet, tundra
blue, and tender green. These colors over here, or the forest colors. So I've got forced
olive, forest green, forest blue, florist, forest
brown, and forest gray. And then the colors at the
end here are the four, the super granulation
Hayes collection. So I've got the haze, pink haze, blue haze indigo, Hayes
brown and Hayes black. So those are the colors on my palette that I'll be using
or have some indigo here. And I might get my
experiment with the indigo almost want to get a different
paint palette to put the indigo on
because I like that this is my tundra palette. So I might pull another one over here with lots of
random colors on it. And if I get to the Indigo, I'll put the indigo on that one. For watercolors. I really love using
ceramic palettes because you can watch these. And so they're always going to be really good for
the environment. You're not putting it on
a disposable palette. And I'm not wasting watercolor
because once it dries, I come back and just wet it
and it's ready to go again. So I like using the
ceramic palettes. These are ceramic or
d'oeuvre plates that I got at TJ Maxx and it
was like six or $7. This is an order of plague
that I got at the cost plus World Market Store and
it was like four or $5, not very expensive at all. You can use any kind of
plate as a paint palette. I just liked that they're white. So if you want to go and get
plate out of your kitchen, you could just works best if the plates are white because then you can see
what the colors are. I don't want there to
be decoration on it. And then also have some yummy
or artisan paint pallets, which I don't use as much because the simple ones
are just easier to grab of hung some of the
artists in one's up on my walls so that they're just, they're pretty to look at. But I do like ceramic palettes. So basically what I'm gonna do is I'm going to wet my
brush and I'm going to activate my color and get
a lot of color in my brush. And I'm going to start
laying color down. In layers. I want a dark layer, maybe a medium layer, maybe the sky, a little lighter. And then I might come back with a clean brush
after I dipped it in water and pull some
watercolor back off just to create some
pattern or texture. And then we'll throw that
to the side and let it dry. Almost want this to look
like maybe the bottom, there's mountains and
it fades off into the background kind of look. So let's come over
here into this one. This is that forest blue and
I'm just gonna go for it. You can do one color
all the way up. You could do two or three
colors all the way up. You can take your
inspiration from something in nature or
photograph that you took. I'm making this up on
my mind on the fly. So there's not something
specific here. But I might just kinda come
in like it's a mountain and just get this started
and I want to work while all the
edges are wet. So I'm not I'm not wanting
to let anything dry. I'm going to mix colors here. So maybe I want to go
over here to this green. Again, keep the edges wet. I don't want any of it to dry. I wanna go ahead and just
see what I can get going up. So this is the forest says this, I think that's brown there. And then as I get further up, I really just want to
pull the color up. And then I might
take a clean brush, dab it off a little here on
my random rag or paper towel. And pull some of this back out. Kinda making texture
roadways, just some extra. Interests. And then while it's still wet, I could come back at the bottom before
it's completely dry, throw some extra
dark at the bottom. Look how pretty that is. And then before you're
tempted to mess it up, because you kept going too much. Throw this down behind you on the floor and paint another one. So that's what we're gonna do. That's what I'm gonna do,
is throw this one down. There we go. And let's just
paint another one. Let's see what we can get. Let's just go for it. So this one over here. These are my tundra colors. This is that bile it I believe. Maybe let's throw
a little bit of this blue and maybe a
tiny bit of this green. Let's just layer some
of these colors. Maybe the sky is
this yummy orange, and then I'm just going to wet that and run that color up. Yeah, look at that.
Whoa, look at this. Maybe come back in
with a clean brush and wipe some in our watercolor
wipe some little pathway, some extra kinda pulling
that back off and then might go back in at the very bottom with
some extra dark. Make us a mountain or two here. And then Dolby to
tempted to overwork it. I love that. Let's let that dry. Alright, throw it down. Okay, see how easy
these are to make. The very first one is come
over here and this third set, what was this third set? This might be the haze set, so we've got some blue. These are super fun and you
can see as we're using them, I think this might
be the indigo. How amazing these look. In this kind of lets do
this kinda that the blue, this might be the rose color. Anyway. You can kinda see
how amazing these are. Let's just run that up. Too easy technique. Do a couple, really
kinda get your flow. First few you do, you might think, oh, I
don't know about this. But after that, Let's
run this in like we've got a after that, after you get a few going, if you don't like
them the first day, wait and come back and
look at them tomorrow because some of the ones
that I did originally, I thought Do I like those? I don't know. Let's let's
run a little bit up here. And I don't want to overwork it, so I'm gonna go ahead
and let that be good. Anyway, some of the early
ones I did, I thought too, I love that and I was like, I don't know if I
love that or not. And I've looked at
them lightly and I thought, Man,
these are amazing. What was I thinking? I always sometimes got to
take a little break. Let's do one of these
and that indigo, I'm going to pull my
other paint palette down. I'm sure I've got
indigo on here, but I don't remember what it is. Might be that one
right over there. Let's just put a little
indigo on the paint thing. And I'm doing the same. I'm going to run this up. Maybe is all indigo. So I'm just loading my brush
with some indigo paint. Make sure I got plenty of water. I want these to really
just blend up as I, as I do stuff. Maybe I want it to have some
nice darker elements as the look at that whole
liquid doing a0. So definitely play and experiment here with
your watercolors. But I had too much
on my, my tip there. So let's just take
that with some water, run it to the top. Now the solid
watercolors like this, I'm calling the solid, the regular watercolors
will let you pull some of that backoff easier than the sneaky
ones, I believe. I'm not sure why, but it is easier
to push and pull the color with these
regular colors. You can use pan watercolors. I have just gotten used to playing with these
liquidy watercolors. And if I'm doing a fresh
project like this, I think it's fun to
play with those, but you don't have to have them. Alright, let's little tiny bit more of this indigo
at the bottom. I really want this
to be like a yummy, kinda inky, darker, still
going to draw a light. It's watercolor, but I
do want it to be darker. And you do have to
kind of get some of this going before
your paper dries. I'm basically
working wet on wet. I'm not wanting to work. On these ones, it's dry. So once you've set this to the side or you
applied any heat to it, don't be tempted to go back and add more
color after that. You don't know how many pieces
I have ruined doing that. Okay, So look at that. So yummy dark, go up
to the sky, indigo. So we've got the one regular. I really want to go back
to my sneaky colors, but thought it would be fun to experiment with a regular color just so that you can be like, okay, now I see how those work. So now I'm just going
to pull off the pallet. We're going back to the
beginning if you're thinking, What color was that? All right. Let's just run this one all
the way up or look at that. I want you to experiment two
and the way that you layer the colors and the
color that you put at the bottom versus at the top. I want you to play with that. I want you to just get
brave and experiment and just see what can
I do layering these? Because if you look at
a yummy some sunset, you know those
colors are in like stripes and pretty layers. So experiment with your layers,
do something unexpected, do something that you
might normally see, and then to try something
that you would never see. Look at that. Maybe we have a little path coming
down through there. Fine, fine. Look at that. Okay, I think
I'm going to like that one. Well, I love painting these ombre landscapes
because they are super easy. Let's see, whatever this is, this is some kind of brown. These are just so beautiful. When they're done. I love them. Like a blue. Yeah,
that's the black. Okay. Or that might be
indigo, I don't know. Makes some of your colors go and if you want,
you can do that. And then I'm going to
run these up here. You might think, I
don't know if that's enough color up there. I'll pull some color backoff. But trust me, when this dries
and we pull that tape off, you're gonna go, Oh,
look what that did. Let's come back in here
with some stripes. Go back to this brown. Gonna be mighty impressed
with some of your landscapes. I'm telling you. Trying to get this
nice dark down there. All right, look how
pretty that is. Alright though that
one down so that dry. Alright, Let's paint
one more then. Okay, so those all had that Artist's tape from Amazon
does stuff's pretty cool. Just look up artist's tape. This one is the **** Blick
tape and it doesn't want to stay down as good as that
artist's tape is staying down. So definitely vote for
that artist tape there. You want to work fast. I've been going a
little bit slow, but really the fast,
ooh, look at that green. Faster you work on these, the better the results. So don't get tied down
and going slow, go fast. You want these to be wet on wet. You want to work your way
right up through this. You want to pull that color off. You want to come
back and add any extra at the bottom
that you're like, ooh, I want that a lot
darker, lot deeper. Want to add that in. And then it's like
boom, boom, boom. And you want to get that
going before that watercolor has time to dry and do
whatever it's trying to do. It's why we throw
it behind us to let them dry when we're done. But you wanna do all this
part while that paper is still wet with your
initial water. And if you could not go back
over things over and over, like resist that temptation. Now, I'm just pulling
color off to create like pathways and differences there
as the landscape goes up. So you look at this, as you pull the sum
of these monkeys, these colors really,
really change. Try not to get anything on
my side and my paper there. Let's see, I've got
this little test. This is this is just
an artist's eraser. I'll see if it gets
any watercolor off. Let's let's not
worry about anymore. Let's go ahead and
throw a bind us. Okay, so we're gonna let
all our landscapes dry. And then we'll be back in the next video to do some
pinprick mark making. Alright, I'll see
you back in class.
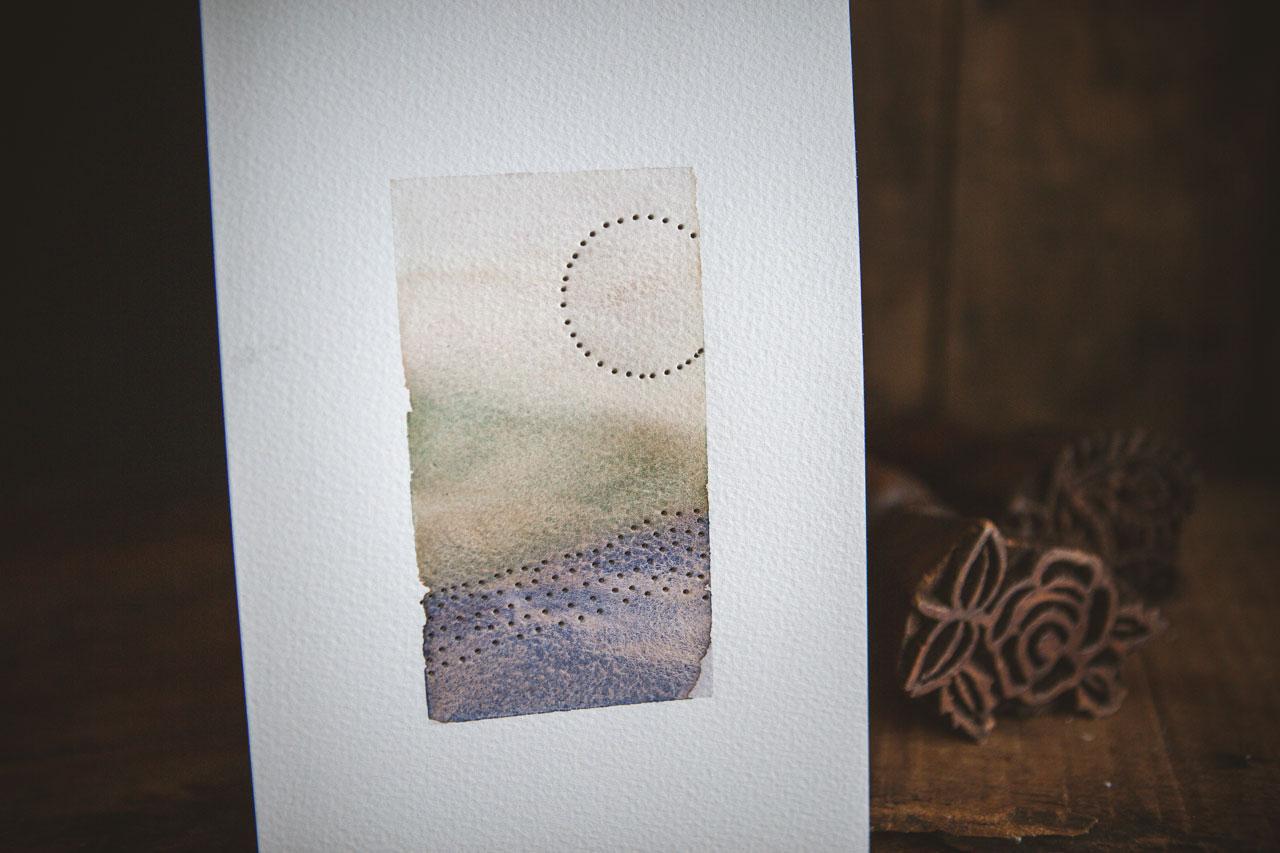
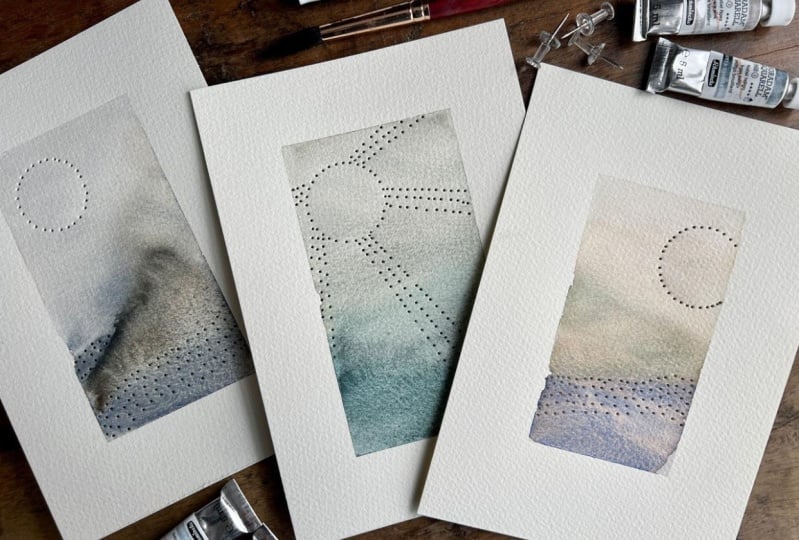
5. Pin Prick Designs On Landscapes: Alright, so I had let our little watercolors
dry and I encourage you to resist hitting these with a heat gun
because watercolor, especially if you play in these little granulating
colors that I'm playing in, watercolor needs some
time to do It's tricks. To do the special magical things that only watercolor can do. If you immediately go hit
these with a heat gun, you're stopping some of the magic that occurs
with watercolor. So if you feel like it's
not drying fast enough, ten of these throw each one behind you as you're painting. And then by the time you're
done painting ten of them. The first few are gonna
be ready for you to then possibly hit with
a heat gun if you must. I really encourage you to
paint a whole bunch of these. Walk away and go eat lunch, come back and then
do the next step. Because watercolor
just is magical and it needs some time to blend and flow and kinda do the
thing it's gonna do. So pope, and this is the
oh, let's just pull one. I'm looking at this one. Oh, my goodness. This
is the **** Blick tape. Do you see how easy
that came off? It's kinda not even
sticking to the paper. This is the artist's
tape from Amazon. And it's sticking a
whole lot better. But you see how I still got a nice clean edge and
a beautiful landscape. And it almost looks
like this was water and this was the grass and
it goes up into the sky. He kinda see how we go in there. If you are really courageous after you've played with
this and you want to come back and paint
landscapes with trees and all kinds
of stuff like that. That would be super cool. But we're gonna start with the Combray and let
gonna peel off the tape. I want to peel the tape
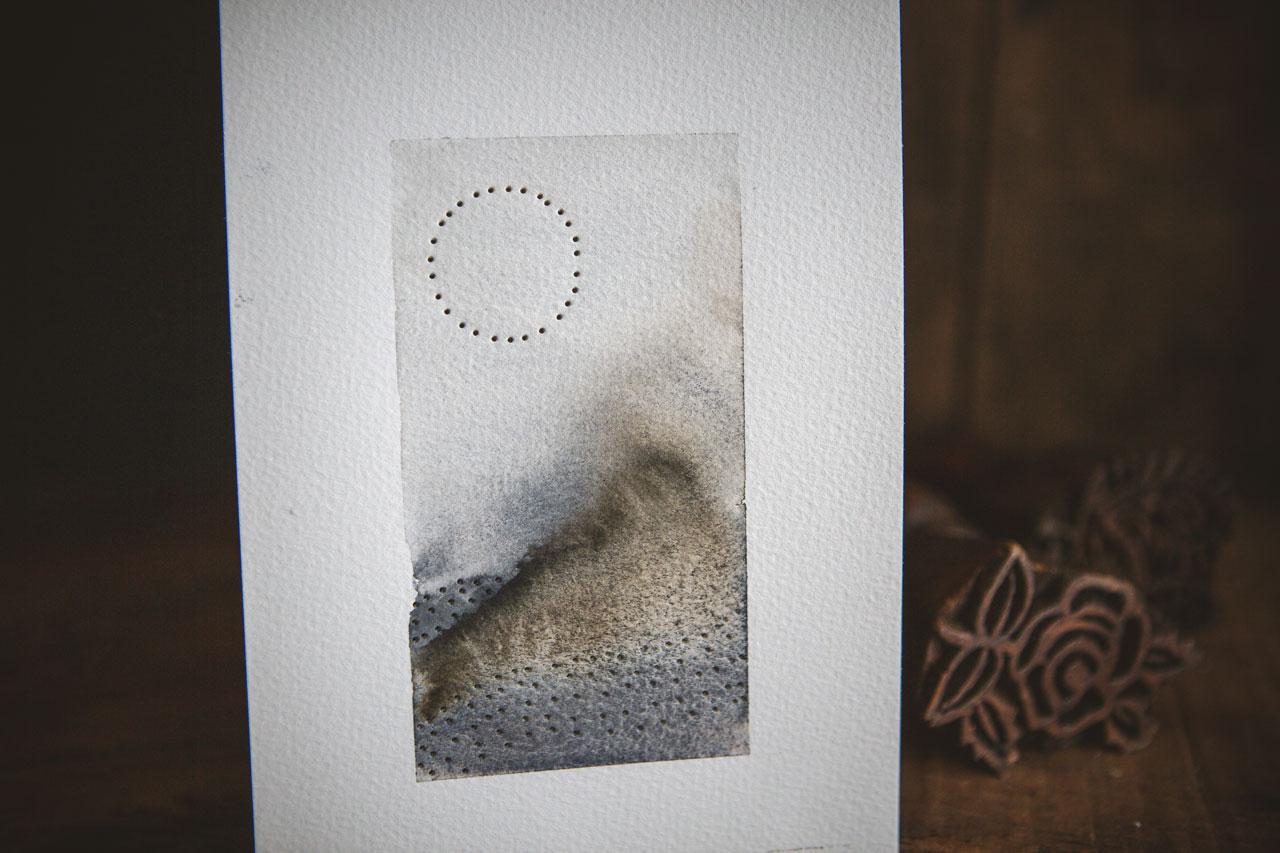
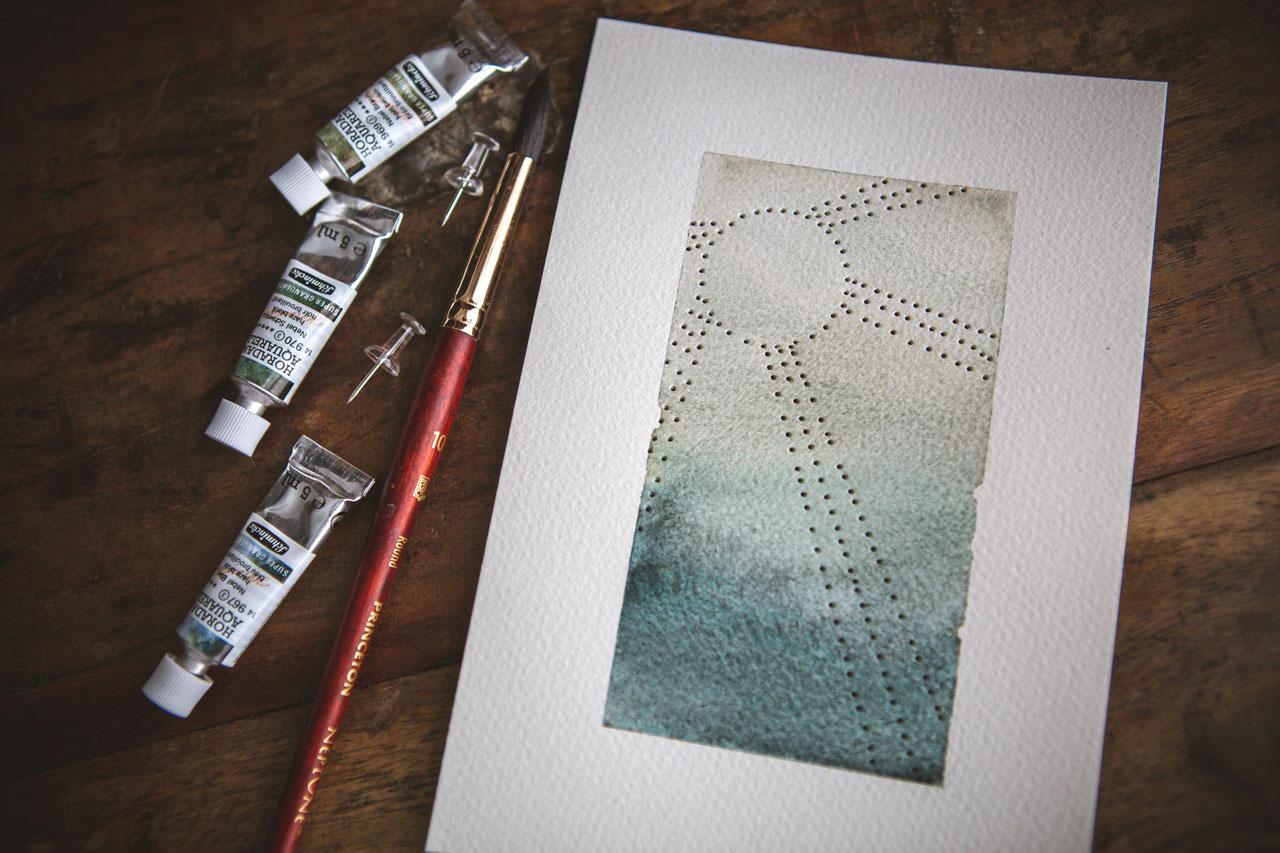
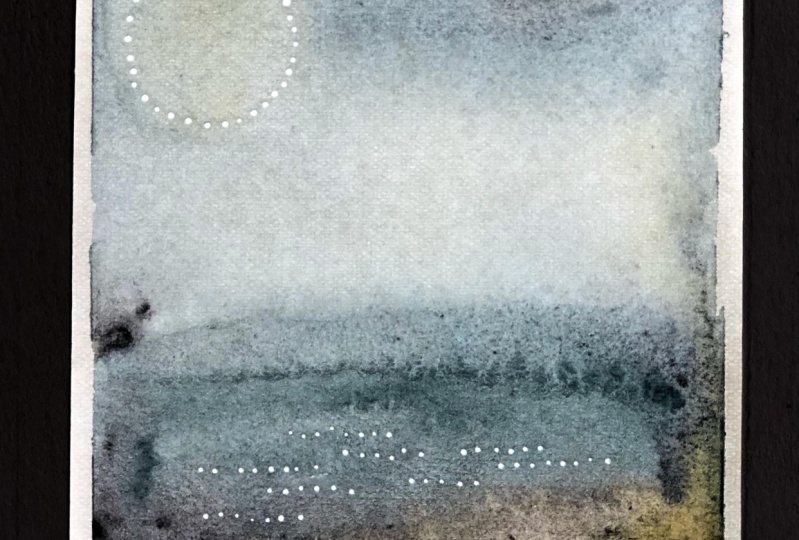
when we put our pin ******, but let's start with this one. So I've got my circle
stencil and I'm going to start off doing a son and
some marks in the landscape. I'm gonna be very basic,
but super impactful. And I've got my piece of crafters foam or shipping
foam underneath here you can use a piece of cardboard if you don't have a
piece of foam that you've saved from a package or you haven't been
to the art store. And my goal here is not
to be true to life size. I'm kinda liking when
I've got like a big sun, maybe it's all on there. Maybe it's kind of
off on the edge. Maybe it's off to the side. Get creative there with
what you decide you want. Like maybe I want this one, like right in here. Let me just show you someone's
I've done in the past. See this one's kinda
coming in from the side. Some marks running
into our landscape. This one's on a really,
really thick paper, so I must have used it,
used the 300 panel paper. And the back is super fun. £300 paper works great too. I love this one coming
in from the side. This one coming a little
in from the side. And I thought, let me fill
the whole moon or sun n. Then I've got some marks
at the bottom, also. Super fun. So I've just
been experimenting with my own pin pricking and
thinking, ooh, that's cool. And just trying out some
new different things. So I'm gonna come in a
little from the side. And I'm just going to follow my stencil and go straight
down with my pinprick. And I'm not trying to be exact. I do want to keep my marks
within my watercolor itself. I want my paper to have it's pretty edge
so my hands are clean. And one thing you wanna do
with these is, you know, look at the size of your
pin itself and decide, do I want them
smaller than that? And if you do, you want to
pick maybe a sewing needle or a sewing pin rather
than this office pen. And you don't want them
to be too close together. We are actually punching a hole all the way
through the paper. And if they're too
close together, you're basically just going
to have a rip in the paper. Because we've just created this thing that we
could punch through. It's kinda like, uh, you know, enough space there we can like punch it out
if we wanted to. So be careful with how close, you know, it maybe you
put these and how many. So let's see. So now I
wanna go here along. You can go fast. So if you go too fast, you may get marks where
you didn't intend. But I kinda like that
kind of along this edge. So maybe on this
whole bottom half. And this can be very
meditative too. Just punching holes,
listening to music, thinking, all right, where do I want that next mark to be? Because this is a mark
just as impactful, maybe even different and more so like we were doing
if we were doing this with our posca paint pens
or our mark-making tools. Whatever tools you like
are crayons or whatever. And what's really cool about this is when you pick them up, the light can shine
through those holes. I think that's super cool. Look at that. Okay, So I
don't have to have two mini, doesn't have to be
a million of them. And I'm going to grab the flashlight on my phone and just see if I can get this. Here we go. Show you underneath how the light shines
through the holes. If you hold it up near a window, It's really super obvious. Or if I hold it up or one of these ring lights are showing, you can tell on. But I really loved
this because you can make it magical
and you've got some sparkly things going on
there and the light coming through it is just
amazing sometimes. And I like doing stuff
like that because if I framed this on a float
frame kind of frame, sometimes the light could come
up underneath it and show. But look how beautiful that is with those kind of
different pinprick marks. And you can see the pin pricking
I did there on the back. But how beautiful and cool and different is that then
what we normally do? I think it's beautiful. So that's one thing
that I like to do. I like to do the sun or
the moon or whatever. You want to refer to that as if you've got some
symbolism that goes in there. That's great. Symbolism
is not my strong forte. I'm good at coming up
with ideas and saying, Oh look how amazing
I can make this. And I have a friend who so amazing with symbolism
that she can put a whole symbolic story to go along with everything
that's created. But I'm not good at
the symbol x stories. But I do love to create amazing things that
could be very symbolic. So if you're one of those people and you're good at symbolism, come up with a good story. Okay, so what if on this
one we had a bigger one? Wouldn't it be cool if there
were tree here and I can circle a tree and do
dots all around it. How cool would that be? That would be pretty amazing. Now that I thought about it, that could be one that
we kinda think about. That's an idea for you to try, try to go to Landscape, get a nice tree in circle. It, dots all around it. I'm gonna do dots all
around it anyway, without necessarily
having the tree there. Just to be another idea for us. Okay. So I did not pull
the tape on this one because I want to be able to pull the tape at the end of the
boom, look at that. And another thing to consider, especially if you do this, solid area dots all around, varying up your pen sizes. Maybe this is the time to have your other pin
pieces that you've scoped out and you're sewing
supplies or the craft store, the office store, maybe vary up your sizes
because maybe that could represent different size stars
and things that occur out. Okay, looking fat,
if I turn this overlook how beautiful
and cool that is. That right there is a
piece of art in itself. So if you really
like pinprick art, you can make whole
designs just in a nice weight
watercolor paper like this and have a cool piece
of art just like that. But we've made our
landscape really cool. So I'm just kinda peel the tape. Because now to reveal
the finished piece, peeling tape is the
most exciting part. Kinda see, did we get it? Did I get outside
the lines here? Go outside the lines a tiny bit, but I don t think
it detracts any. Oh, look how pretty that is. Beautiful. So here's another example
of what we can do. We can kinda do
out from the sun. We can do the sun in the bottom. So I've got all these other ones to do some yummy pin ****** on. I really like this
one almost looks like storm clouds are a big wave or something that's about
to get thrashed. It's pretty cool.
Let's do this one. Gonna do is have this
coming in from the edge. I don't know, I kinda like them. We'll just have
this one up here, like it is the sun or the moon and it's
big and it's bright. It's right over thundering
wave or whatever that was. It's painted in our landscape. All that. Alright, so now we
can be like okay, do I want some dot's kinda
come in here and underneath. Let this doing its thing. I think that is what I want. So I'm gonna start
at the bottom. Just follow the line. I'm kind of letting the
watercolor guide me. And I don't want to get
any of the pin ******, you know, to, to close. I don't want to just
create a rip in my paper. Very specific in
the mark-making. Then I want to create. And I'll kinda go in
like a little bit of a wave here at the bottom. We may not be able to tell
That's what I've done, but that is what I'm doing. And we don't have to go all the way down if we don't want. And then we can come up here. And really there's
this one little piece that's we could just
do this one section. It's like a little
piece that comes in. We don't have to
do the whole top. Look at that. You can kinda see
underneath on the bottom, kinda what I've done there. Whole hall that looks so
cool and on the backside, super cool on the front
side could come up further if I wanted to come
up right here if I wanted, but I think I'm
liking it like this. I'm going to peel the tape. So I want you to just get
creative with these landscapes. See what you can come up with. Look how pretty that one is. Now this one, I've got a little bit of some
markings outside my my lines and you can fix
that in two different ways. We could put a decal dad you around this and just
cut all that off. Or we could frame it with
a piece of mat board. And it would come right in. And we would see that here's just a piece of
craft mat board that I use, but it can be matted,
you know, in a, in a frame and a mat and
you wouldn't see anything. Not long enough, but you
wouldn't see what's on the outside edges if
you put a mat on it. So I wouldn't worry too bad. If you get anything on
an edge and you're like, Oh no, it's ruined.
No, it's not. You could rip the edges for a deck old edge or
framing in with a matte. Look at that one
that is beautiful. Look at those. Look at those. Oh my goodness,
those are exciting. Alright, so we have a few
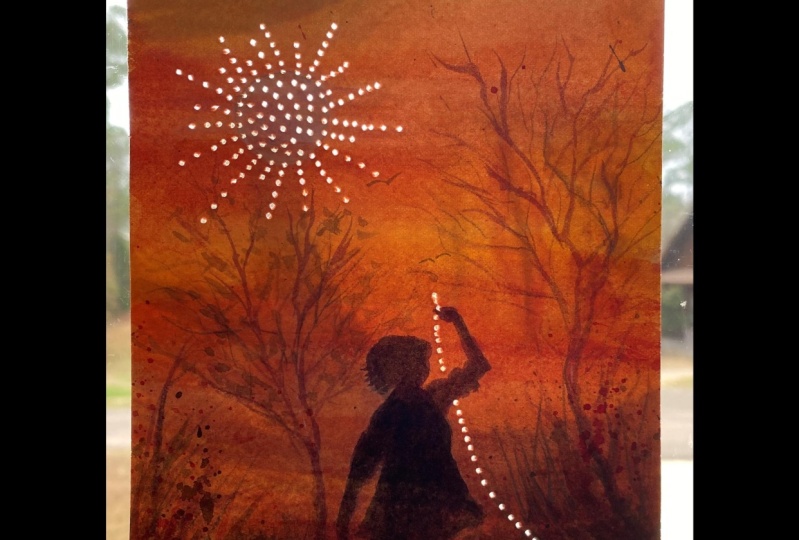
others that we can do. So I want you to paint tin
of these and then just do different mark
making and have some fun with some different pin pricking that you could do. And what we might even do on
one of these is made we have a son that's filled in with
some starburst pops possibly. So we could do that. I like kind of
looking at stuff and thinking about it for a minute. I really like, Let's
do this green one. So what we could do, let's go ahead,
let's make a son. And I'm just kinda
spit balling here, just trying to give
you some more ideas on pinprick ideas. But feel free if
something comes to you. To definitely give it a try out. You don't have to do any of the same things
I'm doing it all. Just given you some fun ideas. Alright, let's create
some sun rays. Let's call the sun rays. I'm just using my stencil as a little straight line guide. And I'm just moving it a little each time to
get a straight line. So we could do a few of those. We don't have to have sun rays
all the way or we could we had dots all the way and I feel like if we did sun
rays all the way on this, it would look the same. So what if we offset that with some blank space and then
another ray coming down? I get that. Okay, let's throw some off
the paper this way then. If you go too fast, sometimes you get some
that are Adeline. So I encourage you
when you're getting too impatient to slow down. Because these little holes in
the paper or not forgiving. Once it's there, it's there, There's no way to
fix it or erase it. Look at that. Let's do one off
to the side here. There's no fixing it once
you punch that paper. So be a little mindful
when you're doing this. Don't get in such a hurry
that you're throwing stuff in a way you didn't mean
to look at that will fall. I like that with the
sun rays off the paper. And here you can kinda see underneath what
that looked like. That's super cool. Let's peel the tape. See
that just finishes it off. When you pull the tape off, it's like the magic is revealed. How pretty that is. Oh my goodness,
That's beautiful. Alright, so we have pen pricked
our way through half of our designs with lots of
different options here. So I want you to paint them
on Bryce Bray landscapes. Let them dry. Don't be tempted to hit
them with your heat gun. Let them do their thing. So go eat lunch or
dinner or something after you paint a
dozen of these. And then I want you to
come back and think of different interesting pinprick
things that you could do. I like the sun and some pin pricking in the
landscape part of it. You may have some amazing idea that I haven't thought
of or shown you. And if you do go for it, I cannot wait to see
what you come up with. This is really fun. I have a shape doesn't
have to be a circle. You could do a rectangle that would have been super
cool to do a nice rectangle, like maybe right through here, and then dots all
the way around that. That would have been super cool. I think I got a
rectangle somewhere. I might do one of those myself. We've got some sun with some sun rays or you
could call it Moon rays, whatever it is that
you're thinking there. Come up with some
yummy pinprick ideas on your landscapes and come
back and show those to me. And I will see you
back in class.
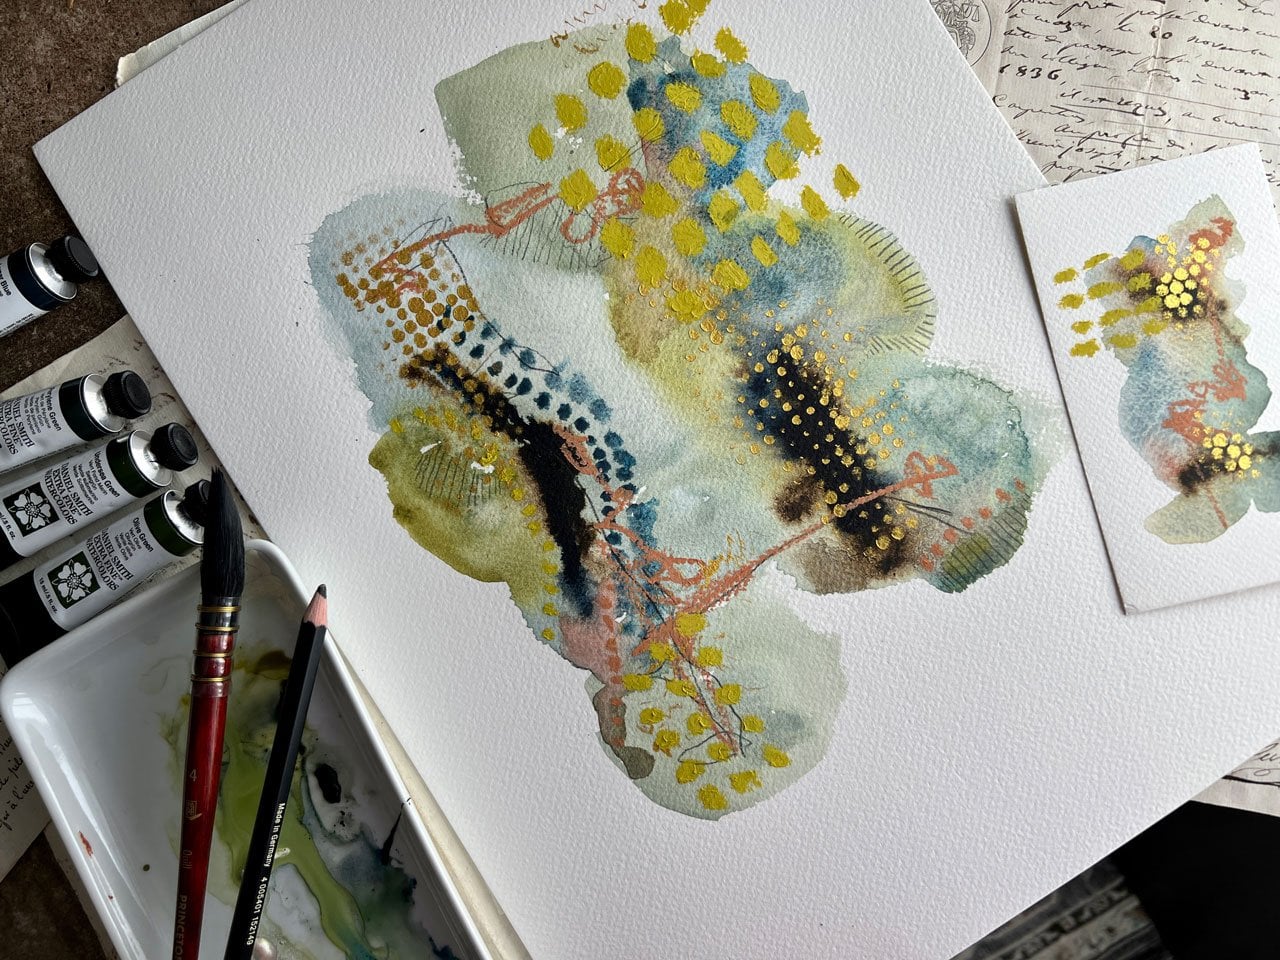
6. More Pin Prick Ideas: So I wanted to give you some other ideas on things
that you could pin *****. You can pinprick any of your
artwork that you've created. As an additional interesting
mark-making elements. So definitely look at whatever art is your
favorite and think, okay, how can I add some
yummy pin ****** or interesting pin marks
to my existing artwork. Because if I thought
of this earlier, I definitely would have
put more pin ****** into some different abstract
things I like to create. But I want to give
you some ideas in addition to your art
work that you could do. So I have some cyano types that I have personally
done in the past. Then I was also thinking some of your photography would
be super interesting. This would turn a photograph into a one-of-a-kind
piece of art. Especially if you
show in a gallery, they love things that
can't be duplicated. And so different marks in your
photography would be cool. I have some other
photography things here. These are iphone photos I took down in Charleston or savanna
in one of the cathedrals. So that would be super cool. There's already some
lights in the ceiling. I could pin ***** those lights. Also like kinda like
the idea of this one. So let's pull it to the side. Got lots of infrared photography
that I tried years ago. So I just pulled
some of this out of my stash to see like, what, what else
could I pinprick? Now for this, I have
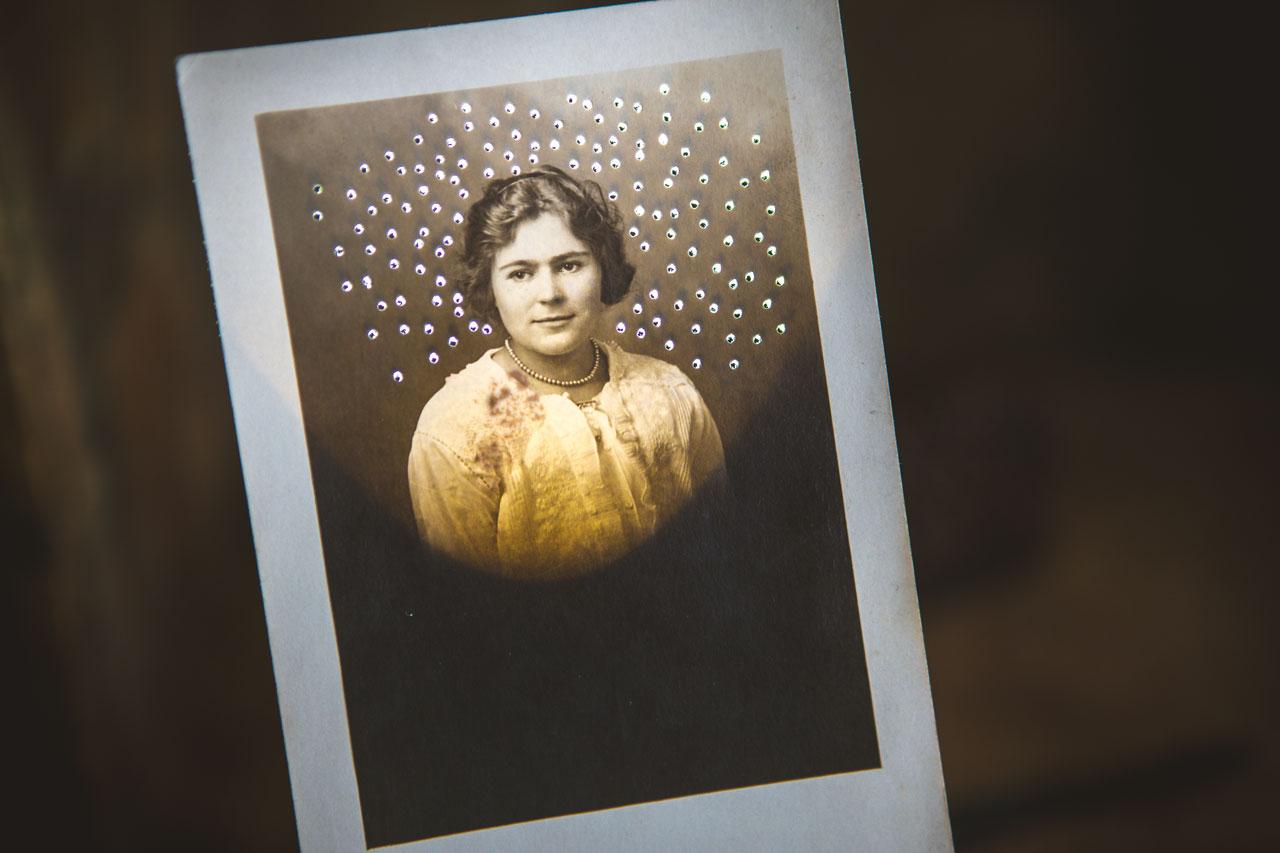
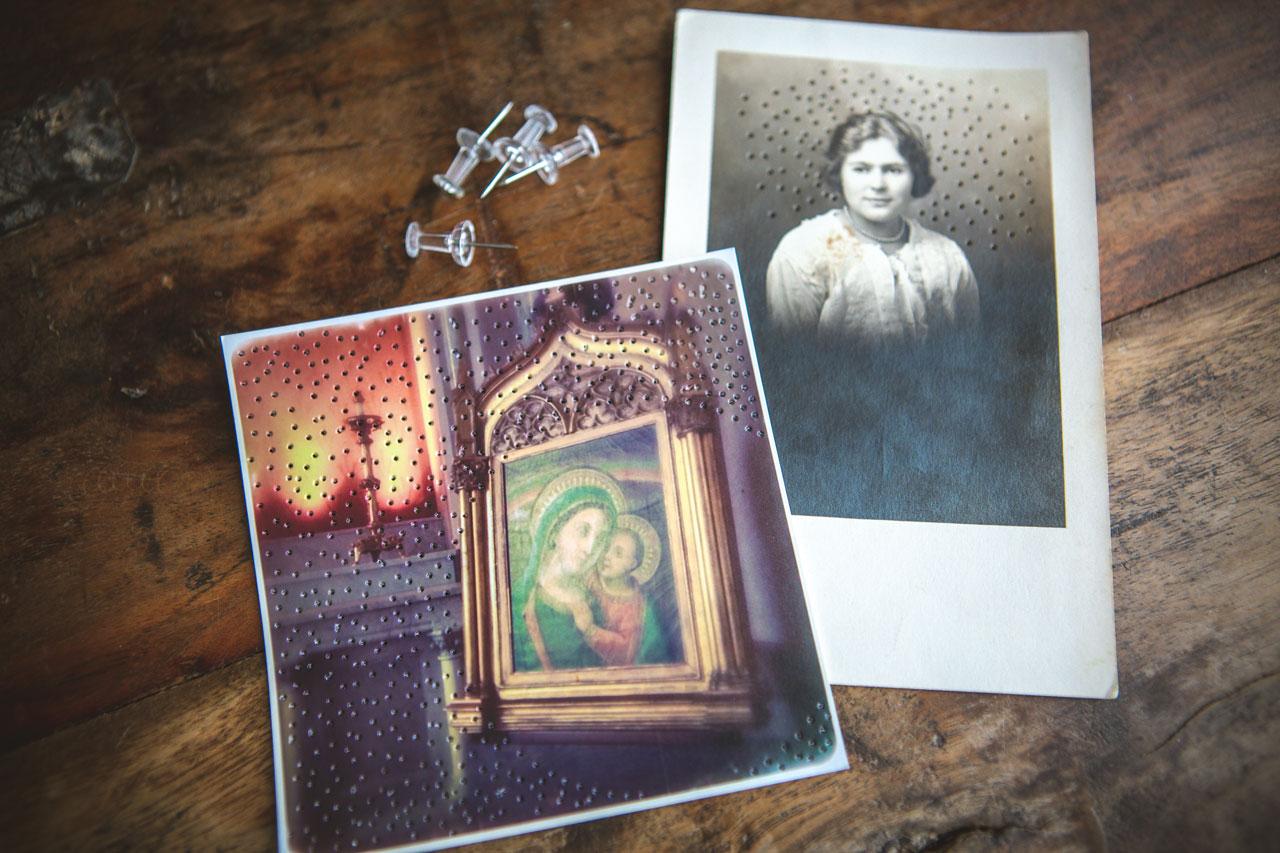
a very specific idea because we have the Mary
and Jesus photo here. And we could check this out. We could almost do
that circle one that we did on our
landscape where we picked out an area and then pinprick around it to really focus on the area
without the pin ******. We could encircle the picture of the Mary and Jesus and
pinprick all around it. How cool would that be? That would be our focus. And then I could either circle them exactly and pinprick
the entire photo, or I could have a big
enough one where maybe I focused on three-quarters
of them rest being pinprick. So you know what,
let's just do this because I'm super excited
and thrilled with this idea. So I've still got
my piece of foam. I'm just using my same stencil. This is some type of
shiny photography paper. And I just want to get your
brain working and thinking beyond what project
we were doing today. And think, okay, how can I add this mark-making element
to my other work? And what is that other work? Is it photography? There's a really
cool photographer, or maybe she's just a pinprick
artist, I'm not sure. Named Amy, friend. Like friend as in
you're my friend. And if you look up her
work, It's really cool. It's photos of people and I don't know if
they're ones that she took are ones that she got
that were antique. But you can find
antique photos a lot of places and these are
intake photo postcards. And we could, you know, think on most of Amy friends, she puts dots on the person. So you could do
something like that or something like what
I'm doing right here. We're maybe we highlight the person and dots all
around it outside of that, it's a really cool
technique when you're doing photos to then have an
element of surprise, like pinprick in
through the photograph. And if you're scared
to ruin an old photo, especially if it's
a family photo. And I have a lot of cool photos that are family
photos that I need to pull out and maybe do
my own pinprick into. Don't don't ***** on
the original photo. Make a copy of the photo, print the copy, and
work on the copy. And this this photo I've got, here's just a cheap print of a digital picture
from my phone. So it's not like it's
super important, like maybe an antique photo. But if you really want to have
something interesting and unusual and something
nobody else can replicate which your family photos
will give you that too. Or if you just don't want
to work on family photos, go to the antique market and buy some old photos that you
don't mind creating art with. And just see what
you can create. Alright, and we'll go
ahead and punch the rest of the holes and this, and then I'll be right back. Alright, so I have pen pricked
my way through that one. And I have just this circle
with a pin ****** behind it. I went got a flashlight. So you kinda see what the
light behind it is doing, like how amazing that is. Super cool. It is an extra
form of mark-making. It is a way to really
add interests to something that maybe is going to just be a
plain photograph. And now it's not, it's a piece of mixed media, different kind of art. And it's one of those things when you
look at it from far away, you're not really thinking
there's something spectacular indifferent about it
until you get closer. And then you're like, Oh, look at this extra
element in here. We could do the same here
on something like this. Super cool. I could do a circle and do
the pinprick around it. I'm actually just going to pinprick my original postcard
here because this one is not a photo of anybody that I know and I can either
pinprick the girl. I could pinprick a halo on her. I could just pinprick around
and it could just be, you know, light radiating
off of the girl. So let's just be
brave and pinprick light on the top part of this because I like how
this is so dark below. And you can see
on something like this how different size pen
marks would be interesting. You could have some a little
smaller than others if you had different size,
pin making tools. And we don't even have to go
all the way to the edges. We can kind of stop wherever it is that we feel so compelled. And just to give you an idea, look what that does, shining a light through it. And the photographer
that I mentioned, Amy friend, she does that. She pin ****** a
photo and somehow makes a photograph of that with the light
shining behind it. And then the print with
a light shining behind it is so beautiful. Look how beautiful that is. So we could do that
with a flashlight. I mean, you could
take the photo, have it sitting up on a
little bit higher surface, have a flashlight
underneath, shining up. Take a photo of that and look
how interesting that would be as a piece of art or as a print of an
original piece of art. If you wanted to sell the
original and then sell prints, that it's gonna be the print, the ones where you have
the beautiful light shining through,
making it magical. This would be really
cool on landscapes. These could be fairy lights, it could be dragonflies
out there in the evening. That kind of excites
me because I have some wonderful
photos that I took noun at the ocean where the shrimp boats and
everything or on the coast. And I have some narrow
kind of at sunset. And it would be beautiful if
out there on the marshes we had little lights
twinkling like this. So that makes me excited
actually to think about that. Alright, so let's
take a look again. Look bad. Is that not like
the most amazing thing? Add a little magic to a photo. I want to do some of my mom like this and the light kinda
coming off her like that, that would be super
cool because I have some real fun photos of
her as a little girl holding her doll in a fun
little Sunday dress outfit. And then as you get closer, you can just see the details as the spots kinda shine off. How beautiful is that? So now I want you to
be thinking outside of what we originally did
with our ombre landscapes. And look at all of
your art and say, okay, how can I use
pinprick in as a, another cool element featured in a piece of art or an O photo. I'd love it if you
had all photos and you did a little
series of those, how cool would that be with the light
shining behind them? Super cool. And then look at this
one with the light shining behind it you can really see just kinda adds the extra element on
this type of photo. Alright, so I hope
you have fun with this technique on different
things of your art. I love to see any of
those that you did. I think that'd be super cool. And I'll see you back in class.
7. Final Thoughts: I hope you enjoyed the
projects that we did today. I had a really fun time
having you in class. I hope you create some of
our own brain landscapes and experiment with your different
pinprick mark-making. And then I hope you
take that skill and create some pin ****** in
your own artwork or in some vintage photos are
photos that you take for the purpose of adding some pinprick spots for
light to shine through. I can't wait to see the
different things that you create and how adding
this extra element into your art takes it one step further than maybe you
were considering before. So hope you enjoyed
learning this technique. It's super easy. I don't see a lot
of people doing it and I'd love to
see more people, especially in the photos and the old photos and the
photos that you take. I think it's such
a cool element, a surprising bit,
something that turns say, a photo into a
true piece of art. That's one of a kind. It can't be replicated
exactly over and over. I love that and I hope
that you love that tooth. I've really enjoyed having
you in class today. Can't wait to see what you're creating and I'll
see you next time.
 DENISE LOVE, Artist & Creative Educator