Transcripts
1. Introduction: Photoshop is an incredibly powerful tool when it is absolutely essential enough photographers and graphic designer's toolbelt, many times you want a little, little bit of flair to your photos are edits. You might want to add some floating shaped or completely reflective 3D shapes, but how do you even get started? The 3D workspace in Photoshop can look quite daunting, but I will simplify it frayed today and make it one of those tools that once you try it, once, you're going to always want to use it, it's incredibly powerful. I want to welcome you to my new series while I will be covering very specific parts of Photoshop compositing. Welcome to Photoshop compositing, floating metal shapes. My name is Tom Chi and I've been a photographer and graphic designer for almost 12 years now and from the United States and travel around shooting photos and designing for various clients and companies specializing in fashion, lifestyle and commercial photography. I absolutely love what I do. You'll see a few examples of my work going on screen right now. But if you want to see more, please head over to my website at www dot the real-time kind.com or looking up on Instagram at the Rio Tom Chi. I'm really excited to show you some really cool things today. The main focus of today's course is going to be the 3D workspace, creating realistic looking, shiny and metallic surfaces in Photoshop. Having this particular skill on your toolbelt is a vital because many companies will require some form of 3D work in their day-to-day work. And not only that, having some 3D work in your portfolio can really help you stand out. Now I know that there are plenty of 3D programs out there, but utilizing a 3D functionality that is present already in Photoshop can help you to create some really unique things. I'll be showing you today where you can find photos to use unit creations, the basic 3D workspace interface, and then how to use those 3D shapes in your composite. My goal is to make this to only Photoshop 3D workspace course you'll ever need. This course is for anyone who wants to learn about working with 3D objects and want to take them Photoshop composites to the next level. It's more than just bringing in a shape from the internet. It's about creating art, making some, something striking and visual and having full control over it. Whether you do Photoshop composites for fun or you want to learn the skills to use this to make some money creating for clients. This course is for you. So enough of this introduction is time for us to dive in and get started because this is one of my favorite things to do in Photoshop. I hope that you decide to enroll in this course. We examined lots of great information to share with you. And if you do unroll, I will see you in the very next video.
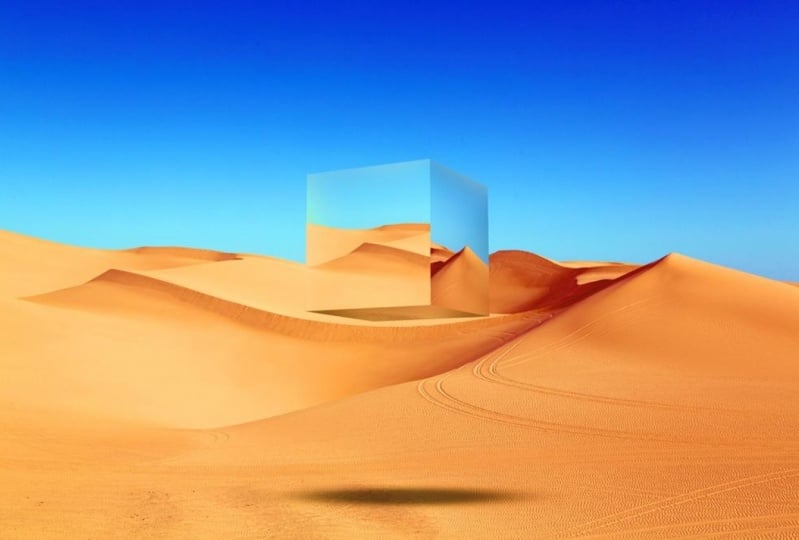
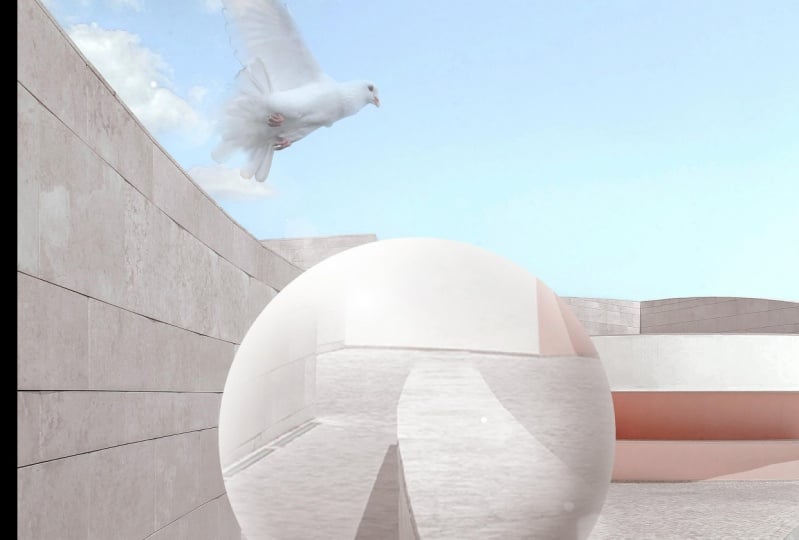
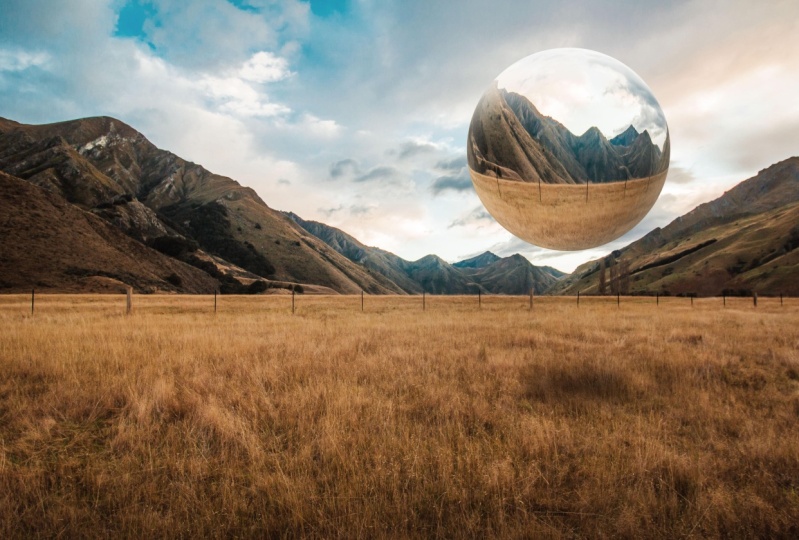
2. Image Sources: Ok, we're almost ready to get into Photoshop up before we get started really Photoshop composite we actually need images to work with. So if you haven't already taken images yourself, we need some images that we can use. So I'm going to show you really quickly three fantastic websites I used to get completely free to use images for composite. So that's off over into my web browser right now and take a look at those. Sultan, the first website I'm going to show you today is pixabay.com. Absolutely loved Pixabay because not only does it have access to a huge amount of fantastic images, it also has access to vector images, to illustrations, and some really unique types of images. So for example, if I wanted to include an alien in my composite, I can type an alien and they'll actually come up with some fairly usable things for me to use. For example, down here we have some characters that have been made. You're not going to find this on some other types of stock image websites. You're not going to find these sci-fi type of things. So a lot of my edits do include sci-fi elements like spaceships, for example. And that is why I come to Pixabay can get some really cool images for that here. Now the second website I'm going to quickly show you is pixels. Pixels is fantastic because there's some really high-quality images. You can scroll down and look at all of these yourselves. Or these are very studio quality, very professional photographer quality, photos that are really useful for composites. You can get very clean, very minimal images to use. And this also gives you access to some free videos, which is where I get some of my B-roll footage for someone, my courses and other projects. So again, this is a fantastic resource. But next I'm gonna go to my favorite website which is on Splash.com. Don splash probably has the largest selection of free images. You can spend hours just looking for photos here. And the great thing here is they have it categorized and very well you see along the top here you have everything from nature to architecture, street photography, travel, anything and everything you can think of. And you can have a category for it. You can just click on it and look at that. For example, animals. I can start looking through here and all the different animals if have one in mind. If I really want to use a lion in my image, I'll just go ahead and type in Lyon. And I have a lot of images that you see. We have 2.4 thousand images of lines here. So that is fantastic. Even spent a long time just looking through here trying to get the exact photo that you are looking for. Now I'm going to show you the images that I'll be using today in this course. So we have this image of a field and it's a very nice, and we have this image of kind of like a barren, deserty almost landscape here with a woman standing in the foreground. And then we have this image of some really cool architecture art piece here. Now one thing you want to be mindful of, whenever you download an image, don't just immediately click the download free button over here. You want to click the dropdown and make sure that you download the original size. We want to work with the biggest possible file size that we can, depending on the Website, sometimes I might default the free download too large or medium, or depending what your screen sizes that it might have access to that and give you a smaller image. So make sure you click the dropdown and download the original size. But for this course I'm gonna include all the images that I use in the Donald's for it. So make sure that you download all the images that I've provided. Because in the next video, we're going to dive right into Photoshop and get started salt, let's keep going.
3. Import + Basic Interface Overview: Okay, and we are finally in Photoshop. Now I'm using the most up-to-date version of Photoshop. And so Photoshop Creative Cloud 2021 version. So if you haven't already make sure you update your photo shop today news version so that you can follow along in the easiest way possible. Let's go ahead and let's get our images in here. So instead of creating a canvas and I'm going to be working with, I'm just going to be working with the actual image itself today. Okay, so let's go ahead. Let's click open. Now want you to navigate to the folder of images used. Make sure you download those, and then unzip that folder. And then you should have all three of these photos. So I'm gonna just do one for now. Select offers image and click open. And we immediately have it here and lovely. And what we're going to do is we're gonna unlock the Background layer over here. And we're just going to duplicate it. So I'm just going to hit Control or Command J on your keyboard to duplicate that, just so we have the original in case anything ever happens. Okay, so we can hide the one underneath. Now if your interface doesn't look the same as mine, it might actually look like this if you're loading it up for the very first time, I'm just going to reset the essentials. So if you load your Photoshop for the first time, it might look like this. So what I usually do is I drag my Properties panel over here, keep that over there, and then I make sure I've adjustments open here so I can access all my different brightness contrast levels, everything that I need. And I instantly drag this up so I have the most space possible for my layers. I like to see all the layers that I'm working with. Okay. Now on the left you notice that I had something over here. What did I have over here? I had my brushes. It's really easy to just have brushes over here that I can pick and choose from in my composites. Because if I were to just go to the brush tool and I wanted to switch a brush, I'd have to click this dropdown. Scroll down, maybe makes us bigger. Scroll down until I find the brush I want it's a little bit tedious and time-consuming. So in order to save time, what I do click Window and then I click brushes. Now it's going to load it up here on the right. They can simply just click and drag and pin it until you see there's a blue line on the left. And now it's going to be pinned to the left side of your screen. That's what works for me. And then I drag this to the point that just two rows and brushes are shown. So now if I'm painting, for example, let me just get some brushes here just as an example. So if I'm working with this particular brush and I'm busy here, let me just go New Layer. And I'm busy here painting. But now I want to use this other brush. I can just click here, quickly switch over, and then I can go back to another brush. So it's a very, very time efficient and great for your workflow. So let's just go ahead and delete this layer would all these pressures that I did, and that is essentially the workspace that I work in. Now, any and all brushes that I use which are not part of the Default Photoshop I will include as a download as well. So in order to install those, just gonna click these three lines up here. There are a couple of lines here, and all you're gonna do is end port brushes and then select the brush file that you download. So any and all that I use, such as birds, clouds, anything will be included in there for you. Now, as for the tools that we are going to be using today, we will be touching upon some of these tools here on the left, we're mainly going to be using the brush tools. We're gonna be using some of the gradient tool possibly. But we're going to be using more of the 3D panel up here, everything to do with 3D, or we're going to be doing that in the next video. In the next video I'm gonna go over how to make a basic 3D shape. Because you can very easily just clinton shaped off of Google. You can type in cube, you can type in pyramid and just pull in a 3D shape that's already been made. But what if you want to have a little bit more control over that? Well, that's what I'm going to show you in the very next video. So let's keep going. And let me show you how to make some very basic and easy 3D shapes.
4. Making 3D Shapes: Okay, so this course is about creating 3D shapes in Photoshop. And how do we actually do this? It's a very simple, I'm gonna show you a very simple way to do it. So what we're gonna do is we're gonna head up here where we see 3D in the top toolbar. And what we're going to do is we're gonna create a new mesh from layer. Now you can go ahead and create another layer if you would like. And we're just going to fill in this layer, for example, let's just choose a nice red color here. You can hit g to get your paint bucket tool. And now we have just a very red layer. Let me get a color that's not as harsh on the eyes and mountain. There we go. And what we're gonna do is gonna go to 3D and you mess from layer. So we're gonna make a new mesh out of this layer that we made, this hostile red pink layer. And here are all the different shapes that you can make. With Photoshop, you can make a cone, a cube, wrap a cube or cylinder. Don't not hat pyramid, ring a soda. So that's probably like a bottle shape, a sphere wine bottle. So there are many different shapes that you can make. Today we are going to be touching upon a cube, a pyramid, and a sphere. But I'm gonna show you a different way to do this sphere then the 3d function here. So let's go ahead and select the first one here, cube. And it's going to ask you if you want to switch to the 3D workspace. Just hit yes, because we want to work in the 3D workspace. Take a second and now as you see, a lot has changed on our screen. Let me try and walk you through everything. So this still looks like a square, doesn't it? But we haven't orbiting Camera Tool selected right now. So if we click and drag, we slowly unveil our 3D shape. So now we see that we are indeed any 3D work environment. So for the purposes of this course, I'm going to keep things very, very simple. In order to make a 3D object. We've already essentially done it. But when it comes to the way we're going to be using in a composite, we're going to want to make this float. So we're not going to be seeing it particularly from the top side, are we are going to be seeing it more from a bottom angle, something more like this. But as you see, this does not look all that good, does it? So let's go ahead and fix some of the lighting because we want to see all three sites here that are visible to the camera very nicely. So if you don't see this infinite light icon here, you're gonna go to your 3D layer panel and make sure infinite light is turned on. Ok. And then once you click that, you now have access to move the light that is in this image. So if we start to click and drag, you see we're starting to move this around. So you don't want to be mindful of the light that is in your image. So for the purposes of this, let's just have this be like so, so we see the three sides very clearly. And then if you click the Infinite Light button again, and it gets rid of that turns that function ofs. So now the light is fixed again and we can pan around as much as we want. Now we have a few other ways that we can manipulate the camera. So if you come down here, we see we have the orbit Camera Tool, which is what we have by default. Now we have a pan, the 3D camera. So if you click and drag and you're able to pan this, so if you need to have it be a little bit higher in your frame, you can definitely do that. And then we have a dolly camera. So this will move in and out so we can zoom in. We can zoom it out. So you can change that as well. Not not only that, if we look over here, we can change the field of view. So if you know what camera, what lens you specifically want for your perspective here. You can go ahead and find that I might want this to be an 80 millimeter lens or I might want to do you rarely wide angle. Now the slider is very sensitive, so we might want to just type in the number. I'm going to keep it at 55 at. So I'm gonna take this down to 5050 millimeter lens is one of my favorite lenses of all time. We're just going to hit enter on that, change down to 49, but that is fine. So we have, we have a cube here. How are we going to actually use this in our composite? Now, you might be inclined to click 3D and render 3D layer. But depending on your system, it might take a long time to actually render that out. For some systems that are beefier, the computer can render it out in a couple of seconds. But I do have colleagues who don't have that powerful of a computer. And for them it takes about five to ten minutes to render this out. So you don't always have that time to wait around for just a simple cube. So what are we going to do long to show you a really easy way that you can still use this cube in your composite. So what we're going to do is I'm going to go back to our Layers panel here. And up here we're going to switch back from the 3D workspace and back to our essential workspace. And as we've seen out, we're back to where we were. And we have our layer here with r cubed. Now if we turn off the background layer, you see we just have to cube here, nothing else. So now we already have that in our image. So if we have, for example, a background here, let me pull in a background really quickly. Now regard just bought in a random backgrounds. So now if we had a background here, we already have r cubed in our image. And what you can do now, you can right-click this and convert it to a smart object. And that's going to just put it into one shape free one object for you to move around. And now you can hit Control Command T. And you can adjust this even more. Maybe shrink it down a little bit to match. You can rotate it a little bit, but we've made a fully custom 3D shape in Photoshop. So now we can apply the mirror effect, which I'm going to show you later on. But this is just how to create a 3D shape. And later on you can add a different shading to this. So if we have our brush here and nice soft brush with hardness at 0, we can select a nice dark color here. And you can go ahead and make this actually look like a legitimate 3D object. Well, that's when you can start actually doing the proper 3d effect to your image, which we're going to go over in more detail later on. But this is essentially how you make a 3D shape. I'm gonna show you really quickly how you can do some other shapes, ok, because this cube is the simplest shape to make you. So let's go ahead. Let's turn this off. Let's turn everything off. I'm gonna make another new layer. This time, I'm going to fill this layer with a nice pastel blue here, nice purple blue. And we're gonna do essentially the same thing. We're going to go to Phil to 3D layer here. And you mesh from layer mesh Teresa. And we're gonna do a pyramid, this sign. Again, it's going to ask you to switch to the 3D workspace. Just click yes. It's gonna take a second. And there we go. So now if we pan around, we see we have a pyramid. How cool is that? So now again, you can do a very similar thing. You can set it up exactly how you want it. You can even set it to be upside down if that is why your image calls for. So you can play around with this, gets some really cool shapes. And again, once you have the exact layout that you want, you can render it out as a 3D object if your computer can handle it. F naught, again, just simply switch back into the essentials tab. You can go ahead and convert that a smart object. And you can get rid of that shadow later on, you can just delete that. And now we have another shape, NR environments. I'm going to show you exactly how useful this is going to be. In the next couple of videos, I'm going to show you how you can actually apply the mirror effect to these shapes. So let's keep going. I'm also gonna show you how to do a sphere. So let's keep going. We're going to start with a cube edit. Let's go.
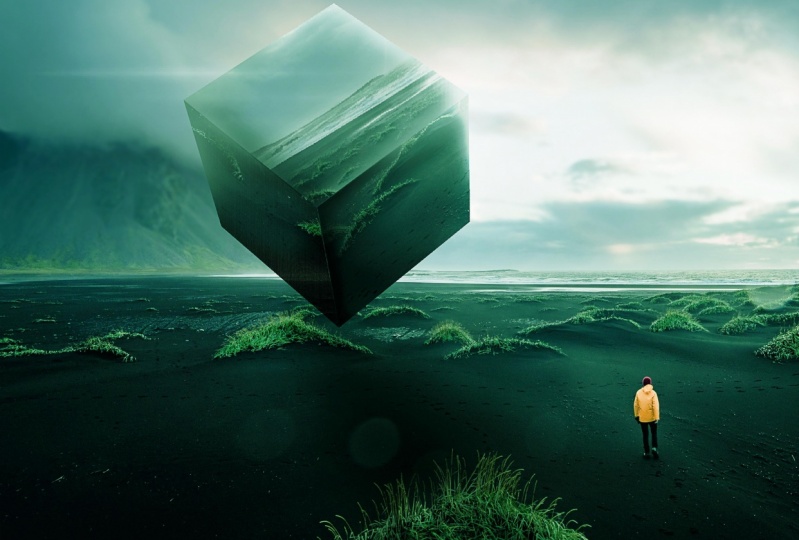
5. Cube: And we're back to this field image. Now we imported this in the import and basic interface overview video. So if you haven't already done so, make sure you do the same thing. Download all the images we're going to be using, and let's open up this image. So into this image, I want to add a floating cube right here in the middle, floating over this field. I think that would look really cool. So how are we going to do this? Well, first of all, I'm going to add the 3D shape to this image. And then afterwards I'm gonna add the reflections and the shading and the finishing colors. So let's go ahead and do that. Let's make a new layer. And I'm going to fill this layer in with any colour. You can pick any color at this point. So I'm gonna pick this nice PESTEL blue that we had from earlier. Very nice. And we're going to click the drop-down for 3D. We're gonna do the same thing we did in the last video. So let's cook that 3D dropdown here. I'm going to do new mesh from layer mesh preset. And we're gonna do a cube. We're going to switch the 3D workspace and not a problem. And now you see we have this cube and 3D space interface over our field. How cool was that? So now when we turn this, we can see how this is going to relate to our actual image. So first of all, I want to move this back. So let's go to the dolly. Let's move that further back into our image. I want it to be about that far away. And then let's pan the camera for a cube. Let's lift it up off the ground. Wanted to be floating around. They're lovely. And now we can just use the normal rotating tool till we get to the exact rotation that we want. Something like this would look really nice. But now the lighting doesn't look too good. So let's click infinite light again. If you don't have that under the 3D tab, make sure you have the Infinite Light layer turned on. If it's off, you won't have access to that. So let's make sure that's on. Let's click on our infinite light. And what I want to do is I'm going to drag this until there's good enough contrast between the three sections that are visible to the eye. So something like that, we have a nice amount of contrast. So I can click that to lock that in. And now I'm Mike, go ahead. Just dolly it back a little bit more, which is shrinking it. Something like that. Lovely. And now what we're going to do is under the Layers panel, we're gonna right-click Convert to Smart Object. It's gonna take a second button now that's a smart object in our image. Now let's make sure we switch back to the essentials work space here. And now if we zoom in, we have a shape here. Very nice. It's not perfect. We see all these jagged edges, right? What we will deal with that, okay? So first of all, we need to get three side's going to this. And that's going to be very simple for essentially going to have three layers clip down to this object with masks over it. So let me show you, let's start with this first site here. Okay? So what we're going to need, we're going to need this side here to be essentially mirrored on this side. So I'm gonna hit M on my keyboard to get the marquee tool. Now if you don't have the rectangular marquee selected and might be on elliptical or a single row. And make sure you click and hold down over here and make sure you have the rectangular tool selected. Now you want to make sure you're on your background layer. And we're going to drag a square, we're going to hold down shift. Lock it into a square. And there we go. We have a nice square and I can go ahead. If you don't like that. You can go ahead if you don't like that, you can just hit controller Command D to Deselect and make a bigger selection. I always say make it a little bit bigger than you think you need because there's gonna be a lot better for you. Now what we're gonna do is we're going to hit Control or Command C to copy that and controller command V to paste that down. So now we have that selection on its own layer. So let's bring that above r cube here. And now if we hit Control Command T, we see that's above everything. How cool is that? So let's just undo that and put it back to its original space. Now we want to clip it down. So if you hold on alter option, you see this icon comes up between the layers. So now that's clipped to R cube layer. So again, let's just control command team can now transform that and it's only going to show up on this layer. Now, I tend to shrink this down, but before I do any shrinking, I right-click and convert it to a Smart Object. Everything I ever do is smart objects, so I highly recommend you do the same. So let's go ahead and let's shrink this down just a little bit. And we're going to want to mimic the angles that we have going on. So I want to make sure that I have some of the hillside in here. And I'm going to drag this down until I have that same angle going across the top. And we're going to do essentially the same thing for the bottom. We want to have that same angle going across the bottom. Mimic that as best as you possibly can. And drag that until it fits. And now that doesn't look too good, does it? So we're gonna hide this layer that we just made. And using our magic wand, you said W on your keyboard. We're gonna select that particular color squared. That's why we want that large amount of contrast between East. Because now I can just click that. If it doesn't do a good enough job, we can change the tolerance, make it be a little bit less tolerant. Let's bring that down to about 21. And now it's only that rectangle. And now on this layer, we can very simply just create a mastery. Clicks this button down here. And now the mask is covering that how cool is up. And there we go, we have our first reflection. Let's keep doing this to make an actually look really good. Let's go with this left side here. Ok. So we're going to repeat all of these same steps. So I'm gonna create a rectangle holding down shift to make sure that it's a square actually. But I might actually drag this out to be more of a rectangle. So I don't want much of the graphs in this, just a little bit. And again, control command C, Control Command V. To copy that, we're going to drag that above everything else. We're gonna right-click Convert to Smart Object. Because now we can move this around and we're going to click that down again. Very nice. So I'm gonna do a very similar thing. We're gonna hit Control Command T. And we want to hold down control command on these corners to allow it to stretch the way that we wanted to. So just going to bring this in. And if you're not sure what it's supposed to look like, just drag it up so you see the actual angle. So we know this angle down here goes down from the original. So we're gonna call this up to be something reasonable. I want to show a little bit more of the sky. Something like that. Very nice. Not I want to mask out the proper things again. So let's hide that layer. Gonna hit W on the keyboard to get our magic wand tool. And let's get that rectangle that's squared. And now we see we're selecting too much here. So let's control commending the Select. That's when the tolerance down just a little bit at 14. And that is good enough now. So we're going to re-enable this layer. And again, we're gonna make a mask over that. So now it is slowly starting to come together. But we're not done yet. We need to get the bottom section here, but this is going to be actually really easy and really interesting. So let's go back to our bottom layer, our base layer. And we're going to hit M to get our marquis. And I'm just going to drag a rectangle like so and hit Control or Command C and then control command me to make a layer. We're going to pull that to the very top right-click Convert to Smart Object. And immediately what I'm going to do is I'm going to rotate it so that it's upside down. You can also hit edit, transform, flip vertically to turn around. But, and this is a little bit more fun for me. And then you're just going to bring it up to where you think it should be. Going to shrink that down. So matches the width. Hit enter. And now we can go ahead and clip it down just like we did before. And let's a controller command t. And let's move these corners around just a little bit. And, and pull this over here. I'm gonna make sure everything is being covered. So just go ahead and like that. Lovely. But now we need to mask it out because it doesn't look too good, doesn't. So we're gonna do the exact same thing. I'm gonna zoom in a little bit so that I see more of what I mean. And I hit W. And now we're sucking still too much. So we're going to deselect that, bring our tolerance down a little bit more till we have about the selection that we want might need 0 tolerance for this, and there we go. 00 tolerance will work. So now we're gonna do is we're gonna re-enable that layer and we're going to add a Layer Mask. And lovely. So now we have the basic cube made, but it doesn't look that good, does it? We're going to fix that. Okay. We need to add some shading, some lighting to make it actually look decent. So let's go ahead and do that. I'm going to be zoomed in a little bit so that I see what I am doing. First of all, untied shading and lighting to R cube itself. And then we're going to add a shadow going down below. So let's start with the cube itself. So I'm gonna go ahead and make a layer above everything. And I want this to only apply to this lower section. But now if I clip it down and I start to paint, let's just use any brush. And let's go ahead and hit D. So get our default colors. If I start painting here some shade, some shadows, it's gonna go up to these other sites and I might not want that. So how am I going to make sure it only applies it to this lower layer? Will very simply, what we're going to do is controller command click on the layer mask for that layer. So still on the top layer, we have this selection. I can just go ahead and start to paint just on bottom layer. And we can lower the opacity a little bit. And if we hit Control Command D to the select, we have now have a shaded bottom area. So that's essentially what we want to add some shading to this. So I'm gonna make another layer. Let's go ahead and select our left side and L. Lovely. And at this one, it doesn't matter if this layer is clipped down or not. This way I'm going to have it be unclick just to show you that it doesn't really matter. So let's go ahead and zoom out a little bit. Make sure we have our brush, a nice soft brush and unopened opacity down to about 40%. I'm just going to paint a little shadow because this whole side here isn't a shadow. So you do want to be mindful of the lighting that is existing in your image. We have light coming from the right. So we're gonna make sure that we keep that in mind. So I'm gonna turn the opacity of this down. Ever so slightly. Lovely. And I'm going to hit control Command D to de-select. Very cool. Now let's go ahead and add some highlights star image. Okay, another new layer. And i'm going to select the right side of our cube now. But this time I want to use one of the highlight colors that exist already in our image. So let's define the brightest spot. This particular color exists. We see has a little bit of saturation of this particular orange. So let's keep that. And I'm gonna go ahead and paint a little bit here on the right side of our image. Very nice. And this part is a little bit up to your discretion how intense you want this to be. Let's deselect and zoom out a little bit. That's starting to look a lot better and not the capacity of this highlight down just a little bit. And I'm also going to add a little bit of a highlight along the top edge here. So you can go ahead and select the Mosque of that shape. And again, what that same brush. You can just bring that like. So now we can add a little bit of a shape, a little bit of a highlight actually going across this edge. For the selected, we can see what we've done there and can toggle that off and on. And I'm really happy with that. So we now have a mirrored cube floating in a field, but it still looks place when even a little bit of a shadow here, you can just create a new layer on top. Get our brush that is nice and big. And I want this to be black, so I'll hit D just so you get black. I'm gonna make that a 100% opaque. And we're gonna start to paint until we have just a nice shape like this. And they're gonna hit controller command. And we're going to hold down shift as we flatten this so that it becomes a flattened disk of a shadow. Like so. And then you can drag this, make it bigger, smaller. I'm going to keep in mind where the lighting is, so it's going to be a little bit off to the right. Hit Enter, lovely. And then I'm going to change the Blending Mode probably to something like a Linear Burn and turn the opacity of that down. That's going to allow some of the other color to come through underneath. Very nice. And at this point I would probably go ahead and create some final finishing colors. So let's go ahead and create another layer up top. And I'm gonna add just a little bit of a gradient. So this is near the end of your edit and when you're actually trying to finish it up to look very nice. So I'm gonna do that. Add just a little color over everything. Not a nice cool blue to everything. That's due that change the Blending Mode down to see what would look very nice on this. Lets make this be screen and lower the opacity down too. Let's go about 16%. So now we have a finished piece. This looks really, really good. Let us, this is a very simple shape. It's just a cube. What do we do when we have something like a pyramid or a sphere? Let's keep going. I'm going to show you how to do a pyramid shape. Let's keep going.
6. Pyramid: All right, we're ready to get started with our pyramid edit. Now, make sure you opened up this image just like we did for the first one. Just hit File Open and navigate to this image and let's load it up. And I'm going to duplicate this layer really quickly. So we have our original. If we ever need to get back to it, we can go ahead and hide that. Let's get started and create our shape. Very simple. We're going to create a new layer above this. We're going to fill it in with any color that's among the pick. A nice orange color. This is a very bright, I know. That's going to help us with our different sides. Let's go 3D. And you mesh from layer mesh preset. Let's go ahead and do pyramid. Hit. Yes, we're gonna go into our 3D workspace. And now again, we have our image where we want it. So first of all, I'm going to Dolly this all the way back so that it's somewhere around here. Lovely. And let's move it up just a little bit. Like so. And now we can rotate our actual pyramid and have it be floating and like so. And it might actually dolly it even more just so that it is a smaller shape. Very nice. And I bring them back a little bit. Something like that, I think will look good. So play around with this. Feel free to get a nicer angle if you wish. Very nice. And if you want to change your light, Click on the Infinite Light up here, and then just drag this to change it. I'm going to drag it to the point where there's a lot of contrast like so. And I click that to lock it in place. And that's a right-click on our shaper Convert to Smart Object. Now we go. Now let's go back to our Essentials workspace, and now we're ready to get started. This will be very similar in fact to the cube. So we're gonna do is, we're going to create new layers for each side here. So let's go ahead and go back to our original image, hit em for the marquee tool. I'm going to get this side reflected on this edge here. But this time I'm not going to have perfect squares. So let's just select that and add Control Command C and then Control Command V. To copy that, let's drag that to the top layer. Right-click and Convert to Smart Object. Very nice. Now we can go ahead and click Control Command T to transform that. And what I'm going to do is I'm going to drag the bottom corner to be near the bottom corner of that rectangle and other corner to be the Other Button corner. And now I can just drag this like so. So it's like a nice angled image like that. Leveling. Now we can hide that layer. And what we're gonna do is we're going to use w to get our quick selection. Select. This might want to bring our tolerance of just a little bit to about four as de-select and try again, we now have our full selection here. Let's bring that what we just added. And let's create our Musk. Lovely. Now let's repeat that over on all of these sides as well. So again, go back to our background layer. Hit em. We're going to select a nice section of our background here, net Control Command C, Control Command V to copy that. Can drag that up to the top. And a right-click converted to smart object. And now I'm going to hit Control Command T so that we can move it around. Now this isn't wide enough, so we're just going to make it wider. We are going to ask it very nicely if it could be nice enough to do that. So let's drag this to match the corners. Let me zoom out a little bit so I see our full shape here. Sometimes I just squish my selection and that can actually really help to sell it to make it look good. Now, this, if you think about this in a 3D space, this is going to be tilted backwards. So instead of having this being tilted in this direction, are gonna want it to be tilted back. So what I tend to do is I bring this middle point to the top point of our triangle and that's gonna get us a fairly accurate angle for that particular side. So let's zoom back in a little bit. And let's get our selection made. So I want to make sure we're all still not top layer, hit W. Let's get our quick selection tool and we now have our colors selected. But I might have it be a little bit more tolerant semi dislike that i'm gonna bring the tolerance up to about ten. That's a nice selection. And now we just simply create a mosque on that layer and that we see some of the orange here. We can definitely fix that. Ok, we'll fix that in just a second. So now what we're gonna do, we want this bottom section here. So I'm going to do a similar thing that we did before. Marquee on our middle section here. Control command C, Control Command V to copy that, drag that to the top layer, right-click Convert to Smart Object. And as you see, the more you do this, the more it's gonna become natural to you, you're going to know all the step is going to become very quick for the workflow. And let's hit Control or Command T. And we're gonna rotate this so that it's upside down. That's what we want here. Now luckily we have four points sehr, So we can simply drag this to the four points. So I can drag this up there. This point over here. This corner will go in there and just a secondary don't overlap these. Let's bring this to that corner and we can bring this corner in like so. And I tend to bring it a little bit bigger than actual shape so that when I do the mask, it'll do a good job. So we just turned that off, hit W, get our selection and now we need to turn our tolerance down where too tolerant. So let's make sure we get that down to 0. We have a nice selection. Now. We can turn that back on, create a mask. And there we go. We have our basic pyramid shape here, but it doesn't look too good. We need more shading, more highlights, and we need to get rid of some of the orange that seems to be peaking through. Though when you zoom in, it's not as prevalent, but we still see it there. So we can do that very, very simply. What we're going to do is for our object layer here. Turn that off completely if you'd like. What I tend to do is I go on to the shape, go to layer above it and fill it in with the dominant colour of my shape. That gets rid of some of that. I'm going to deselect. And if you see some details here like that, you can just come in with a paint brush. You can go ahead and get a small brush and you can try and get rid of that. But it looks like that might be on ONE layer, that might be an edge from here. So we can go ahead and fix that later on. And now we have our basic shape. Doesn't look too good though right now, does it? And we need to add the whole mirror look to it. So let's go ahead and do a very similar thing that we did before, except this time the light is coming straight from above and from the hind. So what does that mean for us? Well, let's get started. One thing that we do know fissures out this bottom section is going to be in shade. So select our layer mass, just Control or Command. Click on the layer mask for our bottom section. And we're going to go ahead with our brush. We're going to alter option click the darkest part of our image. Now we go, can I get a nice big brush? Make sure it's a soft brush or pass it. I'm gonna pull that down to about 47%. And we're going to start to just paint here. Paint some nice shadows onto that bottom area. Right? Nice. Take your time of this so that it looks really nice. And internal passage of that down just a little bit and look before, after adding some of that detail. Now I want to add shadows to our main image here. I'm gonna do this all on separate layers. So I'm gonna do a shadow separately for this site, shadow separately for the side. It's gonna make things a lot simpler. So let's go ahead and select our front shape here. And with our same brush, just gonna go ahead and paint near the bottom of this. It's gonna come up a little bit on the edges. A little bit of shadow is going to be cast by this shape here. So let's deselect that. And I just see we're adding a little bit of depth now to this. So we're gonna keep going. Another new layer, control command, kick, click this section. And we're gonna do the same thing. There we go. And if you find that it's too much, which I think it is a little bit. I'm going to call capacity of these two layers down to about 63%. Saw before. After. Very nice. Now we want to deal with highlights. There's not gonna be any highlights on the bottom here, but there will definitely be some along the top. So another new layer control command click on our front shape here. And I'm going to use the highlight that is in our sky that's pure white. We're just gonna do a little bit. Kundalini edges. Again a little bit goes a long way. So keep that in mind. You can deselect that. There we go. We're adding a lot of 3D and is to this shape. A lot of that. We're gonna do another layer. We're going to select our side here and add a little bit going down that side. And with a smaller brush. And add a little bit of an edge light along here. So if we deselect that, we see this a little bit of a more defined edge. And if you ever want to get that selection batches Control or Command Z right after you get rid of it, and you should get it back. But now this is a little bit too much for this side. So I'm gonna go ahead and turn that upside down. Like so. Very nice. And along the front on my turn that down just a little bit. Probably not going to show you another way in which you can get a shadow for your image is going to be very simple. Or we're gonna do is we're gonna Control or Command click onto our main object layer. So we have our nice triangle here. And we're gonna go on to a new layer at the top. And using our paint bucket tool, we're gonna fill that end completely with the darkest color in our image, which is almost a pure black. So there we go, we have our shape, they're filled in. I'm going to deselect that Control or Command D. And we're going to hit Control or Command T to transform that. And you can go ahead and hold down shift to flip that over. And now we essentially have a shape which we can work with to get that perfect pyramid shape. Now the lice coming straight from above. So this might be more of a square shadow, but let's just imagine it's coming from a little bit behind. So we're gonna drag this and down to about here. And a squish it just a little bit. But these edges are way too sharp. How are we going to fix that? Very simply, actually, I'm just gonna go to filter blur. We're gonna go to Gaussian Blur. And we have a live update. So as we change it, we will see how it looks here. She want to go to the point where the edges start to get blurred. For this particular image, it's around ten pixels. Let's just hit OK on that. And we're going to change the Blending Mode again to Linear Burn. Let's bring the opacity of that down a little bit. There we go. There we go. We've added a shadow to this image in and you can always go ahead and move that shadow around if you want to bring that more into the foreground. Now this image is closer to us, so you can definitely play around with this. And there you go. That's how you do a nice pyramid shape. And then again, you can go ahead, finish this up however you would like. And go ahead and add a nice and brightness layer to everything, bring that up. And then you can have a lot of fun with this. So you can go ahead and add another little gradient going across the bottom. So once you have that and you add these finishing touches with the color and everything, you can make a really cool looking image. So let me get like a nice cyan type of color here on the fill in the whole layer of that. And let's go ahead and find a nice blending mode. Again, soft light does a really good job of this. So I'm gonna go to about 20. Let's go 34%. So then before the final touches, after the final touches. So you can really create a very striking image to sway. But what if you want to do a sphere? Sphere is one of my favorite things to do because it looks the best in my personal opinion. So let me show you in the next video and the next part how to create a very convincing sphere, 3D metallic sphere and Photoshop. Let's keep going.
7. Sphere: And we're down to our very last 3D shape for it in this course. And I'm going to show you my favorite. It's also a little bit more advanced than the other ones that we did, but it's also a lot more effective, has a lot more of a wow factor button and walk you through every single step. So make sure that you've loaded up with this particular image. It's included in the downloads. So open it up and we're gonna get started right away. So first things first we're going to create a duplicate of this layer Control or Command J. We have a new layer and we're going to be using this layer quite a bit in just a second. Now, let's go ahead and make a brand new layer, blank layer. And I'm going to hit B to get our brush. And we're gonna draw where we want our sphere to be. So make sure you have the hard brush a 100%, any color will be fine. And just to show you that any colors fine, let me pick a very bright purple, pink, magenta color here. And let's say I want this to be somewhere around here. Okay, so we have that image there. All we're gonna do is we're going to drag our copy image to the top. So now we don't see that anymore. And on this layer I'm actually going to want to get rid of our model here. So let's zoom in. Let's hit S on our keyboard. We're gonna get our clone stamp tool. And we're just going to take our time here really quickly. And we're going to mask our model out of this image. And it's fine if this isn't perfect, you just want it to look somewhat decent. Because this is actually going to be turned into a sphere. This is the layer that we're going to turn into this sphere. So there we go. Now our model is gone and we want to make sure we're doing it on that one layer, okay? Now before we do anything to this, we're going to right-click and we're going to convert this twice smart object. And now very simply you just go to Filter. I'm going to go to this store and sphere eyes. Now you're gonna want to make sure that this is drank all the way to 100% and we're going to hit OK. And now we see this has been stretched. And do this as many times as you want. You can do this two times, three times. I'm going to do this twice and see what it looks like. Now you can just click. The most recently used filter will be up here. So I'm going to click that. It's gonna apply the exact same filter. I'm going to hit OK again. And I will see it some even more distorted. But what are we going to do now? Now, we want to make this fit into the sphere and that we've made down here, the circle. So what are we going to do? Well first we're going to right-click this. And what we're going to do is we're going to rasterize this layer right here. Right nice. Now we're gonna do Control Command T, and we can now adjust this layer. So what we're going to do is we're gonna make sure that it fits into that circle. Now luckily, Eclipse to the edges. But now you see these edges aren't fitting, right? What we're gonna do is hold down shift. And we're just going to drag that until it snaps to either side. Now we can hit enter. And now that is a perfect circle since we snapped it to all those lines. When now we want to get rid of these corners here don't mean, well, we're gonna Control or Command click on our circle layer. And we're simply just going to create a mask over everything. And if you want, get rid of this pink. Outline here, we just turn that layer off now. So we now have a floating sphere. How cool was that? But we're not actually done yet. We need to add some shading to this. As we see the light is coming and hitting these mountains from the front left. So the Sun is probably off summer over here in the background behind the camera. So wanted to keep that in mind. Let's go ahead and make a new layer. And here we can actually clip this down. So anything we paint here, let me get a black brush here. I'm gonna make that smaller. Kind of got a soft brush and we're going to reduce the opacity down to about 40, 36%. So anything we paint here is going to be applied to our sphere. So I'm going to add good amount of shadow, give a good bit of depth. And keep in mind all the lighting that is in our image. Now for the highlight, I'm actually going to sample some of the lightest lights in our image. Let me look around here. This cloud seems to have some of the lightest lights, but I'm actually going to pull that up a little bit more. So now we're painting are highlights here. Along the front. Very nice. And you can go ahead and lower the opacity of that too. I'm gonna lower that little bit. Lovely. I'm gonna low capacity of our shadows and little bit as well. Lovely. And I'm also going to add a blending mode today, so I'm going to double-click on this. Let's pull this. Just over here. We're going to add an Inner Glow to our image. So let's just do Inner Glow. We're gonna make sure that's on our opacity of all the ways so we see and what we're working with. And we're going to have a nice little bit of a glow to our image is going to look nice. So let's go ahead and increase in noise just a little bit of an increase the size of the children of that mountain to get rid of some of that noise. And we can bring the choke All the way in. As you see now, are adding a little bit more of that spherical look to our image. And at this point we are going to reduce the opacity of this down all the way to this point where it's only about 20%, let's hit OK. And as you see the added a nice little bit of reflective light to our sphere. If we toggle that off, we can turn that off. It's very flattened out. And now we have a little bit more shape. So we're almost done with this. We need to add a nice casts shadow. Now for this particular image, I'm going to use the simple method that I showed in our queue video and get a soft brush that is black, full opacity. And I'm gonna do a nice blob of color hair. We're going to control the command T. And we're going to flatten out and just hold down shift. And then you'll be able to flatten that. Now I'm going to bring that in just a little bit. So I want this to be living around here, like so, but because of the light and we're going to move this ever so slightly to the right. And now there's a little drop off here, so we'll deal with that as well. First, let's make this linear burn. And let's reduce the opacity of this down to about 82%. And then let's zoom in here. Let's zoom in here. And we're actually going to erase part of the shadow that we just made. So let's get a soft brush. And the way we're gonna race is going to be non-destructively. So we're gonna make a layer mask and we're going to paint in black. And that's going to erase from our image here. So we're going to just take the slowly but surely. Want to make sure that everything after the drop off here is taken away. That looks a lot better. So now have our image plantain more in our setting here. Now my reduced capacity of that just a little bit more lovely. And now I can go ahead and do all the finishing touches that you want. I'm gonna do the usual that I do that I did for my others, my other videos as well at a little gradient to the bottom. And you still pass any of the non, the increase of brightness of everything just a little bit. Um, I go ahead and be saturate everything just ever so slightly lovely and let me do a few other little adjustments. I'm gonna bring curves up like so. And Latin layer here. There's a lot of orange juice. I want to counterbalance that with a little bit of cyan. Sign isn't my favorite colours to use when it comes to finishing off a piece. From that, fill that in, Go down to soft light blending mode. And have this be just slight amount, maybe 20% will look good on before and after, before our edits will look like this. After our finishing edits, whatever nice-looking image. Very nice. So there you go. We have made a floating spirit, floating reflective sphere and foolish banal looks really cool. You can play around, tweak all the settings, have less of a reflection, more of a reflection. It is entirely up to you. So in the next video, I'm going to actually give you your assignment because I want to see what you can do. So let's get going and let's see what your assignment is for this course.
8. Your Assignment: Now we finally come to the part of the course where you are going to get involved. I'm going to give you an assignment for this course because I wanted to see what kind of an edit you can do using the skills that I've taught you. So for your assignment, I want you to create one very simple composite using a background image like we did for all the examples. Create one floating Italian shape in your image. That is, it can be any shape, a cube, a pyramid, a sphere. It can either be one of the shapes we didn't do. You can do a cone, you can do a cylinder. You can really get creative with this at any kind of 3D shape. And let's see what you can do. Once you've done that, make sure that you upload it to the students submitted projects because I really want to see what you can do and I want you to be able to show off what you can do. So have fun with this, get creative. And I'm really excited to see what you can make using all the skills that you've learned in this course. And the next video, I'm gonna show you some of my final thoughts.
9. Final Thoughts: You've done, you've completed my course, Photoshop compositing, floating metal shapes. That's fantastic. And you ended up with three of your own creative pieces that you've made throughout the course, you should be proud of yourself. I highly encourage you to go ahead and do the assignment that I covered in the previous video because I wanted to see what you can do on your own. Feel free to follow along with the course again and watch it as you work on your own piece and follow all the steps on your own piece. I would like to mention that I'm selling Lightroom presets right now for special introductory price over on my website. So head over to www dot the real Tom Chi.com forward slash presets. Your presets today, these are perfect to use on Lightroom to apply Preset Color reached your photos and edits presets that I've already made and tested over many years of practice and use. And you know the best part, both presets are cheaper than a cup of coffee. That's crazy. I really want to give you the means to get great results in your edits and photos. If you've enjoyed this course, I highly encourage you to leave a review and rating as I helped me out a lot and feel free to check out my teacher page to see other Lightroom and Photoshop courses that I've made, ranging from beginner courses all the way to mastery level courses. It's been a pleasure teaching you today and I hope to see you again in a future course. Take it easy.
 Tom Kai, Senior Graphic Designer & Art Director