Transcripts
1. Course Intro: Hi. My name is Avraham, and I've been a professional photographer for over a decade. In this skill share class, we're going to learn all about how you can control how much of your photo is in focus
versus how much remains blurry, which is commonly referred
to as the depth of field. When you know how to
control the depth of field in your photography, you can not only signal to
the viewer where to focus, but you have so much
more creative choices when it comes to
crafting your image. As we learn about the
different methods that you can use to
affect depth of field, we're going to reshoot
the same subjects again using each of
the different methods. That way you could see exactly
how this all plays out. Additionally, at the
end of each lesson, I'll provide you with examples and instructions
for how you can get hands on experience yourself to really
drive the ideas home. To get the maximum benefit
out of this class, I recommend that you
have a DSLR camera or some other camera
where you have the ability to
change the aperture. So if you're ready
to get started, I'll see you in the next lesson.
2. General Overview: We'll begin with a general
overview of depth of field explaining what is depth of field and why is
it so important? Depth of field is
caused by the fact that the camera can really only
focus at one particular point. There's also a range
that stretches both in front of and behind this point that still
appears to be in focus. And that is the range that we're referring to when we
say depth of field. A way that I like to think
of it is like a plane or a piece of glass where the piece of
glass has a thickness. Whatever's in the thickness
of the glass is in focus, and the area outside
the glass is blurry. When you change your
depth of field, you change the thickness
of that plane or the piece of glass of how
much is going to be in focus. Why is being able to control
depth of field so important? First of all, it gives you the creative control
over your photographs. You choose how sharp and in focus the different
elements will be. It gives you the ability to
guide the eye of the viewer. You can choose where the
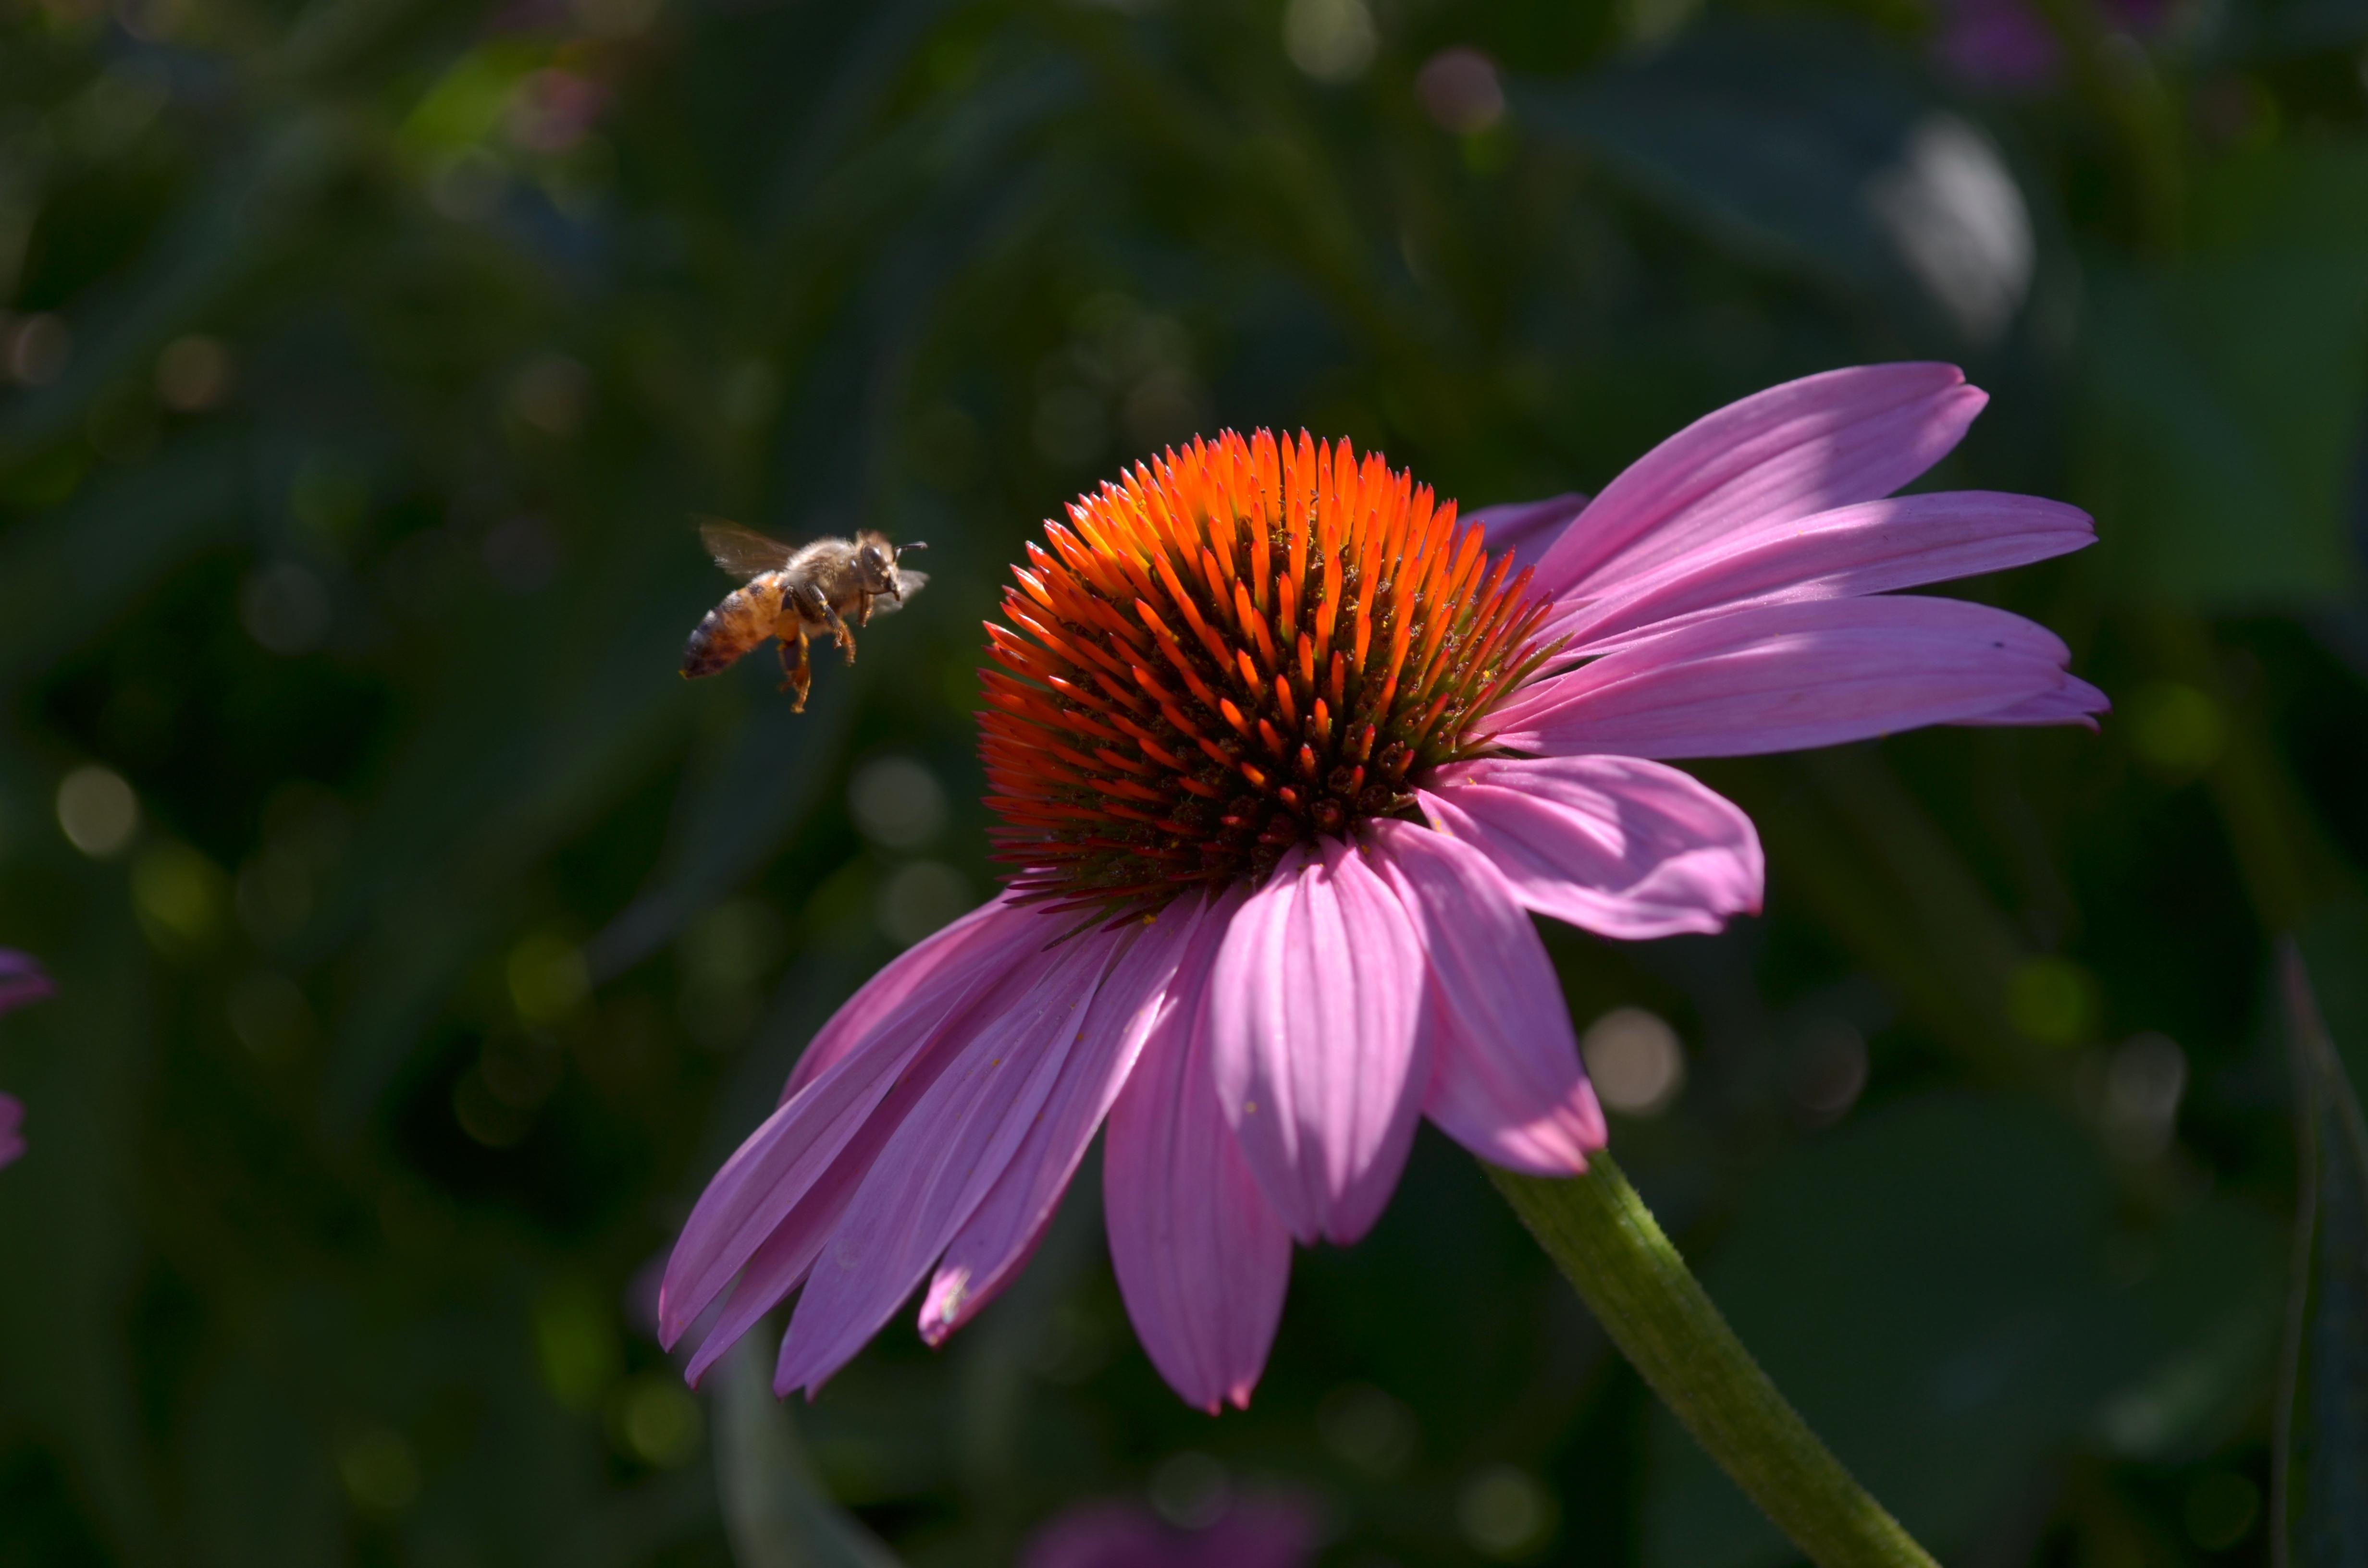
viewer is going to look. In this picture, for example, the eye is immediately drawn to the weed that is in focus on the right side of the screen. While the bush on
the left side of the screen doesn't get
the same attention. Typically, in
nature photography, photographers like to have as
much as possible in focus. That is, they don't use depth of field to guide the viewer
through the scene, rather they use the elements
in the scene itself. However, it doesn't have to
be a hard and fast rule. You can choose to have
a nature photograph where depth of field does influence where
the viewer looks. On the other hand, when it
comes to portrait photography, photographers generally prefer
to have a shallow depth of field where the subject is in focus and the background
is out of focus. By learning how to
control depth of field, you can decide how much of the background will
be in focus or not. So in the next video, we'll go into depth explaining
what influences depth of field and how you can
control this important tool.
3. Controlling Depth of Field - Part 1: Perhaps the first and
foremost thing that affects depth of field is
the camera's aperture. Aperture refers to how open
is the lens on your camera. The aperture on the lens is determined by the
position of the blades. As you see in the picture here, as the blades get
closer together, the amount of light that
can reach the sensor of the camera becomes smaller, and as the blades
move further apart, the amount of light that
reaches the sensor increases. When the blades are
close together, that's called closed
or small aperture, and when the blades
are further apart, that's an open or wide aperture. What effect does this
have on depth of field? To go back to our analogy to the plane or the
piece of glass. Shooting with a closed
or small aperture is essentially like
shooting with a very, very thick piece of glass where everything in that
thickness is in focus. Whereas shooting with a wide or open aperture is like shot where there's a very thin sliver of glass whose area is in focus. Let's look at some
examples to see how changing aperture
affects the photograph. Here we have three objects all parallel to the camera lens. Because they are all parallel and equi distant from
the camera lens, they all will be in focus. If however, we were to rearrange them so that
they are staggered, then if we were to
take a picture with our focus being on
the nearest subject, the objects further away
become more and more blurry because they
are outside of that range of depth of
field that is in focus. In the picture we're
looking at right now, you can see from the XF data that I was shooting
at an F stop of 2.8, which is rather wide open. That means that the subject in the front will be in focus, and things beyond it will fall out of focus
rather quickly. In the next picture, I'm
closing down my FSTop to 7.1. And here you can see how
items even further away from my subject point are also
now coming into focus. And then when I go
down to NSTop of 13, everything is really
now in focus, even though my focus point that I'm telling
the camera to focus on is the subject closest
to the camera, that girl. Let's put the picture
side by side so you can compare at one time how the
dept to feel is changing. Understanding how
aperture affects depth of field is one of the
most important things that you can understand. The best way to do
it after you have the basic information from
watching these videos is to go and do it to actually
see for yourself how you can affect your depth
of field in your photos. So as an assignment, before we start the next video, I want you to get
out some objects and place them equal
distant from each other. Then focus on either the one closest to you
or the one furst away, and take pictures varying the aperture and see how that
affects your photographs. I recommend shooting an
aperture priority mode or manual mode when
doing these exercises. If you shoot in any other mode, so the camera will actually
change your aperture for you. And won't give you
the control you need necessary to learn the
exercise we're doing here. Have fun, and I'll see
you in the next video.
4. Controlling Depth of Field - Part 2: Next thing which photographers
typically do to affect the depth of field is by
changing their focal distance, otherwise known as focal length. This is done by changing
the zoom on your lens. When you zoom in
more, you create a shallower depth of field
and when you zoom out, you have a wider depth of field. Let's look at a few
pictures to illustrate. In this picture here, as you
can see from the XF data that I shot with a focal
length of 100 millimeters. You can see that the girl, who was my subject is
relatively in focus, and the other two objects
are less in focus. As I increase my
focal distance and now shoot at 200 millimeters, you can see that
the girl is still in focus because she
is my focus point. But the other two items
are now more blurry. And in this last picture, would I zoom in all the
way to 300 millimeters. So now you can see that the bird is much more blurry
than from where we started. While many photographers
will use this as a way of controlling
depth of field, this may not actually be a
true depth of field change. Because if you notice
the girl who's the subject in all
these pictures gets increasingly larger. In fact, if we were to
take the original picture shot at 100 millimeters
and blow it up so the subject is now
the same size in the photo where the girl is
shot at 300 millimeters, the blur on the bird behind
would be almost the same. What's happening is that changing focal
distance is magnifying the existing blur
that is occurring at the current depth of field that is caused
by your aperture. The aperture is still
creating the depth of field, but by changing focal distance, you are magnifying the effect of that depth of field blur. Don't get me wrong.
Using focal distance to create depth of field is a
very, very important tool. However, realize that
it must be used in tandem with changing
the aperture. Before going on to
the next video, I'd like you to take
a few moments to take out your camera again and practice changing focal distance and seeing how that
affects your photos.
5. Controlling Depth of Field - Part 3: The third factor that
affects depth of field is the distance of the
camera lens to the subject. By changing the distance between the lens
and the subject, you are essentially
changing the ratio between the lens and subject distance and the subject in
background distance. I know that speaking about ratios might make your
head start to spin. So let's look at some examples to make it more understandable. In next few pictures,
the items are placed equal distant from each other
and will not be moving. The only thing that will
be moving is my camera. In this first picture, I was standing around 3 meters from the subject, the girl. And as you can see, that
at an F step of 5.6, the girl and the chicken behind her are pretty
much in focus, and the horse is
a little less so. As I take a step forward
and refocus on the girl. She is still, of
course, in focus, and the chicken gets
a little blurrier, and the horse even more so. In this last picture, I step even closer to
the girl and refocus. Now you can see that
the chicken and horse are clearly out of focus. Let's put all three pictures together so you can
compare them in one view and see how even though I keep all the settings
the seam in my camera, but change the camera's
distance from the subject, I have affected depth of field. Now it's your turn. In
order to see for yourself, how the distance
from the lens to subject affects the
depth of field. I want you to take some
practice pictures. We have items set up equal
distance from each other, and practice moving closer to the subject in each
successive picture. Another thing you could do is have the subject at
fixed length from your camera and
only change how far the background items
are from that subject. One way to do this
is hold an item at arm's length from your
camera as your subject, taking photos of it,
and moving around, having backgrounds at different lengths
from that subject. I think it would be very
helpful to show you just what I'm trying to
do here for this example. And so you see here we have these three cars equal
distantly spaced. And what we're doing is
I'm going to take taking pictures where they stay exactly the same for
this first exercise, and I'm just going
to get closer. So I'm going to come down
and focus on the first car, and I'm showing at 5.6 aperture. So take a picture
here like this. And now we get closer.
Readjust for the car. You can compare how
to see how they change in the depth of field. Another example that
we could do is you take any of the
objects and hold it and you always want to keep
it the same let's take a different went
easier to maneuver. This one is going to stay
in the same distance from my camera all the
time as I swivel around to different distances
from the background. And then we can do is you can compare afterwards to see how much the background is in blur compared to the focus of the subjects that's
in front of you. All right. So I
hope these examples demonstrate what we're
trying to do for the exercises and that you have fun learning
about depth of field.
6. The Depth of Field Calculator: Till now, we've had many
examples where we've seen the effects of depth
of field empirically. That is, by experimenting
and seeing the results. However, there are tools
you could use as well to be able to accurately predict the depth of field before
you start shooting. There are many depth of field
calculator applications that you can have both on
the computer and your phone. By entering in the type of camera you have,
your focal length, the F stop you're using, and how far the subject
is from the camera, you can find what the estimated
depth of field will be. A tool like this can
be very helpful when doing nature photography where
you have time to set up. However, doing the exercises
that I've outlined in the previous videos is very important for your
everyday photography, and event photography,
you don't have the time to enter in
all these calculations. You need to have an intuitive
feel for how to use your camera to get the depth of field to achieve the
look that you want. Nonetheless, knowing that
tools like this exists, it can be very helpful
in some circumstances. I recommend that you check this tool out to
see how it works.
7. Conclusion: Thank you for joining me in this Skillshare course on
understanding depth of field. I hope that you've learned a lot about what causes depth of field and what techniques you can use to alter
the depth of field. As a final class assignment, I'd like to see an
example of you using depth of field to
take a photograph. You may submit one of
the practice photos from the previous videos, but I prefer if
you went and took another one because
practice makes perfect, and there's always more to
learn about depth of field. Thanks for joining me, I look forward to seeing you
in a future video.
 Avraham Nacher, Artist & Photographer