Transcripts
1. Course promo video: There. Have you
ever wanted to take amazing photos but didn't
know where to start, or maybe you're a
parent looking for a creative activity
for your kids? Well, you're in the right place. Welcome to my online
photography course where learning about
composition is fun, easy, and exciting for kids, teens, and anyone who wants
to improve their photography. In this course, I'll
show you how to transform everyday moments
into stunning photos. You'll learn tricks
like framing, finding patterns,
and creating depth, all with simple
tools you already have like your phone or
camera. Don't worry. This course isn't
about fancy equipment or confusing jargon. It's all about learning to see the world in new
and creative ways. You'll also get to
share your photos, see what others create, and cheer each other on in a
safe and supportive space. So if you're ready to start your photography
journey or just want to have some creative
fun, join me today. Let's capture the world
one photo at a time.
2. Composition for Kids 1 Intro to Composition: Hey, there, future
photographers, welcome to this exciting
journey where you'll learn how to take awesome photos
with great composition. Now you might be wondering
what is composition? Well, composition is how we arrange everything
in our photo. It's like setting up
the stage for a play. You decide where
everything goes to tell the best story.
Think about it. When you look at a picture, you want your eyes to be drawn to the most
important part. That's what composition
helps us do. Let's take a look
at two pictures. One will have bad composition and the other will have
great composition. Can you tell the difference?
Here's the first one. It's not very exciting. Everything's in the middle and the background is too busy. Now let's look at a second picture with better composition. Wow. This one feels much more
interesting, doesn't it? It's got balance. The
subject is off to the side, and the background
isn't distracting. That's the power of
good composition. Throughout this
course, I'll teach you some really cool ways to make
your photos even better. So they stand out and
tell awesome stories. You don't need a
fancy camera to be an awesome
photographer. Trust me. One of my favorite sayings is the best camera you can use
is the one you have with you. Think about it. If you
only have your phone, then that's your best camera. Even if you own the
latest fanciest camera with all the cool gear
but left it at home, it won't help you
capture the moment. No camera, no shot. Whether you're snapping
away with a phone, tablet, simple digital camera,
borrowed DSLR, or the newest mirror less
model, it doesn't matter. What makes a photo great isn't the camera. It's how you use it. With strong composition skills, you can create amazing photos
with whatever you've got. Sharing your photos and
getting feedback is one of the best ways to grow as a photographer and
it's super fun too. Throughout this course, I'd love for you to share your
photos with me and your fellow students in a special Google Photos
album I've set up for us. Don't stress if your
photos aren't perfect. This is all about learning
and experimenting together. Let's celebrate each
other's creativity and see how we can
inspire one another. I'm excited for you to share
your amazing photos in our private Google Photos
albums after each topic. Here's how to get
started step by step. At the end of each lesson, you'll find a link in
the resources section for that week's photo album. Click on the link
to open the album. Once you're in the album, look
for the Add Photos button. It's a small photo
icon with a plus sign. Click on it and then choose your one photo for the
topic from your device. After you upload your photo, you can add a short
caption if you'd like. For example, you
could share what inspired your photo or
which techniques you used. Next, spend a little
time looking at the photos your
classmates have uploaded. Leave a positive comment
on at least two photos. Remember to be kind
and encouraging. Here are the rules. Only
upload one photo per topic. No photos of people and always focus on giving
positive feedback to others. That's it. I can't wait to see the incredible photos you
create and share in the albums. Ready? Let's jump into our
first compositional technique.
3. Photography composition for kids 2 rule of thirds: Welcome back photographers. Now that we know
what composition is, let's dive into our
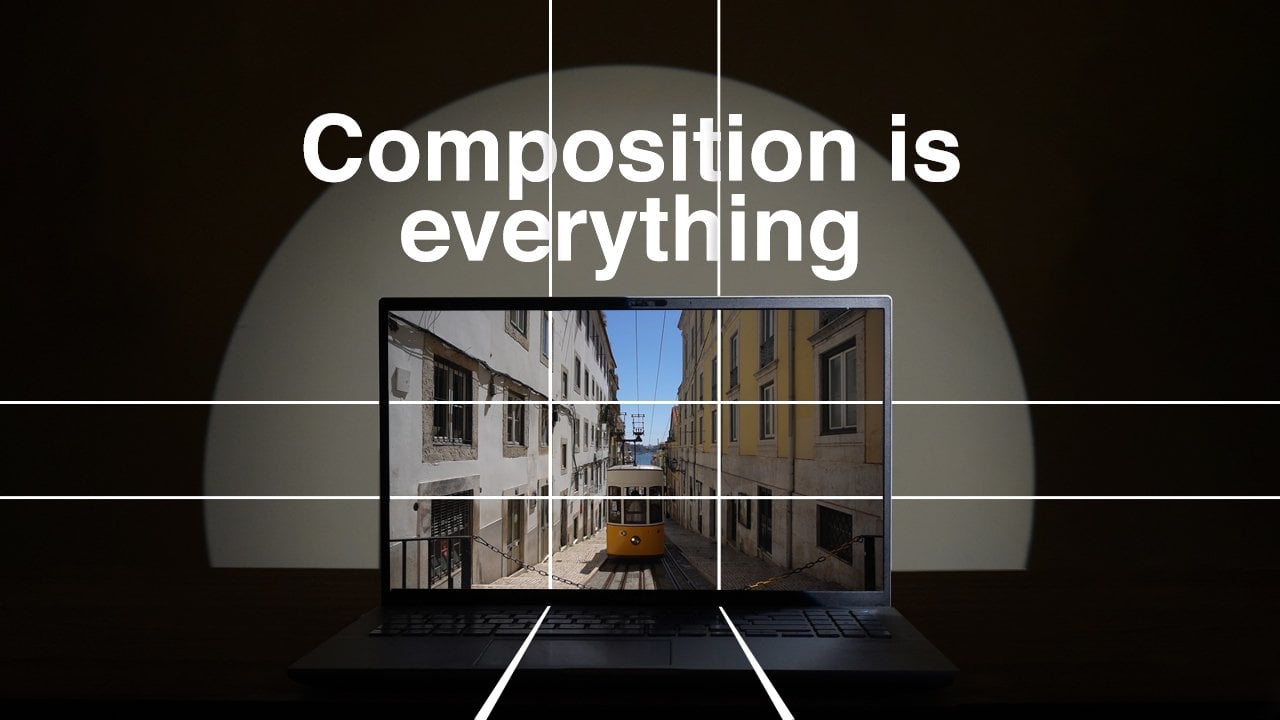
very first technique, the rule of thirds. The rule of thirds has
been helping artists and photographers create amazing pictures for
a very long time. It's a simple way to
make your photos more balanced and
interesting by dividing your picture into
nine equal parts using two lines across
and two lines down. The idea is to place
your subject along these lines or where they cross. This makes the picture
more fun to look at. This idea started hundreds
of years ago with painters. In 17 97, an artist named John Thomas Smith
wrote about it in a book. He noticed that pictures
looked better when the main subject wasn't
in the exact center, and he called it
the rule of thirds. Painters like Leonardo
Da Vinci also used ideas like this to make
their art look amazing. When cameras were invented, photographers began using
the rule of thirds too. It helped them make their
photos feel balanced and guide the viewer's eye to the most important
parts of the picture. Did you know the rule
of thirds isn't based on any scientific
discovery or natural law? It's actually rooted in artistic intuition
and human perception. What's fascinating is that
the rule of thirds likely resonates with us because of how our brains process
visual information. Studies in neuroscience and psychology suggest
that images with off center focal
points like where the lines of the rule of
thirds grid intersect, feel more natural and
engaging because they mimic the way we naturally
scan scenes with our eyes. That's why using this
technique can make your photos feel balanced
and visually interesting. Here's an interesting fact. The rule of thirds is actually inspired by something
called the golden ratio, a mathematical principle
found in nature, art, and even architecture. While the golden ratio
can be complex to use, the rule of thirds
simplifies it, making it an easy way to bring that same sense of harmony
and beauty into your photos. When you place your
subject off center using the rule of thirds, it
doesn't just look good. It creates space for the rest of the scene to add context
and tell a story. This makes your photo
more engaging and allows viewers to feel like
they're part of the moment. Today, the rule of thirds is a great starting point
for learning composition. But remember, rules are
made to be bent or broken. Once you get the hang of it, you can experiment and create
your own unique style. Imagine your camera screen has a big tick tack toe
board drawn on it. You've got two
vertical lines and two horizontal lines that divide your frame
into nine parts. These lines create four
intersections in the middle. The rule of thirds says, place the important parts of your photo where
those lines cross. An easy trick to remember is to not put your subject
right in the middle. When you move it to one
of the intersections, it creates balance and makes the photo feel more
exciting and natural. Let's look at an example. This photo is using
the rule of thirds. See how the subject is off to one side instead of being
smack in the middle. It makes the photo look
more dynamic, doesn't it? Grab your camera
and get ready to try the rule of
thirds in action. First, find something
interesting to photograph. It could be a toy, a flower, your pet, or even
a tree outside. Next, imagine your camera
screen is divided into nine equal parts like
a tick tact grid. Instead of placing your
subject right in the middle, try lining it up along one of the grid lines or
where the lines cross. This will make your photo look more balanced and creative. Snap a picture and
see how it looks. Try moving your subject
to different parts of the grid and take a few
more photos to experiment. The rule of thirds is more like a helpful tip than a strict
rule in photography. It's a technique that
can guide you in creating well balanced
and interesting photos, but you don't have to
use it all the time. Some of the best photos break
the rule, and that's okay. The most important
thing is to have fun and experiment with
what looks good to you. Don't forget to upload your
photo for this lesson to the Google Photos album and check out your
classmates work too. Share some kind words
or positive feedback. It's all about learning
and growing together.
4. Photography composition for kids 3 Framing: I'm back photographers. Today we're going to learn about a simple composition
technique you can use that can make your photos
a lot more interesting. Framing framing is when we use something around our
subject to make it stand out. It could be a doorway, a tree, or even the edge of a window. Think of it like a picture
frame, but in the real world. Here's an example. This photo shows a person
standing in a doorway. The doorway frames the person and draws your eye
right to them. Without the doorway, the
photo would be plain, right? But with the frame, it
feels special and focused. Let's check out another example. Look at the picture on the left of the dog in the living room. Do your eyes wander to
other things in the room, like the plant and the window? Now, look at the
picture on the right. See how the doorway
frames the dog? It makes him the
star of the photo. Good photographers
know exactly what they want you to notice
in their pictures. They use framing, like the
doorway in this example, to guide your eyes straight
to the main subject. Now it's your turn to try
the framing technique. First, find something that can act as a frame for your photo. This could be a window, a door, tree branches, or even
a friend's hands. Be creative. Your frame can be anything that forms a
shape around your subject. Next, choose your subject. It could be your pet, a toy, a flower, or even a friend. Once you've found both your
subject and your frame, position yourself so the
subject is inside the frame. Take your time to
line up the shot so the frame surrounds
your subject nicely. Now, take your photo and check how the frame makes
your subject stand out. Does it guide your eyes to the most important
part of the picture? Try a few different frames and angles to see how they change
the look of your photo. Have fun experimenting
with framing. Don't forget to upload your
photo for this lesson to the Google Photos album and check out your
classmates work too. Share some kind words
or positive feedback. It's all about learning
and growing together.
5. Composition for Kids 4 Layering: That you've learned
about framing, let's take it a step further
and talk about layering. When we take a photo, it's not just about the subject
in the middle. It's about what's around it. Layers in photography
mean we have foreground, middle ground and
background elements that help tell a story
and give the photo depth. Depth in photography is what makes a picture look
more like real life. It shows how things
are near, far, or in between, just
like how you see the world with your own
eyes. Here's an example. In this photo, we have flowers
in the front, foreground, trees in the middle,
middle ground, and a mountain in the
back, background. All of these layers make
the photo feel like it has depth and
tells a bigger story. Look at the first photo
of the two sheep. It's just the sheep and there isn't much around them
to help tell a story. Now, look at the second photo. The background shows fog, which tells us it's a cold day. In the middle ground, it's dark and there's
no grass growing. But in the foreground, the sheep are standing on a
patch of green grass. We can guess they chose that
spot so they could eat. See how the layers,
background, middle ground, and foreground, add
more information to the photo and create a story. Here are some more examples. Take a look and see if you can figure out which parts
are the background, middle ground, and foreground. Think carefully about
what's far away, what's in the middle, and
what's closest to the camera. Now, let's check and
see how you did. L. L. L. Now it's your turn. Find a place where you can
see different distances. This could be a
park, your backyard, or even your living room. Look for three things you
can include in your photo. Something close to you
for the foreground, like a flower, a
toy, or a table. Something further away, but not too far for
the middle ground, like a person, a tree, or a chair, something even further away
for the background, like mountains,
buildings, or a wall. Arrange your camera so you can see all three
layers in one shot. For example, you could crouch down to include
flowers in the front, a tree in the middle, and the sky or buildings
in the back. Take your photo, try moving around to see how
changing your position can make the layers
look more connected or interesting. Look
at your picture. Does it tell a story or make you feel like
you're really there? That's the power of layering. Don't forget to upload your
photo for this lesson to the Google Photos album and check out your
classmates work too. Share some kind words
or positive feedback. It's all about learning
and growing together.
6. Composition for Kids 5 Perspective: Come back creative
photographers. Today we're going to
explore perspective, an awesome way to make
your photos stand out. Perspective is all about where you stand when
you take a picture. As a photographer, you
don't just stand and take a picture from eye level
like everyone else does. You get to show the world
in a whole new way. Try crouching down low, climbing up to a higher spot, or even lying on the ground. You might get a little muddy,
but that's part of the fun. Maybe you'll find a cool angle by looking through
the branches of a tree or discovering a hidden
spot off the usual path. By changing your position, you can capture photos
that show the world in a unique and exciting
way that others might not have noticed.
Here's an example. If you take a photo from
a low angle looking up, your subject might look huge and powerful like a superhero. From a high angle looking down, the subject might look
tiny and vulnerable. Let's check out
some cool examples of what happens when you
point the camera up. Now, take a look
at these examples of pointing the camera down. See how each angle creates a totally
different perspective. Look at these three photos. Aren't they so different? All it took was changing
the camera angle. Let's try an activity
to see how changing your position can make a big
difference in your photos. Look around for something
fun to photograph. Maybe it's your pet, a toy, a favorite plant, or
even a book on a table. Pick something that you think
looks cool or interesting. Start by standing
up straight and holding your camera
at eye level. Take a photo of your
subject just as you see it. This is the regular view, the way most people
might see the subject. Next, get low, sit, kneel, or even lie on the
ground so your camera is tilted slightly upward
toward your subject. Take a photo from
this low angle. Does the subject look
bigger or more dramatic? Now let's get creative
with a high angle shot. You can hold your
camera above your head, stand on tiptoes or carefully use something sturdy
like a chair or step. Just make sure it's safe and
stable before climbing on, and if you're unsure, ask
someone to help you check. Hold your camera above your
subject and look down. Take a photo from
this high angle. How does your subject look now? Smaller, softer. Look at all three photos. Notice how each one
feels different, even though you photograph
the exact same thing. Don't forget to upload your
photo for this lesson to the Google Photos album and check out your
classmates work too. Share some kind words
or positive feedback. It's all about learning
and growing together.
7. Photography Composition for kids 6 Forced Perspective: Hey photographers, now that you know the basics
of perspective, let's try something really
fun, forced perspective. This is a photography trick
where you use distance and positioning to create
an optical illusion. It can make things look bigger, smaller, closer or farther
away than they really are. By playing with
angles and spacing, you can create surprising
and funny effects that make people look
twice. Here's how it works. Imagine you're trying
to make it look like someone is holding
the sun in their hand. You would stand far
away from them, position your camera so the sun appears right above their
hand and take the shot. Or let's say you want to make a toy look
as big as a person. You'd place the toy close to your camera and have the
person stand far away, then align them so they
appear to be the same size. Your task today is to create a fun forced perspective photo. You can make someone look like they're balancing on a spoon, holding up a tree or squishing a building
between their fingers. The key is to use your
imagination and have fun. Let's break it
down step by step. Think about what kind of fun
photo you want to create. Do you want someone to look like they're stepping
on a tiny person, maybe balancing a cup on their head or holding a
giant object like the moon? Find a wide open space
like a park or backyard. This gives you room to position your subject and objects
at different distances. Place one object or person close to the camera and the
other farther away. Move around and experiment with angles to make them look
like they're interacting. For example, to make someone look like they're
holding a giant object, position the object far behind them and your camera close
to the person's hand. Forced perspective
works best when you move the camera
to align the objects. Try crouching,
tilting your camera or stepping back to
find the perfect angle. Once everything is lined
up, take the photo. It might take a few tries
to get it just right, so don't be afraid to
adjust experiment. When you're done, look at your photo and see if
the illusion works. Do you think it would make
people stop and think? If it's not quite right,
go back and adjust the distance angle or positioning until it looks
just the way you want. Forced perspective is all about creativity and having fun. Enjoy experimenting and
discovering how you can use your camera to transform the ordinary into
something extraordinary. Don't forget to upload your
photo for this lesson to the Google Photos album and check out your
classmates work too. Share some kind words
or positive feedback. It's all about learning
and growing together.
8. Composition for kids 7 Leading Lines: I back photographers. Now, we're going to talk about something called leading lines. Leading lines are
lines in your photo that draw the viewer's
eye toward the subject. These lines could be roads, fences, paths, or even
the lines on the ground. Let's take a look
at this example. See how the road leads your eyes straight to the person
standing in the distance. That's the power
of leading lines. They guide your eyes to
where the action is, creating a sense of movement
and excitement in the photo. Compare these two photos
of a person in a field. In the first photo, there
are no leading lines, so the person doesn't
really stand out. But in the second photo, the pathway creates
leading lines that point directly
to the person. These lines guide our
eyes to the subject, making it clear that
the photographer wants us to focus on them. Now, let's look at some examples of
architectural leading lines. Remember when we talked about
depth in the layers lesson, leading lines can also help
create depth in your photos. Look at these nature photos. See how the leading
lines make it feel like you can look
further into the picture. The lines create a sense of distance and make the
photo more interesting. It's your turn to find
some leading lines. Start by looking around for things like a road, a sidewalk, a path, or even a row of
trees, fences, or benches. These can all work
as leading lines. Once you've found your lines, think about what you
want them to point to. Maybe a person, an object, or something interesting
in the distance. Position your camera
so the lines guide the viewers eyes to that subject and then take your photo. Don't rush. Try different angles and positions to see
what works best. Have fun and let those
lines tell a story. Don't forget to upload your
photo for this lesson to the Google Photos album and check out your
classmates work too. Share some kind words
or positive feedback. It's all about learning
and growing together.
9. Composition for Kids 8 Symmetry: There photographers. Today we're going to talk about symmetry. Symmetry is when things are the same on both sides of a picture, like a mirror image. Symmetry can make a
photo feel balanced, calm, and even a little magical. Look at this picture,
for example. The building's reflection
is symmetrical and it makes the photo look
really cool and peaceful. You can find symmetry all around you, especially in nature. Look at this butterfly,
for example. Is wings are a perfect
mirror image of each other. Flowers, plants, leaves and trees often have beautiful
symmetrical patterns, too. Slow down and take a close
look at the little details. Nature is full of tiny,
amazing symmetrical designs. Animals and even some landscapes can also have symmetry
if you look carefully. Now let's talk about
symmetry in architecture. Buildings, bridges and windows are great places
to spot symmetry. The more you look,
the more you'll start to see it everywhere. And if you pay attention, you might even notice some of the other composition
techniques we've talked about, like leading lines or framing. Another great way
to find symmetry is with reflections
in still water. When the water is calm, it creates a clear reflection that can double the
beauty of your photo. The stiller the water,
the better the effect. Keep your eyes open for ponds, lakes, or even puddles. They all work. Your task today is to hunt for symmetry
in the world around you. Start by looking for
something that has two sides that are the
same or nearly the same. This could be a reflection in
a puddle or on still water, a building with
symmetrical windows or doors or a pattern in
nature like a leaf, a flower, or even a
butterfly's wings. When you've found
something symmetrical, take your time to line up your camera so the symmetry
is clear in your photo. Reflections, try to
position yourself so the line where the reflection begins is in the
center of your frame. For buildings or patterns, make sure you're
standing straight on so both sides look balanced. Snap your photo and check
if the symmetry stands out. If it doesn't, try
moving closer, stepping back, or adjusting your angle until you
get the perfect shot. Have fun exploring and capturing
the beauty of symmetry. Don't forget to upload your
photo for this lesson to the Google Photos album and check out your
classmates work too. Share some kind words
or positive feedback. It's all about learning
and growing together.
10. Composition for kids 9 Patterns: Now let's explore patterns. Patterns are repeating
shapes, lines, or colors that make a photo look fun and rhythmical.
Look at this photo. See how the tiles on the floor create a repeating pattern. The pattern makes the photo feel more interesting
and exciting. Just like symmetry, patterns are everywhere if you slow
down and look carefully. In nature, you might spot
patterns in a sunflower seeds, a spider's web or the
intricate design of a leaf. These patterns are
repeated shapes, lines or colors that create balance and
rhythm in a photo. Patterns aren't just in nature. They're all around us
in everyday life too. For example, look at this row of buttons or the repeating
parts of this fence. Even in a busy city street, patterns are hiding
everywhere on buildings, sidewalks, and even
the arrangement of objects in a shop window. The more you look, the more
patterns you'll discover. Patterns can make a photo feel
organized and harmonious, like the examples you see here. A great way to highlight a
pattern is to fill the frame. This means getting
up close and making the pattern the main
focus of your photo with nothing else in the
background to distract from it. Now it's your turn. Look around your
home, your backyard, or anywhere you are, and
search for patterns. It could be the veins on a leaf, the design of a brick wall, or even the way books
are stacked on a shelf. When you find a pattern, take a close up photo to fill the frame and make the
pattern stand out. Experiment with different
angles and distances to see how the pattern
changes. Happy hunting. Don't forget to upload your
photo for this lesson to the Google Photos album and check out your
classmates work too. Share some kind words
or positive feedback. It's all about learning
and growing together.
11. Composition challenge: Fantastic job photographers. Now it's time for
your big challenge. Your challenge, if you choose
to accept it is to create one final masterpiece using everything you've
learned in this course. You've learned so many cool
compositional techniques, and now it's time to
put them all together. For this final project, I want you to take
your best photo using the techniques we've
learned, rule of thirds, framing, layering, perspective,
forced perspective, leading lines,
symmetry and patterns. Take a photo that
uses at least two of the compositional
techniques we've explored, like the rule of thirds, leading lines,
framing or patterns. You don't have to
use every technique, but aim to combine
a few to create a photo that tells a story
and shows off your skills. This is your chance
to get creative, experiment, and showcase how much you've grown
as a photographer. When you're ready, upload
your final photo to the shared Google Photos
Challenge album and tell me which compositional
techniques you used. Remember, this isn't
about being perfect. It's about experimenting,
having fun, and learning from each other. Ready to take on the challenge? Let's go. Let's see what
amazing ideas you come up with.
 Rebecca McQueen, Pro Photographer & Ex-Teacher