Transcripts
1. Introduction to the class: Hello everyone. I
hope you all are doing well. This is crucial. I'm making this class
perspective sketching like an architect for people who
are starting out at Scratch. Or I've never done any
perspective sketching before. And also for people who are at an intermediate level who
are familiar with sketching, but are looking to
improvise on their skill. This sounds interesting to you. I'll be guiding you on
basics of perspective. Perspective is how
perspective sketching can be useful in your architectural
design presentations. And how Perspective
Sketching can also help you sketch out
some details which are easier to explain
in sketches rather than any drafting
or drawing mediums. So you'll also be learning
about the different types of equipments that you can use for your
perspective sketching. What are the different
types of mediums you can use to make your
sketch look better and how overall to improve on
your sketching skills to make it look more architectural than just a perspective sketch. If you're also interested
in architectural rendering, architectural
modelling, then you can check out my
Skillshare classes. You're going to go to
my profile and look at the different classes
that I've already made. And if you find something interesting or something
that will help you out, then you can go
through those classes. And yeah, that's about it
for the brief to this class. And I hope you guys find something that
might help you out. So I will see you
guys in the class.
2. Understanding what perspective is: Welcome to the Chapter
One of this class. I'm going to be explaining about perspective in this chapter. So before we get
into any detail, let's understand what
perspective actually is. So what is perspective? Perspective is a
form of art that represents a
three-dimensional object on a two-dimensional
surface to create an impression of height,
depth, and scale. Let's imagine that there is a building and that's a
three-dimensional object. And you want to create
an impression of that three-dimensional
object onto a 2D surface, which is probably
a drawing sheet or any paper that you are
going to be sketching onto. So how do you create
this real-life 3D object into onto a flat 2D surface? So you are basically going
to do that with the help of perspective, which
utilize height. So you are going
to see that there is some sort of
height indication, some sort of depth. So you will see that there
is some sort of depth into the sketch and also
some sort of scale. So these are three
things that come together and merge to form a perspective sketch
on a 2D surface. Okay, now that we know the
definition of perspective, there are three main rules of achieving this
perspective sketch. Those include horizon,
line and vanishing points. So whenever you are looking to create a perspective sketch, you have to determine where
your horizon line is, where your vanishing points are, and also where
your eye level is, either above or below
the horizon line. Based on this, you will
understand how tall your sketches will be or how
much deep your sketches are. Now that we know what
perspective means, what are the three
different roles required to achieve
perspective sketching? Let's understand the
different types of perspectives that we have. They're mostly three different
types of perspectives. The one-point perspective,
the two-point perspective, and the three-point perspective. So 1 is mostly for interior design sketches with us catching an interior space. Two-point perspective
are mostly used for outdoor spaces or
exterior buildings. And three-point
perspective is mostly used where you want to
show a different order, more interesting
angle of a sketch. That is either an ions view
or a bird's eye view sketch. So the most common type of
sketching that we generally have is a 2 perspective or
a one-point perspective. That's it for this class. I hope you guys have a better understanding
about what perspective is. What are the different
types of perspectives, and what are the rules to
achieve a perspective sketch.
3. Types of Material and requirements for class: Before you get more
into this class, there are a few materials
that you need to continue, and that would include
a set of HB pencils. These fences are from different people so you don't have to buy
anything specific. I have fuel from upset, I have fuel from Staedtler, and there are many
different things, so it doesn't really matter. All that matters, that is, you have a set of hedge pencils
and a set of B pencils. Pens as well to
help you draw are those construction
lines which are more light and more towards something which you don't want to emphasize on your sketch. And the B pencils will help you make those lines standout, the comparative to
the hatch lines. So these are the
hedge and B pencils. You can also use a
mechanical pencil to get fine lines depending on which one you're
comfortable with, either hedge pencils
or B pencils, or you can also use
a mechanical pencil. That type of pencils
that I have. Charcoal pencils. These are
pencils from cradle color. I guess. Yeah, that's what it is. So
these are a set of pencils which have light charcoal, heavy charcoal, soft, charcoal, hard, dark or stuff like that. And there is also
like brown color, dark brown, light
brown, stuff like that. So these are some
things that you can use in your sketches
if you want. This is not mandatory. The
next materials that I have, these microns is often outline. And these migrants help
you draw ten and take a marker lines so
you can see that they have a different number
labeled on each of them. There. This is off by 0.5 thickness, this is 0.8, this is
0.3, and this is 0.1. So you can see that we
have a very fine line. I don't even think
that you will be able to see this on the camera. It's a very fine marker. And then you have something like warranted the
highest one I have. So you can see the
point on this. Let me open both of those. So now if you compare
both of these, like let's, let me
put it on my skin. You can barely even see
the point on this one. And you can at least make out that there is a layered
on top of that. So this is the 0.1 and
this is a 0.8 micron. These are cheap. These are better to create thick outlines or create
hatching for your sketching. If you're someone who
likes to sketch with pens or microns or something
like what I just showed. And if you're looking to go more deep into the material that you use and you are
interested in using something more
better in quality, then you have an option
called rotting pens. I have for you here. So these other ordering pens, and these are as same
as the migrants. They are 0.2.40.8.6. So I have 2468 and it's the
same like the migrants. They are the varying thickness, but the difference
is that this is not a marker, this is a pen. You'll see this tube. You have to fill this tube with the ink fluid that you buy. Those come in boxes like this. This is the black ink and
I also have a lighting. So they come in a box like this, which you can open
the cap and just pour the liquid into the tube
of the rotating pen. This is how it looks. You're going to
open it like this. And these are something which
require heavy maintenance. They require a proper
wash after use. The ink doesn't dry out
and close the board. As you can see, the neighbors
were eaten. Very dedicated. If you put too much force
while you're sketching, then you might bend the nib and fluid will stop
coming out of it. So these are towards
the expensive side, but also something which
if you are interested and you are looking to
put in the work for it, then you can buy this. So all of these
have the tube below and all of them open
from the top like this. So you can use this to sketch. These are mediums which are
mostly used for sketching, but there are also parts where you would
like to add some color to your sketches or add some details like
rendering or hatching. So you can use those
for hatching as well, the microns and the routing. But let's say you wanted
to add some colors, so you have few options. I have this fine
liner color markers, so they have these colors on it. So you can use this to create details like if I want to do window hatching and I want to use a blue color,
I can use this. This has a fine tip like this. So it's almost like a micron, but these don't have
thickness differences. They're all the same. Thickness is just that. You're going to add some
color to your sketches. Let's say you want to add
some landscape, some grass, you want to create
an indication, you can use this green
color, fine liner. This will add some color to
your perspective sketch. Then let's say you want to add something where you want
to fill some colors. So you will have something
like soft patients. These are different
colored chalks. They're soft and
you can use them on top of a specific paper. I'll show you that
paper as well. And you will have to
smudge it to create, it creates a blemish and a
blurry kind of an effect. So let's say if you want to color out a sky or you
want to color some clouds, then you can use those jokes. Just grab it on the
paper and smudge it. This way to create a
nice bloom effect. And many people prefer that
in their sketches as well. And let's say you
want to just be simple and you want to
use colored pencils, then I would recommend you get this PRISMA color, ventral side. This is a set of 7472 colors.
These are all the colors. These are more than what you would require
perspective sketching, but that already, I've already got our pencils that are not very
expensive also, and you can use them to bring your sketches to another level
by using color rendering. Know that we have spoke about all the pencils and markers,
microns, and stuff. Okay. Wait, I have one
more thing that is, these are, I have a few markers. These are something
like Copic markers. But they're not exactly, but yeah, there's
something similar to that. They have a fine nib on top and they have a flat nib
on the bottom like this. You can use this to color your perspective
sketch as well. And this is a colorless blender. So let's say you are mixing
two different colors, probably not pink and orange, but let's say if
you want to plan to different micro Copic markers or any other markers of salt. You can use this
colorless blender to just blend both of those
colors together seamlessly. So this has a transparent liquid that helps you blend
them both the same. It has a fine nib on the top and a flat
nib on the bottom. So this is called a
colorless blender. And I also have
this white gel pen. This is something that I enjoyed by Schneider
using in my sketches. This helps you add
highlights on your sketch. So let's say you
have a sketch and maybe you had a mono
tone color on it, let's say dark gray and
brown shade on that. Let's say you want to add
some more depth to it. So you will use this white color gel pen
that creates some kind of a reflection effect
or a glossy effect on your glass surfaces or steel surface or
something like that. Or if you want to
create an outline showing that there's light
coming from the background. So there are many
different options you can do with this white gel
pen coming to paper. For this class, we don't have
any specific requirement. You can use any printer paper
which is off 70 or 75 GSM. Let's just consider that, that is having a soft surface. Whereas other papers, they can either be thick or thin
enough or to smooth. The rough and smooth determines
how much teeth the papers that represents how rough
or smooth paper is smooth. Then if you're using a medium such as markers, then
that'll be fine. But if you are using
something which is, which has more detail
and you want to use something like the software
that I showed you, the jokes, you will require something which is
more than enough so that it picks up
more of the medium. And you can have some more color on that and
you will have more control. So the harder you press, the more teeth you been
through and the lighter you press them on amount of layers you can apply it
on top of each layer. So far the soft pastels, if you want to have
something harder, this is a paper, this is specifically
made for those patients. And I don't think you'll be
able to see it on the camera, but this is a very
rough surface. It has so much data on it. Like you can literally
feel it rubbing your hands across their
different colors. So it doesn't really matter their tone sheets
for this class. But this class I'm going to be using the printer paper,
like I mentioned, it's just a soft, fine paper with the, It's slight amount of tweets. It's not very
rough, it's smooth, so I'll just be
using pencil line, probably marker,
so I don't really require that much teeth or
roughness on the paper. And that those are the different types of
materials that you can use. Perspective sketching, those are the different types of
papers that you can use. And please don't forget that you require hedge and B pencils
and also printing paper. Also, if you have migrans or if you have any fine liner markers, then that would also
be helpful for you to create these sketches
in the coming class.
4. Practice free hand sketching: Hi guys, This is Chapter three. In this chapter I'm
going to be showing you how to start warming up for sketching and
how to get into the zone of
perspective sketching. This is going to be
a top-down video, obviously, since I have to
show you what I'm sketching. And right here we have
our printer paper and we have our raw materials
right in our hands or each. So now, before we get into a
proper perspective sketch, if certain things that are
required for you to learn and practice so that
you can be better at the sketches that
you are going to do. So as you can see,
I have my paper placed straight, my body. I do not want to angle it to any certain angle like
this or like this. Since if, let's consider if you're drawing a straight line and if you say that I'm comfortable in this specific angle and you'll
sketch this line straight. But then when you are going
to draw something here, you are not going to
draw something straight. You're going to draw
something like this. So this is not
something we want. We do not want one straight and when we want to
keep it straight, and this is how we add
one to place our paper. We're going to put
our body, right? Finally, do the paper. And the main things that we need to learn before
we get into sketching. Very simple things like
shared line is diagonal, lines are perpendicular lines. These are all
parallel lines that will be sketching all
through that paper. So I, let me just show
you what I mean by that. So let's say I'm going
to start warming up. And I'm going to be holding
the pencil very light. This is a HB pencil that I have. This pencil has motivated
to it since it's base pins. And so I wanted to
start off by drawing straight lines all the way from the left to the
right of the page. So as you see, I did not
draw very straight line, but that's not a problem. That is how the shore, what our district scale
and perspective sketching. So this is what I'm going to do the same for the
rest of the lines here. I'm just going to start
drawing lines like this with a very
light handedness. I'm going to try to keep my
pencil as night of the paper as possible and
also trying to move my hand as straight as possible. This is not a class
where you are going to just watch
me do something. I want you to walk
at your own papers, place the order on your
person in front of yogurt your own material for the class in front of you
and follow along with me. This is an activity which we have to do it
together so that I know for sure that you guys are learning and
taking the right steps. So now let's just
continue by your drawing. All the lines. Draw the beach. This is
something we have to keep doing until we feel that
our hand is steady enough. I just see my lines
are getting better. I'm just going to keep
going all over the page. You can see that my lines
are getting better now. They have a
consistent thickness, a consistent Loch Ness
through all that. And they are not very
shabby, mostly straight. So I think I'm doing well. I hope you guys are
doing well. We don't have to worry too much about how your lines
are coming out. And also keep in mind that
you will not be drawing such straight lines from
end-to-end of your page. So you do not want
to worry about if your line is exact. It's okay. You will be drawing
smaller lines comparative to this
and smaller lines. I'm more competitive to a longer life so you can
draw a straight line, more straight like this then
it compared to this line. So I hope that makes sense. Let me just keep on doing this. And I'm going to
show up right here. I guess my lines
are good enough. My lines are having a
proper consistency, as you can see that they were
light here, but at archaea. So that is not
something what I want. I want to keep my hand steady and keeping that line straight. As you can see, I've improved. This. Is it for the
straight lines? I want you guys to
finish one voice shoot. And if you're still feeling
like you want some words, well, I'm hoping your
hand then you can do another sheet in the
same manner as well. Now that we're done with the
practice of straight lines, we're going to start drawing
perpendicular lines. And we're going to do the same like what we did in
the previous sheet. But instead we're going to
do it from top to bottom. So I see him right handedness trying to
keep my lines straight, keeping my paper color
to the body and not rotating it as part of my knee and trying to maintain the
same thickness of the line. This is what I'm
doing right now. I want you guys to follow
along and practice along with me so that your base. I feel like my lines are
coming out pretty good. They are not very shabby. There. They don't look like they haven't drawn with a scale, but there are also
straight enough. So that is how it
is and maintaining the same consistency of the
line thickness of the line. I feel like I'm doing good. Keep in mind that
this is not always, you do not want to
compete with someone. That is not what this is about. This is about you taking your own work time
and lying dog. Sketch that you are
satisfied with is an art, is that you are supposed to win or you might
lose against someone. Just take your time
and try to see that whatever you're doing
is coming out too well. So there is no need
to rush a good time. Are these needs if your lines are looking
something like this, that means you are going
on the right track. You're not rushed. Like I said, if you rush, really not doing something that will not have consistency, it's very dark yet
it's very light here. It's kind of route. So that is not
something you want to make sure that
you take your time. And I hope you guys are
following along and you are at the same
stage as I am. Now. Since we finished
straight lines, perpendicular
lines, we are going to do the same with
diagonal lines. So that is like this. So they wanted to see
that you are able to draw lines across
the page like this. And also wondering like di, have white eyes sketches. You'll have to keep
rotating your pencil after every line probably, since if you draw
something like this, has already begun,
blends like this. So you want to use
the sharper site, so you'll just get a bit so that the next line you draw
is something more shot. So that is something
I keep doing. This should look good. I want you to do this
on the worksheet, not just something that
guided once you're done with the diagonal lines from the
bottom to the top this way. Then you want to do from the other side and opposite
direction like this. These lines will help build your perspective lines
from your vanishing point. So you have to make sure
that you are able to do these lines as
straight as possible. You don't have to give a very
shabby. That's all right. So I started to mess up here. That was because my hand
is going off the paper. So I would want to readjust
but not in an angle. I want to just move
it to the side so that I have some workplace. Okay. So you can see that the lines
look pretty good to me. Once you're done doing
these diagonal lines, diagonal lines,
perpendicular lines, and also the straight lines. We can start by sketching
some basic shapes. So the basic shapes would
include something like a squared like this, or
something like this. Rectangle, something which
is longer like this. You can dry out
triangles and stuff, all the basic shapes
that aren't in school. So that is something
you want to do. Remember order so
good like ducts, so you want to keep
practicing squares. So there is something like this because squares or something, everyone going to use a
lot in your perspective, sketching rectangles the same. You are going to be
using this a lot. So you want to
practice these shapes. As you can see, I'm not
positive. Perfect myself. I added overdraw. I did know it's more than
nine then it needs to be. That's okay. It's
completely fine. You don't all have to be perfect sitting there like this and drawing every shape exactly
what it needs to be. It's okay if you're
driving a bit different so you can always go back
and kind of like that. Looks fine. You're going to
draw a rectangle like this. Okay? So I wondered all
the main shapes are square and a rectangle. I wanted to go practice
one or sheet of squares. So just, just started drying different size of those
squares like this. Something like that. Your frame sizes,
all the rectangles.
5. Different line weights and line types: Instruct, but I'm going to be showing you the
different types of lines and a different type
of line rates in lines. So since I had already
read ahead and B pencils, so let me just take a few pens. I have one hedge funds and everyone We've
been sit with me. This is a six people in
Seattle to be specific. When it comes to language. There are a whole spectrum of language that you can use any alternate,
high above sketch. So let's say you
start from hedge, hedges, a light line. This is light. And
it goes all the way to something that is dark
that some events at. And this is not the events of this as the number increases, like somewhere around six feet. Adb, these pencils
that have a ticket. So they are thick and
indeed be pincers are soft. And as your were to hedge
fences and if you go towards the end where it had two or three, had
something like this. These are very thin thin lines and dad are very hard like hard, light and thin lines. So this is how it works. So there's some
unknown six hedge, forward hedge, the hedge
to hedge and hedge. And towards this side
it's hedge be OB, three, maybe four to be this height be sometimes
there's six, B to be. The main ones that we'll be using sketching is
I would recommend you either know Hetch, Hetchy. These are totally fired up
and says that I have my one, I'm using countries hedge, so it's still not very light. I mean, you can
it on the camera, but it's it's night, depending on how much
pressure you put two wedges, something which is more lighter than this but can be
used in sketching. And further darker lines, something you want to
show more contrast on to something which you
want to emphasize on two, I would recommend you
use anything like Toby or you can also use
six v or let it be. So Adobe is something
you can use for doing a lot of
money to sketch lines. And if you want to draw
something which is more dark, so let's say you have, you have a square like this. So this is done with the hedge funds that this is an orange, something which will be visible after you start
using the pen tool. I mean, you have to obviously
it was very likely. You cannot. We're so much better
that way I did because I want you guys to be
able to see it on camera. So that is why I'm using that. There's enough want
to be offensive. So let's say I start
drawing my lines. This is a bent
rectangle that I drew. You can see me Vincent lines, and you can also see
the edge pencil lines. So this creates that
artistic look when, let's say you want to create
more emphasis on this line, showing that it's
more darker line to separate it from
the bag at home. So you would use a sixth events and that's something like this. So now you can see
the difference. This is more dark and this is more like That's the difference that had been set
to unhappy opening. It also helps you in
your line weights. So you're kind of hedge funds
is when I've night length. And as you will do
your events is, let's say this is Adobe line. This is a freebie for b and then you have a
FIB than six feet. I probably need to have IV, but maybe not right here. So that is, that is how it goes. So this is the spectrum
of your names edge. Once, once you start getting
used to these pencils, you can probably just use two different
ventures like I do. I always, I hedge fund second-order all my
voice lightest lines like this and probably some
better on Toby and six B, to draw my moisture
darkish lines like this. This is your line weight. And these other nine weeks. Now I wanted to
show you guys about the different types of
lines that you can drop. We have different
types of lines that we can use to indicate on
Mark, Nightline represents. So you can use a dotted line. This dotted line will help you, or something like this,
evolve your sketch. So let's say you are
drawing a blind. This is your outline
of your plan. And you have a roof that is extremely
old, don't care plan. So now when you use
your HMP events, as you can see that
I'm going to be using this experience and this is the name that are born
to represent my walls. These are thick lines. I'm going to use something
which is more lighter, the HB pencil to draw the
dotted line around my building. So this is going to represent the cantilever above my plan. That's just something like
that. I hope you get the idea. This is the dotted line. We have straight
lines nor deadlines. You have dimension
lines which are indicators like
this or like this, depends on your personal
preference and your game looks. So these aren't I
mentioned lines. Okay. So those are probably some lines that I can
give you as an example. So like I told the
straight line, I mentioned line, an
alternate dimension. And this is also dimensioning a few lines that you can use. The combination of
your line weights and line types will help you create a preservative architecture
perspective sketch. So when you have something to show it like if
we're trying to create a due date or
a specific brand, like if you want to
show perspective, I manage all of those sections, then you can use these
different dots and lines. They're different
line weights to represent your
construction lines. So let's say you draw a
construction line like this. Construction line like this. And all, you're going
to use this plane, the one like this one, but I present your
break and this window. And also if you wanted to
show your dimension lines, then you can do something like this and draw it like that. These are lines, you're going, obviously this is a section, but this suggests that
representation about how you can use different lines and how you can use different line weights.
6. One point perspective sketching: Now that we have learned the
different types of lines, we have practiced sketching
different types of lines. Have learned the different
types of line weights, the different types of lines, and how we can represent
those in our sketches. Let me explain you more
on perspective now. I'm going to be
showing you examples on what one-point
perspective means, what two-point
perspective means, and what three-point
perspective means. Let's start with one-point
perspective first. When you say one-point
perspective, it means exactly what it sounds. That is 1 and it is a
perspective sketch. Hey, all you will need a vanishing point in
perspective sketching. We'll need a horizon line
and we need a high level. So these are the
three things that are required to do a
perspective sketch. Okay? So now the first thing we need to determine
is our horizon line. So let's just say this
is our horizon line. Okay? No, since it's a
one-point perspective, we have one vanishing
point, just one. So we have to decide where
that 1 is going to be. And let's just consider
that on the horizon line. Let's, let's consider
that it is here, and this is our
horizon line, okay? And horizon line like this. And this is our vanishing
point like this. So whenever you draw
these horizon lines and the vanishing point and
the vanishing point lines, you have to make sure that
they are very light so that they don't
become the sketch. They are only tools for you to create the required sketch,
their construction lines. So now we have our vanishing
0.1 vanishing point. We have our horizon line, and our eye level is somewhere
around the horizon line. So now when we want it, let's, let's create a box. So I'm going to draw some
lines from here like this. So these are my lines
from the vanishing point. And I'm going to
connect them like this, trying to create a box. So it's like this, okay? It doesn't have to be
exactly connecting on every different vertex. It's okay if it doesn't
connect like this. And now we have our box. So since we draw these lines, the lines that are going through the vertices of
our box like this. Okay, I'm making it some more darker so that you
can see it on camera. But this is not how
dark you want it. You want it as light as only
you can see that you have and you draw those lines and they don't
emphasize the sketch. Okay, so now that
we have this box, I'm going to continue by closing the box on the way
to the inside. So something like this. Now you will see that
this is our room. And like Lego do audio, one-point perspective is mostly used for an interior sketch. So let's just consider that this is your room and you will use, should be doing this
sketch with me. Follow along. I
do it as I do it. Okay. No, you got to where
I'm using the six B Benson. And I'm going to start
making the outer lines a bit dark so that that
becomes the sketch. And these are the
interior lines like this. This is the line that
separates out floor two walls. And this is the line that
separates our floor to ceiling. As you can see, I'm not
rotating the paper, but I'm rotating my hand so that you will stay
consistent with your sketch. And now you'll see that we have something that
shows a sense of depth. So you'll see this. Let me use the expensive. You see this, this gap. This gap shows that the
depth of their drawing. So this is the oil
in the background. This is our walls on the sides. This is on the floor, and this is our stealing. So it's showing our sense of depth and showing
the sense of height. You'll see this, this line is smaller compared to this line. Since this is more
closer to our eye. So let's say our eyeball is here and this is more closer to, this line, is more closer
to this than it is to this. So that is a reason why this
is smaller than this is longer comparative
to each other. So that creates the
sense of height. This is our one-point
perspective. And like I mentioned, 1 means that is one vanishing
point on the horizon line. So this is basically an example of what a
one-point perspective is.
7. Two point perspective sketching: Now the same thing in
two-point perspective. Okay? So like it says, it has two points, that is two vanishing
points like this, the same horizon line
and also the I element. So let's start by drawing
our horizon line. That is the first step of
perspective sketching anyway. So this is horizon
line like this. And we can choose to
put our two points on the horizon line anywhere
based on our liking. So there are two opposing lines, so it has to be on
opposite sides. And that is quite obvious too. So let's consider 1 here, and that's considered 1 here. So this is another
vanishing 0.1. This is our vanishing
point to know, Let's consider we want
to draw the same Q. So we're going to stretch out our vanishing point lines
like this, like this. And we are also going to stretch it out
this way like this. Okay, so now that we
have these lines, I want to see that
this point here and the point below,
it should connect. So that's somewhere around here. So I'm going to draw another vanishing point line like this. Now I'm going to connect
these boards like this, somewhere here and
somewhere here like this. Okay? So this is our basic cube. You can use your head
Jordan me pencils like that and make it a bit
more dark like this. Okay? So as you see, we have an
image which has depth. We can see that this is our horizon line and this
is where the building is. You can see the height clearly, we can see the scale. You can see there
differences between that. And let's say you
want to make some, something more complex on this. Let's say you want to add
another block below this. All you have to do is externally or vanishing point
lines like this. And externalities like this
doesn't have to be perfect. I keep mentioning. So that is a box below it. So you can see that this
box is smaller than this, but you can also God that
it is below this box. So the same goes for
something on top of it. Let's say you want to make something which extends
outside the building. So we have this like this. So we've got to learn to
sketch this line here and we add one to extend
list horizon line like this. And like that. Okay? You can
also connect it this way. If you want to add
some thickness to the box, when
do the same thing, you're going to extend a line
there externally like this, and also externally like this. And they will have
thickness to this box. So you see this is below that. This is above its extending
outwards like this. It has some thickness. This has some depth like this. And it shows a sense of scale because this line
is bigger than this line. I can see the depth like this. That is basically your
two-point perspective. You have two vanishing points.
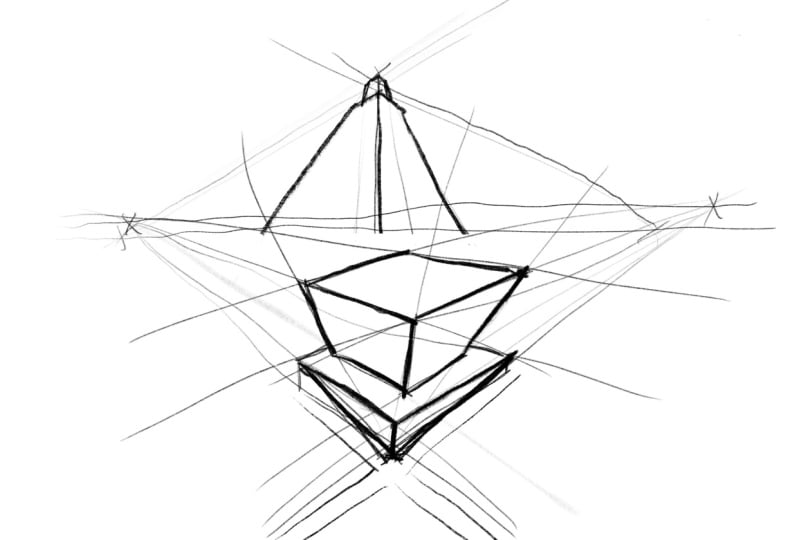
8. Three point perspective sketching: Now we have 3 perspective. No vanishing points are always located on
your horizon line. That always, if it is 1, it is anywhere on
your horizon line. If it is two points, they are two points opposing
each other on Sunday. But what if you have the third? In this case you have
three vanishing points, One horizon line,
and your eye level. So where do you place? The third one is obvious question that you'll get tripped me take my HB pencil. Let's draw a line
again like this. Draw our two vanishing points
the same way we did before. So this is 3p1, p2. Now where do we place our
third vanishing point? That totally depends on
the type of view you want. If it is, if it is
above the horizon line, then you will have and I view. Okay. And if it is below
the horizon line, then you will have
a bird's eye view. Okay? So that is how it is. Okay, let's say
you have selected your vanishing point
above the horizon line. So this is the point. Now that's going to come
out as an ion say View. It'll be like you are. So let's consider a
totally dry ground. This are, these
are your buildings like this. This is your cube. And let's say we
are going to draw two cubes or
something like this. And if you are a human, this is your, this
is the eye level. Okay? But let's consider, since we have our
vanishing point on top, it's an on-site view. So this is where
an enzyme will be. So this is the anti view. So if you want to look at
the whole building and the whole height of the building to obviously look like this. Okay? So this is something that you are going to be looking
from the bottom to the top. Okay, Now, let's just
draw a vanishing lines. Let's draw our vanishing lines to draw a building like this. And we are also going
to use this line. These vanishing
points do not have to connect to the
vanishing point itself, the third vanishing point, they can go anywhere
in the drawing. They can go here or
they can go here. It's totally up to you. You can draw it
anywhere you want. But this vanishing point, you will be extending towards
the downside like this. So let's say you want to
draw your cube and this is your vanishing line like this. And the other one is like this. So you are going
to use this point, all your pattern lines or that remaining
lines of the cube. So let's say it's like this. So now this is going to be one line and this is going
to be the other line. And this is going to
be the third line. And since this is the extension, this is going to
be another line. So this is your eyes and line. That's the ground
level like this. Now since we are drawing
another cube on top, this is the rest of it. I guess. This is one store. This is the third
event like this. So as you see, this is this
is your 3 perspective sketch. This is your ground level. So doesn't this
look like you are a very small living thing and you are looking at
a very tall building. So you can obviously tell that this is a very
tall building. The height of this
building is very high. And you can also talk about the depth it's
going this way. You can also talk
about the skin. This status will be a very
almost similar size to this. But you can see that this is very small competitor to this. So you can get a
sense of scale here. Since I've hired here, since I've lived here. Notice how perspective works. This is your ground level. You're looking at some object
from the bottom like this. And that is how it is. So you are extending the
lines from this point, this point, and this
point. Now the same thing. If you want to look at it
from a bird's eye view, then you will have your vanishing
point all the way down. So let me just do a
basic sketch here. This is your horizon line, is your vanishing
0.1 vanishing point to your horizon line. And since you have this below, want to be extra
ending it like this. Okay. So let me just sketch that. Obviously you would want
to be seeing the top of the building that's
going to look like this. So this is your top terrace
that this is this part. And you are going to
extend out like this. Okay? So it's going to be like this. Since this is going to
be a bird's eye view, you are not want to
receive this, this tall. I just wanted to be a bit
shorter than what you can see there in the on-site review. So it's going to be
something like this. Dark. This is our first block. And now since we have
to draw another block, we're going to do
the same like this and extend our horizon. I mean, vanishing
point lines like this. And like this. So now we have a line
going like that, okay? Like this, and a line
going like this. And then a line going like this, and a line going like this. And also more
vanishing points will be connecting it like this. Okay? Then the bottom part, we can examine it
around like this. Really connecting this. So this is our bird's eye view. This is the link. This is from the anti view. Okay? So this is our smaller
block here, this one. This is our bigger block. So you can see that let's say, let's just imagine that
there's going to be a row. So let's draw some
lines like this. Your drawing is going to
obviously look very clumsy because of all the
vanishing point lines that you are going to extreme. But that is why you are going
to be using an H pencil. I'm not using an H pencil here. So that is why it is looking
like there are so many lines and the drawing still can be seen because
of the thickness. But that is not generally
what you'll be doing. You'll be using a hedge
pencil to draw these lines. And let's innovate what
we're going to draw a road. So if you draw it or that's going to
be something that you wanted to look
something like this. So you will have that or
like this, like that. Be this name. This same type of
road you will have. Okay? So this really gives
you an idea about how we look from the top view. So this is going to
be a bird's eye view. I hope you understood the
three different types of perspectives that we have. The 1, that 2.3, both the three-point sketches. And that will give you a basic understanding about
how you want your sketch to be using these three
different elements of perspective sketching. You can create any type of
sketch that you'll need. Mostly they are going
to be blocks like this. Some tricky parts
are going to be your answer if you and
your bird's-eye view. But you will just
have to give it a minute and think
about how it is actually going to turn
out into your life and give it some thought and you will be able to
create this case.
9. Hatching, rendering and annotating the sketch: Now that you have
learned how to sketch the different types of perspectives or
different elements, the basics, how to develop a good block model of
your desired building. How to create a good
perspective sketch with all the perspective
lines correctly, all the vanishing points
currently trying to get those different
levels and you've done all this now let's
say you want to take this sketching to
another level and they want to start making it
more presentable and less of a rough sketch
or a practice sketch. Now, just like any other
skill in this world, sketching is also a skill. It also requires
practice and it takes some time for you to get better at what you do to get
better at your craft. So like, like anything else, you would also have to
spend a good amount of time every day to sketch. It's not something which takes up a lot of time in your day. You just have to spend at least five to ten minutes
every day on sketching some random thing you'll just see online or just
see around your home. Just try sketching
these and perspective. Try sketching more often. Try doing it every day
for five to ten minutes. And you will see that
you have developed more skill as you go by
practicing each day. Now that you have
been practicing, you would want to
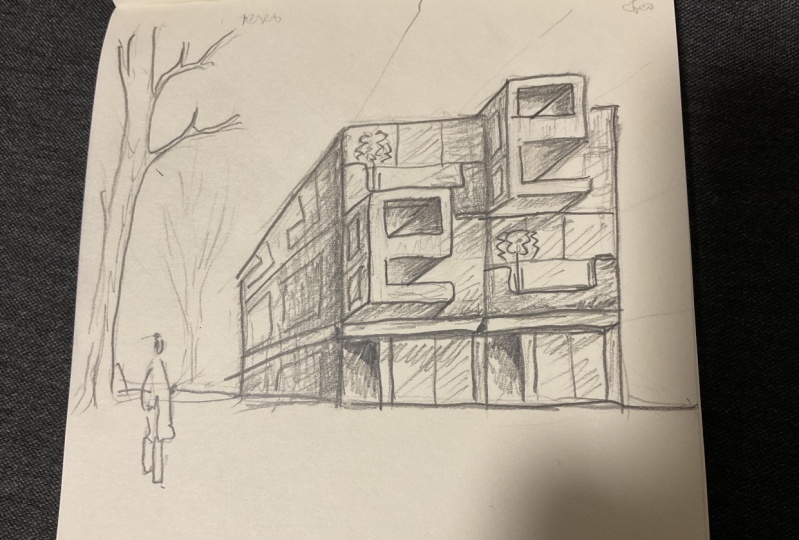
also try implementing some hatching or some kind of
rendering in your sketches. So hatching is
something which you just create a different type of a pattern which represents a specific material
or a specific type. Or it also can represent shadows and lights
in your sketch. So I will just show you an example of different types
of hatching on the screen. And you can use these
hatchlings to create some more depth and some more shadow and your
perspective sketching. You can use these
kind of material. Is material hatches to
your sketch so that you can give it a
specific field to it. So if you have a brick wall, you can use a break Catch. If you have a stone wall, you
can give it a stone hatch. If you are having
a grass surface, you can have grass. So these are different
types of hatches that you will use onto your sketches to give it a more a
sense of field which, which helps in making
it more presentable, makes it more defined toward material that
specific surface is, and also helps create
your sketches. Look better. Hatching is mostly
your blacking. It's going to be something which you will be
using your marker for, like I showed you, you can
use those fine liner markers, but I'm not a fan of that. Having a black outline sketch
with a fine line marker, I'm in color markers
to create a hatch, I would rather use
the blocking microns or rotating pen to
hatch out the surfaces. But let's say you want to add some more color to your sketch. You can use microns, you can use colored pencil. These are some
perspective sketches that use color in them. You can use a
combination of hatching and color rendering
into your sketches. So these are different
types of things that you will have to
start implementing in your sketch to
start making it more presentable and taking
it to the next level. Now that you have been
hatching your sketches, rendering your sketches, color
rendering your sketches. But you're still
feel that you miss that artistic look
of your sketch. So I ended it seems very rigid. So you have to concentrate on one thing called
imperfections. You have to see that your
drawing is not perfect. It's something that you do out
of your personal interest. You have to see
that it's something more subjective towards you. It's something more
personal to you. So you don't have to worry about drawing straight
lines, single lines. You have to be comfortable with seeing
lines overtake each other. You should be fine with seeing lines
overlapping each other, lines extending each other's. You don't have to see. I don't have to worry
that the lines meet at the same what is their
meet at the same corner? It's okay if it extends beyond the line of your building
or anything like that. So you have to be fine
with imperfections. Once you start seeing that
your sketches are more free, your sketches have
more undefined lines. They are not very straight
and they are wavy. It's okay if that is there. It's okay if it is overlapping. 234 times, how many times you are required to satisfy
yourself on the sketch. So don't worry to go back and forth with what you
have already done. You can overlap. You can do any of what I've mentioned before. See that your sketches
are not perfect. You have to be comfortable
with imperfections. The next step on improving
your sketches are start. Annotating them, start
labeling some parts, as you've seen in my
sketches that I showed you. If I were to just draw
the perspective sketch and I wouldn't have annotated
anything out of them. It would just be a plain
drawing on a plain sheet. So let's say you want to make
a presentation where you are trying to make
something self-explanatory. And you are, you, even though you had some
surfaces with a material had so that it gives an
understanding that this is a specific stone
material or a material. But it would also make
your sketch look better. It would elevate
your presentation. If you start annotating, start drawing some nice arrows, showing and labeling
what the material is or what the functionality
of that specific area is. Start doing these things which which showed
the significance of what you're trying
to sketch there. These are some things that help your normal sketches
look more architectural. When you have imperfections, you have hatching, you off color rendering, you
have annotations. These things will
help your sketch look more architecturally
presentable. So annotating is a
very important thing. And sketching, the
last and final tip that I would give you to improve your
sketching is don't be scared to try out
different mediums. If you are only sketching
with a pencil today, try sketching with
charcoal pencil tomorrow. Or try sketching with markers or try sketching with
microns or ink pens, or try sketching with
colored pencils. Try it, try color rendering with colored pencils or soft
pastels or markers. Try try out different things. See, whichever you
are comfortable with. Dry blending two
different things. Try hatching with microns and coloring it
with Copic markers. Try out things like that. You never know what you like and you never know
what you're good at. So once you try
different mediums and different styles onto
your sketching process, then you will start seeing new, newer things and you will start improvising on what
you already know. So these are my main tips on how to improvise on your architectural
perspective sketching. I would like to give you all a huge thanks for watching and going
through my class. I really hope that this helped you guys out in your perspective sketching and I hope
you guys improve on it. I would like to tell you guys to start sketching
five minutes every day. And also try creating some
sketches and try leaving it in the project panel
below so that I can go through them and if I have any tips for
you guys personally, I can give them to you. I really hope that this perspective class
has helped you either learn how to start perspective sketching or improve on
your perspective sketching. So, yeah, I guess that
would be it for this class. I will see you guys in the next class and hope you guys have a good
rest of your day. Thanks for watching.
 Khushal Panchariya, Create with KP