Transcripts
1. Introduction: Are you passionate about drawing and eager to
improve your skills? Learning perspective is one of the most important
steps for any artist. It helps you create depth
and realism in your artwork, making every piece more
dynamic and lifelike. Joining my Skillshare class on the fundamentals of
perspective drawing. In this class, you
learn the basics of one point perspective through clear practical exercises
and step by step guidance. I'll show you how to use
this essential technique to bring your drawings to
life. And that's not all. I'll also introduce you
to two point perspective, giving you the tools to create even more realistic and
professional looking artwork. By the end of this class, you'll have a strong
foundation in perspective drawing that you can build upon in future projects. If you're serious
about improving your art and want to establish a solid
base in perspective, this class is the
perfect place to start. After completing it,
you can continue exploring more advanced
perspective classes with me. Hello to all of you and welcome to a new part and a new
course of tutorial with me. Okay. In this part, we are going to work
on the principles and basics of perspective. So for this course, you need an Etude. It can be 0.5 or 0.7, and you also need a ruler. So that's all you need. Let's go in the next
part to startup.
2. Introduction to the Principles of One-Point Perspective: Hello, again and welcome to the first part of perspective. So we are going to learn how we can create different
types of perspectives. First of all, I should tell
you what is perspective. Well, perspective means that
you can turn your objects into two dimensions or three dimensions and basically
give them more volume. And we are going
to do that using a vanishing point or a
viewpoint or a viewpoint. It can be the perspective
can be done with one point, two points or even three points. So I'm going to tell you all about all these three
kinds of perspectives, one viewpoint, two
viewpoints, and three. Why do we call it the
one point perspective, the two points perspective? Well, this point is actually represents
the point of the view, and based on that, we can make our object in two D or three D. So that's a
viewpoint or vanishing point. Both are correct. So why do we call it
a Vpoint again if a person who is watching
this object is placed here, what can or how can
they see this object in a three D shape or in a two
D shape from this point? Okay? So our object can be seen two D or three D
from one viewpoint, from two viewpoints or
even from three Vpoints. Okay, we're going to start off with the one point perspective, which is the easiest
kind of perspective, and you're going to
learn it so quickly. So first, I consider a point
in the center of our paper. This is our viewpoint. And then our viewpoint is actually placed on
our horizon line. What is a horizon line? The horizon line is the
line that is exactly on the same level of the eye and of the view.
What does it mean? Well, imagine that you are at the beach and you're
looking into the sea. You can see a line separating the sky and the sea at
the end of the sea. That's what we call
a horizon line. It's exactly on the
same level on your eye, and it's separating
the sky and the sea. This is what we call
a horizon line. Now, if I put the object
exactly in front of your eyes, not above the line,
not lower than that, right in front of it
and on the same level, let's see how we can see this object and how
we can see this cube. How many sides of
this cube I can see? Well, exactly. If it's exactly right
in front of you, you can only see one side of it. You see, this is the only
side that can be seen. But if I take this object
toward the right side, it's still on the
same level as my eye, but I'm just taking
it toward the right. Let's see how many sides of
this cube, I can see now. Okay. How can I see that? How can I create the volume
of this rectangle cube? Now, in perspective, we connect all the corners of our
objects to the Ve point. So if I have even ten corners, I just take them to the
Vpoint with a line. You should take
these lines that are going from the corners to
the Vpoint very lightly. You should create them very lightly because you don't want to confuse it with the
main parts of your work. These are some guide lines for you and they're going to help
you to complete your shape. I just connect all four corners to my Vpoint with four
lines for straight lines. Now I consider this
size for my cube. We that. Right now, I can see two
sides of my cube here. If I keep it on my horizon line, but I take it toward the right, I can only see two
sides of my cube. It's on the same
level on the eye. Now, the question
here is that how can I create the rest of
the volume for my cube, the parts that I cannot see. Well, obviously, my cube
should be complete. I just want to show
you how you can create even the parts that you
cannot see inside of it. For example, imagine that
this cube is transparent. So just parallel to these lines, I come toward inside. Over here, I have one point
and parallel to this, I come toward the inside again and I have
another point here. I connect these two
lines together, and you see, this is the
ending part of a cube. So as I said, imagine that
your cube is transparent, so you can also
see through that. But if it's not transparent, these are the sides
that I can see. Well, I just completed the cube completely
so you can see, you can turn it completely into a two D or three D
shape with perspective. But you can only see
two sides of it. Even if you want to try it, you can just take a
box, for example, a tissue box and then try it in the positions that
we are trying right here. For example, right
in front of you, then take it a
little to the right, see how many sides can you see. Or this time, I'm going to
take my rectangle a little toward left and see how many
sides I can see this time. Obviously, as I already
told you, from each corner, I should just drag on
line to my viewpoint. So I do it for all four corners. All the way through here. Then again, I consider a
size for my cube here. Now I've got two sides here. These are the two sides that I can actually see
from my viewpoint. But as I told you,
if you want to get the inner volume of this cube, you can also do that too. I come to it inside, I connect these two parts, and this is the inner volume and inner shape inner
space of my cube. So it was just that easy. We have six more angles that
we can create our cube in, and again, you can see
the difference about it. This time, maybe my
rectangle cube would be above my head above my eyes
and above my horizon line. I'm going to take
the rectangle cube above the horizon line or basically above my
eye and my head and see how can I see it this time. So first, I create a rectangle. Then again, as we
talked about it, from each corner,
I'm going to drag a straight line to my viewpoint. I'll do it for all four corners. Okay. Then obviously, I should
consider a site for it. I want to have my
rectangle in this size. And again, in this position, I can only see two sides. One of them is the
front side of it, and the other is actually
the bottom side of it. I can only see two sides
of my rectangle cube. Now, again, I can also show you the back side
of my rectangle. I come up from here, parallel to this line,
I come up again, and then I connect these
two parts together. Now you can see the inner
space of my rectangle cube. But as I told you before, you can only see
two sides of it, one on the bottom,
and one in the front. This is just the inner volume and the inner space of the cube. Now, if I still keep
it above the line, but I take it to the right, I want to see how it's done. So what are you guessing? How many sides can
we see this time? Let's find out together. So from each corner, of course, I'm just going to
drag a straight line down back to my Vepoint. Go to the viewpoint. A from here. And of course from here. Then again, I just consider size for my cube and based on that, I get my cube done. You see? This time when it's above me
and it's toward the right, I can see three
sides of my cube, the front side, the bottom side and the left side actually. So in general, I can see
three sides of my cube. Well, again, I can also show you the inner space
and the inner volume. Let's see how we can do
it. Parallel to here. I come toward inside. I've got a line here
and from the bottom, I come up parallel to that line. See, they meet each
other at this point, and this is the inner
space of my cube. But again, I say,
in this position, I can see three sides
of my rectangle cube. Okay. Now, let's
do the same thing, but this time on the left side, it's still above
the horizon line. But instead of being
on the right side, we're going to put
it on the left side. Again, from each corner, I just take it to the point. Some of you might say,
Okay, this is a boring job. Why should we do it in all different
positions and angles? The answer is because
you need to know how they are going to be placed in these different
positions and angles, and you should just
know how they're done, and it's a good practice for you because it takes a
bit of time for you to get more comfortable with perspective and
the way it's done. So again, I just have to
consider a size for it, connect my lines together, connect my corners together. And again, in this position, I can see three sides
of my cube from side, bottom side and the right side. So don't get bored,
don't get tired. Just try to create
these objects in different positions and
different angles so you can get more comfortable with
one point perspective. Also understand it better. Now, I'm also going to get the inner space like
the ones before. Parallel to this one, I go up. I've got a point here,
parallel to that line, I come toward the inside. Again, I've got a
meeting point here and that's the inner space
of my rectangle cube. Let's continue and watch the three other positions
I'm going to create for you.
3. Continuing the Principles of One-Point Perspective: Drawing a Chair: Hello again and welcome to the rest of the
tutorial with me. Now, let's do the three
other left angles which are this time
below my horizon line. First of all, I'm
going to create it in the center but below my line. Okay. Now, obviously, as we've
already said, from each corner, I should just connect a
straight line to my viewpoint, and that's how it's done. Okay. I'm going to do the
same for all corners. Then I consider size for my cube because it's
right in front of my eye, but below it, I can only
see two sides of my cube. One of them is the top side and the other would
be the front side. This is my basic side. Now if I want to get its
inner space, obviously, I come down from here and I'll do the same thing
from the other side, and then I connect these
two parts together, this would be the inner volume or the inner space of cube. Now let's just take
it to the left side. It's below the line, but it's on the left. Again, I just
create a rectangle. This is my stable or base sound. Then from each corner, I just take it to my viewpoint. I'll do it with a ruler. After a while, when you
get more comfortable, sometimes you can even drag these lines from the corners to the viewpoint without a ruler. If your hand is very comfortable with dragging
these straight lines, you can just
eliminate the ruler, but I strongly recommend
you to use a ruler for the beginning of your work or even when
you're intermediate. So and parallel to this line, I create another one here to determine the
size of my cube. Now, this time, again, I can see three
sides of my cube. Of course, one on the top, one in front and
one on the side. Now for getting the
inner, let me see, for getting the inner space, I should also drag another
line from this corner. I've forgotten that. Then parallel to this
line, I come down. And parallel to this line, I go toward inside. When these two lines
meet each other, that's my inner space. Okay. I'm going to do the same thing this
time on the right side, I'm going to bring my cube
to the right First of all, I just have my sorry, just my rectangle, usual
a normal rectangle. Then when I connect the
corners to the VPoint, I can turn it into a cube. I connect all the
four corners to my Vpoint so I'll do
it for four of them. Let me just go over once more, just not to lose it. And now, again, I should
consider a general size for it. For example, over here, I'll get a line, then over here another one. And again, in this angle, I can see three sides, one on top, one in front, and one on the side. Here we go. Now, you know how to get the inner space
coming this line, bringing this line
down and bringing this line toward the inside. Then when they meet each other, we've got our inner
space and inner volume. Okay. Let me just go over this one and
complete it as well. Now, something that we want
to do in this part is that I want to turn each one of
these cubes into a chair. Let's see how are they going to turn out if they are going to be chairs and how are
they going to be seen? For example, for
the first chair, I want to work on
this one, this angle. If this is a setting place, this is the surface of the seat. So this is seating
surface of my chair. And if that's the case, these would be the four legs
of my chair, of course. See, one leg here in behind and another
one here in front. Now, how about the
back of the seat? How can I have that? If
I want to have it here, it would actually be very easy and it's just
like my basic side. But if I take it
to the left side, I can also bring the back of
my chair into perspective. See? Now, from here,
from the viewpoint, I should also drag another line and bring
it to my back end, then I can go over these lines again to get
my back of the chair. Just like that. See?
It was easy. Okay. Now, this is my chair in this
angle and this position. Now, what happens
if I want to have this chair over here,
the center part? Again, I would need four legs. This is my seating. This is my seat area, my seat surface or
my sitting surface, the place where I sit on it. Just like that. Then over here, from here, I come up again, I'll do it on the right side so I can take it
into perspective. It goes into perspective. And here would be the
back of my chair. Now, if I want to turn this one into a chair,
how would that be? I can see more of my
legs here this time. I just have to show them. You see, these are the
forelegs of my chair. I've got a seating surface, but I can only see
it from below. Actually, I can see
the undersurface of my setting surface. I'm able to see my sitting surface but from
below and I can see under it. And over here, I can get
the back of my chair. Here we go. Just like that. Now, if I want to create
this chair in this position, let's see how it's done. Again, I can have four legs for my chair.
I should have them. This time, I see them
totally and clearly, I see all of the legs. This is a surface. This is a sitting surface, but I can only see under it. I can see it from below. Now, if I want to
consider a back for it, I want to consider
it on this side. So again, I can take
it into perspective. This is the back of
my chair now. Okay. Here we go. Now if I want to have my chair
in this position, let's see how that turns out. This time, again, I can see all of my
four legs completely. I can see my sitting
surface completely too, but I can see red and I
can see it from below. This is the sitting surface, which I can see from below, only under of that can be seen. Okay. Now, where should I put
the back of my chair here? Well, I want to place it over here that it actually will be like the basic
side of my work. It doesn't go into perspective because it's just
in front of my eye, not on the same level, but it's still in front of it. So that doesn't go
into perspective. So I'll continue until
I get to the end of it. So my dear friends, try to create your guidelines
as light as you can. So when you want to work on your actual object and
you want to shape it, you can actually have it better and you
won't get confused. And if you want to
erase them later, they won't make any
problems for you. Then let's make the chair
in this position this time. Again, I have four legs. I can actually see them. And and then I can see a sitting surface, but again, from below, and I can only see 100. Now, the back of my chair
would be placed here again. So it would definitely
go into perspective. Over here would be
the back of my chair. See? Just like that. Perspective is actually a very delightful and
exciting concept and course, you just have to practice
on it over and over again. I hope you've learned
it and enjoyed it, and let's follow
in the next parts.
4. Drawing Paper and Letters in One-Point Perspective: Hello again, and
welcome to a new part of Perspective Tutorial with me. Okay. This time, we
are going to work on different kinds and
different shapes of paper, and we're going to take
them into perspective. For example, if I want to take a paper shape like
this into perspective, let's see how we can do it. Because it's not always
like that we should take objects which are in geometrical
shapes into perspective. We can create anything
that we want and we can take it into perspective,
whatever we want. Okay, so over here, I want to show you
how you can create curved parts and take them into perspective and give
them dimension. If I have a paper
shape like this, it's got lots of ups and down. Let's see what can I
do to get it's volume. First of all, I said from the outest part of each
curve, for example, if this is the curve, this would be the outest
part of my curve. Now, from outest part of
each one of my curves, I drag a straight
line to my viewpoint. And also I need to drag
two straight lines from the beginning and the
end of my paper as well. These are my guidelines, so I just create
them very lightly. I'll do the same
thing from this side. This is the ending
part of my curve. This is the outest
part of my curve. From here, I drag another
line to my point. Okay. From this inner part, I'll do the same thing. I drag another straight line
to my viewpoint. That's it. Now I want to consider
the width of this paper. For example, I want the width of my paper to be 3 centimeters. I separate 3
centimeters from here, or better say determine
3 centimeters here. Then on each one of the lines that I've got here
on my guidelines, I should determine
these 3 centimeters so I can get the width of my paper in all of these places. 3 centimeters from
here and from here. Okay. Moving on
to the next line. From here, that would be 3 centimeters that the
rest of it cannot be seen. Only a part of it can be seen, and I only create that part. And again, from here, it cannot be seen again. It will be actually
underneath the paper. So I have determined
my main 3 centimeters on the parts which are on top and which can actually show. They also said this
part cannot be seen because the end of it would be underneath the whole hyper. Okay, now, if I want to connect
this area to this part, I cannot just connect
to the straight. I'm going to create the
exact same curves that I have in the front and take them and create
them in the back. You see? I'm going to create the exact same lines with
the exact same shapes. And I come up the
exact same way. So just like that, I go up and down, or better say down and up, and I just create the shape that I have in
front right in the back. This is my main line. Let me just make
it darker for you. And if this part will
also be 3 centimeters, it will come up. From here, it goes down and it will connect to this
part because it would actually go behind this part of the paper and it cannot
be seen completely. That's right. Yep. Now over here with the help
of my perspective, I could actually get a very folded or not a straight
paper into perspective, or better say I just created a strange shape
into my perspective. I want to create another
one shape like this. How can I take it
into perspective? Well, I'm going to do the exact same thing from the beginning and
the end of my line. Of course, I'm going
to drag a line to my viewpoint and then from the
out as part of each curve, I'm going to connect
to my Vpoint again. Okay. So from out as part
of each curve, I just move toward my Vpoint. Okay. Now I should also consider a width for my paper, obviously. Now, let me just
do it with ruler. I want to consider 4
centimeters for this one. Okay. Now, from each line that
I drag to the point, I want to consider 4
centimeters on each one of the lines that I
dragged to the VPoint. I'm considering this with my, but that's because I've
had lots of practice. If you want to do it,
make sure that you use a ruler for all of
your 4 centimeters. You work would actually
look in sync and Okay. When you're finished with it. So I forgot a line from here, but I cannot see all of it, so From here, it should come back. That will be the curve, that will be the
inside of the curve, and it will go down again. And again, as I told you, I'm going to create the
same shape that over here, it will be closed like this and the rest of it
cannot be seen. Okay. Now, it will
come back like this. And if it goes out to the
point, it will look like that. You can actually create these curves in all
different shapes and take them into perspective
and practice on it. This time I want to work
on some English alphabet. Let's take them into
perspective and see how they are going
to work together. First, I'm going to start with the first letter of the
alphabet. That's right. I'm going to start and
I'm going to kick off with an A. Um, You can work on any kind of letter or any
letter that you like. Here it goes. Just like that. That's my A. Now, if I want to take
this A into perspective, let's see how would that look? Okay. My viewpoint can be in any place that
I want it to be. But I want it to be
placed over here. I want my viewpoint to be there. Now, again, exactly
as we worked before, from each corner, I should take and drag a straight
line to my Vpoint. I'll do it from all corners, and I take it from all
corners to my viewpoint. Remember to do it
on straight lines. I should also
consider a width and thickness for my alphabet too. I want to have it like this. I want to have this
much width for my a. So it's also like that. And this one. So the width is that much, so I just go in that much. And based on that, I can
also see where it's cut off and where it's shaping and
where it's ending over here. Maybe if it was, you know, thicker or more white, I couldn't see this
line coming down, but it's not so I can see it. Let's try with another letter. I want to work with an H. And let's see how the He is placed well
in my perspective. This is my age. Yeah. How can I take this
letter into perspective? Again, I can place my
VPoint anywhere I like. If my Vpoint would be in this
corner over here, Again, from each and every one of
my corners in my letter, I take and drag a straight
line toward my V point. I want to consider
this width and this thickness for my H. It's a bit wide, isn't it? Okay. Now, this one has gone
into perspective, and I'll take this one
into perspective too, and I can also see
this line over here. This is actually
the inner side of my I can see all of it. These are the inner sides of my and I'm just going to give it some more
volume with my shading. Don't forget that shading
always makes things prettier and more
volumed of course. Okay. In the next part, I'm going to tell you about
two point perspective, and you can learn it with
me next in the next part, but it has a very
strong condition. And the condition
is that if you've actually worked on the
one point perspective, try it with different
paper shapes with different alphabet letters
and work on your point and point perspective
in order to make your handle stronger in order to improve your skill
and perspective, don't forget to
practice over and over again on it and enjoy
it at the same time. Let's move on into
the next chapter, into the next episode and learn about the two point perspective.
5. Introduction to the Principles of Two-Point Perspective: Hello, and welcome to a new part of perspective
Tutorial with me. This time we are going to work
on two point perspective. Well, as it's
obvious in its name, on the contrary of the previous part that we
worked with only one Vpoint, this time, we are going to
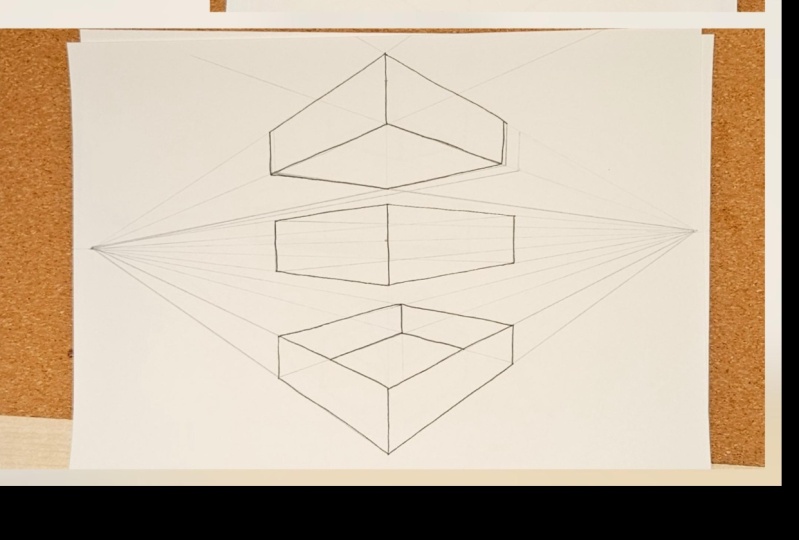
work with two viewpoints. First of all, I create
my horizon line. And then I place
my two viewpoints, one at each end of
the horizon line. I put one of my viewpoints
on the right end and the other on the left
end of my horizon line. Now, let's start
working on our object. Let's see my friends, I want to start right from here. I just have to create
one straight line here. Now, in two point perspective, all of the lines, all of
the corners and all of the objects and volumes
would go to the viewpoints. Say, for example, I've created a straight
line in the center. Now, from the top of it
and from the bottom of it, I drag straight lines first
to my right viewpoint, and then I'll do the exact
same thing and I connect the top and the bottom of my
line to my left viewpoint. Now, I want to consider
the size of my volume, the size of my object over here. And as you can see, I can see two sides of
this cube in front of me. Now, if I also want to get
the other side of my object, if I want to get the
inner volume and the inner space of this cube,
let's see how it's done. Well, this time, I should connect the corners to
the opposite sides. You see, I go from the left upper corner
to my right viewpoint. And from my bottom left corner, again, I go to the
right viewpoint. I'll do the exact same thing, but in the opposite way
for this other side, it means that from my
upper right corner, I go to my left viewpoint, and I'll do the same
for the lower corner. Okay. Now, my lines have cut
each other over here, that would be the
end of our cube. So this is the side
that I can see, but that was the inner space and the inner volume of my cube. But these two are the sides
that are visible for me. See? And this would be the inner side and the inner volume
and space of my cube. Okay. Now what can I do if I want
this above my horizon line? Let's see how it can be done. Again I get a straight
line in the center, one above the line and the
other would be below the line. I want to have both of them for you so you can
see the difference. Now again, from the top
and bottom of my line, I go to each of my
viewpoints separately. So don't worry if you made
a mistake just like me, you can always erase it and make your lines straight
with your ruler. Okay. And for here, I'll do the same. And just like that,
I'll continue. Then I consider the size exactly as the one
I did below it. Now, let's see how can
I get this volume. Again, exactly like the one that we did on our horizon line. From each corner, I go through the opposite side
of my viewpoint. So I'll just take it there. And now over here, I got my works volume. See? Now, my viewpoint would do everything and this
would be my cube. It looks like this. Okay, so it's just easy. You just got to do it right. Then this would be the inner
space of my cube as well, just like I did in
the previous one. For example, if you
imagine that it's a box, you can actually see
inside of this box. Okay, now I want to do
the exact same thing, but below my horizon line. See, again, from both sides, I just take it to my viewpoints. See? Just like that. Then I'll do the same thing for both sides connecting
them all well together. And again, I consider
the same sizes for it. Okay. Now, from each side, I go to the opposite side
to get the shape correctly. As I told you, you don't have to work on these and make them really dark because these
are your guidelines. You guidelines should be drawn really light so you don't
have to create them dark. Then I connect these two
and as you can see again, I have another box
over here again. If this is an empty box
you can see inside of it, you can see the bottom of it. Okay. Here it goes. Here we are. Then inside of my
box would be shaded, so you can see better. You can understand
better what I mean here. Okay. So this was our two
point perspective. I hope you've enjoyed
it, learn it, practice over and over again, and I'll see you next time.
 Amelie Braun, Artist & Cartoonist