Transcripts
1. Project Intro: Hi, everyone. This is Patty from PS illustrations. Today we are going to do a stylized Inc landscape. I've got one example here behind me of a desert. I've got a couple more examples of different landscape illustrations that are executing this. What this Austin's gonna be focusing on is atmosphere perspective, making sure we've got a foreground middle ground in a background. We are also going to be focusing on line. Wait. As you can see on here, we've got really thick lines as well as some skinny airlines. I've achieved that through the use, different sites, Microns. So I've got a size three, a five and a one. You can also for this project, use a should be you're gonna want one that's either thick and thin or one of each. So I've got the fine tip an ultra fine on that overall. For paper, you're gonna want a bristol. Smooth. Any kind of real drawing paper. Smooth is gonna be the highest quality for this. Your best option you could in theory, do this in your sketchbook as well. And then a regular number two pencil. Really? Any kind of landscape is going toe work for this project. I really want you to focus on finding something that again has a foreground middle ground in a background so that we can play with some atmosphere. Perspective. As we start, allies are drawings, plus get started.
2. Areas of Focus: Okay, guys. So I wanted to kind of go over the basics of foreground middle ground on background, the different details that I'm looking for in my landscape when I'm looking for a reference and general landscapes that I want to be working from. So the foreground is going to be this stuff that's generally don't hear the bottom third of your paper. I like to think of it as when I'm looking at reference or I'm out walking or hiking. It's the stuff that I can touch within 1 to 2 steps. Really, it's it's grabbing distance. Right? Middle ground is like the middle of your paper, right? So Premier Li kind of right here now middle ground I like to think of as it's like throwing distance, right? So if you were to throw a baseball or a tennis ball right, this is going to be generally the area that you're gonna be able to throw two. And then background is strangely stuff that's in back right? But it's the area that's going to be less, um, detailed, right? There's gonna be things that are really small, like these trees air super tiny compared to this tree up here. So that's pushing the atmospheric perspective, Really trying to shrink things and give it that illusion of depth. Um, background is gonna be beyond throwing distance. Knocked my camera, sir. Background is gonna be beyond throwing distance. Another example I have Here's with canyons. So I used the graphic micron, the number one on this. When I was outlining my major landscape features, I found that this was really successful with mountains or canyons as well as like any kind of hills, because it allowed me to define really easily my major landscape features as well as allowing it so that you could tell what was in front. So, like, back here, I can tell that this kind of canyon cliff is in front of this one prior to making them thick. It was really confusing, cause it was all of these thin lines. I also used the thick tip Sharpie or the Micron one in these front areas and my foreground . The reason why is I wanted to bring emphasis to my different bushes and spoilage up here in the front. I kind of mixed it up with my pattern that I have here going into my rocky shore with the sin micron and the thick Um, I kept the patterns within the different bushes or ferns as the thinner pen. I really wanted to bring emphasis to the overall shape, but then not lose the differentiation that I had and the variance between the different line weights. When style izing these, I really tried to hone in on a specific pattern for each area, right, so a pattern is a drawing motif shape color that's repeated three or more times. So in these we've got different dots that are repeated circles that are repeated with my trees, right with my pine trees, I've got different, kind of, um, they're all unique, but they follow the same kind of line formula with the trunk and the branches in the background. It's definitely stylized. It's not supposed to be realistic with my water. I've got repeating horizontal lines, right? I didn't want it to be full stripes, so I made sure to break up my lines as they went back. Another thing that I did to try and push the atmospheric perspective in this is I varied the, uh, line kind of distances, and as they go back towards the horizon line. I have them getting closer and closer together, almost like the line ripples, air stacking, more on top, trying to push that atmosphere. Perspective. Uh, here I've got a beach one right again, the same kind of horizontal water motif. One of the things I want to really push for you guys is to find quality reference. So beaches are something that my students all really love to draw. But they fall into palm tree syndrome where it's like two palm trees in a beach because we lived down in Los Angeles and that's what they're used to. But here I've got a A beach, and there's definitely different things that are going on. I've got these rocky cliffs. I've got different kind of patterns. I've got bushes and flowers, some some ground plants, trees in the background, a lighthouse, right? I've got a large amount of puffy clouds, right? So I'm pushing overall textures and pushing patterns. I've got repeating lines. There's a lot of movement going on, so this is generally a higher content kind of beach that is more successful versus having to palm trees. So again, when we're focusing on finding a reference make sure we've got a foreground stuff you can touch middle ground stuff that you can throw, too, as well as a background, different things that you can push far away to really emphasize that atmosphere. Perspective. Okay, so let's get sketching.
3. Finding Reference: So for finding good reference, you're gonna want to use Google images right away. I'm going to go over here to the tools and I'm gonna change my size toe large. This is going to give me a higher pixel ratio. Ah, as you see me hovering over, you can see these images are larger. Um, I really like this image, right? I've got a path going back in space. I really like this big cavern where that Scott like the wildfire damage to the tree. That's something that's really iconic about the redwoods, right? Different areas where you couldn't go inside. Right? You can see the scale of these trees, right? They're gigantic. So I really like this one. This is probably what I'm in a base, the foundation of my drawing off of. But I really enjoy some of these other references, right? We've got some smaller trees in the background. We've got these beautiful firms over here. We've got our foreground, right? Stuff that I could touch. It's gonna be in this bottom. 1/3 of my drawing middle ground is like throwing distance. If I were to throw a baseball or a rock, right, and then background is like far away, right? Like yelling and beyond distance like but after yodel for somebody over here to hear me. Great. Um, lots of kind of different reference, right? You've got to be able to discern what things you're going to want to draw, right? This one's got water marks on it. Obviously, you don't want to have watermarks. I would challenge you to even use pictures that you've taken on your own adventures. Ah, different hikes. Different. You know, it could be city. It could be forest. Um, another drawing that I kind of focus on is one of a ball. A pond. Right. So if I search pond right, there's some different ones. I like this one. It's got lily pads and stuff, but really small image. Right? But even though I've got the large selected So you've got a really discern different features. Who? I like this duck. Maybe I'll include some wildlife. And my photo we've got some reads here. Generally, you can find some different photos off of these smaller ones here. I like these little spiky bushes. We've got kind of a range of different things. More flowers, right? This one, the foreground element is a little bit more simple, more boring. Great. We've got some grass. But maybe I could add shrubbery or to be a duck. Write something to kind of bring that visual interest and pull that atmospheric perspective more trying to push it. This one's really cool. If it weren't blurry, this could be a good reference, right, cause it's got stuff in the foreground flowers and reads You could touch middle ground. You've got your background with these hills and these trees, right? Overall, it's blurry, though you wouldn't want to use this photo. All right, you got to keep hunting, right? You've got to be able to discern. Yes, this is something I want to work from or No, this is definitely a bad photo. This one's good, right? You've got fish in the foreground. That might be something interesting to kind of include great ago Zebo different kind of things. So whatever, it's gonna bring visual interests to your overall Ah, landscape. Right. You can go vague what you're looking for, right? If you're like, I have no idea. I would say avoid like, the postcard kind of look great. I mean, you gotta foreground. element with the road. But there's really nothing here in this middle ground, right? You're gonna want stuff that you can really differentiate like this one. You know, it's still kind of has the postcard feel to it. But we've got stuff here in the foreground. Stuff weaken, touch metal ground, Right. We've got kind of this grassy marsh kind of interests, and then we've got these trees on this mountain in the background. So this one has more layers. So it's more visually interesting. Weaken style eyes this pretty easily. You know, this tree is really cool, but, you know, this middle area is pretty boring. So when we come to do our patterns and whatnot overall, it's a beautiful photo. But when we go to style eyes and add pattern and add different elements to our line landscape, this isn't gonna have enough visual interest stuff to pull from, right? Don't work from already artistic drawing reference. Go from a photo, right. Try to find something that, um, you could have your own artistic take on. Right? Here's one with, like horses, right? If you want to draw animals, this one's kind of interesting, right? We've got this leading line here. We've got the mountains going into the background. We've got these rocks and horses. This is more of a middle ground and a background. Right. There's not a whole lot in the foreground, but we could maybe at a tree or something. Right? So you just got a kind of roll with it. Figure out what you want to do, What you want to emphasize. Um, you know, there's lots of different options that you could dio, and you just want to go with what inspires you.
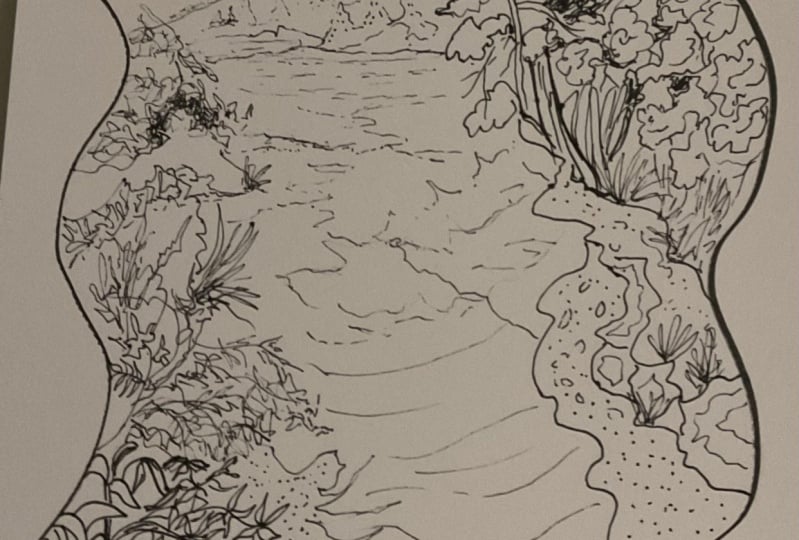
4. Sketch Video: Okay, So for this first sketch out, all you're gonna be focused on is getting the be sick, foreground, middle ground on background, kind of outlined and deciding what you're gonna be doing as faras your simplification with your stylized, patterned plants. So for this one, I'm gonna do a redwood forest. One of my favorite adventures that I went on growing up was hiking the redwoods out of Sausalito kind of San Francisco area. So I'm going Teoh, use some different redwood kind of references, Uh, kind of pulling from multiple ones, but really trying Teoh focus on my pattern making and my foreground middle ground background. So I'm gonna come in here, I'm going to kind of establish my horizon line, so I know I'm gonna want some sort of sky, so I'm just gonna kind of roughly put in a horizontal line. So I know that my backgrounds going to be pushed more here. I'll have some opportunity for some really tall trees as well as pushing my foreground elements. So I am going to throw in kind of a road based on my reference kind of like a walk path. Curve it up. These air kind of fun because it pushes the atmospheric perspective automatically because as it goes back towards the horizon line, it's gonna get skinnier. My fence posts are going to get smaller. Um, in the redwoods, They've got these really thick posts that they use. They're kind of old and starting to deteriorate. Deteriorate, right? They're going to start off massive kind around, just blocking it in right as it goes back gets smaller, skinnier, closer together. Great. And then I'm gonna kind of stock run there. So then I've got this side, right, And because it's below my horizon line, I'm gonna be able to see the tops of these posts. That's why I'm kind of blocking in the tops of these. Um, if my posts were on top, I wouldn't see the tops of the posts. Right. So as they go back in space right there getting smaller, skinnier, closer together. Okay, so these posts generally the way that these fences work is they've got they're really trying to promote the hikers, the tourists, for staying on the path. Great. Some of them are closer together, further apart. Great. Just kind of coming in here roughly sketching it in at this point, you could do as many lines, auras little lines as you need. Right? If you feel like you want to render this more closely in the pencil stage, you absolutely can. It will make your life easier when you go to inking. Right. But just keep in mind, you will be erasing all of these pencil lines. So, um, it's why I'm moving a little bit faster because they know that I'm gonna come in here and spend some more time with my ink. So now I'm going to kind of block in my first redwoods. So these air kind of super wide at the base have it come up and out of the frame, right? Really trained a push these as they go back in space. Maybe throw in a smaller one here. Lots of vertical lines over here. Maybe add some over here. Men have some farther back in the distance. Way back here. The forest looks like it's kind of maybe opening up to more of a valley. Okay, so I've got all of these really great vertical lines right now. I've got to figure out how I'm going to simplify the overall leaf structure of these. So in my reference, I've got some that are more close. Toe foreground. I'm going to try and push this tree Maurin front, overlapping the, um the branches and the leaves in front of these other ones. Which is why I didn't super render any of these Because I really want the focal point to be on this front. Kind of, um Redwood. So I'm just kind of keeping some raw edges. Great. Just kind of blocking him in. Maybe I want one. Kind of a branch will be going off this way. Great. Generally, they have very few branches towards the bottom. Lots and lots towards the top. That's where they're able toe. Grab the sunlight. I'm gonna put big hole in here that are created by the natural wildfires. Some of them are so big, you can hike through, walk through him. There's one, um, in the West coast redwood forests that you can drive through believe so really just kind of coming in here and blocking things in right as faras like the bushes on the ground. Right? There's a lot of ferns in this area. So maybe style izing a fern. Great. They've got things coming up both sides, right? And then they get thin as they move up. Maybe something like that, and repeat it throughout. If I were to do that same fern back here, right? Kind of pushing my pattern again. It's gonna be smaller. Right? So this one's this big look at the size difference. Great. So you're just gonna come in, come in here and start flushing out your basic shapes. Here. I've got one finished for more of a close up landscape of a pond, and I throw in some animals to like I've got a frog. Great. Here. I've got a blue Herron turtle and some fish right on this one. I did more with stylized rendition of cattails, right? I've got some bushes, right, Some grass lily pads, right. That was really fun to kind of pattern. So you've got a bunch of different options that you could really dio eso for my foreground . In this one, it's gonna be more bility pads and, like, thes capitales that air, like massive right? So from the top to the bottom there, about this big compared to like, one that's back here, right? Look at the size difference It's like, you know, So we're really pushing that atmospheric perspective there, Um, have got larger lily pads among smaller lily pads. My different lily flowers, right? They get smaller as they go back. Um, I've got some kind of hills way back here, but I wanted to keep my far background pretty simplistic. Once I have inked my foreground, I might decide that I want to add some more details back here. But generally, what you're not gonna dio when you start thinking is go foreground middle ground in the background. Because if you add stuff in the foreground, you don't want to go the opposite direction, cause then you'll have conflicts with your inclines, So let's go ahead and get thinking.
5. Ink Video: a bit more of my drawing. Overall, I'm going to start with my number one micron again. If you're using a Sharpie, you're going to start with thick one on this part. So what I'm gonna be doing is I'm going to be emphasizing the stuff in the foreground that I want really to pop. Um, so I've got this first tree in my foreground, So I'm gonna come in here and I'm just going toe outline his basic shape, right? Simplified kind of shrubbery. Texture. I've got my lease punches coming in front. Really? Organic lines not going too fast. But I've got my kind of basic shape that I'm looking for already in my pencil. No, I've got kind of a branch that I sketched in right here. Kind of looks like a mustache. He's got, like, a little branch back here. Great. It's a little happy trees, right? Nice move edge. Getting a little bit of bumps in there. Try and get that bark texture really coming in and emphasizing that kind of cavern. Great. I also have these fence posts in this foreground. Now that I've got this tree emphasized, Almost forgot of his branch. Okay, I can kind of come in here. And if I wanted to add some more kind of textures, the tryingto push that oil edge kind of look e got three. Maybe this one's good. Fine. Comes out of the picture. Plane rate adds a little bit more dimension on that. All right, so coming back down here to my fence posts, part of what is going to help you create depth is Theo element of having things overlap. Right? So I've got my fence post pushed in front. I also have this really pretty fern kind of pushed into the background. So all I'm gonna do is I'm gonna go over my pencil lines, right and try to emphasize that shape than I've got Kind of this post. I'm not super focused on it being a perfectly straight line because thes have eroded in time and they are not perfectly straight. These wooden posts fencing, you almost look like they've been made from fallen trees that they re purposed, which I just think is like the coolest. Just kind of coming in here, emphasizing right. Maybe in here I wanna do some rings, you get a little bit more emphasis on that for my shrubs. I'm going to keep kind of my thick penn right again. I'm using the micron one. It's the graphic one m or using my thick tip Sharpie. You're working with sharpies until about here, right? Because then we're gonna be getting into my metal ground, right? Included the street cause I really wanted it to pop in front of these other ones in the background. But if I were to switch to maybe some of the fence posts back, they're gonna want to use, like, the five in this back area. I'll do a couple just so you can kind of see the difference. So the five is pretty close to the one. It's like a size or two smaller still overall, pretty thick right Vs. The three is significantly thinner. Right? So if I come in here now with the three look at the difference in that line great and back here again, it's gonna change too. More really tiny lines as it gets pushed back. So, like thes trees back here, I'm gonna use my three, right? Really trained push the overall look of these. I got a tree here. Okay, We just kind of come in and you think right, this fern, Maybe I keep skinny my pen. Right. But then these ones in front Great. I'm gonna emphasize a little bit more. So have, like, the thickness of the stem showing. And then I'll have these starting from that. Okay, that's kind of coming in. This is the easy part because you've already done all the work with really blocking things in your pattern. Making with your pencil is probably gonna take you longer, especially on your initial one. I've done quite a few of these. I've already got how I'm doing my shrubbery and plants simplified and made into different kind of, um, easy patterns. So I've kind of already figured out my formula. So if it overall takes you longer on the sketch out stage, it's time while used, because again, once you start thinking you're not, could be able to erase. Can you raise your pencil lines from behind? Right. But you're not gonna be able to erase your drink. It is permanent. We're getting some cool friends so you can see the difference Now with this line weight from this thick fern to this thin one Here I'm just gonna go ahead and keep thinking and you're welcome to skip forward to the next video. Kind of go along with me whatever you want to dio. So something I'm doing here is I'm changing the direction of my overall line, and I might want to thicken, uh, this line as it goes into Kind of like my little burned out, most like tree cave. Right? I'm still going to kind of space it out a little bit because I want a nice kind of pattern As it goes down, we're more light. It's gonna be able to sneak in. All right, But I'm gonna concentrate it. Careful about smudging your ink looking. I'm getting it on my finger. Right? Really? Trying toe repeat thes lines, making them look more organic. All right. Starting to look more like bark. I mean, they continue up here, maybe disappear a little bit as they wrap around. Okay, Maybe he's got, like, a big one coming coming here, trying to block these in different kind of tree textures that you couldn dio All right, It's got kind of like a line pattern in here. Maybe I push, um, my perspective as I go back here by switching from my one to my three right as we go here, right. Makes it a little bit easier to draws and going back to cause with these smaller details they get lost with the thicker pen. And you just kind of make your own judgment call. Right. So here, I've got another post. Right. Comes in from here. Another one there. And then it wraps around. Right? So you can see it's starting to kind of take shape. Switching back to my one. I want to kind of continue those going up. He looked weird with it. Just blink. You can always add more. Take away. Um but you can see how the different line waits start to really pushed the overall concept . Alright as we move forward.
 Pattie Schleicher, Illustrating, Inspiring, & Equipping Others