Transcripts
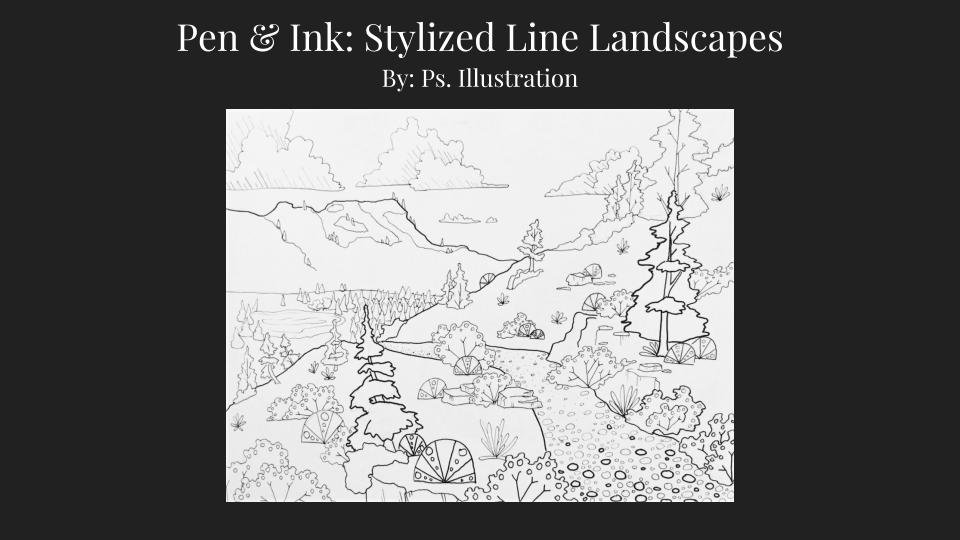
1. Pen and Ink Intro: Hi. My name is Patty Sue. I'm here today for my first video with PS illustrations. Today, we're going to be doing a petting illustration in set like the one behind me. We're also gonna do some skill building and do a full value skill with three different mark making skills. Stumbling catchy in cross hatching. We're gonna try it with three D. For So for this assignment, you're only gonna need a ballpoint pen and a piece of paper. If you do have my contents, I would suggest using no smaller than three and keeping your infects relatively small around the 3 to 5 inches for your first. All right, let's go ahead and get started.
2. Scumbling: Alright, guys. So the first thing that we're gonna do is we're gonna do three different values skills one's gonna be in stumbling, one's gonna be in hatching and the last is gonna be in cross hatching. Then we're gonna apply these to three different circles making them into spheres, because we're gonna have a consistent light source and we're gonna do our shadings from light to dark, using the full values, guilt of each. So over here, we're going to go ahead and start with stumbling. So stumbling is a term that I have used throughout my career to describe, like, controlled scribbling. Now it's very different from scribbling, because when you apply it, you're gonna want to stick to, like, figure eights and circles. So we're gonna just break this down. You're not pushing hard on your pen. You're just overlapping your lines. I'm not going super fast on this. Take your time because you're going to get more consistent mark making when you go slow notice. I'm not doing any kind of star pattern. It's all figure eights in circles, very random and controlled towards my edges. I kind of go smaller so that I don't scribble out. I want you to match it with the square about you're gonna be able to go darker than your printer with your pure meat. Overall, this is looking pretty good, but I still have a ton of white on this initial square. I don't want you to have any white whatsoever. Lots of circles. Figure is for me. This is very methodical and soothing. Almost. It's great for beginners, but it's really great for advanced students to, because it reinforces the skills. All right, so now I'm gonna start on this second square. So this second square is gonna be a little bit lighter than this one. Try to match the one above. Okay, So again, I'm coming in here with circles doing curlicues and figure eights. Even do flowers. Don't matter. Just no sharp corners, trying not to do any star patterns or fast edges. Really? You just don't want those edges. This could be used in pencil as well. This is really great shading techniques for doing realistic portrait. It's because with the smooth edges, you can be very consistent with your blending for check that one out. It's a little bit lighter than the one before there's a little bit more pockets of white overall. And as faras the value scale is it's pretty close to this one about now You move onto the next line a little bit lighter now. A little bit. I don't know. OK, Sorry. Getting in here. Figure raid circles. Curlicues make it look good. Yeah. The largest air on this is losing patience and starting to actually scribble and getting those sharp corners and edges. Avoid it. Okay, It's a little bit lighter now. More pockets of white as you go this way, it's gonna get easier and easier because you're gonna have more white space now. It needs to be lighter than the one next to it. Generally with your stumbling. If you wanted to go lighter, you could make your swirls bigger. Okay, I notice my figure eights and my circles are getting bigger. Okay? And then my last once, you're lying quality to go down. Just wanted to be a little lighter. Now for me. These two look pretty close, so I'm actually gonna go back to this one because I can't erase its pen. I'm gonna make this one a little bit darker now. These two are too close. We're gonna make this one a little bit darker. This is the tricky part because with the line work with pen, you can always add value, but it's hard to take it away.
3. Hatching: So we finished with our stumbling layer. Never gonna move ahead toe hatching. So really, what I want you guys to do on this is really focused on lifting your pen between each breast stroke. Okay, so on here, for the sake of time, I've switched it to a micron. One pen. It's a little bit of a wider Inc tip. I want you to go one direction notice I'm lifting up between each line. Okay, the farther apart, your individual lines are the lighter. The value is so for this 1st 1 I want my blinds completely overlapping. Okay. Be careful. New your edges. Try not to go over on to the next value step to get out of your edges on the sides. Though not as picky. It's more important along the such here. Okay, here is that first word. Now I want to match it to the square above. Okay, so it's gonna be a little bit lighter, remember? Go slow on this because you can't erase with ink. Okay, Overall, that looks good, but it looks more like this one here, so I'm just gonna go and do another house on it. There we go. Okay. Now I'm gonna move to this one, okay? Having it's slightly spaced out farther. I'm not liking that one there, Right? It's a little bit lighter. Now. I'm gonna move Teoh. Now, my micron three 0.1 direction. The's microns A really great because they have so many different sizes of the tips. So you can be really sensitive with your line making and have more control over your results Again, You can do this with a ballpoint pen. And actually, it would probably be better for beginners, because then you're gonna have less variables. You're gonna have the same consistent tip of your tool. Okay? I'm just spacing out these lines, okay? Trying to make him a straight as possible notice. I'm not flicking my wrist. I'm moving from my elbow. You're going to get some more consistent lines with that. Okay. And then this last one
4. Crosshatching: now it's cross hatching. Now, cross hatching is just like catching. But you're going to go across your original light so it's gonna meet a pattern of lots. X is essentially so you're gonna go one direction initially. Remember, For this 1st 1 you want your lines pretty close together, okay? And then you're gonna go the other direction with your lines on this first square, you could have your lines overlapping a lot because you don't want any white whatsoever. Now, on this one, space out your lines just like we didn't hatching notice. It's a little bit farther apart than the one above, because now we're going to go this way with airlines. So you don't have to have him quite as close is when you're just going one direction because you're gonna want it toe have some way in between. Okay, Because here is that dividing line here. You can see a clear difference between this side and this side. The whole value stuff. Okay, let's do the next line. So start again. Lines even farther apart. Now I'm gonna go the other direction, go even farther apart. And this takes practice overall to get more consistent marks. But it really makes a difference practicing these skills because then when you move forward onto your finished piece, you're gonna have better results. Practice makes perfect. There were
5. Apply Shading To Form: So now we're gonna go ahead and start shading are three circles turning them into spheres. I went ahead and put them in the order that we practice them with scum bowling, hatching and cross hatching. But you really don't have to do it in that sequence. Whichever one you're more confident with might be easier to start with. Okay, So for my stumbling on my light stores, let's say my light source is coming from the left that we can copy of the example over here . Right. So here is my little life. All right? So if my light sources on this side generally with the sphere, you're gonna have your shadow on the opposite side. Notice on these examples, though, just like in real life. When you're light wraps around the four, generally you're gonna have a little bit of a reflection highlight from the surface that it's standing on. So there's a little bit of lightness here, So the darkest part is gonna be more, um, on the opposite side from your life, but it's not completely on the edge. So on here, when I start stumbling circles, I think you're AIDS. Remember, push light. So that's just my first layer, right? That's like the equivalent of this one here. Now I'm gonna go back, and I'm gonna do another layer. So I'm not gonna go quite as far as I did before. Not a lot, baby girl. Just a little bit, right? I'm just gonna overlap my lines. Gonna want me court shadow being more towards the edge, but still leaving again today, Then I'm gonna move toe hatching. Remember, that's one direction. So this one can be tricky when applying it to a three d form because you don't want to lose this pretty c shape because that's what establishes it as round. Right? So you're gonna come in here with your marks, frame it with the edge. That's not totally perfect. If I come in here again, can bring it back some. This one's gonna be more dramatically lit. So my lines are getting shorter and shorter each time because I'm wanting to establish shadow more heavily on the side opposite the light. So now you're getting a smooth transition relatively from light to dark. Okay, the last one that we're going to do right now is called cross hatching. So we're going to get in here. I'm gonna use a little bit of a center pin. We're gonna go one direction. So as you can see using a thinner or thicker pen tip, it's sometimes better to use the thinner Onley because you get more chances. Kind of polish your lines when you do, you think it goes faster, but your don't necessarily have the same control over the medium over the mark. Okay, so there's my crock. My hat right cross hatching. You have to go across the original. So now I'm gonna come in here and I'm gonna try and maintain my C shape going the opposite direction, right? Because my light sources here on this side night sores. Here's my smiley son. Okay? Coming back again on my seat now doing a skinnier. She sure notice every time. Right over a lot. My line gets a little bit darker. Not a lot. Just a little bit. Go back the other way. Gorgeous. Simply gorgeous. I'm pretty pleased with this one, So I got an even better result with a thunder pin
6. Finding Good Beetle Reference: where this next segment of the lesson, we're gonna go over what you want to look for in your reference. So scrolling down through these images, all I did was search a beetle. If you know the specific name of the Beetle that you want to use, you can type that in. The one I illustrated was an Atlas Beetle, but right now I just wanted to get a range on Google. So with your references, this one is great because of a couple of things. So pose wise for a side shut. It's not a full flat side shot. You've got a little bit of a top angle, and it's got these great reflections here. These highlights with these different textures on this bug and you can see highlights on pretty much every segment on him, including his antenna. Right then we go toe like another image of Let's say you find you and not so great one, this one. So this one still has highlights, right? And it's got this great little detail here That's kind of interesting to include on your illustrations, but it's boring, right? We've got not really a great clear silhouette with this feat, and it just kind of falls flat. So if you're wanting like a side angle, you could do 3/4 view here. We've got a clear silhouette. We've got our highlights. The iridescence right on his different limbs in the shell pattern. Right. This one's a great one. So this one even has a cash shadow from his but clear silhouette. Over here, it gets blurry. Not really ideal for when you're doing your own illustration. Great photo overall. But you lose all these details here. You don't really want to blur on your photo. This one's a great top down view. Everything's and focus clear silhouette. Nothing's really overlapping, so this one overall is great.
7. Insect Gesture: So with my Atlas Beetle looking at him overall, he's got kind of like an approval, but and it comes in with almost this elongated M shape and then a rectangle head with these shooting horns that come off. Okay, so I'm gonna come in here, and I'm just gonna start with the gesture of the bug, the gesture of the insect. So the reason why re gesture in pencil before we go to ink is a you can erase great. And B, you don't get super attached to how the insect is drawn because we're not spending a ton of time on it, right? I'm just coming in here and I'm breaking down where I want to put his legs. I'm not doing the different details on its legs yet. With these little spikes, I'm just doing kind of the line so that I can figure out where I want to place them. So notice on him. His front legs look like they're coming out of his head now. They're not. They're coming out from underneath him. But for this top down to you, I want you to be very careful with where you've got your legs. I'm gonna move his legs a little bit out on my drawing just so that I could have a clear silhouette with his forms. That way they don't get in the way and then it's middle. Horn doesn't go quite as far because it's coming up towards the viewer. Then he's got, like, a little baby horn in here. Okay, so that's our basic insect shape. Never gonna come in here. And I'm gonna break down more of to the lines within here as faras the nuances with the shape. So on his rectangular head, it actually comes in a little bit, and then it shoots back out and rounds down. Okay. Another great thing about insects is they are very proportional as far as you can divide them in half, and this side is gonna be the exact same is the side. He could almost divide a beetle in half in Photoshopped, on flipping. It's a meter, Okay? And then this body part comes up off of him. You can see where there's a little bit of a gap in here. Another reason why I'm using a life beetle is it's easier for me to pick him up and move him around to show you the nuances. Can't really do that with an image. Right? So we've got his wings here, right? And these guys open up with these dried beetles, so unless you re hydrate them, you don't want to really move around the legs of bollocks of you. See, I'm touching his leg and his whole body is moving. When you re hydrate them, then you can actually physically move them around, pin them into different spots. Bug taxidermy. Okay, so looking at us forn, it comes out and then comes up and then starts to head down, we're gonna have it come out kind of phase in its head. Crest goes like that and then on the same and the thing on the other side, it's all right. If you mess up, that's pretty razors. Or for Okay, so then looking at him, he's got, like, a little mini horn, and I'll bring it closer so that you can see, right, he's got a smaller horn right in here. And then this big one that comes up. So from like a top down view close, you can see that better. So that kind of looks like a little mini rhino horn the rhinoceros. And then there's this dinner horn on the inside. But it doesn't really come to a point from this top down view because the point is coming up towards the viewer, right? So it's gonna be more rounded. Then you can have, like, a shirt appear. We'll see that when we shave. And then something you baby and 10 I am here right on these Atlas Beatles, though they're not like the traditional. And tonight of an insect they kind of look like little I brush wands or mascara ones because they've got, like, these tips that come out this way. Okay, breaking down the lake, segments that come around, Come on, right? That's like one segment. And then he's got, like, another segment that comes here. And on these there's these crazy spikes. Okay, there's gonna dress for those in, and then he's got four little segments, then these crazy see where they get skinny, and then they've got these two little problems that come up and another technical word for him. But I think they're awesome. I don't know if I'd be down to only have two toes, though, to he's got like 1/3 1 over here. One to three four, and then the crazy foot. This lake is kind of going up a little higher. I want to make it more but accurate silhouette. I can always race. There were just gonna quickly throw in these last little legs on the sites of this main shape trying to be symmetrical. That was the word I was get. 1234 metals 12 free. Four or five on these 12345 Always checking your reference, making sure that you're not making it up as you go with the scientific illustrations. I really wanted to look like what you're drawing. This is a practice of really drawing what you see get better at the media. You could do more experiments and stuff from your head. Oh, I almost forgot his little to three or right. And then it's a little late. Sanders that time. All right. He's ready for incon on him, just like we did on our spears. I want you to decide where you want your light source to go. So you could be consistent with the reference that you found online. Um, for him. Got a lot of lights kind of going around. So I'm gonna do it from this angle, Almost like a top down coming at the single. So I know that my highlights gonna be kind of right around here. It's gonna highlight on this side the highlight here.
8. Outline Insect: so overall on these forms, you're gonna have relatively a solid outline unless you're highlight is coming directly from one side versus, like, a top down side, cause as it wraps around the form, it's gonna go into shadow because it's gonna believe direct sunlight. So I'm gonna come on here and I'm just gonna stirred thinking my lungs, thanks part of a shadow later, pretty go slow. You kind of paying attention to the contours of your line. And this strategy can be applied to anything, not just insects. Starting from the gesture of your drawing right and then moving more to contour line and then your final kind of draft. You can work with landscapes, figures. It's really great for six figures moving from gestured a contour. Then he could focus on the proportions and everything before you really polish it. Because when you get to that Polish stage, if I mess up, you realize that it's like you're proportions and it's like the worst cause. Then you have to start all over so really breaking it down. It's helpful just focusing on its contours. Coming in those basic shapes, right headed comes up and down this shape here when he said things Crazy antenna, but look like little eyebrow mascara wands Almost. Okay, just keep outlining his legs. The next one that I'm gonna dio It's far, but the scientific illustrations was I think I'm gonna do some service. No, recommitted. These legs are just way fund dio with all of the different pieces. Because then when you go into shading overall, it's just a basic shape. But these different segments, they're so satisfying to shade. Just enjoy it. I'm weird. That's okay. Get then here. A little bit of repetition in some sweet sweet patterns. Coffee. Okay, basic outline done.
9. Shading Insect: All right, so now it's time to shave. So remember, our light source is coming from for me. It's gonna becoming almost, like top down, but a little bit off to the side just so that I could get some interesting shadow shapes. So I like to start with the head and work my way down reason why is some of these pens, especially if you're using a ballpoint pen? You don't want it to smear. Okay, So whether you're right handed or you're left handed, you're really got a plan out. How you're going to attack your artwork because you don't want toe move your hand over what you've done until it's dry. So coming on this guy, I'm gonna start with his leg, right? And I'm just gonna move my way over towards the light source. Okay, so it's gonna go dark toe like light, dark. Too late for me. Okay, So I'm gonna come in here, and I'm just gonna do hatching for this whole book just cause I think with his shape with these great vertical lines that I've got, I think it's just really gonna help give him that Shane appearance, That shiny appearance he can sing that song that the crab did and marijuana shut. But this you can kind of do a little bit of contouring with your shading going in the direction of your curves. It's not necessarily a straight line, but this will do is it will allow you to make it look like it's moving around Your farm could be somewhat challenging. So straight up and down works, too. It's just could be more fun. That's what we're here for, Philip. Skills and have fun. I'm going in one direction, lifting my pennant, right? Always one direction. So run. Here's where I want my highlight. Some kind of space it out. I can always overlap, like over here where it's gonna be going into the shadow can always over a lot. My line Really want a nice over on this side. It's gonna completely in the shadows. Study on that side. Okay on him. He's got, like, a shadow shape over here. He's got, like, a sweet, sweet shadow shape here because up on here, he almost has, like, this ridge that comes down from his forms. So I'm gonna come in here, shade that sucker in shade in shaded all right. My sing song voice trying to do Normally I'm teaching these tools toe classroom full of about 40 students. So usually there's a lot more interaction. Interruptions with questions. It's kind of strange talking to a camera, but being honest, trying to think What would my students ask? Some kind of coming in here, blocking out the shape, trying to give him that little horn. Great. It's gonna have more of a consistent shadow away from my lights or someone. A dark lead edge jerk and message Clark almost done with his upper body. So we're gonna come in here now. Sorry. I got excited and knocked the table with the pencil school. I'm just hatching again. Kind of going up his farm. Remember? I want the side away from the light to be darker. You got to be consistent. You have one shadow on the other side. It's gonna stick out like a sore thumb. Make your drawing look really weird. So just be consistent with your light sources status, right? Fix that line. Got a little squirrely with my pen. Here we go. So now his headstone. So now I can kind of move down two more of hiss wings. So I'm here and he's got, like, this beautiful segment here where his wings actually rotate out. So I'm gonna hatch that man. And the cool thing about hatching is for different parts. You can go in different directions, right? So in here, that a little darker. Remember, you can always go darker. We'll do like a final pass at the very end. Decide what we like to see what we hate so that. But the great thing about being this size of being no larger than my hand is I'm not spending a super amount of time on this bug. You can go larger. It's just gonna take longer to shade, especially if you're using a thin pen. Tip 1st 3 strokes. Gonna look super amazing. But I get that. Alex, You're like, That's good. This is It's just soothing, hatching, getting in there, doing the sweet, sweet shadow shapes loving. You can do those calligraphy tips to those air kind of fun. Um, they take a while to get more control. Then he can use like India ink could do the same process. Okay, I'm gonna come in here. Do some are match just going up and down. I'm getting on in years because he's a black bug I don't want, like a super amount of white. Even in his highlights. Reason why is, even though there's like these really high Sheen's, they still have some pigment in them like it's not a true white. And if you're moving from a black and white photo where you were able to change it in any of your photo editors a computer, you'll see it. It's like a really light gray. So, like on this, it's gonna be closer. Toe. No, we're the highlight where there's no shading, kind of but step great before when this little bodies curve around, I'm just taking my time. Come in here kind of defeats down towards this well triangle section That's for his wings. Flick out when the Atlas Beetle goes to fly. I know it's a he because the females don't have quite the same head armor as the males. They don't have to throw anybody off the tree. The bush, even with hulking these guys up like their competitors off the branches of the trees. They don't die just like fly away. Or, if they aren't able to open their wings, run away their armor. It's so strong, they're exo skeleton. It's it's insane. What these guys can survive. Like I think humans would look weird with Exodus skeletons. You know, I get really read at the beach and look like a lobster, But it's not Excess was getting in here. It's kind of sheet is. But I'm gonna go this way. Yeah, Look at that shade in my beetle. This side gets a little darker and it goes down into Hiss Queen split The's beetles have those translucent wings underneath, which are really cool. You can do the same kind of shading technique on those, um, your lines air just spaced further apart. And then you do thicker lines on, like, the divisions of the wheels. Okay, Come in here. This leg hatching cross section could be cool in. This guy just made this commitment to go one direction. But then he could do, like, cool contours going the other way. Sorry, I got the sniffles. It's my first year officially teaching high school. And for whatever reason, my immune system is in forward. Bold germs been sick for almost a month. All right, so looking at him. We've got a full range of shut lights, highlights and shadows, right? Got my hot highlights kind of in the middle. I've got my darkest arts over here. I want to kind of maybe make this a little darker so that I can continue this shadow shape over night. Here's like you're polishing step. We look at him overall and be like, Let's make this starker. Maybe over here could bring out his horn. Who like that looking at him, it's dark here. Translucent, not transit goes up value here. Here kind of fades and muzzle. Dumb helmet, warrior helmet. More sensitivity With this 10 these might even have a different name than until it's kind of like in the same position the cricket would have it. And then once he is all dry rain so I could check. There's nothing on my hand in. Come in here and you can erase your regional pencil marks. And what that'll do is it'll crisp up your ink work. You'll get that higher contrast. Walda. You now have a scientific illustration oven atlas beetle
10. Project Recap: so thanks, guys, for watching it stupor. Exciting to do the first skill share video with all of you as a review, we've now done any value skill in three different mark making strategies with stumbling, catching and cross hatching A polite them the basic spirits and then applied that learned knowledge to create a scientific illustration of an insect so overall super excited. Please post your projects here on skill share underneath the project section because I would love to see what you guys created, what you challenge yourselves to do. And I will be sure to answer any questions or hopefully help you through any difficulties that you may experience, so I can't wait to see your work.
 Pattie Schleicher, Illustrating, Inspiring, & Equipping Others