Transcripts
1. Introduction: Welcome along to this
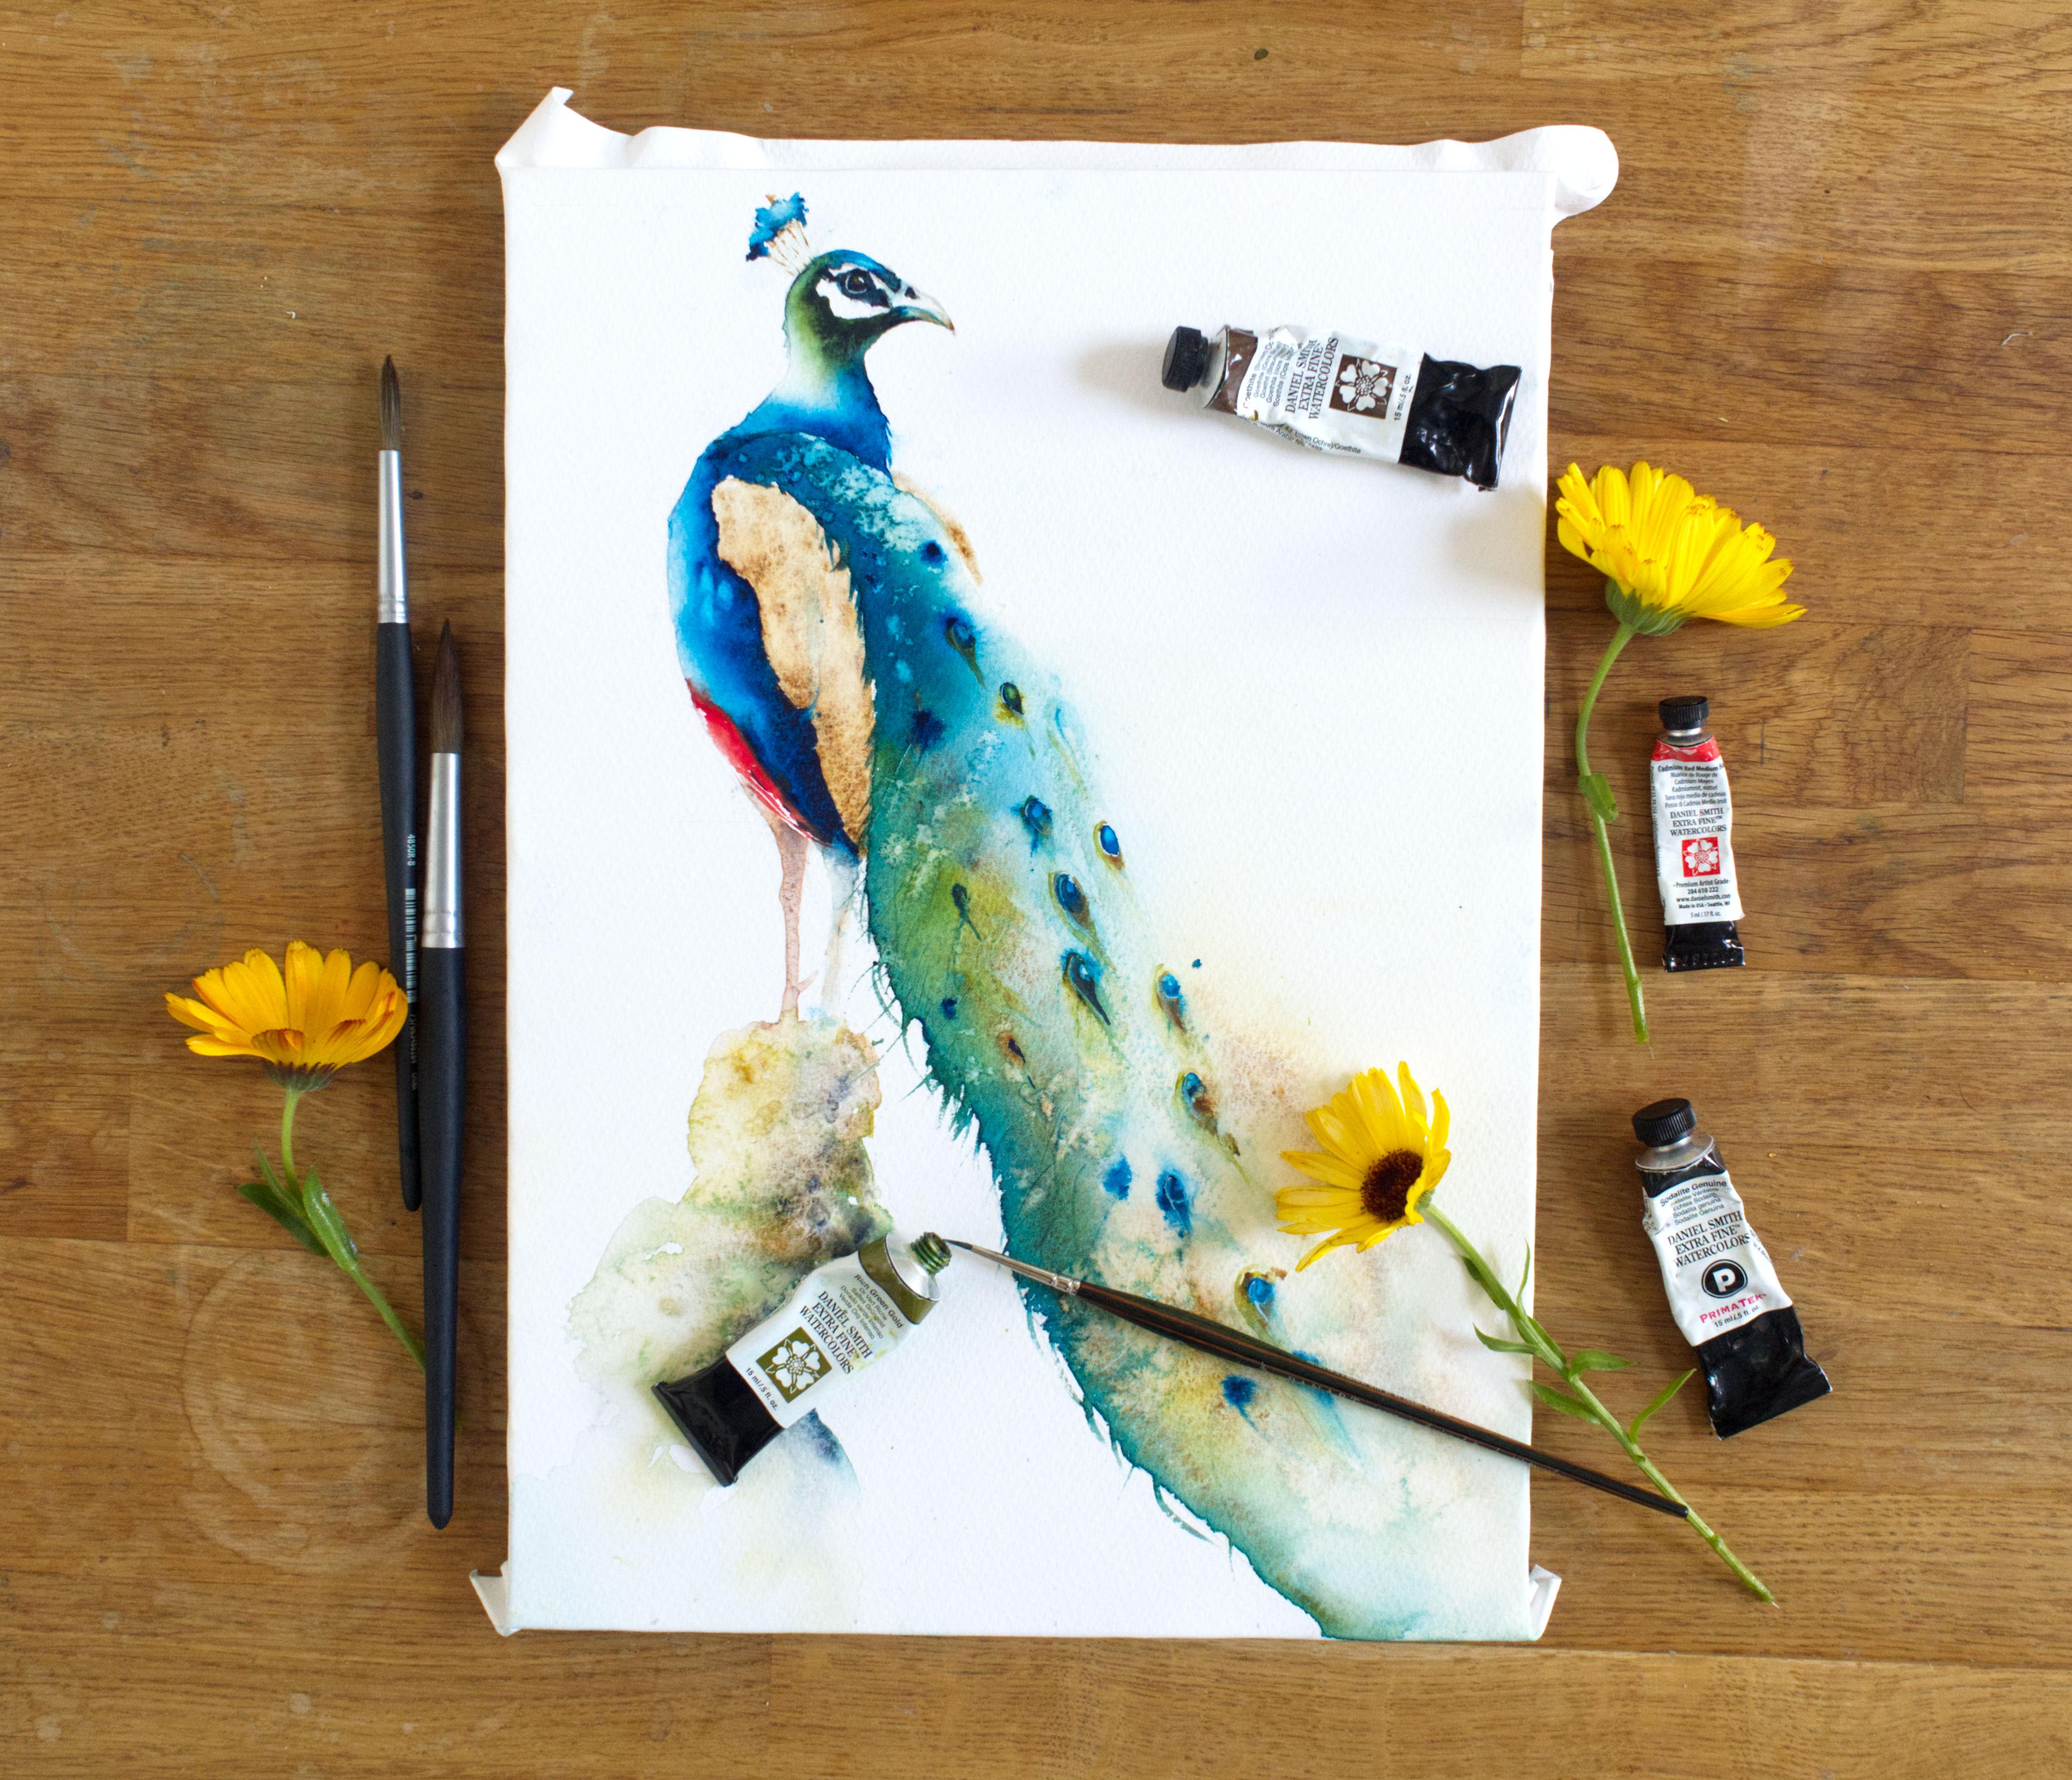
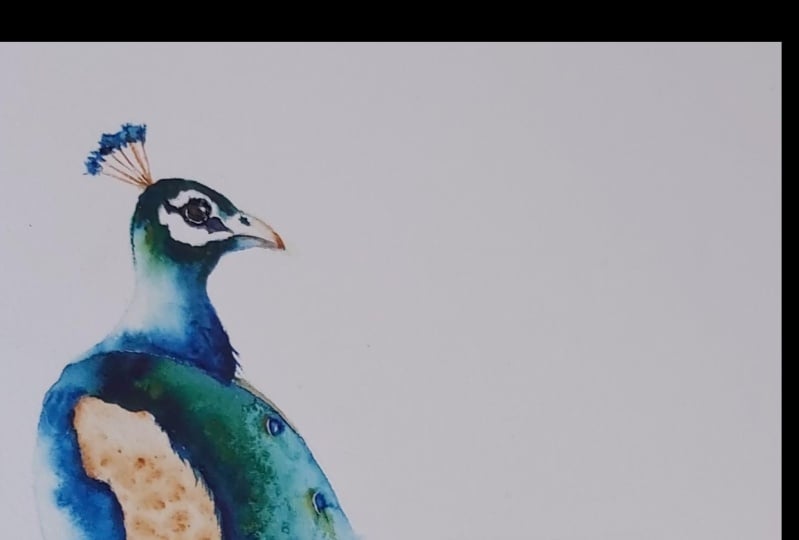
intermediate watercolor class. Today, we're going to paint this vibrant peacock together. Now there's an eye
boggling amount of detail, but I'm going to show
you how to simplify him so you can create
a fresh flowing piece. I'm Jane Davis. I live, paint, teach, and walk my lovely spaniels in the beautiful South Downs
National Park, England. Over the last 15 years, I've taught myself the
free flow technique that you see today. Not having been to art school, finding my own way has been
fun and sometimes daunting, but it has allowed me to
develop my own style. This has led me to teaching others either on a
one-to-one basis or as part of a group in a wonderful studio in the
heart of the South Downs. Also run a successful
commission-based business, painting pet portraits and wildlife art in my
own home studio. In all my classes, you will follow
along in real-time. I can guide you to
keeping your work loose and fresh
without over fasting. I have over 20 classes
available on Skillshare. Now, if you're
just starting out, my three beginner
classes will guide you. Then you will find
over 20 masterclasses covering a wide range
of beautiful subjects. In each one, I'll share the techniques I use in
my own professional work. We have a lot of fun together and you'll gain the
understanding and confidence to
incorporate everything you learned into your own work. Plus our share a few of my tips and tricks
along the way too. As ever, I provided you with a fabulous reference
photo along with a downloadable template
for you to print out. The template gives you a stress-free drawing so you
can just enjoy painting. I'll be showing you the joy
and simplicity of placing paint onto wet paper and
allowing it to work its magic. There's an interesting technique
to curating that lovely, soft flowing tale that
I want to show you. I'll be guiding you
through adding detail. Still working wet-on-wet. Of course, our share many
of my professional tips, tricks and musings as we work
our way through the Cloud. If you'd like to learn more
about me, all my work, please pop over to my website at Jane Davis watercolors.co.uk. This can be found
on my profile page, along with links to my
Instagram and Facebook pages. I'm very active on my
social media pages, who I love sharing my art, especially on stories
with many ideas, works in progress and
tales of student life. I really hope you will share all your paintings on the
projects and resources pages. As I love senior most PTs. And don't forget, I'm
here to help if you get stuck or have any questions. I want you to
experience that buzz of painting in this
liberating wet on wet, loose style. So
come and join me.
2. Materials: And a very jolly welcome
along to this peacock class. As ever, I show unto all
the materials I'm using today and all of
these can be found on the projects and
resources pages. I'm going to start
with my collection of Daniel Smith plate. So I've got go flight. That is a brown ocher. I've got just a cadmium red. I've got a rich cold green. Hello, blue. And that is, I think
as a green shade, obviously, a chocolate
That's soda like genuine. And a little tiny bit
of white gouache. Now, as ever, you don't necessarily
need all these paints, but I found a Buffalo Blue
amazing for this class. I'm such an intense blue color. Regarding the other colors, you could probably
use other greens and other sort of brownie tones. The red really doesn't matter. It's only a tiny hint here. I've found so like
genuine useful for the darkness here and
just tiny bits here. But really, the only one I would say it was the most
beautiful is the patella blue. So the other colors you could probably easily substitute
for others you have. Now, I'm using my
trusty Bockingford and I've actually
stretched this. I didn't quite a
good stretch for me. Sometimes my strategy is
gonna be a little bit wonky. But it's 140 pound,
not more water. I've got two lots
of salt here today. I've got one that's
been finely ground. Ground it up a little bit fine. It's just for the
top and there's some chunkier bits
for further down. Got a little. This is what I always use this
to build a tilt my paper. But you can also, you may find you might need something
a little bit taller. Again. At various stages, you
might need more of a tilt. So find something that's just gone a little bit
more height to it. Doesn't matter what
is picked out. And I've got a pencil
and four brushes. I've got a large
number 12 now this really isn't that
necessary if you haven't got a big one because it's just wet scenario
down a bit quicker. So you could have easily done
it with and number eight, which I use for most of it. I've got a tiny number naught. Again, this could, or you could have used something
a little bit bigger. This is quite a small painting. I would love to see somebody do something a
little bit bigger. I've had to squish some
of these features a little bit to fit it onto
this piece of paper. That's probably a I'll
explain that in a minute. So yes, that's a number note. And I've got my
eradicated brush, which just, is just brilliant
for taking light out. Now, I have used a hairdryer, but a lot of this relies
on it dry on its own. So the hairdryer is
only useful just as it begins to go off and you
can quickly with your oven, dry the last couple
of minutes better. Not necessary by any means. Going back to the reference
photo which can be found on the projects and resources
pages along with the template. Because I'm a little limited
to the space I'm working on and I had to squish
his neck a little bit. So actually the
reference photo has a longer, more elegant Nick. I will put a template of
both versions on the, we'll find a template in
both versions on the, in the projects and
resources pages. So if you've got a
bigger expanse of paper, I would love to see a larger
and larger one with him, but I go through those techniques
and the techniques apply exactly the same even though this
little one has got a slightly squished and neck than maybe the
reference photo has. And I don't think
there's anything else I need to mention. So come on. Can sketch them out.
3. Sketching Out: I'm just gonna give you just a few helpful tips to getting into
sketched out nicely. Now if you've used
your template, you've gone round it carefully. You'll find you've
got some sort of blunt areas,
especially on points. So it's just worth, once you do that
template away is to just check that you've
got the shapes right. It's looking at your reference
photo and just going back and looking at the two
and just to make sure everything is looking
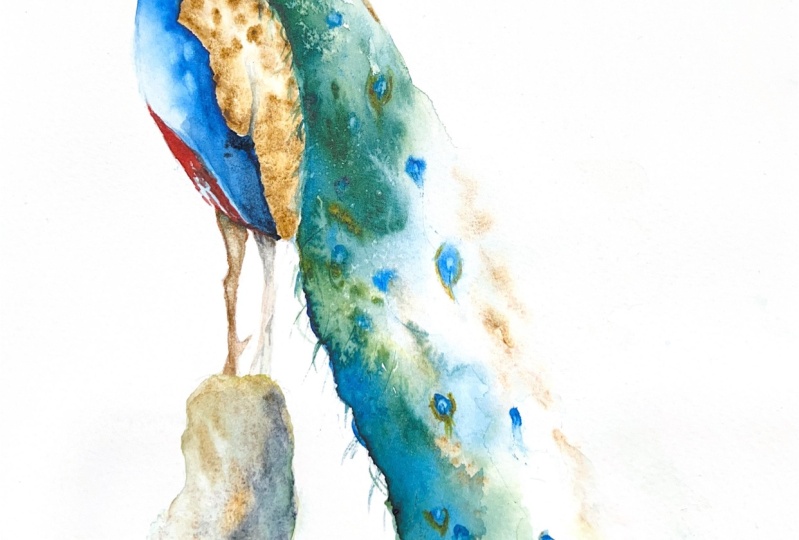
Lovely and crisp. Now we don't want to put this right hand
line of the tail. We're going to hopefully blend
all that out beautifully, but we do want this
left-hand side. You want to get your winging. Make sure that's got a
nice sort of shapes. Again. Just sectioning off the
little red area there. Puppies legs in. Now I put him on a slightly
different shapes bow. I just found the reference
photo looks a little complicated and kindly
distracted, distracted from him. So I kind of made up my own. But that's entirely up to you on how on what you want
to stand him on. You could be you could
put them on anything. You could be adventurous. But i'm, I'm sticking with just a simple about
for this class. Now I haven't
popped the eyes in. I found when I drew them in, I was getting a
little distracted and getting a bit regimented. But if you think
that might help you, just very gently sketch them in. But again, my pencil
lines are quite thick and strong is just more
for you to be able to see. I would strongly
suggest trying to keep your pencil marks as
light as possible. So when you when the picture is finished and
you rub them out, you can get rid of them and you're left with
strong pencil marks. It's always distracted,
distracted, distracts from the
finished piece. So go lightly. Don't think there's
anything else to tell you. But I think we should
go and paint him.
4. Wing: Right onto the fun bit. Pick up your brush. I picked up my
number size eight. Lovely and wet. And we're going to wet
the whole of this. When I tell you what I do. This is just for you and a few people suggested
this was helpful. Just to put a little bit
of color on my brush, just for you to see
the area of wet down. This is say only for
me and hopefully a helpful tool for you so you
can see where I've wet down. So you want yours lovely and
clean with nice clean water? Yeah, that's probably
probably helpful, isn't it? If you can clear enough. So I'm just going to refer
to my paints as brown, green, dark blue, red. And the blue. Just to stop as me
pronouncing things badly, you've probably got
different colors as well. So I'm going to just
pick up my brown. Help it, keep it a
little more simple. And we're gonna nice amount on your brush and
we're just going to tap right at the bottom. We're going to
allow that paint to move up its own accord. I had a little bit more
of it's not moving. Should carry on. With the peacock's
ever so complicated. He's got such precise, beautiful markings, but we're going to try and avoid trying to
get too detailed. So I'm just tapping, leaving some little brush marks, making sure I've got
into the corners. Nice shape of the wing feathers. Just going round. Again, just sort of
up here as well. And that is all we're
going to do for the wing. And that's that a
little bit done. Again, we want this to dry
because we're going next, we're gonna do this
big tail feathers. So this needs to dry because
we don't want to tell further and running
into the wing feathers.
5. Tail: Right then, big deep breath. I'm going to clear my DEXA
little bit so I'm going to get rid of my knee, my two little brushes. I'm just going to put
those to one side. If you haven't got a big brush, it doesn't matter, but I'm
going to pick up my number 12, just I can wet the area down
a little bit more quicker. And we're going to start
right at the very top. And I'm going to pop a little
bit of color on for you. Have a bit of the green. So we're going to wet. The color is only for you, so don't keep your brush nice and clean,
nice clean water. We're gonna go probably
about halfway down the body. And then I'm going to come out, square it off a little bit. And then we're going to
run out to the edge. I'll put that color when again. Going to make my painting
a little, little odd, but I think it's gonna be helpful for you to see
the areas I've wet down. But again, this is just
for just the purpose of you being able to see
the areas I've got wet. Yours are gonna be
lovely and clean. So I've stepped it as two steps. And then we're going
to run it right up against that wing
feather we've just painted, follow that nice curve around. And I'm going to run my feather, feather, tail feathers
right off the board. I'm going to switch it all down. Okay. Make sure it's
all lovely in wet. And where you've started
the top, you may, may find it starting
to dry a little bit to make sure you've
got everything really good and wet
because we were going to be relying on our
on our paint to run. If he's not wet enough, you'll find it just sticks. Plenty of water, so
it's almost sitting in puddles but not quite. Right. I can see there's
no dry patches. Now I'm going to tilt
this at various heights. I'm going to start off from my smaller I'm trying to get
underneath it straight for you. I'm going to start off
not quite as stilted. And I'm going to pick
up my blue and I'm going to pick up my green mite. Let's pick up my smaller brush. I'm ignoring. We're going to mainly work. We blew down the side
and green this side. It just felt a little bit
better on my practice. Pts can try and soften my
age a little bit here. That's just me right? Now. Item add color. Let's start at the top. Should all start running
down little bit of green. Put that right on top, and we're going to
allow that to run. And we want to keep mainly
to the left-hand side. Don't want to put too
much paint on the right. Just at the moment
we're going to see how we're going to
see how it all flows. If you feel yours is going too much into the
right-hand side, you can always just gently
tilt it back, vice versa, if it's not moving
enough, we can, we've got the power to
kind of move it around. This is going to be
a little bit judging on your own piece and
how it's all going. You're going to have to wing
it a little, little more. Be a judge of your own
piece and how it's going. I'm just out. I want to keep this nice
and strong at the top, and I want that to
allow that to run off. If you can see it's
just starting to paddle a little
bit on the bottom. I clean my brush and
I want to get that off the ball to it's
running off onto my table. A little bit more
blue down here, just to strengthen that
up that line down nicely. The mine is sticking very
closely to this edge. So what I'm gonna do, just gonna give it a
little bit of a tilt. See how that's running. Let's see if I can do
something clever with this. It's now on a slight angle. You can see how
that paint running. Now. I'm going to
pick up my brown. I'm going to start
putting some of this kind of brown markings
you see running down. And you can see how that paint reacting and pushing
the blue out. I'm going to have to be mindful. That doesn't go too far. I just want this
to be lovely and soft and disappearing off. So I say, you're
going to have to judge your own little
pieces a little bit. I'm just going to
put mine back at at a more of a tilts its running down the boardwalk
across the board. And look what you're going
to have to keep looking at your own piece and
seeing how it looks. And having faith. Say that the idea, it just gently blend into, if you find it's
gently blending in, then tilt it around
the right way again. Where am I? Let's put a little
clean my brush. I'm just going to put a little
bit of brown down here. It's got a little
contaminated with the green, but that doesn't matter. Strokes here. I like to keep it
quite soft so I don't want to put too
much color in and i'm, I'm conscious that he's
actually looking quite nice. There are some bands aren't
there that run down here. So I'm just, I've
got my nice amount of paint on my brush and I'm
laying it down on the side. Just popping some of those in. It will all blend. You'll just get a hint
of a band down there. See some green on my Boston. Yeah, it's kinda
put a little bit of trouble working out a tube sometimes bit of a
contamination going on here. Give it up, squeeze, lift, put a little bit of brown. Let's better. I don't want to
define this edge, but I also want to
give it some body, some sort of idea. There is an end to that tail. I want to keep it as
soft as I possibly can. Also, we're going to
have to bear in mind that the top is going
to dry quicker, obviously than the bottom end. And we need to put some
flicks into the wing areas. And I'd like to put some salt. So there's a lot going on
in this little lesson. Just running off the ball, just making sure that's
all running down. Now if you find yours, mine is actually
doing quite nice. I'm pleased with how that's
running, but I've done. And if you followed
me on Instagram, you may remember how
many of them are these? You can eat, encourage
this, paint it. That's sitting here
on the left-hand side across to the right by using this wet area here. So I'm rewetting and
wetting my step. I'm filling in that step part
and I'm pulling it right to the edge and that will pull
some of this paint over. Hopefully you can see that it's a very subtle way of
getting that softness. The paint is just giving this paint here more
space to run in. See if I can get rid of
my little line there. Yeah, that's doing quite nicely. Again, if you find that sort of wheezing over to the
right-hand side, you've got the ability to then you can even lift it up a lot higher and just
allow that to run. And that will encourage you to start obviously moving
downward and the cross. So you just have to tilt
your board depending on way, on sort of how it's forming. Little spots here and it's just worth watching it
for a little bit. See, we've only doing one layer, so we don't want to
do too much on here. Just want to give an idea. There's something
there but not a line. Very conscious of trying to keep this this right-hand edge of the tail feathers loose
as I possibly can. Just using the Brown. Got my big brush here. It doesn't matter
what size brush, whatever brush you're using. Just going to tap
a little bit in. This is starting to dry up here, so I have to be a bit careful. I didn't add too much color in there now because it's going to give me some unusual marks. But this is nice and
wet down here, still. A little bit of green on top. Just trying to keep
everything loose. Stepper if you can step
away or look away from it, That's always really
helpful because. It's very easy to stand on top of it and I'll sit
or however you're standing would be lovely for
this, this little lesson. Because you can really keep, you keep you keep
your head looking. You're really looking
at it from a distance rather than sitting
and cramped over it. You won't get a nice overview. So if you can stand, you get a nice overview of
where you're working. A bit more water in there. If you're just looking for something nice and
interesting patterns, yours is gonna look
very different. All my practice T-cells
are being very different. So this is a very much You're, you're looking for something, say interesting, a nice flow. There's no right
or wrong to this. You just want to get something
you're pleased with and what you quite how
to explain it. Really lovely sort of flow. Now I can see up here, this is starting to dry and
if I don't flick those out, we're going to be a
little bit too late. So bring back my little
don't need my pencil, bring back my little brushes. I've got my number naught, but just a small brush. We'll very carefully
just going to flick a few little bits into the wing. Don't go crazy. Just a, just a few hints. And again, you can
run down the tail. Again just doing a few bits. Yeah, that's looking good. Now I need I need to put my
eyes in in here in a minute. We need to. But I need to
catch it at the right time. It just needs to be going off. So it's just a little bit tacky. Might have a go at the top. Pick up my number size
eight. I'm using the blue. Just going to pop one down as a bit of an experiment
to see how it's moving. It's going a little
bit too much, just a touch too wet. So it's all about finding the getting your timing spot on. Ideally, your brush
needs to be fairly dry. You don't want too
much water on that. And you need to pick
up a nice amount that will have an influence
on how much it moves. A little bit of salt
on the top here because this is really
starting to dry. So I'm going to use
my smaller amount. So i've I've ground this
up a little bit smaller. Just a little bit. Some
of my practice pieces I've got a bit carried away with how much salt I added in it. It looked it looked
a bit too much. That's all I'm gonna do
there. Put that one down. Bit of a waiting game merely. I'm going to fingernails a wonderful it is doing
some because they've got such wispy little bits of
tail feathers, haven't they? So you can pull
some of those out. So you just flick
some of them out. Just a few. And we're just waiting
for this paper to dry it. Actually, we can get some
of those blue markings on. I've got a bit of a
puddle. Be careful you don't have a puddle at the
bottom here because it has that dries and if you
allow a puddle, see that. If this part always
allowed to stay there, it will quite often
moved back up your paper and you'll end up with a
rather nasty watermark. So make sure it
continues to run off the board and just bring it
down, allow it to come off. I'm going to pick up
my little brush in readiness. Pick up blue. Already. Have another little go
see how that's doing now. So again, nice thick amount. Doesn't it doesn't matter
which brush you use. I was using the excuse me, the larger one but
doesn't matter. Yeah, that's, that's
starting to go now. So try to be pseudorandom
because if they're, if they're very uniformed, it looks, it looks
a little bit stuck. My paper has just began the buckle a little bits is actually the top where it's
buckled is drier. So I'm going to pop one
of those big eyes there. But I know this little dip
here where it's dipped is wetter because obviously it's peddling a little bit there. Can you bob your
head up and down, you'll be able to
see the stages. Obviously, this is quite
wet down here still, so I don't want
to go down there. It will it will
bleed out too much. I'm going to actually
put a green eye in as well because again, it can all get a bit uniformed. So if I put a just a
hint of green in there, we can play with those on
the finishing off bits. See how that's just,
it's really soft. I've got no, no sort
of finish here. So it's ideal is drawing nicely. Let's travel, isn't
it? You're standing here waiting and you're like, Oh, I could just
do this or that. So I might put my
hands behind my back looking at it now I think I'm going to put a little
bit of salt in here while I'm while I'm waiting
for this little area to dry, I think it's ready to have
just a touch of salt. Think I'm going to use
my slightly bigger one. Just a few grains though. Here's one or two. It's quite nice to have them
in a sort of a band as well, rather than sprinkled all over. So just as a, just a little lighter than they're starting to dry
nicely now down there. So I've got my brush
again back with the blue. I'm going to put another
dot bear in mind. Obviously they are round, but the angle you're working on, they're going to be more oblong. Kind of pop another
one down here, see how that's spreading. Going. Keep it in, keep
your brush quite dry and your paint as thick as you want, so it's neat, but you want it
quite nice and quite thick. That's bleeding a bit too much. You can see that spreading. So I'm just going to
pick up my bigger brush, soaked my thesis paper towel
haven't done very carefully. I'm just going to
bring that back in. Don't want it to spread
too for perfect. I will go down here
and this is looks like it's a might actually pick
up the brown as well. Let's have a brown
mark down here. Brown eye. I didn't want down there. There's some eyes
are half covered. So there'll be a
little moon shape. So I'm going to just pop a
little moon shape one there. We just want these eyes to
be as random as we can. And the trouble
with standing here waiting for little bits to dry, it's very easy to to put
them in very uniformed. I could see myself doing it. Now. Let's put another
one down there. Just when I went down there, unless you're just starting to go off quite nicely now I can see I've just dipped
my head up and down. I can see we're
withdrawing nicely now. Again, I'm going to,
I'm looking away at it. I think I got enough little
blobs going on there. So I might call it a day. So what we need to do just, I'm gonna put a little bit
more salt in down here. And we're going to have to
leave this completely dry. Managed to put my looks
like my finger there. So bear out in a minute. Right? Let's have the
larger one again. Just a few little bits to
say, don't go too mad. Actually, I might just as, as beginning to joy. It's almost a might've missed, might a little bit late to
a little bit too late here, but I'm going to try and
put a little bit there, just fill it'd be quite nice
to have that area broken up. Again. Be a judge
of your own piece. So just want to soften this one because a
bit of a thing I've actually got a lumper painter
rid of that. This stage. It's a very dangerous stage to be playing with your brush. So I'm gonna put that down right before you let
that completely dry. It has been quite fun
just to pull some of your little some of these little
specs or I should say, your back, your nail, just pull some of
those out and again, go through the tail and just
just do some little marks. They gave quite a nice texture. Markings. Just run some of those just felt it
just helped break, break some of the
heaviness of the eyes. Again, don't get
too carried away. So, um, yeah, let's
see how that dries.
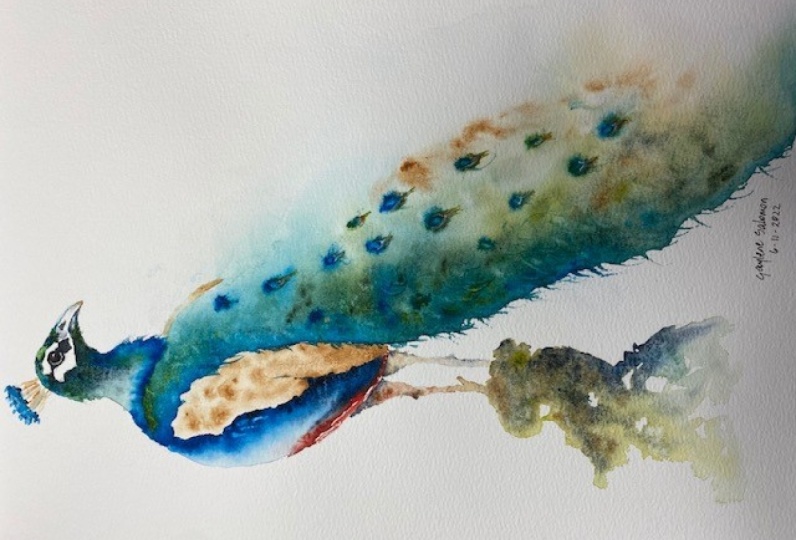
6. Tail Second Example: Right? Well, my
main pieces drying. I thought it might
be helpful for me to do this tail again for you just so hopefully
I can come up with a slightly different scenario
of how it's working, which will hopefully
help you a little bit. So I'm going to do
exactly the same. I'm going to wet it down. I'm also going to use my little
bit of color on my brush. You can see where I've wet down. So, excuse the shape of
the rest of the bird. It's a very, very rough just to hopefully you can see what
parts I'm referring to. I'm not sure. I can not sure I can paint
a headless peacock anyway. Okay. So I've wet
halfway down the body, I'm doing that step out, say bear in mind the color
here is just for you to see what I've wet down yours
would be nice and clean. Then I'm coming down back
out right to that edge. Then I'm going to fit it in. Following that nice
sweep at the tail. Bit more paint on
my brush you can see then wet everything
else in that in-between. It all lovely and wet. This is an unstretched
piece of paper, so it's going to buck a
little bit more butter. Say I hope it will. I'm hoping something different
will happen this time. So I can talk you through a different scenario right next. I'm going to tilt it.
Hold the piece of paper. We're going to do exactly the same. Right? So picking up my number
size eight brush and I'm going to grab
the green and the blue. Make sure my brush is wet. And then I'm going
to take it bit of excess moisture for
my paper towel. And I'm going to
start with a blue. And we'll say again, we wanted to keep
this all the way down the left-hand side edge. Nice and strong. Add a bit of green in there now. Allow it all to one. We're trying to not interfere, trying to allow the
paint to find it. You can see I've
lifted tiny little bit of dry paper that's
going around that spot. Fill that vacuum.
One down this edge. Such a powerful color,
this pathetic blue. Beautiful. But I have had, I've been permanently
going around with this in my hands the last few days where I've been practicing this chat. It down here. You can see how that's
moving out beautifully. So I can see if I can
do something different. I'm going to raise my
paper just a bit higher. I've got my tin of
paint. Very pro here. Jeff, Go to use that
to give me more of a tilt and hopefully you
will have to see how it acts when it's
got more of a tilt. Just keep adding color. Add a bit of water if you find, if you found your stuck, I can add water that will
again allow it to run. This is probably not going to be overly helpful
because you can see how it's running around
the buckled piece of paper, buckling. Better. You see how much
that's wheezing now because we've got
more of a tail on it. I can man handle it.
I can just hold it. You see how much
that's giving you a really good strong
sense of flow down their bit too much I think. But I can tilt it. Now, can then allow some of
that to run into these steps. I can add water. It's all a case of just
picking up your p.sit, seeing how your piece is doing. The minute you think
it's flow too much, you can then put it down. I can get rid of my
taller support and drift. Go back to my trusty
little heart. Make sure I've got
you on camera. You just got to be
careful with this doesn't pull in the bottom here. Obviously because we've
allowed that to flow. This is starting to, um, it's washed out a
bit so I can add as long as this is still damp and Workable as in work. It needs to be wet
still or at least good. It needs to needs
to be wet or damp. I'm hesitating on damp
because you don't want it. It's all just getting used
to the stages of dryness. And he is the biggest trick I think in this sort
of technique is judging how wet your paper is and how your paints are going
to react to that wet paper. I know what's going to happen. This is going to be the
nice-looking piece because it's, I'm not worried as
much about this piece was my main piece. I'm obviously a little bit more worried it's going to work out. So it's that mind
game, isn't it? That's looking nice. I haven't put in either Brown. Have I pick up
some of the brown? We can add some of that in. You see how that's reacting
to the particular paint, reacts to the other colors that are existing
on there already. Add a little bit of
water that run game. We always have to be careful mindful of catching fix as well. So we need to make
sure that it doesn't dry out too quickly. We won't get time to flick out some of
these into that wing. So that you need this
deal to be damped to work for those flicks to work nicely. It's nothing really to stop. You're adding in
the latest stage, but they tend to
look a bit stuck. That has, the Brown has really pushed that color out at
that stage of dryness. So let's add a bit
more water instead, if I can get that
flow back in again, a bit more, Blue's gone,
a little bit green. Okay, It's lay this
fat for a minute. Let's get rid of that heart and lay it flat and see
what see what occurs. It won't be flat flat because
it's the papers buckling. So it's a, it's a good class to do with
stretched paper piece. You can see it's making it harder to get a nice result
because it's buckling. I'm just lifting up
again just to get some of that water
to run, run off. You can see how easily you
can manipulate these things. See how that's running. I can just pull that
off the bottom. Preferably with a clean brush. You, if you've gotten
lovely, nice clean water, you won't have got
these steps of color. So they will be nice and clean. So you're just left
with a nice soft edge. Let's see if I can pull that
we did on the first piece. If I can wet this area
and pull it right to the edge to allow some of this to move my
Internet it a touch. Probably about right. A little bit too
late. You can see how that's pulling it all across will be helped by
me tilting it as well. So let's lay it out flat. That would drive just feed it with dry
better at this stage with a little bit
of a tilt on it. Again, those covered
covered my blue. There it is. Again, we can put those eyes inch just making
sure your brush is clean. It's not too wet, needs to be just damp and not wet though
you don't want to add too much water at this stage because it would bloom
and I'll show you. That will be easier,
wouldn't it? If I do that, you're obviously going to
get some marks in there. So if you use a very wet week, so the concentration
of this paint, you're gonna get
the same effect. So make sure your brushes sort of taken the
excess moisture off. And you've got this quite
a nice strong consistency. We can just have the two colors.
Pop some of that. Green one. The green, they're a little bit too much. It's going to spread
a bit too much. We get something like
that where it's split. You feel like it's
spreading, clean your brush. And you can just gently suck
that up just a little bit. It's a tricky thing getting
these eyes just to write, just to spread at
the right time. And actually one of my
very early classes, the butterflies is not doing a dissimilar
technique actually. And we were putting eyes and
markings on a butterfly. So if you want to practice this and getting
the timing right, that class might be
quite useful for you. That spread too much.
And it's a shame because there's not a lot you can do about it at this stage
because it's gonna go, you can keep sucking it in. But I was just being a
little bit slap dash. And that's balanced between being loose and just
going for it and being a little bit mindful as well
while you're doing it. So it's a balancing act. And just catching your paper
at the right time, really, that was probably a
little bit too wet there. That's I don't know if anything. I don't have anything changed a lot on for my first piece, but hopefully I might have
included something which I didn't include on the first one and it's just giving
you a little bit more help. Just going to pull out
some of these again, just using my little brush. And that's enough. This
paper is wet enough. Enough paint just to
pull some of them out. Again, you can do
your fingernail. I liked the fingernail for this. It's also wood catches that captures the very
wispy tail feathers. So fine. To just a few of those actually marks the
papers who actually scratching the
surface of the paper. Pretty much dry there
and we haven't actually put any salt on either have ISO Let's just about just
about wet enough. That's almost dry. So I've I've missed the miss
my chance on that bit there. Probably a bit wet chunky
one on the bottom. And actually, let's
put a little bit out here as well and see
how that drives. Because some of that worked. It was quite, it's quite fun or some of the other ones
are practice pieces. And I'll see how
that dries and show you show you later
how that dries.
7. Head and Neck: I'm pretty pleased with
how my main pieces dried, whether there's quite enough down here on this
right-hand side, as I suspect, probably my little demonstration
second piece I did for you is probably
going to be the nicer, but that's the way it goes. So we're going to
tackle their head next, but just be mindful
that this is dry. Before you start, I've
got little salt crystals, I think a little bit damp still. So I'm going to be
quite cautious, but I'd like to sort of
get on with the head. So just be mindful. You don't stick your hand
in it and smudge it around. Ideally, clean your water. Because if you've used
it, the fellow blue, it's a really strong color
and we'll change the color, the paint to your
water and your book. You want to have clean
water and it will taint. Got a piece of
clean kitchen roll. So let's let's crack on. So I'm going to use
my number eight. Now. We're going to wet down
the whole of the head, but not the white markings
around her her his head. So nice brush, nice wet brush. And again, go really carefully
with inside those lines. You can go right
up against that, the age that hopefully
some of that will just, just very gently bleed. This painting is fairly small. It would be lovely to
do a really big one. So if you're feeling brave, I would love to say that
the larger version, because the head gets a
little bit small to tackle, it, makes it a little bit. I've just picked up my
little brush because it's quite a small areas on
the top of his head. I want to make sure it's wet. My brush is tainted with
epithelial blue checking. Sure it's nice and
wet right up to that. Sort of blue goes quiet
way into the beak. So make sure that's
nice and wet too. Okay. I'm going to put that one down. I'm going to use the blue
and the green again. I'm going to use the
green on top of the head. Just going to use both of
them on top of the head. Let's do both colors. Just gently tap. Say it's a very small area, so I can't do much
more than to attack the color into and then
just allow that to run. It's very dark underneath these underneath these white
markings he's chained. So we're going to
use the two colors and I'm going to pick
up my sewed light genuine is going to
get a little outing on a lot of very large one, but just keep tapping. Let's pick up the
solar light genuine, because that will give
me the dark, darkness. And it also allows
the colors to run it. So it's a nice granulating
color and it also moves by. Wealth. Is no just happening. There's no brushstrokes,
just tapping, coloring, clean off. Pick up some the
blue and it gets at the bottom of the neck and round underneath the chin as those in the lower
part of the neck. Again, just tapping. What we want is just to gently spread on its own so we're left with a nice area of light. Again, it will be a
little case of watching the sea just moves up on it in on its own rather
than me painting it on. Okay, I'm going to
grab my little brush. Just gonna make sure I've got
all that, all those colors. White far enough down. Make that a little
bit more irregular. Just goes in a little
bit, doesn't it? He didn't want to
have a boring circle of color around those, um, ran that white face marking. Also want to put in that
little, little nostril area. Let's use the soda like genuine. It's just a tiny
say what's working? Very small here, so something larger would work beautifully. Just not so easy the
way I have my desk and equipment setup to do anything to dodge at the moment. Now what we want to do,
you can see the eye is all tense purposes is
inside that dark markings. So we're going to touch the head color and then we're going to make up the eye will, in the next class,
lesson subclass, we will, we will, sorry, the deconcentration
went disappeared there. Well, we'll put some
brown in there and we'll make the eye a better
shape at the moment. We're just pulling in that dark. Just keep it on that
reference photo. I'm thinking my eye move on a
little bit too far back and I mistakenly joined
that bit up there, but let me see if I
can get rid of that. We'll gently bleed. They open the majority of out. Just keep an eye on
that reference photo. Click UI back-and-forth. But they still don't
superimpose themselves, so just keep keep your
eye on it. Thank you. Sure you shape right. You can make sure the face shape is out of
the head shape is right. And we can see that's moving. That's doing a brilliant job. Just before it completely dries. I just wanted to
do a few flicks, but there's a little
bit wet at the moment. I feel this is a bit green
still underneath the chin, so I'm just going to
add a little bit more. So like genuine. Just try them. Try to get that face marking. Quite sure if I did an
overly good job and actually sketching
out some of the shape is a little off and I can't
quite see what it is. So it's a good
lesson though I told you to make sure your
sketches dead right Then. Haven't necessarily
isn't to my own advice. I think I'm about there that off and say we will
put the eye sits amongst, you can see really
amongst that dark area. So we'll do that
at a later stage. Obviously that needs to
dry before we can do that. This is just about almost
a little bit too wet, but I'm going to take a chance
and I'm going to just pull out with little tiny brush,
put up some of that. Just tiny bit. Breaks off, breaks up some other sort
of some of those lines. Little bit of back
of the neck as well. Tiny, tiny bit. And this as it dries, we'll want to keep some
of the light there. If you feel like it's moving in a bit too much in
the very gently, just coax it back. This is ideally why you don't want your pencil marks to show, because that will be lovely. Minor, quite strong. If you've done yours nice
and light to build a rub that out and you'll have
that lovely Lost and Found. Look. All right. I don't think
there's much else we can do. I say it's always worth just
watching that as it dries. So don't take you don't
just disappear and leave it to dry if it's still quite wet and
it's moving, it's this. If you're wanting
to leave that area, nice light, it's just worth
hanging on and watching it. It will get to a stage. You'll begin to learn that at a certain stage it won't
be moving anymore. So you can then go, go off and leave it
to dry on its own. But while it's still
quite wet and moving, you can be with it and just gently tease anything back if you feel it
needs teasing back. Fill it back in
again because that was working quite well. But yeah, just watch it. And then once it's
got to that stage and you can leave it and
let it dry completely.
8. Body: Well, I'm pleased with
how the hedge dried. I'm just see by allowing that
paint to move on its own, it's created that lovely since a light on the back of his neck. Now you could have
put some salt in here and had the painting
being a little bit bigger, I think it would have
worked really nicely, but as it's small, Crystal mark just made a
little bit too chunky. So I prefer it being smoother, but it's another option
for you if you if you felt there that's taught
would have worked but not for me on this size. Okay, so it's onto the body. So what we're going to
do, number size eight brush and we're going to wet down the whole of the body that she does do
that bit of color again, didn't do it on the head today. Me being random again. Going to miss out the
area where the red is. Go carefully right up
against that brown wing. And down. You can see, you see
that little hint of color and go right up
against that blue body? Those are the sweeper, the top of the head. No body part. Just so it joined
in, it softens. So we're just going to use the blue nice amount when you brush, give it a bit of a squeeze. And we're going to adjust
again, similar to the head. We're just going to place
it and hopefully allow that to gently move over to give
us a nice sense of light. We're going to tap
it all the way here. We're just making
any shapes you, you think for the wing. Working at a funny angle here, so I don't get my heading. The camera shots are sometimes
a little awkward for me. That's my excuse anywhere
and I'm sticking to it. And carry on working
your way down. Just tapping. No brush strokes. It's not moving. Not moving. You can get rid little tilt because this is
such a small area, I tend to put more
color in actually, and that generally makes it
more likely to move over. You can always get
it's looking a bit, little bit too dry
because that's always another reason
why it's not moving. You always add a little
bit of more work, a little bit more water. You will find that will move and maybe even move too quickly. So it's a, I think
this class is a great, a great one for sort of
getting an idea of how, how you can add
strong color and just allow and getting to know the, the difference in the
state of the paper and it's how dry it is and how the paint will
react to that dryness, wetness little bit might actually have a
little bit of that. So light and that's part of pop a little bit of that, right. And the bottom, again, just tapping and keeping an eye
on on the on this area. We don't want you to
go right up against, although the reference photo
oversee shows a very dark. I'm body is quite nice
to just get that nice. It does it center light. Sometimes you have to use your reference photo and then go a little off pieced at times as well to get something
you'd like. Sonya guide. Okay. I think I'm just going to allow again
I'm just going to watch, allow that to to gently move its way over
on in its own time. Little like the head is just
worth waiting and watching. We just need to, this needs to dry almost
completely and then we'll add a little bit of
red and that will hopefully just gently
bleed. But not. We put it in now
it's going to be too much, it will spread. So I'm going to stand
here and watch. I reckon we're about there. Grc just beginning to go off. It's almost dry, but I can still see if I put my finger
in it, I can smudge it. Sat kind of dryness. So I'm just picked up the red. Just going to use my
dinky little brush. I'm not going to wet
because the risk is if I wet this area and touch
it up against here, it will bloom up into that
body and I don't want that. So I'm just going to do a bit
of painting very carefully. I would start right
on the edge there. You're kind of aware,
So you're going right up against that edge. So hopefully it should just gently bleed. Clean your brush. If he touched that blue, you're going to find
you've picked up a little bit of
blue on your brush. You want it to keep
it nice and fresh and clean your brush in-between them light
up against the edge. With the intention it
just gently bleeds. Going to use my bigger
brush to clean. Make sure it's quite quite dry. Don't want it I
don't want it wet. I don't want to risk any
water running into this area. Again, I'm just going to
just fill it in really. We can do a few little lines, so it's not sort of
little bit broken up to two regimented with any of it. I
think that's plenty. And now we just need
to allow it to dry.
9. Legs and Bough: You make sure your
body is nice and dry. It's always nice to draw the little sections off before you start a new
one because it's just so easy to release for me
to bunch it with your hand. So I've cleaned my water again. I've got a clean piece
of kitchen roll as well. I've got my size
eight brush the way. All right. I'm going to pick
up a red and the brown. And we're going to
do these lakes. So let's wet the leg down. Brown is a little bit for you
to see where I've wet down, but I'm also going to be in the process making
Leganto. Again. I'm gonna do the, do the
back one a little bit. I just want to hint that I
might just leave it at that. Better. Better, that would
be better at a slight angle. Bit array with me angles. Let's talk that out in a minute. If I do any fight, then put the lake in again. The paint's going to
find those damp areas and it's gonna go a little bit, a little bit murky on me. I'm going to pick up
my little brush again, actually feels a little bit to have a bit more
control with that one. So you will probably just wet this down with nice clean water so you won't have
much color in there. So what we're doing, we're
adding the brown and the red. We're just allowing that. You go right up to the top
and we can almost pick up it actually a little bit of
light genuine as well. We want that to run down
and you're always again, you can tilt your
board if you're not getting if that's
not running on you or brushes escaped
underneath there. We can add more water. If you don't. Simple trees, this is
little bit like doing the, um, the trees, the
trunks on the trees. All these, they will, they will have similar,
similar set of techniques. Is that little
spring he's got his legacy nets as quite
nice to put in. Make sure they're chunky enough. They got quite big legs. I think a nice noble going on there to get that in as well. Then the foot back down, let's just put those colors
down from an see where am I going to wet my bowels? I'm going to touch that
bottom of that leg. If like me, I think I may have made that a little
bit too long so I can actually shrink
his leg up by making the bowel bit taller. And then I can just do a
bit of random pressing. Quite good at doing
random wetting. I'm left with a few dry patches. I think that might be quite fun. And we're going to pick up, I've got this old
light, genuine green. And let's have the brown. Might put it a
little bit blue in, but it's quite,
quite severe color. And again, I'm just
I really am here. Maybe try out a little piece of paper just to test your colors. It's like a little swatch
of almost all you're doing. Just want something that just makes a few
interesting marks. Well, I don't
really want this to detract from the peacock, but equally feel he might be a bit lonely
without being on something. Whatever it so like
genuine in there. So again, I don't want
to make this too heavy. Green load or water. Keep it all nice and soft. And again, you can run this off the board like we
did with the tail. Just allow you pull that down. You'll be pulling some of that. All this paint here will
be working its way down. A bit more strength in
that. I do love so light, genuine, such a beautiful color. They act so lovely. Really good color if you haven't got it
in your collection. I strongly recommend it. Had ties to see what this
blue looks like in there. Yeah, I think that's a little
bit too severe for that. I'm just typing a
step back from it, having a little look
at him or herself away so I can see what it would look like
from a distance. I'm thinking I might leave
that at that at that actually trying to pull
some of the color there. Finger, I really want to again, this would all move
and fill out some that some of the wetter areas. So I'm going to take a risk. I'm going to leave
it at that and let it move and give me some
interesting patterns. Now again, you can
add a little bit of salt if you feel you
want a bit of salt, I might because I haven't
there's not an awful lot on on the on the tail feather would have liked it to work a
little bit better. Just there. I think I lifted
a bit too long, didn't I? So I might add a little
bit here though. I think this time I'm
putting onto wet, but see here we go. Salt if you if you struggle with your salt and
getting it to work, It's really worth
doing some swatches and allowing different little, little patches to dry at
different times and add the salt and you'll get a gauge then when your salt is
going to work best. It's a really good
little exercise to do. One. I will probably wish I had done on this because I think
I've done that too soon. But anyway, we're we're allow that to dry on
its own. Good time. This back leg, I
think what I would do in the finishing off
parts, I will put it in. I'm a little bit worried. Well, I've taken it
out with a damp brush. This paper is going to be
a little bit damp still. And the Lego sort of spread and make a bit of a mucky mess. But for you, I'd suggest just being a just a hint of
it or you can follow me. Yeah. When we do the
finishing off bits and you can see me
put the back leg in, but if you want to
put that in now, I would just do a slight hint, but unlike me, I would try and get it a
little bit of an angle. It would just appear
that he's he's sitting back a little
bit on his own. He waits a little
bit further back. So it's a quite nice to
get them in an angle. Lovely, right? We need
to allow it to dry.
10. Eye Tuft and Beak: So before you start the
head, just be aware, make sure your bow is nice
and dry because it's, again, it's going to be
right in your, in your way. So this should be
a nice little fund less than because
we're really going to bring to life with finishing off these little details
around the head. I'm going to be mainly working
with little tiny brush. And we're going to start
with the zeal top, not sure there's a word for it. And I will look it up and maybe put it in the
resources pages. Because I'm sure I'm not
doing the word Tufte justice. But anyway, you get what I mean. I gotta pick up my brown
this week this up. I'm actually just gonna
do a few quick lines. So we're going to start at the top of the head,
get the angle right. So what's that going
to about 11:00. Always quite a good little
tip is to look for angles. I'm sorry, I'm doing this on a funny funny angle and
it's made a bit chunky. Thank you. I think it'd be okay. Ideally, you do a little
lighter than that. Working at a, a bit of
a strange angle there. Don't do too many,
it's only just a hint. Let's put that down. I'm just going to pick up
a slightly bigger brush. I'm on number eight. Pick up the blue. Get a nice, You want
a nice amount along the bristle ahead and we're
going to lay it flat, flattish at a slight angle. And we're going to just, just, just a hint
is just an idea. So good a shape
deeply along a little bit more strength and they might pick up the
satellite genuine. Put a little bit the bottom. Keep flicking back from the back-and-forth to that
nice reference photo. Yeah, I think that that will do. We'll tidy little bit on the finishing off and we'll take
a little bit of light out and say my strokes have
gone a little thick. Hopefully you will have
some lovely fine once. Their next job is to find this. I, firstly, again, picking up the
brown we're going to make, we're going to pop a little bit of brown in just
to try and warm that area. Obviously, if you've
got a different brown or richer brown, you sat and I just
didn't want to add too many paints to
this collection. So very carefully. And if you, if you haven't
been standing, sitting there, nice time now to do this, you can get nice
and close to it. To all quite relaxing. All we're doing is literally painting that in,
not doing anything. Funny drip on the end. Either. The good thing about having markings like this a little bit. The pandemic you've
done the panda. You have the markings are
disguised within the eye. When I disguised within the markings or
saying the other way, read that just kinda little
bit of warmth there. We need that to dry first. So what we'll do,
we'll work a cup. So light gentlemen, if
you just try and do this, bill, obviously it's white, but it'd be quite
nice to give it a, just a little bit of
color so we can see, see it defined a bit more so tiny little bit
of so like genuine. And I'm just going
to go underneath. So going to that line in there, the blue line, and
we're just going to backfill it onto a tiny amount. Let's say this is
the the trouble we work in a little bit too small is a small, small area to work on. Trying to pull some of that
back a bit a little bit too strong for a minute. And pick up my brown to see if we can make
this a little bit. Okay, say lift your head
up. If you're sitting. Just take a minute
to raise your head. Have a look, see
what it looks like. It's so easy to
keep working away. And you don't look up and
see the bigger picture. So I've just picked up
a little bit of blue. I'm going to want to
make sure I've got that at Blue runs quite a
long way along that beak. So sometimes you think you
know what it should look like and actually in
actually when you look, check at the reference photo, it's different than sometimes you think it should
be all you having a mind die of what
it looks like in it's sometimes your mind's eyes. Always right? Okay. I'll get gain. I'm going to let that dry. I think the eye looks dry. If any doubt if you
have a hairdryer and you've used a hairdryer
at any stage in this, you can give it a
quick wins over. And I might do that just to
make sure it's nice and dry. Should do it. And I'm going to
pick up my white. Again, just clean your brush, make sure it's nice and clean. It hasn't got a stalk
contaminated with this blue. And take the excess
moisture off. So you've got a damp brush. This to a nice creamy
consistency and we're going to outline the eye in the white. Now this can be quite chunky at the moment
because we can again, we can backfill it again. So if you look at
the reference photo, really only runs
underneath the eye. So we're going to depict
the eye very carefully. Look at your reference
photo. Get nice shape. So you can take your
time on estimate. There's no nothing
is drawing on. You were younger, were
not playing around with wet paper or dry. Only wanted a little
bit, don't make it to make it too thick. And if it does go a
little bit thick, it doesn't matter
because we can again, we're going to backfill
it again in a minute. So I'm going to make mine a little bit chunkier so
you can see what I mean. As you can see a bit just
a bit clumsy and chunky. And we can neaten up
any clean off again. If you've gone a little
array on a little messy, you can just very carefully use the white ticks are
closing some of those areas. If you think you
have gone a little, I say little array with some of the blue tab listener
needs to dry again. So I'm hoping this is dried. The top part of
the witch going to do the top part of the beak. I'm going to use a
little bit of the brown and a pop a little
bit right at the tip. Clean your brush. You haven't
got any paint on your brush and we're just going
to work our way up. I just want the
tiniest hint of color just so you can see it's
attached to the bird. It's not a trouble working
on a white background. You, you have to
try in some way, just show there's
something there. He moves only a hint. Say take your brush
away, have a look. I think that's working right? And I've seem to
have got blue on my hand and transferring
onto paper. That blue is everywhere
in my arm around my studio. That's looking away. And actually, while I'm
sounding so surprised, um, that should
have dried by now. So I'm going to use
the soda like genuine. They clean my brush off again. And we're going to go underneath
this I into the eyeball, but on the lower part of it, and we're going to close
that white line down a bit. Again, very gently. Neaten up the other
side if you want, if it needs to be neat and up. Are you going to do
the bottom half and just hopefully give you
an idea of bidder light, dark part of the eye and
probably at the bottom. I'm going to swing it
around a little bit. Neith, make your eyes go funny. You're looking at it,
staring at it for too long. I think we're about
there for the eye. You can keep fiddling and it doesn't necessarily
make it better. I do want I'm just this has
gone a little misshapen, so some paint on my brush
to get this to work. This is just
something I've done. And again, you can
tweak if need be. If in your black bits are quite the right shape or don't
look quite right in there. Yeah, that's a bit better. Silence, concentration. Little tiny bits that will make all the difference.
Take your time with it. Yeah, that's looking good. Apart from smudging bits
of blue around the place. Just need that to dry
a little bit more. I think while we're waiting, as I said, we could have done this in the finishing
off stages, but while we're over
here and we're waiting, just going to take a little bit of light at the top of this. It's just with a damp brush. I cleaned it. Make sure it's clean. You can thumb or
fingers quite good. It's got a squishes
it around a bit. Rather than taking
lots of color out. It would just sort of squish it. Quite like using a I think sometimes you can see the
light sort of pinning there. I'm sure I won't fit Alyssa
too long because this is probably the city
declare I've made, but the little eradicated, but she's quite good for
taking color out better. And say, I don't think
you would probably have done such big chunky lines, but if you have,
you can then gently take them out and you
kinda get the idea. I'll spend, spend time
correcting errors. Right? You reckon that eye is dry. So again, clean your
brush back to the White. Get a nice creamy consistency. And we're gonna put
that catch light in. Now on the reference photo, it shows it going right along. I'm going to put a little dot towards
the front of the eye, to the top and
towards the front. To get my head in a bit closer. I think yeah, I think that's a that's a that's a
little catch light. It just brings it to life. We're a sudden doesn't
eat amazing that little white dot, right? That Stan said, let all that
area dry before you move on, but then we can finish off
digital, finish you off bits.
11. Finishing Off: So it's onto their
little, little, tiny little bits that GRS finished and pull all
this painting together. So I think the first thing
we need to tackle it is these eyes on the tail feathers. Now, if you happen to have some really pretty markings
and you think, you know what? I think that's enough. I don't want to make this look, make it look too tweets. Very easy to get this over detailed and you lose
that lobby sort of sense of light and looseness and just an impression
of the eyes. But we will try on
some of these too, just to emphasize
a little bit more. So the best thing to do, we're going to pick
up little brush. I'm going to pick up the
green and the brown. We're just going to highlight
just a few of them. Pick out your favorite
ones and we can eat. You can even paint some in C if you feel you want
to paint them in, paint something,
Let's paint money. So we're gonna do
a little bit of, little bit of blue dye is hopefully it'll
give you an idea of, and you can sort of make up
your mind whether you want to paint them in or whether you think it looks a
little bit too much. So if I do this for you, Hopefully you can have an idea of what you would
like to do to yours. That's a little bit
of the green again, I try and keep it
as soft as you can. And if, if when you
paint it and you think, oh, that's enough, leave it. And I think he's very, very easy to overdo this. And I think the nice thing about this tail feather
was just loose. It's just an impression. The heads quite detailed anyway. So we're just using the brown, we're putting a little brown on the really distinctive
markings aren't they? Might find just need
a couple just to the eye to be drawn
in and go, oh yeah. Because they can
see what that is. The brand that they're going to be slightly
different as in nature, things are always a
little different. None of them are gonna
be exactly the same. The light or the
lighter part of that, I can be taken out but
we'll let that dry first. Just this is a
softened some of that down. Just a wet brush. And again, you can
use a finger to soften the edge of
that wet patch. Like I'm not taking
too much green out. Yeah, that's quite pretty. So we can start to make these little
blobs into something now. Can they use it a little
bit of green around? I won't do them all. I'll just do a few of them. And again, bear in mind
that they're at an angle, so don't try and even
make them irregularly, but they're obviously
flowing down to try to look at your reference photo and sort of follow that shape. Circled it with a
little bit of green, a little bit of the brown. If you happen to have
sort of salt marks, you've been a little bit more extravagant where
your salt marks, you can almost use
one of the salt marks and it may lend
itself to an ice. I have a look, see
how your marks have. Sort of come about. Soften that down again. Let's pick another one. Let's do this one here. The blue whom you've got a blue, green gained go round it. Going to do too much
of the greener, can concentrate a bit
more on the brown, just to make them a little bit
more irregular, irregular. When even use a fingernail and just pull some of those out. Say, I am always often something just doesn't
look too regular time. So not all the same. Just want to pick a brush and getting all levels will get number nor there
for doing this. Let's see if we can
soften that down again. Again, I can use my
finger to tap it away. As ever sort of pocket
pop your head up, see what it looks
like. I'm white. I think that's looking okay. Actually, let's do one of
the ones a little bit higher up that she's having taken a little bit
of color out first. So this one, it's quite a strong color
already on the back here. So I've been around in their shows up. Maybe a little dark on here. Thumb. It's probably
just enough. It's just a hint, isn't it? I'm inclined to almost
leave these as they are. Um, let's do just one of them. I'm going to pick this
one. I'm fearful. Did many practice PTs? Don't think I've
practiced one of the Skillshare classes
as much as this. But the eyes were
the tricky part. Always. It was always
getting a bit twee. It's very easy to get tweets. Hopefully you get
the, get the idea. You can kind of work around, um, soften it again. Really don't be careful,
you don't end up. I personally love
that, just fading out. So I don't want to put any line or any sort of
end to that tail feather. I just want it to blend out. And once this has dried, if there's marks
we don't like we can always gently
remove some of them. And you can see how
that's blended and where we put the greens in. Just given a slight
impression of lines, every splendid, very
splendid a lot. Let me pop these down. Just try and take some of
that color out to the color. Color comes out at
the top of the blue. To my trusty eradicated. You wanna do is just literally just take a little bit
out there like that. And I think that's
a very obvious, the very telling sort of
pot to these pheasant, a peasant, peacock eyes. Again, you might not
want to do them all. So careful not to go around and make them
all very uniformed. Maybe just leave one blue. I will just want to put
a little bit of blue on that green one up
there because to me, it doesn't really make a lot
of sentences just green, so I'm just going to pop
a little bit of blue. Just there. I think I'm going to
stop there because I can see I mean, danger overdoing it. A little bit of light
at the top there. But just because I like it in
a certain way doesn't mean to say you can't put those eyes in as as you see them
in a very detailed, It's entirely up to you. I don't want to
tell you shouldn't. Just just how I like things
to look a little bit looser. And it's I know from having
done many practice species, I tended to ruin them when
I got a little bit over over key on trying to put
all the i's in, right? The other little
part we need to do, There's a tiny hint,
a wing feather. So we're going to
pop that in there. Use my number eight. We're just going to wet just a little little round
round crescent shape and we're going to
pop that much. Yeah. So a little hint, just a hint. Again that will help around
his body off as well, giving them the right shape. That's all you need to do. Nothing more than that.
Don't, don't try and get too fussy about trying to. They've got such a
detailed wing feathers. It would be terribly
time-consuming and I don't know if it would necessarily
help them get your painting. So I'm not going down that road. Right. I need to do
that lake, don't I? So let's do that quickly. We I'm going to use the brown and the
satellite genuine need to get it at that angle. So I kind of made it
slightly the wrong angle didn't just a bit dark. And like I said earlier, they've got really
big powerful legs. Want to turn, gives
the illusion of that. But don't want to get too detailed that
I think is enough. I don't want to do too much. Okay. Put those colors down. No, I'm just gonna
go around him and take any any color that I
think needs to come out. I'm going to start at
the top of the head and we can gently take, because this is the patella, blue is very staining. So by taking the color out, we get another lovely
sense of light. So tiny bit top of the head. This has worked really well. So I don't want to touch that, but you could very gently, if you found your
users to a joined up, you can gently take a
little bit of color out. Again, that applies
to this area as well. But I'm pleased
how that's worked. But he has got some fantastic blue markings
here, has an e to work. Again, we're going to take
this out with the brush. A little bit of kitchen
roll. Just enough. I'm just going to very carefully using a little
bit of this blue, strong blue and just consult, pull up a slight hint. Exaggerating the word hint
of like a feather coming up into the medical
brush a bit bigger. Just call me up and do the body. Just a tiny, tiny hint. That's enough. Okey-dokey. I'm going to rub out these
pencil marks in due course. Want to make sure it's all dry. We can rub out the
salt actually, nowhere haven't
done that earlier. So make sure it's dry because it does take a bit
longer to dry salt if you've got it down to just check pressure onto the floor. Let's take this out at the top. Because of course
can be done right at the beginning of the. Just be careful if
you've worked on these eyes and you're
doing this along with me. You don't smudge the eyes. Might be easier to blow. The fellow blues,
easy to transfer. Okay, I think, I think
he's looking pretty good. Yeah. I don't think again, that this has worked quite well. I don't need to
take any light out, but you could again, I'm not going to put feet in or I know some of you are
really good at your feet, so do put feet in
if you want to. But other than that, I really think he's he's there. The pencil marks can be very, very gently rubbed out
and be careful again, if you've used the patella blue, It's quite easy to
transfer as you can see, I've still got it on my hands. So when you come to rub
it out, go very gently. You don't eat will, it will smear across the paper
if you're not careful. Not to bad my pencil marks, but it's always lovely
if you've managed to keep the pencil marks
nice and light, get this one out here and
you'll see how lovely it is to not have the pencil marks that are holding that lighting. Well, I'm pretty pleased. I think that's worked out. Well. I don't know what I
was going to show you. Let me show you the
other tail feather. I use it a demo. This is just about dried. Might have been a bit
heavy handed with assault. But you can see it's given some quite distinctive markings. And actually if I'd, if we painted him in, that's a really loose, very bold impression of that
tail feather, isn't it? It's quite nice and the distance closer up, it's not so good. But I'm hopefully having
done this for you. I've included some other
tips that I might not have said in the first run
of the main piece. And it's giving,
giving you another, another look at me painting it. Hope joke, right? I'm, I hope you, I hope you've enjoyed
painting along with me. And as ever, please, please share these with me on the projects
and resources pages. It's a real thrill
to see them appear. So, yeah, thank you very
much for joining me.
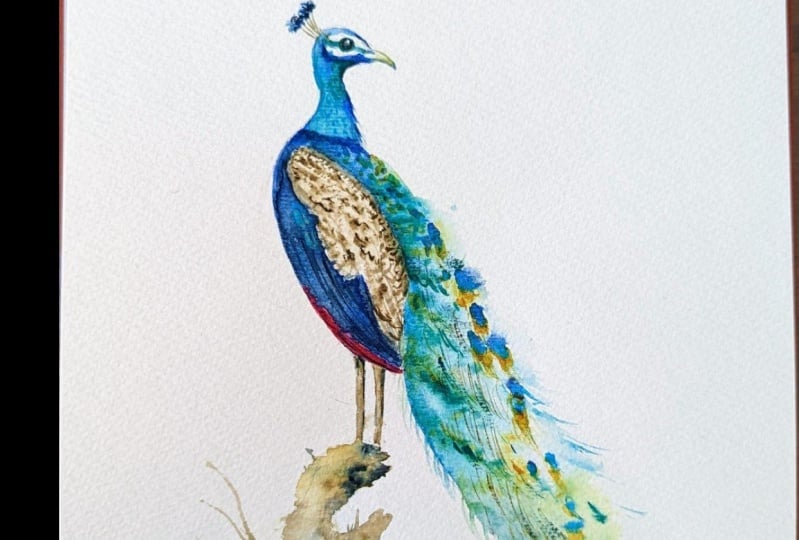
12. Final Tweaks: No, I just thought I would
pop back and explain why the eyes look a
little different on your reference photo
of the final piece. Now when I looked at
him the next day, which is often the case and a really good tip to take away is always assess
your piece after the next day or even a few hours is sometimes
enough and you will see glaringly obvious areas that need a little bit of attention. I found or thought my little blue blobs
looked a little bit too sloppy and didn't have enough detail really to
emphasize those beautiful eyes. So I went back in, used a slightly
bigger brush and I damped the more like this one, a damped it down. I use my finger.
Just run it down. So I've just smudging just
to soften some of the area. Then I went back in with a smaller brush and
use my white gouache. And I did, let me pick up my little brush and I
just went around these. You'd see that one was
actually done before. Better. Just to, just to make them
look a little more detailed, add a little bit more brown and also some of the green again. Some of them I smudged
again with my finger. Some are just gently
wet down and again, just drew that down. I didn't want them to look
like they'd been stuck on, which is often the case if you
go back in and add detail. So the conscious or trying
to soften the edges. So I hope that helps because it's a valuable
lesson, as I say, is to always look
at your piece after a few hours and and see
what these altering, if anything, of course. Yes. Thank you for watching
this last little lesson. I hope you enjoyed the class.
13. Final Thoughts: So I hope you
enjoyed this class. Isn't he an amazing bird to paint with so many
beautiful elements? Hope you enjoy creating his amazing tail
feather water buzzer is allowing the paint
to work its magic. I hope you found
breaking them down into sections made the painting
feel less daunting. Did you enjoy adding the
crisp detail around the head? It's nice to get the contrast. A lovely flowing, loose tail. It's always worth stepping
away for a couple of hours. I looking at him again
with a fresh pair of eyes. It's amazing what you see. So we look forward to seeing
you in the next class.
 Jane Davies, Professional Artist and Teacher