Transcripts
1. Introduction: Welcome to my class
on the Pattern Tool and Adobe Illustrator. I'm Amy, a surface
pattern designer, illustrator, and
Skillshare top teacher. The Pattern Tool makes
it easy to explore different pattern layouts and see your adjustments
in real time. So whether you're a beginner
or a season designer, it can be fun to experiment with the different layouts
using the Pattern Tool. In this class, I'll
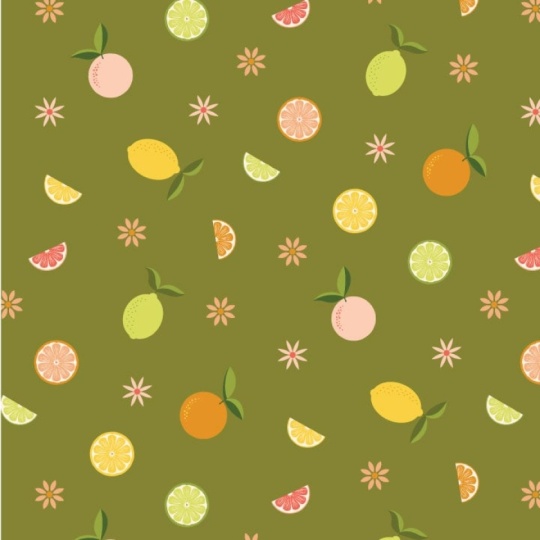
show you how to create some cute citrus motifs with basic shapes and
Adobe Illustrator. Then we will explore all the pattern tool
options in detail, including some of the nuances to using the brick and
Hex Pattern types. At the end of class,
we'll discuss adding a background color
to your pattern swatch and how to
export your pattern. It will be helpful to have
some pattern design experience and know the basics of Adobe Illustrator
before you get started. For an in depth look
at creating patterns, check out my class
geometric patterns, simple too sophisticated
repeats in Adobe Illustrator, where I teach foundational
skills for pattern design. I'm ready to get started. So
if this class sounds fun, I'll see you in
the first lesson.
2. Class Project: For the class project,
we're going to create brick and hex patterns using the Pattern Tool and
Adobe Illustrator. We'll start by creating the
elements for our pattern. I'll show you how
to import assets from Adobe Libraries and turn basic shapes into citrus fruits using the tools in
Adobe Illustrator. Then we'll review the Pattern
Tool options in detail and discuss the nuances of creating brick and hex patterns. You'll also learn how to plan your final swatch size when
using the pattern tool. At the end of class,
I'll show you how to add a background color and
export your final patterns. You can follow along
with me as I create a set of citrus motifs
from basic shapes. In the Project and
resources tab, I've included the color
palettes I use in class, along with a list of keyboard
shortcuts for both Mac and PC and reference guides for swatch sizes and converting pixels to inches when
exporting your work. You can download
these files from your browser and save
them to your desktop. When you're ready, please upload your project to
the class gallery. You can upload any
part of your process, and I'd really love to
see what you create. To upload a project, just go to the Project and
resources section of the class page and
tap Submit Project. When the page opens, you
can add a project title and description and then upload
your image and click Publish. In the next lesson, we'll
start by setting up our Canvas and importing
shapes from Adobe Libraries.
3. Importing from Adobe Libraries: First, let's set up a new file. I'll tap New File, and then
I'll go ahead and give my file a name and just
call it New pattern. And I'll leave the width and
the height at 1,500 pixels, and just one artboard is fine. Now you can choose the
same or a different size, but you can always
change this later. And I'm going to keep
the unit at pixels. But if you want to choose a different unit of measurement,
you can do that here. And I'm also going to leave
this at CMYK color mode. So with these selections,
I'll tap create. Now, if your workspoos looks a little
different than mine, you can always adjust the toolbars or add
and remove windows, but you can also go up
to Window workspace and choose Essentials Classic,
which I have selected. You can add
additional tools from this Windows menu
as you need them. For this pattern, I'm going to focus on how to use
the pattern tool, and I need motifs
for my pattern. So I'm going to start with
some shapes I already created in my class on geometric patterns in Adobe Illustrator. If you've taken that class, you may remember that
we took circles and squares and turned them
into several new forms. And at the end of the
class, I showed you how to add shapes you created
to your adobe libraries. In this lesson, I'll show
you how I would take those shapes I saved and
use them for this pattern. Down here, I have
my library's panel. But if you don't see
this in your panel doc, then go up to Window
and click Libraries, and that panel will open
up in your workspace. I'll just drag this
over to the left side, and once I see the blue line, I'll let it go and
lock into place there. And I'll use the space bar to drag this over just
a bit to center it. And you'll see in
my library's panel that I have all the shapes
that I created in that class, as I mentioned earlier,
and I want to use some of these shapes to create new
elements for my pattern. So if I select this one, I can just click and then
drag it over to my artboard. And with my shape cued up, I just click once to add
it at its original size, which in this case is
100 pixel squared. Another option is to go back, click and drag just like before. But this time on the artboard, I click and I drag to set up
the size I want it to be. And I can also change this
size here in the control bar, making sure the proportions
are constrained, and then I can type
a specific size, and it will change
proportionately. So that's one way to
import my shapes. Now, you may notice
that this method brings in an image and
not a vector path. If I open up my layers
panel over here, you can see that I
have two artworks, but they're not paths,
they're images, even though the
original shapes I added to my libraries
were vector paths. I'll press A on my
keyboard to bring up the direct selection tool or you can find it over
here in your tool bar. And you'll notice
that you don't see any anchor points because
this isn't a vector shape. So how can I import these shapes from the Adobe Libraries
as vector pads? Well, this time,
I'll press and hold Option on my keyboard as I
click and drag this over. And now when I click to
add this to my artboard, you can see the anchor points. And I also still have my
direct selection tool opened up so you can see
those anchor points. And I can do this with
the second import option. So I'll press Option, click and drag, and this time, I'll click and drag
on my artboard to size it something different
than the original size. Yeah. You still have
both options for import, but now you have vector
paths instead of images. So just remember to
use the option key if you want to
import your vectors. I'm just going to delete these because I
don't need them now. One last thing I do want to
point out is that you can drag multiple shapes onto
your artboard at once. So if I select this
shape and then I press Shift on my keyboard
and select another shape, then it'll select everything
in between, as well. If I want to select
nonconsecutive elements, I can press and hold command as I click and select
different shapes. And then once I've selected all the shapes that
I want to add, I simply press Option
on my keyboard as I click and drag
over to the artboard. And you can see that the
first image is cued up. And like before, I can click and drag to resize the element, or I can simply click to add the element at
its original size. And I'll just go through adding each element until I finished
adding every single one, and it just goes
right down the list. So those are some
tips for adding elements that you have
saved to your libraries. In the next lesson, I'm
going to take these shapes and turn them into some
citrus fruit motifs. They're nice, but they're
super simple and very clean, and I want to make them
a little more organic looking and not so
perfect and uniform. So join me in the next lesson, and I'll show you how I'd
create my new motifs.
4. Editing Your Elements: I've cleaned things up
by removing some of the shapes I didn't need
and ungrouping everything, so I can start transforming
them into new shapes. I also want to pull in some
color palettes I've created. I deleted the standard colors
that come with a new file, and I'm ready to
import my palette. So I'll go up to the
file I've opened. And if you downloaded the file I shared in the resources tab, you can also open it
up in Illustrator. I want to add these
color palettes to the file I just created. And the easiest way is to
go up to the swatch menu, go down to the Save swatch
Library as AI option, and it should default to saving
to your Swatches folder. So I hit Save, and
now I can go to my new file and go down to my swatch libraries and
select user defined, and I should be able to find
the citrus color palettes. I need to just simply click
each one of these groups, and it will automatically be
added to the Swatches panel. And now I can just close this and I have all my
palettes ready to go. I'll press Z on my keyboard, and then I'll just zoom in here a little bit to make
this easier to see, and I'll press space bar for the hand tool
and pan this down. I'll press V for the selection tool and
select this circle. And the first element I'm going to make is a slice of citrus. I'll press Command C to copy and Command F
to paste in front. And you can see in
the layers panel, I have a copy directly
on top of the original. Now I want to resize it
using the bounding box. So from the corner or the sides, I'll press and hold the
shift and option keys to constrain the proportions and
resize it from the center. When I let go, I've got a slightly smaller circle
inside the original. I'll give my duplicate
shape a new color, and this will be the
pith of my citrus slice. Next, I'm going to take one
of these little wedge shapes, and I'll center it at
the top of my circles. So you can see the
pink line appear to tell me it's
centered horizontally. And from here, I can stretch
it using the bounding box. If I press Shift, it will resize it
proportionally. And I could squeeze
it a little bit. And if I press
option as I squeeze, it'll resize it from the center rather than just
from the left side. And I can press A on my keyboard for the direct selection tool, and I'll select this anchor
point and adjust the handles, pressing Shift to
keep it aligned, and then I'll do it again
on the other side as well, so it'll flatten that top. I'll select the anchor
points on the sides, holding shift to select both, and I'll drag them
down a little bit. And then I'll go back and just adjust these handles to
flatten it a little bit more. And I'm pressing Shift to
keep the handles aligned. I also want to make
the bottom narrow, so I'll pull the
handles in a little on this anchor point and pressing
Shift to keep it aligned. And I'll press V on my keyboard again to bring up
the selection tool, and I'll just squeeze
this in a little bit, pressing option to squeeze from the center, and I like that. And now I have a nice
little wedge that I could duplicate around this circle
to create the citrus pieces. Make these copies, I want to make sure that my wedge
piece is selected, and I'll press R for
the rotation tool. And before I do anything else, I'm going to hover
to find the center of this cream circle. If I click, it'll
move the point of rotation down to the
center of that circle. Next, I want to press Option, and you'll see the
double arrows appeal. And I'll click once, and it should bring up the
bull's eye with the ellipses, and I'll click once more, and it brings up my rotate menu. I'll set the angle of rotation based on the number
of copies I'll need, and 30 degrees should
work perfectly. So I'll click Copy, and then you can see it adds
a copy rotated to the left. And next, I want to
press Command D several times until I complete
that wedge of circles. I'll press V to go back
to the selection tool, and I want to keep these
aligned and grouped. So I'm going to select
one, hold down Shift, and then click each
additional wedge until I've selected all of them, and I'll press Command
G to group them. So now if I want to
resize the group, pressing Shift and option
to resize it uniformly, it'll all size together. I'll press Command Z to undo that to go back to the original. So now I'm going to take
one of these circles, and I'm going to add it to the center to create some seeds. And I need to make it
a little bit smaller and maybe a little
more oval shaped. When I'm done resizing, I'll press Option and drag
to create a few duplicates. And then I'll press R
because I want to rotate this one slightly and select that one and
do the same thing. Press R to rotate. And now they resemble seeds in the center of my slice, and
that looks pretty good. And I can keep playing around
with this and refining it. But the next thing
I want to share with you is how I might make these shapes look a little
less uniform and perfect. So I'll press Z to zoom in and then Spacebar
to move this down. And I'll press V, and then I'll drag to select both of
these outer circles. And I want to loosen
up the outline, so I'll go up to effect,
distort and transform, and I want to use roughen. And this looks a
little crazy at first, but I'll select absolute, and then I'll reduce this
to maybe two pixels. Yeah, like that. I also
want to reduce the detail. So let me take this down to maybe three pixels. I
think that looks good. And I want to use smooth
because I don't want sharp corners since this is a citrus slice, and I'll press. Okay. So you can
see that it makes the contour slightly irregular
and a little more organic. And you can opt to
make yours more exaggerated or more
subtle than mine. And I can also add
the same effect to my wedge slices and my
seeds in the center. But this is one way to make your shapes look a
little more hand drawn while only using
the tools in Illustrator. So I'll press on my
keyboard and zoom back out, and let's work on
the next element. To save time, I'll
use part of what I've already created to
start my next shape. So I'll press Option and drag this circle down to
make a duplicate. I'll also recolor it, and this time, I'm going
to make it into a lemon. So I want to stretch
this into an oval shape. Next, I'll press
Option to make a duplicate and then shift to
drag it down in alignment. Next, I'll resize
it from the top, pressing Shift to
create a little nub at the end of the lemon.
And that looks good. And I'll add another
one at the top by pressing Option and Shift to duplicate it and
keep it aligned vertically. And I don't want the top to be exactly the same
as the bottom, so I'm going to flatten
this one a little bit. And I'm going for
imperfection here. And that's a bit much,
but maybe I can shrink it down holding Shift
to make it smaller. There we go. Okay, I like that. Next, I'll click and drag
to select all three ovals, and I'll go over and click
the Shape Builder tool. And now, if I drag through
each of these shapes, I'll turn it into
one single path. And now I have a shape
that resembles a lemon. And the nice thing
about creating any of these new forms is I can
then create variations. So I'll press Option
to duplicate it, and then I'm going to
resize the proportions and change it up a
little bit and give it a new color like this green, and this time, it's a lime. And I can also add
embellishments. So I can take one
of these circles, and let's change it to white
for a better contrast, and I'll resize it
a little smaller, and I'll press Z to zoom in
so you can see this better. And then I want to press V on my keyboard and select this and drag pressing
Option to duplicate it several times
around my shape. And this adds some
little textural dots. And I can add
variations in size, oops, go shift too soon. But I can resize these
two different sizes and distribute them
throughout my fruit, you know, changing
up the density. But I could create
this texture that is a nice little addition for some embellishment. So
I'll zoom out again. And lastly, I want to create some leaves for my citrus frit. And these green shapes
are good starting point. So I'll press Z on my keyboard to zoom
back into this area. And I already have
this textured line from my geometric pattern class, so this will be
perfect as my stem. And I'm going to select
this leaf shape. I'll press Command C to copy and Command F
to paste in front. And I'll press A for the
direct selection tool, and I'm going to select this
anchor point to manipulate the handle and curve the
shape a little bit more. And I'll also bring
this top one up, too. And I'll press V on my keyboard, select the bottom shape, and go over to the
Swatches panel and create a darker color. So now I have a
basic leaf shape. And if I select both of these, I can enhance it further by
going to the effect menu, distort and transform and
this time choose Twist. This menu lets you choose
the angle of the twist, and the higher the number,
the more extreme the twist. So I'll find something that
I like and then click Okay. And anytime you use an effect, including the roughen option, you want to go up to
Object Expand Appearance once you've settled on the form to make this change permanent. I'll press Z on my
keyboard to zoom out so we can see how these
shapes are coming together. And I want to do another
variation on this leaf. So I'll select the next
one, press Command C, then Command F to
paste it in front, and then I'll press A so I can edit the
anchor points again. And I want this to curve but
not be exactly the same. So I'll select the bottom
copy, and recolor it, and then select
both and go back up to effect, transform twist. And this time, I'll choose 35 degrees so it's not as
exaggerated and hit Okay. And then I want to go back up object and expand appearance. And now I've got a new
variation of my leaf. Next, I'm going to
recolor this shape to dark green and resize it
so it can be my stem, and I'm going to
take my lemon shape, and I'll move the
stem to the top. But I think I want it
to be in the back. So I'll press Command Option left bracket to send
it to the back, and then I'll bring
my leaf shape over and Oops, forgot
to group these, so I'll select and Command G to group and now I can move
this to the top of my stem, and then I'll take the next one, and I'm going to press R so
I can rotate it slightly. And then I'll press O so
I can reflect it. Oops. Command Z to undo that. And I need to make sure that the expand appearance is set up. There we go. Let's
try that again. So I'll press O on my
keyboard so I can reflect it. And then I'll just move
it over a little bit. And yeah, I think
that looks better. So this is coming
together. I can also grab this circle again
and drag it down here, and then I'll add the
leaves and stems to it. But this time, I
want it in front, so command shift right bracket will bring
it to the front. And now I can actually shrink
this stem a little bit, move this up, and then
give it a new color, and now it's transformed
into an orange. So I can work with
these shapes to transform them again and
again into something new. Also have this
version, which was already halved into semicircles. So I could take half of
these wedge pieces and add them to the Syme circle
to create a citrus wedge. And then I'd have a wedge, a slice, and a whole fruit. And this creates a nice set
of elements for my pattern that adds variety without having to start from
scratch every single time. You can see how you can add texture, some
irregular contouring, change up the colors, and
then really transform these shapes into a variety of different citrus fruit motifs. In this way, there's
a little variety to the repetition of elements. I'll finish creating
two or three versions of the wedge, the slice, and the whole fruit, and each time I'll change the color to reflect the different fruits. So yellow lemons, green limes, some oranges, maybe a pink shade for
grapefruit and so on. And before the next lesson, I want you to take some time
to create your own fruits and have fun manipulating these
shapes using the effects. Just be sure to expand appearance
if you add any effect. When you're ready, meet me
in the next lesson so we can turn these elements into a pattern using
the pattern tool.
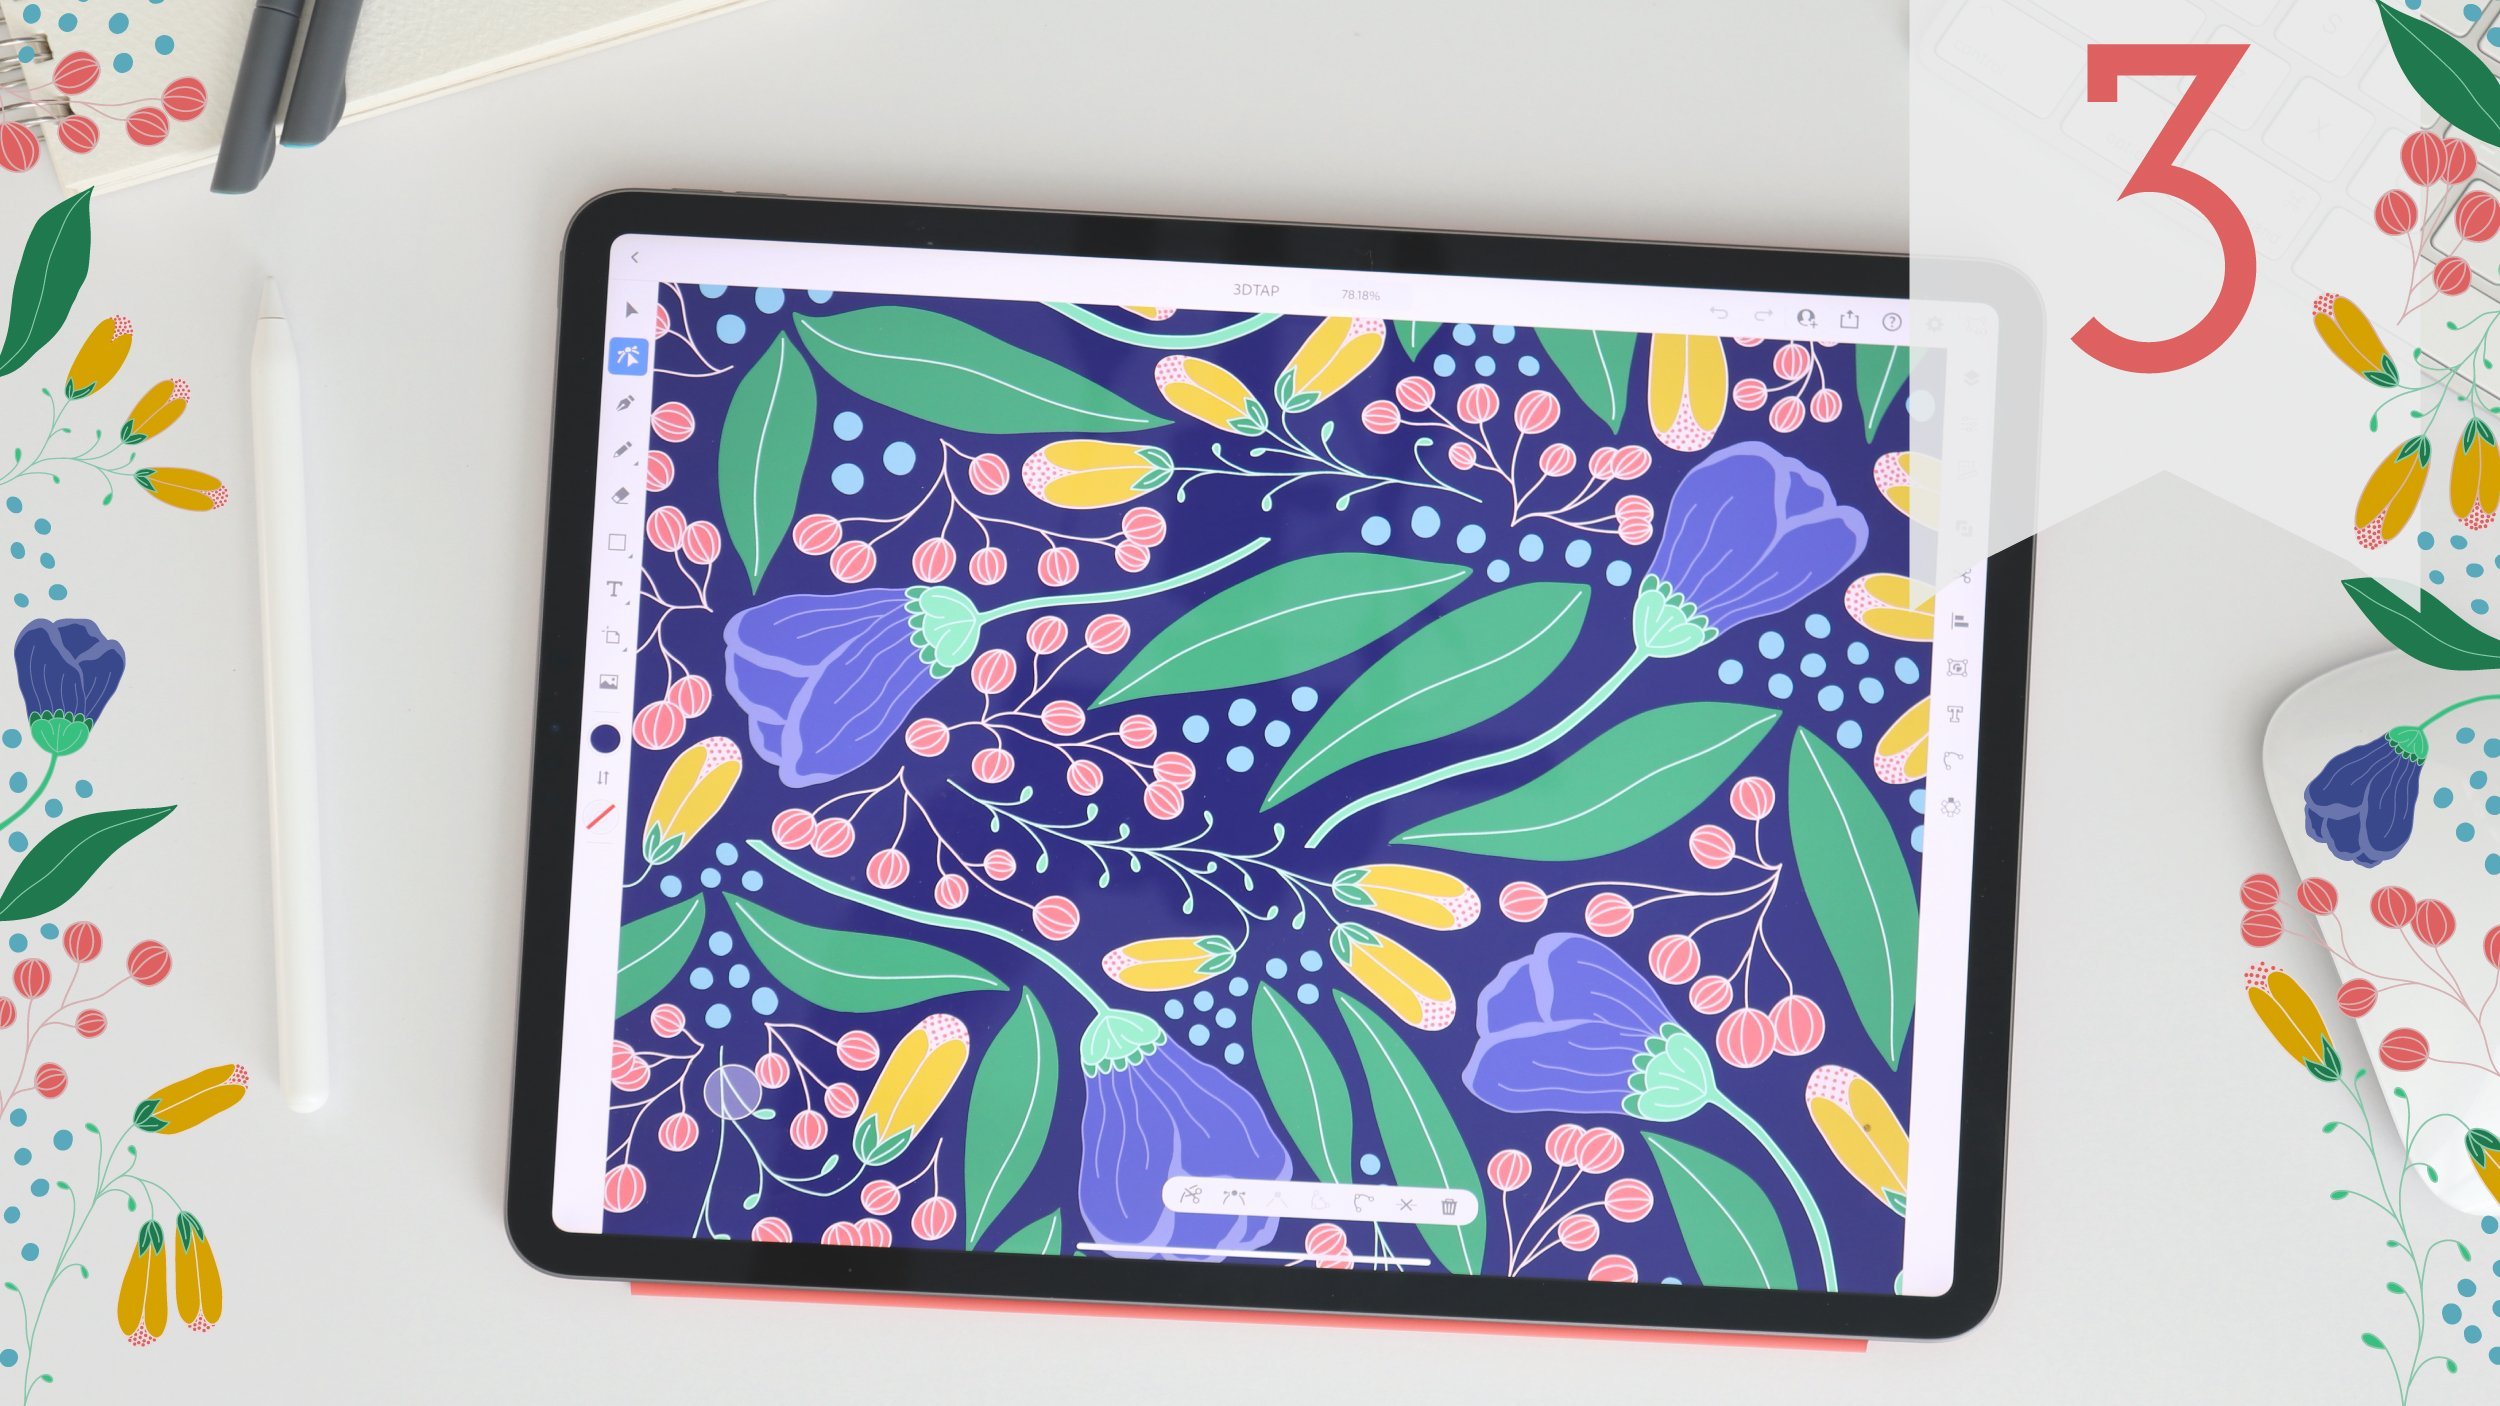
5. Pattern Tool Options: I finished creating
all of my elements and coloring them with one of the
color palettes I imported. And you should have your
own set of elements, and you can follow along with
me as I design my patterns. I need to select
all of my elements, so I'll drag to
select everything. Now, I haven't
arranged these into a pattern layout because I can do that with
the pattern tool. The configuration will change based on the layout I choose, so I don't need to arrange
things ahead of time. Now, if you've
already laid yours into a pattern,
that's okay, too. So with my elements selected, I'll go up to object,
pattern make. A dialog box will come
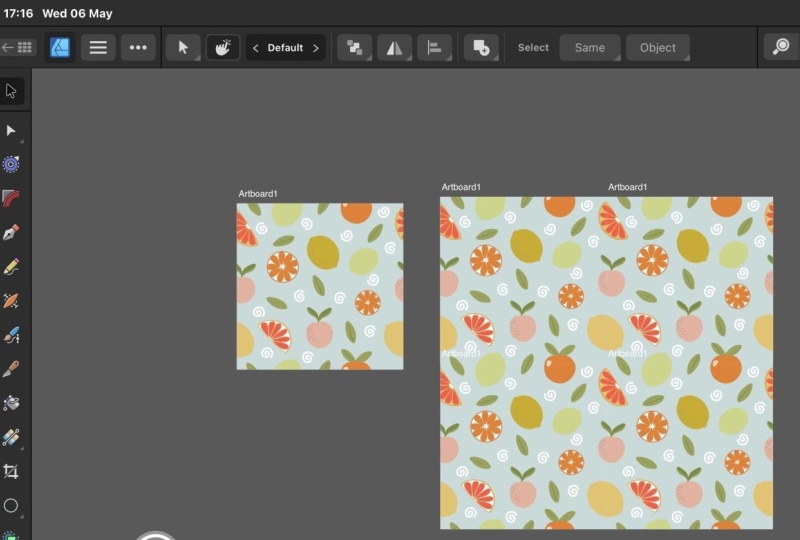
up just telling me that the pattern swatch has been added to the Swatches panel, and any changes I make will be applied once I exit the tool. So I'll click Okay.
And you can see this blue outline which marks the edges of
my pattern tile. The default color is dark blue, but you have the
option to change it. I'll just go over to this menu and select tile edge color. And I can go to
this drop down menu and choose what color I
want to change it to. So maybe I'll try
this green color. Now, you can also make this
new color your default, and if you're happy,
just click Okay. And now my tile edge
color has changed. Next, let's go to the name field and give our pattern
swatch a name. So I'll just call
this citrus Pattern. Next, we can select a tile type, and you can see there
are five options, but it's really
three main types, grid, brick and hex. And the brick and hex options let you choose between
row or column. So if I select a grid, you'll notice that
the brick offset is grade out because this only applies when you select brick by row or brick by column. So if I choose one of those, it'll now be able to show me
the brick offset options. I can also see a little pattern
swatch preview over here. I'll press Z on my keyboard,
and I'm just going to zoom, zoom out a little bit to make this easier to see as
I make these edits. I'll press V on my keyboard to go back to the
selection tool. Now, you can see the default
brick offset is one half. If you've created a brick
or half-drop before, then you've likely used
a half offset standard. But you have additional
offset options in this dropdown menu. So what is fun about the pattern tool is you can play around with
different offsets. You can try one third or
maybe three fifths offset, and you can see how that
changes the layout. Next, we can see the width and height
of our pattern tile. So I can click inside this field and type
in a specific size. I'll press tab to move
to the next field, and the tile adjusts
accordingly. I can also lock the proportions so that if I make an
adjustment in one field, it'll update the other
field in proportion. I can also adjust the
size incrementally. So I can see how the pattern changes by using the
upper down arrows. So I'll click the down and it reduces the
width by one pixel. I can also press Shift
and the down arrow, and it reduces it by ten pixels. And then if I press command, I will decrease it by
one tenth of a pixel. Next, we have the option
to size tile to art. So if I click here,
it will update the tile size to the farthest
edges of my artwork. And this can be good
reset if needed. You'll notice that
if I move anything, the tile size shifts
along with it. And this can be helpful when you first start arranging
your elements so you can spread out the artwork and then the tile size adjusts
with the movement. You'll also notice that when
size tile to art is checked, you have the option to set the horizontal and
vertical spacing. If I uncheck this box, the width and height
filter editable again, and with it checked, the width
and height are grade out, but I see the horizontal and
vertical spacing options. So I can set this to 100 pixels, and I'll set the vertical
spacing to negative 100 pixels. No 1,000, just 100. And this will cause my
elements to overlap because the negative vertical spacing means it falls inside
the tile boundary. So my horizontal spacing is a positive number
set at 100 pixels, and there's this gap from the tile boundary
to the artwork. If I go back and I make
this negative as well, it'll make the spacing tighter. Now, if I were to drag this citrus slice over
to the tile edge, these elements will
overlap each other. You'll also notice
that my tile edge isn't resizing when I make small adjustments to
my artwork because the negative space changes
the parameters a bit. Next, we have move
tile with art, and I'm going to turn
off size tile to art for now so we can see how
move tile with art works. I'll press Command
A to select all of my elements because this feature only really works if
you select everything. Now, if I move this as a group, my tile will move along with it. Again, when I move
these elements, my tile moves too. I'll press the space bar for the hand tool and pan
over a little bit, and I'll click once to deselect. If I were to select
only one piece, you can see the tile stays
in place because this is only effective if you're moving the entire group of elements. So you can use this
feature as needed. I'll turn that back off for now. And next, we have
the overlap options. So this first set is for
left or right overlap. So right now I have
left in front, and you can see that these
pieces overlap each other. So if I go back and I select right in front, the
elements switch. Same with the top and bottom. So these pieces overlap, and I can shift
which is in front. Now, this feature only applies if you have
overlapping elements. Next up, we can choose the
number of copies we see. Right now I have three by three, but I could change
that to five by five if I want to
see more copies. And I can also change
it to three by one and only show top and
bottom or one by three, where I'm only showing
the repeat on the sides. And you can decide how
many copies you want to view and you can switch
between them as needed. You also have the option
to just see one by one, which only shows your tile. Here you can choose
to dim copies. So as you're
arranging elements in tight spacing, it
can get confusing. When I click on the right one, it will be highlighted,
but it's not always easy to tell
that right away. So if you have
duplicated elements and you're not sure which
ones are the originals, you can dim your copies. So I'll go over
here, check this. And now everything that isn't
the original is dimmed. You can also choose how
much to dim the copies. So you can choose 20%, so your art will
really stand out, or you can keep
it subtle so that you're still able
to see the repeat. If your pattern is dense or you have several
duplicated elements, adjusting the dimness
of your copies can really help you
keep things straight. You can also turn
off your tile edge. Now, generally, I like
to see my tile edge, but I find this helpful
when I want to check how my pattern repeat
is looking without having the tile
as a distraction, especially if you then
increase the copies to say, five by five and then fill the workspace
with the pattern. So I'm going to click
to show my tile again. You can also choose to
show the swatch bounds, and this will show you
the full swatch size. So right now, I
have the brick by column tile type at
three fifth offset. So my swatch is very wide. Let me drag this over, and you can see it actually stretches quite a bit
to create that swatch. If I switch to brick by row, the swatch dimensions
are going to change. I'll press space bar to pan this down and you can see
the full swatch height. I'll go back over and turn
off the swatch bounds. And the last thing
we need to look at is the pattern tile tool. So if I turn this
on, you can see that I'm able to manually
adjust the tile size, so I can drag from the corners, the sides or the top and bottom. And if I press Shift, I can size it proportionately. I press Option and Shift, I can resize everything from
the center proportionally. So I can size it horizontally, vertically or from the corners. You also have this diamond here, which only shows up if you have a brick tile type set because it's for
adjusting the offset. So if I go back
and I choose grid, it disappears since there's
no offset to adjust. But if I go back and I
select brick by row, you can see it's in
the middle because it defaults back to half. If I slide this over, it will cycle through the
different brick offsets, and you can see the field
has changed to two thirds. There's one at the top and
there's one at the bottom, but they do the same thing. So you can use the
Pattern tile tool to make your adjustments rather than changing the width
and height here. And if you prefer
to make adjustments from the tile bounding box, you can use this option instead. Now, to go back to
normal editing, you just click to
turn the tool off. Once you're satisfied
with your pattern, you can either click Done, or you can just double
click anywhere in the workspace to exit your pattern swatch,
and it'll be saved. So here is my saved
pattern swatch, and you can see that it
takes you right back to the original workspace
just like when you started. In the next lesson,
we're going to take a deeper dive into
creating brick patterns.
6. Brick Patterns: In the last lesson, we reviewed all of
the pattern options. In this lesson, we're
going to review a few more basic tips and then dive deeper
into brick patterns. So to go back into
the pattern options and edit the pattern
I just created, all I have to do is go up to my pattern swatch and double click, and it'll bring
it right back up. So first, understanding how
to save changes is important. Now, let's say that I move
this orange over here. Up at the top, I have a few options for exiting
the pattern tool. If I click Cancel, it would
exit the pattern options, and it wouldn't save the
changes that I just made. If I click Done, it'll save that change to
my original swatch. So it'll save over my original version and
update that swatch. If I click Save a copy, it will add a new swatch to my swatches panel
with this change. So I can create different
swatch versions. Now, you may want to make a few different versions to
compare different layouts, and you can save several copies and then decide which
one you like best. So, the other thing to
note is that there are multiple ways to save your
swatch besides clicking done, and all of them will exit the pattern options and
save your original swatch. First, I can double click
anywhere in open space, and it'll exit and
update the swatch. Now, when I open that back up, you'll see that the change I made to the orange was saved. Now, this is important
to keep in mind, since you might accidentally
double click in the space and save
over the original. Another way you can exit is
to click this arrow up here, and that will also save
your changes to the swatch. And then if you double click, you can edit it again, and
the changes are saved. Now the last option
is simply press Command S on your
keyboard to save changes. Then if you want to go back in, just double click to edit. So you can click Done.
Click the arrow, press Command S on your keyboard or double click
anywhere in open space, and all of these
actions will exit the Pattern Tool and save
changes to your swatch. Now, I opened to
the Pattern Tool before arranging my elements. Let's take a look at
some of the ways we can edit the elements as
we build our pattern. Now, obviously, we
can move them around I can press R on my keyboard
to rotate this orange. I can press O on my keyboard
to open the reflect tool. So one rotates and the
other one flips the object. If I press V on my keyboard
for the selection tool, I can also, of course, rotate using my bounding box. I can also resize it and just remember to press Shift
to keep it in proportion. And then, of course, if you
press Shift and option, it resizes it from the center. And lastly, I can press Option
and drag to create a copy. So it's easy to
create duplicates. I don't actually
want a duplicate of my orange, so I'm
going to press delete. But I do want more of
my little flowers, so I'll click and drag while pressing Option to
duplicate this flower. And as I'm making changes, I can see in real time how the changes are affecting
the layout of my pattern. So let's say I want
to resize all of my elements together and
keep them in proportion. I'll press Command A to
select all of my elements, and then I can resize everything uniformly by pressing Shift
as I drag from this corner. This is helpful if
you need to reduce the size of your
tile significantly. By pressing Command A,
you'll select every element, so you can make changes
to the group rather than resizing one
element at a time. Now, if you want to make the same changes to just
a few elements, you can select and then press Shift as you select
additional elements. When you press Command A, it selects everything
that is in your tile, but not the copies, because the copies
will be transformed by whatever you do to the
elements in your tile. So to deselect, just click
once in your workspace. Next, let's talk about
the tile size versus the swatch size when using
the brick pattern types. To create a brick by row, you are offsetting
every other row. I'll press Z on my keyboard
to zoom out a little bit. So you can see my
tile boundary here. Let me press V for
the selection tool. And then this is my
swatch boundary. Because of the additional rows needed to create a full repeat, the swatch height is
more than its width. So my tile size and my swatch size will change based on the
brick offset I choose. Right now I have
two thirds offset, which means the swatch needs two extra tiles to
create the repeat. In this case, my
swatch height will be three times my tile height
because I chose brick by row. Width and height I set in my pattern options is the
width and height of my tile. The swatch width and height is adjusted to accommodate
the offset I choose. So if you need your swatch
to be a specific size, you need to choose a tile
width and height that factors in the extra dimensions needed for the
offset you choose. Two thirds and one third share the same number
of extra tiles. With both options, you need
three times your tile size. If I select brick by column, I need extra width to
accommodate the extra columns. You can see my swatch boundary changes to three
times the width of my tile. So when you set up
your tile width, the swatch width
will triple in size. If I change the
offset to one fourth, you can see the swatch
boundaries get wider. Now, the swatch width is
four times the tile width. You can see there is 1.5
tile widths on either side. And so any offset that has four in the denominator
will increase the swatch boundary
four times the width you entered in
the options panel. And of course, if I
change to brick by row, it quadruples the height. You'll notice that
the denominator of the offset is the multiplier. If it ends in four, it'll be four times
the height or width. So one third, two thirds, equals three times,
three fourths, one fourths equals four times, and the fifths would
be five times. So if you choose two fifths, the swatch will be
really stretched out. I'll press Z on my keyboard
for the Zoom tool and you can see my swatch height is very tall because it's
five tiles high. You can experiment
with the offsets, but you'll want to
pay attention to your overall swatch size. Going to go back to one third
because I like that option. I'll press Z and zoom
in just a little bit, and I'll use my
space bar to bring up the hand tool and pan down, and I'll press V for
my selection tool. So if you know you need to
export a specific swatch size, set your offset and select
brick by row or column, and then based on
those selections, set your width and
height accordingly. So this is a brick by row
with a one third offset. I would set my height to be one third the final
swatch size I need. I'm going to lock
those proportions, and let's say that my
final swatch height needs to be 1,200 pixels. I would divide that by three. And that would make my
tile height 400 pixels. When I press Enter, my tile
size shrinks dramatically, but my elements
are the same size. So I'll press Command A
to select everything, and then pressing Shift and
option at the same time, I can resize my elements
to fit this new size tile. With everything still selected, I'll drag them to the
center of my tile. Whoops. I've moved tile
with arts checked, so let me turn that
off and try that again, and that's better. I'll press Z on my keyboard and zoom back in so you
can see this better. Now, I've resized my tile, and I've resized my elements
to fit the new tile size. Now, you'll notice
that my swatch proportions change to a square. Ultimately, the only
thing that needs to increase is the height because I have a brick by row selected. But when your tile
size gets smaller, the swatch boundary may
look a little different. So let me unlock this, and if I make the width
double the height, it'll go back to only showing the extra
height of my swatch. And it can be a
little confusing, but regardless of whether your swatch is a
square or rectangle, the important factor
is the offset value and how much it increases
your swatch size. Most people are used
to using half offsets. Oops. Wrong selection.
There we go. So usually the most you have to factor in is
doubling the size. And you can see a half
tile on either side. If you've ever created a brick repeat or a
half-drop repeat, you're used to these dimensions. Working with the
additional offset values is a little different, but can be fun to explore. So now I'm going to start
laying out my brick pattern. I'll go back to the
one third offset, and I'll reduce the width
to 600 pixels, that's good. And I'll click once to
deselect my elements, and now I can start spacing everything out and arranging
them around the tile. And as I make my changes, I can see how the pattern
layout looks with my copies. So I'll start with these
larger elements first and move on to the
smaller ones next. And I'm going to speed this
up so you don't have to watch this whole process as
it can take a little while. Okay, so my pattern layout
is coming together. And at this point, one thing
I could do is turn off my tile edge to focus
on the swatch layout. And I can look for holes in the spacing or crowded elements. Anything that might draw
the eye or call attention. And if I'm happy
with this, I can click Done and save
over the old swatch. I can also save a copy, and I can give that copy a name, call it citrus, pattern, brick. And then I'll click
Okay. And this just tells me that a new
pattern swatch has been added, which you can see
here in the panel, but I still have the original. And I'll click Okay. And
if I double click to exit, it'll also update
the original swatch. I'll press Option Command zero to fit my
artboard to screen, and then I'll press Z to
zoom out a little bit, and I'll just move this over. And I'll press M on my keyboard
for the rectangle tool, and I'll draw a square that is filled with
my pattern swatch. I'll right click and
go to transform scale, and I need to turn off
transform objects, and I'll increase
the pattern scale by pressing Shift
plus the up arrow. That's good. So I'll click Okay. And this is a pretty
decent pattern layout. But if I want to make
any adjustments, I just go back to the swatch and double click to make edits. Now that you understand some of the nuances of brick
pattern tiles, go ahead and work on
your own brick pattern. And in the next lesson, we'll
discuss Hex Pattern tiles.
7. Hex Patterns: In the last lesson, we discussed the brick pattern
layouts in detail. And in this lesson, I want
to go over Hex patterns. I'll open the pattern
swatch I just created, so I'll double click the swatch. And I'll immediately
click Save a copy, and I'll name it
citrus Pattern Hex, and click Okay, and
I'll click Okay again. Now, next, I'll click
Cancel so that I exit that swatch before making any changes to my brick pattern. Now I can double click to open the saved copy to
create a Hex Pattern. I can change the
layout and not worry about accidentally saving
over my brick pattern. So I'm going to press Z on my keyboard and zoom
in a little bit. And I'll press V on my keyboard to go back to the
selection tool. Now, over here in
my pattern options, I want to choose hex
by column or row, and I'm going to
pick hex by column. And you'll notice
that the tile shape converts to this
hexagonal pattern. So the repeat is going to behave differently than the
square tile shape. And you'll notice
that the motifs on the sides automatically overlap, and they crowd together
when you go from the straight edges to
the diagonal edges of the hex tile shape. And I'm going to dim
this to about 40%, so it's easier to identify which elements are the
ones that I can move. I'm also going to change my
width to 480 and press tab and then make the height 480 to change the dimensions
in my new pattern. At first glance, the hex pattern looks very similar to
a half-drop layouts. While the brick pattern
lets you choose from several offset increments, the Hex pattern
offset is preset. So similar to brick patterns, Hex by column adds extra
width to the swatch, and Hex by row
adds extra height. So while my tile
size is 480 by 480, the swatch height is
not because you have to account for the
additional columns needed to complete the repeat. My tile width is 480, so I need to multiply
that by 1.5 to figure out my swatch
width, which equals 720. So if I make the
tile height 720, my swatch will be 720 by 720. And you can see now that
my swatch is square because 480 times 1.5 is 720, which is the same height
I have entered here. And now I am appropriately
accounting for the additional width my offset columns will
add to my swatch. Another thing to note
is how to set up your swatch so that it
exports to the size you need. If you like working in pixels, but you need to
export in inches, you need to understand
that Adobe Illustrator uses a resolution of 72 PPI. So 72 pixels equals 1 ". And if you need to
export your artwork at, say, ten by 10 ", then you need to set
your artwork to be 720 by 720 pixels. So you can either
multiply your inches by 72 to find your pixel size or divide your pixels by 72 to determine how many
inches it will export. I've created a quick
reference guide for converting inches to pixels
to make this easy for you, and you can download it
from the resources tab. Now, this current swatch
size is 720 pixels squared, which means if I
export this in inches, it would be 10 " squared. Resolution I choose when I export will not change
the size and inches. It'll only change
the resolution. Multiples of 72 don't make
for the easiest conversions, so Illustrator can help
you with your formulas. So let's say that I need
a 12 by 12 inch swatch. I can go over to my width
field and type in 12 times 72, and it does the math and
gives me 864 pixels. So now I know that 864 pixels in Illustrator will
export to 12 ". Now, because this
is hex by column, I have to account for
the extra column width. And I know my swatch
width is going to be 1.5 times whatever I
put in this field. I need to figure out what number multiplied by 1.5 equals 864. And all I have to do
is type divide by 1.5, and that gives me 576. I also need to change
my height to 864, and you can see, now I
have a square swatch. My tile width is 576 pixels, making my swatch
width 864 pixels, and my height is 864 pixels, which converts to a
12 by 12 inch swatch. I hope this helps you
if you're asked to export your work to a
specific size in inches. You can, of course, work in
inches if that's easier, but if you're already
working on pixels, these tips should
help you easily convert your work to inches. I'm actually going to change this back to my original size of 480 by 720 pixels
because I like that size, and I can start
adjusting the layout of these elements to better
fix this hex pattern. And I'll just speed
this up a little bit. So I would continue making adjustments until I'm
happy with my pattern. Because I started
by saving a copy, I can just click Done and it'll
exit and save my changes. You can also use any
of the other methods I showed you earlier to
exit and save your work. If I go back over to my
swatch and double click, you can see my pattern
changes are saved. So take some time to make your own hex pattern and practice setting up your
swatch size for export. When you're ready, meet
me in the next lesson, where I'll show you how to add a background color
to your swatches.
8. Adding a Background: At this point, you
should have created your own brick and
or hex patterns. In this lesson, I
want to discuss adding a background
color to your swatches, because right now these patterns have a transparent background. So first, I'll show you what would happen if I were to add a background color while I was working inside the
Pattern Tool options. I'm going to press
M on my keyboard, which will bring up
the rectangle tool, and I'll click and
draw a square. It's automatically
filled with my pattern, but let's change that
to a background color. Now, it's in front
of all my elements, so I'll press Command Option left bracket to send
it to the back, but it's going to cover
up parts of my pattern. Even if I try resizing it, this background layer
is treated like any other shape in my repeat, and it's subject to
the overlap settings. So it doesn't really work to add a background color this way. I'll press delete to
remove that shape, and I'll go up and click Done. Now I want to go over
to my pattern swatch and click and drag it
onto my workspace. And now you can see
the full swatch that was created with
the pattern tool. I'll go over to my Layers panel
and I'll open this group. If I select this path, you'll see that it
is 720 pixels wide by 720 pixels high as I had calculated
in the last lesson. So my tile was 480 by 720, my swatch is 720 by 720. All I have to do
is take this path, which is the swatch boundary with no fill and no stroke and press Command C to copy and
Command F to paste in front. Over in the Layers panel, you can see the added
copy right on top. It has no fill and no stroke, so I'll select the top copy
and give it a background. Now I can either
select the group in the layers panel
or I can click and drag to select everything and drag it over to
my swatches panel. I'll press Delete. I'll press in my my keyboard again to bring up
the rectangle tool, and I'll draw square and fill it with my new
pattern swatch. And it's that simple to add a background color to
your pattern swatch. I'm going to delete this, and I'll drag my swatch back out, and I'll press V on my
keyboard and move this down. You may notice
that when you drag your pattern swatch
into your workspace, some of the elements on your
borders are incomplete. Let me press Z to zoom in here so you can
see this better. Now, the reason part of my
lime slice is missing is because only elements that cross the pattern swatch
boundary are shown. And this is a group
of shapes and the extra wedges fall
outside the swatch. So I'll press Z to
zoom out a little bit. And if this bothers you, you can move a full
piece in its place. Since this is a group, I'll double click to Enter
Isolation mode, and I can delete this
incomplete piece. Next, I'll go to that
slice that is complete, and this is all grouped, so I'll press Ship
Command G to ungroup it. And now if I click outside the group and then
select the slice, I can move it the
height of my swatch. I'll press Shift Command M
to bring up the move tool, and I don't want to
move it horizontally, but I do want to move it
vertically, 720 pixels. If I click Copy, it'll
place a copy at the bottom. So you can reconfigure your border elements if them being incomplete
bothers you. It's not necessary for
the swatch to repeat, but just something to note. So that's how you add a
background and how you would fix up the elements in
your swatch if you want to. In the next lesson, we will talk about exporting your work.
9. Exporting Your Work: Mm. Now that we've
created our patterns, we need to save and
export our work. The first thing I want to
do is save my swatches. So I'll go up to my
swatch menu here and go down to Save
swatch Library as AI. And similar to how we saved the color palettes
at the beginning of class, I'm going to save this
as a swatch library. I'll give this a name and
call it citrus Swatches, and it should default
to saving it in the Swatches folder,
so I'll click Save. And that'll save all
those color palettes, but it'll also save all the pattern swatches I
created, as well. And then if I ever want
to use my swatches, I can find them in my
swatch library's menu like I did when I imported
the color palettes. To export your work for class, all you need is a JPEG. So we'll start by
making an artboard. If I press Shift O, it will bring up
the Artboard tool, and you can also find that
here on your toolbar, and then I'll click and
drag out an artboard. Up here, I can set the size. And we discussed converting pixels to inches in
the last lesson, so I can set this size for a specific output in
inches if needed. So if I use the same
size as my swatch, I'll make this 720 pixels and then click to make
the width 720 pixels, and now I have a nice
square ten inch artboard. I'll press M on my keyboard to bring up the rectangle tool. And if I click once, I
can set my height and width to match my artboard
size, and I'll click Okay. And that has added a white
square to my artboard, and I'll go over and click to fill it with my
pattern swatch. I'll press V on my keyboard
for the selection tool again, and now I have an artboard with my pattern swatch
that can be exported. If I wanted to export
the swatch itself, I could click and drag it
from the swatches panel. So instead of having a
shape with a pattern fill, I could export the
full swatch size if I need to upload
it for printing. If you're exporting the
pattern field shape, you can also scale it. Just right click and go
to transform scale and make sure to turn off transform objects and
keep transform patterns. You want to scale it
uniformly so you can decrease the scale by pressing Shift and the down arrow or increase
with the up barrow. When I'm done, I'll click Okay. And with our artwork setup,
we're ready to export it. I'll go up to file, go down
to Export and Export As, and I'll give my file a name. We'll call it citrus Pattern. Choose where to save it
here and then choose the format from this drop
down menu of options. And I'll select JPEG, so I can upload
this to the Project and resources tab of the class. Use Artboards should be checked, and you can choose to use
all artboards or just range. So I have two artboards, one here and one here, but all I really want
to export right now is Artboard two,
containing my pattern. So I'll click Export and
I get the JPEG options. I can choose the
color mode here. If I'm exporting
this for screens, I need to select RGB and
see MKS for print media. Next, I can choose
the resolution. If this is for screens,
then 72 PPI is sufficient, and then I want to
choose art optimized. You were exporting for print
and needed high resolution, then you choose CM white
color mode and 300 PPI. But regardless of the
resolution I select, my 720 pixel square artboard
will export to 10 ". So in this case, it'll just be 72 PPI. So I'll click Okay. Now, you may need to also
export this as a PDF. So to do that, you can go
back up to File export, Export As, and then you can
switch the format to PDF. And once again, I can
give this a name, so I'll call it citrus Pattern. And now when I click Export, it brings up the Export
Adobe PDF options. You can play around
with the settings, but one thing I want
to point out is preserve Illustrator
editing capabilities. If this is unchecked, it will export a
flattened image. If you check this box, then your PDF can be opened in Illustrator with
all of its layers. So if you're sharing this
with someone and you don't want to give them
access to all of your layers, you need to leave
this box unchecked. Once you've made
your selections, just click Export
PDF and you're done. So all you need to upload for the class project is
a JPEG of your work. You can export your
final pattern, or if you create
multiple versions, you can share as many as you like to the class Gallery page. I hope you'll
upload a project so I can see what you
created in class. In the next lesson,
we'll wrap up the class with some
final thoughts.
10. Final Thoughts: I hope you had fun exploring the Pattern Tool and we continue
to create more patterns. I'd really love to
see what you create, so please share your project
to the class gallery. You can share your
thoughts and ask questions in the discussion
section of the class. And I'd also love for
you to leave a review. Reviews help other
students find this class, so please consider
leaving a review. And if you enjoyed this class and want to
learn more from me, check out my other classes
here on Skillshare. Click the follow button
if you want to say UT date and be the first to know what I'm working on next. As always, it's been
an honor to teach you, and I hope I'll see
you in my next class.
 Amy Bradley, Surface Pattern Designer & Artist