Transcripts
1. Intro: You don't have to
be an artist to create beautiful
seamless patterns. All you need is your iPad. In this course, we'll
go step by step through the entire process of creating a seamless
pattern from scratch. You will learn how to set up your canvas correctly
for pattern design, keep your colors vibrant
and print ready. Avoid pixelation and preserve the quality of your artwork. Make sure the right side
connects perfectly with the left side with no visible
scams or white lines. Export your pattern in the right formats and
know when to use each. And last but not least, create sonic Mups for your patterns directly
and procreate, even if you don't have
Photoshop I promise you, by the end of the course, you will have the skills to design your own
seamless patterns and bring them to life on
products, prints, and more. By the way, Helen, I'm Sarah. I'm an artist, illustrator,
and content creator. I do content in Arabic as I
Egyptian and English as well. I'm so excited to start
this course with you, so let's get it started.
2. Setting Up The Canvas: To create a new canvas, we click on the plus
sign in the corner. As you can see, I already have a canvas with a good
size for patterns, but since we're making
a new one from scratch, I click on the file
that has plus sign. Once I click on it, I
enter the Canvas sittings and the first thing we start
with is the dimensions. I'll choose my size in
pixels and set the width and height to 3,000 by 3,000 pixels. This size works well for small printer items
like toolbgs, caps, small tablecloths,
clusters, or phone covers. But if you want the
pattern to be printed on large size like bit
sheets or curtains, you can set it to
4,500 by 5,400 pixels. But here, I'll keep
it just 3,000 by 3,000 because I know the
products I print on, and if later I want
a bigger size, I can place my pattern
inside a bigger canvas. Let's move to one of the most
important things the DPI. You're going to print, so
it should be 300 at least. Higher is okay, but never go
lower if you're printing. This is because DBI controls how clear the details
look when printed. So make sure it mustn't
be less than 300. The second important thing I'll adjust is the
color profile, and I'll make sure
it's set on CYA a RGB. Why? Because CMYK
stands for cyan, magenta, yellow, and key black. And these are the colors
that printing machines use. But RGB stands for
red, green, and blue. And these are for screens which look brighter
and more vivid. So what happens if
you draw in RGB, and then you try to print? Your colors will look dull, and many of them won't have the same brightness or saturation
you saw on the screen. And to put it simply, RGB can show around
16.7 million colors, but CMYK shows around
1 million colors. Can you imagine the difference? The printer converts
your RGB colors into the closest value in CMYK. So the result looks less brighter than what you
saw on your screen. And unfortunately, this
is a mistake many people make because they don't know the difference
between CMYK and RGB. They choose RGB because the colors look brighter
and more vivid. And when they go to print, they are surprised the colors look washed out or
totally different. That's why it's very
important to always set it to CMYK if
you're going to print. I will not change anything in the time lap settings or
the canvas properties, but the last thing I'll
do is rename the canvas. I'll do that by clicking on untitled Canvas and
typing pattern. Then I click Create, and now our canvas is
ready to start working on. Now, why do rename my canvas? Because if I go back to
the gallery and want to create a new canvas with
the same pattern size, when I tap on plus sign, I need to start from scratch, and I'll find the
set size below, and just by clicking on it, I'll get ready to use Canvas. And that's it. We're done with
the first important step, how to set up the
canvas and the colors. Next time, we'll start drawing the pattern together and
learn more about layers.
3. Tangerines & Select tool: Right, so the very first thing we're going to do is
set up our background, tap on layers, and
we're going to keep the official background color
in procreate white for now. But instead of using that, we're going to make layer
one our actual background. Why? Because later
this background layer will be part of the
pattern itself, and we will need to
duplicate it several times. So we'll tap on layer one, tap on rename and rename
it to background. Now, let's open the color
palette and choose a nice light pink and then drag it from the color wear bright into
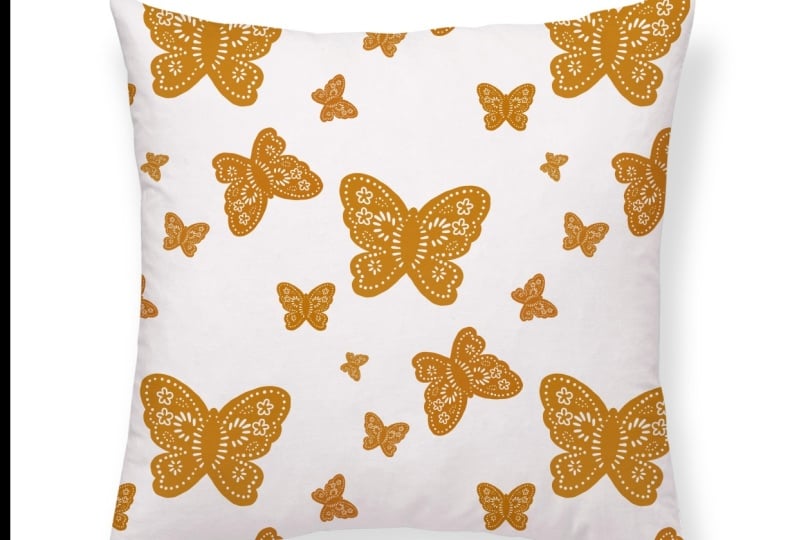
the layer to fill it. And that's it. Background ready. Now, let's draw the tangerines. Hit the plus icon
for a new layer, tap one, and rename
it tangerine. Always name your layers. Trust me, when you
have a bunch later, you will thank yourself
for keeping it organized. Now hit over to
your color wheel, grab a nice og shade and
from the brushes library, open the inking section and
choose the tender box brush. Now, draw an oval shape, circle, something in between, and it doesn't have to
be perfect at all. We just want to keep the summary cartoonish
pattern style, you know. And without lifting your
pencil, Cloetm. That's perfect. Now, let me erase this part. Yes, like this. Now, it's fine. I know you're asking why not
just draw a circle and wrap the color inside as we did to the background
layer. Let me show you. This brush gives the
beautiful textured effect, light spots, darker spots, as you see, and little grain, which makes the
pattern feel fun, playful and samury
on the other side, if we fill it after
lifting your pencil, it turns flat, and
we don't want that. No, I don't need
this flatty one. So quick tap for you. If you made any mistake
and you want to erase it, so instead of erasing, just tap the screen with two fingers to undo
and want to redo, tap with three fingers. But for now, I don't
need it, so undo. Another tip for easily drawing. Now, I don't want my
lines to look wobbly. I want it to be smooth. I just want fine lines. So I'll go to the actions, the wrench icon here, select prefs, and under
pressure and smoothing, set civilization to around 50%. That way, my lines will be smoother and easier to control. Alright, let's add tangerines
all over the canvas, big ones, small ones. And remember, they don't have to be perfect circles
and think more. This is about having
fun. There're one here. I like where this one is, so let's move it. And to do that, to move any
drawing from your canvas, go to the select tool, choose free hand, draw around the tangrine
you want to move. Now use three fingers, swipe down, choose
cut and paste, and place it wherever you want. And as you can see, it's
now in its own layer. I'll tap on the moving tool and move it a little
bit up there. And let me rotate it to
the right a little bit. And also I can use
distort or wrap it. Let me make it a little
bigger from this side. And after finishing that, just tap again the moving
tool, and that's it. I'll do the same with
another tangerine. But this time, I'll
have a copy of this tangerine and move
it here in the canvas. But first, I'll tap on layers and make sure that I'm
in the right layer. Tap on select tool, select it, swipe down
with three fingers. And this time, choose Copy again swipe with three
fingers and choose paste. Now, I can move it
whatever I want. And let me move it here
down in the corner, rotate it a little bit to the
left and make it smaller. Yes, much better. Once I'm happy with everything, I'll merge them back
into one tangerne layer. And to do that, tack on layers, put one finger on
the first layer, one finger on the last, and swipe them together quickly. Now they are one layer again. And that's it. We have finished the first part of
drawing our tangerines. In the next video, we'll
move on to drawing the base of our pattern
and adding the leaves.
4. Leaves: Now we're going to work
on the tangerine leaves. Tap the plus icon to
make a new layer, tap it once, choose rename
and rename it leaves up. Keep it as it is above
the tangerine layer. Then create another new layer, move it down under
the tangerine layer, tap it once, rename and
rename it leaves down. Tap on leaves up layer and open your color palette and
pick a nice green shade. Go to brush library and
open the inking set again. But this time it choose
the technical pen. We already have the
stabilization set to 50%, so our lines will be nice and smooth for the
leaves and branches. I start right from
the tangerine, pull out a short line,
then a longer one. And from there, draw the leaves. I'm making the leaves
a little zigzag. Not too realistic because we're going for a cartoon
style pattern here. I'm going to connect these
two tangerines together, and now continue
drawing the leaves in the empty spaces on the
tangerine anywhere you prefer. I draw one here,
another over there, and don't worry about
making them perfect. I speed up the drawing process so the video won't be too long, but take your time with
your own drawing, please. Once you finish
drawing the leaves, drag the green color from the color wheel and
fill the first leaf. And to make the coloring easier, tap on color drop up there. And every time I tap on a leaf, it fills with green. Instead of going back
to the color wheel, drag the color each
time and so on. Now let's move to the
leaves underneath. Go to layers and tap on leaves down layer
and start growing. Here is one leaf
part of it showing, part of it hid under
the tangerine. Draw as much as you want. But for me, I will
not draw a lot of leaves in this layer
under the tangerines, as much as I draw in
the leaves up layer. I'll draw one here,
another one there. And after finishing drawing, grab the green color from the color wheel and start
filling all the leaves. Looks good. Now, let's zoom
in and show you something. See how some parts of the leaves under the
tangerine are still visible? They look darker, and
I don't want that. So I tap on eraser. And remove any bits that
are showing underneath. I do this because later, when we add shadows
and lighting, the dark green
under the tangerine could make things look missy. Now, everything's
clean, and we've got the base shape of
our pattern ready. And next time we'll start adding fun details to make this
pattern come to life.
5. Adding Flowers & details: I actually love two things
about making pattern. The first one is adding fun details that bring
the drawing to life, and the second one turning a normal pattern
into a seamless one. And in this part, we're
focusing on adding details. So go to your layers panel, and above the leaves up layer, tap the plus bottom and
create a new layer. Tap it once, and
rename it to flowers. Pick the white color
from your color panel. Now start drawing flowers. Big ones, small ones, each with five petals. You can draw on the
tangerines, on the leaves. All I want to say spread
them out however you like, however you see that
pattern goes well. If you want to make it easier, just draw one flower and make a lot of copies of this flower. The same way we
copied the tangerine, if you remember, swipe
your fingers down, choose api, swipe them again, and choose paste, and spread them everywhere in your canvas. But remember, if you use that way and made a lot
of copies of this flower, don't forget to go to layers and merge all the flowers
together in one layer. And when you're done drawing, drag the color from the color
wheel and fill the petals. Now, put your finger on
the tangerine to get the right shade of
orange and draw a small circle
inside each flower. Alright, let's move on to adding details to the leaves
and the tangerines, starting with the leaves. Go to your layers,
tap on leaves up, and add a new layer above it. Tap it once and
choose clipping mask. See that little arrow
pointing to the layer, that means whatever you draw will only show on
that specific layer. And before we start
adding anything, I'll hide the leaves down layer so things don't get confused. Go to the color panel and
choose a darker green. Now, let me show you
what clipping mask do. And let me draw
some random lines. See, the only lines show
on the leaves up layer. Nothing else was affected. No the tangerine nor the
background, just the leaf. Now, let me reduce
the brush size. And start adding veins to
the leaves in a exact shape. Some small lines at
the bottom. Great. So I'll fill up the video
and continue the rest. So stop the video. Take
your time with adding details and come again
to continue together. And when it looks good, we're done with the
leaves up layer. Do the same with the
leaves down layer. Go to layers, tap on
leaves down layer. A the plus icon to create
a new layer above it. Tap it once, choose
clipping mask and start adding small green
lines and done. Now, time for the tangerine. Go to the layers, tap
on the tangerine layer, create a new layer above it. Tap it once. Choose
clipping mask. Put your finger on the tangerine to get the tangerine color. Now tap on the color wheel, go down a little bit darker. Add the small lines
or the little dots at the bottom of the tangerine
to give it texture. Once you're done, merge each detail layer
with its main layer, the tangerine details
with the tangerine layer, the veins with leaves up layer, and so on with leaves
down and veins. And there you go. Your pattern now has much nicer details. And in the next lesson,
we will take it even further by adding
shadows and lighting. It will be the last
step before turning our normal pattern into
a seamless pattern. Tia.
6. Light & Shadow: Now we're going to add shadow and lighting
to our drawing. We will add shadows and
lighting to every layer. So we'll go to the layers panel, and above the flowers layer, we will going to create
a new layer, tap on it, tap clipping mask,
then put your finger on the flowers so you can get
the shade of this flower. And now move to the color panel. Go down a little with your pencil to get the darker
shade of the off white. And let's get a textured brush, so move to brush library. Then we're going to choose
the charcoals brush set. And to be compressed, we're going to add our
shadows and lightings. And let's add some
shadows to this flower. Look at the texture
of the brush. Looks so nice. And no
need to remind you, pause the video because
I'm going to speed up the video and do the rest. So pause the video. Take your time with adding
shadows to the flowers, and the shadows will look like this on my beautiful flowers. And once we're done, we're going back to
the Layers panel and merge the flowers layer
with its shadow layer. Now it's leave a
layer, so tap on it, create a new layer, tap once. Clipping mask. Hide leaves down layer so
you don't get confused, which leaves you need
to add shadows to it. Put your finger on a leaf so you can get the
green shade of it. Then go back to the color panel, go down a little bit
with your pencil. And start adding
shadows to your leaves. Pause the video and do the rest because I'm going
to speed up the video. And if you are confused
with the dark green shade, you can just use the same dark color we
used for the leaf veins. But look here, the
shadow covered the details that we
added to the leaf. So what can I do go
to the layers and reduce the opacity of the shadow layer till
you see the details. Let me reduce it to 73,
will look like this. So once we're done, don't forget to merge the
layers together. And now let's hide
leaves down layer. Start adding new
layer, dap at once, clipping mask and adding
shadows the same way we added to the leaves up layer. Add shadows to the par
that need shadowing. And when you're done, don't forget to go back to the layers, reduce the opacity, and
merge the layers together. Now it's tangerine time
and the last layer. So tag on the tangerine layer, create a new layer above it. Tap it once, top clipping mask. Then put your finger on the details that we
added to the tangerine. We're going to use this
dark shade of orange. So let me resize my brush and start adding shadows
to our tangerines. And it's fine if you
don't see the details right now because we're going to do the same that we
did to the leaves, we're going to
reduce the opacity till you see the details. And I'm done with the shadows, so I'll go back to the layer and reduce the opacity of the shadow and merge
the layers together. And here is our
pattern with shadow. The last thing we're
going to add is lighting because there is
no shadow without lighting. We're going to do
the lighting using the exact same steps we
used for the shadow. For sure, there is a
little difference. We can say they are two. The first one is for sure, the colors are going
to be lighter, and the second one,
we're going to make the lighting softer
than the shadows. So we're going to
the layers panel, and above the first layer, the flowers layer, we're
going to create a new layer, tap on it, clipping mask, and put my finger on the flower so I get the
shade of the flower, go to color panel and
move above so you get a lighter color or just
pick white as I did. Let me add lightings to our flowers to adjust
to little parts. And now, how can I make
the lighting softer, tap on adjustments,
the gahmblur, move your pencil to the right. And you can see the
persons up there, and I'll just swipe it 2%. I feel that's fine, but you can increase the percents
as much as you want. Just do what you feel that
it's good for your pattern. And when you're done, let's
move to another layer. But before that, let's merge the flowers layer with
its lighting layer. Now, tap and leaves up layer, create a new layer, tap clipping mask,
and I'll tap and hold on the green color of
the leaf to pick it up. Then go to the color wheel
and choose a lighter green. And with the same
brush I'm using, I'll start to resize my brush. And adding lightings
to my leaves. So pause the video and take your time with
adding lightings. Now I'm going to make
my lighting softer, so tap on adjustments, gash and blur, and
I'll make it to 1%. And now I'm going to
also reduce the opacity of the lighting layer to 73, merge them together, and it's
time for leaves down layer. I'll do the same thing,
you know, great. New layer, tap, clipping mask, and hide leaves up layer. And our lighting
will be like this. So let's move to the last layer, and it's tangerines
layer. So tap on it. And let me unhide
leaves up layer. Now, create a new layer. Tap it once, top clipping mask and put my
finger on the tangerines. Now move to the color panel
and go up at the wall with your pencil and let me
resize my brush first. No, I don't think so, we decide to reduce
it a little bit. Yes, this is better.
So we're going to add lightings on the
top of the tangerines. I don't think so that I'm going to make them soft as we did to the leaves and
the flowers and just keep it as it
is with its picture. And that's what I'm
saying all the time. I want you to do what you feel it's good
for your pattern. You don't have to
do all the details. You don't have to do
the shadow as I did, be creative, do what you see it's good and
feel the drawing. And that's it. We're done
with drawing the pattern. We're done with the details,
shadows, lightings. And now we're ready
to turn our pattern from normal pattern to
a seamless pattern.
7. Turn your normal Pattern to A Seamless Pattern: Right, let's go into
our layers panel. I'm going to start by
selecting all my layers. I swipe each layer to the right, and when it turns blue, that means it's selected. This even includes
the background layer. You remember the
very first layer we set as the background, now I'm going to group them, so I tap on group and
then I'll duplicate this group by swiping it to the left and choosing duplicate. The first group, this is my original base
for the pattern. I'm going to lock it just to make sure nothing
happens to it. That way, if I want to go
back later and make changes, I still have it safe. So I swipe left on it and
tap lock and also hide it. Now, in the duplicated group, I tap and choose flatten. Flatten merges all the layers inside the group
into a single layer. So if you hide it, the whole
drawing disappears at once. Next, I'll duplicate
this flattened layer. Swipe left, tap Duplicate. Then I'll tap on the move tool, make sure it's set to uniform, and also make sure
my snapping and magnetics are turned
on to the maximum. And now you are working on
the first duplicated layer. I'll move it all the
way to the left. And because the snapping and
the magnetics are active, you will notice the guidance. These guidance show me when I have reached the exact center. And once it reaches the center, go back to the layers and tap on the second duplicated layer and move it all the way to the right till it
reaches the center. Turn off the moving tool. Now, I have a gap
between my tangarins. This empty space is
part of the background. I can fill this
space with anything. And let me show
you what may I do? Go to layers and merge
these two layers together, create a new layer above them, put my finger on the background so I get the right
shade of pink. Then I'll go a darker
shade of pink, and I'll start growing
random flowers, spreading them everywhere
in the background. And they will look like
this in your pattern. But for me, I don't prefer this. But I prefer to select
something from the pattern itself like this
flower and spread it everywhere in the empty
spaces in the background. And to do that,
I'll go to layers and unhide my original groove. Then I'll go inside
the flowers layer and unlock it by swiping it to
the left and ta unlock. Now tap on the select tool and make sure it's on freehand. Select the flour you prefer, swipe three fingers down. Copy three fingers down, paste. Now move this layer to the top, above all the layers, and hide the group again. Select the move tool
and start moving the flour anywhere you
prefer in the empty spaces. Rotate them, make them smaller, play with the shape
by using grab. And if you want to
move more free, just turn off the snapping, the magnetics, and you will find the details moving with you
without these guidelines. Now, let's add another flower. So I'll go to layers and
applicate this flower. Then I'll move it up there
and make it smaller. For me, this is
enough, but for you, you can add as much as
you want with details. But for now, let's go back to the layers and merge
the layers together, the pattern and the details that we added in the empty spaces. Now, I want you to
duplicate this layer four times and make sure that
you are on the first layer. Let's name it 14. Choose the moving tool and turn on the snapping magnetics if you turn it off while moving the flowers and the details
in the empty space. I'll drag it from the bottom
to the top left square of the canvas and the pencil will snap into place ultimately. Now go to layers and tap
on the second layer, layer two or four,
and drag it from the bottom to the top right
square of the canvas. Go to the layers
again and tap on the third layer,
the three or four. And this layer will move it from top to bottom into
the bottom left. Back to the layers and select the fourth and the last layer, the layer four or four, and then move it from the
top into the bottom right. And now my pattern is
completely seamless. Everything connects
perfectly. No gaps, and it looks amazing. And if you want to
make it even smaller, I just merge
everything again into one layer or these
four layers together, and then duplicate them for four times and do the same
way that we did before. But I look the basic
layer because I want it. I love the pattern and
how it looks in this way. So layer one oh four, drag it from the bottom
into the top left square. Layer two or four, drag it from the bottom
into the top right square. Layer three or four, drag it from the top
into the bottom left, and layer four or four, drag it from the top
into the bottom right. And now you have smaller. And you know the way if you
want to make it even smaller. Now, how to make mockups on Percurate without
needing to photoshop.
8. Saving Formats & Mockups in Procreate: The first thing I'll talk
about is how to save your pattern after you've
decided on the final design, whether it's a small size
pattern or a large one. So go to Actions, Share. From Share, you'll see
different actions. I'll tell you about
the most important file formats and
when we use them. The first one is PSD. PSD means your file is
saved with all the layers. That way, you can open
it in Photoshop later, edit the layers, and make mock-ups in a more
professional and easy way. Here, I'll save it as
a file on my iPad, name it tangerine
and press save. The second option is PDF. This creates a locked file, so no one can edit the layers. And that's why when
I send my pattern or any design to a print shop, I sent it as a PDF. When I choose PDF, it asks me if I want to save
it as good, better or best. I'll choose best and
save it in my file. Tangerine, print, and save. The third option is image
formats like PNG and GPG. We use these formats
more for making mockups, or if you're planning to
sell your pattern online, some websites ask for both
a PDF and an image file. Personally, if I'm saving it
as an image, I prefer PNG. And honestly, I usually upload both options to
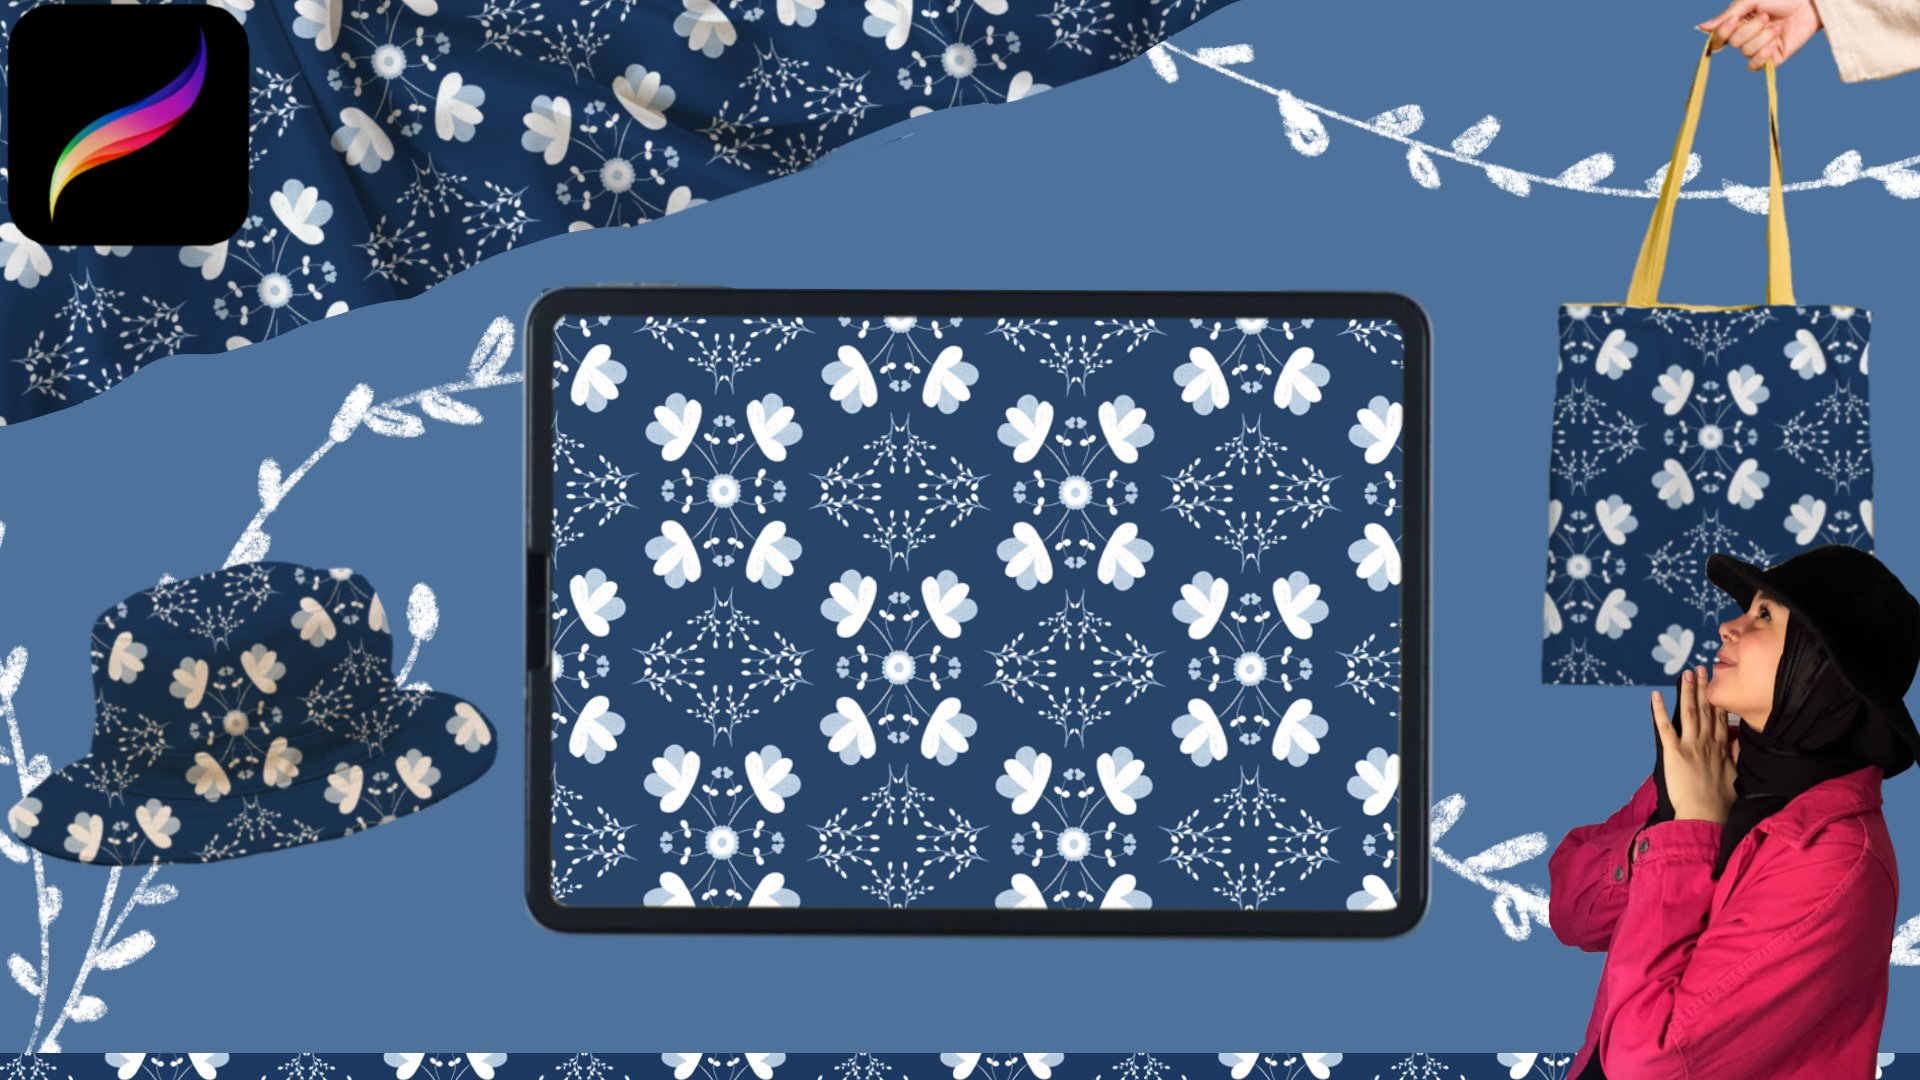
websites PDF and PNG. Now, let's learn how to make a mockup in Procreate
and what is a Mup? It's simply a way to showcase
your design on a product. Like fabric, a cap, a tablecloth, a phone
case, and more. Mockups are super
important if you want to sell your design
online because for sure, the client prefers to
have an image of how the product will look when
printed or when buying it. And that's why mockups
are so important for you. Mockups will help you a lot
in marketing your products. So how did choose
the right mockup? First, decide what product
you want to print on. Do you want to print
on fabric, like hats, bedclothes, or do you want to print on plastic,
like phone covers? Second, choose a mockup with
a white or light background. Avoid dark colors or
mock-ups with other designs. So download yours
and let's practice. Go to your gallery, tap on photo and import the
mockup you choose, and we'll open in a
new separated canvas. Now, we'll use a tool
we already used before when creating the
pattern, the select tool. Carefully trace the area of the mockup where you want
to place your pattern. Make sure that you are
using the free hand tool. Take your time, pause the video and trace the hat or the
mockup that you choose. And when you reach
the starting point, the area is selected and
you know the next step already with three fingers swiped down and
choose cut and paste. Now, the mockup is separated, and you can move it around, hide it, or show it. It's ready for
adding the pattern. Let's go back to the gallery and open the pattern we created. Here, I pick the bigger version, tap one on the
layer, choose copy, then go back to the Map file. Swipe down with three
fingers and pase. Now resize your pattern until
it fully covers the hat. Next, go to the Layers panel, tap the pattern layer, and select the clipping mask. Then use the move tool to adjust the position
until it looks right. At this point, the pattern
is inside the hat, but it looks flat with
no fabric details. To fix this, go to the
Layers panel again, open the blend mood. And set the pattern to multiply. Now you can see the fabric
texture and stitches. And even later if
you have shadows and lightings in your mockup, you will see them, and the
mockup will look realistic. And that's it, we
just made a mou in a simple way using Procreate
without even using Fat Shop. Now, you can upload your
moups and pattern to online marketplaces
or send them to the print shop to print
on the products you love.
9. Ending: Said, I hope you found this course easy
and useful for you. I'll be waiting
for your designs, product to share
them with me. Bye.
 Binoo's Studio, Artist & Illustrator