Transcripts
1. Introduction: Do you want to start
the best hobby ever, something to create
very personal things, maybe a few beloved
worn-out clothes? Then patchwork is just
the right thing for you. Hello everyone. I am Brigitte. A quilter and fabric designer
from a little town in Germany with a lifetime
of sewing experience, you could say, because my granny taught me when I
was six years old. I have worked for
avert leading company in quilting fabrics, Moda, and I'm an educator and the author of two
books about modern quilts. Modern patchwork is an increasingly popular
form of sowing. The aim is to solve small
parts together into so-called blocks that can
turn into pillow covers, quilts, volleying as
bags, tape around, anything you can imagine. In this class, we're going to learn the perfect data project, how to sew a pillowcase
with an envelope closure. You'll learn the basic
skill of patchwork, including how to
work with patterns, including a cutting plane, pick and combined fabrics, cut, pin, and sew pieces together
for your patchwork, assemble the front, and finalize your pillow
with an envelope closure. This project is perfect
for anyone new to patchwork sewing or
foundation paper piecing, or for anyone who
wants to try out a fun new activity
on a summer day. If you already know
how to sew garments, but would like to
expand into home deck, this class will give you a good foundation in
creating quilts, pillows, and so much more so you can add that personal touch to
any room in your home. I love quilting because it opens endless possibilities for sowing awesome fabrics and
different techniques. I'm very excited to share my knowledge and
experience with you. Let's get quilting.
2. Your Class Project: The Skillshare class
is perfect for anyone who wants to learn
how to sew patchwork. I've been sewing for a
long time and I love it. The best part is
that you can learn all the techniques you
need for patchwork in a small scale and without investing a lot
of time or money. For example with a pillow and that's why I chose this
project for our class here. Anyone who knows how to
use a sewing machine and has already sewed
on a straight sim can get started right away. I show how to make a patchwork pillow with
an envelope closure. This method doesn't
require a sip and I like it because
it's easy at fast. The first step is to
choose the fabrics, then the pieces of
fabric are cut to the right size according
to the cutting plans. Next, I'll show you the
correct sim settings and we'll then start with
so-called simple piecing. Then it goes one step further and I'll show you
foundation paper piecing, a paper sewing technique that produces very accurate results. We sew all our patchwork blocks together to form the
front part of the pillow. Finally, we sew the back. There's an envelope closure, which means we don't need
a zipper or buttons. For this class, you will need a sewing machine,
cotton fabrics, sewing thread, ideally
a rotary cutter, an inch ruler, and
a cutting mat. I definitely recommend buying
the latter three tools if you want to sew
more patchwork, they make life so much easier. You will see it's so much
fun sewing patchwork that the clothes just
soak among ourselves. We are addicted to
it we are hooked and we need new
fabric all the time. To share your project, scroll down below the Class View and go to the Project
and Resources tab. Click on the "Class
Project" button. Name your project and upload as many images as
you would like by clicking the image icon here when it says add more content. Don't forget to
upload a cover image because sets what will
appear in the gallery view.
3. Class Materials and Downloads: [MUSIC] Hey. Now, let's get
started with the sewing. But first, we need our
sewing instructions. You will find those in
the resources area. Here is the download button. When you download
your instructions, you will get the cutting plan for all the background fabrics. You will have the
block layout diagrams, and also you will get the foundation paper
piecing templates. I made these sewing instructions for you on US letter size. But, please make sure when you print out your
sewing instructions, that your printing options
are either on 100 percent or actual size so we get all
that under perfect scale. Also, I have included a little proof for you
of one-inch square where you can put on your
inch ruler and see if everything
printed out correctly. [MUSIC] When you have your
sewing instructions, you want to start
choosing fabrics, and for that, we will see each other in the next video. [MUSIC]
4. Choosing and Combining Fabrics: Now, when you have downloaded
your song instruction, it's time to talk about fabric. Patchwork was originalism thing when you have used up
the worn-out closes, and stitched them together to something new
like a blank torso. Now, you might think, well, then I can bring every fabric
together, which is true. But then on the other hand, imagine a rough linen
and a fine taste in your pillow or
velvet and leather. I don't think that would
really look professional. Nowadays, we have a complete
industry around patchwork, and this industry brings us beautiful quilting
cotton to pick from. This is what we aim for. When we put so much
time into our project, then we want to go for the
highest quality fabrics. Quilting cotton have
a durable quality. You can use them often in your washing machine
by about 60 degrees. They're light resistant
and they're just durable, and they have all
the same thickness. These make for perfect look. Also, we want to consider which colors should
our fabrics have? If you already know by now that your pillow will lead
to lay on your blue couch, for example, then you can go and buy fabric matching
a blue color scheme. Or you can go for certain
topic in your fabric choices. Maybe you say, I want
all of my fabrics having a geometric print or large
flora prints, for example. you can also go
with only solids. Solids make for a pure
minimalist's look, and this is always a success. Or if you are already a soloist, you can go to your script box
and pick some cottons there. If you want to make a really
personal gift for someone, you could go and find their
worn out to be left garments, maybe something from cotton, and use that for the
fabric in your pillow. When we have decided which fabric we want to have, we can then go and
talk about cutting.
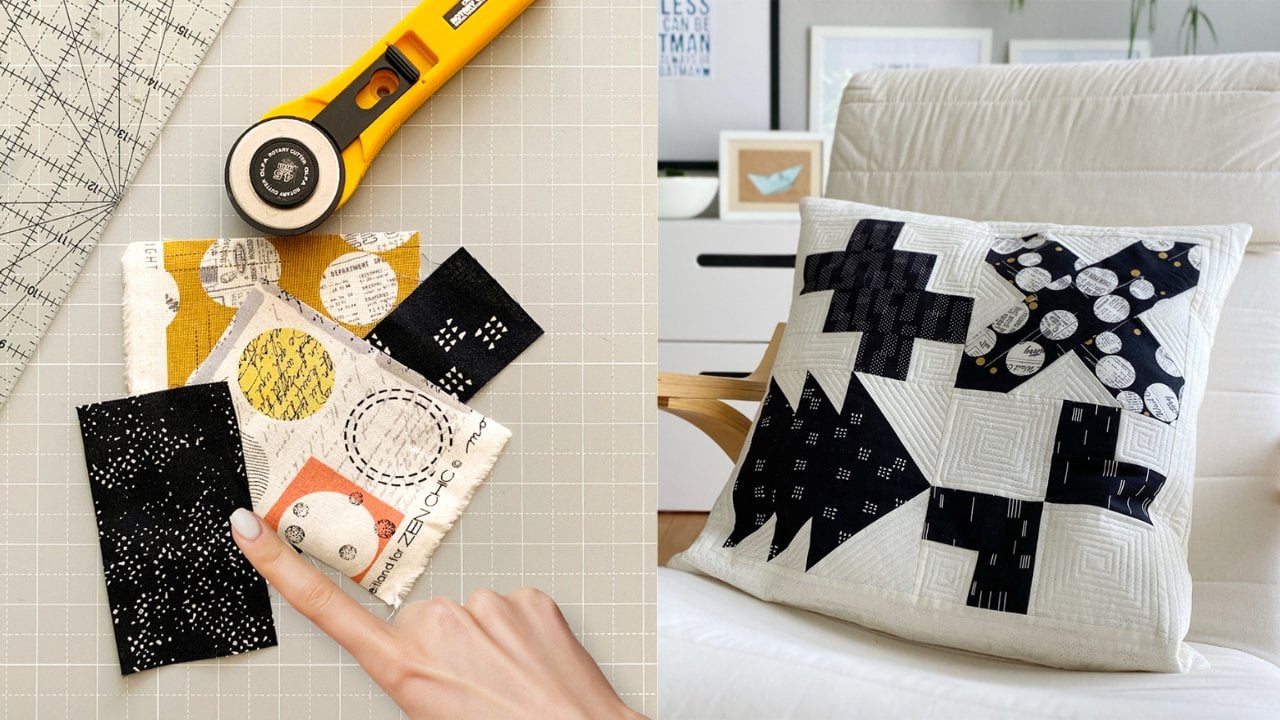
5. Cutting the Fabrics: [MUSIC] Now when you have
picked all your fabrics, you can finally start cutting. You've already downloaded
your cutting charts and now let's go to the sewing table and let me show you
how to do that. The cutting plans for
the background in the blocks are included
in the download. In the cutting plan, you see by colors which part
belongs to which block. For example, block 1 has a pink heading and all pink parts in the
cutting plan belong to it. Block 2 is blue and
takes all blue parts. Block 3 is orange, and block 4 is gray. When you cut the pieces
from your fabric, you always start with
the largest pieces for our pillow this are
pecking pieces A and B. [MUSIC] Then we cut the border strips, C and D. From the
remaining fabric, we can then cut all
the rectangles, squares and triangles
we need in the blocks. You can find the measurements
for these pieces, all in your sawing instructions, or in the block layout diagrams. For the two back pieces cut two rectangles with the
following measurements. For the two longer and the
two shorter border strips, you will need the
following measurements. For the background
fabrics in block three, follow the orange part and cut the following
measurements. By the way, once you start
cutting pieces for the blocks, it's a good idea to keep
all pieces for one block together and my little clothes pins come in handy for that. For the background
fabrics in block four, you will need the gray square that has these measurements. [MUSIC] Next, you'll
cut the pink pieces, those are for block
one and you'll look at your block layout
chart for that. You will see a graphic of the finished block and
a diagram with letters. The letters indicate what
size the shape should be and how many of these shapes you have
to cut per color. For block one, you see that
you'd need two pieces, A, which are the large
light squares measuring 4.5 by 4.5 inch. Then for B, you need two smaller light squares and
two smaller dark squares, each 2.5 by 2.5 inch, and so on. You cut your light fabrics and also your dark
fabrics accordingly. We ignore the dark fabrics for blocks three and four here, we will cut those
in video eight. [MUSIC] We're done cutting, and this is the largest part of our project already
so now we can start sewing but before we go to the sewing machine let me
show you one important trick, how the setup for the perfect patchwork seam and I show you that in
the next video. [MUSIC]
6. The Perfect Patchwork Seam: Now, when they have
cut off fabrics, we can finally start sewing. But other than with garment
sewing, in patchwork, you have to be very accurately and to be exact to
the millimeter. The standard seam here
is a quarter inch seam. I will show you on our
sewing table how to install your machine to achieve
perfect results every time? Well, I already mentioned
that we have to have a very accurate quarter
inch seam in patchwork, and you might already have a patchwork for your
machine like that when your needle is exactly a quarter inch from
your fabric edge apart. But if you don't
own such a foot, I will show you how you
can be to solve a helper. This is in your downloads, in the cutting edge is
stands for fabric edge. We want to trim this part
of our template off, which I already did, and it brings this
particle with the machine, so I show you how I set up mine. I have the paper under my foot, and I brought the needle in
a way that the needle is exactly a hair right next
to the stitching line. You might wonder,
why did you bring the needle exactly into
the stitching line? Just because the fabric
has its own thickness. Later when you hold
your seam open, then the thickness needs
a little bit of room, and we take it into account by putting our needle
next to the line. Now, we can take a little bit of a thicker material
like a cardboard, also place it on the
edge of our template. This tape, we glue it down, and the tape allows us also
to fold up this cardboard when you want to
change the bobbin. Now, we have our
template in place and you want to make
a test strip now. For our test strip, you want to have
dark middle strip, and too late side strip. The middle strip should be cut exactly one-and-a-half inch, and one inch is
the finished size. A quarter inch on the left and a quarter inch on the
right is for seams, and we start making
this little test strip. I already have
prepared mine here. This is how you test
the strip [inaudible]. You just leave both
fabrics onto each other. Oh, we have a help on board. Do you like cats? Mine loves to play with
my fabrics old days. Whenever she sees me sewing
with a new piece of fabric, she has to make her
own print on my piece and leave her hairs on. This is how you see along. Let's see how this
test strip turns out. Oh, hi, it's exactly
what I wanted. If you have a little
bit of a wider or tighter like
strip in the middle, you can still adjust your
card button and machine by bringing it a little bit more to the left or to the right, and then do a second test until you are happy
with the results and then you are set
up for our next video. Did you saw your test strip. Did you make any
adjustments needed? Your patchwork seam
is perfectly set up. Then we can start sewing Block
1 and 2 in the next video.
7. Sewing: Block 1 and 2: You have downloaded your
sewing instruction, you have cut your fabrics, you have setup your machine
for the perfect seam. Now let's start with
sewing Block 1 and 2 here at my sewing table. We start with Block 2, lay out all pieces according
to your layout diagram. Now we will join these
pieces to single rows by using the perfect quarter
inch seam allowance. Press seams while
the seam allowance goes in one direction, no matter which one. Once you have pieced
all the single rows, you will now join rows to
get your square block. Block 2 is done
and should measure eight-and-a-half by
eight-and-a-half inches. In the same manner, we will now saw Block 1, but this time we go
one step further. When you lay out all pieces according to the layout diagram, you will recognize that we
no longer have single rows. To get to our shapes from
the accentuating fabric, we have to solve
first two sub units. You will first join
the two little squares and then add the longer
rectangle to this unit to get the square
with this L shape. Now we have two sub
units and two squares. You lay them out according
to your block layout diagram and again, start with
sewing rows together. Now press the seam allowances of Row 1 and 2 in
opposite directions. This allows you to nest seams when you now join your rows. It will help you to achieve
perfect matching points. Block 1 and 2 are done. This was a piece of
cake, wasn't it? Now you're ready to learn
something more difficult. We're going to patch the foundation paper piecing
method in the next video.
8. Cutting for Foundation Paper Piecing: [MUSIC] With Block 1 and
2 we have learned the simple piecing technique, and it was really simple, wasn't it? Piece of cake. But now we are prepared
to go one step further. We saw Blocks 3 and 4. This is the so-called foundation
paper piecing technique, which is more in
intermediate level. Usually, we have three
teams or a 45-degree angle. But now imagine if you want to, so let's say a 67-degree angle. It's tricky to cut all these pieces exactly
and gets them together. There's a technique
which allows, no matter which angle
you want to be perfect, and this technique is called foundation paper
piecing technique. This technique has
its own rules, for example, here is a similar
one a little bit larger. In this video, we
cut all the pieces needed for Block 3 and 4. We need some paper, we need to allow for a slightly more generous seam
allowance for our pieces. When you bring the pieces
together in the next video, it will quickly
become clear why. For now, let's just stick
to the rule of adding a half-inch seam allowance on all sides when cutting foundation
paper piecing patches. We've already cut the
background fabrics for Blocks 3 and 4. Now the next step is to cut out unnecessary pieces from
the accentuating fabric. For Block 3, you need a large triangle and two rectangles with
these measurements. For Block 4, three rectangles with
these measurements. To stay well organized, you can now pin these
pieces together, is the corresponding background
patches of each block. [MUSIC] We have now prepared
all the pieces we need for our Blocks 3 and 4. In the next video, we then can start
putting these together.
9. Sewing FPP: Block 3 and 4: [MUSIC] All the pieces for
Blocks 3 and 4 are now prepared so that we can start
sewing on paper. When we sew on paper,
we want to adjust the settings of our sewing
machine a little bit. Why and how? I'll show you in my machine. Come on with me over there. [NOISE] For sewing on paper, we now change the stitch length on the sewing machine
to 1.0 or 1.5 so that the seam
will be perforated and the paper is easier
to rip off later. We'll start with our
template for Block 3. If you look at the template, you'll see a numbering of
the individual pieces. This is the order in
which we will sew the pieces together. I like to first slightly
scratch all the lines with the point of a pin so that it will be
very easy to fold over at that point later. You'll see why that
makes sense in a minute. We fold the paper
template on this line and turn the paper over so that we have the unprotected
side in front of us on our paper pattern that
would be this theme. Now place the fabric pieces for Sections 1 and 2
on top of each other, right sides together so that
the edges are matching. The fold indicates the
line that will be sown on. Now, all we have to do is place the edge of our
two fabrics on this line and move it about a
quarter inch beyond so that we get a seam allowance. We pinned the fabrics
to the paper, turn the paper so that the printed lines are big
on top and divisible. Now sew exactly along
the printed line. Our seam goes a few stitches beyond the printed line
at the beginning and end. [MUSIC] Next, we turn
the block over again so that we are on the side with
the fabrics, and we press. Now we go on with
piece number 3. First, we turn all over
again to the printed side and fold the paper back
at our next seam line. The piece of fabric underneath has plenty of seam
allowance after all, and we now trim that back
to exactly in quarter inch. Why would we do that? Well, for one thing, this exact edge gives
us a guideline, so it shows us exactly where
to place the next piece and it makes our block
look much neater and tidier right away. If we now turn the block
back to the fabric side, we can place our piece
number 3 exactly. First, we lay down as it
should look when sewn on, then flip it over to the
wrong side of the fabric so that both edges
are exactly matching, and pin it in place. Always pin perpendicular
to the seam so you can easily sew over it. Then we sew again from the side where you can see
the printed lines. The following steps always
follow the same principle. Fold the paper back on the
printed side at the seam line and trim the seam allowance
to a quarter inch. On the fabric side, place the next piece right
sides on top of the other so that edges are matching. [MUSIC] Stitch on the printed side. [NOISE] Then press the attached piece. [MUSIC] For the large triangles, it's a good idea to
mark the center line to be sure that the tip
of the fabric triangle will lead to fill the
corner of the block. Repeat the steps. You now sew together all
the pieces for the block one after the other. When you're done, you only
need to trim the edges. The dashed outer edges
are the cutting lines and if they are, in some way,
are missing on your print, you simply add a quarter inch to the actual block outer edge as a seam allowance. Your block should be 8.5 by 8.5. Now you can rip off the paper
and your block is done. Sew block number 4
in the same manner. Block 4 is made of two segments. The paper template is just cut
into two parts accordingly. The paperpiecing are then sewn as in the previous
block for both segments and now they are
to be put together so that the crossbar
has no offset. For this, I drew small
marks on the paperpiecing. Both segments are
pinned together right sides with wonder clips and I make sure
the marks line up. [NOISE] The block is finished, and the ruler shows me that the line of the
crossbars has no offset. Perfect. [MUSIC] All the four blocks
are now ready and we can assemble
our pillow top. How to do that? I will show you in
the next video.
10. Sewing the Front of the Pillow: [MUSIC] We have pieced
single elements, and we have cut
our border strips. In this video, I will
show you how to put that all together to
make our pillow front. Lay out all the blocks
and border strips and they will be sown
together later in the pillow. Your block should all
be the same size. Sew the two blocks off
the first row together, pressing the seam allowance
in one direction. Then sow second row
blocks together, now pressing the seam allowance in the opposite
direction of Row 1. [NOISE] Next you can join
the both rows to form the centerpiece while
seams are nesting. [MUSIC] Press your joining
seams all in one direction, either clockwise or
the other way around. That way, you can press the
center nice and flat later. Now that you've sown the
centerpiece together, you will add a border. Pin the two shorter border
strips to the centerpiece on the right and left
and sow them in place. [NOISE] In this same way, sow the two longer border strips to the top [NOISE] and bottom. [MUSIC] The most important part, your pillow front is done. I'll show you how to add a special effect with clothing
in the next video. [MUSIC]
11. Bonus: Quilting the Front: Quilting or simple stitch lines can even enhance
your pillow front. I'll show you what
I mean by that. This is a zigzag piece pillow, and I enhance it with
zigzag parallel lines. While in this modern one, I want to have a
humble quilting. I just have a free-motion grit. Here I wanted the
color shapes pop. I used an echo quilting. In this video, I will
show you for our project how we can enhance these shapes. I want to build a quilt sandwich and then use the
domestic machine to close it with
some simple lines. You might wonder, what is
a quilt sandwich at all? Well, it is a layer
of pecking or lining, it's in a layer of batting
and then pieced top. Obviously a kind of sandwich. You're aligning and batting have to be a bit larger on your top. At plus three inch all
around when cutting. Lay out all your three
layers while making sure they moved out in
free of any wrinkles. Before you can now
start stitching through the sandwich you have to
make sure it stays in place. You have to somehow fix it. You can do this either by
pinning it together with safety pins or to
use a spray glue. Safety pins don't leave a
sticky residue on your fabric, which is a plus. The downside is that cell get in your way
while you're sewing. I'm going to use a spray
glue for my pillow, which isn't that
large of a sandwich. When these three
layers are fixed, you can start quilting. The stitch length can be
set to three millimeter so that the stitches
are clearly visible. You send it through
all the three layers with your machine to
create your pattern. Straight lines work best
when quilting says pillow, such as a simple
cross-hatch pattern. You can draw the pattern
with the friction pen and then iron it out
again after quilting. Another motive could be eco quilting where the
dark fabrics of my pillow are highlighted by outlining some with
a parallel line. I can use the width
of my sewing foot as a guide for the spacing
of the stitching lines. If you want to make
your pillow stand out, try giving it some
dimension with squilting. Maybe this video inspired you to try your hand on
your own quilting and if not it doesn't matter you can use your pillow
front as it is. In each case, I will show
you in the next video how to do the backside
with the envelope closure.
12. Backing: Sewing an Envelope Closure: [MUSIC] Now we're nearly done. We just need the
backside of our pillow. We don't need any
zipper or button here. We just go with a simple any loop closure
and in this video, I show you how. The two pieces for the
back are already cut. Saw a hem to both pieces by folding the fabric
involved twice, half inch at a time and
then top stitch the edges. Lay out the pillow
fronts right-side up and then lay the
larger big piece, wrong side facing you on top. Though set the hem is
towards the center and the raw edges line
up with the front piece. Then place the smaller back
piece on top in the same way. The two back pieces will
overlap by a couple of inches. So with a quarter inch seam
allowance all the way around. If you like, you can search the seam so it doesn't
fray when you wash it. Turn the pillow around, press it and you're done. [MUSIC] Our pillows
are done and I will bring mine to my
couch where I have already a collection of
interesting patchwork pillows. What will you do with yours? I would love to see your
result on social media. In each case, don't miss to show it in our
project gallery. So you can be proud
of yourself. [MUSIC]
13. Conclusion: [MUSIC] Metric is the
best hobby in the world. It offers many possibilities and allows a lot of creativity. In addition, it is
relatively easy to learn and this class will
for sure get you started. Who doesn't love to have
some handmade pillows? A whole series of cartoons and simply redecorate your living
room from time to time. Once you've got the
hang of things, you want to try
something bigger, maybe your first quilt. The process is
basically the same. It'll be easier than you think. The four blocks of
our project are all for my new book, modern
building blocks. There you will find
36 more blocks with detailed sewing
instructions. Besides, you will get
six inspiring projects, such as baby quilts, table runners, or
quilts for your couch. You can sew along and
make your own version. I'm so glad you joined
me for this class. Don't miss to share
your finished pillow in the project gallery
and on social media. You can be proud of yourself. Show us what you have
made [MUSIC] [LAUGHTER]
 Brigitte Heitland, Surface Pattern and Quilt Designer