Transcripts
1. Intro: Hey everybody. My name is Heather sportsman. Welcome back to my
Skillshare class. This one is called pastels and portraits of beginner's guide
to drawing facial features. In this class, you're
going to learn how to draw the eyes, the nose, and the mouth. We're going to break
them down into its simplest forms,
lines and shapes. Then we're going
to use the pastels to our advantage to
create the depth, light and form to give it
the three-dimensional look. So you're going to
learn some shading and methods and techniques. And so by the end of this class, you'll walk away with
the confidence to draw those three facial features
that will later on help you to build up even more confidence
when we learn how to draw a complete portrait, human face, okay,
this is really what most people are afraid of tackling because
they are fearful of, you know, I'm not gonna get it right is now going to
look like the person. I've never drawn
a person before. It's all these things. It's not, the proportions are
going to be off is so many. I know this class is
perfect for beginners. Those of you that you're
not just quite ready to take on the entire
thing all at one time. We're only going to
draw three things. The eyes, the nose,
and the mouth. And I'm going to show
you how to do it using basic lines and shapes. That's it. Sometimes maybe
five steps or less. Sound like a good thing. Okay. And I'm gonna be
right here to help you build up the strength
and the skills that you need to be successful in drawing a portrait of initially, okay, but we're going to start small first baby steps, right? So if you're ready, I'm ready to help you
take on a challenge. So let's get right into this
project videos so you'll know what you need to
be successful, alright? And I'm so excited that
you're joining me. Let's go.
2. Project Video: Often think about
like when I was in high school and
college and how I did all those studies of the human face and the
body and all that stuff. I did a figure. Like, why did I do so many? But I know why. When you study something, you become more
keenly aware of it, you pay more attention to it. It's like magnify it. Yeah. Sorry, I put on glaze, but sometimes visuals
help you understand. Okay, You guys. Alright, well, we all
studied in school, some of us more than others. Some of those movies, but you get the idea. But in this case, this is why we're doing these small little
studies of the eyes, the nose, and the mouth. It's going to help
us to focus more on those particular features
before we take on the entire portrait
altogether, you follow me. Okay, great. So for our project, what we're going to need soft
pastels or pastel pencil. You're going to need
paper, kneaded eraser, wreck, and a blending stump. Now the beginning of the course, it gives you three simple reference guides
or cheat sheets, who doesn't love those
that you can refer to it anytime to help
you draw the eyes, the nose, and the mouth. Even if you get
stuck on one part, you can look at those. The middle of the class. I'm going to show you step-by-step
how to draw the eyes, the nose, and the mouth using
basic lines and shapes. And at the end of the lesson, I showed you how to use the
pastels to apply color and value to create form and give those features at
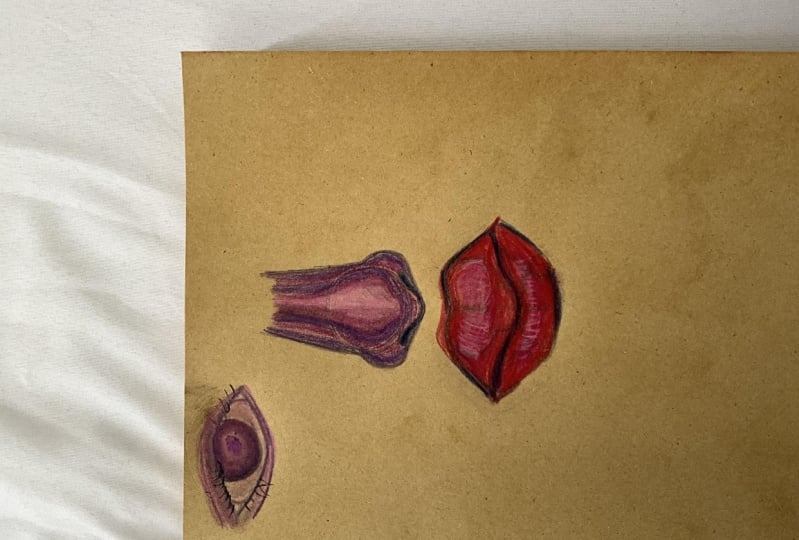
three-dimensional look. Yeah, alright, your project, what you're actually creating, you will submit three
complete pastel drawings of an eye or a set of eyes, a nose, and a mouth. See, here's my exemplar. 123. Pretty cool. Or a variety of so
I'm focused on light, realistic colors like you
want some blue eyes, cool. Green loops. Work it out. Alright. Now that you've seen
this, Are you ready? Because we're going to
jump right into it. Nicks the eyes. Make sure you get your
supplies at it now try to run, but it sounded okay. Let's go. Yeah, we're gonna go
and draw the eyes next, get supplies into
the next video. Here we go. I'm ramen again. Let's go get.
3. Drawing the Eyes: Good. Welcome to the first lesson
in pastels and portraits. Let's go ahead and grab our
materials, whichever pastel, pencils or pastels or read kneaded eraser and
our blending stump. Going to jump right
in and step one. Step one, we need
to draw up like a football shape almost for
the top part of our eyes. Okay. There's a sixth tutorial right there in each corner. We're just gonna kinda
make two little dots. These are guidelines
for us and we're gonna make a horizontal
line connecting them. Alright, you guys see that at the bottom we're
going to go ahead and try to match that
top football shape, have football shape
that we created. All right, that's
going to make up the lower lead of our eye, right at step one. We're one and done. So far. Yeah. Now step two, we're going to focus on making the corners of her eyes are kinda like where
our tear tear ducts are. Okay. Those are
going to help make really good markers for
us as well to know where to start and they kinda look
like little parentheses. I see I'm curving,
line, curving line. There we go. And I'm gonna go a
bow of the eyelid because this what I'm doing now this
represents the eye ball. The ball of the eye
sits in our socket. There's a circle, okay? So this is, this helps us to recognize the
anatomy of the eye. And even if you were to stop the video, you would see that. Now we don't need
these lines anymore. These are just guidelines, but it really helps us
to appreciate the shape of the eye in its
totality, Okay? To really help us understand
like what are we drawing? So look at is starting
to take shape, is starting to take some
form here, right now, step three, we're done
going on step four, we're going to focus
on the iris now. Now that is the colored part of the eye now,
yeah, I didn't know. Yeah, I was gonna be
getting a little science. Listen here just a little bit. Okay, Now I teach
art, not science. Well, I taught art not science, but this is important too. So I'm just going to go in, I'm dive in writing and making this circle inside of the act. Notice I'm going right above the LEA lightly
with a little line. Okay. Now below the lead, but above the lead
lightly, Yossi, just lightly with my circle. Okay. Now I'm erasing it. Okay. I don't need that.
Wait a minute. I do need that weight. Yes, I do. It's good that I caught this on camera and I'm not
going to take this out. You know why? Because teachers make
mistakes and it's good that you all see this. Their guidelines still needs to be there and you know why? So as I put it
back, you know why? Because it's going to
help us Draw step five, which is the, I lead the upper leaves and we're going to start
back in that little corner. And then when we
do that little dot earlier than to start from
there and we're gonna just draw a line slightly above that iris circle that
we drew earlier. There we go. We're
going to bring it back. Here. You guys see that? Now I'm going to
erase the guideline. Now I'm going to erase it. I don't need it anymore. Alright. There we go. No. That's it. That's it. Yeah. Guess what? You are done. You literally just drew
the basic shape of an eye. Now I know there's no
frills and there's no lashes and value
and all those things, add it and what I'm
doing now and you can follow along with me and do
this as well on your papers. I'm just kind of going in and giving a slight little shape up. As you can see, I'm
going in and rounding out some of the
features of the eye. I'm going in and rounding
out the eyeball, the iris as you can see, the lead Laura lead the corners of the
I'm even going in and kinda adding like
the little crease that all of us normally have
at the bottom of the Abbot. Don't worry about the value that's common in later lessons. Alright, but up next, we're drawing the nose. So step six, we're done. Good job. Yeah, get
ready for the nose. Here we go.
4. Drawing the Nose: All right, now we should
be all warmed up from our drawing the eyes lesson. That was lesson number one. Now we're getting into drawing the nose so we have our
supplies out and we are ready. Okay. So I'm just going to grab
my still pencils here. I think I'm gonna go with I'm gonna go with
green this time. Yep, gonna go green. So when thinking about
drawing the nose, okay, we're going to think about
just the basic shapes. So the nose, you're
going to start out with step number one and
we're going to just draw a circle, small circle Desi. Now you're a person who has trouble with drawing the nose. Okay. You can always draw a vertical line straight
down the middle and then two semi-circles on
each side of the line. You can do that
or tell you what. I'll show you
something else, okay? Because some people really have trouble flip my paper
over on the back. You're going to
draw a dashed line. Okay? Steel vertical line but
a dashed line, alright. And then lightly, because
this is a guideline, lightly. Draw over that. Go ahead and draw
your semicircle, dashed line again on each side. And then you can lightly
come over there, guideline. And voila, you have
your full circle. Now that's for
people that are just like I can't draw a circle, I can draw a vertical line. Okay? But if you're confident
enough, Go right ahead. Now I erase my guideline. Next step, on each
side of that circle, that first larger
circle we drew, I'm going to draw
two smaller circles that are going to overlap, that they need to be
about the same height. As you can see. And I drew two light little guidelines
to measure that for myself. And if you really wanted to take it a step further and see
how to do that cross line, you could do that as well. That can help you.
Then erase that. Keep referring to your
tutorial, your reference guide. I'm just gonna kinda
clean up some lines here. Okay? So now we're going to
focus on the bridge of the nose and that's the
part that runs up the middle, that longer part of our nose. Just two vertical lines
slightly at an angle. Now we're gonna go
from in-between those two smaller circles
to draw our septum. You see those people that get those rings right
there in the middle. Or even if you notice
a bool that has a ring in their
nose right there, that's called the septum. The septum, that's what
we're drawing right there. So that's step three. Complete it. Done. Yeah. You just kinda, kinda
shape that a little bit and going into step four, what kind of nicht? Diagonal line from the smaller
circles to the septum. And that is actually
going to help us to create our nostrils. Nostrils. What's funny about those? Yeah, they actually, I always tell my students that they
look like little teardrops, if that helps at all. When you're thinking
about drawing them, see that it's like a little
teardrop on each side. Like a little teardrop
or a rain drop? Like that. Yeah. Now I'm going to round out that symptom just
a little bit more. Yeah. But that is it. You're done. Of course, I'm shaping it up and whatnot, but the value is going to
come later in the Calais. We're done already. Can you believe it? Oh my God. It went by that quick.
Are you excited? Are you happy? You should be five
steps or less. Did not tell you that. Let's go on to the mouth. You're done.
5. Drawing the Mouth: Okay, So now we're
gonna get into drawing the mouth and the first
steps to drawing the mouth. And I think I'm gonna
go ahead and use my pink and red colors for this. We're going to start off
with drawing three circles. And this is going to
represent the top lip. So I'm going to draw one circle, little bit lower, and then
two that are overlapping. Same height, a
little bit higher. Okay? Cat looks
like Mickey Mouse. Just a little bit.
This is step one. And then I'm going to
follow those curves. Follow those curves. Watch what happens. This is going to represent
the shape of the loop. Okay? So I'm gonna take
my pastel pencil, make that little dip the top, like the cleft of your
loop and go around. I'm going to bring this
line down to the live. And it's gonna kinda stop almost at the bottom
of the lower circle. All right. And I'll make a little
dot on both sides. Okay? And, uh, kinda
helped me to stay in line. Okay, so that's step two. Now, I don't always do this, but I think this center line does help to keep some
symmetry with things. So I'm going to start from the very center of
that middle circle. And I'm going to bring a
line straight down and then I'll put a little dot
right there at the bottom. Okay? So you can almost
make by folate or T, bring it down, put a
dot at the bottom. This is going to serve as a
basis for the bottom lip. Nested three, that's done. Alright. Now step four, we're going to draw on some
people like to say, in a loop sees or an oval. You can use interchangeably. I'll just say an oval. Okay. This is going to
represent part of the bottom lip that
step four done. Now let's go on to step five. See that little point in
the corner we started with. We're going to draw another old starting there
and it's going to overlap with that
center 0 that we drew. And they were gonna
go to the other side. And we're going to
draw another one and it's going to overlap as well. All right, done. Step six, last one. Let's follow the curves. Let's start from the left side. We're going to
follow the curves of those ovals that we drew
and this is going to represent the crease
of our mouth. And then once you've done that, you can begin to shape
the mouth a little more. This is where you
can begin to add a little bit more character. In step five. Okay, get a little
more comfortable. And if you're working from
my tutorial reference, but from your own, this is where you
can really look at the person's lips
and begin to make it resemble more of who they are. But right now,
we're just getting basically how to draw
it down and that's it. You're done. You ready to move on? Step six is done with snakes. Adding value.
6. Adding Value to the Eyes: Alright, so now we're going
to add a value to the eyes. I don't want to
use my blue colors here and I'm first start
off with the pupil. The pupil should be a circle. You have problems
drawing a circle. I just say, move your pastels
in a circular motion. The pupil is gonna be the
darkest part of your eye. You can even cheat a
little bit if you want. Use your blending stump. Put a little color
down and move in a circular direction with that. Okay, That always helps. And then now I'm taking
my softer pastel, larger piece and I'm filling in the iris or the colored part of my eye with the
blending stump, getting a nice layer
of base color down. Okay, spreading that
out really well. And again, I'm not
a history teacher, science teacher, and none of it, but trying to help out
a little bit loose. I'm about the anatomy. So the sclera, the white
eyes is not really white. It's made up of a bunch
of blood vessels. So whenever you are adding
value to the sclera, the whites of your eyes, please make sure that you are not just leaving them white. If you leave them
white, it looks more cartoonish and that's
what we want to avoid. If you're going for
a realistic look, if you want the
cartoonish anime, manga style, leave it white. If you want it realistic, you're going to add value. Okay? So now all I'm doing
is going in and adding a little bit more
contrast and value to the iris and the pupil
around the edges. Take him my blending stump, born around the upper lead. And making that look a
little bit more rounded, like it has an actual fold. Blending stumps are great, but I still love my fingers when it comes to
blending things. Pay, I am a sucker for that. I must say so muscle. So you choose either or is fine. But try to keep your hands off your papers so you can
have less smudges. That's also important as well. All right. You can always use a white pesto to try
and create highlights. I will tell you it's a
little bit more difficult. So you can use your kneaded eraser to
lift some of the color. And if you are working from
my reference tutorial, that's great to look at the highlights in the eyes
and the shadows in the eyes. But if you're working from a realistic photo or if you
work in from real life, that's great as well. Okay. I want you to just continue
to build layers in contrast by using dark and mid tones
as you see me doing here. All right, just keep
building, keep working. That's going to add character to your drawing and continue adding that value in the
direction of your shapes. Okay, that helps to keep
your drawing in unison. So I'm just going
to continue adding my value to my lower leaves. As you can see here. Going around those bottom, going back over to the top, just making little small
adjustments as I go Wait, where you see fit, right? Constantly going back. Now, this pore gets
tricky, the reflections, this gets tricky because it's always going to be
different and it only depends on how much light is bouncing off of the
iris of the eye. Everybody is going to look different depending on
the light in the room is, depends on the
location the person is it and how their face is
turned or what have you. Especially if
you're working from a photograph or real life. So if you're working from my reference is going
to look different. If you're working from
a photograph right now, is going to look different. Don't beat yourself up about it. If you're working from your
imagination, that's fine too. I'm not beating you up about it. Okay. Have fun with this. This is just to get you started. Okay. We're almost done. We're almost done the next day I'm going to talk about as he's, Alice is Lord have mercy. My students. Girls, these lashes
at the top go from under the upper
lash and then out. The lashes at the bottom go from inside the
lower lid and out. And they are much
lighter and thinner. Okay. I know we like
these 50 pound lashes, but there's not
always realistic. And you're done. There we go. Okay. So up next we're going to add value to the nose.
Good job. Yeah.
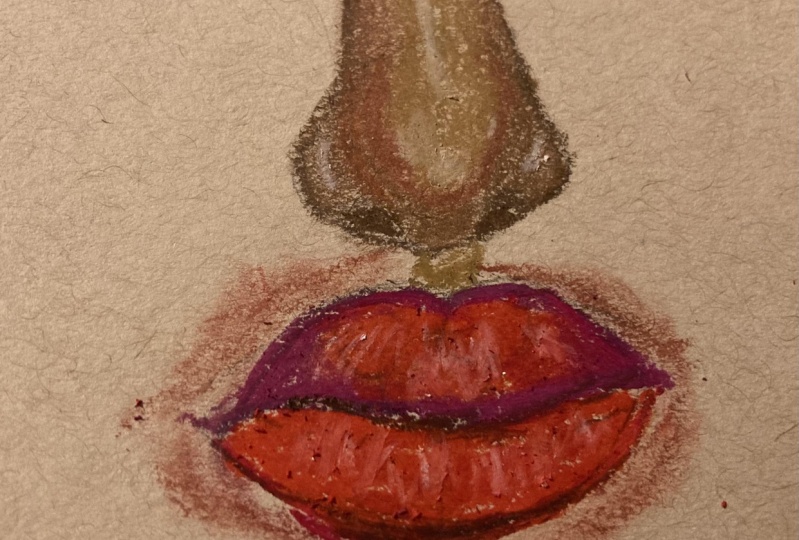
7. Adding Value to the Nose: However, yeah, We are back now with adding
value to the nose. And you know what, I'm
going to choose green. Okay? Yeah, I'll choose green. As you can see, I have my guidelines here. I'm going to start with my
largest circle and I'm going to follow the shape of it. And just going to
begin adding value, bridges and nose, following the guidelines,
as you can see, I'm starting off with a
darker green, darker green, and I'm going around those
guidelines down to the bottom, coming around right
sag one back up. And if you notice, I'm ending up with another set of lines that are kinda conversion
of the breach. Oh, the nose. Yeah. And that's exactly
what I'm looking for. I use my blending stump. Yes. The blending stump, the
rounded areas of the nose, the circular areas are
gonna be your lightest. So make sure that you get a
lighter tone pastel for this. Okay, again, blending sounds work-based for quick coverage, but on my hand rule, to use the hands. So this methane. So I'm gonna go back filling in my sights to lose sad nostrils. Plus gamma should be
key the paper clean. Okay. I'm using a little
mid tone green here. And I am looking at the reference guide as
well as I'm working. And you see how I kind of went
outside on the left side? Yeah. It's okay. If you read it, you
feel like you missed. That's what the
kneaded eraser is for. Use it. Erase if you
have to clean it up. It's not a big deal. Okay. Use your kneaded eraser. So I'm going to continue
to my value and blend. And I just love how
soft these pests are. Fun fact though real quick. Did you know that the inside of your
nostrils really armed but it's just a play
on light or shadows. Should I say it's something
I learned in college. And I feel like this
is why artists are so important because
we're record keepers. You know, when you see all these old paintings and
pictures and we look at people's faces and
their nostrils and things are black or darker. It's, it's because of how the
light is shone or captured, or maybe if their
heads are tilted a certain way and the light is shown as out of their face. It almost looks like
maybe the inside of their noses are
illuminated in a way. And is true. It is very true. Is out of your
nostrils and Blake, a visual flashlight up, Don't you realize it, you know. But any who just wanted to
throw it out, it's a yeah, so just continue building with your mid tones
and your values and adding the value in the
direction of your guidelines, once again, helps you
to continue to build things and keep your
whole drawing insane. You see how I took
that white pesto? I made those highlights. And I'll probably do you
pick the wrong color? Nose? I will pick green nodes. For somebody to be
thinking about a boo-boo. Something like My bad job. But hey, angry and he is my husband's
favorite code anyway. So shout out to Mr. sportsman. I know he loves green. So I'm going around
and I'm kinda just adding some final touches
around the edges. Shadows. Ya, realize
how quick this is. We are really done. Your move it on. Adding value to the
mouth is with snakes.
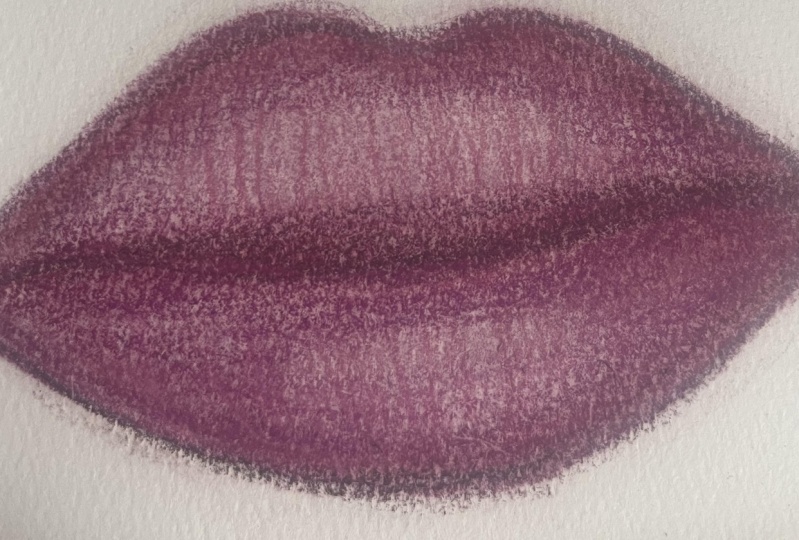
8. Adding Value to the Mouth: Right, So now we're
gonna get into how we're adding value to the mouth. So make sure you
have your supplies. You definitely going to need your blending stump for this. And if you notice, I
went ahead and picked up the larger soft pastels just so I can
maneuver a little bit faster across larger
areas this time. Now, something I want you
guys to keep in mind. If you are standing in front of the mirror
and you look at it, you're still face on, your mouth is closed, the darkest area
of your mouth is decrease and the
outline of your mouth, and you can look back
at your reference guide for that is, well, okay, this is where I will start
adding the darkest values. And as you can see,
I got a darker red because that's what
I'm going with for my my lip color here. I'm not worried about skin color theory and all that stuff because
like I said before, if you want purple leaves, green loops, orange loops, whatever, do your thing. I don't care. But
notice I'm taking my blending stump and I'm going over these areas and spreading
that color out quickly. Again, if you miss my last
class and you have some of that past CEO does kinda going every which
way on your paper. You can give your
paper a quick tap. Take your rag and wipe
your surface off, or just blow the dust
away real quick. And you're good to go. Continue blending. Continue blending with
your soft pastels. Use that blending stump to
spray their color out quickly. Right now, we're
not too concerned about gotta get everything
in the right spot. We're just concerned
about getting that color spread out all over. Okay, We're going
to come in and do some refining a little later. Alright? But if you notice, I still am kind of following along those guidelines
that we set for ourselves earlier with
those ovals are ellipses, as some of you like to say. And those circles at the top, I'm still kinda following
those guidelines with the shape of the
mouth or the lips. Notice that when
you look as well, all of our mouths have like these little
wrinkles in them, like creases, I guess
blue column wrinkles. Wrinkles like I loops are old or something that crazy. Old loops. I'm joking, but we have them. And what you could do is you
could take a lighter pastel and just go in a
vertical direction, place those wrinkles in there. You can blend them out with your blending stump
just as I'm doing here. Okay. And something that I like to do. Okay. Because I just want to
soften that up a little bit. I'll come back in with another darker pastel. Then refine. Once again. See that constant refinement, constant refinement
because we also want to create contrasts. We want some things to
stand out, pop out, right? We want to give that
three-dimensional look. Yes. So just keeping in mind, I'm making some very
voluptuous loops here. You know, very voluptuous loops. You'll lose. Don't
have to be like mine. Nice and juicy. But this is what I chose to do. So with it, again, still refining the corners under the lip also
is very important. You can give a
little shadow around the edge across the top. And that is pretty much it. You can still come in and
refine in those certain areas. Once again, go back
if you want to put in a little bit
more of the wrinkles. Okay? But this is very,
very, very basic. Now, in later classes, I will go even more in depth in detail with how to draw
more realistically. But this is just a crash
beginners course to get you started and build your
confidence with what you can do, okay, with which you can do. And I'm proud of
you for doing it. All right. Good job. Yeah.
9. Conclusion: So you should be giving yourself a round
of applause. Okay? You have tackled three things. Alright? They may seem small
to some people, but for us, they're huge. Okay. We've got to take it. Alright. You have drawn the eyes, the nose, the mouth. You have studied. Okay, yoga hand-off
in this class. I'm so very proud of you. Not only have you done that, but you use pastels, alright? Some of you may not even have ever picked up a pastel before. You've learned some
shading techniques in this class and
how to create form. Adding that in to really give these features are
three-dimensional loop and you're drawing a portrait
yet, mind-blowing. I'm so proud of you. At the beginning. You got to crawl
before you can walk. I think you just start walking. Well, maybe we're getting there. We're getting it regardless. I'm so very proud of you. Okay. Make sure that you upload those projects,
those studies, how hard you work to the
project gallery makes sure that if you have really
enjoyed my class, please leave a review, let
other people know, Hey, come on over c, we have
the sportsman is talking about she knows her stuff. I enjoyed our class. I want you to take something
away from it as well. Even if it's just a good time, a laugh, a new hobby, something, a lesson learned. I enjoyed having you with me. I hope to see you the next time when we dive a little bit deeper
into portraits, okay, because we don't
keep leveling up guys. Alright, thanks for joining
me until next time. Take care.
 Heather Sportsman, Full Time Artist & Arts Educator