Transcripts
1. Class Intro: Creating abstract art is both
innovative and enjoyable. In today's class, we'll create abstract art without
using a paintbrush. Instead, we're going to pull our painting and create a
very interesting result. Now the results are
never the same twice, and they're completely unique. In order to create this art, we'll make our own tool
using a piece of card, but you can use cardboard
or even a plastic plate, or even a paper
plate if you want. And I'll show you the
things you're going to look for when creating your own tool from materials
that you have on hand. From there, we'll select our
colors of acrylic paint, choosing colors just
the ones that we like or that we like in
combination with each other. And these colors
will be beautiful. We'll pull our work repeatedly until we get those
beautiful gradient blends. And then it's up to you. If you want to take it further, you can leave your
work just as it is, or you can make some interesting
motion with your work. And I'll show you
different techniques to do that in the video. This class is for all levels of artists, you'll need canvas, acrylic paints, and then some
card to make your own tool. But there'll be other little
things that you can use, like rags or paper towels. And these are very beneficial. So let's get started.
2. Class Supplies: So here are the tools
that we'll need for our pulled acrylic painting. Now these are
abstract paintings, so there's a lot of
leeway and a lot of flexibility with them. To that end, I have Canvas here. Now I have various
pieces of canvas. I have a small little canvas that's only maybe
two by three inches. Then I have a little four by
65 by seven and a larger, I think this is an eight by ten. It's just a piece of canvas and you can see there
are differences. This is a stretched canvas and
this is on a canvas board. So you can use
whatever you have. You can even use a
thick paper like a heavy watercolor
paper as well. To create this technique, you can even use the background
of an art journal page. So you'll just have
to play around with the amount
of paint you use, using more for the Canvas
then for the paper, will need something
to spread our paint. You could use a squeegee. You can use an old
gift card as well. What you want to make
sure is that your, your tool covers the
width of your Canvas. So this gift card would be
perfect for this size canvas. You may be able to get away
with it for this size. But anything larger. I'd like to make my own tool. And as I said, you
can use a squeegee. This is just an old
board from a planner. It's the cover and it is almost like a plastic
covered cardboard. Cardboard would
work just as well. I just liked the feel of this. It's a temporary tool, but it is very helpful. And what I do is I like to cut my tool to the
width that I need. So I always pull in a
format where it's long. If I was to pull on
my canvas this way, I would make sure my tool
would cover that way as well. So for this purpose
of this class, I'm going to cut my
tool longest possible. And it only has to be
maybe six inches long. You don't need it to
cover your entire canvas. Just four to six inches so you can get a nice pool with that. So to create that, I just take my scissors and I'll just
cut down the length. Now if I was using cardboard, I would do the same thing. So this will be my tool for
creating my polls today. I also use acrylic
paints and I liked them from the tube as opposed
to craft acrylics. They are highly
pigmented and they have less water than
the craft pigments. You can use the craft
paints as well. You'll have to modify
the techniques slightly. And that's why I like to
use the tube acrylic, but you use what you
have in which you like. This is very experimental. I also have a bunch
of rags that I'll use to clean off my tool. I'll cover my surface with a silicone mat and then
we can get started. The next chapter, I want to
show you some variations on the Canvas and how
to prep it for use.
3. The Canvas Options: Now, to make these
acrylic poles, this is a good time to use any old canvases that
you have that you might not be thrilled with the results because we're
going to paint over them. That's an option you have if
you have the old canvases. I also have some canvases that I've covered in a solid color of paint and I've let it dry
and cure for a few days. So it's not tacky any longer and the paint
is completely dry. And here I have some green and I have some in black
as well because I just like that contrast between the paint we put down,
the black background. So that's an option you have. You can use most
canvases that are pulled and stretched because they've been primed somewhat. But if you want to
prime it additionally, which I like to do, I just feel like the pigment, the actual acrylic
paint that I use pulls nicer when the
canvas is prepped. Again, it's an optional step if you want to take it this far. And for art journals, I would advise
doing it because I think it strengthens the paper. I just take a little bit
of gesso right here, and I just put it
down on my canvas. Now that is way too much gesso, but that's what spilled out. So I'll just use this on a number of canvases
that I have. And then I just take the gesso and spread it across my canvas. Now I can use the
little old card here to spread it across this
little one very easily. But to spread it across this, I would do the same thing. I need to find another canvas
to use this leftover gesso. But you just spread it on and it spreads kinda
like toothpaste, a little bit easier
than toothpaste. From here. I want it
to be nice and smooth. I don't want any bubbles or mounds of gesso.
I'll let this dry. And then we can
start our paintings.
4. Pulling the Straight Pull: So for our first technique, I'm going to use a canvas
that was painted black. Again, it's just an option. You can use a use Canvas, a new canvas, or
just sewed Canvas. I like to use a lot of
white and black in my work, and that's completely
subjective. And I like to start
with the white. So to start with
the white, I put just a dab of white
down my painting. And I usually go about
a third of the way or so down the canvas. The purpose of this
pole is to smear the colors together and let them do something interesting. So I'm going to take
some of this magenta. Again, I'll add it over here. And he just play around. I like to do
something symmetrical or at least something balanced. But that's up to you. I think I'll come back
in here at a little more white on either
side of the pink. And you get a feel for
how much paint you need. Every time you pull, every time you do a
poll with your work. And I think I'm gonna go
in with some yellow now. Let me just like to pull
it right over here. Now as you can see, I like to buffer my colors with white. I think that makes
for a nice smear of color and a nice blend. It gives me a nice
gradient and variation. I think I have
enough paint here. If I don't, I can always add it. But I like to start by taking my tool and I put it right on top of my piece and then I just tilt it
at a slight angle. I don't want it to
be perpendicular. I want that slight angle. And then I just pull gently
down the length of my piece, flexing my tool somewhat. And they go over it
again and again, maybe three or four times. And I can see the result. Now this is very abstract
looking very interesting. In some cases, I might
stop there because I'm really excited by this area. This is very intriguing to me. But I think I want
to change it up a little and add a
little more paint. Especially since now I'm
getting a feel for it. I'll take a little more yellow
and add it up top here. Going to add just a
little more pink. And I'll add it maybe
halfway through. So that will make it at the
length of the painting. Then I'll add a
little more white. If you have a painting
knife or a gift card, you can scrape up any of
the paint that's coming off and just put it
down on your painting. As you go. If you want to continue
with the painting, if you're not pleased
with the way it looks. Now I'm gonna take
my tool again, but the line it up
right at the top, tilted and gently pull down
the length of this painting. Again, I'm flexing that tool. I'm getting very
interesting result. You don't want to
scrape too hard. You want to leave
paint on your Canvas, but you also want to
create that blend. So I'll just do this a couple
more times because I'm quite pleased with the
way this is coming along. I have an interesting base here, right at the end of this Canvas. Kind of like that
little spot here. That's the black is
peeking through. But if you don't like that, take a little bit of white. Add it to your Canvas. Fill it in, lineup
your card again, and just pull down. And you get a very
interesting result. And you can do this
as often as you want, as many times as you want. I can pull some of
that paint back onto the Canvas and pull down. And I really liked the
blend that's forming. Come over here,
my palette knife. Fill it in, line it
up one more time. And just pull Maybe one more time and you get a feel
for what you're creating. There's a lot of movement here. Little bit of paint
left on my card, which I can wipe off
on a piece of paper or some card stock or
with my paper towel. Just going to clean
up the edges. Then I'll set this piece
aside and let it dry. So that's just a straight pull.
5. Pulling a Gentle Wave: For our next poll, we're going to
create a soft wave. So I'll start with my
white paint again. Put it on the edge
and bring it down. This is a much smaller canvas, so I have to modify my amount of paint
that I use as well. Again, I need it to spread
the length of the canvas. Then I'm going to take a little
of this turquoise green. Lastly, I'll take some black. Now we already have the
black of the canvas. But I want this black to be
introduced to our painting. Now I'm going to take my tool. I only need half of it again. Start and I'm just
going to start at the top and pull the length. And I'll do this a
couple of times, just so that I feel
like I have a lot of paint on my canvas. Once I'm happy with that
blend and I really liked the way that looks and that
is quite beautiful in itself. I'm going to start the wave. So I go up to the
top of my canvas. I match up my card
with my Canvas. And now I'm just going to
certainly make a swirl. You can do this as many
times as you want. Again, matching up your
canvas and your card. And you're not scraping
the paint too hard, you're just scraping
it across to bring it across your work. I'll do it one more time. Trying to get this
little spot here. Again, make that gentle wave. And I've completed the
gentle wave on this canvas. The colors are beautiful, the blends are beautiful, and this really works for me. Clean up my paint, will come back and try
a different technique.
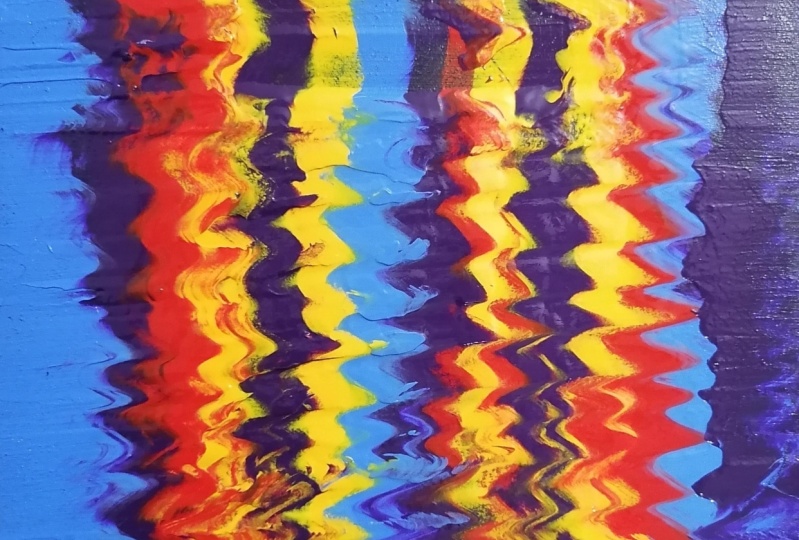
6. Pulling a Zig Zag: Now for our next painting, we're going to pull a zigzag. So I'm gonna go in
there with some pink. And I'm going to create those
lines down the painting. I'm going to take a
little red as well. Then I'm going to go in
with white at the end. And again, vary the
colors as you like. I like the addition of white
because I like that blend that it creates that
gradient of the colors. I'm gonna take my card here, I'm going to turn it to
the side instead of long. I'll just have it on the side. And I'll gently
pull my piece down. They get a beautiful blend. Just do this a couple of times. Now, the fun begins and I'm
going to create that zigzag, making tight little zigzag
strokes going back-and-forth. And I've got that
with the first poll. I use a lot more paint
than I usually use, so there's a lot more leftover. So now I just want to take
a straight edge here and just go across the sides
just to clean it up. Then we'll carefully
set this aside to dry. I'll clean up my
card and my mat. And I'll show one
variation where we zigzag wave and straight marks
all in one piece.
7. Pulling a Combination : So for my last painting, because we're
making a variation, I'm going to use
two shades of blue. This is a Cyrillic in blue. I'm going to create
my little lines. Maybe I'll add a little
bit more over here. Now that I know I need
enough paint to make it to the end of our canvas. Going to take some of
this primary blue. Maybe one more if
I can manage it. Take my white. And again, you get used
to how much paint you need as you go, as you get more experience
with this technique. And a little more pigment here. Now I'm going to take
my card the long way and create my poll. I'll start at the top
and just drag it down. And I'll do this a
couple of times. Getting a beautiful blend here. I don't have enough paint, so I know I'll go back in, add a little more paint. Right up top here. Maybe a little
down here as well. Then I want to go in
with those blues again. So I'll take my
card lined it up. Trying to get that blend that
covers the entire canvas. Creates that nice blend. When I'm happy with that blend, I'm going to vary
some, do some wide, some small, and
just play with it. So I have a very
interesting result. And I'm very pleased with
the way that's come out. I'll just clean up the
edges and let my piece dry. The next chapter we'll
look at a bunch of variations are finished
working class today, as well as other paintings
using these same techniques. But I'll show you the different effects
you get depending on the canvas you use and
the colors you select.
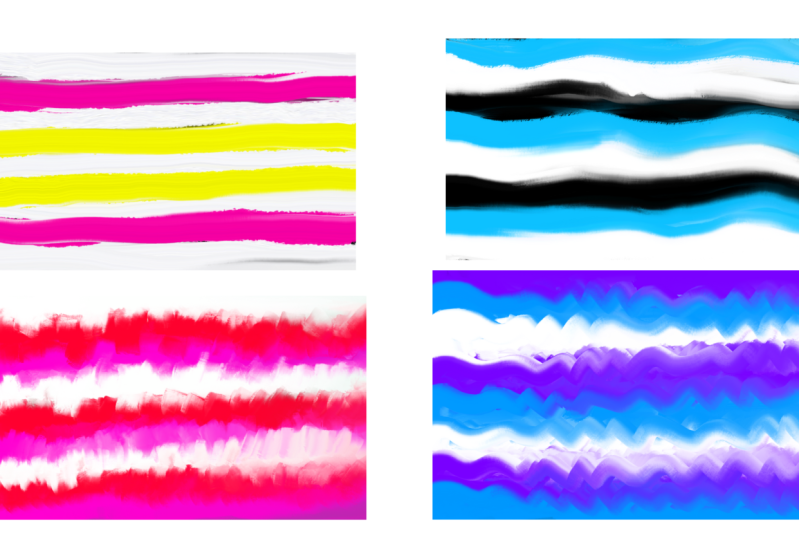
8. Class Wrap Up & Variations: So here's the painting
that we completed in class are first
painting where we just did the straight
poles and you have the beautiful variation of colors now that the
paint has dried. So over here we have something
somewhat of an orange. Then we have the yellows and
the different tones of that, as well as the pinks. And it's very effective. Now here's a variation
than I did off-camera, where I created a painting
by dividing it in half. And I went over 1.5. And then I went
over the next half and created the center line. So you can very interesting abstract linear result from
just the straight poles. And it's very intriguing. Now for the second painting, we again did our
straight poles here with the black and the
teal and the white. And then we added a slow groove, kind of like a winding river, very gentle and smoothing shapes that are really quite
pleasant to see. Here, did the same thing with
pinks and reds and whites. And because I really
blended them quite a bit, I have a really subtle result, really subtle gradient change. If you look, you can see little highlights of
that white slow blend. And so that's very effective. Then from there, we moved on to really tight little blends. So here we have a four by
six that we did in class of the tight blends with reds
and pinks and whites. And here we have an
eight inch square panel where we use pinks and
purples and whites. And I made that tight blend. And it's very
interesting the results, there's so much
movement going on here. Now I wanted to show
you some variations on the same theme and how different colors and
shape canvases affected. So here are two very
interesting tight blends. This one is considerably
tighter than this one here, the green and the yellow. These are a little looser, but still they go back-and-forth with a zigzag to
create the look. Here we have at least
twice as many zigzags, so you get a different feel, a different tension
in your work. And the last technique
we worked on was varying our blends from zigzag
to loose waves. In class, we did
this beautiful blue and white blend where we got so many shades of
blue here and get this little blurred look
for those tight blends. It's quite the contrast. So that smooth, gentle curve. Here I did a similar
thing where I blended purples and blues
and blacks and whites. And when you see
the gentle curve, you get that nice windy river and then those
little tight curves. Very intriguing effect. The last variation
using size that I wanted to show you
was quite colorful. So here I created six
very tiny paintings. And as you can see,
correlations my hand, how small they actually are. I just used a gift card to make my little lines and
I made them all nice and tiny because that slow, loose blend, I wouldn't
really get very far, maybe only one or two curves on these small little canvases. I really liked the
way they look, the contrast in
each of the colors. And I think they're very
effective altogether. Now after they've cured
for about a week, so that the plastic components in the acrylic paint will
really dry and solidify. I'll seal them with a varnish and I'll just
varnish it by lightly painting a couple of coats right on top of it of clear varnish. I'll keep these out of the sun just to protect them further. But they are complete and
they're very enjoyable to do. I hope you found
this class useful. And if you did, please be
sure to follow me here on Skillshare to get notified
of future classes. If you've enjoyed this class, please be sure to leave a
review and I hope you take a photo of your work and post
it in the project section. For more information
on my classes, check out my YouTube channel. Thanks very much for watching.
 Daniela Mellen, Artist & Author