Transcripts
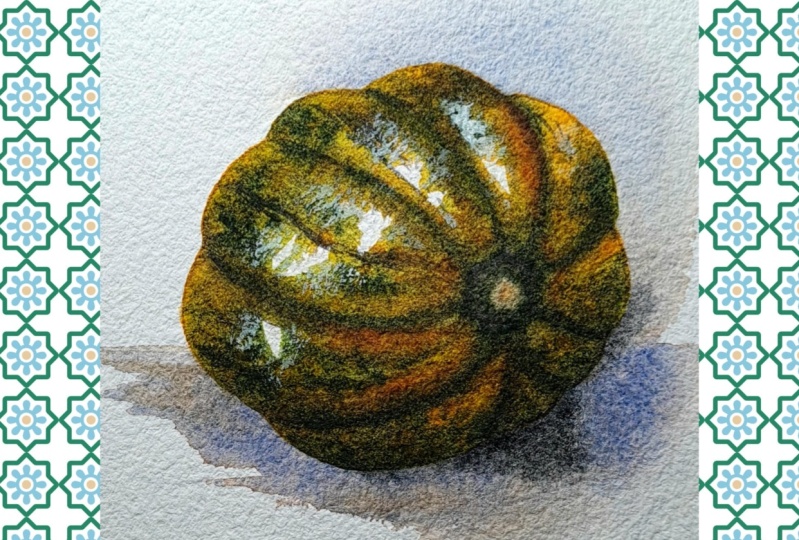
1. Painting the Odd Vegetable | an Acorn Squash Still Life | WATERCOLOR: The low skill share IM Suzy on blade, IMA artist here in Arizona that specializes in watercolour. Today we're going to be working on a acorn squash as this thing. Q, it's got these wonderful oranges and greens that kinda mixed throughout. We're gonna see if we can attempt putting this onto the page for painting and doing a still-life. I've been doing a series of still lifes and I thought maybe doing a really odd vegetable would be fun to do rather than a bunch of fruits like lemons and oranges. So here we go. Go ahead and grab your paint brushes are gonna be doing four colors. Cougars, green, burnt umber, ultramarine blue, and a cadmium orange. So we're gonna be using all those four colors in this piece and teaching it.
2. Art Supplies: Yeah. The space here.
3. Mixing Paint First!: To get started, we're gonna go ahead and just do four colors. We have the burnt umber, a hookers green, ultramarine blue, and a cadmium orange. So just with these three colors, we can have a beautiful composition because when you have too many colors, sometimes it can get muddy without meaning to because you haven't practiced just having a few colors. So a lot of professional artists will have a particular set of colors because they know how they work. When we have it. So severely limited with only four options. A lot of times what that will do is make your painting look cohesive, professional without having to do too much research on the colors you're working with. So if you're not a professional like I am, and not have your own huge list of colours that, you know, work well together. Sometimes starting out with just a couple really makes it look good. Now, one of the things with these colors now before we get started, even before I do the sketches, I want to make sure that the hookers green is not too it's not muddy enough. It's not a natural green that I typically find in vegetables. A good way to tone down those green color, since it's so vibrant, is to use an opposite colors, so a red. But since we don't have a red and this limited color palette, we're going to be using the next best thing which is burnt umber, which is actually a reddish sort of brown. So it works very well. So we're going to mix this hunger's green, which just a tad of this burnt umber to tone down the grain and look more natural like the vegetable we'll be painting. So when it comes to mixing, it's very good to have a stiff bristles brush like this one. This is a synthetic brush perfect for mixing. If you use a actual real hair brush, you can see that it's a lot more springy. It's not as stiff, which is not as good for mixing paint. So what you want to use instead is the stiff bristles brush. So now here's the green paint that we'll be using is already dry here, but I can always add more water so that we can mix it up. And this is why I always use a spoon because it's easier just to dip it into the water and solution in instead of having to dip constantly. So go ahead and grab some of this burnt umber and dip it in. And now look at that. We have a more natural green. And that's a simple as that. So I'm gonna see if I can make this thicker. Get a little bit more this burnt umber to make sure it's tone down. Excellent. Now it's more of a natural green versus a two vibrant fellow, almost curried.
4. Under Sketch: Now that we've tone down that own a naturally bright green with the burnt umber to look more of a natural green that you'll see on a actual vegetable. We'll be able to do the sketch of the vegetable and then painted after that. So grab your pencil and let's go ahead and start sketching out our vegetable. So it's starting off with a circle. We're gonna do it over here. It's not quite that fat. And I'm not going to worry too much about these pencil marks. It's gonna erase that one here. These are more guidelines. And then it's easy to get more of the centerpiece. So the route that it's coming from this attachment to the vine that was cut off would be right here. And we're gonna make that 3D. So have that come into the plant. There we go. And it's not perfect. It's not the exact thing that I'm seeing in front of me, but that's okay because I'm sure every single vegetable in the world is unique. Let's see. There's a bunch of ribs here. So doing all these curves here. And if we did the pumpkin earlier, we didn't quite have such drastic ridges as this one does. This particular squash has more, more curves to it. And there we are. And we go ahead and get rid of these lines on the edges. Were there for us to be guided. Now this is not the best eraser. I highly recommend using a cleaner eraser though, I just did. But if we use our paint correctly, we will have to worry about the smudges that remained because the paint will cover it and no one will know. Okay. And then I want to give an indication of where the fold lines are of that fabric.
5. First Layer of Color: So now that your sketches complete, we're gonna go ahead and do the painting part of the squash, which is going to be fun because it's going to be a wet on wet technique. So we're gonna do a wash. first of just pure orange all the way across except for maybe a couple spots where there'll be some shine. And then while it's still wet, we're gonna go in with some dark greens on top of that. So we're gonna use orange and then the green, and then we let the water do the work and spreading it around. So give me a lot of fun. All right, to get started, we're gonna go ahead and do that wash of orange. So we have that cadmium orange right here. I'm going to use all of it. And this is a nice big brush. I think this is a ten round. And you want to get as much pigment on your brushes you possibly can. I'm going to cover the whole thing. Will get more. Try not to let it dry because we want to do that. What I'm wet technique I was telling you about. And this is why we pre-mixed our colors at the beginning of the tutorial. Because if you try to mix it and then do it while this is already currently drying, then it's not going to work as well. Right. So it's still still wet like right here and here is already starting to dry. Go ahead and switch breast is don't worry about wiping this one off completely. I think the best option for this is to get your rigour brush or a pointer brush. I'm going gonna use that to apply the green. That way we can be more precise on where we put it. All right, here we go. And there's kind of a whole bunch of lines coming out from here. Now the reason I like having a line brush now I don't think I use quite enough. What is it called? Burnt umber in the green because right now it's still a very vibrant green. This is a painting that you can say it's artistic license can make it as dark or light as we want. And if anyone else complains, Well, it's not their painting. Try and do this while it's what I already have some dry spots here. I'm going to have to wet down again. Oop. This is what happens when you have a brush that's so long, it's kind of difficult to control sometimes. Okay. So let me see if I can wet down this part right here a little bit more. So I'm gonna get just a little bit more orange and get some more green. There's a big splotch right here. And not too much of a spot over here. Line, line, line. Alright, to get more of a scuffle over here on those shiny spots. So there's the wet in wet technique for your acorn squash. Go ahead and let that dry. And then after that, we'll go ahead and do the shadows on the fabric that it's sitting on for our Still Life. And that way we can ground the piece so it doesn't look like it's floating in a whitespace.
6. Shadow: Let's go ahead and move forward by making this acorn squash we have currently painted and dried into a more of a 3D looking object by adding in the shadows. Alright, so I'm going to be using my number eight calligraphy brush. This is a weasel for a brush that I like to use that I got from South Korea and wonderful art shop. But not everyone has that. So feel free to use any eight sized brush that you have or any size that would go with the size of squash you painted yourself. Alright, so you want a watered down burnt umber. You don't want to be too, too watery. But here we go for the shadows. So light's coming from this direction just like my other pieces I've done. And remember that these ridges cast their own shadows. Ridge number one. Number two. And this is all in shadow here. And I'm gonna go ahead and stop here so I can soften those. So go ahead and wipe off the excess after washing brush, soften this edge here. And there we go. There's that shadow. Go ahead and grab some more, and we'll do it again. Now, these ridges are actually in shadow right here and here. So it's almost like there's a circle right here that's all in shadow. But then again, there's also a dip. Remember that there's a dip. Here we are more shadow. And then this bottom one is in shadow. And wipe off your brush, take off the excess, and see if you can soften these edges a little bit because they might already be drawing. Here we are. Might be a little too much hair and clean that up. And there we are. There's your shadows. But there's still more to do. We want to make sure that it's clear that right here has those ridges. So we're gonna go ahead and see if we can do a little bit more. I'm gonna take the orange this time, that beautiful cadmium orange that we started out with to do the ridges up here instead of the burnt umber. That way we can still indicate that there's ridges, but we don't have to make it look like it's so far in shadow as the other parts. The other thing I would like to do is a dry brush technique. Once this is all dry, because it can do a dry brush technique on top of what's already wet. Wait until the shadows are dry. And then we'll do the dry brush technique again just so we can get a few more of those dark greens in there and add some texture.
7. Darks and Details: Alright, so now that you're acorn squash is dry and you have the shadows on there. We're going to go ahead and push it even further by adding a few more darks on the greens and shadows on the underside. So by doing more of these details, we're going to do a dry brush technique with a rigor brush. If you don't have one of these, you can just use the flat side of any other kinda brush. I would recommend one that's a stiff bristle brush like this one. Or you can still use one of these if you want to. Just so long as you take the flat side of the Brussels, instead of pointing down, you want it flat, almost horizontal to the page as you drag it along. So we're gonna go ahead and drag it towards that center connection point for the W9 would be and get as much blue on there as you can. This is going to be ultramarine blue. You don't want it to be too watery. You don't want it to be sopping on the brush. You want it to be sticking to the brush. Drag along. See how it's dry and making that dry brush sound. That's what we want. All right. So I kind of got to the outside here a little bit. Don't worry about that because we can just have it joined the shadows. And now that we have this, I'm gonna do a little bit more here. There's lines coming out of this section here. And I'm just gonna go ahead and go on with almost a pure ultramarine blue on this edge. And then water it down slightly and just help it define those edges. And then you can use your dry brush technique again. Because it works so well. So this is a very watered-down blue here. So I can get some of these unique lines. Okay. Now we're just gonna go ahead and do the centerpiece while we're at it. Go and get that green again. Along the outside. Grab some burnt umber shadows and maybe some of that blue. So there's more shadow here. Then the inside of the vine has more of a brown hue to it, but I don't want it to be orange. So I'm gonna do the burnt umber. Here we go. Okay. So if you wanted to, you could stop here and just have a nice cute pumpkin with a white background. If you want to push it further, we're gonna go ahead and do the shadows next, so that the acorn squash doesn't look like it's just sitting in, floating in the middle of space, a white space. This is not the matrix, this is real life and he insisted on something. Alright, shadows or Next, let's get started.
8. Complete the Piece: So if you want to, you can stop right there. Just have your pumpkin all nice and clean and done. Or you can push it even further and you can add in shadows so that the acorn squash doesn't look like it's just sitting in, floating in the middle of space, a white space. This is not the matrix, this is real life and he insisted on something. Alright, shadows or Next, let's get started. So closest to the acorn squash, we're gonna go ahead and use the burnt umber and then kind of fade out towards a ultramarine blue and then fade out towards the right. Here we go. Okay, there's a nice shadow there. We could stop here. However, I am too much of a perfectionist to stop there. There's also a shadow going this way and I kinda wanna do it. So this one is kind of coming up like that. And let's go ahead and add some darkness underneath. Probably shouldn't do this next part with just this big fat brush. Get a smaller one. Mix, the ultramarine blue with the burnt umber and you'll be able to get a very dark, dark. We're gonna do this right underneath here. Because this is where the darkest dark is located, right here in this shadow. Will get even more and get that array in there. That's awesome. You see this word, this shadow here and the shadow here. When two shadows cross each other, there are twice as dark. It's called a penumbra. I think that's what's called a penumbra is when two shadows cross or it's an umbra. I'm not a scientist, but it's something along those lines. I'll go ahead and put a description in the video so you can see. But there's that. I'm going to add another shadow right here. I think a blue would be good and just going to be a very light shadow over, over here. Maybe a little number over there as well. Okay. Take a little bit more. Work is never finished for an artist. There we go. Okay. And there we are. Your acorn squash is finished. Go ahead and wipe, clean your brushes, dump out the water, sign your work. And when you're all complete, then maybe you can go ahead and get a framed. That's always the nice icing on the cake because you, we make the cake, but then the vaccine just makes it so much better. That's what a frame does for every single piece of art.
9. Thanks: Thank you skill share for joining me today on painting a adorable little acorn squash. It's a vegetable I've actually never tried before. Please go ahead and share your projects in the project section, I would love to see what you guys were painting. Go ahead and ask me some questions in a review. I would be happy to answer them. Since I've been painting for ten years, I've specialized in watercolor. A lot of things come naturally to me now that I've practiced for so long that I forget what sort of questions I had in the beginning. So if you have questions, ask them and I'd be happy to answer. Well, thank you again for joining me and I hope to see you on the next skill share tutorial.
 Suzy Paint N Simple, Watercolorist