Transcripts
1. Introduction: Hi, I'm [inaudible] illustrator. Welcome to my studio. In today's class, I
want to show you how to create Fairy in the
mixed media technique. Besides why the color will
be using colored pencil, acrylic beam, and some
collage techniques to create this
nice moving wings. [inaudible] present
it's spark of imagination when we are
ready to spread our wings. So here the symbol has
to be in each house, especially if you're an artist. It also make a great gift. I enjoy so much
creating this class, and I hope you're enjoying
painting with me. If you are new on this channel, thank you for
joining and welcome. Press the follow button on top, and let's get started. [MUSIC]
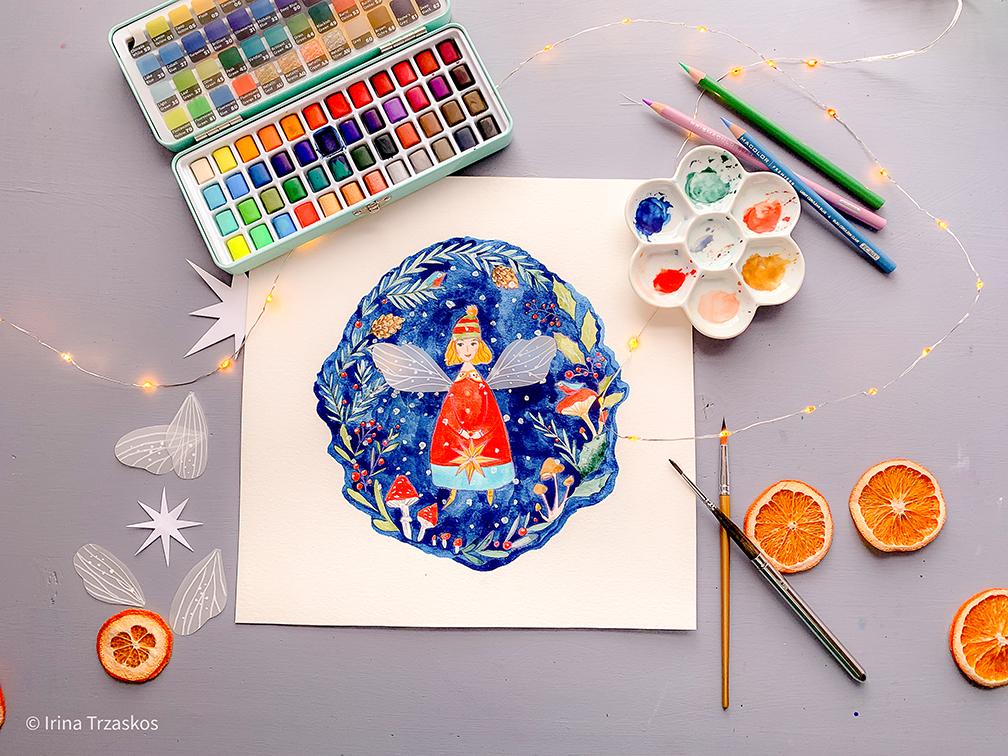
2. Supplies: In this class, we will be using an unusual big amount of materials because
besides watercolor, it's also other media
we'll be using. First of all, of course,
we'll need watercolor paint, I'll be using all these kinds. Next on, I'll just
draw watercolor. I really liked it. I also need watercolor theme, I'll be using a pencil, a paint palette for
water, paper towel, a regular pencil, and an eraser to
make our drawing. If you are using a
template make sure you have a template of plant. It's near the sources
of the class. You can print it or you
can just transfer it from laptop and
you work on paper, whatever works for you. Besides watercolor set, we'll be using watercolor
brushes Number 4 and Number 2. Also because we'll
be using acrylic, I'm using a separate
brush for acrylic. Also, be be using a cotton swab. We'll be using colored pencils, so make sure you have
a sharpener on hand, acrylic paint as I said already. For the fitter wings, we'll be using a small piece of tracing paper, a little wings. Let me show you the
paper I'm using. It's soft, this
kind tracing see, but only just a small piece. Also, I'll be using a
white pen like this one. For cutting, I'll be using
X-Acto knife and make sure you are having a cutting mat or cardboard or something to put underneath. You can use also a paper knife, also use scissors, and optional, we'll need an embossing tool if
you're transferring them. Thanks for the time.
3. Drawing a Winter Fairy: So the first what we have to do, we have to draw our
Fairy without wings, into the a watercolor paper. But before we do that, I wanted to tell you that we have a resources
of this circles, you'll find a template. So you can just tape it
into the window or into collide box and put over it watercolor paper and
outline it like I did. I taped it on the window. However, I encourage you to try to draw your own painting. I want to show you how
messy my drawings are. I usually start with a
very rough drawing in a sketchbook. Let me
show you shortly. [NOISE] This or this. You can see it's very rough. Then I would just take a
piece of office paper, I put it over and would make a drawing
with a micron pen, or any ink pen which you like. After that I have a
nice clean drawing. I can transfer it onto
watercolor paper, with very, very light lines. Make sure your lines
are very light, maybe even lighter
than here I have. Because it's important. Watercolor is transparent
and if your lines are dark, you can see it for watercolor. I'll join my lines darker
so you can see now, but you please keep them
as light as you can. I usually start
drawing my Fairy, all my characters,
from the face. It's like [inaudible]
I finished over. Then I'm getting to eyes, and I make sure I have
right face expression. As I told you I'm doing this so you should let in
sketchbook piece. I would erase and add more
lines until I'm happy with the face expression
with hairstyle. Then she'll have a hat. Feel free to draw with me or
feel free just to outline the drawing from the templates from the resources
of this class. Whichever works for you. I stylized this so shape of
this face so she's like calm. If you want to make a paper dull or something it's
easier for you to color out and have long arms coming
out or anything like that. Here she's holding a star, a symbol of light, a hope. I was going to draw a star with an eight ends and I ended up with a nine
somehow, and that's okay. I like it. I hope you do too. Here's the hair. [NOISE] Out of the arms to the
center we have lines. Okay, let's finish
drawing the figure. I have this tendency to jump from one piece I've
been drawing to another and I'll try not to
to that but it happens often. Then you draw foot, another one. The rest will be drawing the elements surrounding
to the leaf. So we have mushrooms here, and cocoa buds, some branches. You really can draw anything
you want or you can just follow me and charge together. Again, keep your lines
as light as possible, not as dark as mine. It's so windy today so
you can hear the wind, that's some wind outside. For the leaves of her branches, you don't have to actually
draw every single needle, you can just draw the
middle of a branch and the rest of the painting
with the brush strokes. Just draw the middle
of a branch and pine cones and the berries if it's a [inaudible]
or something. You must have by time
and just enjoy it. You don't have to be perfect
with your paintings, just enjoy the process. Here we have a little bird. You can add more
elements if you want, I think it's plenty of
elements for the clause, otherwise it will take
so long to paint it. But if you have time and just want to add more
elements, go for it. Here we have hollow leaves. Not shine if I need to make them darker you probably see them as it is but just in case. Then we have another
bird sitting here on the mushroom, happily, [inaudible]. Then we have another mushroom, a big one for the bird. Again the textures
you can see on the template that
there are textures, you can just drop an outline when you're
making the drawing and all these lines will be
[inaudible] with watercolor. [NOISE] Another [inaudible] branch here. Every change I decided
to draw the needles. Another cluster of mushrooms
of course there is. Beautiful. Few more
little mushrooms here. To complete this circle, there is finger leaves. This is our drawing. This is enough you don't need to add more details or anything, the rest we'll be
painting with watercolor. Let's start painting.
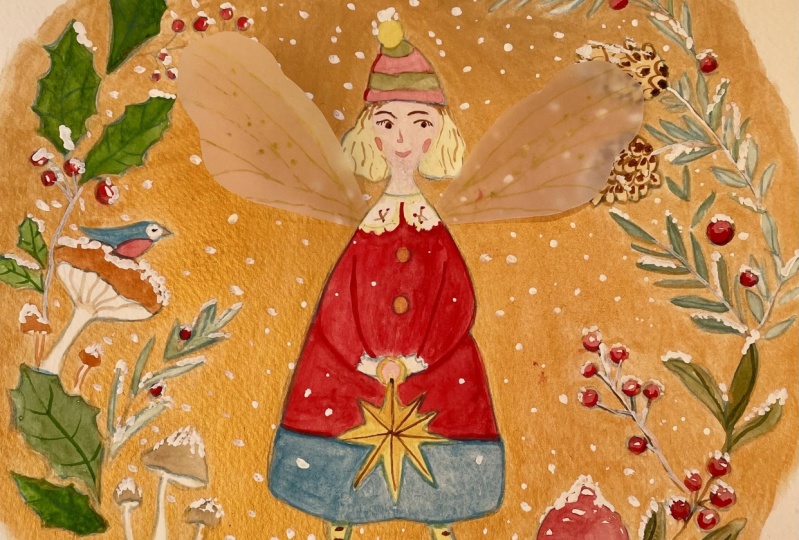
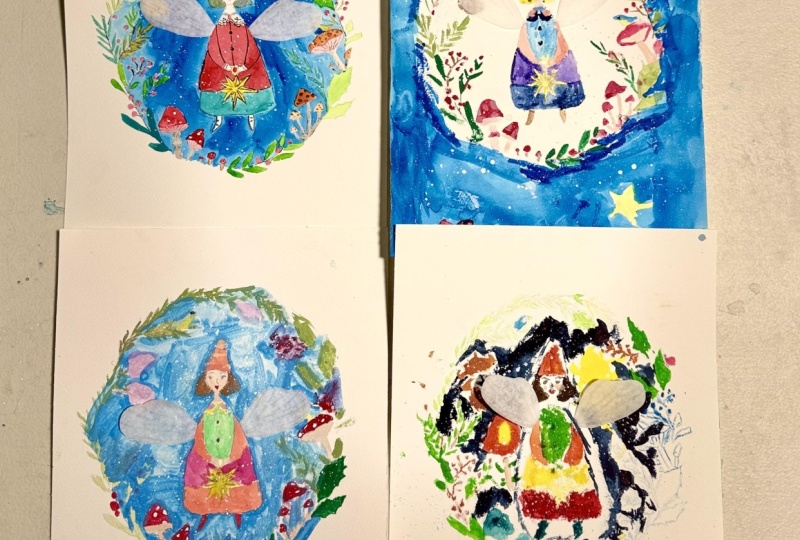
4. Painting a Fairy Part 1: For fairly painting, we'll be using a limited
colored palette. As often, we'll start
with the skin tone. I will be doing the
light skin tone, but you can use any color
of a skin tone you want to. We're using burnt sienna. [MUSIC] I'll dilute it with
a lot of water. The skin tone secret is
to to have enough mix of color and the water so you can cover
the entire surface without trying to add more
color or water to your mix. I hope we have enough. Remember that our watercolor
is lightening a little bit. After it dries, you can look at the skin tone and if
you think is too wet, you can add another layer, just make sure it's completely
dry before you do to that. Otherwise, you can
get some textures and you want the skin tone
to be nice and smooth. [MUSIC] Here's the skin tone and next what we'll be doing, I'll take kombucha color and we'll be painting
all the elements which are with this beautiful
orange-yellow color which is called kombucha. I hope I pronounce it right. Strategically, I passed it in different points
of the painting so the viewers' eye
travels a nice way. First, I decided it's going
to be here on the pop-on. Next, it's going to be at hair. Just make sure the skin tone is totally dry before
you do the hair. I am really risking it here. If it's not dry, I'll just branch right into the face and will have
yellow into the face. Well, thankfully,
it didn't happen. Here it should glow
and go ready because of this beautiful yellow. I just saw this collar. Because the collar itself, I want to leave white, and do the yellow and the star, of course, and then we'll
be edging the lines later. [MUSIC] If you don't have a color
which is called kombucha, you can use yellow ocher. You can use some
golden [inaudible]. You don't have to maintain
the same color scheme. You can come up with your own. [MUSIC] I love her shoes or her boots to be
awesome for this color. Nice. [MUSIC] It's very joyful. Next to this kombucha color, we'll be adding the
Van Dyke brown, which is this one. We get almost like
a raw sienna color. If you have raw sienna, you can use that. Let's look at the water paint
and paint our pine colors. Just flat as they are. Don't worry about texture
or the lines at this point. We'll add them later, [MUSIC] and the nominal find cone here. You can use bigger
brush or smaller brush, just whatever you're
comfortable with. I have this habit of
just picking one brush and not letting it go unless
it's totally necessary. [MUSIC] All right. Next, let's keep
painting graffiti. For the hat, I chose olive green for half of stripes and brilliant
red for the half. I'll paint the half of stripes first and then will let them dry and then we'll add the rest. [MUSIC] This is the painting
I wanted to do. I told you to relax and there is not much
of mixing colors. We pretty much just
take them straight from the pens and add them
into their painting, which makes it more
easy and relaxing. Next, let's paint the coat. For the coat, we
probably should take a bigger brush, maybe not. Let's try it with this one. [MUSIC] Again, take any brush
you're comfortable with. Don't hesitate if this
is too small for you. Which one is this one?
This is number 2. This is brilliant red, you can pick any red you want. This is like a warmer shade
of red, very festive. [MUSIC] Just take your time. Don't paint the coat in red. [MUSIC] Most challenge in this
painting will be to paint the ground because
I want it to be dark. Most likely, it won't be perfect because it's very
hard to paint with dark watercolor and it
refers to so many details. But it's okay because it's
nice sometimes to see the textures and then we will be adding this now, you'll see. Just important to
enjoy the process. I think we'll end up with
a beautiful artwork. [MUSIC] How did I miss a line here? It's okay. I forgot this
coat is a different color. I will fix it in a second. [MUSIC] Just make her coat a
little bit longer. [MUSIC] Okay, we fixed it. Well, I hope you
didn't do a mistake, but I did and I fixed it.
5. Painting a Fairy Part 2: [MUSIC] Now our green lines are done, we can add the red
lines into the hat. It needs a little bit of
water so it flows nicer. [BACKGROUND] Now, with a teeny tiny brush, is our number two, if you have a small brush, you can take a small brush. Let's paint a few
berries on the collar. [MUSIC] With brown, let's add some
branches to the collar. Again, have a small brush. [MUSIC] Also with red, let's fill this
space, we have that. Nice. Now, can take a little bit of red with a follow-up
with water and paint the mouth. [MUSIC] On the sienna we have
from the skin tone, you can see how
brighter it became. Let's paint the nose and the
baseline under the chin. Let's make some rosy cheeks. [MUSIC] Let's paint the eyes, [MUSIC] eyebrows and tell him what
eyelashes were not. [NOISE] [MUSIC] Nice. Next, we are going
to paint of the skirt. For Skirt let's use
something like blue, which is almost like [inaudible] and I call it, looks with this yellow and red. [MUSIC] Here is our fairy. Now, let's mix some, red, with a little bit of green, just a drop of green, any green you want. [MUSIC] We need a little more red, as a result, we get
a darker zip of red. We can paint the
hands, the arms, and shadow under
the collar maybe [MUSIC] Maybe a little shadow
on the bottom here. Now, sun hat, [NOISE]
we'll match the yellow on its paint to the
rest of the buttons. [MUSIC] We'll still water it, think a drop of water
just fell on them. From the brush, it's
okay it will dry. And next, let's
take some of this brown and our teeny tiny brush, add a little bit of
texture to the hair, and the last to the star. [MUSIC] Then some good brush control on your side. [MUSIC] This one is crooked, it's okay, [MUSIC] add a few details on the shoes. [MUSIC] This is our fairy, we need to let it
dry before we start painting the leaf
around it, smudge it.
6. Painting a Wreath Part 1: Now I can start
painting the leaf. If you're right-handed like me, we'll start from the left
and to the right into the circle so we don't
smudge anything on the way. For the branches we'll be using blackish green. It's very nice color of green. However, we'll dilute
it with a lot of water. Feel free to use any size of
brushes you like. Before we paint the green, I want to take a small brush and paint the middle of
the branches with brown, with not a lot of water. I fear it isn't dry, so we can't put the hand there, hopefully she's dry This is a pretty
style flower it's not a real flower or like we
painted in some other classes. But I think it's beautiful. We'll be painting some
berries in between. I'm trying not to
make the flower too dark because we have
to put at the ground. I'd love it to be visible and
not to blend in too much. You have branches in it. If you don't have enough paint, that's funny, you
need to refill it. Now let's take more
brown and again, paint the middle of
the branch first. It's a little blackish green
or whatever green you're using with water
and keep painting. This is too dark we need to
dilute it with more water. So let's wash the brush and lift out some color like that. After finishing
over the branches, we can paint the berries. Let's take the same brilliant
red we used for her coat, so the color palette
all works together. Lets paint our berries. You can leave the
white highlights but if you didn't, it's okay. We can add them with
a white paint later. There's brown left from the
pine cones, this color. Let's paint this beak. Let's dilute some red with a little bit of
water so it's not so thick and paint
this bird's tummy. Like this. While the bird is drying because we need to
add more color to the bird, let's paint the details
on these pine cones. We'll take the dark brown
and you just end the lines. Let's get more brown and
add some darker dots on each of them. Add the same thing with
the other pine cones. Not too regular, kind of
whimsical. I like it. With the light blue,
let's paint the bird. leaving some part
of the face white, and the eye.
7. Painting a Wreath Part 2: Next let's paint this
part of the leaf. The thing is we won't be
painting these branches, we will paint them after
we add the background. For leaves I want to use olive
green we used on the hat. Berries will be red, like here. Next let's paint the top of the mushrooms. Because they're red anyway. I'm leaving some white spots. But you don't have to, because we can always
add them later when we'll be working
with white paint. But I'll try to give some. If you think there
are too many of them, if you think you left too
many, just paint them. If it's not enough
we can always add more when we will be
working with white paint, just like I said. It's the same thing
with this one, and little ones. Most likely we'll be
adding some white dots on these little ones
because it's not easy to make white dots even I left some natural
[inaudible] like them or not. Next let's take some Payne gray, and add a little bit of water, and just add some details on
the bottom of the mushrooms. Just some textures, so it doesn't get lost. I'm going to have a
dark background on, so don't have too
much not to get lost. Just a little bit so
it's not so white. I'm thinking on these
other mushrooms. Nice. Just a little
bit like that. Let's keep moving. Now I want to paint this part and then
finish on the bottom. For all the leaves I'll
also use olive green. I'm not playing much of lights
and shadow because it's already a pretty
complex illustration. I'm just done. You can play a little bit
with amount of water, or you can add shadows
if you want to. I think it's so much
going on already. It's, well, not
really necessary. Let's finish painting this leaf, and then I'll go back
to those berries before we went too far so
I don't smudge any ink. You feel free to rotate your
painting any way you want, whichever is more
comfortable for you. I'm just trying to keep it in one place so it doesn't get out of the camera view. Like this. Again, we're not painting these
teeny tiny branches, we'll add them later with
white after we paint the background.
Let's keep going. Again, let's paint the berries. Make time of the bird. I have rather my brush anyway. This color from the pine
cones to make the beak. The same color we can use for the bottom of these mushrooms. I think it will work nicely. Again, let's leave some white, and just add little
bit of shade. Nice.
8. Painting a Wreath Part 3: Make sure your bird's belly is totally dry before we
paint the rest of it. I'm using again, this
turquoise-ish blue, which is called lake
blue in this set. For the eye we can use brown or we
can use Payne's gray. The mushrooms are going to
be [inaudible] mushrooms, are going to be burnt sienna, just not as diluted
as for skin tone. Now, for the rest
of the greenery, I want to switch back to blackish greens which will
balance this color in here, because this color
green is lost in here. It's all like nicely balanced. I wonder if it's too
dark, hopefully it's not. We'll see later. Again, we'll use
red for berries. All our berries are red. Last few leaves. For this mushroom, say I want to make some
of the pine cone color, so I will use kombucha, and brown, and I'll
mix them together. Golden brown. Add in some more yellow. Again, we are
balancing the colors. It's nice to add some happy
tones and then add the [inaudible] too, not so bright. At the bottom,
let's try to use a little of a burnt sienna. Not perfect, but it works. I love adding some
texture on the lines. Why not? The last premise. This is our leaf and
next we have to let it completely dry before we start
painting the background.
9. Painting a Background : We go to the background, which is the hardest
part in watercolor. It's so hard to paint
a dark background. It's okay if it doesn't
come out perfect, because of the adding snow
later, we'll need wings. It's going to be great. Just be patient. Use as many brushes as you want, as small as wide
as you feel like. I'll be using just one
color to make it easier, add some called phthalo blue. It's just like a
shade of dark blue. I love it and I think
it's beautiful. However, if you want a totally flat background
without textures, which usually
watercolor gives us, you can use some ink or ink
products to give you texture. Or you can use wash, which will give you a
totally flat background. I'm starting with the
space around the fairy. This is not easy, so probably I'll be just
quiet and I'll try to focus, and you can paint
along and watch. Here's another great
brush control exercise. Go between all
these tiny details. It can be so relaxing. Just take your time and
paint the white space, and don't worry about
textures. That's all good. Some gems something here. Try not to ruin it. You can see I'm overlapping
them, our painted areas, so the texture becomes
more abstract, it's not too obvious where
all the brushes went. For these berries just be
careful not to smudge, because I am already very
close to smudging something. For these berries we just
painting the branch. Just covering the
background color for now, and then we'll be
painting it with white. I think you understood
the principle, just go around every
little object. Try not to smudge it, and you can rotate the paper
anywhere you're comfortable. If you want to put
it upside down, which I'll be doing,
you'll see in a second. Because this process
can take up to an hour. Just take your time. Take breaks if you want to. It doesn't matter if one area dries a little bit
or totally dries, just take your time, and once you get tired
just take a break. The rest of this
background painting I'll leave behind the scenes and I'll show you
the final result.
10. Adding Snow: We can set aside water columns. However, we'll still need
acrylic paint or gouache, or whatever white
paint you are using. This is my dish for my paint. At some point it
had some black ink, but it doesn't come off
so it's there forever. This is a heavy body acrylic, so I'm not sure how
it will behave, but I think it will be great. We have water to dilute it
if we want more liquid. But before we start adding snow, I wanted to show you a trick I'm using in my book illustrations. To make it look more
finished and more unified, I would use color pencils. You can use any color you want, and these three
are my favorites. A green, which has like
almost fairy tale heel. This is lavender, and blue. These are three tones I like, but we need to choose just one color to unify
the entire illustration. I'm choosing lavender this time. It's important it
should be very sharp. Make sure you have a
sharpener next to you, and once it gets a little dull, you can sharpen it again. Which we'll be doing will
be just filling the gaps. You can see a little
bit of white, just fill it, and shaping the form, and shape even better. There is a little
imperfections here and there. We have colored
pencil layer just making the illustration
more precise. All these rough edges
become more smooth. No wide gaps here, and a little bit here. It takes a little bit of
aura around the objects, which I think as is finishing
that to the illustration. At the same time it unifies the entire carpet if some colors maybe are not exactly perfect
together. Now they are. Of course, you can go further
and add some textures, some lines, if you want
to with color pencils. You can see it's becoming dull, so in this point I'll
take a sharpener, and I'll sharpen it. I'm back with a
sharp pencil again, and then slowly adding some precision where it
needs some precision, especially if you
see some wide gaps. This is so good. You
don't have to go crazy, just little bit here and there. This part, just a
little bit of aura. You remember we didn't paint
the branches for this. Now, we can do it with pencil. But we also could do
it with a white paint, we'll be using for snow. A pencil works more great. Nice. Keep going until you are happy with the result. Till you feel like it's totally looks finished and polished. But this is a very
nice check to add to your illustrations,
more polished look. Next let's start adding some
snow and acrylic paint. I have a different brush, not my watercolor brushes, because I don't want to
ruin my watercolor brushes. Some of these, very thick acrylic paint, and again you can use
any white you want. I'm using a little bit of water. We're doing all this
before we add her wings, and we go all over repeating. Some of the branches, some are drawings and
some are not just like in nature. Come on here. For this comb and snow
flakes I wanted to use a cotton swab, to put few little big ones. Now it looks like winter. Do you enjoy working
with this cotton swab? After adding the snow, let's humor the
lines with white. here we need a little branch, maybe a little bit here, maybe a few lines on
these our leaves. They look flat. Some white and the pum-pum, add some lines in a star. You see how much texture the acrylic paint
adds to our painting. I think it's great. Now we'll leave this to dry. Meanwhile we'll be making
the wings for our fairy.
11. Making Fairy Wings: [MUSIC] To make her wings, we'll need a small
piece of tracing paper. [LAUGHTER] I'm just
making wings for fun. We have a lot of
wings [inaudible]. I have them, and when
I need [inaudible] to attach them, and it's really addictive, so you probably will be making
a lot of wings too now. These are the wings I
planned for this class. [NOISE] You can see I
added them to template, and then I changed
them a little bit. But if you want to
use a template, I'll show you how to do that, and I will also show you how to just come up with your
own design for wings. If you are using the template, the template is in the
resources of a class. We need to fold our
piece of tracing paper. Is that big enough? It is. We'll fold it in half. We'll be doing two
wings at once. You can use a bone folder, but you don't have to. If you have it in your house, you can use it, but
it doesn't matter. Just need to fold it, it doesn't have be to
this sharp on the fold. Then to transfer the template, do not use pen, but use something
like an old pen which doesn't write or use
some embossing tool. Just emboss it. Emboss the shape, just outline all the wing. It's good to leave
some more space on this end because
we'll be cutting into the paper and we need
a little more to get there. Pretty much just a sketch
of the shape of the wing, I hope you can see it. Then I'll take the
scissors, and I'll cut it. Make sure it's narrower here. Maybe even more
narrow, like this. Nice. For now, we have two
wings which are attached, but they're boring, we don't
have these so nice lines. Let's fold it back. Again, if we're
using the template, actually we cannot fold
it for some parts. We'll take a white pen, and we'll draw the lines. They don't have to be
exactly as in the template, you can come up with
your own lines. [MUSIC] We copied the lines. Let's copy the dots. It's very important that
your hands are not greasy, so don't put in your lotion or anything on your hands when you are working
with tracing paper. Here are the thin lines. To copy them on the second wing, we would fold it, and we can draw it. I shouldn't press so much on my hand so the
lines are thinner, but that's my mistake. [NOISE] That's how we copy the lines and the
dots into the second wing. Now I have two identical
wings, like this. Well, bit identical. Now we can cut them, and we got two wings. If you don't want to
follow the template, you just take a folded
tracing paper and just cut a shape of the wing any way you want, just be creative. You do it like this, and then after these, take your painting, or the drawing and look
if it's the way you want, maybe you want it small, and if you want it bigger
just cut a different one. I think it's a good size. Then, we'll do exactly what
we did with another one. We'll just take a pen, [NOISE] and we'll draw the
design on the first wing. I'm trying not to press
on the pen as much, so the lines are thinner. We'll turn it over, and we'll copy the lines. On the first wing,
you can be creative, but second wing we just have to copy which we did
on the first one, so they are identical
and symmetrical. Nice. But sometimes
I just open them, and then I add some dots. Because the dots don't have
to be completely identical. Like always, I love
[inaudible] dots. I definitely like the
one which we created. Intuitively, I think
those are always coming out better than
the template ones, but it's totally up to you. We have enough wings
and now in next video, we can attach them to our fairy.
12. Attaching the Wings: All right. Our painting
is fairly dry. I think it is dry, and we got point of wings. Now let's attach the wings to Fairy and finish
our illustration. First of all, if you have more wings and even if
you have just one pair, just try them on first. We need to decide
where are they'll go, and I think I'll
go with this pair. However, you can try all
the pairs and you can try to put them upside down, different positions, or you can go with
even four of them, if you want to, especially if you have more. You can see when
the tracing paper is overlapping is
also beautiful. We could go with four. However, I think
I'll go with two, and I want them to
stay up like this. I don't want them
to stay like this. But it's totally up to you. I'm deciding on position. I think I want to I'm here like somewhere in
the shoulder area. Take a pencil and do like, these sharp pencils
are there I think. I did a small dot to
know where to cut the paper and how to do it
symmetrically here and here. Let's put away the wings, and then we'll need
a paper-knife or a scalpel or
something like that. A blade, whichever you have. Make sure you have
a cutting mat or a cardboard or something underneath so you
don't ruin your table. Then with knife just
let's make a cut. It has to be a little wider, so we have a little
bit of room to play. We did two cuts, and now it
comes to the tricky part, to put the wing inside. I always have trouble
doing this but okay. It worked this time. I put in one wing, press it a little bit. Let's see if it works
for the second one. No, it's not as easier. Let's cut this fold because
it may cause trouble. [MUSIC] I'm pressing this paper down hoping it'll help
to put it inside easier. [MUSIC] Come on. I think it's in. I'm pulling it on another
side, and spread it. It's out. All right, let me make a cut again. Now another one fell too. I put it inside, let's fix it right now. Is it in place? Maybe I should have left
a little longer ink, but I'll take a
painter's tape and I'll just cut a rectangle and I'll fix this wing in
place with the painter's tape. Nice. So let's go back and put the second wing
here and do the same thing. I hope it wasn't too
painful to watch. Here we go. We got snow, we got wings, we got the fairy, and I think it's a
magical illustration. I hope you enjoyed
painting it with me. Thank you. [MUSIC]
13. Last Thoughts: Thank you for joining
me in this class. I hope you had a chance
to paint with me. If you like the class, please leave a review, and upload the project, or project section of a class. If you're uploading your
project to Instagram, please tag me so I can see
your beautiful art work. I will see you in
my next class. Bye.
 Irina Trzaskos, Watercolor Artist & Illustrator