Transcripts
1. Intro: Hi, my name is Fiona the Pinto, and I'm a Scottish
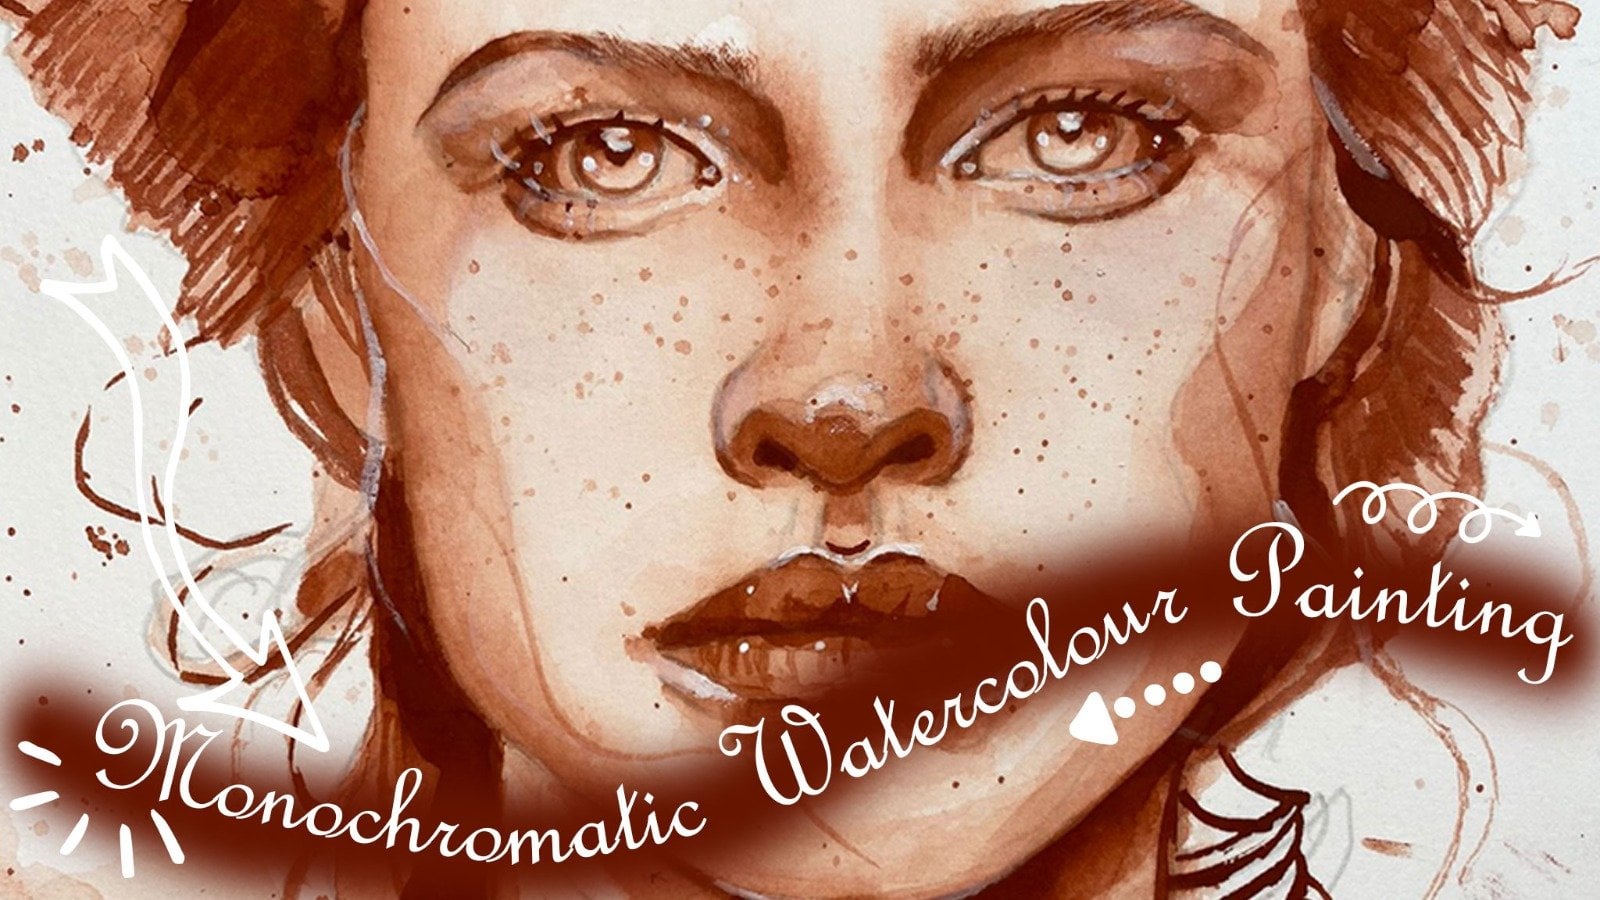
italian watercolor artist based in Rome. I love painting
expressive portraits. And naturally the eyes
are the feature that reveals most about one's
thoughts and emotions. One state of mind. In this lesson, I
will walk you through painting the eye in watercolor, which is something
that can be quite challenging if you don't
know which steps to take. So I'll do my best
to help you along.
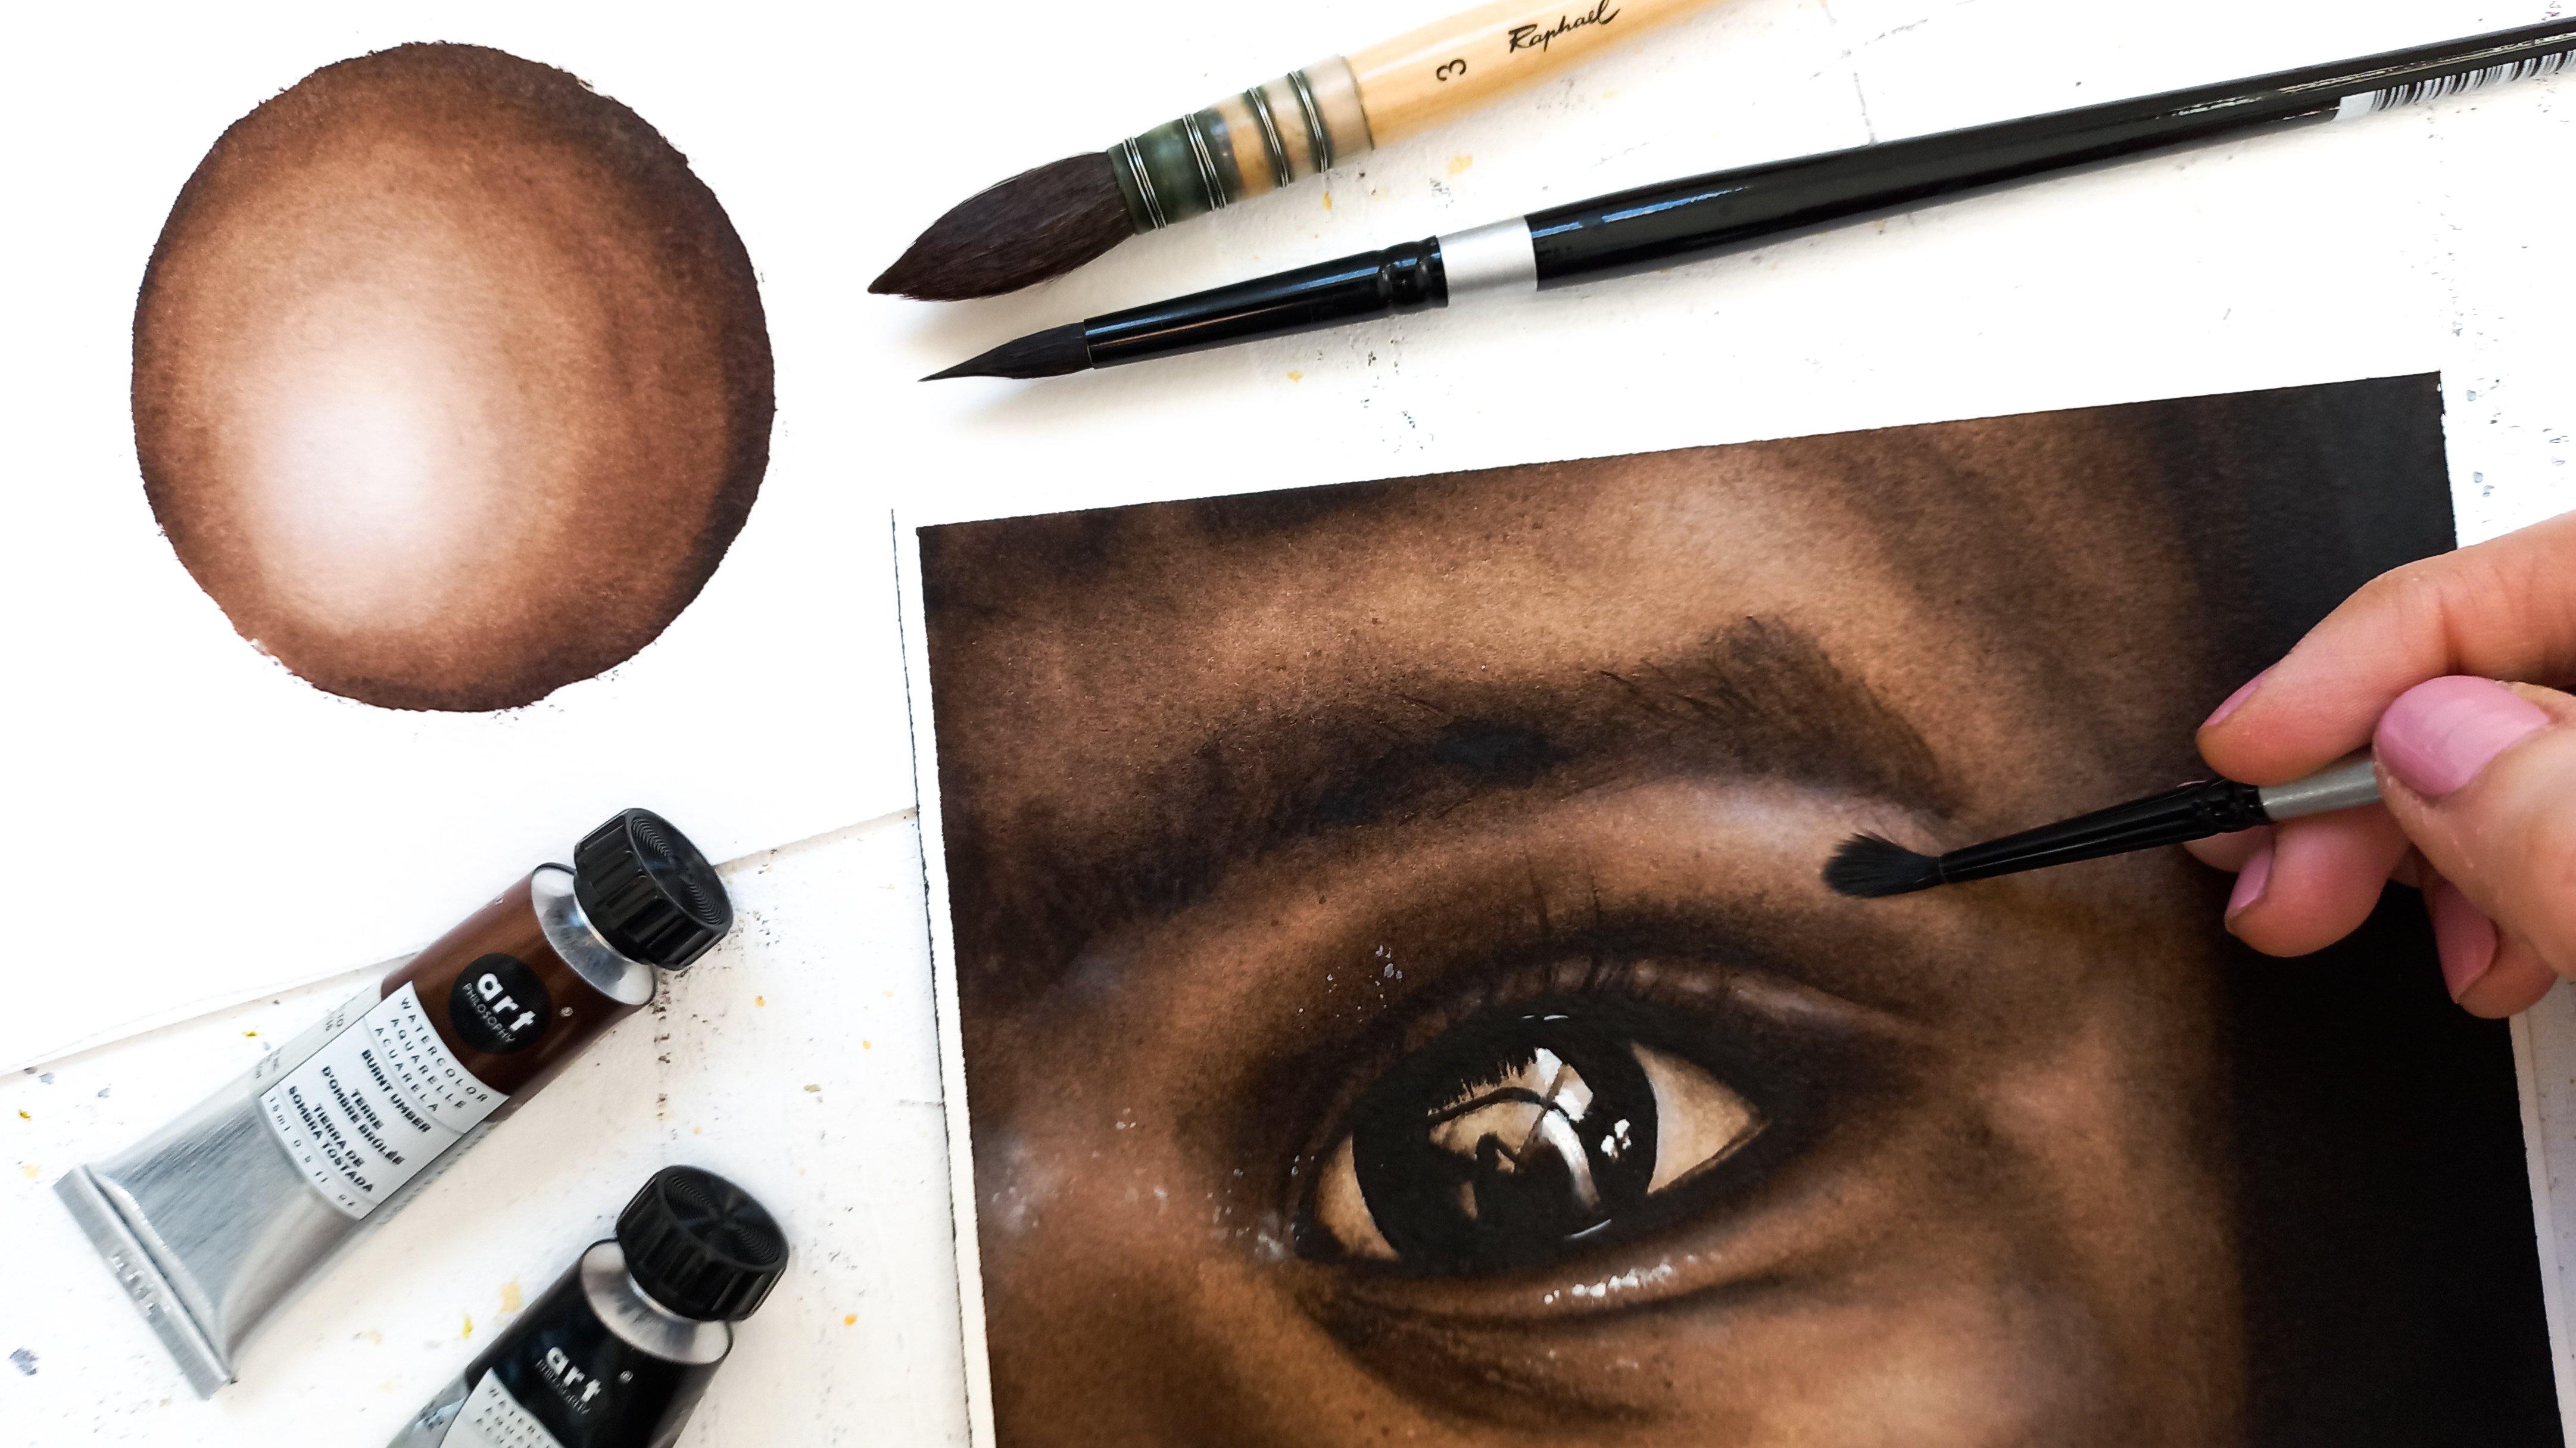
2. Materials: Let's jump right into what materials you're going to need. Well, of course, a
large jar of water, a pallet to mix your paints. I love ceramic ones, but any dish will do
your watercolors. Of course, I have loads, but even a small
pilot or a few tubes will do paint brushes. My favorite is silver black
velvet, number eight, but I also have a
finer detail brush, especially for this project. Nh2 pencil and eraser. And if you own one or white
gel pen, watercolor paper, I am using Winsor and Newton
hot pressed 100% cotton, but makes sure whatever brand you're using that
it's good quality. A scrap piece of paper
to test your colors out, of course, kitchen paper, which I'm sure you will
have in your house.
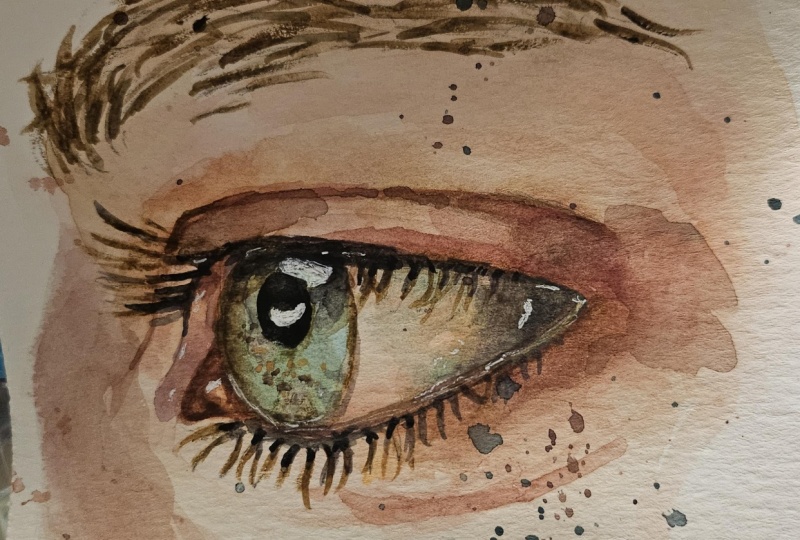
3. First Wet in Wet Layers: So this is the reference
photo that I chose and I really like it
because it's very blurred, especially around this area. And that will help us
to remain expressive. And also the fact that it's in black and white
will help us with gauging values and
choosing our own collect. You will find the sketch, outline and the photo reference and everything else in
the list of materials. So I'm mixing this very
watery wash of madder lake, red light, burnt umber on something called flesh
tint by Roman small. Now if you don't have that, you can use a Naples yellow. If you don't have
Naples yellow, either, you can just go ahead
and use something like yellow ocher or raw sienna. So the important
thing here is to have quite a large
brush and to make sure that your water to color racial isn't favor of the water. So it's like a puddle
of paint basically. We are just going in
and I'm using this is Skoda number ten brush. This is going to help me remain express it using a large brush, which will stop me from
trying to go into details. I'm just laying that down
all around the eyelid and the under eye and also bringing it up into
the white of the eye. Because something
that we've got to understand really early on is that the white
of the eye is not light that are
capillaries in it. There are shadows and we're just getting rid of
it right off the bat. I am spreading that
mixture all over r I. And I am using what is called
the wet and wet technique, which basically means
exactly what it sounds using wet paint on wet paper. So as you can see, I keep adding more of that
mixture into certain areas. I am dotting it along
the eyelid and just letting the water
do the work for us. Letting the water allowed
to spread the paint and to get this really expressive
and beautiful Look. I'm not picking up some burnt umber and I'm
just going to go right in late in the areas where there is naturally
more redness around the eye. So on the lower outer
corner of the eye, on the inside of the eye, up near the corner
of the eyelid. And I am just putting
it down where I see that there is more
darkness in a reference image. And going over the crease of the upper eyelid to
enhance the shadow. I'm using this dotting technique because our paper is still wet that you will see the adults can spread out by themselves. I'm also already flicking some paint on there
because it kind of helps me get into that mindset where everything has to
be loose and expressive. Have to fight myself trying to go towards more
detail and more control. So this really helps me. I am going into the
tear duct and I am dropping in for madder lake, red light, more and more, let's say concentrated
mixture of that. And again, I'm dotting it
along the lower rim of the eye and up in the eyelid, also in the inner corner, again using that
dotting technique. And you can see me do that also. In the upper rim on the inside
of the corner of the eye. I'm just pulling that paint
along the crease of the eye trying to get intensity
in that shadow area. And remember that
it's important to keep your reference image
nearby at all times, not for the colors in this case, because it's a black
and white photo that to gauge values. So dark tones, mid
tones, and tones. We need at least three
tones in every painting. For it to look realistic. And using a clean
brush to spread out the color and smooth out harsh edges where I don't want
them to be going back in, just dropping some color into that tear duct. As you can see. As I just dropped
the color in there, automatically spreads by itself. So it's really important
to let the paint and water work together and create
the magic of watercolor. Let them do the work for you. I go on dotting the paint along the lower
edge of the sclera, which is the so-called
white of the eyeball. And more of that more
concentrated mixture in the tear duct again, because I really want
it to stand out. And as you can see, we are already beginning
to achieve that intensity. And this is beginning to
look more like an eye. Just start to act
more intuitively. I have no picked up some more of that mixture with
more burnt umber in it and I'm dragging it
along the crease of the eyelid to get more
darkness in that area. Are wet and wet. On wet layers have
been put down. And I will see you in the
second part of our course.
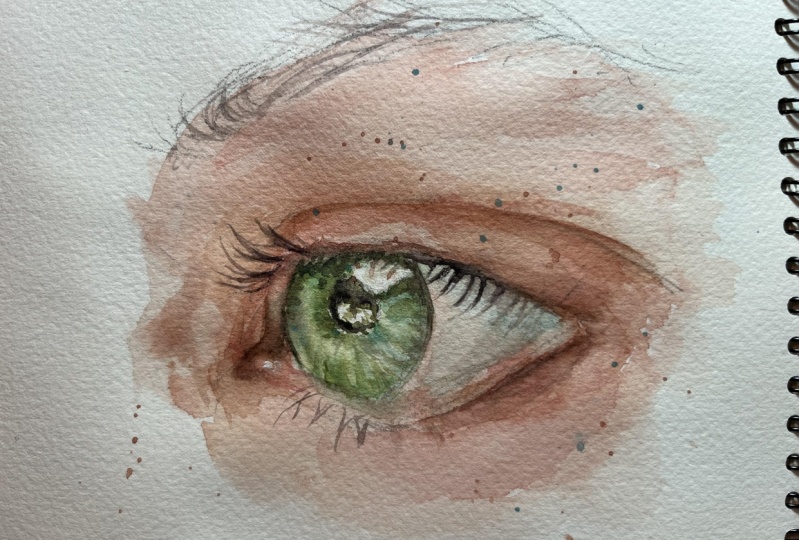
4. Building Your Layers: So at this stage,
don't worry if you see any bleeding
into areas where you don't want the paint to
be intentional part of painting wet and wet and
remaining expressive, embrace those hard edges. So I've picked up
some more of that burnt umber here
and I'm just going into any darker areas that I can see in my reference photo. I cannot stress,
stress enough how important it is to always have your reference image nearby. Because it really helps you
to gauge and values and to be able to see where
the light and shadow are. If you don't get
these things right, this step right in a painting, then it's going to lose
intensity and depth. So you need to build up
layers with watercolor, everything dry so much later, we always end up with a diluted version compared to the one that we were expecting. So it's a matter to
build up layers and build up layers that are thin. So to avoid other
working your piece, you will want to make
sure you are, as I said, building up layers
that are thin and avoid using colors that
are not too transparent. So if Martinez is a
problem that you have, I would stray away from colors
that are fighting them. Or if you decide to use them, then maybe you should
just use one of them. Pair, piece. I've not picked up
some cobalt teal and I'm going into the eyeball. Now if you don't
have cobalt teal, anything like ultra
marine or any other blue. We'll also do my paper
is still quite down. It's not sopping wet anymore. If you find that your
paper is too wet, then just go in and use
your heat to your hairdryer and dry the paper so that
you have more control. So basically I'm
concentrating on this shadow area in
the corner of the eye. Sweeping my brush across any edges that I
want to be softer. And then I'm going
into the eye with the same color will
seem cobalt teal, which is quite a bright color. And I'm beginning
to gently lay down the color inside the iris. This stage, I don't have
much paint on my brush, much water on my brush. It's very just just
slightly damp. I want to try and paint around the highlight at the
top of the iris. Now, don't worry if
by any chance you lose that because we will be able to bring it back with white gouache
or white gel pen. So very gently, just by
using the side of my brush. As I said, not very wet. It's lightly damped. Go in and carefully and just using a very thin
layer of paint. So I'm going to go in
with some sap green. You can see it here. I've picked up my
shrinking palette, which is lovely, very old, but it's such good quality. And I love the sap green here. And I'm just going
to bring that in, drop that into the cobalt teal that I had previously mixed. And they're going to drop
it into the iris because obviously the iris
never just one color. So we want to have a little
bit of variety in there. And I'm checking if the
paper is still wet enough to allow the paint to spread a little bit on its
own. But it gives it. You can just help it
along with your brush. And I just love how expressive this watercolor I is coming along and how soft
and beautiful it is. And I hope that
you are achieving the same softness
and the same effect. I'm just going in with
some burnt umber to deepen the shadow in the Iowa Lead
in the crease of the eyelid. And as earlier, there's not
much water on my brush, so the mix, mixture
is more concentrated. And in watercolor, you
always have to be aware of how much water you
have on your brush. Because controlling
delicate balance between painting water is really one of the biggest challenges
of this technique. I've just picked up
some madder lake red light and I'm
going to go into that tear ducts and I'm just darkening it
up a little bit. And mimics is slightly
more watery at this stage. Here, I'm using a smaller
brush, number six, and I'm mixing some violet with yellow ocher to obtain
this shadow area. And I'm checking it
on a scrap piece of watercolor paper to see if it's suitable for what
they want to use it for. And then going
into the corner of that eyeball again because I see darker shadow in my
reference image there. And then just placing that
shadow where I see it. Then I will also check for other shadow areas I can see in the reference image and use that same mixture to
add intensity to them. This becomes a very
intuitive process. At this stage, you have to just follow your instinct
and follow your intuition and obviously follow your what
you see visually as well. And I hope you're beginning
to get a grip of things. If you're a beginner, don't
feel too scared or worried. Because watercolor can be daunting when you're
starting out, but it's just really
a matter of practice. And as I often say, pushing through the
ugly face because that happens so
often in watercolor. I'm just going into
the top of the iris as well to create some shadow. We very often do have a shadow
at the top of the iris is cast by our eyelid
and the eyelashes. And we want to be very
careful at this stage to not go in with details
that are too stiff. We need to preserve the
softness of this painting. I'm not mixing some
violet just over there on my palate to the
right hand side. And then bringing that yeah, Again, using it like
a shadow color, let's say I'm bringing it into the iris and around the eye. And as I was saying, it's very important
right now not to go in with details
that are too stiff. In the reference photo, there are some strands
of her eyebrows are hairs and the eyebrows
that are in focus. I'm still on the
fence about that, whether to go in
and enhance them. But it's really
walking a thin line. Managing to keep the looseness because all it takes is adding a few stiff details and you've
lost that expressiveness. So be very careful. I'm adding a shadow next to the pupil because
there's one there. And I just also added
one at the bottom of the iris as C1 in
the reference photo. I'm going into those flying
eyelashes, very likely. And if you look at
the reference image, you will see that
they are blurred. And the way we can achieve something like this is
by picking up a really, really fine detail brush. I'm actually using a
nail art brush for this. And the heart trouble trouble I was having with it was that it was really hardly picks
up any paint at all. So I would suggest if
you have a really, really fine brush to
premix your color with with a larger brush and then pick up the paint
with your smaller brush. So I'm using this brush and put very little
pressure on it. And remember that the
eyelashes are not straight. They were carved up the root and also they will cross
over each other, kind of crisscrossing
and just be very delicate while going
into those eyelashes. I'm painting thumb in the inner corner of
the eye as well. Remember, they are curved and sometimes adding
too many eyelashes. As they say, less is more. And sometimes
eyelashes can distract from the softness of a painting. So be very delicate. So just a little
bit of a sneak peek into my messy workspace. So things are not all with
aesthetically pleasing. So I'm mixing some English red and violet because
I think that I need to intensify the area
of the tear ducts and the area around the eye just been really no more
intensity certain areas. And remember to always have your kitchen paper
handy if you need to. Lift some color, just press
it down firmly and lift. I'm working with that theme
for column number six, brush and literally just
going into anywhere, I think needs to tackling
the root of the eyelashes and then going in with a clean, damp brush, smoothing out areas that need to
be smoothed out. I've slightly sped
up the video here, not too much, just slightly. So we can get through this step faster because I don't
really have much to say at this point except for the
fact that I use this mixture to reinforce factum
shadow areas. And we have built up the layers. So we're now going to go into the next segment of our lesson. And I hope that you are
enjoying it up till now. And I will need to in the
next part of this course.
5. Adding Subtle Details: I'm still using that to Cal number six brush
and I'm going into the root of the eyelashes using some of that madder
lake red light. And I'm actually enhancing the shadow I can
see in the corner, on the outside corner
of the eyelid. I think can see that
in my reference image. And also that slight line you can see in the reference
image just below her eye. That is something that I like, I like to put in my paintings. And at the moment, you can actually mix anything
that you find on your mixing tray as the palette for this painting
is quite limited, just as long as you don't
mix any of that cobalt teal, if that is what we're
using for the iris. And by mixing these colors, you will also get a
more cohesive palette. So what I'm doing is just going into all the areas
where I see shadow. This is a very repetitive
exercise in that way. But as with watercolor, that is just a matter of
working with watercolor, you have to keep on intensify your layers and adding depth. And that is what I am doing. And just mixing some burnt umber there and going into the iris. I'm actually darkening up the area up at the
top of the iris. And I'm bringing
down because very often irises do have a
darker circle around the, around them and darkening up the inside of the top
of the iris as well. I usually go much
darker than this, creating shadows in the iris, but I find that in this photo the transitions are much softer or they want
to keep it that way. I'm slightly
reinforcing that shadow at the bottom of the iris, which is the shape of an upturned triangle
or a pyramid shape. So I'm getting that in
there and going around the iris as I can detect
some shadow in there. And then up at the top again. Now the area just
above the iris, I want to make slightly darker because I'm picking up
some indigo and then placing it around that
highlight that I know that when I add the white gouache
or white gel pen, if I decide to add it, then that will
really make it pop. If the area around it is darker. Just working my way around
the top of the iris with that indigo and belong with a more kind of
watered version of it. And bringing it down
very softly with a clean damp brush going into the inside
of the iris as well. I'm bringing it down. And then just kind of
creating those little lines. You can see around the
edges of the iris as well. Using very delicate
sweeping motions and not putting much pressure
on your brush at all. So I'm now going into the
eyebrows and as I said earlier, I am not sure or I
wasn't sure yet, whether to make them as to make some of the
strands and then stand out as they do
in the photograph. So a trick is, in this case, I mixed
burnt umber with violet. And in this case the trick is to go in with a color
that is pretty light. As you can see, that
is quite watered down. It's not a very dark color. And it's almost as though you are laying down
a sketch, an idea. And then if you like it, you can always go
in later on and reinforce those headers
and make them darker. Or maybe just reinforce some of them and leave some
of them lighter. Which reflects what we actually
see in real life because obviously some strands of hair will pick up more
light than others. So that is what I'm going, what I'm doing here, just going in very
lightly and going in filling and individual hairs, kind of trying to replicate what I see in the reference image. My mixture here is very, not too watery and quite light. So I have more burnt umber and they're rather than violet, because Violet can quite, can bring mixed to go
darker quite easily. A specific brand of burnt umber, which is White Nights, is not very pigmented anyway. So I'm just going over some of those specific strands that
I wanted to stand out more. I like to step back here and there to assess how
a painting is going, just to take a look at it and decide what I
want to do with it. Basically. Now I've wet my brush
and I'm kind of smoothing out some
of those hairs. I'm drying everything
with my heat tool. I'm not mixing some burnt
umber with some blue. Ultramarine blue would be a good color to
mix for any blue, really just to get a darker
color that is not black, which can sometimes be
a little bit opaque. And I'm going into the eyelashes always being very delicate. And again, as I said earlier, not putting too much
pressure on them and creating that curving shape. That eyelashes have. Just barely touching the paper
with the tip of my brush. We have some eyelashes, they are going downwards
towards the outer edge. For the bottom, eyelashes be even more delicate
if possible, as they are very
fine and don't bring the darkness all the
way down because they tend to get even
finer at the tip. So making them darker
at the root and lighter at the tip is
generally a good idea. I'm also going in with some burnt umber and a pinprick
of violet to darken up that shadow near to where the bridge of
the nose would be. See you in the final segment.
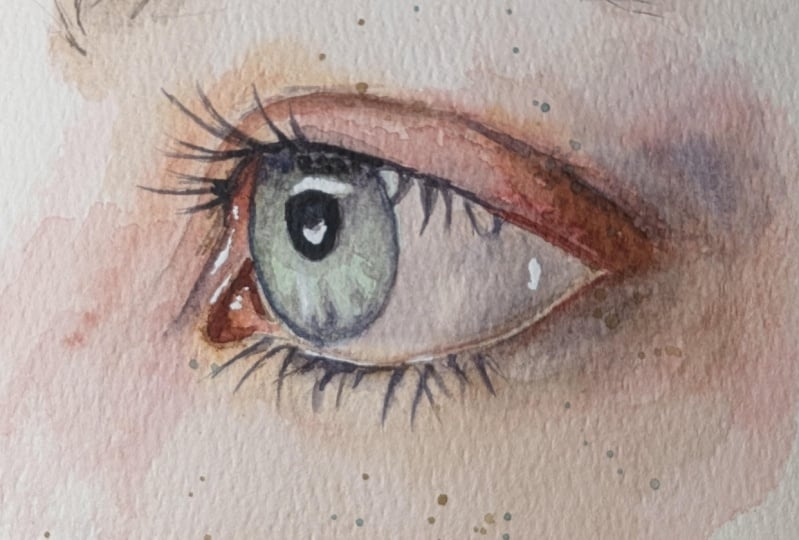
6. Finishing Touches and Project: Welcome to the final
segment of this class. I'm now mixing dark color or dark value for this painting. And you can either
mix burnt umber and ultramarine
blue to get a more transparent black are just makes black if you
prefer to do so. And I'm rolling my
brush in that mixture, which is very concentrated. There's not much water in it. You can see that rolling motion. This helps me pick up paint
on all sides of the brush. I'm going into that pupil
and I'm just filling it in using the tip of this
Raquel number six brush, which is a brush that
comes to a nice point. And then just
repeating the action and leaving a little highlight, which is just the white of
the paper inside the pupil. And then just using
that lack to go over certain individual
eyelashes just to make them stand out more and leaving
the other one's lighter, just to give the eye a more
natural appearance and the painting a more
expressive modes. Then also darkening that area
just above the highlight, as I was saying earlier, if you really wanted
to highlight, to pop or the standout, placing it in an area
that is darker or surrounding it with darker paint is really going to make it pop. I'm cleaning my
brush and going into any areas that need
to be smoothed out. And I am also going in with some dark paint from my palate into the
corner of the eyeball. Because I really feel that in the final stages
of this painting, some shadow areas need to be reinforced as
they have dried. Lighter, of course, as always. Going into the tear duct, into the top of the iris again
in the inside of the iris. Just looking back and forth
between my painting and the reference image and see which areas need
to be darkened up. Mixing some burnt umber here
I'm creating a puddle orbit, so lots of water. And I'm flicking it
with my brush just by tapping the handle of my
brush with my forefinger, using a very confident
steady movement. And I'm also picking
up some blue and I'm repeating that
same action again, going all around the
eye area and then also bringing it up
above the eyebrow. And this is a step
that will really make the painting look
loose and expressive. I'm then mixing some burnt
umber with that violet. And I'm going into the area
in the corner of the eyelid. Not only to intensify shadows, but to create that
nice contrast between the browns and the
blue of the iris. And I use my clean damp
brush to smooth out any hard edges and to create nice and smooth
transitions of color. And also using that mixture to go over the crease
of the eyelid. And also to intensify
that shadow, which is hinting at the beginning of the
top of the bridge of the nose and then smoothing it out with
my clean damp brush. Just picked up my
gouache gouache or white gel pen and
adding some highlights, dotting them around the eye. And you will also see me go
in with some burnt umber and doffing that into the iris just to add some dimension. So we've come to the
end of my class and I hope you've thoroughly
enjoyed it as much as I did. And please upload your project of this expressive watercolor I to Skillshare so that I
can give you some feedback. And also tagging me at
my Instagram handle, drawings in a drawer,
all in one word. If you're a beginner
and watercolor and would also like to check out my other class on
Skillshare for portrait. It's called Women in watercolor. I also have a YouTube
channel where I often upload product reviews
and tutorials and it's also called
drawings in a drawer. I hope to see you
in my next class. Bye.
 Fiona Di Pinto, Watercolour and more