Transcripts
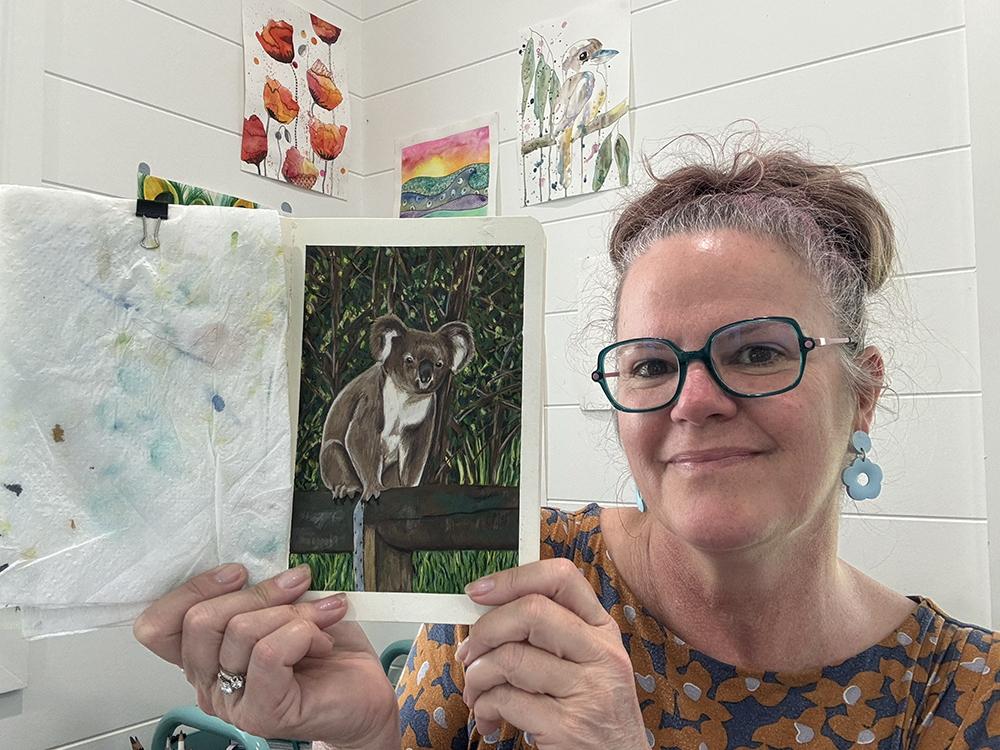
1. Koala Welcome: What animal comes to mind
when you think of Australia? We've got the kangaroo, the oka bara, the magpie, the crocodile, the mu, and of coe, the Koala. The Koala is one of the
most recognized animals for Australians. This is what we're going to
be painting in this project. What makes it even
more special is that the reference photo
for the project, I took in my own backyard. I live in the Hinterland
on the Gold Coast, and this little guy was just hanging around on
the paddock fence, just minding his own business, and let me get quite
close to him as well. We're going to be working
quite small again, just like A five standard
paper or sketchbook, and we're going to be using
gas and colored pencil. And if I haven't met you before, my name is Jane from
misses Red's art room. I am the multi million
Ditto colored art teacher and illustrator. So let us get painting.
2. Koala Class Project: On our class project, we're going to be using gas
paints and colored pencils. If you haven't used gua
before, that's not a problem. It is different to watercolor, it is different to acrylic. There is a lot of
similarities with them, but I do recommend that you
actually have ga paints handy for this exercise because I'm using them and you
will see how I use them. You will learn how to
use the gua paints. Another thing that I need
to just make clear is that my natural style
is quite detailed. The end result of this project, has very, very fine detail
to it. That is my thing. I would love to be a
lot looser with my art, but it's just where it goes. It will always end down
that detailed path. If your natural style is
not the detail that I have got and you don't spend as much time on the
project as I do, then please don't worry. We've all got a different style, and that is the great
thing about doing these classes is
that you actually start to learn what
your natural style is. This is a great
project to familiarize yourself with gas paint
and the colored pencils. Fill another page in your sketchbook if that's
what you're working in. A painting and
drawing is relaxing. Finally, nobody needs to draw this Koala free hand because I show you
in the video how to transfer your line drawing onto your sketchbook or your mixed media paper
that you'll be using. All right. Video
is not over yet. I actually forgot to
mention the project and description tab in the
skill share folder. This is where you will
find your Koala template, and it is also where you will upload your project
once you've finished, or if you've got a question, in regards to it or you want
feedback halfway through, this is also where you post it. The project and
description tab is between the about
and the review tab. If you click on there,
that's where you're going to find the
Kuala template, but it's also where
you can upload. When you do upload, other students who are doing the project are going
to see it as well. But if you've got
a question for me, someone else might
have the same question but haven't actually asked. You're helping out
by asking questions or putting your
finished Koala project up there at the end.
I want to see it. Absolutely, I do.
But I will see it in any stage of the project
as well for feedback. If there's a question that you've got, anything like that. The next video, we're going to be talking about materials, so I'll see you there.
3. Materials: Okay, we are onto
the material list. So let's start with
our sketch book. Now, if you don't
have a sketchbook, paper has to be at least mixed
media or watercolor paper, and you wanting it
to be over 200 GSM. And the reason for that is because anything
that's thinner than that is going to w bubble. It won't lay flat. If you're in a sketch book, this one is not a five, but it's very close
to an A five. It is a Stillman and
burn mixed media book. I love using this one, and the little slip
is in the back here. Mixed media, 270 GSM. A, so that's what
all my gas paintings are being done in
currently in C, that one's still
got the sticky on it because that one is
being done at the moment. So Sketchbook, the printout
is for an A five size. So if you wanted to do it larger than that and you wanted
to trace your printout, you're going to have to
print out your image photo a little bit bigger. In regards to the image, so do print it out. If you're going to do
the tracing method, which I'll show you
in the next video. Um because the back you
do all the scribble on, and then you transfer
it onto your page. So the only time you
actually use this printout is for transferring your
koala onto your page. You don't use it for
color reference. As you can see, I have
a general home printer. And the colors in that do not reflect the colors
that are in the photo. Use your photo that is part of this project to actually
look at color wise, but use your printout to do
the tracing of the koala. Of course, you can
also free hand draw. I did do that with the magpie, but I have just gone with
the template for the Koala. All right. We've got that. Yes, you need to get
a print out of that. Okay. So into what I've
got in here, paper towel, always handy because
it's cheap to buy, great to use, and
you end up with beautiful delight works
all over your paper towel. So definitely have a
sheet of paper towel. In regards to the
brushes we're using, I have started with a flat
doesn't say a size on that, but it would be about a
ten. I think, hang on. I've got another one
here. Oh, that's a different funny size as well. So, sort of a largish
brush size flat. That's to put color
down to start with. Then we've got a fel bit six. You don't have to
have the exact size and shapes of brushes, but this is just to let you
know what size that we are working with because there's plenty of different
size brushes. A fill six, A fb is just that
it's got round edges on it. Then I've got two rounds
in very small size, two and a zero. The zeros are hard to come by. They're not easy to find. If your smallest brush
is a two or a one, that's perfect as well. Okay. That's the four brushes that I'm using through this. That's just to put
color down to start with and these three
used throughout. Then, of course, just a pencil, and this is the washi tape
that I use that you'll see, it's the same as the one
that I'm doing on here. Why tape is great to use. It's easy to to purchase. You can buy them from, I reckon you can
probably even pick them up in supermarkets now. Um, but the one thing
you want to do with your washer tape is when you peel off to put down so that you get these
lovely crisp borders, you have to put it onto your clothes first
and then pull it up. And then that just takes
away a little bit of the tact and then
you can put it down. It is still torn. I don't know if you can
see that there. Oh, yeah. It has still torn a
little bit there, but that's okay. It
wasn't a big tear. Um, so that's the washer tape, not essential, but if you've
got it, then perfect. And of course, a
bucket for your water. So, this one's mine. Nice and big, solid. It's not going to
be knocked over, and I'm definitely
not going to confuse it for the glass that
I'm drinking out of. And then we move on to our gage. So I will provide
you with a list of the colors that I've used. You don't have to use
exactly the same colors, but at least if you can get
into the ballpark of it. This one here, the Linden green, that one's a color that can
be made up quite easily. It's a bit of a golden yellow. Um color. So I've
got Lyndon green, Sap green, Windsor green, Sepia, van **** brown, burnt umber, ultramarine, ivory
black, sinc white, and neutral gray three. So that's the colors that I
have used in this project. And if you don't
have these colors, then something similar is
going to work as well. If you're looking for that
realistic color palette of the koala. Now, they are all
Windsor and Newton. Windsor and Newton are not
the only ones that make Gach. There are other
companies as well. I feel that with
Gach and watercolor, if you buy cheap, you will get cheap color. These tubes are not
that expensive. They are in series. So you've got Series one. The Windsor green
is a series three. And the rest are all series one. They will be roughly a let's
say Let's say $12 a tube, depending on where you are and at what time
you're watching this, but you get a lot
out of these tubes. There are 14 mill and you will get a lot of life
out of the tubes. Best not to go cheap on gas because your
colors will fade. They won't blend properly, better to just buy the
essentials of what you need. The other thing
that's not in view. I'll just bring it into
view is my colored pencils. Now, I have a large set
of the polychromos, and I bought them 30 years ago. So the container
that they came in, the plastic is all deteriorated. So I had to put them
into a new folder, and that is fine
because I really like this little pencil case. I haven't specified
colors that I use because you use
what you've got. And when it comes to pencils, again, the better the quality, the better the result, but you can get away with a student grade pencils as well. I'm not expecting
anyone to go out there and buy the artist quality
if you can't afford it. Just use what you've got. You really we just do the fine little details with the colored pencil.
There's not a lot. All right, so that is
the materials that we are using in this project, and let's get on
to the next video.
4. Drawing Koala up: All right, so we are about to prepare our paper
with our image. So we need to put
some washi tape down. With the washi tape, I
do tend to just stick it on my clothes first
once. So peel it out. Stick it onto my
whatever I'm wearing. It just helps take a
little bit of the tack. Um, now, I do have to reveal a half painting already
happening on that side. So that is there, but
I didn't want to go to a blank page just for
the purpose of doing this. So I've printed out
the Koala image. This is the size that
you will receive it as. So if you are going
to go larger, you will have to blow your
image up a little bit. Otherwise, it's
suitable for around an A five sketch book that
this one is in. All right. So let's start by preparing Okay, so now we are ready to apply our template
to the page. Now, I would normally
draw this up myself. But just time wise, I think it's easier just
to do a transfer of this. So Any pencil doesn't have to
be a proper drawing pencil, but as long as it's
at least HB or two B. So you will just turn
your image over. And then with the
side of your pencil, do a nice, dark, messy transfer over the koala. You should be able
to see the image roughly through the paper. All you need is the
post that he's sitting on call him a he. I don't know if he's a he, but he is a big koala.
He looks like a boy. And then bring back your paper. This is a mixed
media paper as well. Stillman and Bourne book. This is a little bit
harder for me to see where I'm going to place him I want him
to be over the side. It's about there. I hope
that it's fairly straight. I can just see down
the bottom here. Straighten that up a bit there. I'm thinking it's about
there and it ends just here. Then for this, you just go
back over with that pencil again and do all your outlines. You could even just
do how I've just done where the back leg
meets with the front leg. These are a little bit
hard to see their claws. There might have
to be a little bit of guess work going on there. He's actually got one
hand over the other hand. This koala was taken
in my backyard, and I'll actually, if I
haven't already showed you, I will show you where
he was sitting. We've lived here for 19 years and it's the third
koala I've seen. This was in the broad daylight. The other ones have
been at nighttime. I just sitting on
our back fence. Anyway, there we go. A trick to this, if you want to make sure
that you have covered everything is to keep
your less dominant hand staying flat and just being
able to move it like that. I know it's hard for you to see that there is pencil there, but there so I could check it to make
sure I put both eyes in, the nose, everything looks like it in position,
which it is. Don't know if I'm going
to keep this bit of metal in. Don't know. This along here is old wire that for the electric fence that the dog to keep the
dog in got a beagle. That was before we had it under the ground
to keep him in, which works so better. Maybe I will keep
this bit of metal in. It's part of the fencing. Okay. See I haven't
done that bit. That looks like that's
all in there now. I haven't done the
bottom bit here. I haven't colored it in, but it has left an
impression on the paper, so I'll be able to do that. Let me see if I can
show you there we go. So that's what you should get, and you don't really want
to go over that in Well, you will have to actually
go over it in a little bit darker because we're going to be putting a wash over
it to start with. So yeah, once you have
finished the transfer, then just go over it lightly.
Don't press too hard. You can see that this has
actually left a bit of an indent in the paper, which you won't see once
we get the gah going. All right, so just do that, and then we'll get on
with the next lesson.
5. Koala first layer: All right, everyone. We are
about to start painting. So with this layer, it is going to be very thin. When I talk about Gach, I have three consistency levels. Consistency one is
when it is just ga, no water added and
a fairly dry brush. Consistency two is what I will generally use when I'm
painting with Gach, which is a wet brush. And a little bit of water
mixed into your gross paint. And then the third consistency is like a watercolor effect. So for the first layer, we want it to be a
watercolor effect, which means you'll see
all your brush marks. It will be Um, not true to the color
that you're working. The other thing I want to say is that I actually
created two videos, and they were stuffed
up in the editing, and I don't know how, but I lost everything. So this is the second time I'm actually going
through this video. And what happens in about two
videos time or two project, you know, is that I will start actually talking to the camera as I'm painting. Um, so this voice over
won't go on for too long. And the beauty behind
that is that I talk about which color paint
I'm using at the time. Was now, I'm I'm
guessing a little bit. But if I just go back
to my notes on this, this is most likely
the Van **** brown. So Van **** brown is um, a warm chocolate brown. Exactly what you can see
on what I'm painting here. So just get a warm brown. It is basically so that we
just cover the white paper. That is all we're
doing at the moment. Is just covering that white, fresh paper look and just
getting first layer down. Okay. So, I don't think there's
too much I have to say. I probably have to come back
and say about the colors, the other colors that
I'm going to do. So, I will just let a little bit of music play until I
get onto the next color, and then I'll come back and
do another voice over for it. Oh, Okay, so we're about to do the post that the
Koala is sitting on. And this looks like I've
put winds of green in, which is quite a deep green. You'll see pretty much what
I'm doing with it here. I maybe adding it. Yes, I am. I'm adding a little bit of the van **** brown
to it as well. I obviously don't want
it to be a fresh green. I want it to be a bit of a brown green because
the post would have naturally been that
timber colored look, and there's a lot of moss that's grown
on it in the years, very old post that this
ala is sitting on. So again, very watered down and just painting
this windsor green, which is just a deep green. So if you don't have
the Windsor green, you can see there it's like
a really deep tree green, and I've created it to be a little bit darker with
the Van **** brown. O O. O. H. Okay, so I'm now going to add a bit of what is
called linden green. It's a lime green. So a light, yellowy green, not going to add it just alone, it's going to have a bit of
the windsor green into it. This is for sorry, not the trees, the grass
that's under the post. So it's a little bit brighter, or I shouldn't say
it's brighter. It's just that there's
nothing behind it. So it really can be just put
down as a brightish green. So if you don't have
that linden green, something like a sap green
should work just as well, sort of like a froggy green
that I'm putting down here. Then I will do that little bit of metal
that's on the post, and that will be done
in neutral gray three, which just to any gray, you can even mix it with
black and white, if you want. Still keeping it to
this consistency of consistency three. So just nice washes, and you should be able to
still see a lot of your paint, your marks that the
brushes are making. You'll see that the
post is bleeding into the background here.
That doesn't matter at all. I don't know whether I'm
going to mop it up or not, but it doesn't matter because
it's just a base layer. Alright, so I'm going to start
painting in A koala now. I've added a little bit more of the van **** brown and
the neutral gray three, and I will mix these
together to create that sort of browny gray
coat of the koala. And you'll notice I've also
moved to a size, what is it? Size six felt. So this is still a flat brush, but the corner is a round. So it's sort of like right in between a round brush and
a flat brush, I guess. Yeah. And the
consistency for this is sort of between that
consistency two and three. So you can see it
looks nice and watery, but it's not going
to be like stupidly watery because it doesn't have to be because
it's a smaller area. So we don't have to apply
too many layers to this. You can see that straightaway, as I start painting it, I'm not too sure what
I do in regards to different areas because
you wouldn't be able to see a pencil
line underneath. It's been too long since
I actually did this. So just continue that. And and then I'll
probably go to some black after this for eyes and nose. But, yeah, just
continue on and if I change color or anything,
I'll let you know. Oh. Ooh the O. All right. So it was more of a consistency
three to the Koala, because I think I
would still be able to see the pencil
work underneath. So now I'm just going
to put the sorry, the neutral gray three into
the metal on the post. And then I have laid in there. I'm sure it's a bit of it could be it could be black or it could be CPA.
We'll soon find out. I think it's black that
I've just laid down there. See, this is what's
going to make it so easy when I actually
start talking rather than having to do this guess
work with the voiceover. I've also gone to a
very small brush. So this is a zero round for this and the eyes and
nose is a zero round. So just grab a small brush
similar to this one. Now, just put the
the neutral gray into what appears
to be the black, and I'm just making
a darker gray to do the nose and
possibly the eyes as well. Yeah, that wouldn't have been CPA, that would
have been black. Consistency level for this is between the one and the two. So one is bruh, dry paint, and two is a damp brush, a little bit of water
added to your mix. So I'd say that it's
a consistency too, but it's such a small brush that it's not going to take a lot
of water in that heather. All right. Cutting
in for a second, just to let you know
that my palette is, and this is where we're
up to with the Koala. So it has been about a month since I've
been working on this. The reason for that
is because I've actually been over in Fiji. And then when I got
back, I just had a lot of art stuff to get done. Back into it, but yes, I've got a clean palette, so it will just be
starting again. I've put down my base colors apart from inside
the koala here, which I'm just about to do now, and then we start really getting into the gas painting again. All right. We're
just finishing up the last first layer of koala. I do have construction
going on next door. They're extending
on their house. And every time I go talk, I can hear the drops
going. Apologies for that. It's something that I
cannot do anything about. And hopefully, the
actual recording of this is not too bad either, for some reason, it just seems a bit harder to hear today. So I'm using white. You can use titanium or
zinc. It doesn't matter. With the neutral gray, putting a bit of water to it so that it gets that
consistency two, possibly two or three. Consistency three is
quite watered down. You should be able to see
the pencil line where the legs meet the belly
underneath this layer. It is a smaller area, so we don't have to worry too much about it
being too thin. But yeah, just keep it still between that
consistency two and three. We end all of this with colored pencil as well to
get those fine little tones. All right, so this is
the end of this video. And then we get back into
doing the background again and really
thickening up the paint so that consistency two
to consistency one. All right, so I will see
you in the next video.
6. Koala background trees P1: All right. So we are onto
the background again. We are doing more of
a consistency to now. I will be starting with
the Van **** brown, not mixing anything
in with it at this stage, and consistency too. So we're looking at a nice
creamy texture to the paint. You can't really go wrong
with your tree placement. Just have a look at where
they are in the background. Remember they are about 4 meters at least from where
the koala is sitting. And we will build up layers
with finer little sticks. We'll change to a smaller
brush, I think, maybe not. And we will mix a little bit of the sap green into
the brown as well just to create some different
color for these branches, tree trunks, and
also we finish with a sort of a greeny
brown background to it. Okay. So for the first or probably the first
two thirds of this video, it is a voice over of me, and then towards the end is when I actually start talking
while I'm painting. So it just gets a
bit easier then. I'm actually telling
you what color I'm using rather than guessing. The brush that I'm
using at the moment is this number six felt. So the filbert is a flat brush, but with round corners. So you're not getting that
straight edge off it. The other thing
that I do is I go to a really light
color at some stage. I think that might
be towards the end, and you really can't
see what I'm doing, but I'm talking by that stage, so you'll know what
color I'm using. Just doesn't really
show up in the video. Anyway, I'll switch
to some music and jump back in if I need to. Okay, just jumping
back in again. I'm painfully mixing
very slowly here. I could edit it out,
but you won't actually see the quantity of the brown that I'm using
towards the green. So it is Vandy brown
and sap green. So that chocolate brown and a froggy green is what
you need to mix next. This is going to be behind all those branches that
I've just painted in. So it's a bit of a archy army green kind of color
that I'm mixing, and I'll just paint
in the background. This is the last
bit of the video where I need to do
a voice over for. So once this bit's finished, it's gonna be a lot
easier on all of us. Thank you. Thank you. Thank Oh. Oh. O The see Okay, so I have decided to just press the record button and
just talk as I go, which I think is just going to work better
cause in that way, I know exactly what
paints I'm using, I've just put burn down
because I want to get a little bit more
warmth into some of the branches that I'm
about to paint in now. Before I paint in
some of the leaves. And all of this has got to
be very done very roughly. There is green sap green
in this CPR still, and that is okay. So I'm using a very
small brush now, a number zero round,
which I don't know. Don't know if it really
needs to be so small. And I'm just putting
in branches, sticks. Actually, that feels like
it's still a bit too dark. I might Try and grab
a bit of this white. Some of these paints
are quite old, so they come out of
the tube quite hard. The white being one of them. So really, it doesn't matter where you put these branches. We're just filling
up our background. Gosh. 'Cause I'm using
such a tiny, tiny brush. It really doesn't hold
any paint on it at all. Don't worry if it doesn't
make a complete line either. These are all wayward sticks. So we're going to be
doing a few leaves next and then more sticks
and just really build it up, so it looks like a bit of
a jungle behind the koala, which is what is
happening there. You can't really go wrong
with this part of it. Down below, we've
got just grass, so we don't have to really
worry about it long grass. And you can keep changing the
color of your sticks, too. I can go darker or lighter.
It doesn't matter. Just don't put any over
because he is sitting a good or I'm going to say about four metres in
front of all these trees. Okay. I will now go to six rounds. So we're going to do
a bit of greenery. I'm going to get more green. It's very runny. And might throw down
a bit of winds green, although it might be
No, I don't like that. The bright green is too bright. That's the greens I've got. So that means I want
to grab a dark blue, which I have to run
upstairs and grab.
7. Koala background trees 2: Okay. I've got ultramarine
and also some Prusian blue. So when making a darker green, I might even mix it into there. To make it darker green if
you haven't got a deep green. I had a bit of blue to it. And that will make it darker. I don't know where to put
this one now up there. O Again, this is going to change
as you go along. So what color you make here doesn't have to
remain for very long. We're going to be dusing
it for some leaves, and then we'll
lighten, will darken. So with this, I just want to put down brush strokes
that resemble leaves. They don't have to join up
to any particular stick. They are fairly
dark at the moment. And as we go along, I'm just going to
get lighter leaves happening and add some
more sticks again. We want it all to reflect a fairly dark
background, though. So that our Koala
really stands out. I don't want him to be the same value range
as the background. Okay, so I'm going to start
to lighten up a bit now. Just make sure that
there's empty covering. I got to do Actually, probably should do
the tree branch, get them a little bit lightened. And paint brush
size is a favorite. Number two, two
round on the use. So to do these branches, we're going to be adding
a little bit of white. Oh sorry, not white. We're going to be
lightening the background. So we do have a
mix here of white. I might just encourage that. That was white that
was down there, and then I added brown to it. I think it was the CPA, but I might add a bit of
the very hard burn umber. Just make a nice light brown that I can just do a
few streaks for bark. Again, doesn't have
to be perfect. Actually. I won't I was about to go over the top of
some of the sticks, but I'll just add more sticks. And that does not look like I've put
anything down at all. Mm. I kind of does. Need to be going
lighter, though. Touch more white. Can see how hard it
is to get white. So I'm just adding texture to the larger trees and probably put in a few
more sticks as well. Keeping it on the left
side of the trees, too, because that's where the light seems to be coming from. Yeah, that's starting too good. Add in some more branches
that are lighter in value. You can go down the
sides of some of the darker ones just to
give them a bit more tone. Don't worry about going
over leaves, though. Just a few little light taps of the brush to give more
in the tree trunks. And then we'll get back
onto some more leaves. Okay. So I'll go back up to the
number six round brush. And I might add I might go for
a bit of this linden green just to add some
s kind of green. It's just a real lime
green that linden green. I love it. One of my
favorite colors lime green. Okay, so that's clearly brighter than the other
green that we had. So we'll just continue on and some more green leaves. Keep looking at
your reference to see where those
lighter leaves are. It's there's a big
area down here, which is all light.
It's actually grass. So you could actually I'm
still using the what is it? Six. Yeah, six brush, but I'm not really
putting much pressure on it to get some big
strands of grass. Some bright ones down here. And then I'm going to
add a bit of yellow. And then we'll go back to
a few more steps, I think. Okay, bit of yellow. Let's see. Let's just
go the primary yellow. Oh, geez. One of these really, really hardened up. Oh, boy. I don't remember it
being that hard. Okay. For what is now hard, I'm just going to be putting the brush with the green on it, straight in with water, and this will help soften it. 't got to be careful that you
don't go too watery because you'll be bringing
the consistency down. Didn't realize how hard that
primary yellow had gone. Goes to show. We can still use them even
when they're old. It's feeling like it's
a little bit wafer. So. Oh. Oh, Okay, so I'm going to go back and do some dark sticks again now. Rush, wash. Go back down to the zero rush. And we'll go back to darker mits. These sticks can just be dashes. Really, they don't have to be big strong sticks. Okay. I don't know why I
wash my brush then. I need to put some
lighter ones in as well. All right, so now I'll go back
to doing the leaves again. And really, we're almost
done on that ground. Brush fires, back
to the six round. And Ling that light green. But might just do dark. And some more dark. I wouldn't mind actually putting the window for a
different yellow. I'm going to go spectrum yellow, which really there's
not a lot of difference between primary and spectrum. So that I can
really throw a fly. And also, while I do that, where did I put my white? There I put white. I want to make it a
real golden color. Don't worry about
that little bit of brown that's in there. It's actually added a
really nice darkness to the yellow.
More of a natural. Now, I've got a lot on my brush, so I'm going to rinse my brush. There's too. Rinse brush. Give it a quickie. I don't want excess water in
the brush, take that out. And now adding a new value
to our little painting here. Be a bit more sparingly. We can always come back
to this background. It's just a the ears where
they're quite fluffy, and you can see the
background poking through. Apart from yeah, the ears, it doesn't really matter
about the body of the Koala. He's. And maybe we should just do the bottom
bit before we go on to ale. Just going over a few of them because they
are a little bit too pale and watery
for what I wanted. Okay. All right. Now down to the bottom. I think I might go back
to the zero brush. So a one, two, or zero. And I'll go back to I don't know where this green
falls into mid tone. Maybe. We're going
to be down here, we're going to be doing just
what we did with the sticks, really, and just doing a whole heap of
little brush strokes. And we need to paint over this. If you get some going over the
top, don't worry about it. Because we haven't
painted that yet. We're not doing that black
pipe that's running. I don't even know what
that black pipe is for. I might have been an old
watering system we once had Oh. To a lighter green again. Be a little bit more
gentle with the strikes. Hops. Okay. It has dipped it into the wrong
color. That's right. The wiring that is on
that fence, again, I think we can just use
our artistic license for that and not worry about it. You can do it if
you like. You do it after this green if
you were to put it in. And do more dark ones again. O and go to some of the light yellow. Just a little hints. Okay. All right. So if anything, the bottom doesn't look like it's matching up too
much with the top. Apart from that area there, where we've put some
of those leaves in sorry, blades of grass. So we might just need to enhance that strong
blades of grass there. Doesn't really need
to happen over here. I feel like I want to put some
switch to the number two. Want to put some dark fits in. I don't know where I'm mixed. Okay, so I just want to
be really careful here. Give me a little bit of debt. Add a bit more of
this up here, too. I've added a lot of blue. Go back into more of
a stroke for leaves. That will really help add a little bit more depth
to that background. So that is more blue than green that's been
added there or mixed. Using the sides two rod Oh Okay. We'll do it. So much fun.
Alright. We'll start focusing on the post that the Koala is sitting
on and the itself.
8. Painting koala P1: All right, so we're going
to start on our koala. We still do have stuff
to do on the background. Add some more sticks. Deal with this branch
here a little bit more. But we can move on because we can easily
go back to any of it. I have cleaned my
water bucket as well, so I got some nice clean water. I'm going to be using
a combination for the koala of a six fiel bit and a four round because I don't want
to get too delicate. We will be going back to maybe the two round to do
the nose and the eyes, but hopefully won't be using
that for a little while. We're going to be
using the burnt umber and the neutral gray three. I'm going to actually
put brown into the gray here because that's the color that I really want to achieve. He's not brown and
he's not gray. He's a real smoky smoky color. But with a warmth to it as well. It's making a nice color. It's kind of lightening it, but like adding that gray, smoky color to it as well. I'll just add a bit of water to it. Okay. So I'm starting on
the back and the back does have the sun coming down and creating
that lighter color, but we can go over
that afterwards. Kind of want to
put in these areas I can still see my
pencil work through it, so I don't want to lose that. I might just leave that
area there and that there because that will
actually be lighter anyway. Put in the dark. These little claws are black, so we can just
paint down to them. Don't have to paint them though. That bit there is
quite light and white, so I will let that I'll
paint that in next. Okay. Go over to the other arm. And that area in there, painted, can be
very dark, though. Okay. And up to
these fluffy ears. Don't have to go right out to the sides on this because that's where the fluffiness
will happen. Just keep looking
at your reference, seeing where things
sit and fall. Oh. Okay. Once you have put down the majority of this
color we've made up, that's where we're going
to go to a smaller brush and start adding those
lights and darks. I too dry. Okay. I'll go to the two. I said I was going
to use the four, but I didn't end up
using it just the fiel, but Okay, so we now need
to lighten this again. So I'm going to have
to use this very, very heavy and go
over to this side, I think, unless I
use that one there. I probably use that one there. And the two. I'll need
some of the gray as well. I'll need d d. I'll put
that in there as well. Probably mixing a little bit too here for what we're
going to be needing. I bet to just up my ubers. Okay. So bringing in
a bit of that brown. Probably didn't need any
of the white, actually. Oh, well, we got
it as we use it. Total excess here.
That's all right. Better to have more
than not enough. If anything, I still need to add a little bit more white to it. I might start with this bit, The paint brush is not too wet. You can see the marks
that it's making. I am adding a little
bit of water to it. I don't want it to be too. A it's quite light, and I've just made it
a little bit darker. That's okay. And still
go over it again. It's only 12 layers now. Yeah, and I still
want to add more to his back. Oh. I actually going to go over that again with a lighter color. But nice dry brush
technique over the top to help create
a bit of texture. Are we putting the darker
brown back in again as well. And I'll go up and
do bit in here. I don't like what I've done
there. But that's okay. I can I've still got
time to paint over it. There's going to be a of different tones of
the brown coming th. I have to finish
up here for now, and when I come
back, these paints will have dried out a
bit and that's okay. They're not going to take much
to get nice and wet again. That's what happens to be able to just sit down and get a painting done in one sitting. Fortunately, life
doesn't work that way. My daughter's got a
medical appointment, but I've got to take her to But that's good because it means that when I
come back to it, I'll have nice fresh eyes
and be able to continue on and kind of look at it and see where I need to
improve bits and pieces. He's looking very cute, though. I'll just finish
this leg. Not to do. Okay. All right. I'll leave him just
realize there is meant to be a little claw
that comes out this way. I'll just paint that in there. It's not that light, but I just don't want
to forget about it. I will leave it now, and I will be back probably tomorrow toe on and hopefully be able to finish
it in another sitting. I didn't want to
stop. Actually, I might just do a little
bit on that other ear. Just get that
fluffiness. I ears. Okay. Oh, very cute, little Koala. You're
coming together. I don't want to leave
you, but I have to. Okay. Can brushes down. Make sure, actually,
make sure that you never leave your
brushes in your water. So give them a good sir. Get rid of the water. So you can come back to having clean ice clean water and leave your brushes lying flat to dry. Never stand them upright. Container because all
the paint sediment We'll gather in the barrel of
where the bristles are. So nice clean wash. And then
you just lying them straight down somewhere in
their natural shape. And they'll just dry
like that happily. And then you can put them into whatever container
you use for your brushes. All right. See you
in the next video. Okay. So it's been two days since I have
been painting that. So the paints have all dried up. That's exactly what I was
expecting them to do. If you know that
you're not going to be able to paint
for a couple of days, do your best to actually
cover your palette so that you don't
get little bits of dust and everything in there. So I'm just going to jump
back into the koala, the actual koala itself,
painting the fur. And yeah, continuing on. I've been really wanting to
come back to doing this. Once you get started
on a painting, it's very hard to stop. So I need to wet my paints down, and I was thinking I
probably need to add a bit of actually I should
do this with a larger brush. Just get them all nice
and give them a little. So this is what you
can do in advance. Give everything a nice good
wet to you're working on. Now, I was also thinking as much as I don't
like using black, I am going to have to add
a little bit of black just for toning or shading, I shall say, shading areas. I got my paper towel. And the other color I need
to add is a bit of white. I think that was white. Feel like I should be putting my little painting
glove on now too. Painting glove is a glove that just covers these two fingers, and it's a silk, and I feel
like I should get that out. I will do so soon. I just don't want to hit
because of me to set back down. Starting on a new day is a little bit like when
you are doing exercise, and you really should
do a bit of warm up. Probably shouldn't be going
straight back into the Koala, should have maybe started with a bit more of the
background for a bit of a. But too late, I'm on
to the Koala now. Now that I've blocked in the brown under
painting of the koala. I'm now going over
the top and just putting in highlights and I'll probably be using this size
brush for the majority of this get that
brush out of the way. I want to do a bit
of the dark black. I there's a hair in there. I think a painting
such as this one, it's really just
building up those layers and the painting will
just start to form. I do tend to get into
detail pretty quickly, which is what's
happening right now. So some of you might still
be building up base layers. I'm just putting a
little bit of black into my burnt umber. Okay. I'm continually looking up at my reference of the Koala. It's on my screen. I will
have said it in the intro, but please don't go off a from a home printer unless it's a very good one because
the colors will not be. Much better to go from an
image that's on your screen. My home print is a good one, but when I print something out, I usually do it
not very many dots per inch, usually around 300. If you wanted a really
good quality print out, you got to be up there, 600 DPI easily, if not more, so that you get your colors. You need to have the
right paper as well. It's not just normal old laser copy paper
or ink jet paper. That will just absorb in and
make your image very flat. I'm just basically
jumping around and putting in some of
those low light areas. Oh, I've got my hair down today, so it keeps falling in my face. Saturday afternoon
here. And this morning, I went and did urban sketching with the Gold Coast
Urban Sketch group. We were in the northern
area of New South Wales. So G Coast is right
on the border of the New South Wales and Queensland. We're in Queensland. And it's just
beautiful down there. Lots of trees, the river I guess a lot of this can
be done with the pencils, as well, colored pencils, which I always go to after
I finished painting. So there will be a certain level I'll get
to of detail with the
9. Painting koala P2: I'm probably going
to get a little bit of the shadow start painting on the shadow
underneath, as well. While, I've got the dark out. I feel like that is
incredibly wide. O Okay. So I'm going to go
back to probably a mid tone of the brown gray. After this, stay
with the same brush. Probably put those crawls into. Very hard to see. So
just make them up. It's what we do when we
need to Artistic licenses. We can't really see them anyway. They're so dark. So
they'll probably blend into bit of timber anyway. Okay. So going back to Oh, gosh, what color, was it? Maybe this one. I Mm. I feel like this
here is quite flat, and this is the color
that I'm using. D d d. I want to be a bit. So To see as it's drying. It's gonna dry a bit darker
than water goes down. O Okay. I'm just gonna get
into these ears, so I need to turn it around. Get the brush strokes
going the same way, now I just got to see
which year I'm doing. Oh. You just have to enjoy the process of this. Work slowly. What you using small brushes if you are
working at A five size, same as me and just to enjoy it. I guess you do have
to enjoy detail, ugh I you're going to do something like this,
not for everyone. Oh The area there needs to be a lighter. I might move to a lighter. I got to get it too
nice consistency. I don't want to d. Oh. Wait. M. Oh, M And I go back to this dark
the brown umber. Not with the black in it. To go up to its face. It's quite dark. I feel like it should have a bit
more gray in it, though. I had a bit of gray inside. Oh. It's going to end up making
a tone of these two. When you get little crumbs
of dried up gase like this, they are very hard to soften. You really just have to persist with them, leave them there. Every time you put
your brush over them, they are going to
soften a little bit, but they're never going to just dissolve back into a paste. Oh. Bear in mind that
we are going to be using colored pencils
over the top. So we don't have to get
looking exactly like fur. I just don't like to rely
on the colored pencils. I like to use them
as a bit of a bonus. I need to address
those cute lies, too. So I'm going to go down
to my 0.3 for that. And I'm not going to go
black. I'm going to go that. Tiny little eyes. An M. Where was I going
with that? I think I was going in he Oh. I think I'm coming to a happy spot with the
gas on the Koala, where I can do a lot more
with colored pencils, finishing off, giving a
bit of texture to the. I just wanted to address
that area there. You just don't want
to get too thick with the glass because
then when you put the color pencil over the top it can chip the paint it
gets a bit too thick. So that's another reason why
I want to start to think that I can probably go
to the color pencil. I'm not happy with that
area down there either. Okay.
10. Koala post and background: All right, so it's actually been about two weeks since I've
been working on this project. When you're working
with gas or watercolor, taking two weeks in between
is never a problem. If you look at my palette here, you can see that it
is all dried up, and there's even little bits
of paint that chip away. So in the white as well
and some in the brown. Um, so that is not a problem because as soon
as we put water to them, they're going to reactivate. They're not going to be as thick as when they come
out of the tube. But if we want to have
it nice and thick, which we don't at the moment, then you can just add
some more color to it. So that's never a problem. And in regards to the painting, it's not a problem that we
have taken two weeks off. So I've kept a note of the
brushes that I've been using, so that's these three here. And we're going to start
by doing the post that the koala is sitting on and then go back to a
bit of the background. At the moment, the koala is where I want it in
regards to gas. I want to go over it
with colored pencil. And I have a couple of
examples to show you here that have had colored
pencil over the top. So this one right here, I've only used loops. That's just my little info sheet that I keep in the
back of this fold. Let's say what sketch book is. I haven't used any
colored pencil in the waves, the creek. But I have used
colored pencil down here in the sand to
get those indentse, because it was just
easier to blend. You can actually I don't
know If I show it like that, you can see where the colored
pencil is being added, and you can see the shine
of it Guash is Matt. But when it's actually
sitting there, you can't tell what it is. Another one which I'm
working on at the moment. This is just a personal one. This is just me painting for me, and this is the one that I'm also just doing for
myself as well. So again, up here, there's been no
colored pencil added, although I might, but I just
need to work on that more. Here in the surf, there's a lot of color
pencil over added. You can see the shine No. No, it's not going
to show the shine. But a lot of colored paints
are going down onto that now, and that will also have a big spray of the wave that
I'll do in gas at the end. It's going to be all
this here is just spray from the surf
along here from the surfboard and
here coming over the break of the where
the wave breaks. All right. Let's get on with painting in this post and then doing a little bit
more in the background. One thing I must note is
you don't want to get too thick with your gas if you're going to go over it with colored
pencil because what will happen and it's hard
to see in here. You get little chips. So the paint will chip off. I mean, we can solve that problem by using
watercolor pencils. Because then we can just put a little bit of
paint back over it. But yeah, you tend to
want to not go too far with Gach like thickness wise so that you can put
pencil over the top. I'm going to be putting
pencil over the koala, but I don't know about
the background yet. I don't know whether
I'll be happy with it once it's just Gach, most likely, All right, Let's get this started. So I need to just put some water in there
so that it reactivates it. It won't be back to
water color consistency will be still thicker than that. It doesn't really take
much to reactivate. Although if you have little bits of paint that are in there, they're not going to just
break up straight away. They'll take a bit of
time. Okay, that's p good. For that consistency. I just don't know
if I want to add a bit of darker color
to it or not. Mm. No, I don't mind that. Okay, I might start with
that because there's quite a bit going on
in the post anyway. I may even I'll just get a bit of this
green going as well. There's a real moss green to it. I haven't even written this blue down that I've got there, and I don't know
which one it is. It looks like it
could be ultramarine. I want to get a bit of that
happening in here as well. Really just mix it up
and not clean brush. Still thin, which
is what we want. Washing tape has just
got to be careful not to create a new I just did
a new little white edge. That's all right. It was 0.1
of a millimeter, I reckon. And then it's a bit lighter
for this stump of posts. I don't really know the
technical terms of these. Although that looks like the
color that I've mixed there. So I'm going to this color. I'm going to here. I need to p yellow. I have to get my little
paint brush out to get into these corners. T. You don't have to do that. That's probably me being just
the detailed person I am. If you want to use
a larger brush up in these little tight
areas, go for it. I just trying to create a
little dark area there. So I just dipped my brush
into the black paint. Remembering that all
the paint that's in the palette at the
moment has been sitting there for two weeks while I've been busy
doing other things. I've had a lot of computer
problems actually last week. So the editing
software that I use for these videos
all was crashing. So I had a week of
talking with adobe and Apple and getting
everything back on track, which it is now. Thank goodness. I
hope so anyway. Okay, I'm just going to
use a thicker brush. And just move this up
while it's still wet. The paint is still quite watery, but because there's
already a layer down, it just complements it. And we wanted that mottled look, and I think we're getting
it there, so that's good. We've got a little bit
of metal to go yet. And I think I was using the
neutral gray for this one. And I think it was in there. So I might just add a bit to the side there
because I think that may have gone a little bit
brown and I'll use my two and it's a two to brush. Just a wet brush, straight into the fresh guash. It's got a bit of a
blue tinge to it, too, so I might have to Get a little bit of blue
happening in there. Cold blue metal. Okay, that's very watery. And going down on wet paint, it's just going to blend it. Again, that's just going to
give a bit of texture to it rather than just sit on top of it because
it is still wet paint. Middle of winter here
on the Gold Coast. So drying times are a little bit later or a
bit longer, I should say. Now, there's a nice
dark line down there, which I might just
paint straight in now. Go back to my zero brush, and go straight into
that little bit of black and very softly. Put that in, and I'm
going to put in a few of the little holes as well. We can go back over
that with a bit of pencil as well just to
make those holes not look so harsh and add little
bits of white as well to it. But other than that,
I'm happy with that. We're not adding
the wire in down. We're just going to
let it be what it is, and I think that
that's actually okay. I don't mind that do and here. It's just this
background here that I want to do a bit more on. All right. So I want to add a little bit more depth
to the background. I will use I'll use the
two size to brush round. And I want it to be fairly dark, so I'm going to get a little bit of black
and go over to this. I think is burnt umber. I don't think this
is the andy brown. It could be the burnt umber. I get a really dark color, and then just start adding
it through all the trees, maybe a bit through
the trunk as well. Give it a bit more. Just move that palette out of the way or I'll go this way a bit more. Just keep looking
at your reference. Keep seeing like where
little dark patches are. They're very mottled. A You just want to
create a real contrast. You want the koala to
definitely be the focus of the artwork and the background to be darker than the koala. At the moment I was thinking
it was just looking a little bit to same value tones. I just wanted to bring in some darker dark areas
into the background. So the man put my finger
right on top of you. I shouldn't do that. Not to touch your artwork
with your fingers because you've got natural
oils in your fingers, and definitely when you're putting pencil
down over the top, the pencil might not
want to work as well. Some of those tree
branches back in, and I'm just getting a bit
more paint on my brush. I might go straight
over to this area. I don't think you can
really go wrong doing this. It is just building
up layers and layers so you get
depth and highlights. And we don't want to
have too many highlights from the background
because then it will take away from the
being a main image. It's raining here today. It's been raining all night and just overcast,
not that cold. I don't know the
actual temperature, but probably around
20 Gulf coast. We don't get extremely
cold weather here. But it is raining at the
moment, and I tell you, there is nothing
better than being snug in the tom painting
while it's raining outside. What is it? What
is it about that? I mean, I'm a water
person. I love the water. Ocean swim every
week. Is it just me? Let me know. That's why all the personal work I do is of the beaches
of the Gold Coast. This book is actually I'm dedicating it to
Gold Coast images. This Koala was in my backyard, and we've got them all
over the Gold Coast. Gold Coast image. But,
the water images, the beaches, the
creeks, the seabirds. The what are going to
dominate this book. I'm really changing the
color up of this brown now. I now going back for it. I got a little bit of darkness
down in the bottom here, give it a little bit D. Get so much mileage
out of one brush. When it comes to gush. Especially when
you layering Okay, that's looking a lot better. Painting over a bit of
the highlights as well, being able to get some
tone going through them. O know when to stop, though. Keep taking a look at it. See if you happy with it. With a background like this, we can keep coming back
to it all the time. Okay. I think that's good
enough for now. We'll return with doing a
little bit of pencil on our ka.
11. Colouring Koala: Alright, so I'm going
to start putting color pencil onto the koala because you will not have the same colored pencils and same brand as me, most likely. I'm just going to speed
this up because there's no point in you
seeing me do this. As long as you can see
what I'm doing roughly, you will do with your
colored pencils. So I'll put on some music and enjoy as we
fill in our koala. Alright, so I'm just checking in again to see
how you're going. Obviously, my video
is very sped up. But if we're looking at the pencils that I'm
using at the moment, you're looking at
two different brown, so a darkish brown and a brown. I wouldn't say it's a light
brown. I'd say it's a mi. And then the other
pencil might look white, but it's actually a light gray. So if you've got a light
gray, please use that. And if you don't, then yes, use the white. But perhaps if you've got a
really light brown pencil, use it over the white
if you can. All right? I know you've got to use the
pencils that you've got. And really, when it comes to the actual quality of
the pencils, of course, a professional brand
like these ones, which is the Faber
Castel polychromos. They are obviously
the best to use. But if you don't have them, and you've only got
cheaper brands, then please use what you've got. If you get a chance to
buy any of these pencils, you don't have to
buy them in a set. You can actually buy
them individually. You will notice how
creamy they are to use. They won't have any
scratchiness to them at all. And that's with all good
quality artist brand pencils. So another one would
be the prisma color. And you've got Derwin. Derwin have got a lot of
different colored pencils. So if the price is expensive, that's the artist quality. Then there's also jazz art. I don't know if that's
an Australian one, and whether that's available
in other areas of the world, but that's a really nice
one to use as well. Dash is another great one. So, personally, I don't like
the Karin dash too much. I find them too soft, but we're all different, and I know that
the Carin dash are very popular pencils,
the luminants pencils. Alright, so I will
put it back over to music and let you keep coloring your koala in. Oh H Okay, I'm back again just to
see how you're going. You got to see a little hand what is it a thumbs
down a MG appear. I have no idea how
that happened. Maybe I did it when
I was recording, and it's the Zoom camera
has picked it up. It's about there
we go. Right now. I'm just going to leave
it there and say, there's no reason
for any thumbs down action on my video
or your drawing. Only thumbs up is
allowed in here. So, how is the drawing going? I have introduced
two more colors into this now because
I'm onto the face, so you can see in my hand, I'm carrying a mud set it's a darker to midtone gray pencil. Still got that very
light gray pencil, but if you haven't got that, just use white, and I've also
included a darker brown. So that was to get into those ears and just
some real shadows. Around his nose. I go. I put white gash in the eyes, sorry, in the eyes. But I do that right at the end. So you'll see that
in another video. But yeah, if your detail is
not as broad as mine is, you may be actually getting this done a lot
quicker than I was. I speed these drawings up 400%, so you can imagine how
long it actually takes me. I don't think anyone's going
to take as long as I have, unless you are, as well, a very detailed person with your drawing And we will just continue on
until we finish the koala, and then we move on
to the post that he's sitting on and
the grass underneath. And then finally, we
look at the background. And yeah, we use a little
bit of gouache again, just to put some highlights
in the koala's eyes. I guess the main thing that you really want to
be achieving here is making a three
D looking koala. So the tone that you use, that's why we need to use those dark values in the colors, and also some light ones so that he looks like
he has depth to him. You can see where the forearm sort of sits
with that back leg. It looks round. And it looks like the belly is receding away
from the camera. And even on the face, I'm just putting in, like the darks in the
ears around the nose, just to get that
three D appearance. That's what you're looking for. Always check that, not at
the beginning of a painting, but towards the end of it, you're looking for
that three D painting. All right, so I'll
finish up here. I'll throw on a bit more music, and then the next video will be starting on
that post and grass. Ho
12. Koala coloured pencil on post and grass: Okay. So I'm pretty
happy with how I have finished off the koala
with the colored pencil. You can see the shine
if I shine it like that as opposed to the
gas which is Matt. So I'm now going to I've
just got to his claws. So just his little
feet needs claws, and then I'm going
to work on the post, the stump holding the post, and then we'll go
to the background. But I think we might
be able to go to the background straightaway
in pencil now as well. And so, again, I will just
put some music on and fast forward a little bit because you've got the general idea
of what I'm doing here. All right. Thanks. Oh. Oh. H. H. Alright, so I'm just checking
in to see how you're going. As you can see, I have done
the bottom half of the post. Want to just quickly
mention again, just like in when we were
coloring the Koala in, you're looking for
the same effect with the post and
with the background, in that you're
creating something that's two D, which is flat. You're creating something
that's going to look three D. So shadowing um, putting in like this dark line where there's a
crack in the post, a little bit of shadowing
where that the bottom of the post meets the one
that is going horizontal. How to think about that then? That's your main aim with
doing all of this is that you're creating a
three D look. All right. So in seeing the
reference picture there, little dark areas around the bottom of that post
that he's sitting on, and where it connects to the
post that's holding it up, gosh, you can tell I don't
have the right words to say, and I'm married to a builder. So that is just terrible. Anyway, I will take
it back over to the music and keep
going with this. Your aim is to make sure that
it looks three D, enjoy. Okay, so pretty happy
with the post now. Because I've got
studio lights on, it does add a bit
of a shine to me, so that's why I was tilting it up to get rid of that shine. I do have to put highlights
in the Koalas eyes, which I will do with gas. But apart from that, I think I'll start playing
now with the background. Okay, so I think we are
getting close to the end. Now, if you feel you're at this stage and you're happy with
your background, then you are finished. If you are like me and know that I can
keep going with it, and do a little bit more. Do so. I'm going to start
down the bottom here and just improve
these because to me, this just looks like
brush strokes at the moment rather
than blades of grass. So I'm going to put
a bit of sorry, a bit of color pencil into there to make it look
more like their grass. I hope it's going to work.
And then I will probably go through and do the same
thing up here as well. And then at the end, I'm going to do the eyes and possibly a few of the sticks
with a bit of gase again. Uh, so, again, I'm going to just speed this up and put
some music to it, and I will see you at
the end of this video. Oh. All right, so just wanting to
see how we're going again, we've moved onto the grass. So look at what color
greens you've got. You want to have a dark green. If you haven't got a dark green, go a dark brown. And then a light green. And you can add some
yellow in as well. If you don't have a
creamy colored pencil, again, I'm using a creamy
colored pencil here. If you don't have
that, then go for a what did I say, a yellow. So yellow, a green,
and a dark brown, if you're limited to
your color range. Oh. Okay, so I've done down here, and I'm fairly happy
with that now I mean, when I say fairly happy, I'm going to say about 70 80%. I am a stickler for detail. That is my natural go to. Is a lot of detail. So I need to know that this
is just a painting. It's just in my sketchbook. It's not going on the wall. So that will be good enough. I am now going to go up
here with more pencil. And then, as I said, at the end, just do some highlights
in the eyes of the Koala and couple
on the branches. So we'll start a new
video for that one. Just found a little mark
that I don't like there. And there we go. It's all gone. Looks like a bit of his fur
now. Lovely. All right. Se in the next episode episode. In the next chapter.
I don't know. Don't know what they're called.
13. Koala coloured pencil background trees: Okay. So if you
are still with me, you have made it to the end. So, congratulations. We are now onto the
very last video, and we are just finishing
up with the background, just making it a little
bit more defined. That's up to you. You might
be happy with esa Gas. I, as I've explained before, am very detailed, and like to put a little bit
of detail in where I can. Anyway, so it is just
coloring in a bit of the background and then
adding the gas to the eyes. And then we're done. So I'm really looking forward
to being able to see all your finished koalas in the project and description. A tab or folder. Make sure you upload so that I can see it and
give you feedback, as well as to where you might need to add a little
bit more color or paint. And but no, really, just to congratulate you. And it's a buzz for
me to see anyone who has followed along and
produced a gorgeous artwork. Okay, so I will just flick it over to a
little bit more music. I come back at the end and
have a bit of a chat with you when I finish up
on the background. So thank you again and
finish your drawings off. Okay, so I am now going to
just put the highlights in in the next video of the and then probably
just wrap it up. These little
highlights in the eye. This is white, buried
under a bit of brown. So we're just going to
reactivate that there, probably using a bit
of a small brush to do the reactivating width. Don't want it to be too
watery either because it's too watery I won't
come up as a highlight. It will just fade into
the black background. That's why I'm just working just to get a
nice creamy consistency. That should be I just
touched water. Here we go. Now these highlights
are very tiny. And this one, it is
really not there. But now I'm going
to let that dry, actually, what I want to do. Wipe your brush. Then that second one, I'm going to go back in. And just remove a
bit of the paint. I might try on that one as well. The reason I did that
is because if you just let a little thick blob of any gas paint sit there
when you go to blend it, because I just need to I need
to do something with it, whether it's with
brush or with pencil. Once it's dried, it
will just chip off. So I've put the highlights in. I'm thinking. I
want to just go for the black pen as pencil. And I'm just literally
just touching around the white paint just
so it blend in. It was such a small
amount that I put on the brush that it will
dry pretty quickly, especially because I mopped
it up a bit. There we go. That looks a little
bit more natural. Now, in regards to
the background, get it to a stage
where you're with. I'm not happy with this yet, but I'm not going to
keep recording it. I will just do it off camera
and then come back with the final video and take the sides off and we'll
see what it looks like. See you then. I have done probably
another 20 minutes in the background there and I could probably still
keep going on it, but it's time to stop. Let us take off the
washi tape now. I don't know if I filmed
this at the beginning, but with washy tape, it's good to stick it to your clothes f and then put it down
because you can see this one's wanting
to lift as well. I'm just going to pull it from
the other side for a sec. These washi tapes
probably being down for about a month from when
I started this project. It's torn it a bit
there, but that's okay. I can stick that back down. Yeah. When you are
using washi tape, because it's not designed
to be masking tape. Stick it to your clothes first, just to your leg, and
let it just pick up, let it lose a
little bit of tack. It's not going to lose too much. Or that piece was good, but then I've got to put a grubby hand down on it
and I don't have hem. Go. Is one starting to tear the paper as well. All right. So that one. Now this one has
been on for a lot longer because it was for the
artwork on the other side, which I can't remember
when I finished. April, May, and it's July now. But it's coming off really nicely. Beautiful.
 Jane Whittred, Art Teacher and Illustrator at Mrs Red's