Transcripts
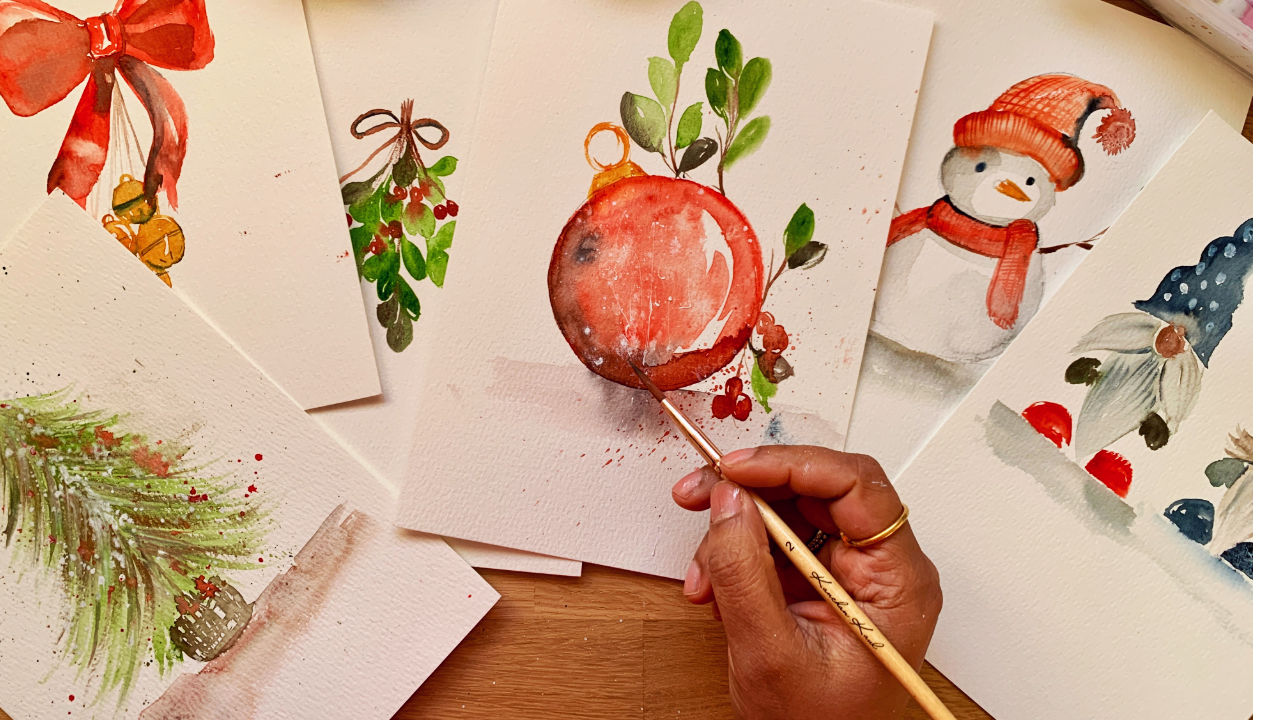
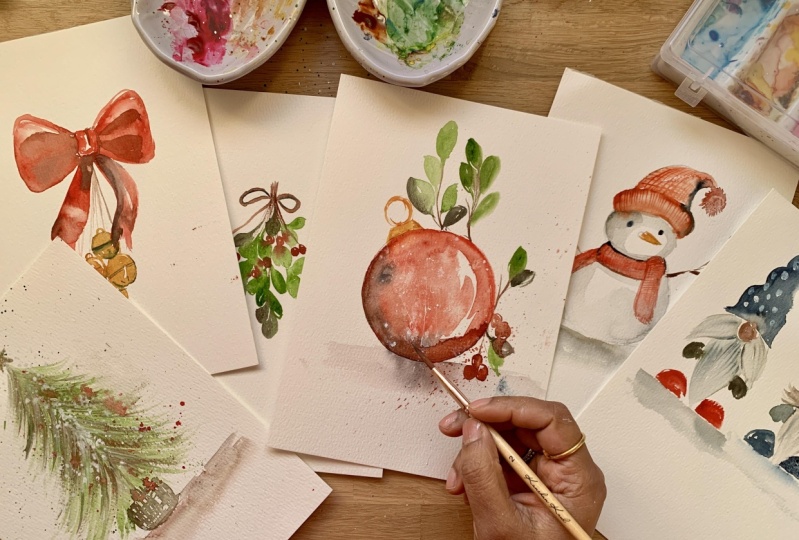
1. Welcome: Welcome to this fun and
festive watercolor class. Hi, I'm Chan Call. I'm an artist, illustrator, and a Skillshare top teacher. Over the years, I have built
a wonderful community of minded watercolor enthusiasts
on Instagram, Pinterest, and Facebook, where
I share my tips, tricks, and my process for creating watercolors
and inspire creativity. Beyond teaching, I also have
my own small business of watercolor brushes
and watercolor paper to support your
artistic journey. In this class, we will
bring some holiday magic to life by creating beautiful
hand painted Christmas cards. Whether you're a beginner
or a seasoned artist, these designs are easy, enjoyable, and packed
with holiday cheer. We will start with
painting a Christmas tree. Then we will go on to paint adorable gnomes
with festive hats, a cheerful snowman, colorful, shiny bauble, an elegant mistletoe sprit and
festive bells and bowls. To elevate your cards, I will show you how to
add special touches using white quash for snow effect and gold paint to add
an extra sparkle. You will also learn
techniques for creating textures and bringing
depth to your artwork, all while keeping things
fun and stress free. Each project is easy
and manageable, perfect for those
busy schedules during this festive time and those
last minute creative moments. So grab your brushes,
paper and watercolors, and let's create
unique cards that spread joy and capture
the holiday spirit. I can't wait to see
what you all create, so let's get started.
2. Orientation: Before we get into the class, I just want you to talk about materials as well as
the class orientation. In this class, we will be painting different
festive motives, and there is no order to follow, so you can choose
which lesson to watch. But I do recommend you to
try all the lessons because there are different
techniques that might help you in your
watercolor journey. For the material, we will
need watercolor paper. I'm using watercolor
paper for my own brand. This is 300 GSM, 100% cotton. Feel free to use any
paper that you like. This is an A five size, which is basically an
A four size paper, which is cut into half, which is the perfect size
for a greeting card. For the watercolors, I will be using festive
colors such as red, greens, blues, and whites. Do keep a gouache paint with you if you can,
if you have it. It gives a beautiful
snowy effect. I'm also using gold for some of the festive cheer and
sparkle to these cards. For the brushes, I will be
using size two and size one round brushes from my own brand of
watercolor brushes, as well as a mob
brush, which is, again, from my own brand
of watercolor brushes. But feel free to use any brushes that you like
and are comfortable with. At the end of the class, don't forget to share
your class project. It's a great
inspiration to others, and I will be giving you my
personal feedback as well. So let's get straight into it.
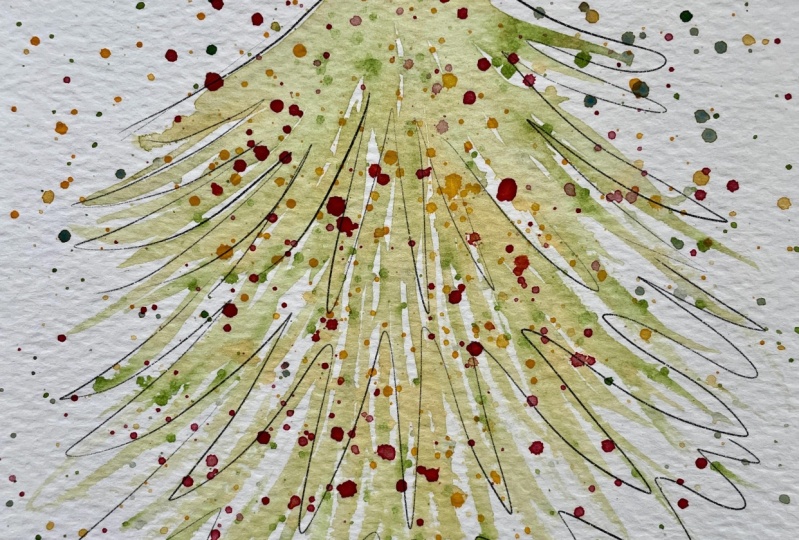
3. Christmas Tree: In this lesson, we
will be painting this beautiful festive
Christmas tree using some dry
brushing technique. I will be using gold
and gouache to give it a little snowy effect as
well, so let's get started. For the Christmas tree, we will be using dry
brushing technique in which a brush is damp, not completely dry, but you
dip it in water and you remove the excess water and use that brush to create the
branches and the leaves. So it's a simple technique that we will be using
throughout the class. And with this, we
can get started. For the Christmas tree,
I'm using two colors. One is the sap green and one
is a darker shade of green. So first, I'm taking the
sap green on a wet brush, and I'm splattering this
paint all over the paper. You don't have to stick to
a particular shape as such, but try to concentrate the splatters in the
center of the paper. Take a damp dry brush
and start pulling this paint in the shape of conical Christmas
tree branches. So the top would be
slightly smaller. And then as you go down, you can do the same thing and in a slightly larger
branches under it. So if you feel that
the brush is too dry, you can always dip it in
water and dampen it again, like I'm doing right now. But don't make it too wet, so it should just
be a damp brush. Now, for the third layer, I'm making bigger branches for the last bottom of
the Christmas tree. Um, this dry brushing
effect gives a really nice foliage
effect for the branches. I feel roughness gives a nice effect through
the branches. So do this and make
sure you fill it up, fill up the paper with all
these branches and let it dry. Then take some darker shade of green and start doing
the same thing, um, in some areas to give it
a little bit of depth, especially at the
bottom of these leaves to make it look like the shadow of the leaves is
falling under it. But don't give too
much coverage. So this is just for the shadows. And again, I'm not
using a very wet brush. It is still a damp,
dryish brush, so it still gives a nice
beautiful foliage effect when you're doing this
method of painting leaves. Now, I'll alternate the
colors, the sap green, as well as the darker
shade of green to give it some depth and
cover the entire tree. Once you're satisfied
with the way it looks, you can go ahead and create
a basket under the tree. You can create a pot with a terracotta color or a basket
or anything else you wish. I'm going for a basket
in this Christmas tree. I'll take a little bit
of gold in my brush. I'm using this gold ink. Um, no. It's okay. We figure it
out later how to fix this. But basically, what you
need is a gold paint on your brush to give a
more festive feel to it. So just do the same
brushing strokes with gold paint on your brush. If you don't have gold,
that's perfectly fine. But if you do, then this
is something that can add for a more festive
feeling to it. I'm also splattering
this gold paint all around the tree to give it, like, the little lights effect and a beautiful
festive feel to this. You can also add a star to it. Now I fix the tree, and I'm using the
same gouache white now for splattering
some white on the tree. This gives a little bit of
a snowy effect to the tree, and then a little bit
of red splatters to give this look of
bobbles around the tree. And this completes beautiful
festive look to it. If you feel some
of the paint has become lighter,
after it has dried, you can add a few
more details to it, but this is the final look of how the Christmas
tree will be.
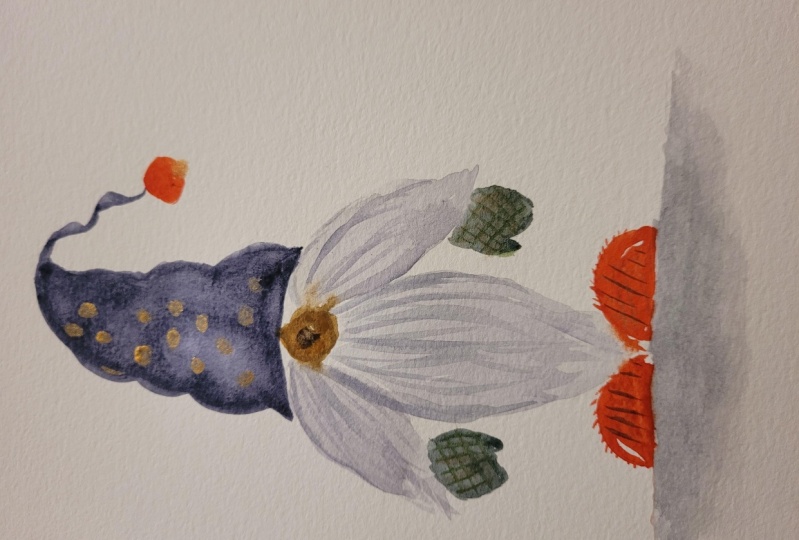
4. Gnomes: In this lesson, we will be
painting two cute gnomes. I am keeping it freehand, and I love using a mop brush when I'm painting
free hand artwork. So for this class, I'm
using a mop brush, but feel free to use any
brush that you like. I'm using reds and blues, but to make it more festive, you can even add green colors to make their shoes and hats. Okay, for the gnomes hat, we will start with a wet brush with paint at the
tip of the brush, and I'm making a wavy
edge of the hat. And I'm pulling that paint to the rest of the hat
on the right side. So it gives a beautiful
effect to the hat. Next I'm using a brown color to make the nose at
the center of the hat. So just make a cute little
circle in the center. Then use a damp brush, wettish color to
make the moustache, which is in the shape of a leaf. So I'm just using watery paint to make droopy leaves on
two sides of the nose and use the same
watery paint to make the beard at the center
of these two moustache. So I'm just again using the watery paint
to make a kind of a leaf shape at the center of the two
mustache to make the beard. Then I'm using a red
color to make shoes. You can get festive and think
of other festive colors, maybe green to make these shoes. They are just two semicircles on the two sides of the beard. Similarly, I'm making two
gloves for the hands. So I'm just making two circles and in the shape of gloves. Again, get festive, maybe
use red or a green color and make some patterns on this with quas to give it
more festive look. Now I'm using a size one brush from my own brand of brushes, so you can use any
smaller brush to pull darker shades of
paint on the beard and the mustache to give it
a bit more detail and depth and giving it a more
salt and peppery look to it. Okay, let it dry. I'll just make a pompom
at the end of this hat, a cute little pompom
with the red colour, and we'll wait for it to dry. While it's drying, I'll make
the hat for the next gnome. In this case, I'm using
a red colour with a similar wet brush and paint
at the tip of the brush. And then I'm just pulling the paint at the
rest of the hat. And for the pompom,
in this case, I'm using a clean wet
brush and pulling the red paint to make a pompom effect at
the end of the hat. Next, make the nose at the center the same way we
made it for the first gnome. And in this case,
for the moustache, I'm using the same
strokes we used in the Christmas tree earlier
to make these see strokes, semicircular kind of strokes to make the upturn
moustache, in this case. Again, use a wet brush
to pick up any paint you wish if it's too dark and use wettish paint
to make the beard, as well, like we did previously. Now, get festive, get creative and make their shoes
as well as the gloves. So I'm just keeping a highlight
for the shoes to give it a shiny look like a white color that I have left
for a highlight. But you can always add that
highlight with gouache or pen a white pen to
add that detail later. Now that the first
gnome is dried up, I'm using a Guash to add
some pol card dots to it. You can get creative, maybe
make some squiggly lines, maybe splatter some paint, maybe use a gold. Then I'm adding a shadow
under these gnomes to give it a bit more base to it so that it gives the effect that they're standing
on some ground. And with this, we are done
with these cute little gnomes. You can make patterns
to their hats and their shoes to be more
creative and festive.
5. Mistletoe: In this lesson, we
will be painting this free hand mistletoe
with little berries. We will be using sap green
and a darker shade of green, which I've mixed with sap
green with indigo to make different shades of green and brown for the thread
as well as the stems. Y Now, let's make mistletoe. So for the mistletoe,
we'll start with a brown colour to
make the branches first. So I'm just adding some lines, curved lines and a center
line to make the branches. Once you have the
branches ready, you can use a green colour
to make the leaves. The leaves will be in the
shape of a tear drop. So for mistletoe, they are
teardrop shaped leaves. And I'm using a sap green, but feel free to use any green, and you can even
dilute this green with some water to give it more depth and a different tone to it. So it gives a beautiful
effect to the mistletoe. I'm using this first
layer of sap green and tone down sap
green with some water. You can also try creating leaves which are upturned to give a different angle to it. Not all of them
should be droopy. So have some leaves
which are going up and some leaves which are
in a different direction. Then I'm using a darker
green to add more depth to this to add some leaves which are darker or a
shadow, which are behind. Make sure you can mix some indigo with sap green
to make this darker green. You can even make some brown
to give a darker green. Now I'm just adding some
holberries with some red randomly across where I feel there is a gap
in the mistletoe. Just look at your
artwork from a distance, and if there are areas where
you want to fill it up, you can add some
beautiful hollyberries. Now I'm using my small size one brush to create this rope, which is tied the
mistletoe together. And that's it. With this, this beautiful
mistletoe is ready. I hope you enjoyed it.
6. Bauble: In this lesson, we
will be painting this cute little red, shiny bubble. If you wish you can
use any other color as well to paint this
bubble, it could be blue. It could be something neutral, like a gold or a silver as well if you have those
paints with you. In this lesson as well, I will be using
gauche white color to add some splatter,
so keep that handy. And if you have gold,
you can even use gold to make those platters to give
it a more festive feel. For the bobble, we'll
start with a circle. You can either draw a circle if you have something
to draw it. I'm using a jar, or you can even paint the jar's rim
with some paint. I'm using red color because
I want a red colour bobble. I'm adding that at
the rim of this jar, and I'll just dab
it on the paper to give that circular
shape to it. So now I know where the bobble
goes and then I'm using a wet brush to spread
the paint around. The brush does have
some paint on it, but it is also very wet brush, and I'm using a
bigger brush now. It's a mob brush to
spread this paint around. Make sure you leave
a little bit gap at the right side to
give this a shiny look. You can give it
on the right side or the left side,
whatever you wish. So I'm giving a shine
on the right side of this bubble by not painting over it, so I'm
leaving that gap. Now, add some shadows at the bottom of this bobble
with a darker color. I'm using indigo. I love using indigo for
shadows and give it a shadow on the right side as well as the bottom of the bobble
by just dropping it. Once it dries up, use a
wet gouache to splatter some paint around to give it a beautiful shine as well
as a festive feel to it. You will see that the
gouache will spread on the bobble if it's too
wet like it is right now, so you can wait for it to
dry before you do this. And I want to give
that effect that the bobble is
tilted to one side. So I'm going to give
that hanging hook on the left side of the bobble so that it
looks like it is a bit tilted on the left side. So when you look at
it from the top, this is how it will show. So you can make like a ring to hang this bobble on
the left side of it. Once you've added that ring, you can in my bobble, since it was too wet, it has lightened up a bit
after it dried up. So I'm just adding more
darker colors at the base of the bobble to make the shadows
a bit more pronounced. You don't have to
do it if you feel you have got that
effect in the first go. So I'm just using
another wet red and indigo color mix
to add more shadows, which I thought became lighter
once the bobble dried up. Alright, now I'm going to
splatter some more paint, white gouache on the bobble to give it a bit more
festive look because my first layer was
too wet and it kind of vanished
after it dried up. So I'm just adding some more. You can even splatter red colour to give it a beautiful
watercolor effect. I love doing that. Next,
I'm adding some leaves. In this case, I'm just making basic leaf shapes to add some leaves at the
back of this bubble. You can use you can even
create pine leaves. If you want, you can
create holly leaves, whatever you wish and just
make some branches around it and add some berries to it to give it a bit
more festive feel to it. And that's it. With this, your bubble is ready. It makes a beautiful
Christmas card.
7. Snowman: So for the snowman, I'll draw
a little bit because it'll be easier for you
to see what I'm painting since it
is white in color. I'm just making a simple shapes for the head and the body. Make circles, maybe
not proper circles, but you can make, like, ovals. I'm making a flattened oval for the head head and
as well as the body. Then make a little
bit of a hat on top, a cute little beni
hat with a pompom. All my hats are
always drooping on the right side when I'm
painting them for some reason, but, of course, you can
make it on any side. Then a carat for the nose, and you can even make
a scarf if you wish, which matches the hat. Alright, now let's get
into the painting. So for the body,
I'm using really, really light watery color for
the body with indigo and, like, a brown mixed
kind of thing. I'm just dropping some paint at the edge of the
snowman for the body. So feel free to rotate
it if you wish, that's easier to paint. And then I'm just spreading this edge to the
rest of the body. So I'm not really
painting the entire body. I do the same thing
for the face. I'll just drop at the
edge of the face, and I'm pulling this
paint for the rest of the face so that it's
lightly painted face. You still see the
white of the paper. Now I'm using a red color
to paint the Bini hat. So I'll just pull this paint
to the rest of the hat, spread it across the hat. Just make sure that the body and the face are dry
before you do it. I couldn't wait, and
you can see that the red is kind of mixing
and blending into the face. Just wait for it to dry
before you get to the hat. And add a little pom pom as
well at the end of the hat. Now, the hat might have a little bit of a shadow
where it's droopy, so you can add some
darker shades of indigo on the right side where you want to
show the shadows. Now, the body and the face
have dried up a little, and if you want to add
some more details, you can start adding
those details. Now I'm adding the nose with a orangy red colour
for the carrot. So make a little
triangle and next, use the same red colour to
make the scarf as well. So after you add the eyes, don't forget the eyes. I'm going to, um use a red
colour to make the scarf. So this is just the first layer
for the scarf in the hat. So you just placing the paint. Next, once it dries up, you can add a bit more
detail to give it a knit feeling or a look
that it is knitted. So pull this red colour to make the end of the scarf with
little tassels, if you wish. Now, while the
snowman is drying, I'll make some
branches for the hand. I'm using a brownish, yellowish color
for the branches. So just make lines
which are roughly made. And next, you can
add some leaves to these branches as well.
Just simple leaves. I'm just making cute
little usual leaves, but if you wish, you can
add pine leaves as well. H Now, I'm using a brownish, indigo color to make the snow
under the snowman, as well. Just spread it leave
some white area. Don't have a very wet brush, so dry brush gives a beautiful
effect of snow as well, and just spread that color. Now when the hat is dried up, I'm using my size one brush
from my own brand of brushes, which is perfect
for these details. I'm using a red color to
make small lines in the hat to give it a feeling or a look or a texture that it is knitted. Make these checked lines, so it gives a texture
that it is a knitted hat. And I want the same knitted texture for the scarf as well, so I'm doing the same thing
for the scarf as well. You can even add more
shadows under the neck to give a bit more details and depth to this artwork
with a indigo color. And with this, we are
ready with the snowman.
8. Bow and Bells: In this lesson, we will be painting a festive
bow with some bells. We will be using red, indigo, as well as yellow ochre
to make the bells. You can even use some gold to make the bells, if you wish. And to add the details,
I'm using a pencil, a regular pencil,
but if you want, you can add details with
a color pencil as well. This bow is going to be free
hand and super fun to paint, and you will learn
certain techniques like lifting the paint to create
highlights and shadows. For the bow, we'll start
with the rectangular shape. I kind of draw it free hand with my brush itself in the
center of the page. So that would be the
center of the bow. Then take some paint on a wet brush at the
tip of the brush and draw one side of the bow
basically in a triangular shape. Then spread this color
all along the bow. Now I want to show a little bit of highlight at the
top of the bow. So what I'm doing is creating a line which is really close to the bow that I painted to make it look
like the highlight. You can even leave that much
of a little bit of gap in your paint when you're making the bow to give a little
bit of highlight on top. Same thing we'll repeat on the left side for the
other side of the bow. So here I'm leaving a
little highlight on top, like I mentioned, and I'm spreading the paint in
the rest of the bow. If you want, you can even pick up some paint with a dry brush. So I've used a dry brush to just pick up some paint
from the left side to give it more highlight and a beautiful
effect to the bow. The same thing I'll repeat on the right side of
the bow as well. Now, make the little tassels in the end of the bows,
which are going down. I love using a mop
brush for this because it is a more free
hand for free hand artwork. I prefer a mop brush. Next, let's add the bells. I'm using a goldish color to it, so you can use an
actual gold color if you have gold watercolors, if you have gold
gouache or gold ink, like we did for the
Christmas tree, or you can use even a
yellow to make these bells. So they are just circles. I'm leaving some gaps
to show the highlights. So I'm not painting
the entire circle. I'm keeping some gaps, and I'm using now
the same gold to make some threads which are
tied to the bow on top. Now let's add some details. While the bells are drying, I'll add some
details to the bows, so I'm using a darker
color of the red, so I'm mixing red
with indigo to add some depth and shadows basically to the bow
with this detail, which is smaller
triangles which are coming out of the bow
to give that detail. Now, use the same
dark color to add some details to the ribbon
which is under it, as well. Basically the
shadows. So I want to show that this ribbon is turned, so there will be part of it, which will be darker and a little bit of it,
which will be lighter. So I'm just adding a little darker and lighter
areas to this ribbon. I'm picking up some
of the paint with my brush to add the highlight
to the ribbon, as well. Let's repeat that on the
other side of the ribbon, as well, one darker area and some highlights
to give it more depth. Now, the bells have dried up, so I've started adding some
details for the bells. So use a darker
color of the gold. You can use indigo to
add those details. I'm basically just adding
these little lines. I'm actually using a pencil to add these lines, so
you can even do that. If you have a color pencil, you can use color pencils. So I'm just adding like lines in the center of the bow sorry, the bells to give those
bell details to it. And that's it. We're ready
with the bow and the bells.
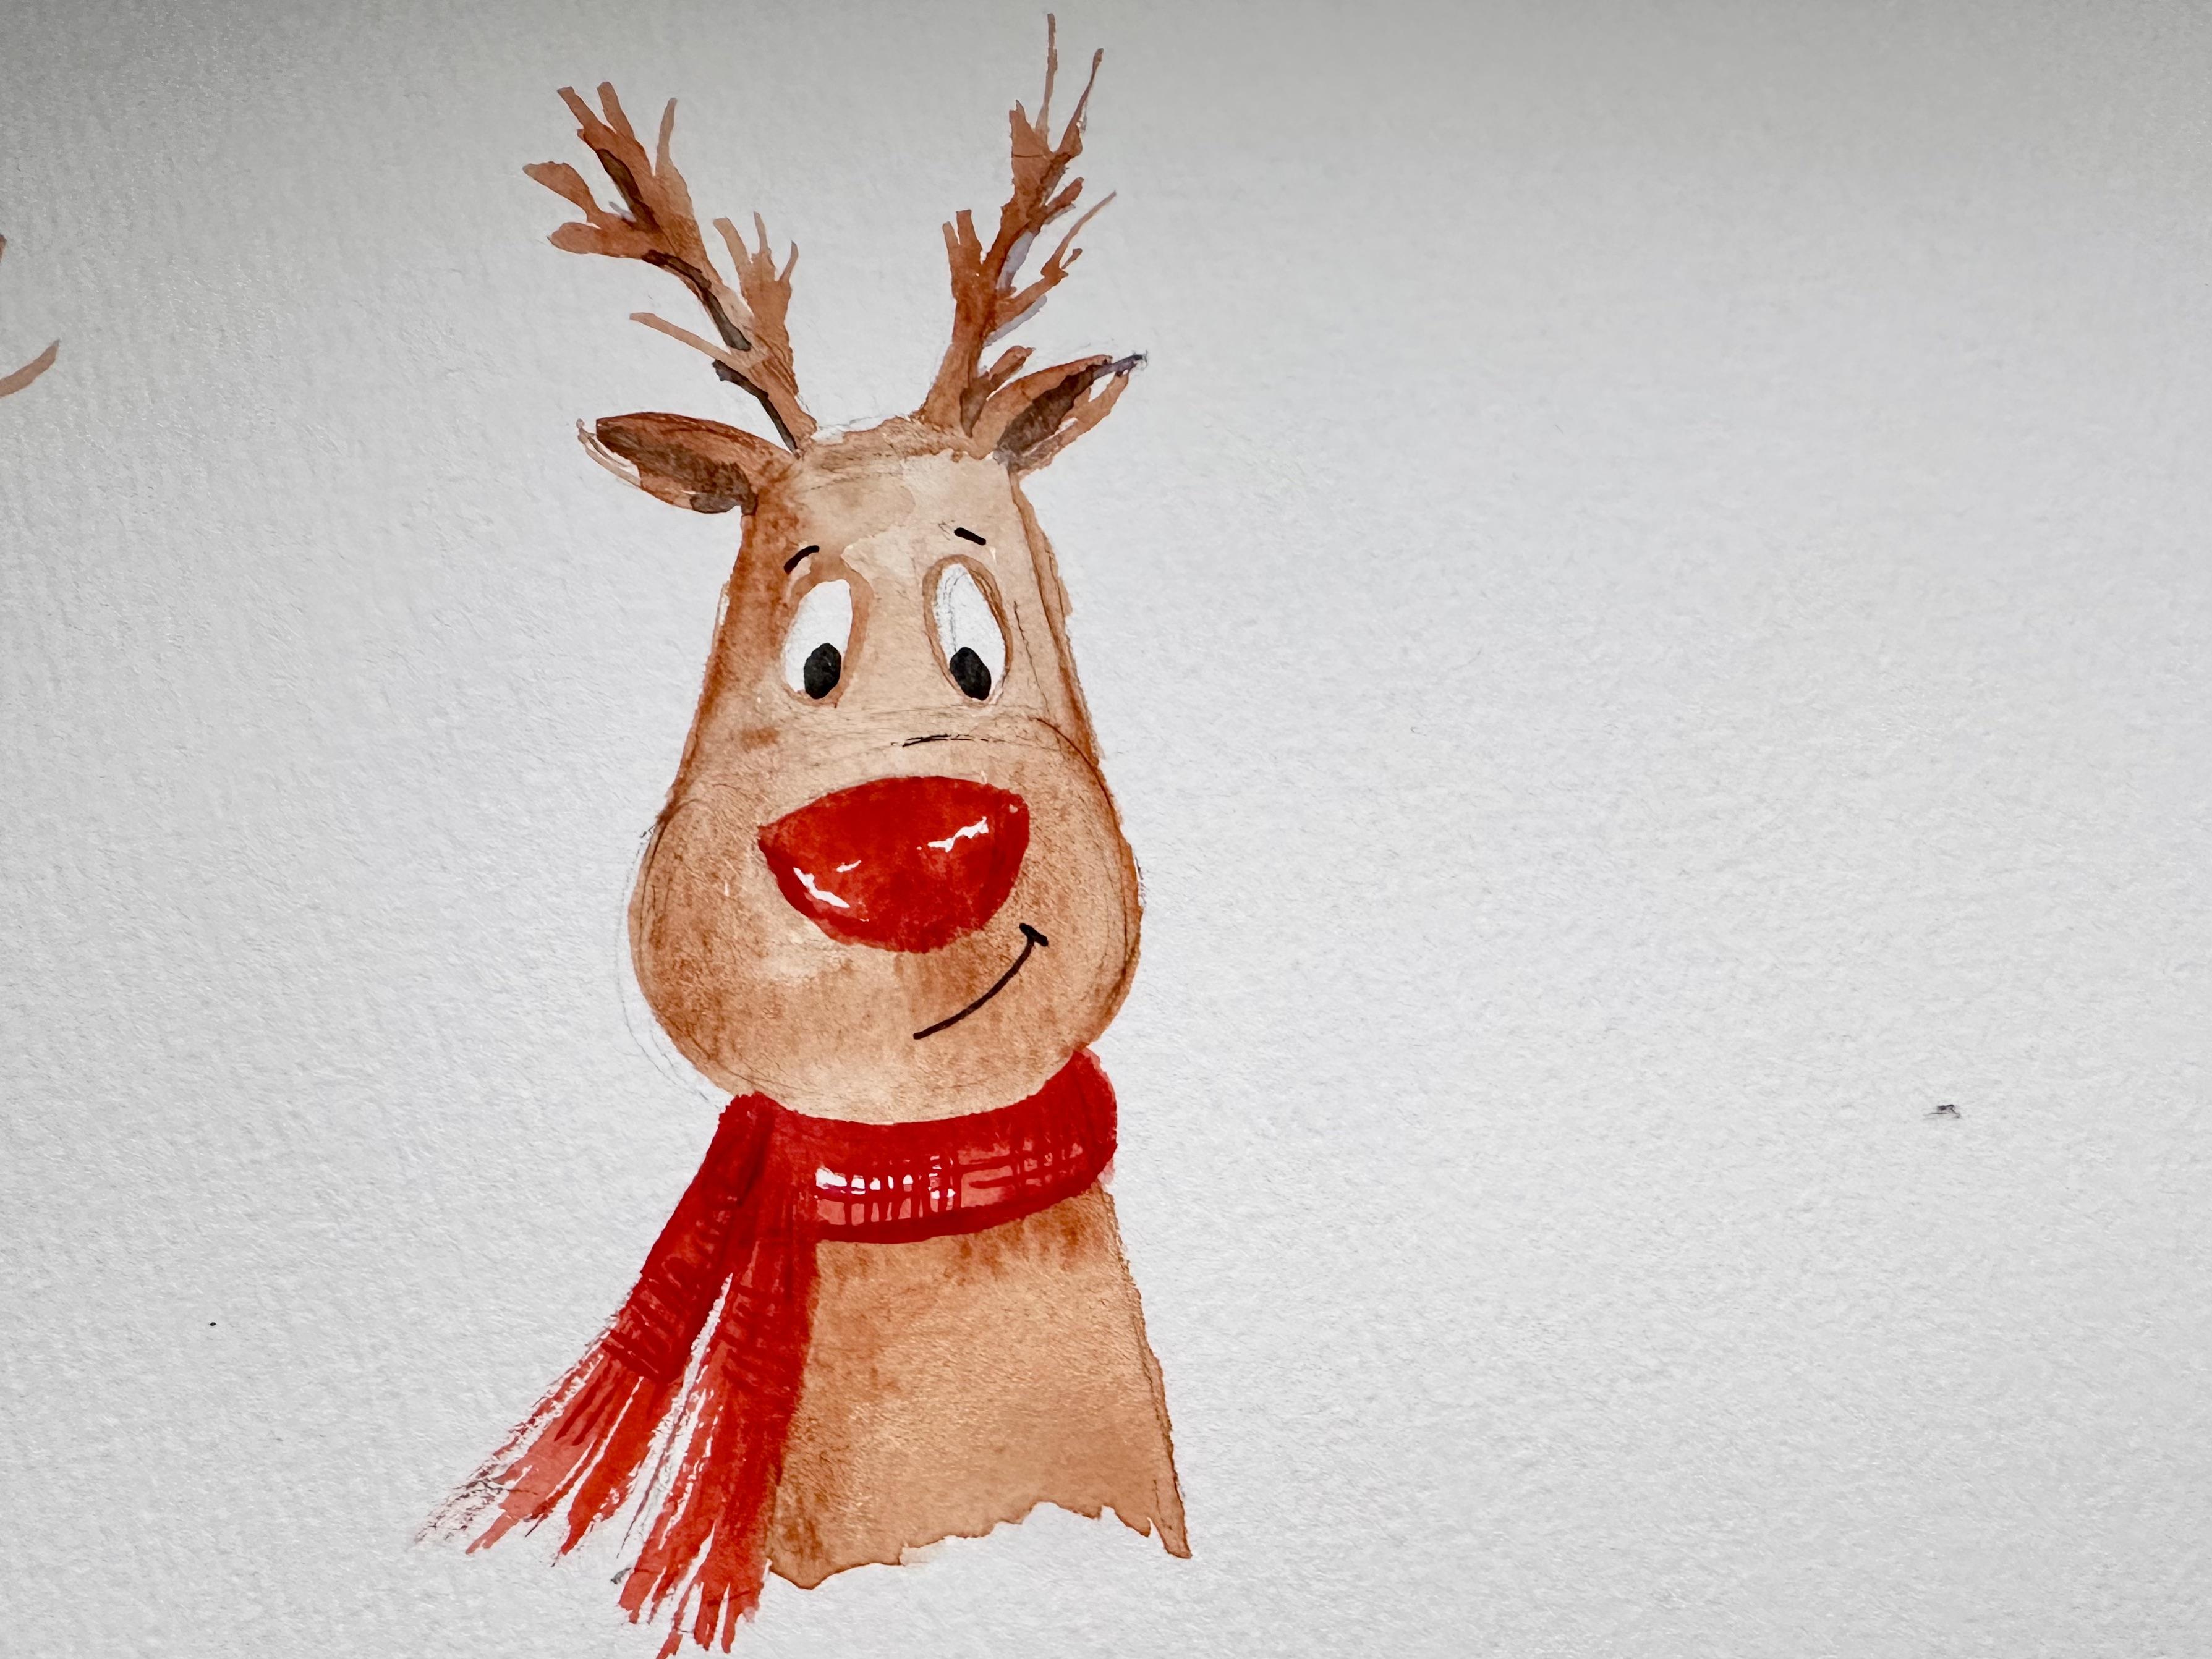
9. 2025 Bonus: Rudolph : Hi, everyone. In this lesson, we are doing a bonus
extra lesson for the 2025 Christmas which is this beautiful
cute little Rudolph. I got a lot of request on
my Instagram to paint this, let's go get right into it. I painted this freehand, so I didn't draw anything, but for this lesson, I will also teach you how
to draw it and you can practice your drawing and then we can go ahead and
start painting it. To draw it, I'll first break it down into quick simple steps. The face will have one round. I'm just going to draw over this to show you
what it looks like. The round has to be something
like this, as you can see, and then conical shape on top of that for the
head for the body, it's a simple conical shape. Then there'll be two
years coming out, so it's a very simple shape. If I have practiced
it a lot of times, so I could do it free hand, but if you've not
done it many times, you may want to give the drawing a try before you
go into painting. Let's start with
the drawing first. So like I said, it
is a roundish shape, but it doesn't have to
be a perfect round. It's a little bit squished
round for the face. And then on top, you can make this conical shape. So in my original painting, I actually made these
eyes with the posca pen, which is basically
just an acrylic pen, which is like this. But if you don't have
that pen with you, the acrylic Posca markers, then you can always
draw the eyes out so that you
keep it unpainted, to be painted in the end,
to be made in the end. Right above this circle
will be the eyes. You can quickly make
these eyes which are slightly coming
towards the center, so they're not straight ovals. And if you want to
mark the eyebrows, you can but not needed. Just below that would be
a nice cute little nose. The nose is a semicircle ish and then here you have the ears. You can just make
something like this, like a leaf shape and
then for the the horns, I think they're
called the horns. You can make just a shape
here and then for the body, again, make some
shape like this. And if you want to add a
scarf to this Rudolph, you can always add
scarf drawing as well. Then you can lighten
the color pencil mark a bit with your eraser. So let me just quickly use that. I use this needed eraser, so I'll just quickly get rid
of extra lead pencil marks. The painting is really
straightforward and simple. I'm using literally just two
colors for the brown and the red and a slightly
darker shadows. I'm using indigo
for the shadows. For the eyes and the
nose, um, Sorry, for the eyes and the mouth, I used a marker pin,
so you can use that. And for the white
part of the eyes, like I said, I had
used Posca marker, but we'll keep it
untouched here in this one so that you can
make the eyes later. So let's go ahead. For the brown, you can
take any shade of brown. I'm using raw umber, but any light shade of
brown would do for this and a darker shade of
indigo for the shadows. Let's get started with the face. I feel like my face was a little bit bigger than I expected. So I'm just going to go a little bit inside the lines that I drew, very simple. I just painted with a
light watery paint. Leaving the nose area as
well as the eyes area. In this the nose, I actually
painted on top of the brown because the red is quite
pigmented on my palate, but it'll be a good idea
to keep it untouched. Then just go ahead and paint the face as well,
leaving the eyes out. Then you can drop
little darker shades, take more pigmented
paint on your brush, and you can drop it at the
edge like this to mark face you can drop
it here as well, towards the to give it a
little bit of dimension. Don't overthink this. It's a very simple
straightforward artwork. Then for the body, we will again keep the scarf area untouched and then
just paint the body. Then later we add a
little bit of shadow like we did for the face
with a darker pigment. Now let's do the years as well. Extremely simple like this. Keep the top darker and the
bottom slightly lighter. You can just make something like this and then we'll use Indigo to add
some more dimension. I use the same brown
for the horns as well, so nothing special here. Just go ahead and make it
like branches and same here. I'll take some little darker
pigment on my paint for the brown and drop
it at the edge near the scarf to give a
shadow. Here as well. Before you get into adding
the nose and the scar, wait for this to dry up, otherwise, it's going
to become really messy, especially if you are doing
like this where you are painting on top of the brown
instead of leaving it out, you need to wait for
a little bit longer. So I just had some
definition while it's dry. Now let's come back to
it after it dries up. Now let's add the red. It has dried up. Let's
start with the nose. Semicircular nose. You can keep a little bit white portion to show the shine. Something like that. Let's
add the scarf as well. I want the scarf to feel like it is flowing with some wind. I'm going to just keep
it loose like this here and then something
similar here. I just paint as well. Then I'm going to go in with a darker shade of red,
not the same one. This one was a lighter red. I'll go in with a darker
red to add some details. If you want the scarf to have some tassels,
you can make this. Something like this. Now, just
take a little darker red. You can even take indigo
mixed with your red to get that darker shade and drop it at the edge where you
want to show some shadow, something like this, here. It gives some dimension and
here as well, near the neck. It gives a little
bit of dimension. Now, let this calf dry
and once it's dry, you can add these little
checkered details if you wish, with this darker red as well. Here at the bottom as well, I'm going to just
drop some aceron if you want to add some
dimension to the nose as well, keep the top lighter
and then you can add some darker shades here
at the bottom half. Okay. Now, what I'll do is take
a little bit of indigo, very slight, just
the tip of my brush like this, very watery indigo. This is to add some
dimension to the ear. On the inner edge,
just like this, you can just add
some dimension to the ear to show the inner
portion of the year. If you want to add some
dimension to the horns as well, you can just add a
little bit indigo on one side to show the
shadows on one side. The light is from
top, for example, you can just add
some shadows here to give a little bit of
dimension to this horns. And for the eyes, I'm going to be
using a marker pen, so simple marker, and just make some eyeballs at the
center, cute little ones. Like this. I'm going
to paint it all black so you can make
different types of eyes, different expressions,
and droopy eyebrows. If you want, you can
add a little bit of a line here to show the nose and I'm making a
half smile for this one, like a cute half smile, you can do that as well,
that's pretty much it. When the scarf dries up, you will go ahead and
add some details. I think it has pretty
much dried up. What I'll do is just
pick some dark red. Or you can mix indigo to your red and very
gently, not very detail, just gently in some areas, add these checkered marks if you want to add
this detailing. Not throughout the
scarf, just some places. It gives a nice detailing. Yep. That's all. And
you are done with this cute little
reindeer, Rudolph, actually, you can use this in your Christmas
cards this year, and I hope you like
it and enjoy it. Post your projects in
the project gallery. I would be really
eager to see what you have painted. Merry Christmas.
10. Final Thoughts: All right. I hope you
have fun in this class. If you like the class, then do leave a review. It really means a lot. If you have any questions, then use the
discussion stab below, and I'm happy to
answer them for you. For future class updates, follow me on Instagram, as well as on Skill Share. Until then, happy painting.
 Kanchan Kaul, Artist and Illustrator