Transcripts
1. Intro: Friends, are you
confused about how to add shadows and textures to
your watercolor flowers? Do you ever sometimes
paint in those details? And maybe you don't wait long
enough for things to dry, and it just becomes
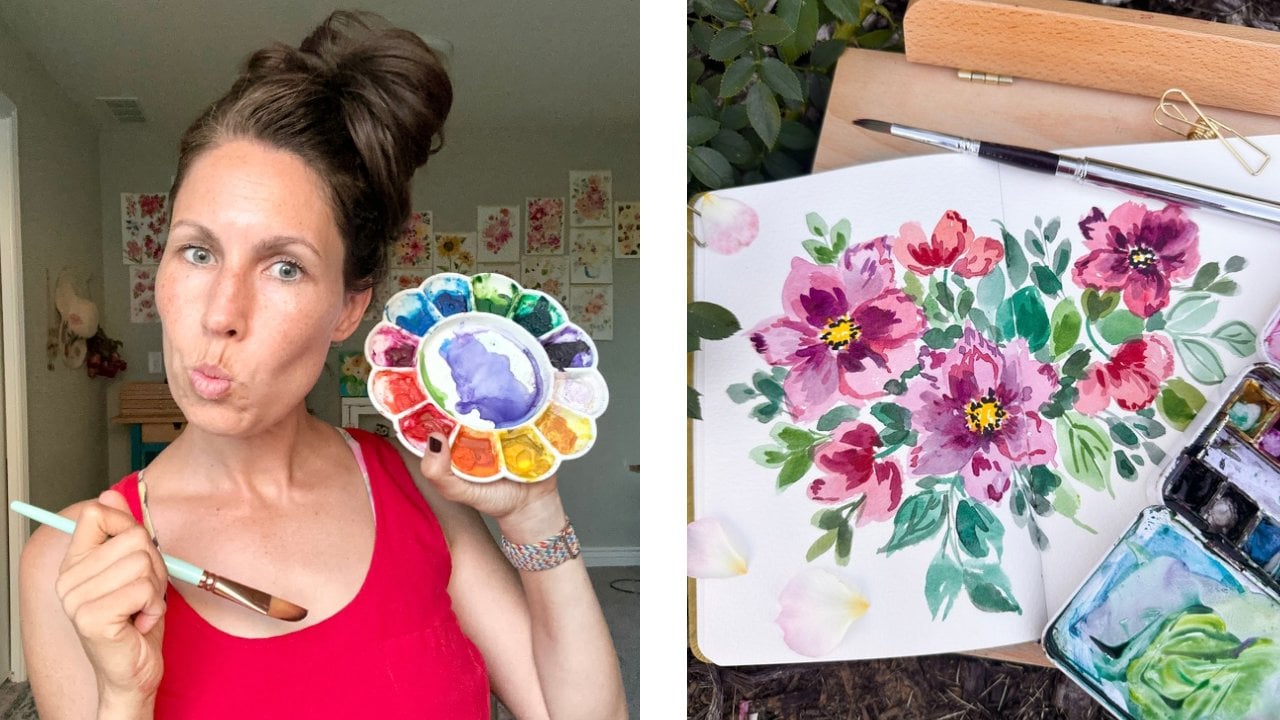
a frustrating mess. Well, then I'm here to help you. I'm Tammy Kay, and I
am a watercolorist, as well as a mental health
therapist working in Kansas. What I love to do is
paint watercolor flowers and sometimes even
loose landscapes, birds, whatever really
floats my boat. Because I'm a therapist,
I love mixing self care in with the things that I paint
just to help you like, let go, relax, and really
enjoy the process. I recently published
three other classes on how to paint loose
watercolor florals, as well as letting go of
perfectionism in your art, so you can check all those out
on my skill share profile. Also teach watercolor
on many platforms, and I've been hearing from
students that they have such a frustrating
time trying to paint the shadows on flowers. They've been looking at
tutorials and courses and just get left frustrated
in the whole process. That's why I created
this class for you guys. This class is all about
the watercolor basics to build up those layers
to create the dimension, the shadow that you're craving. This is what you're going
to learn in this class. Watercolor control basics by creating some paint
value scales, color mixing the easy way. Painting leaves and flowers
from different perspectives, the tools to paint in
texture and shadow, how to create a floral
composition that is attractive. And finally, learning how to embrace mistakes as they happen. So we make mistakes,
and that's okay. It's a way that we
can learn and grow, know what we like, know
what we don't like. We got to tell ourselves, mistakes are okay.
They are not bad. This class is for the beginners who want to get the
basics overview, and it's also for the
more advanced artist or student that is wanting to really
hone in on building those layers in an easy
and simple composition.
2. Your Final Project: So in this lesson,
we will be going over what our final
project is going to be. And I will tell you
about how we will approach this watercolor
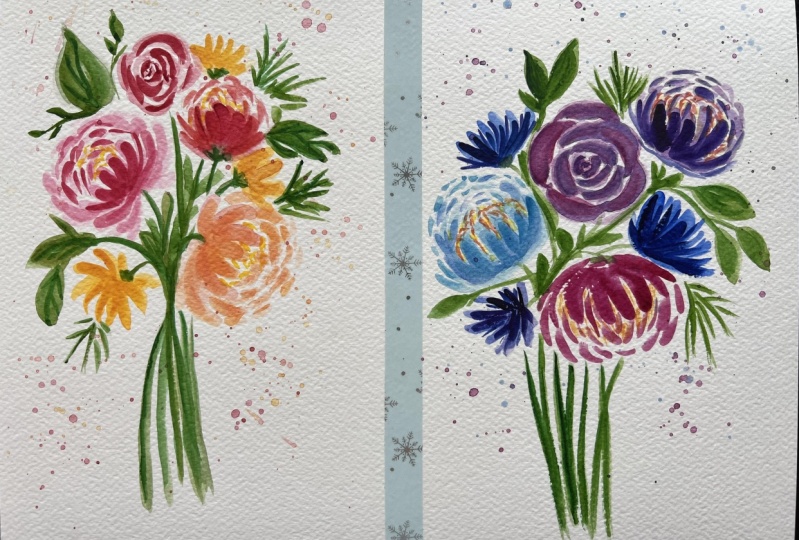
lose bouquet of flowers, which is what we're
doing with lots of shadow and lots of color. So for your final project, we are going to take the
skills and techniques we just learned in
previous lessons, and then we will apply them to the loose
bouquet of flowers. You will be building up
a loose floral bouquet with a base layer
of main flowers, small filler flowers,
and stems, and leaves. And then, of course, we'll add the texture and
shadow wet on dry. Finally, you'll also learn
you guys how to embrace mistakes as part of
learning and growing. So if your final project, I'm going to be looking
for two different things. First of all, just
completing the project. As I always say, I'm not
looking for perfect, I'm looking for you having sat down,
completed the project, completed the class, And the second thing is,
share your story. What was it like? Even
one or two sentences. Just give me an overview. Okay, also, when you are ready, you can share your final
project at the project gallery, and that will give us time to be able to give you
feedback and review it, and like it and all the things. It's a community you guys, and us sharing together helps
us grow together as well. So in the next lesson,
we're going to learn about the supplies that we
need for this class.
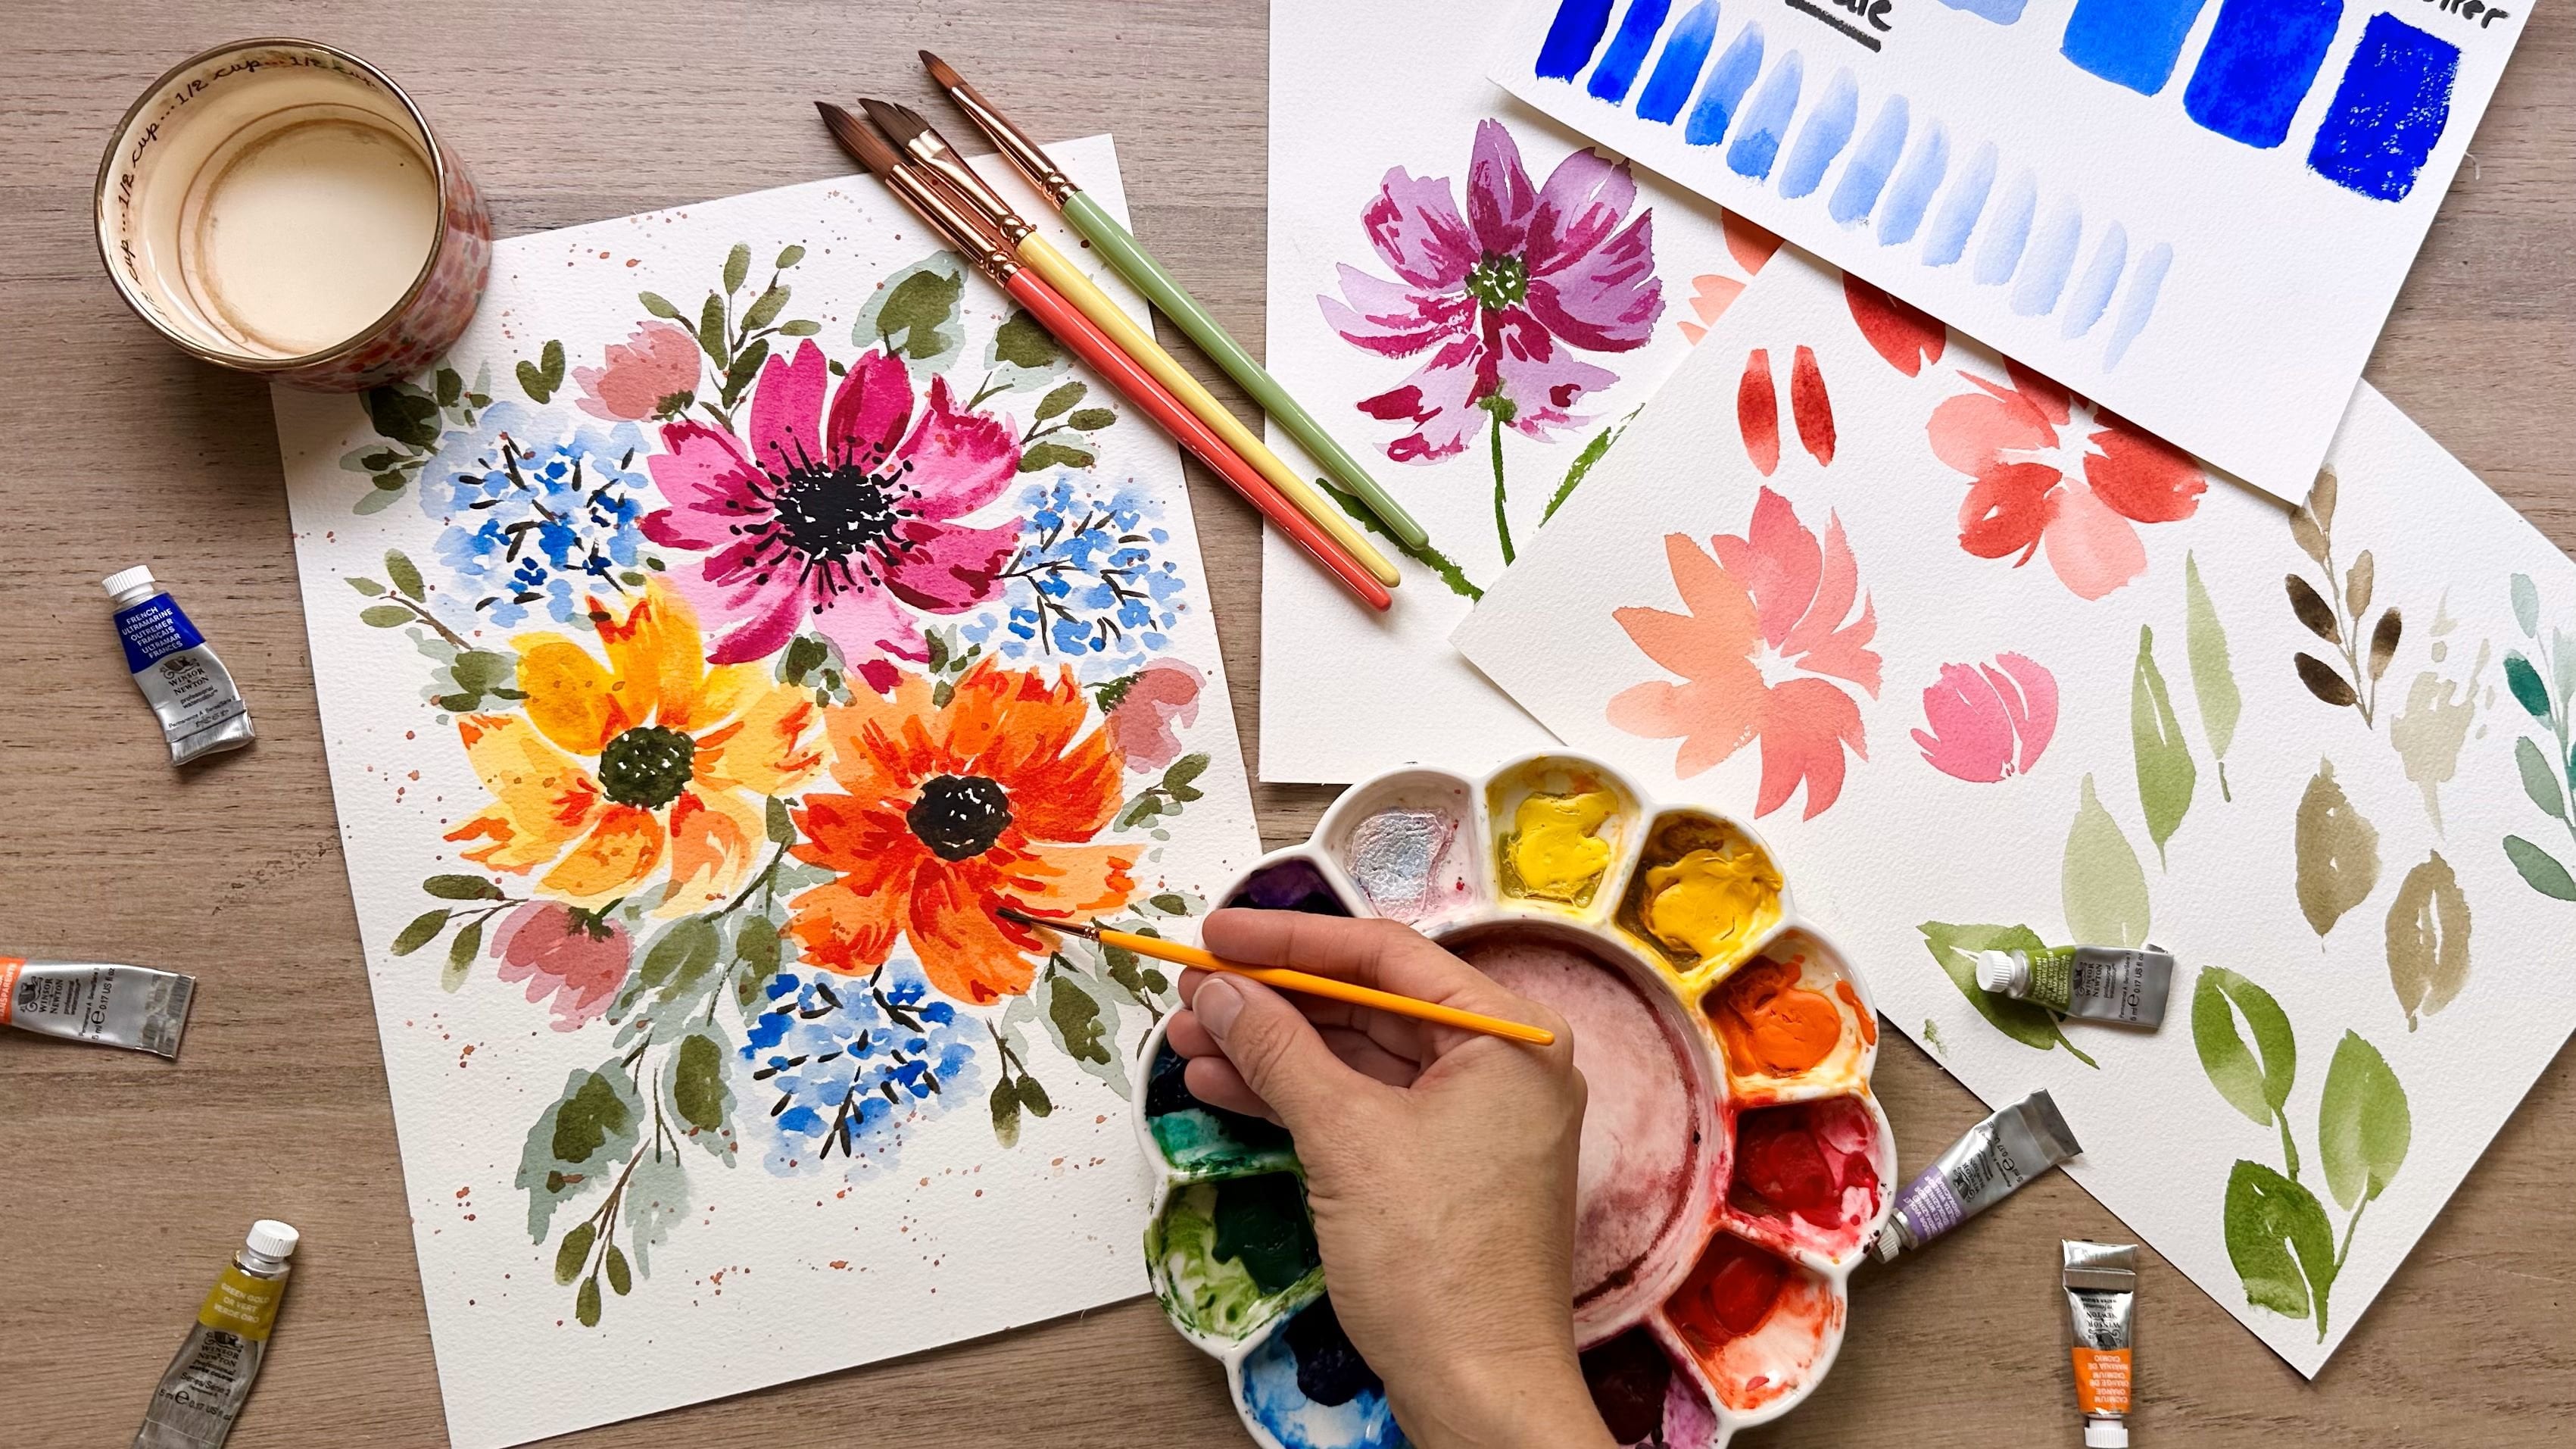
3. Supplies: Okay, so the topic of supplies. Use what you have is always the bottom line that
I'm going to tell you. But sometimes you want
a little direction. If you don't have a budget, then it's okay to go with whatever you can
afford at the time. And you can always
invest a little bit here and there for
more quality supplies. So when I first
started painting, I just didn't have extra
money to invest in it, and I got craft supplies. So you can use your
kids craft supplies. You can use things from like TJ Max or Ross just to
get started Crayola. Honestly, I've seen some amazing things done with Cyla paint. And so I don't want you
to stress about it. I don't want you to
have expensive supplies that you feel scared to use. And I also don't want you
kind of being worried and frustrated that
your supplies might be a little bit less
than professional. So I'm going to show you a few little things
that I like to use, a few things that are out there. The one thing is, make sure that you're using watercolor paper, and it can be cotton and
expensive or it can be pulp. But that is something that's really important to be able to hold all the water that we're using with
our paint mixtures. So when it comes to your paint, you can either buy paint
in little tubes like this, and then you can get a ceramic or a plastic palette and then actually put
the paints in there, or you do get more
for your budget. However, you know, buying
tubes like this or even half of the size can
be a bit of an investment, or you can just go the easier route and get a palette that already has these
little half pans and it's filled and
ready to go for you. When it comes to your
watercolor paper, you can either get
a block like this, where it's attached right here. Some of them come
glued on four sides, there's a little bit of a
hole where you can stick a little knife or something
in there and loosen it up. That's really nice because if you have a loose piece of paper, it tends to buckle when
you put the paint on it. That just keeps everything nice and flat while you're painting. Or you can get a sketch book, something bound like this, and you can see a little roses here. And so you have
everything in one place. All the things we're talking about in this class
and all the classes so that you can kind
of go through and see your progress as
you keep painting. So when it comes to brushes, I recommend a variety of sizes. Right here, you can see
that I've got three. I love having a number 12 for the larger
flowers and leaves. This is a number eight,
or you can do a six for that medium brush for
smaller flowers and leaves. And then if you
have a nice point on your brushes like here, then you don't really
need something small. You can use light pressure. And then you'll just
get a little tiny line. But if you like, can get a smaller brush
like a number two. And that's the detail brush. I will talk more about how we
use these in a little bit. But you use a brush
that when you wet it, it's going to come to
a nice fine point. Always make sure to wash your brushes and
then dry them flat so that you're not
going to get water coming up into the
feral of this. It's going to loosen the glue, and it's going to
destroy your brush. My water, I like
to have two jars. Of course, I would
empty these first. And one I would use for my warm colors and one
for my cool colors. It just helps to keep your
water nice and separate. If you add those two together, then you get a nice
brown muddy color, which can affect the
vibrancy of your paint. I also use a paper towel all the time for
dabbing my brush, and we'll talk about this a
little bit more specifically, but it really helps you
to control the water, how much is on your brush. Then I always have a spray
bottle so that I can activate my paints
and reactivate them over time.
Just spray it down. Let that sit for a second, and your paints are ready to go. So again, bottom line. Use the paints that you have, use the paper that you have, and the paint brushes, invest a little over time. I just want you guys
to be stress free and have so much fun
with this class. So in the next video,
we're going to learn more about water control
and paint consistency.
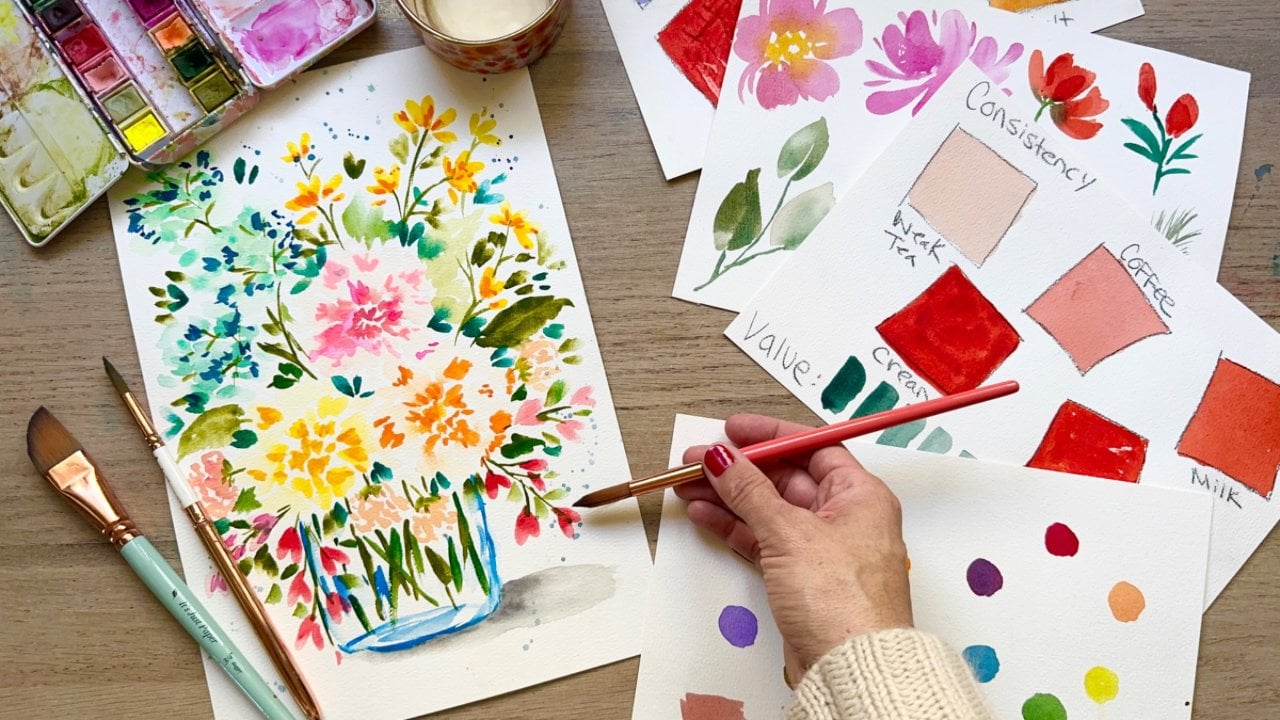
4. Paint Consistency: So I'll be honest, guys. Water control is hard. But that's why I'm hoping to
make it easy by teaching you guys the paint consistency
scale. And the value scale. I don't know why I'm
doing this my hands, but it helps you to
visualize the light, the medium, and the dark values. Values is light and
darkness of a color. And it helps you to
get used to that. So if you're like, I
need to go really light, and you're trying to figure
out what's the amount of water to paint or I
need to go really dark, how much paint to get that
consistency, I've gotcha. All right. I'm
going to start with my large number 12 round brush, and we're going to
quickly do a value scale. Value scale is just like this. We're going to have a wet brush. We're going to grab some
nice creamy paint here, and I'll tell you what I
mean by cream in a minute. But it's going to be pretty thick as thick as I
can get on my brush, mostly paint very little water. Then I'm going to make a mark at the top here on my paper. That is about as dark
as this color can go. Now what I'm going to do is
I'm going to dip my brush, swipe it on the side, dab it, and then I'm going to make
a second mark next to it. All of a sudden,
you're going to see the value is starting to change. Dip swipe, dab. We're getting lighter here. Every time we dip swipe and dab. We add a little water and then we take off a
little bit of paint. This is just showing us how
dark and how light we can go. As we do this technique,
at a certain point, your water is going to
get so contaminated that you might not get
as light of a color, can change your water, and I'm dipping into a different
well that's actually clear. But with water color, we have to be a little bit creative because we're not just adding white to
make things light, and water is our buddy
in this situation. Looks like we have one,
two, three, four, five, six, seven, eight,
nine, ten, one more. And that'll do it. Okay. For this next one, we're going to do a
paint consistency scale. So I'm going to grab a space on my palette that doesn't
have anything. Okay. Just wipe off some
of that paint there. And then we're going to
go with this teal color. So I'm just going to add a little bit of
paint to my palette. We're going to paint
a very light version. This is called our weak tea. Our weak tea is just so light. Very little pigment here. A lot of water, and we're going
to add that to our paper. I want you to see
that it's very light, and we're going to start adding a little bit
more pigment as we go. For basic washes, we often
do something like this, really light weak tea. And then I'm going to add
a little bit more paint. So we're getting a bit darker. It still moves a
lot in the palette. It's still transparent, but it's a little bit more vibrant. This is what we
would call coffee. We'll put that down
on our paper as well. I can see it's a bit darker, a little less opaque. The color is
changing a bit more. Now we're going to go for a bit thicker paint consistency. This is called milk. I still moves on the
palate, but a bit less. It's getting a lot darker, a little bit more opaque.
The movement is key. We do want it to still move. Go ahead and put that
on your paper as well. Look at that dark
progression there. Now we are going to do cream. Now, these first two I would
use for my basic washes, that first layer when you're doing your flowers
or a landscape. The second two, milk
and then cream. And cream is pretty thick. It doesn't move on your palette, but it has enough water so that you can
smoothly paint it. So this one and this
one are the ones that I would use classically
for a shadows. My shadows and texture in my
landscapes in my florals. The last one is I'm just
using a little bit of water. I'm going to just take
paint directly from here. It's too dry. You can grab some more water and
really, really thick. This is the last consistency, and it is called butter. We're going to dab it
on our paper towel, so it's really dry, and you're going to see
all this dry brush effect. So this is not something
I use too often, but it's great for adding
texture in your landscapes, maybe even in your
flowers, if you'd like. Okay, friends, wasn't
that fun doing a little paint consistency
and water control practice. Next, we're going to do
something that might seem just as
challenging or worse. Call itVixing. But I
have a way to do it. That's going to be
pretty easy, peasy. So let's get to it. I'm
excited to show ya.
5. Color Mixing: Okay, so the topic of color
mixing can seem really scary, really daunting, but I've got you back, like
I told you before. I've got an easy way to do this mixing that's going to
be stress free. And so fun. Let's go. Are you ready? Okay.
So I'm going to teach you one of the easiest ways
to do some fun color mixing. So first, let's start with
our flowers themselves. So let's say we're starting
off with a pink, right? Nice little pink here. It's got some other
stuff on here. There's so much on my palette, and I'm just going to you know, make a mark right here.
So I've got that. I've got a more concentrated
version of that as well. And then let's say I want
to add in some orange. I'm just going to mix a little
orange into that puddle, and now I've got a peachy color, add more orange to it. To that puddle, and it's
more of that orange color. If I want to add in some lemon yellow to that original color, all of a sudden, we're a
little bit more muted. What if I wanted to add in some, some orange red to that mixture. Now I've got this one
here, this bright red, add that in, and now
we're looking more red. We're moving along. Let's add in I don't know, some of this yellow ocher and see how that changes things. A That's pretty similar
to some of these. You can see these beautiful, subtle colors that
we can use as well as we can use the concentrated
version of a lot of these. You see that all of a sudden, you have so many options. You've played with the
colors, you've mixed it. The cool thing is that that
base color is it's there. You're just adding things into
it to change it up a bit. If we want to go back to pink, we can go and put
some pink in there, and then we have this
lovely shade as well. In the same way, we can
do this with green. I'll grab my sappy
greeny color here. And we like this one. If we did it with lots of water, we're going to see
something like that and more concentrated, it's going to be like so. Then we can alter it a little
bit and we can say, well, let's add in some of this
beautiful teal color. And now all of a sudden we
have a color like that. If we want to add in more blue, then we add that on the top. As we're painting, we
can be subtly changing. What we're doing can
even mix on paper. If you feel like you didn't
get enough in there, that's a little bit more blue. Let's add in some brown. You can start can paint a
few leaves or whatnot and then change the color by adding in something
over the top. And a little bit of black. That was a lot of black.
Now my green is very dark, maybe need more green, just
ad a little more green in there as well. If I wanted to take my lemon
yellow and add that in, see how that changes
things with the dark. We're back to there, but it's a little
bit more muddy. Then if I wanted to add some of this yellow ocher over
the top, I could do that. And that's kind of a fun
color as well to use. We did some color
mixing, and hopefully, we enjoyed a little
bit of self care, a little relaxation, because
that's what I'm all about. So in the next video,
we're going to go through leaf and floral shapes and some easy ways to
create those two botanical.
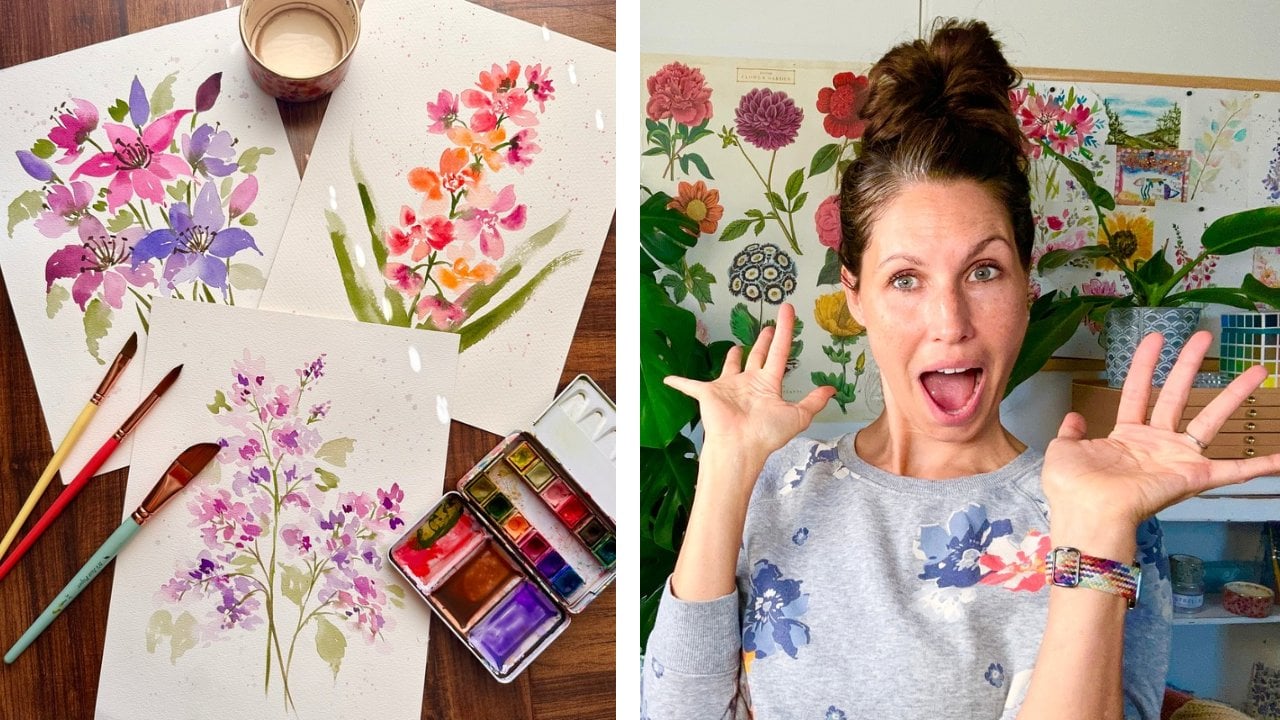
6. Leaf and Floral Shapes: Okay, when it comes to
leaf and petal shape. Sometimes people get really
stressed out by that as well, thinking, Well, petals are so complicated.
How do we do this? Leaves, they can be challenging. I'll tell you that's true. But I'm here to give you
some simple ways to create your petal shapes
and your leaves together so that you can
create something beautiful. I mean, if you take a blob and you add it on
their light color, and then you go back
in when it's dry, add in some details, you're going to have
a fabulous flower. So let's go and practice
some of that stuff today. And I promise you,
you're going to feel so much more confident
at the end of this video. Alright, so today, I've got my number six number
12 round brushes, but I also have
my filbert brush. And it's a nice
rounded tip brush. If you don't have one, just
use a larger round brush, and you can accomplish
all the things anyway. But let's go ahead and start
with this filbert brush. I always start by
dipping in water, taking off some of that water. We're going to go with
really light colors today. So We're going to go through some of the flowers we'll
be doing in our bouquet. First of all, add a little
orange to this pink. But use the colors that you love really doesn't matter
what I'm doing. All right. Remember,
guys, it's all about embracing mistakes today. If you make mistakes or I make mistakes, I'm
going to keep going. I want you to keep going, too. We're going to take our brush
and we're pointing it out, and we're going to make
a brush stroke here. And we twist it, we
can twist it slightly. This is going to be kind
of very tilted flower or could be a side facing. Then we're going to do another
little petal right here. I can dip, take off some paint just for
some value change, and add another petal right there and another right
there. Dip again. I'm trying to swoop, swoop in to this middle point here where everything
is anchored. Within that, we can then anchor it with a
little bit of a stem, and I will take my number
six round for that. I'm just going to
use a sap green, add it to the puddle I used before and add some
water. Dab it. And then we're just going
to add a little stem, curve it around like that. And then wet on wet. I'm just touching down here, so there's the anchor
point with the flower. Okay. That one is pretty simple, pretty easy easy going,
straightforward, I think. Let's do one that might feel a little
bit more complicated, and it's going to be
a side facing rose. Let me just show you what I'm
aiming for. Or like a pony. Maybe not a rose, maybe a peony. So we'll try that out,
wetting my brush, grabbing some pink, and you can see I'm
going really light. So we're going to just try
painting in our little middle. This filbert is great for that. We've got a little bit
of a petal right here. And then we're just
going to with the side, you can kind of turn
onto the side and make these little curved marks
around just like that. About that guys see,
I make mistakes too. It was out of focus, and I've fixed it so
you guys can see. I'm so sorry. Sometimes
those things happen. Now you can see the
flower and it's starting to curve around and then I'm going to just almost make thetle like partial
half circles around it. These are just like the petals that are around the flower, little quick brush strokes, and I'm leaving a
lot of white space. I'm going to have a petal
that comes off over here as well. Flip our brush. And now I just want to start filling in that
space a little bit. There's a lot happening. But as you notice,
everything is just kind of circling around. It's curving around. So now what I want
to do is do a rose. So I'm going to take. Let's do kind of a
pachih color again. I'm just adding some
orange to this pink here, maybe a little more yellow. A little more pink. And just make a mix that you think is nice,
that you like. And then we're going to bruh. And we're going to start
with a little center. So we're going to do the sc
shapes. Kind of like that. All right, and roses
can be challenging, so we're just going to go for
it and not worry too much. So I am going to press down the belly and bring it around and then anchor
that first petal. And I'm going to
do this clockwise, so now I'm going to
angle my brush this way. That little tip is going
to touch that last petal, and I'm going to press down and bring it around a
little bit of white space. It's still It's a
pretty thin petal compared to where
we're going with this. Then I'm going to
anchor down right here, touch that wide petal there, bring it around and just
let your brush be wonky, leaving some white space.
A little bit there. It's okay if it
goes out like that because of a rose opens, and if you can see
the entire rose open versus those tiny
little buds that we see the floral market, you're going to see a ton
of wonky lacy petals. And we always want to
leave some white space, take off some of the
paint, dab your brush. And now we're pointing
that brush back towards me and anchoring it, and we're pressing down a
little bit more the belly, kind of waving around. Just like that. We're getting
a little bit lighter. Okay. And then let's do
another one right here. And I'm really going to
press out with this one. Okay. Grab a little
bit more paint. We're doing this
little circle around. And if you're feeling frustrated,
all just take a breath. Take a break. Okay, B roses can
be challenging, but they're also so satisfying. When we figure it
out, we've been practicing and we figure
out what we like. It's a little bit
of a celebration in our heads, I think. Alright. So there's my rose,
something to practice. We're not needing it to
be perfect in any way. I'm just going to
grab it and send it send it around a little
bit extension here. And I'm going to do
another one right here. I'm looking for a
circular shape, but yet a little wonky because my rose is not going
to be perfectly circular, and also I don't want it to be. I'm going to focus on using
my 12 number 12 rounbrush, focus on the first
ones being very large. I've got my watery paint, and we are going to start
with a s curve shape. We are going to angle
the brush here. Pointing down, but
not pointing at us. We're going to do a little bit
of a stem, just like that. We're going to press down
with the belly of the brush. Slowly k angle it around, lifting up very slowly
for a little point. Then the same thing
on the other side, press down with the belly, curve around and lift up. I like to leave a
little highlight there. I think that's really pretty. I'm actually going
to dip in water. I'm going to take off
some of that paint, and we're going to
practice that again. A little bit of a
sea curve shape. Come back around the other side. The slower you do it, I
think the easier it'll be because you'll really start to feel what that's
supposed to be like. Now, if we want to
do one on a stem, we can take some green
and do a series of three. I'm just going to make a
little stem right here. And then three or four. We'll see how it goes. So we're going to grab our paint again, and we're going to
angle towards us. We're going to do a little stem, and then we're going to
press down at the belly. Right? This is a
really good practice. Lift up slow. Other
side lift up slow. It's a really nice
way to keep yourself calm and do some
self care as well. So I'm going to switch
to my number six round. And the last thing
we're going to do is just some little kind of
grassy brush strokes. So I will add in some
of my lemon yellow, just to lighten this
up a little bit. Like a grassy green. Dab my brush to take
off excess water. And we're just going to
make some flick marks, just a little bit of a mainstem and then go off from there. Okay, quickly, Okay, so now that we
practice those shapes, we're gonna practice
some texture. How do you add in texture
and shadow lines and dots and shapes to create
depth in your painting? Well, let's go find out.
7. Texture and Shadow: So when it comes to
texture in our flowers, we're going to use a variety of brushes to help us get
different types of marks. For example, using
a thicker brush is going to give you
a lot of coverage, and maybe too much liquid, even if you dab your
brush on a paper towel, if you use a detail brush, you're going to get
really thin marks versus the thicker ones. And sometimes we use
these in tandem to do various texture marks in the same flower or in the
same leaf. So let's go do it. I'm going to grab some orange
here, a little bit of pink. That's such a dark color. Let's grab some more pink here. All right, a bit more water. With this, what I
want to do is make some marks here that are going
to really help this stand out and be a bit
fancier than it is. Now, you can take a
number around brush, or if you want, or
you might try that, you could take your filbert
if you're using your filbert. I'm going to grab some of
that paint, dab my brush, and I'm going to just make
some quick brush strokes here, swooping in and not covering up everything
we have there so far, but just adding a little bit of texture shadow
to this whole mix. You can see I did some
really quick strokes. It doesn't take a lot to
add some fun dimension. I can take my
pointy brush Dabit, and I can do a few little like sketchy brush strokes here. I'm just pressing down and making some marks
on the ends there. And if you want to
go even darker, you can grab some more
concentrated cream consistency and add in a little bit
over the top as well. So, I usually work
pretty quickly, and that allows my brain not
to start getting you know, worried about the
details so for the pony. I've got my filbert here and I'm going to
go for that pink color. So I really like that pink. I'm just going to put
that on my palette here. Really nice, really dark dab it. And then I'm just going to
do that same type of thing. I'm going to use the
broad side of the brush, dip dab and then add in these really
soupy marks for the P, grab some more
concentrated paint, and I'm just going to go
around in the circle, just emulating a
bunch of petals. Now you can see that my pen, I'm going to flip it over
here is starting to become more full, more
interesting, exciting. If I want to add a
different color, I can I can grab some orange, add that to my pink. Just to change it
up a little bit. I can even add just a
little bit, some contrast. You can go over some of the
marks that you already did, and I'd like to go sideways here with just the
edge of this brush, creating these circular moments, creating a very full pony, and yet I still have a lot of
white space to work with so that we can
differentiate between the different petals and
give it some breathing room, just a little bit
more over here. Filberts are so much fun, but you don't have to use a
filbert if you don't have it. You know, you can
use a round brush, and you can still get
lovely creative marks. So for my rose, I'm just going to grab a
color in here somewhere. I'm looking at this
nice pinky red, grabbing some of that. So for the rose, we want to do more concentrated
more in the middle. Because that's where all those
petals are really tight, and not a lot of light is getting into them and you
want to emulate that. So I'm grabbing my paint, dabbing my brush, and I'm
just going to lightly, really light pressure,
start filling in some of these lines with
some quick brush strokes. And I am kind of hugging the side where there's the petal starts from
the white space. So for example,
here's a petal here, right where it's touching
the white space, that's where I'm wanting
to put some of my marks. And I'm just trying to be
you know, very intuitive. That's not the only place
I'm putting my marks, but it gives me a fine
little space to start with. I've got some pretty
dark marks here, and I'm doing some little lines. I want to show the
movement of these petals. Then I'm going to
take off some of that paint, dab my brush, And I'm going to
focus on one side. So maybe right down here, I might want to add a little
bit more of these marks. We call this shadow shadow
and texture to your flowers. So you can do some light ones. You don't want to try
to you don't want to really make it super
matchy matchy, but you want it to
be kind of fun. Playful. So now I've
basically cleaned my brush. I'm dabbing my brush, and I'm going to start just spreading out some of
these marks right here. I don't want this
line to be so stark. So I'm just gently doing that so that I don't
have really harsh lines. And we might do a few
over here as well, really light Now, while things are still wet, I am going to grab more of
that concentrated paint, and I am going to dab a little
bit more of that in there. And just let it spread out on this wet wet technique
that I'm using. And, you know, just kind of play and don't worry if you feel
like you've made a mistake. You can always take
that damp clean brush and try to spread out
some of those marks. If you're not sure
that you like it, you can always try
to erase some of it. So removing paint is
something you can do too. But enjoy that process, and it's okay if maybe
you need to try it a couple more times and see what you really like
about the technique. Feel like our leaves are
pretty simple compared to the flowers that we're just
going to grab that mid tone, the medium value
for these leaves, and we can just
simply press down, kind of add in maybe a little
bit over the top of color. Just to add a little
bit of texture there. Or we could just
do like one side. Maybe the bottom is in shadow. The whole point is you want
that beautiful texture, you want that beautiful
dimension that maybe you are craving and weren't
really sure how to do. If you want to keep it simple, you can kind of just follow
the bottom of the leaf. If you want to add in
some dimension lines, darker lines, you
could do that as well. And sometimes you can just
take some paint and just blob it on to create the texture
and that can be fun too. Then simply for these, I'm going to darken
up my green and just go over the tops
of them roughly. Now, if this were
grass in a field, you have lots of dimension. But we're just going with a darker color over the
lighter one, darker value, and it could be a different
shade of green or it could be the same green
but darker. And that's it. Alright, so we've done
our practice exercises, and now it is time to start
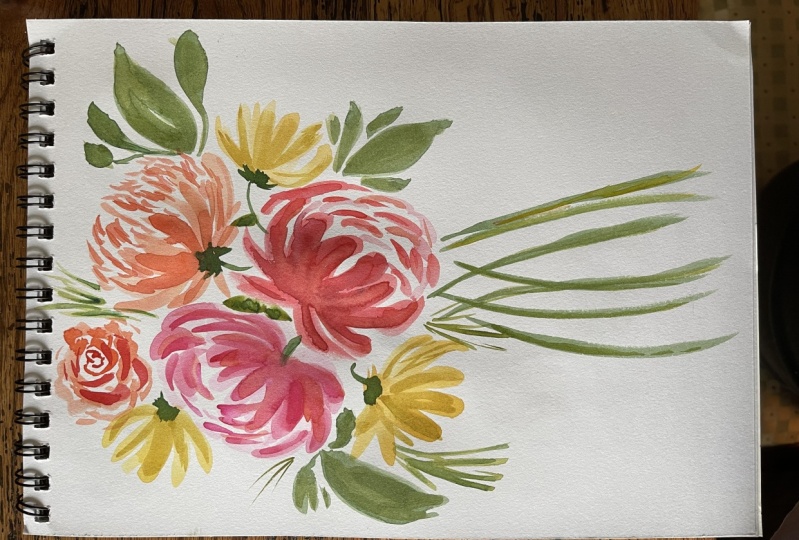
with our main flowers. I'm so excited to get
into this piece with you. This is our final
project. We've got this.
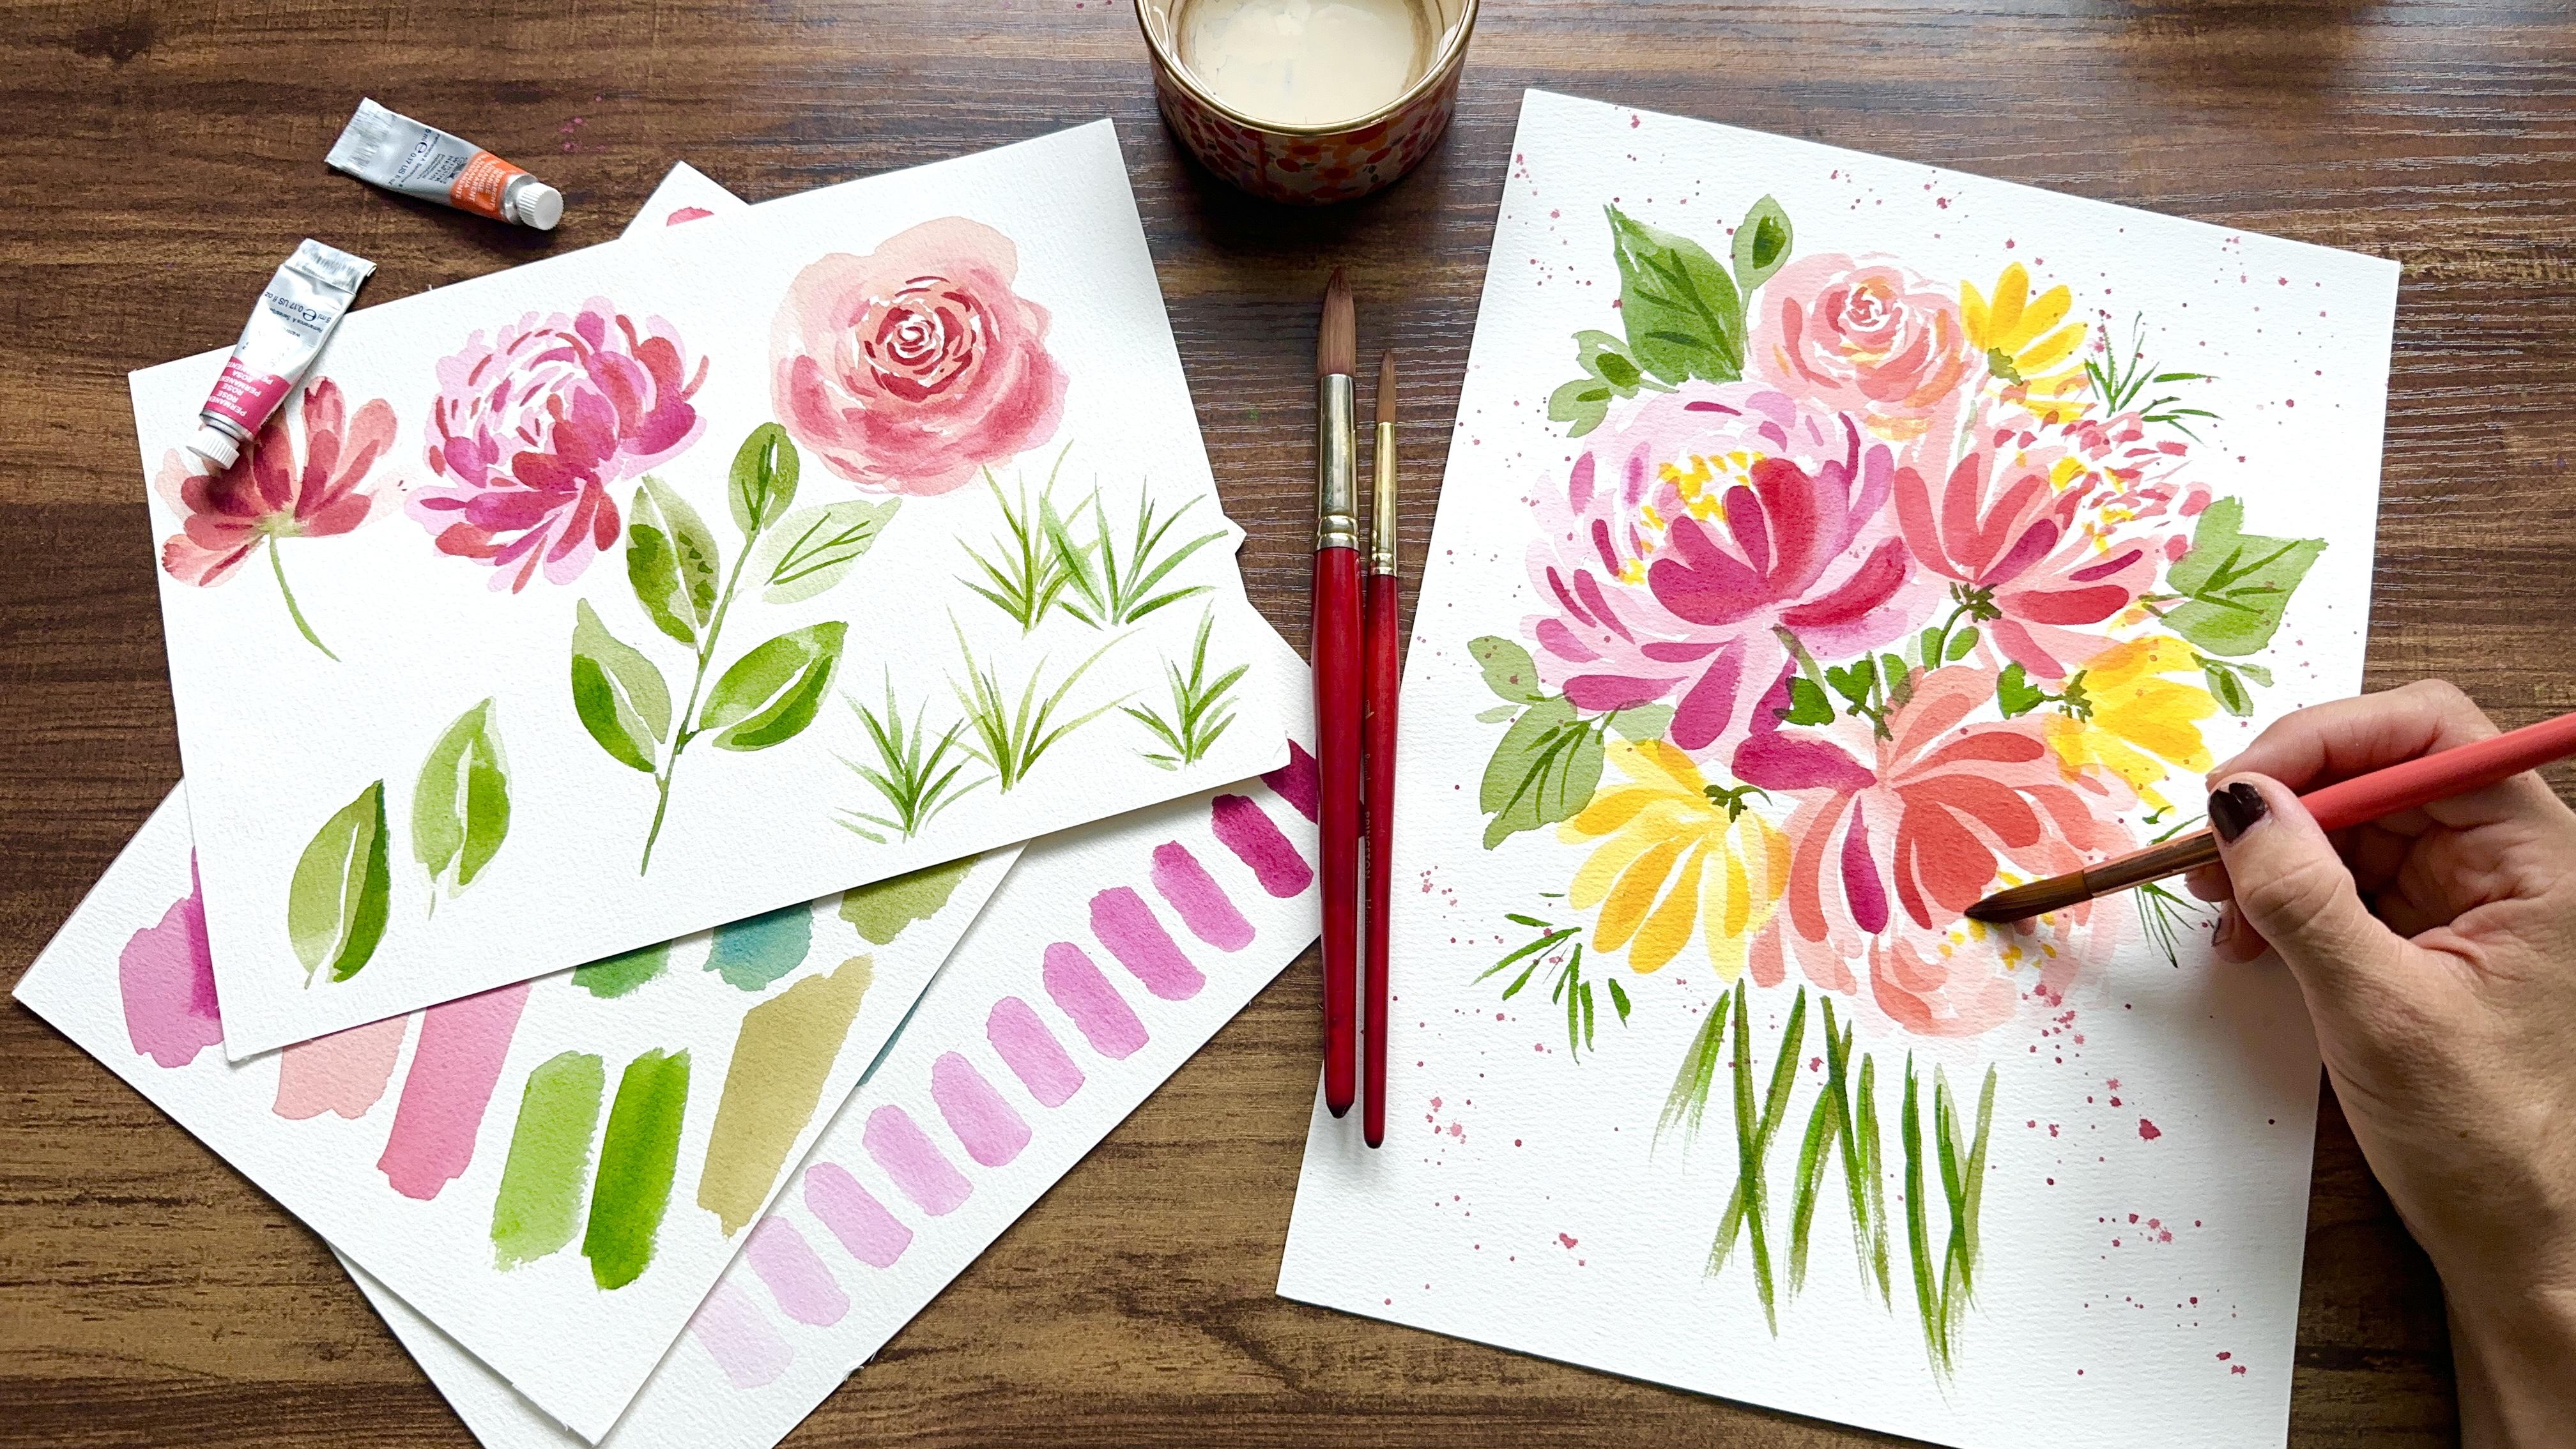
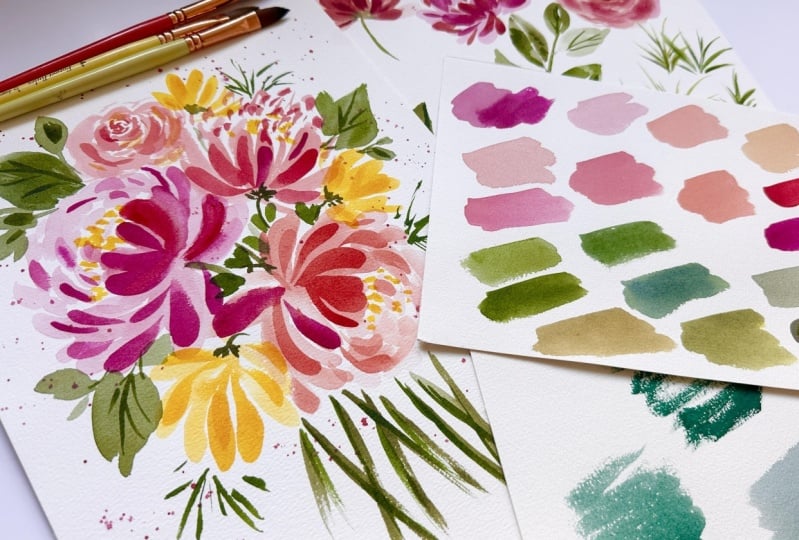
8. Main Flowers: Alright, so the next part is
to paint those main flowers. We're going to do
three large main ones, a swishy flower, but
then we're going to do two more
side facing roses. They'll be a little off center, and we're just trying to create a variety
in this bouquet. So the wonderful thing
about this is these are your focal points and what
the eyes can be drawn to. And then after that, we will paint in some filler foliage, some filler florals, and just h, it's going to be so pretty. So we're going to start by
spraying down our palettes. Getting all those
colors nice and juicy. I have a variety
of brushes today. We're going to start with
just that first base layer, and I've got a number
eight filbert. I also have this
tiny number six, which they don't look the same, but that's the numbers on them. Then I do have a number
six and a number 12. We'll just see
what we use today. But first, I'm going to
start with this pony here and I'm going to wet
my large filbert brush. You might be a
little confused if you're using a filbert
like how to use it. It's just like anything else, learning how to how it responds to the movement of
your wrist of your hand. But we're going to start
with a really watery mix dab my brush of paint, and I'm going to start here,
this is the base layer. We're just going to create
a little petal here, and then we're going to swoop around just
like we did with the practice one,
fairly large bloom. I'm flipping the
brush towards me and then that way because I want the outside petal to be
this part right here. So we get that
nice roundy shape. I'm leaving a lot
of white space, and I'm just making
that little bowl shape. Everything is just
from that bud, they open this way, so they're
just curving in like that. And Just think about how
you want it to look. There's so many petals
in a peony flower, and it can be a little
confusing to know where to put what.
That's too much. I'm going to go ahead
and take off some of that paint. So it's
that first layer. It really doesn't
matter too much. I'm just using the wet
on what technique to just add in a little bit
more color on the top there. Take off some paint.
And we're just kin of folding those
flowers to the top here. If you've ever observed
a peony flower, you're going to see
just million petals, and it's kind of
hard to figure out, well, how do you paint that? So we just go for it. We put that on there. And we're not going to worry
too much, guys. And if you feel like
you make any mistakes. Well, we just won't worry
too much about it because we are accepting the fact
that we do make mistakes, and we will try to embrace
them and just move forward. Okay? So that's the name of this game today, and
hopefully always. So there's one of our flowers. We're going to do
another one over here. And I'm just going
to flip the paper. So that you guys can have
an easier time of it. There's nothing wrong
with that. We're going to grab some pink and
some orange together, slightly different color here
and the same type of thing. So I'm going to just, you know, start with that lovely kind of middle petal and maybe
make it a little bit bigger and start
swooping in swooping. And I take off some
of that paint. It just gets nice and light. And then we just start filling
in, scooping and swooping. To create that pony shape. So there we are. It's just fun to play with this, play with the colors. Maybe we're just going to
take some of that paint off and we're really
light here, just dabbing. Then I might go back
in with a little bit more of that paint
and just wet on wet, add in a few little
accent colors. Now that we have our
large blooms down, I'm going to take
that smaller filbert, and let's go ahead and make
up our own little color. We've got that peachy,
that pink over there. We'll add some red in here. It's a little bit
of a pinky red. Let's add a little bit
of this yellow ocher, and we're going to do
a side facing flower like we've practiced. We're just going to, take
off some of that paint. And a bit more and I'm angling the way my
brush is so that we're getting a nice nice petal that's rounded at
the top as well. It's a small little guy, I've kind of decided I'm going to change it up
just a little bit. So as these are curving around, I'm going to take this brush
and I'm just going to do some little marks griggly marks to show like really
fluffy petals. Just like that. 'Cause I wanted
this to be a bit larger. Then it came out. Now, she's
real fluffy and lovely. So I feel like now that we
have the main flowers down, we've done most of the work, and we've mapped it out, so now we can just
start filling in white space with the
tiny flowers next.
9. Tiny Flowers: So for smaller or tiny flowers, we're going to do some
side facing blooms, first of all, and they'll be
kind of that medium size, but then we're going to do
some really tiny ones also. And we can do a variety of colors and also values of lightness and darkness,
just to change it up. So we're going to do
a variety of those, and you can kind of
choose if you like to use them both or
just to use one. And it'll be really fun just
to practice this together. I'm going to do a bloom
that is facing down, bruh. Some nice cadmium yellow. It's got a bit of an
orangy look to it, and we're going to just make
those nice petals here. I twist the brush a little bit right there to
get a nice thin mark. Let's try another
one and twist it in, take off some of the paint. Try that again. And
another one over here. So as you are painting
with me this morning, I want you to think about how
your flower is coming out, and if you like,
what's happening, we're going to do a
rose right up here. And it's going to be a bit
of a side facing rose. So I've got more of a red, kind of an orangey red here. And I'm just going to take
some of that watery paint, and we're going to
do a little bit of that sea curve shape here for that center, a
little bit there. And then we're going to start to just kind of come
around and make some thicker petals using heavier pressure.
Just like that. Taking off a little paint, and then coming over here and doing some more of
those swoopy petals. And then another one
over here, swoopy, swoopy, kind of bring
around little white space. Roses are tough.
So if you need to practice a few
times, that's okay. We all need to practice
everything that's new to us. So yeah, as you are painting, this kind of think about
what your experience is like so far, some wispy marks. You feel like, you know,
this is working for you? Do you feel like
there's some things that you definitely need to embrace because maybe you would tell yourself those mistakes, but maybe for today, it's okay. Last but not least, let's do another one of these
kind of flowers. Right here, little
guy, just a round on a bouquet of flowers. So if you feel like you've made a mistake
at any point this time, remind yourself
this is practice. I love to say that
we are practicing, we are learning,
and we are growing. Every time we try
something new guys, and it's exciting to learn. And you know me, I'm always
trying something new. I'm going to put a little
guy right here too. When I have a plan, sometimes that plan
changes a lot, just because I never know how
something's gonna turn out. I just wanted that
nice yellow kind of zig zag pattern here. Alright, I'm excited for
this first layer to dry. Okay, we've got our
little flowers in, little, small, tiny, whatever
you want to call them. And our bouquet is
really coming along. The next part is going to be doing the stems
and the leaves. And we've already
practiced that. So easy Pz.
10. Stems and Leaves: Okay, so for your
leaves and your stems, these are great to add texture different colors
to your bouquet. Your florals are usually warmer
colors, kind of the reds, oranges and yellows, not
always, but mostly today. And then the greenery is
usually in cool colors. You could do gray, blue, green, really,
whatever you want. Now, when you're
wiggling your brush, make sure to allow it
to move a little bit. You can make them
a little wonky. It just adds to the looseness
of the whole composition. It's time to add in the
leaves and the stems. I've got my number
six round brush, and I've got my lovely
sappy green mix it in with this brownish green, and I'll start with the stems. We've got one, two, three,
four, five, 67 blooms, which is an odd number, which is a nice attractive mix. But before I do those down here, I'm going to just do some sketchy lines to then
connect our stems down. We can actually bring
it down like that. And we'll do one right here
as well a bit thicker. Then I just quickly put
that stem in there. I like to attach
everything right here a little bit of a stem. I like to vary up the
lengths of them as well. We'll go ahead and do that. There's a lot of white space
that we're going to fill in somewhat with some leaves. But it's nice to have
these stems just. They just look, I might
take some paint off, dab my brush, and then we'll do the same type of thing
for the rest of these. Okay. Grab some more paint. And then this guy
right here needs to stem coming out as well. All right. And then we're going to
have some foliage in there. So I'm just adding a few more just to kind of even
it out. All right. So at this point, we
want to think about, where do we want
our leaves to be? I'm going to do
some larger leaves first with this
sappy green color. I'm going to change some of it, a little bit of color mixing, adding in a little bit of
a blue tone. Bluish green. And I would to balance this out, I'd like to put large leaf here, then right here and
then down here. So I'm going to just
say this is the space, and I'm going to do
that C curve shape, and then same thing over here. I don't have a larger brush. Therefore, I have
to end up filling in that space you
have to paint it in. If you have a larger brush, then you could do
two C curves and you probably have the whole space filled
in, if that makes sense. We can switch to a larger brush. This is a number 12. And see
how that makes a difference. I do want to do a few
little swishy marks here. Just to connect those in.
Those are very simple. And then let's do some
or do one right here. So yes, a larger brush
will definitely make it easier for you. All right. And then one down
here, run right here. You know, so a lot of
times people will try to fill in the spaces all
around the composition, and I'm going to do
some green there. And they'll just make this really square boxy
composition, which is fine. But if we want to make it kind of look, have more of a shape, then we just aren't
going to fill in all the space, and
it's really up to you. So I'm taking my
number six round next. And you know, I think I'm
happy with these leaves. This one a little bit wonky. So just adding in a
little texture now, a little color over the top. I want to do some grassy
bits like we talked about. I think I'm going to go with
some concentrated green, just grabbing a
cream consistency, and I'm going to just start doing some little sketchy lines. And this is going to
give us texture and a difference in what we
have, we've put down. Little sketchy lines, don't be afraid, just to put those in, those marks, right here, just to eelongate
this area down here. Then I always like
to fill in some of that white space with
just some brush strokes. You can even use the belly
of the brush. Did do this? And your eye will fill in the details when it sees all that. So at this point, I do want to make this a
little bit more round. And I do want to elongate this a little bit, make
it a little bit smoother. At this point, I don't
want to do too much more to this because I feel
like it's at a good shape. And that's where you
want to kind of walk away and just go on
to the next thing. You can always add more
if you need to later. Ho. We're almost done. We've added in the base layer. Now it's the second part to add texture and shadow
to our composition.
11. More Texture and Shadow: Okay, so this is one
of my favorite parts because this is where our
painting comes alive. You can leave it like
this, or you can add some dimension to create those flowers that
pop off the page. Now, you can add in some
dimension with different colors, or you can use the same color
in different saturations. And we're going to do
medium and dark tones. And then just a little
splatter at the end. Force and magic. Let's
go. I'm excited. Alright, I love this part
so much because we are gonna add some amazing
dimension and texture. To our bouquet of flowers. So I'm going to grab my filbert, the large one first, wetting my brush, always
wetting the brush. It's a little
dirty. That's okay. We're going to use that paint, and we're going to start
with this one right here. So grabbing some pink, and I'm going to do a variety of watery pink and then
concentrated pink. Let's just grab that nice creamy pink straight out of the well. Always dab your brush,
to have more control. And then we're just going
to kind of swoop away. And I want you to think about everything swooping and coming back to the center point there. I've got one right there. And I'm twisting and
turning my brush to add in these little
curving marks because when you curve it, it shows direction that these are moving around
versus a straight line. It's not going to
show that curvature. It's following the contour of the petals you
already put down. Then I'm going to
just take off some of that paint and if
I made a petal, Oop, and another mistake. I can take it off. If
I can't take it off, I will use splatter to cover it. I'm going to blend a
little bit of this here. And no harm done. We're getting a bit of
some sassy petals here. We just want to make sure
that she's real pretty. How do you feel
about your flower? Going to grab some more pink and add that in a
little over the top. You can use the side
of the brush to create a very small
little shape. Use that broad side to
create that large shape. Okay. That one is, I think she's doing pretty good, going to rinse my brush. I'm going to go with
this next one here. I am flipping my page, guys. There is nothing
wrong with that. So we're going to want to add in some orange to our pink here. To create some more depth. Really concentrated paint.
This is milk almost cream, and milk and cream are my
favorites for this thing. Dab your brush and
save type of thing. I am using the broad side. I'm just twisting it around to create a really
thin bottom part. Then I'm swooping side. And I just want to get that
movement going, right? We want to show movement
with this peony flower. And if you're not
sure about this, you can always practice
these brushtrokes. I'm going to take off some
of that paint and Dab. And then for the little
fluffies on top, add a little bit more
as well to that. That's really all
you need to do. Don't need to do too much. We just want to make sure
it's very easy and flowy. For the next part, we're going to do
this one right here. I am going to grab some of this red that I
have on my palette. Just add that to the
puddle we already had. It's going to a pinky red, but it's definitely
going to show up. So same thing. The temptation is,
and we're moving our brush this way and
then we're going to flip it around and do this. The temptation is to just
put so many brush strokes, and I'm going to add a little
bit of red to change it up. So many brushstrokes that
we're going to cover up all of the original paint that's
on there. Less is more. Then with this, just continue
to add and darken up the little fluffies
And I think I will actually add in one of these bright pink
parts right there. So you can mix and match, too. You don't have to keep
it the same colors, and that makes it fun as well. So right here, I have
something that I feel kind of feels
like a mistake. So I'm going to take a
clean number six brush, and it's clean and it's stamp, and I'm just going to
remove some of the paint right here on the s because
this just looks like a blob. I'm going to remove right here. Then I'm going to
add in a little bit more on this part
to darken up that part. Keeping it really round. And we'll go with that for now. So now we want to
darken up our rose. Gorgeous little rose,
some grabbing some red. I'm actually going to
use my filbert for this. Something I recently discovered that I love using the filbert, and it creates these really fun, kind of roundy shapes
for the shadows. So we're just, you know, swiping around thick and thin lines, and I'm going to even
use some yellow. Like I said, you can
use different colors. And, you know, just I
want you to have fun. And if you use a color that you didn't love, embrace
that mistake. Because nothing
bad is happening. You've just discovered what you like or what you don't like. A little bit of yellow to
make this happen as well. A little bit darker. I hope that shadows and texture are
no longer scary for you. I hope that it's going to be second nature to use
them when you want to. Now with my number
six round brush, I am going to do just a
few little other details. I'm going to put in some yellow here just blobbing that on so you can see the
center in between the petals of the pony. And over here as well. Don't have to worry
about this, too much. Just kind of place
them on there. Let those colors meld together
if things are still wet. And then I also want to darken up my stems on one little side, just taking concentrated paint and sketchy sketchy
marks as I love. A little bit of splatter.
I'm just going to use this brush here
using the pink, a nice watery mix. Twist and turn your brush, get that splatter on the
way that you like it. Ooh, guys, we did it.
Our bouquet is done. Give yourself a high five. That was super
nerdy. But the idea is that we've gone
through these steps. We did the exercises, and then we applied
the exercises to something very specific. Just be so proud of yourself. In this next video, we're going to talk
about, now what do we do? How do we keep going with not only being relaxed and calm, letting go of perfectionism, but also to continue to paint
and love the experience.
12. How To Keep Going: So we have learned
so much together. So the next time that
you sit down and paint, I want you to remember
these things. First of all, you are better today than you were yesterday. Every time you sit
down to practice, you guys, you get better. The second thing I want you
to keep in mind is that embracing your mistakes is so important to grow, to learn, to encourage yourself, because
if we don't make mistakes, that means we are not allowing ourselves to have
those failure moments, which means we're not trying. So it's okay to make mistakes. And remind yourself that you even look forward to it because it is a learning experience. So the third thing is that I want you to paint for
yourself and no one else. So if this is a little piece of self care to help you to
get through your day, your week, your month,
your year, do it. Practice as much as it
makes you feel stress free. If it feels stressful
to you, don't do it. Take a break, walk away. This needs to be
your little time, your little moment of solace, of reprieve, taking a breath, and just enjoying life. So in the next video, we're just going to
hear a few of my. Mm
13. Final Thoughts: You're done. You've
completed this class. So these are the
things that I hope for you because you
took this class. First of all, I
hope that you have a new found confidence in
your painting journey, in making mistakes and
knowing that it's okay, and nothing bad is
going to happen, but only good growth things as long as that's your mindset. And I also hope that you feel
inspired to keep painting, to keep learning,
to keep growing. You are a beginner
watercolorist, and you're wanting to get a nice little
either refresher or just a crash course on some
of the beginner basics. Check out my watercolor
beginner basics course, where we do go through
a floor composition with lovely watercolor
loose florals. But I'm going to teach
you in depth the skills, all the secrets and
things that I have learned in my
watercolor journey. So you can find that on
my Skillshare profile. So remember to upload your final project and or
your practice exercises. So you can share with the group, get feedback, and we can learn from your
growth journey as well. Make sure to share just
ale bit, if not a lot, up to you on your story and what your
experience was like. I love hearing that. And if
you have enjoyed this class, please consider
leaving a review. It really helps you out
here on Skillshare, and it also helps
other future students know what to expect and what
you liked about this class. Thank you so much for
being here, you guys, Happy painting, Happy mental health, and I'll see you in the
 Tammy Kaye, Artist and Mental Health Therapist