Transcripts
1. Class Introduction: Christmas is a very
special time of the year, and I wait to make it even more special is to
give you a loved one's a handmade card to
show them how special Dare. Hi, I'm cardia. I'm an artist and
online teacher, and I'm based in Sicily, Italy. In this class, I will
show you how to create this card using simple
watercolor techniques. First, I will go over the
materials you will need. Then I will show you how to trace the design
and mix the colors. I will also show you
how to apply masking fluid to preserve
the white areas. Then I will explain
step-by-step how to render the tree and the bag texture using the very easiest
stippling technique. And this mode, snow texture for the snowman using the
wet-on-dry technique. We will also see how to give the impression of a
shadow to give form, and how to use gouache with watercolor paint
to simulate snow. I will provide you
with the tracing of the design so you don't even
have to worry about during, and as usual, I
will share with you my tips and tricks
as we go along. This class is best suited for beginner watercolor
artists who have a list, a little bit of experience
with working with watercolor. However, I will guide you step-by-step and show
you my technique. You should be able
to follow along, even if you have very, very little experience
with watercolors. If you like, you can always
have a look at my class. Watercolor basic techniques
for the absolute beginner. When I show you the basic
techniques with watercolors. By the end of this class, you will have a
beautiful card which can even be framed by the receiver. And you will have learned
techniques that you can apply to future
watercolor projects. So if you're ready,
let's get started. I almost forgot since
this Christmas, I have a special gift for you. So have a look at the video
called spatial Christmas gift and see what's
in store for you.
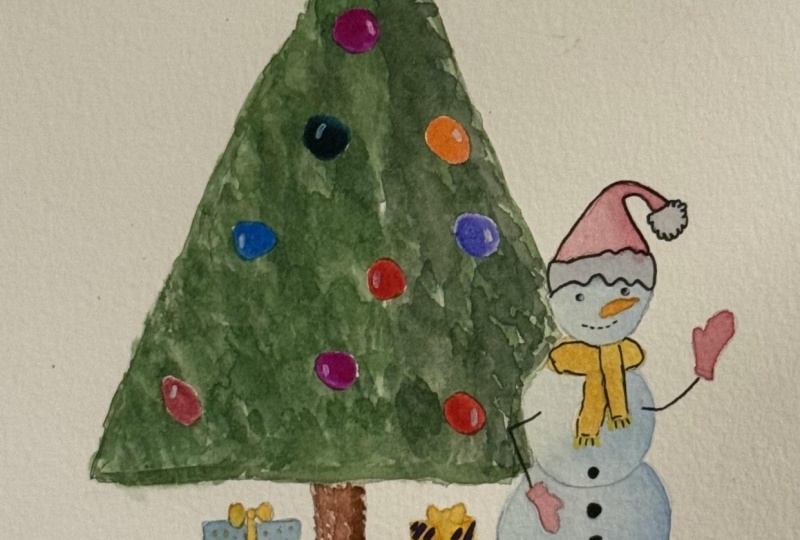
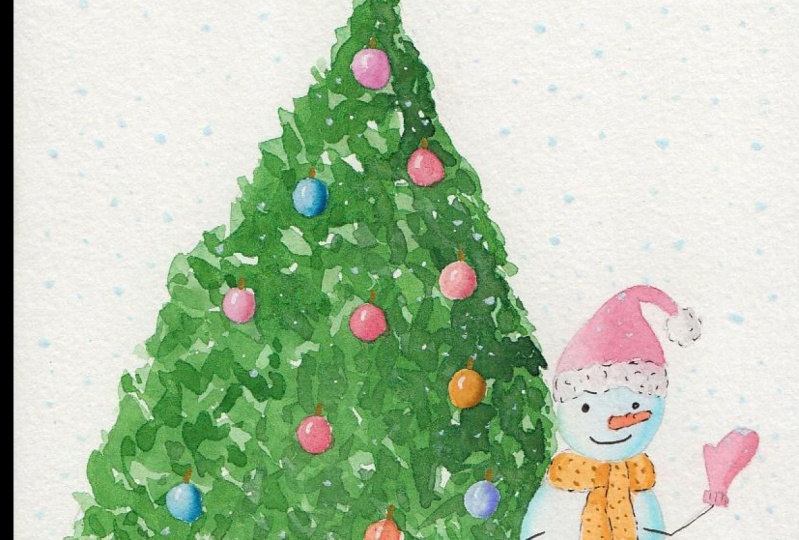
2. Class Project: The project for this
class is of course, to paint the Christmas card. And you can add
your own details. You can add gold paint or ink. Personalize it the
way you you prefer. Don't forget to post pictures
in the project section so that you can receive my
feedback and the special gift. And if you have any questions, don't hesitate to ask. I'm here for you.
3. Special Christmas Gift: So here is my special
gift for you. Every student will complete the project and will post
it in the project section, will receive a set of digital
download the book cards, Christmas cards
from yours truly. Just drop me an email
saying I did it. And I will send you the cards to download
and then you can just print them and send them
to your friends and family. I really can't wait
to see your cards.
4. Materials: The materials you would
need for this class. We're not be all of these. But I can show you, I will tell you which ones are absolutely necessary and
which ones are optional. So first of all, you will need some paper and you can choose
the paper you like. I'm going to use this one here, which is the Canson XL
acquire L, is 300 gram. Paper, is not one of
the top most expensive, but it's not one of
the cheapest ones. So it's kind of a
good, good compromise. And then you need a palette. And if you have seen, if you've watched
my other classes, you know that I
don't really like plastic palettes because
they tend to stain. But my other pallets are
all in use at the moment, so I'm going to use this one, um, it's okay for this project. And you're going to need
some kitchen towel or a rag, just a cotton rag
to dry your brush. And also paints are important. Again, you will
need all of these. But if you have a few paints, you can choose the
colors that you like. But even just a few, I don't know, six
paints will be enough. And this one here and then
you will need what the jazz. I always use 21 to
clean the brush. I want to dilute the paint. And then you will need a pencil. You can use a mechanical pencil, or you can use a normal
pencil and an eraser. So either one of these small ones or just
a normal eraser we do. And brushes are also
important to have. This one here is an old
brush which I use to, I'm just mix the paint and pick it from the watercolor pans. And then as far as the
actual brush for painting, it's always say it's
personal choice, personal preference, which
one you like to work with. This one here, we
would do the tree. So for the tree you can
use a bigger brush. And I have here the
Princeton Neptune is called. And then if you can see it, and I have a number
four and number eight, these are synthetic so
they're not too expensive. Then for the smaller details, you will need a smaller brush. And I have here the Winsor
and Newton Series seven. These ones are
miniature two of them. And then this one here
is just a normal CD27. But again, you can use any
brush that you have available. As long as you have
maybe a couple of sizes, it will be fine because you
just need a bigger brush for the tree and then a smaller
brush for the smaller areas. And then as for the
optional things, I have here, some
Tombow brush pens. These are watercolor brush pens. So if you have any handy, you can use these. And these are quite nice because
they have this tip here, which is like a brush, but also on the other side, they are another
tip which is more like a different type of marker. And I have a selection
of colors here. And then I have a gold pen. So, um, this is from Zig Memory system and
I think it's Japanese. I bought it in England. But I'm sure you can find this everywhere in the
world where you are. And again, he's got two
different size tips. That's quite nice to
add a little details. And a white gel pen. You can use whatever Japan
you find in your area. And I have a tube of white wash and I will show you
how to use this if you want to use it, if you have it. And some masking fluid. So this is the
Winsor and Newton. Again, the loads around
there you can trade. This is the one
that dries clear. I do advise you to buy
the wonder days with a slight coloration so you
will be able to see it better. Um, where you put this. Unfortunately, when I bought it, they didn't have
any of that kind. So I just put this one. And I think that's all. So these last things,
they're all optional. Um, I have also some ink pens, so you can use a
microphone or European, or any other ink pen that you prefer as long as
it's waterproof. Because otherwise it might
as much if you use it. If you put water on
top, watercolor on top. So these ones as well, and oh, and underneath
here we have a light box. So again, if you don't have it, don't worry, you can
always use a window. But I'm going to give you
a tracing for our card. So if you want to
use the light box, you can just print it, put it in the light box, and put your watercolor
paper on top. And if it's dark enough, you will be able to see it also through the watercolor paper. So if you print it, it
is not strong enough. Just go over it with them
with an ink pen, e.g. make the lines quite, quite dark like these ones. And you will be able to see
it through the light box. Or as I was saying, if you don't have this, you can use a window
or you can use just some glass with a light
shining from underneath. And I think that's all. So don't worry if you don't have all of these other extra things. You can use colored
pencil if you like, you can use different things. So you can just use
the watercolors. It's fine. But if you have
them and you want to experiment and have fun, feel free to use them. Well. And now we can move on
to the next lesson.
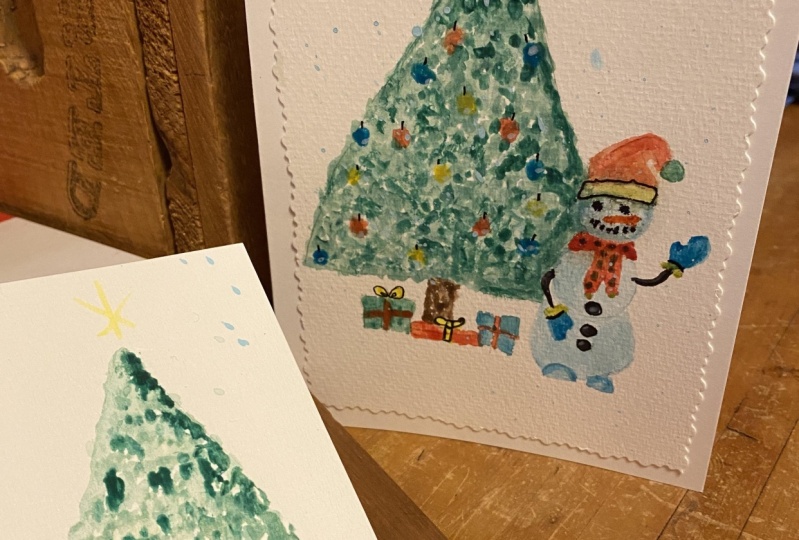
5. Tracing the Design: I'm just going to quickly show
you how I trace my design. So to make a card, I'm going to use this
paper which is A4, which I showed you before
is the Canson paper. And I basically
folded it enough. So I know where the front of the car this and
then open it and I taped down the
tracing so you can print the one I provided in the download and tape
it down like this. If you have a light box, then you adjust, um, center the, the front of
the card with the design. Now, I need to switch off the light for you to see
a little bit better. It might be a bit darker, the general image, um, but, um, you should be able to see the tracing a
little bit better. Okay, so as you can see, with the lights off, you can actually see the tracing through
the watercolor paper. So even if he's quite thick, it's your undergrad,
you can still see it. And the next thing you want to do is to tape down this as well. So let's center it more
or less like that. And when to use a, I forgot to mention
this in the materials. This is a artist tape, so it's very low tack tape. And you just stick
it in the corner. And one down here so it
doesn't really move. And then you can just
trace the design, which I'm going to do now. It is a bit light and
although it's late, I usually do it even lighter
than this, the pencil marks. But in order to see on camera, added a little bit darker. And maybe you, Let's
see this part. But try to remain late
with your pencil marks. And the tree is only little dashes because we're going to do it
in a loose manner. So you don't really need a shape just to an exact
shape for the tree. Just as long as you
have a triangle, then you will know where to, where to stop with
the watercolor. And that's it. I'll see you in the next lesson.
6. How to Make the Textures First Layer: Before we move on
to the actual card, I just wanted to
show you my method for attaining the texture for the tree and the tree trunk. Okay, so I'm going to do
a little triangle shape. Here. You can see it, so make it a bit darker, but always keep your pencil line light when you work
with watercolor. Because when you put watercolor
on top of the pencil, then you will be able
to erase it anymore. Okay? And then what you want to do is take your brush
and depending of course, how big the shape is, you can use a bigger or
smaller brush. For this one. I'm going to use this,
the number four. And then take a good
amount of watercolor. And then just to sort
of dabbing motion. So just the dub, dub, dub, and load the brush again. And you can leave
some whitespaces. Because then when you
put the second layer, you might go on top
of these anyway, create different
movement of the paint. So don't do just
like a solid area. Okay. Then you can go over the lines. That's why I'm telling you
to do this very light. And this will give
you this effect. So the first layer is the lightest one that
you can see here. And then the second layer, we will use a darker, darker version of the paint. That's why I asked you to do
30 a mixed three of them. And I would like
you to do the same. And then the third layer, I'm gonna do The only on one side to give a little
bit of an impression of a 3D tree is not
a realistic tree, but just to give it
a little movement and a bit of an impression. And the way you apply
the second layer is up to you because you can wait until it's
completely dry, this one, or you can apply it
before it dries completely. So e.g. if I pick up a little bit of this darker color,
when you do that, it will expand the color and mixed with a
color underneath. And this is a one effect that you can achieve
with watercolor. And it's the beauty of
watercolor because it just flows and it gives you
an expected shapes. And of course, where
there was no color, it would just stay where it is. And you have this darker
and lighter effect where if it's too wet, it might just mix and
create a third color. Um, so this is the first, and in a way, the second layer. You can wait, as we're saying that until it's completely dry. And then you just
apply the other one. And now I'm going
to just wait until this dries and apply the
darkest layer. Again. You can apply it when this is not completely,
completely dry, so, but wait until it's sort of
you can see still a shine. I'm not sure if you can. So as you can see at the moment, is very, very wet. If you wait until it's dry, like almost dry, it will give you a similar effect to this. If you wait until
it's completely dry, then it will give you
a different effect with more defined shapes. So we'll leave that for now. And I'm going to show you
how to do the tree trunk. So I'm going to make
a bigger shape here. And for that we need the brown. And I'm going to dilute
it a little bit. The first layer, always
dilute your paint. You can make it darker, but it's almost
impossible, very, very difficult to
bring it back to a lighter color and
dilute it quite a bit. That's okay. It could be even more diluted. And a play, you can play this layer also in a W
and fashion if you want. I was gonna do it. I'm just a solid layer. But I can show you the two ways. So let's do this
as a solid layer. And then we do another
one with the stippling. Because this is
called stippling. And you just do like
it did in the tree. So like that. Then you can decide
which one you like best. So they're all
quite width still. Cheese quite width as well. So I'm going to wait for
these to dry a little bit and then we can
apply the other layers.
7. How to Make the Textures Second Layer: Okay, this one here,
it's almost dry. Let's see if I can
show you with a light. There's just a little
bit of shine to it. Wherever is more. What we can do is
apply another layer. We're still not completely DRE is a bit more
down this side. And as you can see, creates this sort of patterns,
this stained. And you can use that. Just make sure that
it's not too way too. As you could see,
it was almost dry. You can just about see the shine on this side that
there was a bit dire. You can see that the
stains are modifying. So if you want a
modified stained, wait until it's dry. And if you want
something like this, wait until it's almost
dry. Well, not exactly. And then this one
is also drying. So what I can do is I can apply. You can see some of these
things are not computed j, and this will create a different play with the
marks, with the stains. And that it's something that
you might you might like. And then of course you can
make that a bit darker. And I can add some of these black mix and make
it a bit darker in a play. Some of that darker
on one side to give the impression of the
shadow on one side. And the tree is still a bit wet. So as you can see, is less than it was before, but it's still a bit wet. And if you want, you can apply some of
this darker paint when it's about this day. So you can you can still see a Shane and the paint
will sort of diffuse. So don't put too much,
load your brush, but then touch it on
the side of the whale. And then just lightly touch it. When you're painting like this. And then usually a play a little tiny bit on
this side as well. Because if you are a 3D shape, it will have a little bit of a shadow on this side,
immoral shadow side. Of course, you don't
have to do this. We need a Christmas card
is a stylized tree, so just do it the way you like. But I wanted to show you this. I will give you a download where you can see
the different steps. So I added the colors, color mixes, and the
Tombow that are used. If you have Tombow,
you want to use them. And I added the steps. Normally, what I do when I do my color mixes is I put
a letter for each mix. So this is the starting mix. Then I add the lemon yellow, then I added the
quinacridone magenta. So I call this mix
with a letter, uh, the way you know,
the alphabet letters. I didn't put a letter
here because these are just the single
color is not a mix. And then here I will put it in pen so
you can see it better. I wrote d, So you use this
mix for the first layer. Then plus b. On top of this, you add the mix, the slightly darker
one, and then plus c. So on top, you add the C mix, the darker one, which is
basically what we did here. And of course they will be, every time there
will be different. He wants he would never
be the same effect. But that's the beauty of it. And I will put this
with your downloads. Okay, this is again, almost dry. So I'm going to add a little
bit of the darker paint. And I just sort
of on a vertical, still the stippling,
but in a vertical way. So it gives the
idea of the bark. And sometimes what I do is
with paintings like this is a pickup some of the neat
color from the palette, which is quite thick. And give it that extra texture. Okay? And so you can do the back. I mean, there are
different ways. But for this type of card, I think is kind of
a mornings if you do the bark in a similar
way as you do the tree. Alright, now we can move
on to the actual count.
8. Color Mixing: In this lesson, I'm
going to show you how to mix the colors. So I'm going to try not to use too many colors and to keep
it as simple as possible. So normally I would mix
my own green and we will need some green for
the tree in here. So, but in this case, I will use ready mixed greens, but I won't use them
as they are because they still look a bit strange. But if you want to mix your
own grid, feel free to do it. I have another class
on color mixing. If you want to try that
and then try to mix your own green color
because this is not a botanical painting, then we can just improvise
and mix a green that we like. I'm going to start
with hookers green. And if you don't have
one of these colors, then feel free to use
another color and other greens are plenty
you can use e.g. sap green and olive green or
a different type of grain. Or again, as I said, just mix blue and yellow
and see what comes up. I'm going to put some of these sap green and hookers
green in here. And I'm going to
mix a good quantity of this because we
will need quite a bit. So I'm just adding some water because you don't want the
color to be too thick, but not too watery either. And always have some
scrap paper handy so you can test the color. That's okay. The next color
is permanent, sap green. These are all Winsor and Newton. And then this color still a
little bit on the inside. So I'm going to add some yellow to make it a
little bit more natural. And this one here
is actually one of the few Daniel Smith colors
that I have, lemon yellow. But you can use Winsor
lemon instead of this one. So Winsor Lemon is from
Winsor and Newton. Or you can use the lemon yellow
if you have Daniel Smith. Or you can use a different
yellow altogether, just be aware that it won't
look exactly like mine. If you use a different yellow, then what I'm going
to do now to make it even more realistic side, I'm going to add a tiny bit
of quinacridone, magenta. Just add a little
bit at the time. Because it's easy to add more, but it's very difficult to bring the color back
if he's gone too dark. That's okay for this one. And then what I'm going to do is I'm going to pick some of this and put it in the other. Well, I think that's enough. And then I'm going to add
a little bit more magenta. As you can see,
it's a bit darker. So I think just a
tiny little bit more. So I have a later version
in a darker version. But I want to have an
even lighter version. So what I'm going to do is I'm going to pick
up some of this, add a bit of water, make it later with the water, but also I'm going to add a little bit
more of the yellow. So now I have a light version, made version and
a darker version. And it's always good to have this combination,
whatever you do. Because one important
thing in watercolor, in any type of
painting is contrast. So it's good to
have some contrast. And then our need bluish color for this
snowman to represent this. No. And I'm going to use
Winsor blue, green shade. And to this, I'm going to add a little bit
of cobalt blue. And then we need this
to be quite diluted. Okay, and I will give
you a download when I write down all the
colors that I've used with a sample of the color. So don't worry about writing
down everything now, I should have told
you that before, but I will give
you the download. And then we're
going to need some. Brown for the little bit of the trunk that we see in here. So for the brown, again, you can use the ready-made one. You can mix your own completely, or you can do a sort of
in-between kind of thing. So I'm going to use
some burnt umber. Burnt amber is like this. I want to make it a
little bit darker, so I'm going to add the
Permanent Alizarin crimson. Okay, I think this is alright, and then we can always
add a little bit more. And then for the carer
to need some orange. So I'm going to use
some scarlet lake. Again, if you just have orange, don't worry too much about it. Use the orange that you have. Maybe you can add a
little tiny bit of red. But don't stress about this. And then I'm going to
add Winsor orange. I think that's
okay for a carrot. And then going to use
probably some of the halos. Paypal, this I think
is from Sennelier. If you don't have Haley's paper, you can use
quinacridone, magenta, which is not too far
off from areas paper, but again, you can
use any color. C is very similar. So quinacridone,
magenta from Winsor and Newton is perfectly fine. And then we'll see if we
need any more colors. We probably need a neutral color for the hat because I'm going to make this as if
it was like white, fair, like the Christmas hat. And to paint white objects, it's good to use a black, but don't use, please do use
the ready-made black because it's quite opaque and
it's not very nice. Normally, I would make my own. But this class is,
I wanted to keep it really simple and stress-free. So if you want, you
can use Payne's gray. So which has got a
sort of bluish tint. But if you make it very diluted, even more diluted than
this, very, very diluted. It's good to give the impression of the shadow on a white object. And I will show you
how to do this. So if you don't want
to do your own black, I have a class on how to mix neutral colors where I explain
how to mix your own black. But basically you need
to mix yellow, blue, and red, and you
will obtain a black. And if you are interested, I can quickly show you
here how to do your black, but otherwise, don't
worry about it. Just use your ready. Payne's gray,
ready-made paints gray, maybe even neutral tint, but Payne's gray
probably is better. However, if you want to try
this and make your own black, you use Winsor
blue, green shade. Then you add
quinacridone, magenta. And you should get the kind
of deep purple like this. And then when you have
this color going to add the lemon yellow
or if you want, you can add, if you don't
have the yellow, lemon, yellow, you can add
the Winsor lemon. This one is getting there. You just have to make
sure that it doesn't have either a blue or a red bias. This is towards the red. I think bias. I'm going to
add a little bit more yellow. And you can use this. I'm not sure you can
see it on camera, but this is more like a
black, the one I did. And the Payne's gray
is more towards blue. Okay. But as I said, don't worry if you
don't want to do this. If you're having trouble, just use a ready-made color
like the Payne's gray. Don't use black because black, it's opaque and it looks
horrible when you dilute it. And what it looks
always horrible. But I think these are all
the colors that we need. I will give you the list with
everything that I mixed. And if we need any more color than I
will tell you as we go, but this should be ok.
And then as I said, they will use some of these Tombow pen just to do
a few more bits and pieces. And if you don't, if you
don't have the Tombow pen, just use the colors
that you have. Just go crazy with your imagination and
use your watercolors. And now we can move on
to painting the card. Uh, see you in the next lesson.
9. Apply the Masking Fluid: Finally, we can start
working on the card. And I just wanted to show
you a couple of examples. So this was mostly a test drive to try different techniques. And if you have time, I advise you to do
that because it will give you a chance to see, you know, how things work. So here I tried the ink pen
and a trade, the gold pen. And what else? I tried to put ink
around the shape of the snowman and I tried to, there's no here, this is done with gouache and watercolor, so I can show you
how that is done. And then what else. I tried the Tombow,
these ones here. And so there's the
white gel pen as well. So it gives you
the possibility to try different things and then see which one
you like best. Also, in this one I tried
to add the little bubbles. I think the code, and I did the boxes
in a different way. So I add a bigger bow. And I did some with a Goldman. And I didn't put the
ink around here. I just use it for the details. And again, I use this no because
I quite like the effect. So if you have time,
you could try that. And in here, I'm going to
again repeat the bubbles. But I wanted to tell
you this paper, the Canson Excel, doesn't
take masking fluid. Very ugly. So I used it here and it's okay. But you have to be really
careful when you remove it and you shouldn't
leave it for too long. So don't leave it
for days and days and then go back and
try to remove it. Because the longer you leave it, the worst statistic
for the paper, it would just take one layer of the paper and it becomes
a kind of rough. You can see it a little bit. Probably. I don't know if you
can see it on camera. We're probably there
is a bit rough. So if you want to
use masking fluid, maybe it's best if you use a more expensive paper
which is stronger anyway, resist a little bit better
to the masking fluid. I mean, I I used it. It's okay. You can't really tell by just
looking at it like this. But if you look at closely, then you will see there are a little like little
imperfections because then the paper starts to tear
and this is quite light. Don't know if you
can see the drawing. Maybe I should do it a little
bit, a little bit as it is. But you should do it
very, very light. So even this is still a bit dark because this is going
to be quite light in color. But other wanted to do a
completely delighted that you don't see anything
what I'm doing. And if you have a
kneaded eraser, just use that to debate on
your pencil line and it will make it lighter without
completely erasing them. So masking fluid, I'm going to apply it
with one of these, which is especially
made for masking fluid. This is from the SAA. And you can find these acetyl, their single ones
on their website. But if you want, you can use an old brush. So that's why I didn't really
tell you about this before. But as long as
there's an old brush because masking fluid
will ruin your brushes. And what I normally do is
actually apply some soap, just a little bit
of a layer of soap, just the one you use to wash your hands before you use it. And then see if I can open this. Just pick up the masking
fluid and apply it. So I did a little
like circle drawing. You don't need to. But if you want to have a guide, alright. And then just wash your
brush straight away. And you can wash it with a
little bit of soap again to take the masking
fluid because it's Psych this plastic thing
that we stick to your to your brush and make sure the masking fluid is completely dry before
you start painting. If you want, you
can also apply it. Let's see if I can
do the both for sample and the little
ribbons in here. And if the order details that you want to keep
the one to preserve white and you're not confident about sort of going around and around them with the paint. I'm not going to put
any masking fluid here. I'm just going to go carefully round with a smaller brush. But if you want to, if
you feel more confident, you can do that. And then just make
sure, as we're saying, that the masking fluid
is completely dry before going forward
to the next step. And we're going to do that. Just wait for this to dry. And in the next step we will start with the paint,
with the first layer.
10. Card First Layer: We can finally start with the first layer on
the Christmas card. So what I'm going to
do is I'm going to use the bigger brush, makes sure that the
masking fluid is dry. And then take some
of the lighter, more diluted paint and start basically applying it with the stippling
motion that we did. Before. I show you. Basically I play
it leaving some spaces. So not a just a full
layer, a solid layer, but with some spaces, the only place where I'm
going to add the color, it's around the bubbles. So I will add and we make sure the bubbles are
surrounded because they look nicer if they stand out
from a solid background. And then everywhere else, just the play, the color
with the stippling. And he would pull naturally
in certain places. So you will have lightened dark. And be careful when you
get close to the snowman. Just go with the tip
of your brush or change your brush to a smaller
one and you feel worried. And then you will
get paint inside. You can paint over the arm
because we're going to do that with the
ink. So that's fine. And it's just the
quick fund lose way to apply the paint key. And then the last bit here. Alright, so you will have these sort of light
and dark areas. And then we leave that to dry. And we will apply the second
layer once. This is day. And then we can
now do a row with the first layer on this snowman with is not touching the tree. So the way I like to apply
my watercolor is wet on dry. And what I do is say, maybe I will use this later. Bigger brush for this. I use the number for Princeton. Very diluted paint. Always start with light and then you can go you
can make it darker. And I apply some paint
on the right side. Goes up. For me. I'm right-handed, so delight
always comes from the left. And then we rinse the brush. Once touched it on the side, make sure it doesn't
have too much water. And then start again. Applying it next to the paint. Rinse. And repeat. The same process. Rinse and repeat basically. And you want to cover
the entire area. And every time you rinse it, you will have less paint. So it will become
lighter and lighter. So you have the
darker on this side, lighter on this side. And as you can see, usually, when a rinse the brush, I touch it lightly on the paper because this brush holds
quite a bit of water. So it will be I will be putting too much water down if I didn't touch it once. But that comes from
knowing your brushes. And we can do, let's see the hat
or maybe decide, maybe we can do this, this one. So I'm going to use a smaller brush because
it's a smaller area. So I'm going to do
the same thing, apply the paint,
rinse the brush. Just be careful not
to go over the scarf. And then we can cover
the rest of the area. And if you want to
make it darker, you can just add
the second layer. Just the same way we
added the first one. Let's see if we can do the face. I try not to touch the tree and be careful there's
the little carrot here. If you are unsure,
you can do this. Then you can always
add masking fluid on, on top of the carrot, e.g. and then you can work
a better like that. And then just the
everyday rinse the brush and keep doing this
transition effect and attached the tree. So if this happens, you can simply rinse your brush, dry it, and with a dump brush, just pick up the color that
you don't want to be there. Okay. So yeah, did that on purpose so I could show
you this, how to do this. Alright. Now we can do the hut. So for the heart
and went to pick up some red which I
didn't prepare before, but I'm just going to use some Permanent Alizarin crimson. And then maybe add a little
bit of this pink and diluted. Because you always want to
start with a diluted paint. And then going to start
to apply it in here. And then again, rinse the brush, touches lightly on
the paper and then make the transition key. You can smooth the
edges if there are not. Enough was more than F. So just the when
your brush lightly. And we can add one layer
to the gloves as well. So just a simple flat
layer in the gloves. And then we will add
the shadow afterwards. You can even leave it like that. If you don't want
to add the shadow. We can do the little
feet as well. So again, put some blue down. And then the other
one. You'll make the transition like this. Alright? And we can do
the tree trunk as well. So with diluted brown paint, we applied the stippling effect like I showed you earlier. And this will give the idea
of the bark of the tree. So we'll leave that and then
we can add the second layer. And we can add some paint
to the boxes as well. So for some people I
think are going to do the first one, the blue color. So just dilute
some of this blue. And if it's too light, you can always add a bit more. And for the first layer, you can just go over
some of the lines, but be careful not to
go over the little bow. And just leave this
area white because we, we add a different color
for the rebound as well. And then we can do the
other one, the other books. We can do it pink. Maybe. I'm going to dilute this. Just be careful not to
touch the blue box. If you did the first. Going to leave this
one for the moment. And we can add some
color to the scarf, which I can show you. You can do with
one of the Tombow, miraculous if you want. And this is quite easy. You just basically apply the
paint, watercolor marker. But you just upload
the painter like a normal pencil
or normal marker. And you have more control. I suppose you could
do the entire card with markers like this, but I'm not sure if you can
do the stippling effect. Now that the box is dry, we can do another box. Let's see, I'm going
to do it actually with a lighter color, with a pink. And if you want, if you don't want
to use the brush in these areas which
are quite small, then you can use the Tombow pens or another
brush pen if you have them. Otherwise this will
use a small brush and you can just use
a normal watercolor. Alright? And one last thing we need
to do is the fair here. So I'm going to use some of the black and mixed before
or you can use Payne's gray. I'm going to dilute
this quite a bit. And then you can just, again do the sort of stippling effect just to give
the impression of the fair. So it's not a solid
solid earlier, little tiny bits in the middle, and then a bit there as well. And I think we're done
for the first layer. And we can carry on in the next video
with the second layer.
11. Card Second Layer: We are ready for
the second layer. And I just notice I forgot to paint the carrot here,
the little nose. So I'm just going
to do that with the orange we mixed before. And the smaller brush. So just do a layer and then we can add some
details afterwards. And I'm going to do the
second layer on the tree. So I'm going to pick
up our medium color. So we applied the lightest. Now we're going
to do the medium, medium strength and
just do the same as we did before with
the stippling action. Just apply it on top of the previous color,
leaving some spaces. And in this case, the spaces we show the
lighter color underneath. And you can go over some of
the white areas as well. So we'd give you different
type of coloring. Just do it like that. And again, being
careful when you get next to the snowman. I'm just going to do around
here a bit more carefully. Just with the very
tip of the brush. Just always make sure you
have enough paint To do the entire tree and day a layer. And a bit down here. I can then if you notice some places where you
could add a bit more, you can just go over them. Alright, so we need to
wait for that to dry. And we can apply a second layer and the
rest of the design. So I'm going to use a
smaller brush and play. His second layer in here just to strengthen this side
to make it a bit darker. So same thing, wet on dry. Then the chip brush on the
side and start from close to the paint and then pick up the paint and do
this transition effect. Then again, rinse the
brush and carry on. And even if it's clear water, I advise you to do the whole
area because otherwise, you might get a mark sort
of a sane way you stopped. If you do the whole
area, this won't happen. Okay? And then in here I want to
show you how to use these, um, if you're using
the Tombow markers. So I'm going to rinse
the brushing of it. I'm done. Then with this brush, just go over this side like
we did before with the paint. And then with a dump brush, you can just go over the paint and create
the transition effect. And again, I will
go over even we just clean water
the entire area. And we can do the same
here and the phase. So add the shadow. And then with the damp brush, just create the transition. And what they normally do
because this is a round shape. We need to add a little
bit of a shadow on this side is less
than the right side. And this is if the light
comes from the left, which for me usually
does because I'm right-handed or left-handed. It would be the other way round. And then the same here. Okay, and that gives you the impression of
a round object. And on the last one I'm going to do with the brush just to show you the previous technique. So pick up some paint, then, apply it in here. Then rinse the brush, and then touch it on
the previous paint. And then just the
transition it laid this. Okay. And in here they're quite small, so I might just do it
with a, with a Tombow. That alright, and then we need to do the
same thing with the hat. So let's get some
of the red color. And I'm just going to
add it on this side. Rinse again. So it becomes
clearer and clearer. Then we add a little bit
on this side as well. So when the paint is still wet, you can also add a bit more
to make it a bit darker. Just drop the paint like that. And then do the transition. Okay. And the same thing we
can do with a white. Let's make it a bit darker. And you can see here
there's a line for being. So if you're the one
that with a damp brush, just lightly, lightly touch it. And then he will, um, so transition a bit better. It's a little bit of fluff in there and a little bit
of paint on this side. And same thing with the gloves. If you want to add maybe a little bit of a
shadow in here. If you don't want
to rinse the brush, you can do this with
a second brush. Just keep it down and do the same thing that
you're doing with this. And I'm drying the brush because this is a very small area so it will be too
much water otherwise. And I'm going to add the second layer to the tree trunk so I'm making
the paint a little bit thicker with a thicker
paint that I have in the well and a bit of fluff. I'm not sure why fluff always
attracted to paint brushes. So I'm giving this stippling
vertical type of effect. So you can see it mimics
the trunk, the back. Alright, so does
the second layer. And then in the next video, I will show you the final layer.
12. Card Third Layer: So the second layer
is almost dry. But I think I can
add the third layer. And I'm going to use the darkest mix that
we have and just apply it on the right side of
the card of the hair tree. I mean. So just to give it
a little bit of an impression of 3D tree. And I'm not going to
pick up any more paint. So I will use the
one in here and just keep applying little
bits here and there. So I won't cover the
entire tree with this. And maybe carefully
at play some around. There's no ma'am. They say it's got a bit more. And on this side, I would like a bit
more variation. So what I'm going to
do is rinse the brush and pick up some of the
midtone and apply it. So there's a bit more variation. And I think that's
it for the tree. I'm not going to add
anything else to it. And then we can do
the same for them. A trunk. So I'm going to
use an even more, um, deep brown so less
diluted paint and play. A third layer. So a bit more on
this side, right? And then we can add the
details in the boxes. So let's see if I add another little bit
of shadow with this. Maybe that's not strong enough. Um, I think it's okay. And then like we did before, with a clean damp brush, just go over the
paint a little bit. So it gives you the
impression that is, there is a shadow there. And a, for this one, I'm going to use some of this color that I had in
their palette, less diluted. And do the same as
I did with a pen. So just go just
underneath, do a line. And then with a
clean, damp brush, just touch the side of the line. Maybe it's diluting
it a bit too much. So I'm going to make it a bit stronger than clean damp
brush and transition it. Okay. And then let's see what
else we need to do. So the scarf. With the scarf, we can do maybe going to do little polka
dots with a darker paint. And of course you can
do this with the paint. You don't have to
use these brushes. And to show that there is a sort of not
here of some sort, you can use the previous paint and just go over it again
and do a sort of shadow. And then the shadow on
the right side as well. And a little bit on this side. But what I like to
do with the scarf normally is to add some ink pen. So even if you don't
do too much shadow, it should be okay
because I like to add the details with a pen. So the buttons as well. And maybe you're going to
strengthen this shadow here. And I'm going to show you, um, where they meant before when I told you you
can use two brushes. So I'm going to wet
this and have it done. Then pick up the color. Put it on this side
where I want the shadow. And then use this
brush to diffuse the paint a little bit on this side. Quite as malaria,
so it's not easy. And you're going to have
to do this. One too. Is just a I like to show a
little bit of the shadow. And always keep the brush clean because it will
pick up the paint. Alright. And then maybe put a little
bit more shadow in here. And I'm doing this
typically action just to show that it's a, it's fair, it's not smooth. Maybe do something like that. And a little bit here. Okay? And I think, um, well, we need to do
now is to add the details. Wait for this to dry and then remove the masking fluid
and add the bubbles. And so it's just a matter of adding a few more
details here and there. And we're almost
homeless, ready, and we'll do that in the
next couple of lessons.
13. Adding the Details: So while we wait for
the tree to dry, I can add some details
here and there. And for sample, I would
like to add some gold on, on this to mimic like a
Christmas wrapping paper. We can add some little dots
in here with a gold pen. So you can make smaller
and bigger dots to make more varied. And then on, uh, on this paper, we can
add some stripes. So we can do stripes like that. So just try to show that
this is just one paper. So the line is continuing
from here to here. This one you can see
a little bit there. And maybe on this one, I mean, you can add it with the paintbrush as well if you like. So I can show you in here. I'm going to pick
up some of these blue and just get rid of the
excess paint in your brush. Don't have too much. And then add some little dots here and there. Okay? And then maybe I can
make this a bit darker. And I will make the center bit darker and maybe
disable the book. So let's do like
we did before with a damp brush transition. This maybe a little bit here. And they might do the
same. On this side. The little center
side transition, it makes sure that brushes
damp and not too wet. Okay. And then what's gonna
put my brush in there? And then maybe we do blue one. We can do the same.
What's a bit late. So okay. And I'm going to apply the ink pen in here so make sure that this is
completely, completely dry. Otherwise, it might smudge. So I'm going to do
the little eyes. I'm going to do some
details here in the carrot. Don't do like a solid
line all around. The, break it up a little bit. Smile. And then we do the
details of the scarf. As you can see, I'm breaking
the incline here and there. And if you do some
like flicking motion, you can do the detail
of the scarf as well. Here. Go select that. You can apply
the pen before if you want. But it's nice to have the
option to decide afterwards. Okay. So this
motion that I do is basically put the pen down
and then flick it like that. And then we have the arms. So can just about
see this in here. And then this one from
this side. The buttons. I'm going to leave tiny bit. This is to sort of mimic a shiny button with a
little bit of light. You can do it all
black if you want. And maybe add a little bit of
a detail here in the fair. So just a little tiny
marks here and there. You can practice this in another piece of
paper if you want. But just nothing like no solid lines just here and
there just to show the fair. And in these balls you can add
also details with the pen. I don't think I will do it, but if you want, you can add it. And I think I might add. Then he lately,
the details here. Just to show like
a knitted gloves. And the next thing to do is to wait for the bubbles
and hadn't been for the paint to dry
completely so we can paint the bubbles and we will need to take the masking
fluid off first. So we do that in
the next lesson.
14. Painting the Baubles: The paint now is dry. So what we need to
do is to remove the masking fluid and you can
remove it with your finger. Just put your finger,
touch it lightly. And very, very delicate tree. You can remove it like that. Or you can use an eraser. So I'm going to use this
one which is quite small. But you can use
any type of eraser and just very gently remove it. Like this. You have to be very gentle, especially if you
use the cancer paper because otherwise it might tear. So very, very slowly. Okay, So make sure
you don't have any more masking fluid there. And then all you need to do
is to color the, the bubbles. So we can do I'm going to
do some with the paint. So let's see this one here. And while you can do to give it the idea there is a round shape. You can leave a white
area like this. And then to make a
smoother transition, do like we've done already. So with a damp,
clean damp brush, just go over this area. Such as more. I'm area here that, um, it might be a bit more
difficult to do that. Um, another way you
can do this is to just color in the shape completely. So, and then, like
I'm doing here, and then we will add the
highlight with a gel pen. Okay? Maybe I'll do this one. Same color. Then maybe do an orange one. We can use these. So I can put a yellow one here. Then maybe pink one
somewhere over here. Maybe a red one. As you can see, you can
just use the same colors. You don't have to have
huge amount of colors. If you have two similar
colors. So e.g. like in this case, I have a lighter and
darker, purple and blue. So put down the
lighter color first, like you would do
with the watercolor. And then you can
add the shadow with the darker color, pink. And in the ones that
are already dry, we can add the shadow. For somebody with a blue one. We can add these
quite a dark color, but we'll see how it goes. So I'll add a little
bit on this side. And then same principle, a damp clean brush. Just do the transition effect. So always clean your
brush because it's picks up the watercolor
and dry it well. So it needs to be
damp and not wet. And let's see if this one. So if you look at it
against the light, you will see which ones are dry. So this might be a
little bit dump steel, but maybe to do the
shadow is not too bad. It's kind of defusing
the paint already. Then you just need to give
it a little bit of a help. They're so tiny touches. And it will create
the transition. And then let's see which one can we do? This one probably. So let's pick up the darker color and
do it in here as well. So for the shadow, clean, damp brush,
and transition. Okay. And let's try with a pink. And this one, we can do
it with the watercolor. And where was it? Here? We add the darker color. And then just do the transition. And we can do the same. Here. Gets a bit more red. The color, this was
still a bit wet, so it just diffusing by itself. And they're gonna
add it here as well. Drop a bit more. And then this was done
with the Dumbo so I can add the shadow with
this darker color. So clean, damp brush
and do the transition. There's one last one. You can do. With this. There was 11 more. If you'll feel your
brushes too big, you can always pick
up smaller brush. K. There's one last one. Pick up some, some color. Going to talk a bit
more in here. Alright. And I think as far as the
CI and everything is fine. Um, but I wanted to
add the snow effect. And for this, I will show
you how to use the gouache. So we're going to
use white gouache. And I will show you in the
next lesson how to add. The background has no effect.
15. Adding the Snow: I'm going to show you how to
add the background effect. I just send this a little bit of the pencil marks here
so they can be erased. And the two ways you can
add, that's no effect. You can use one of these
molecules, either this side, the brush side, or even decide because you just need
to do some small dots. But I like to use the brush because with
this more or less, you get more or less
the same shape, especially if you use
this side of the pen. With a brushy, you'll
get more organic shapes. And what I do is I take
some of the gouache. Gouache is more or less
like a watercolor, but it's opaque. And you can make any color with the white gouache because you just add
the watercolor color. So I'm going to
pick up some of the blue and I'm going to
add it to the white. So you want sort of
a light blue color. When to add a little
bit of water. Don't add too much. And then you can start adding
the little snow flakes. And you can do, you can
push a bit more for a larger shape and you can just barely touch it
for the smaller shape. And it's good to vary where you add your snowflakes so you
can avoid making patterns. So there will be more random. And it takes a little bit, but I find it quite relaxing
actually to do this. And I'm going to speed
up the video with this. And you can add as much
or as little as you like. I think this is quite
a good quantity and might add a little
bit because I'm, the gouache is opaque. You can add a little bit
on the tree as well. And I added a little bit
on the snowman on his hat. So just bits here and
there. If you want. You can do this with the wood, an old toothbrush,
and the paint. But I quite like
you to do this way. I feel I have more
control where this goes. With. Russia was just
flesh everywhere. And if you need a bit more
support to steadier hand, you can just put your
pinky on the table and use that to support your hand instead
of going like that, which could mean that
you push too hard. Just make sure you
don't put your finger in the wet paint. And I'm on the TI, you can also add
this with a gel pen, which is completely
white, or you can, um, pick up the white gouache. But just to show you, you can
use also the the gel pen. And do. I was putting my
finger in the wet paint, like I just said,
not to do this. So it makes it smaller
flakes, if you like. And for the bubbles
which are dry now, you can add to the
highlight just with a little tiny bit of the
tiny mark off the gel pen. It will show more on the darker
paint but is still shows. And that makes the
bubbles, I'm shiny. Add a bit more here. Hopefully you can
see that on camera. And the same thing in here. So if you do the
entire button black, then you can add a
bit of the white on top to make it look shiny. And if you want to add
just one more detail, you can put a little
tiny touch of God here. Doesn't show a lot, but it shows when you have declared
in your hands. And it's like a thread where
the bubbles are hanging. So just a little tiny flick. Then he got disconnected
bit more here. And I will do it only on the
top half of the card just to show that it's snowing and
very Christmas C. Okay, so I think we have
finished our card. And of course you
can add as many or as little details
as you wish. You don't have to do
it. This detailed. But really it doesn't take very long to do
this type of card. And it's something I'm special. Just the unique for your
friends and family. There you can do or you can even make these to
sell them if you want. Um, but yeah, that's
our card, complete. And I hope you have enjoyed
doing this project with me.
16. Final Thoughts: Congratulations on
completing the class. I hope you have enjoyed painting the card
as much as I have. And I hope you have
learned new techniques that you will be able to apply it to your
future projects. Your next step is to keep
practicing watercolor painting. Hopefully every day, even
if for a few minutes a day. And you will see improvements
up and over the time. Don't forget to post
pictures of your project in the project section so you can receive my
feedback if you like. And also, don't forget to hit the Follow button
here on Skillshare, so you can be notified as
soon as I post a new class. You can also check out my profile to see
my older classes. If you'd like to connect, you can find my social
media links down here. If you have enjoyed the class, I will be grateful if you
could leave a good review, because that will
be really helpful. Thanks again for taking the class and I'll see
you in the next class. Bye.
 Katia Galante, Botanical Artist and Illustrator