Paint a Rose Bud in Watercolour | Easy Step-by-Step Tutorial | Kanchan Kaul | Skillshare

Playback Speed


1.0x


  • 0.5x
  • 0.75x
  • 1x (Normal)
  • 1.25x
  • 1.5x
  • 1.75x
  • 2x

Paint a Rose Bud in Watercolour | Easy Step-by-Step Tutorial

teacher avatar Kanchan Kaul, Artist and Illustrator

Watch this class and thousands more

Get unlimited access to every class
Taught by industry leaders & working professionals
Topics include illustration, design, photography, and more

Watch this class and thousands more

Get unlimited access to every class
Taught by industry leaders & working professionals
Topics include illustration, design, photography, and more

Lessons in This Class

    • 1.

      Rose Intro

      0:29

    • 2.

      Rose Drawing

      2:21

    • 3.

      Rose Layer 1

      4:29

    • 4.

      Rose Layer 2

      1:23

  • --
  • Beginner level
  • Intermediate level
  • Advanced level
  • All levels

Community Generated

The level is determined by a majority opinion of students who have reviewed this class. The teacher's recommendation is shown until at least 5 student responses are collected.

18

Students

1

Projects

About This Class

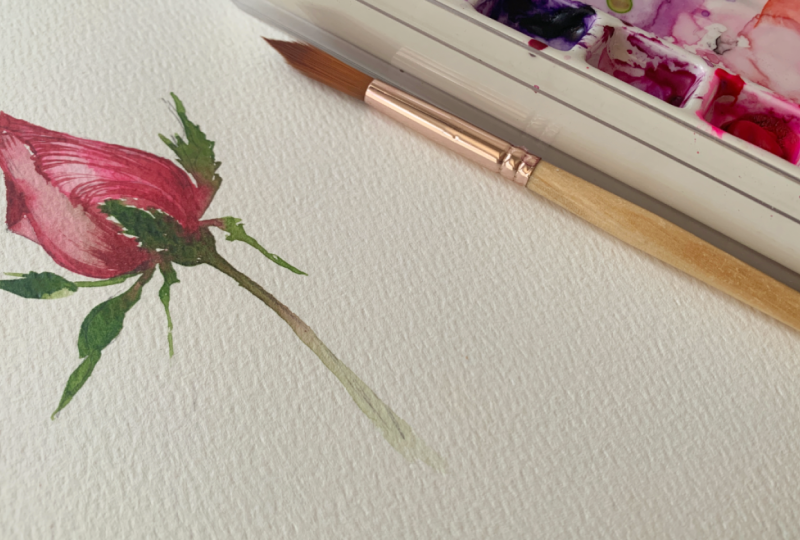
Paint your own expressive rose bud flower in watercolour using simple layering and brush techniques, then share your final piece (or process) in the project gallery.

In this class, your project is to create a  vibrant rose bud using the techniques we cover together. This isn’t about copying my exact painting — it’s about understanding the process and making it your own.

✨ What you’ll do

Follow along with the lessons and create your own cosmos flower painting:

  1. Sketch a simple base shape for your flowe
  2. Build your first layer with soft pink highlights
  3. Add depth using darker reds and tonal variation
  4. Blend edges to create smooth transitions
  5. Use deeper tones (like indigo mixes) to add shadows and folds
  6. Finish with fine details and textures using the tip of your brush

Take your time with each layer — this is where the magic happens.

Meet Your Teacher

Teacher Profile Image

Kanchan Kaul

Artist and Illustrator

Teacher

Related Skills

Art & Illustration Painting
Level: Beginner

Class Ratings

Expectations Met?
    Exceeded!
  • 0%
  • Yes
  • 0%
  • Somewhat
  • 0%
  • Not really
  • 0%

Why Join Skillshare?

Take award-winning Skillshare Original Classes

Each class has short lessons, hands-on projects

Your membership supports Skillshare teachers

Learn From Anywhere

Take classes on the go with the Skillshare app. Stream or download to watch on the plane, the subway, or wherever you learn best.

Transcripts

1. Rose Intro: Hi, everyone, and welcome to the class. In this class, we will be painting this beautiful rosebud. This is the third class in my series, my viral reels in which I go into detail how to draw and paint reels which went viral on Instagram, and I get into the depth of it. Do check out my first and the second class in this series where I paint a cosmos, as well as nemoniflower. And in this class, we will be painting this rosebud. So I'll see you in the class. 2. Rose Drawing: Okay, for the bud and the reel, I have actually made it free hand. That's because I've painted it many times. But for this class, we will start with drawing it. So I'll just draw the base of the bud, something like this, like a circular base, and it has, like, a tip on top. So literally it just looks like a cone on a circle. But this circle is not like a full circle. It is more like a squished circle so something like this. So it's not a complete proper circle. And we have this on top and we'll erase anything extra before we get into the petal. And then it has one petal which comes something like this. One petal. It's a very simple bud, but it's really beautiful. And there's one pinking petal from the back of this, so like this. If you're confident, you can even do it freehand, if you've leaned a little bit of guidelines, so you can draw it out. And then here, we have just, like, random jaggedy edges. And if you want, you can even draw out the leaves which are here. But and then the stem. So just before the stem starts, there's a little bit little bit of a bulge here. So we'll add that the typical rolls stem and we then make the stem. So I'm not going to erase too much of this so that you can see it in the video. But before you get into painting, just rub a needed eraser to pick up the lead as much as you can. I'll pick up a little bit, but not everything, so you can see it in 3. Rose Layer 1: Take a brush, a round brush and take whatever color you want this rose to be. I'm going to make it a pink one. And in the video, I start with the outline, which we have already drawn here. So I'll go ahead and just place an outline on the drawn edge. So I want this to be a little darker. Not this bright. Okay. So I draw this and then fill in the petal which is in front. So I'm just making the outline and then filling it in. Then take some dark colour and place it at the base, not the top. You want the base to be darker. Then take a clean brush and just remove all the white gaps and pick up and paint for highlights. Now we can make a small petal here as well. Just make the fold for now. And you can just draw the jaggedy edges. Not too detailed. Now, while the petal is drying, you can make the leaves. So I'm using sap green. And I'm going to just make the leaves. Try to keep a bit of a gap between the petal and the leaves so that the colors don't merge or wait for it to dry a little bit before you go into this stage. So I'm going to go straight in since I'm recording. And this is very rough. It doesn't have to be perfect. So make some leaves here as well. I had not drawn anything there, but I want something there. And then make this little bulb at the bottom base. And there's one more petal which is here, actually. Sorry, a leaf. Now clean your brush and just pull this to make the stem. Now, take some watery paint on your brush, not too dark, and just fill up, fill it up. Make sure you leave a little bit of gap so that it doesn't get merged between the two petals. If it's not dry, fill it up. And here you can try and leave some gap as well or wait for the leaves to dry. And then again, take some watery paint and fill up this. So now you definitely have to wait for this to dry because we are going to add some little details. It gives a little bit more depth to this. So if it's still wet, you can add drop some dark paint in areas that you think requires it and wait for this to nicely dry up completely. So I'm just adding some dark one the bag as well. Okay, now let's wait for it to completely dry. 4. Rose Layer 2: Okay, now it's dried up completely. I'm taking some dark red on the tip of my brush. My brush is really sharp, so I'm using this, but if you need, you can use a detailing or a smaller brush. And all I'm doing is dropping it here at the edge. And just pull it to make some details. I love doing this. This is always I'll always mention it. It's optional, but I think it adds so much texture and detail and depth to flowers, so I'll just add some little details. Not too much because we still want it to look a bit more loose and easy going, not too detailed. And some details here, very fine ones. And what you can do is make this a bit darker because it's dried up light. In some details, yeah, maybe. Very rough. And that is all.