Transcripts
1. Introduction: Perspective is the key to
almost any drawing or sketch, as well as many paintings. It is one of the
fundamentals you need to understand
in order to create realistic and believable
scenes. I am Nur. I'm an architect and
illustrator with a passien for sketching and
architectural visualization. I create online content. I have multiple courses with
more than 5,000 students and a lot of free resources about both analog and digital
illustration on my website. In this course, I'm
going to explain the basic rules of one
point perspective. The tips and tricks, and you
will have access to a lot of step by step easy and little
more advanced examples. The best part is that you can download the free PDF guide in the resources of all the video to try what you will
learn by yourself. Why is this skill helpful? Understanding
perspective is crucial for anyone looking to create art that accurately represent
three dimensional space on a two dimensional surface. Whether you are
drawing interiors, exteriors, landscapes or
even conceptual design, perspective will help you create more realistic and
proportionate drawings, understand the spatial
relationships between objects, enhance the depth and
dynamism of your artwork. Through step by step instruction
and practical exercises, you will learn how to
incorporate perspective into your everyday drawings and develop a keen eye for
special relationships. So let's get started and bring your drawings to life
with perspective. I can't wait to see
what you create.
2. Draw Easy Shapes: Boxes: First thing you need
to know when learning perspective drawing is how to draw basic shapes like boxes. Because once you
know how to draw squares and boxes
in perspective, you can start drawing anything
using the same rules. They provide a structure
for other forms, which is why this is usually the first thing we learn
in perspective drawing. Don't forget to
download the PDF guide, so you can try all these
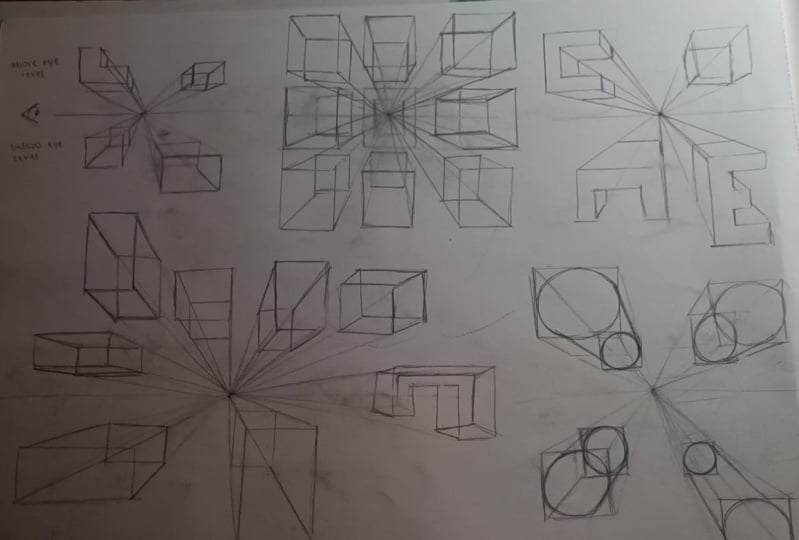
exercise by yourself. So first, trace
the horizon line, a horizontal line
representing the horizon, but also the viewer's eye level. Anything above the
horizon line is above the eye level and anything below the horizon line is
under the eye level. Place a vanishing point on it, which is a point on
the horizon line where objects begin to disappear
because of the distance. Draw the front side of the
box first and now draw the straight lines
from the corner of the square that converge
to the vanishing point. And the form. Remember that these final lines
in the back are parallel to the coinciding
line in the front. I prefer to show you
first with a roller, then I will show you free hand, but feel free to draw however
you think is best for you. Now I'm doing the same
thing with a rectangle. Also, try to draw with different shapes
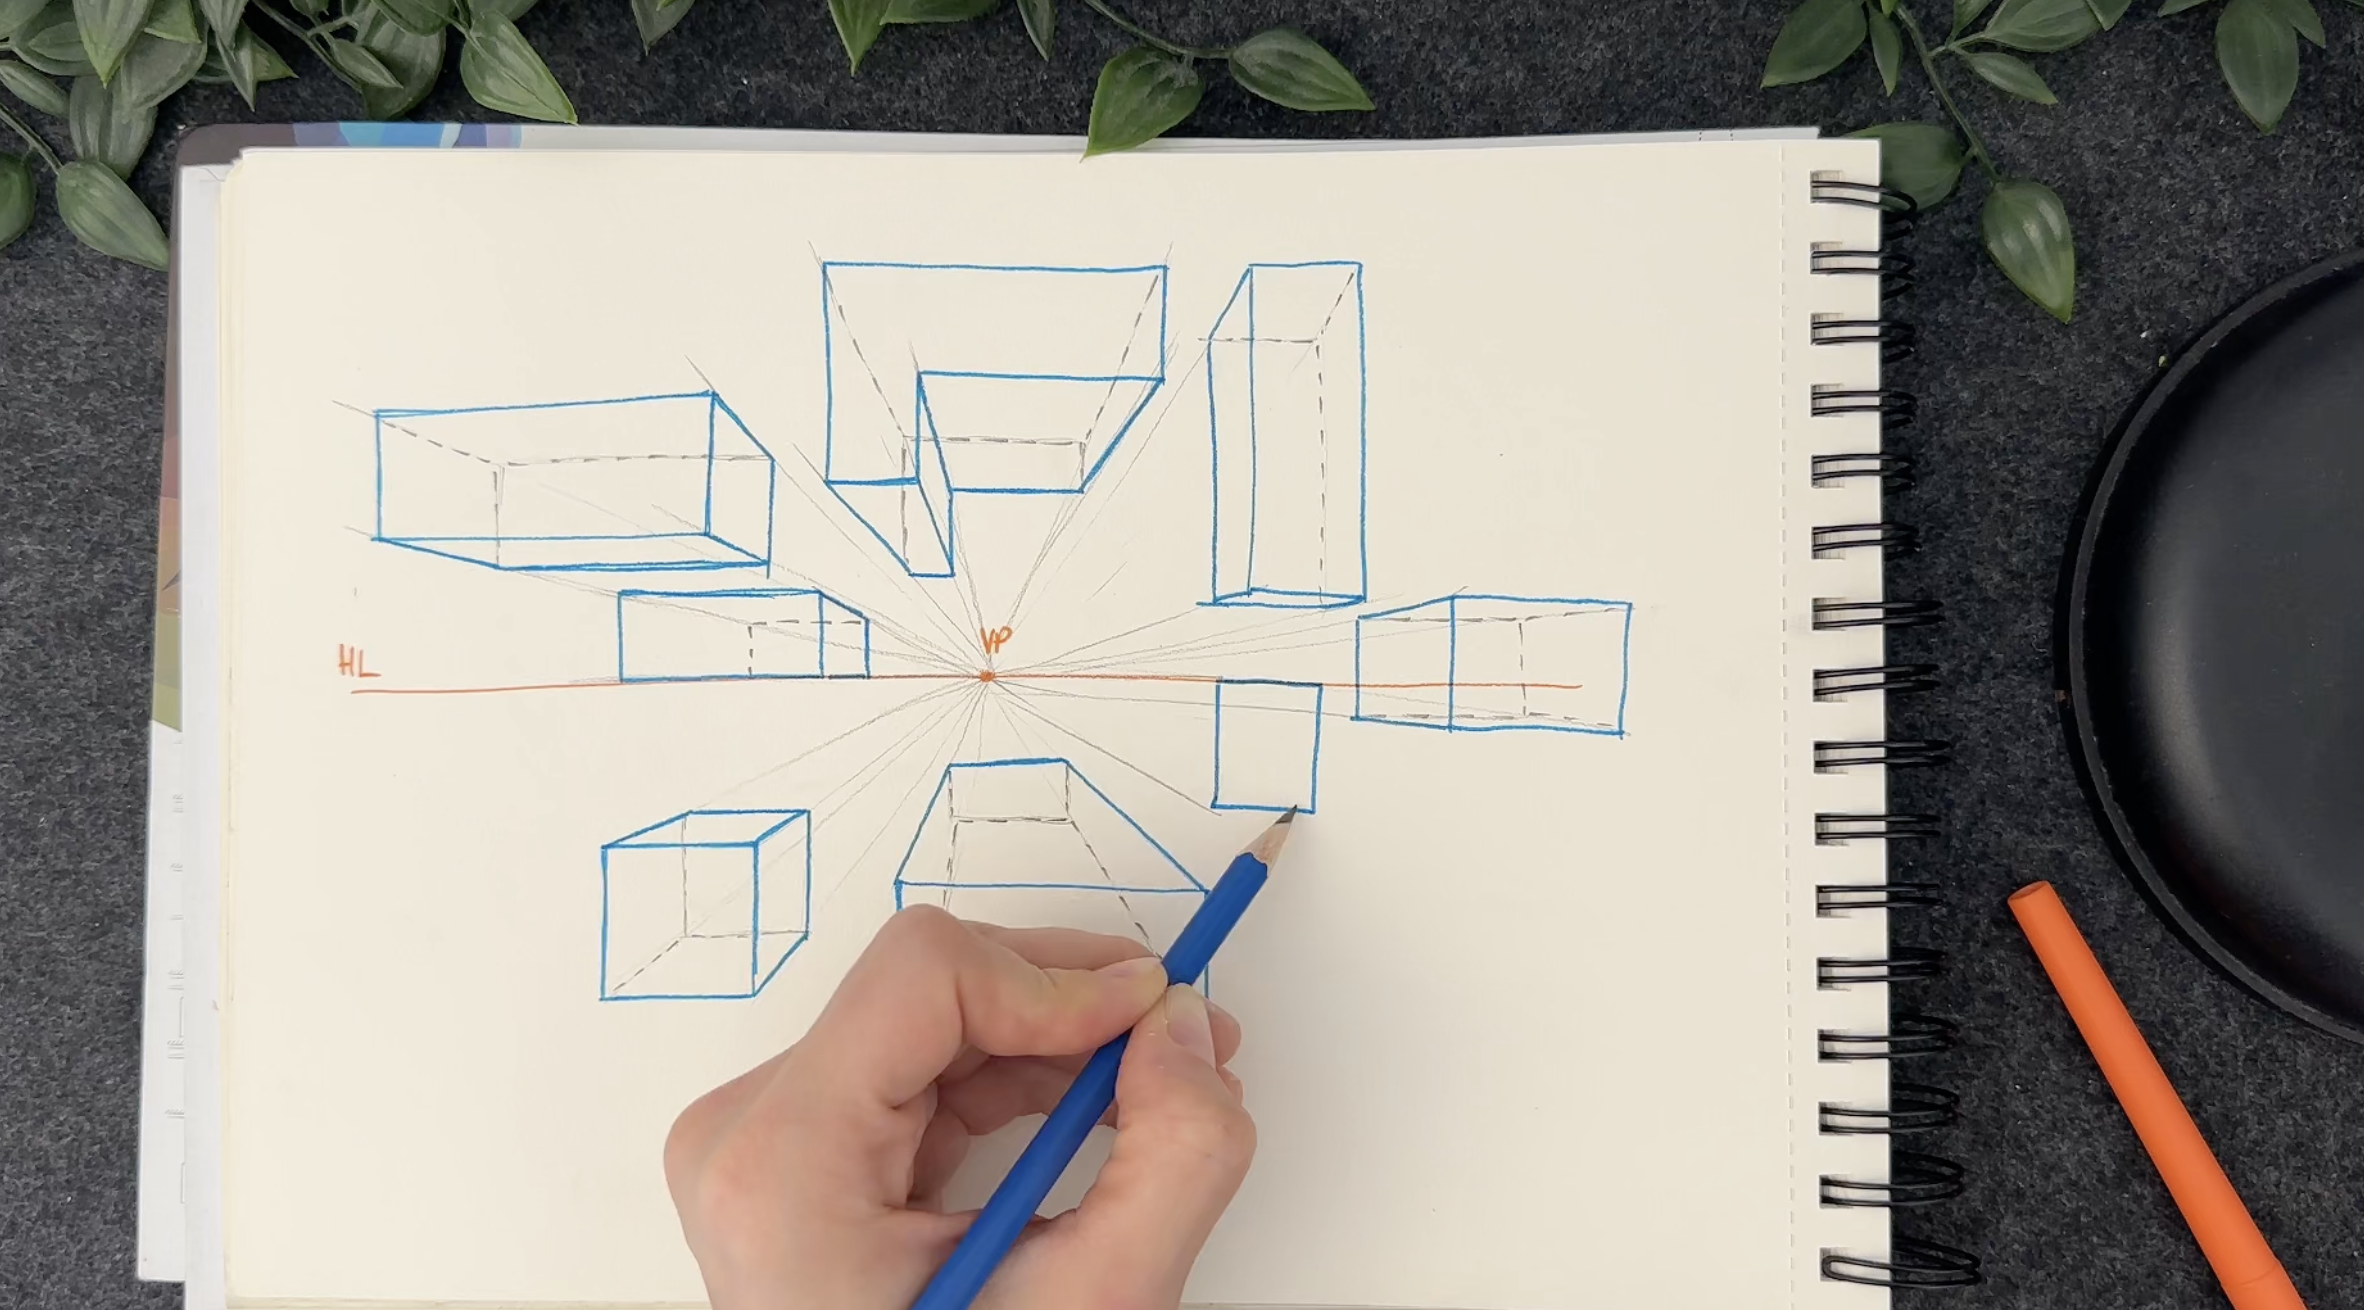
and size of boxes. If you want to experiment how the boxes looks in
different places, according to the
vanishing point, you can try this exercise. And finally, let's make it more challenging by drawing
different shapes. Now, I want to draw boxes in one point perspective
without a roller. This exercise encourages
personal style development. Lines might not be
perfectly straight, but these imperfections
contribute to a distinctive authentic
style that's hard to achieve with strict
mechanical lines. And that's it. Right.
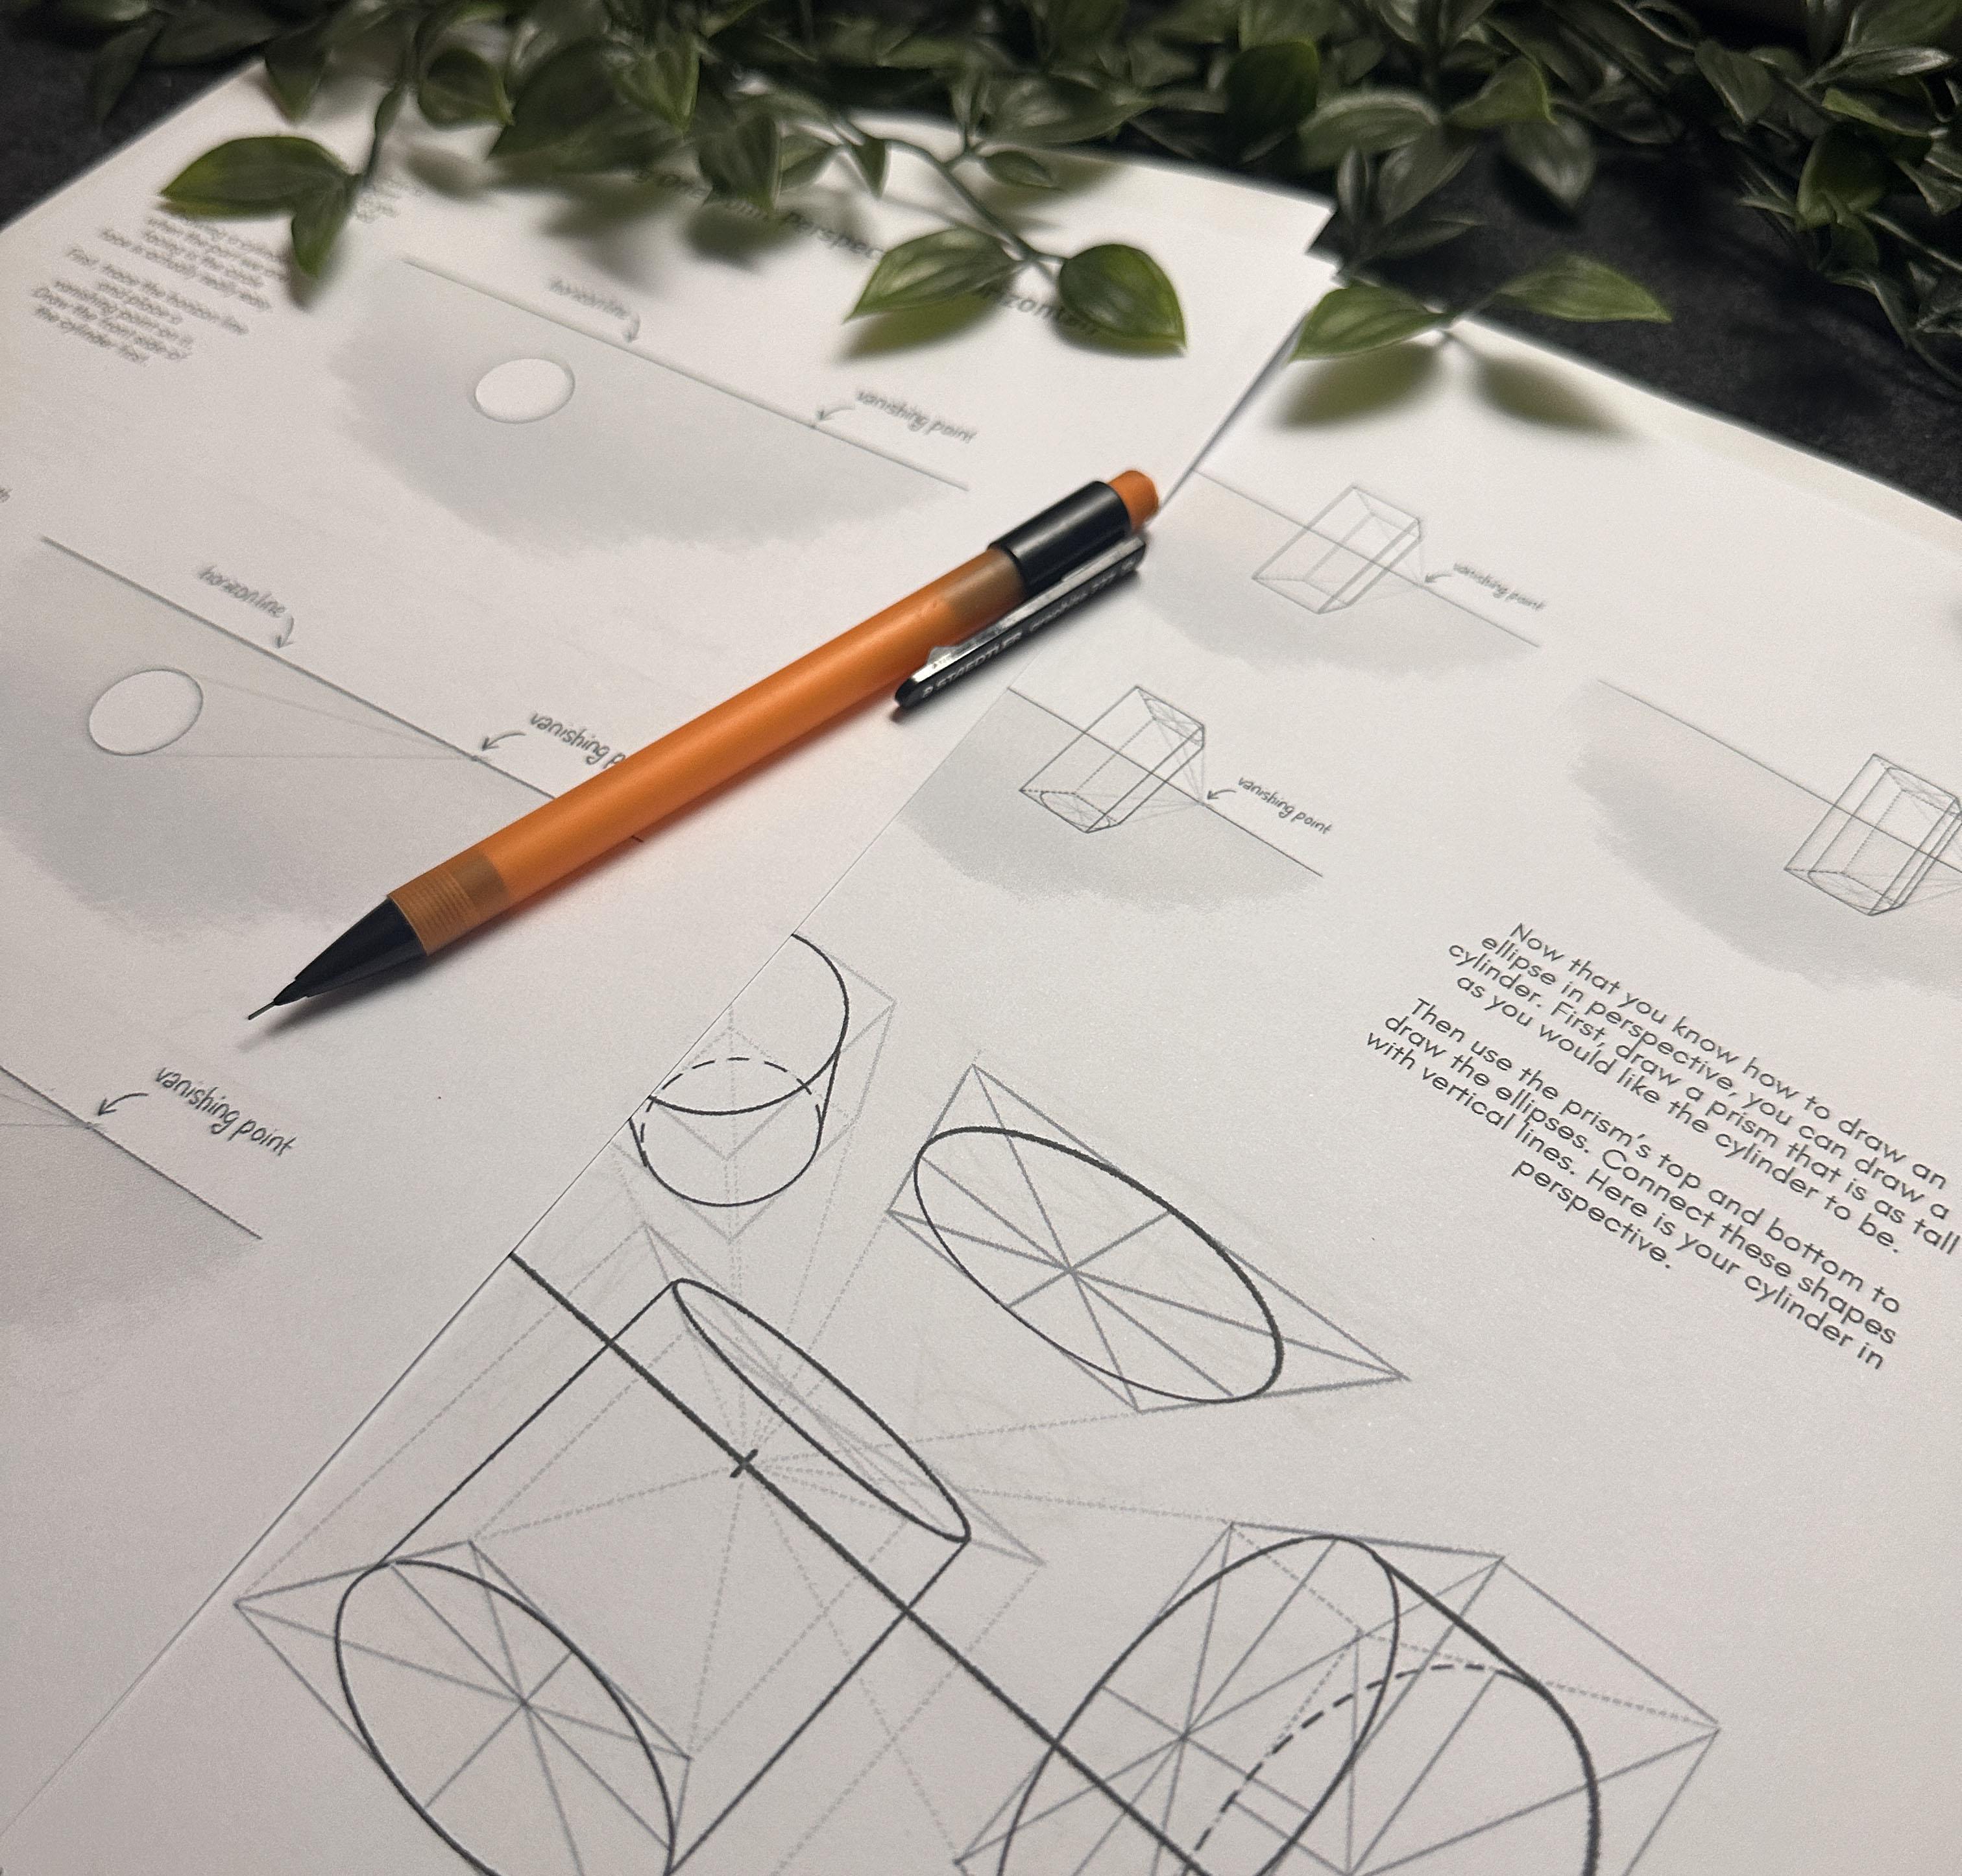
3. Draw Easy Shapes: Cylinders: Now I'm going to
show you how to draw ellipses and Cylanders using
one point perspective, and this is going to help you draw circular shaped objects. The best way to draw a
normal circle is to first draw a square and then
place the circle inside it. The diagonals and
middle lines of the square will help you
draw an accurate circle. So if we trace a square
for drawing a circle, we need to trace a box
for drawing a cylinder. Afterwards, trace
the converging lines starting from the
vanishing point. Their intersection will be
the corner of the square. Now we do exactly the same thing we did in the front square. We use the help of
the diagonals and middle lines to draw the
circle inside the square. To complete the form, which race the two lines, which connects the two circles. And that's it. Let's make another example. Now, this was for cylinders where we are facing
the circled side. What if we want to draw a cylinder where we
face the other side? For this, we need
to learn how to draw an ellipse in
perspective first. We call it an ellipse and not
a circle because an ellipse results from viewing a circle from any point other
than straight on. We need to draw a
square first to draw an ellipse in perspective. Then draw the diagonals and
middle lines of the square. These lines will be used as
a guide to draw the ellipse. Now to draw the other side, we are going to do
the same thing. Connect these shapes
with vertical lines. Here is your Cylander in perspective. Let's
make another one. Drawing circles in some general drawings
can be challenging. So try to practice
this part a lot. Try all kinds of circles with different size in
different places. And Now, let's practice what
we have learned. So I first start by
drawing a quick. Then I draw the circle inside. Then I draw this in a
one point perspective. Then another one. Now I want to draw clander. This is roughly how it looks. The two circles up
and down will be the sides of the boxes we
will draw ellipses in. Let's do some other
freehand practices. And that's it. I
4. Easy and Quick Sketches: In this video, I would like to show you some easy examples you can try after learning how to draw the basic shapes
in perspective. So first, we will find the horizon lines and vanishing
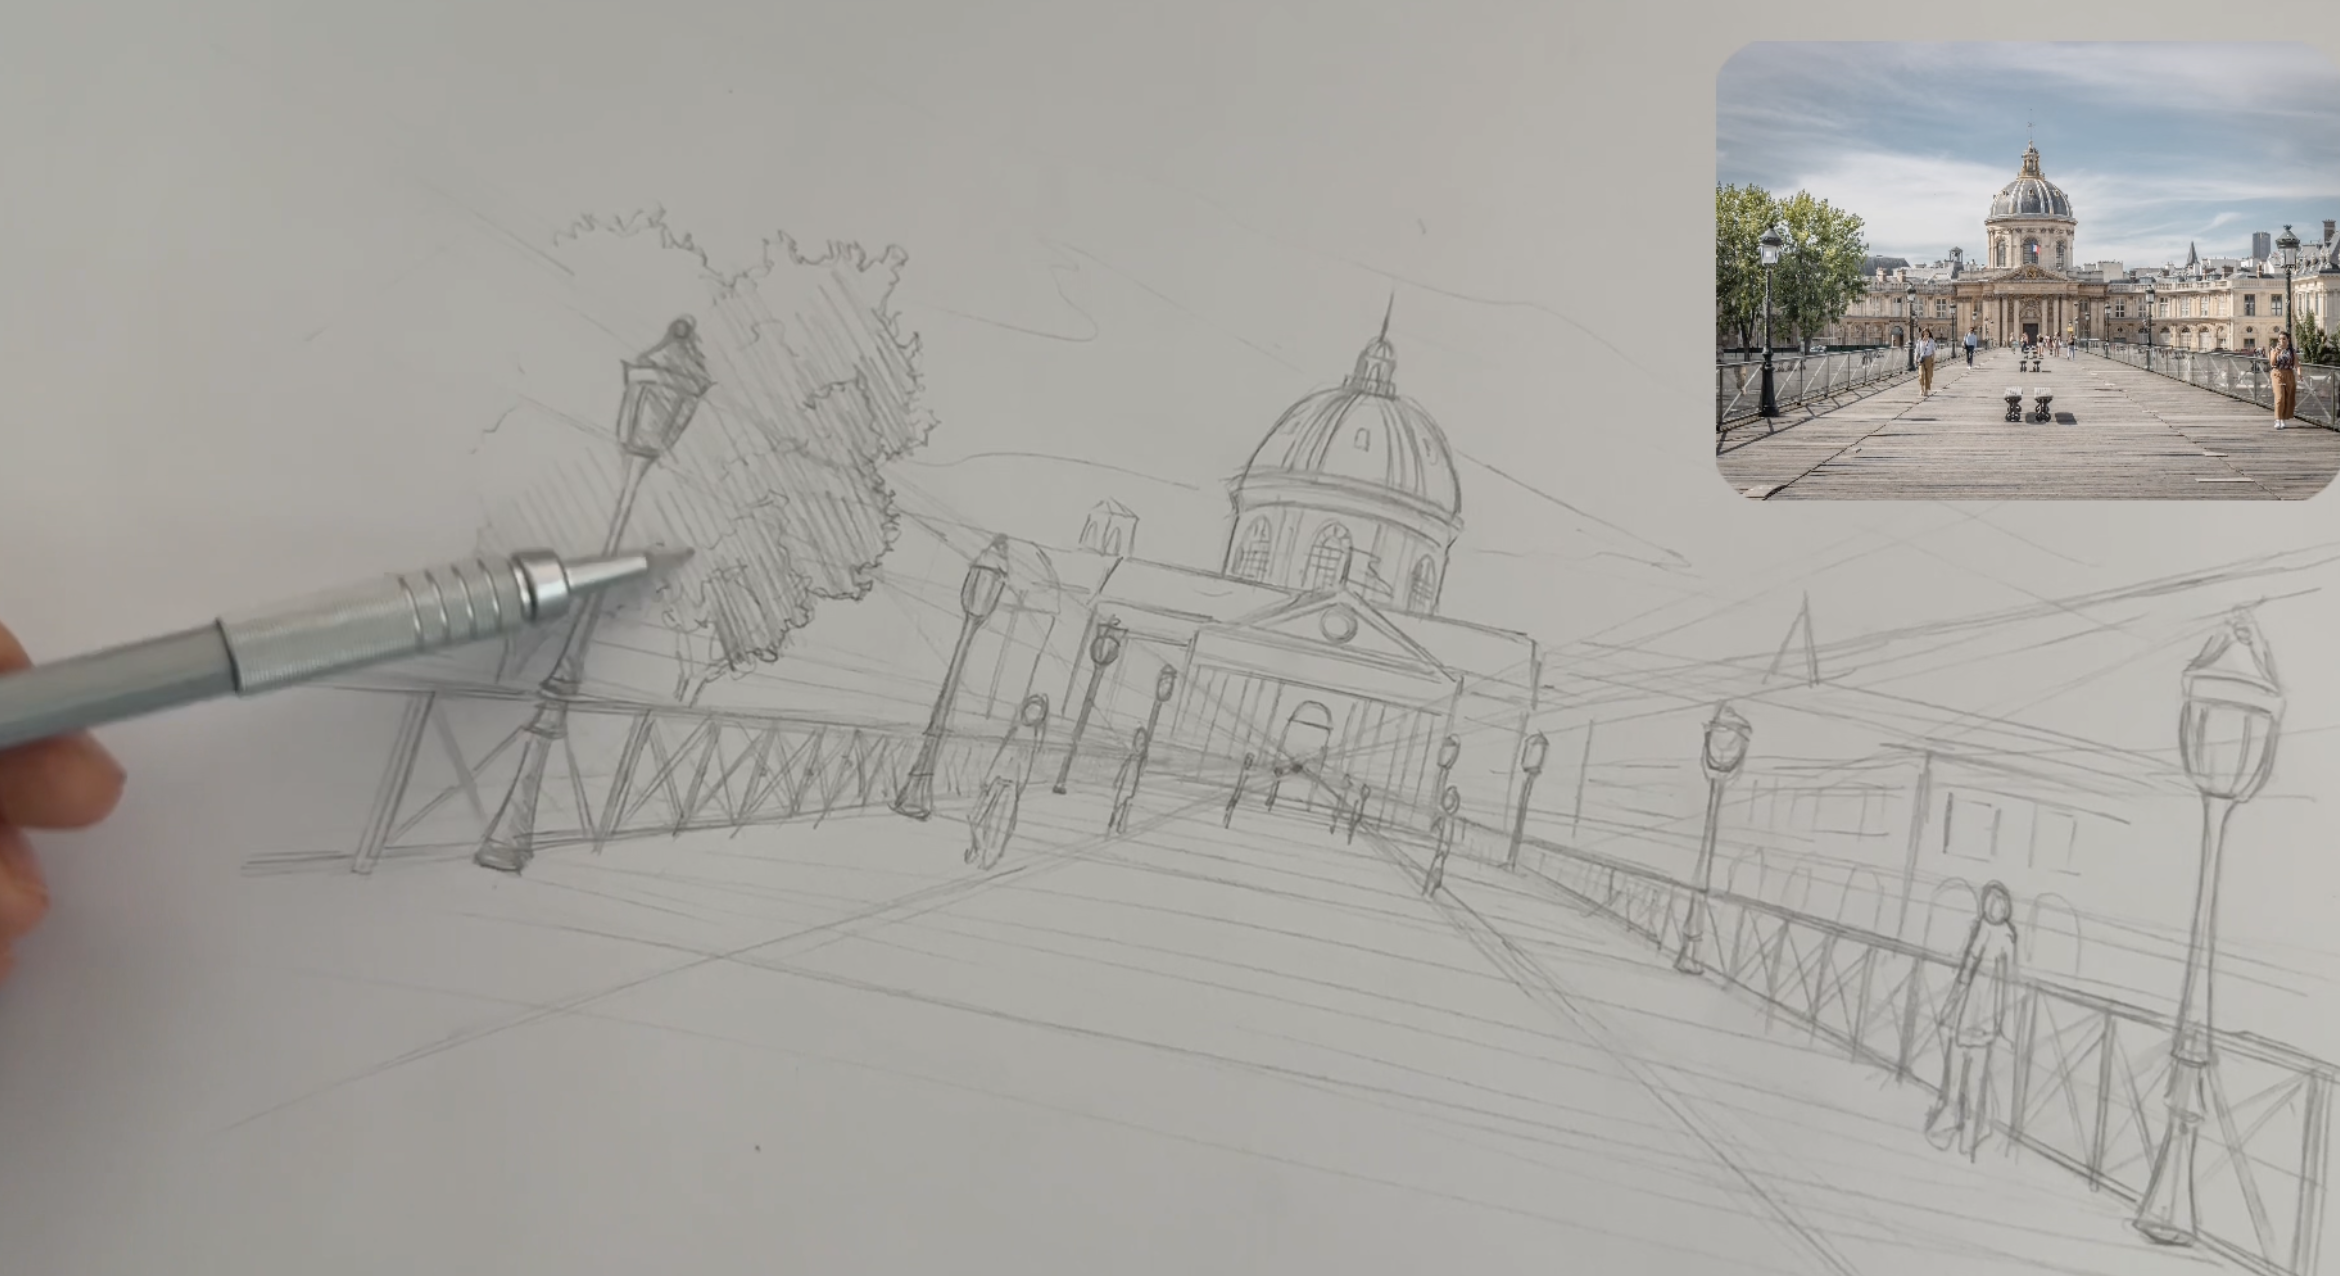
points on some pictures, and we will roughly draw them. The first one is a
city view of Paris. Let's first find the
vanishing point. Tordes I usually locate two or more sets of parallel
lines in the image. These lines should be
parallel in reality but appear to converge as they
extend into the distance. If we try to draw them, it's best to start by tracing the horizon and placing
the vanishing point on it. Now imagine all
these buildings as little boxes all converging
to the vanishing point. In this example, as this is
a high view of the city, we can see that the city is actually located below
the horizon line. But in this image, this is a regular view of a person
walking in the street. So this is the horizon line, and this is the vanishing point. These images have
similar views with the horizon and vanishing
point located on the center. Unlike the first image,
when we traced this, we'd have a converging line up and below the horizon line. Always try to imagine the buildings as boxes
enjoy the trees. In this example, we can see the horizon line is really down. It almost looks like
a kid eye view, which means most of the drawing will be
above the horizon line. Let's now draw this
countryside road. No. For the city view, we are directly facing the
side of this building and draw all the others as
boxes of different sizes. It's great to practice
this finding the horizon and vanishing point in real
life or through pictures. The best way to find
them is to extend these lines in the
picture until they meet. The point at which they intersect
is the vanishing point. If you have multiple
set of parallel lines, they should all converge at the same vanishing point if they are parallel in real
life, of course. To make it clear, I am marking the vanishing point with
the dot on the picture. Mm. In this one, we can see an
interior where again, by following the main
lines of the room, the ceiling, the carpet, you can see them meet here. In this one, we can see
an interior where again, by following the main
lines of the room, the ceiling, the carpet, you can see them meet here. Again, an interior. If you follow the lines
of the wooden beams, you can easily find
the vanishing point. This time, a housing from outside, the same rules apply. Follow the converging lines
to find the vanishing point. You can also walk
through your city and make quick two minute
freehand sketches using one point perspective
because I believe that rapid sketching is really important if you want to
practice your skills. If you want to try, give
yourself 1 minute or 2 minutes, don't think too much, draw. Overthinking will
hinder this exercise, and if you don't like
the resulting drawing, it's right because you are challenging your brain to focus on the basic form instead
of the unimportant details. And that's it.
5. Tips and Tricks: Think the most difficult
part to learn about perspective is to make
accurate proportions. That's why I would
like to show you simple techniques to help you while drawing
in perspective. As usual, you can download the free PDF that comes
along with the video. Proportion is
really important in order to make your
drawing looks realistic. If you don't get the
proportion right, your drawing can look
distorted or flat. When learning how to draw, there is this simple
technique which is to divide your reference
image with a grid. Then you can start drawing
with the help of this grid. Stop looking at the
overall picture for a second and concentrate
on each little square. This will really
help you in finding an accurate proportion for
your construction lines. The thing is that you can use the same technique in
your perspective drawing. You just have to place your
grid in perspective too. The first thing you need
to know, of course, is that objects appears smaller as they move
away from the viewer. Let me explain. For example, if you want to
divide this by 11, you can first divide this line. Then draw the diagonal
of this square and trace the line where it meets the diagonal parallel
to the first one. Or here's another example. I want to draw a row of four straight light getting
smaller with a distance. I decide where I want to place the first
and the last one. Then I draw a diagonal
to find the middle line. Then I divide the first
line into four equal sizes. The lights will be
in the place where the diagonal and
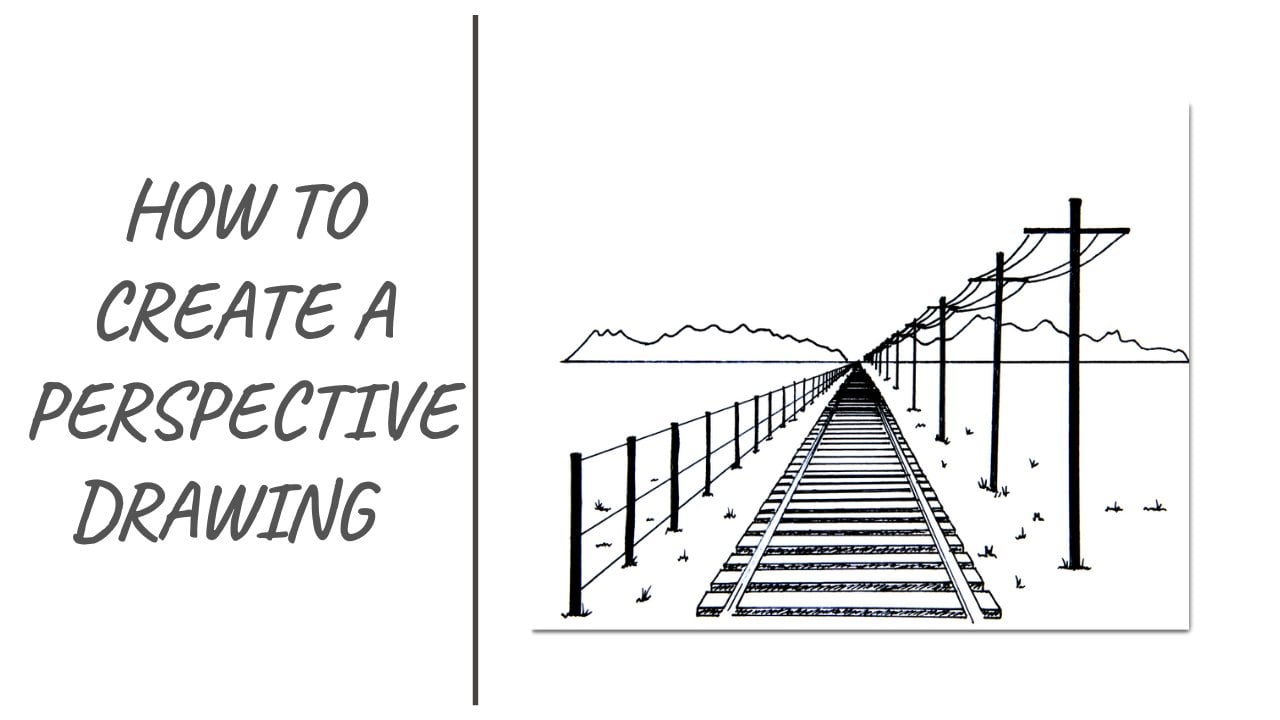
division lines meet. Here's another example
with a railroad this time. There are other ways
you can use this. For example, let's say I have the plan of a house
with its garden, some trees, and the roads. Let's quickly draw this
using perspective. What I'm going to do is divide the plan to use the grid
technique to draw it easily. Here is another example, but this time for a bedroom. And that's it. M.
6. Draw a Street View: That we have learned how to draw boxes in one point perspective, we can easily draw city views. In this video, I'm going
to show you how to draw cities and streets in
one point perspective. I'm going to explain
you the basic rules for drawing a street view
like this or like this. In the end of this video, you will have the concept of one point perspective in
this kind of drawing. A quick reminder, one
point perspective is used when drawing something
we are directly facing. Let's start with a simple box. This is the horizon line, and this is the vanishing point. I first draw a square anywhere around Then I trace the converging lines going from the vanishing point to
each corner of the square. Then I decide where to end
the form and that's it. I also draw here
the hidden lines. In this case, we are directly facing this side of the box. You can imagine it like that. We have a box like this and
we are facing this side, and then you have
all these lines and also the hidden lines which are behind all going to
this vanishing point. And for drawing
this kind of city, imagine all these
big tall buildings like tall boxes next to
each other like that. When drawing, we need
to keep that in mind. I'm drawing another box
on the right this time. Another one here and here. Then you can draw details and then trees and everything
that you want. You can also add the
windows like that. Let me show you
another easy example. This is your horizon line and this is the vanishing point. Let's draw the side
we are facing. Then the converging lines. These are the hidden lines. We don't really have to draw them. This is just to show you. Here is a taller one. I do the same thing on
the other side. Continue to draw boxes of different sizes
next to each other. Then let's start adding living details and
complete the drawing. Using this concept, you can draw different city
views like that. In this case, for example, the vanishing point is
behind this building, so it looks like we
are facing this side. Keep in mind that the horizon
line is your eye level. So if you place it
lower like this, this is really going to look
like this is the view of someone walking in the
street and looking around. It really means that
the eye level of this person is on the first
floor of the buildings. While on the other
one we drew before, it looks like someone
is looking out of the window of the tenth
floor of a building. If you want to draw bird's
eye view of a city, you can place the horizon
line high like that. Then you can also draw a completely high view of a
city like in this picture, where we are directly facing the rooftops
of the buildings. Anyway, now I'm going to draw a nice street view
inspired by this picture. And now, let's draw this image. This is easier compared to
the other one, you will see. And that's all.
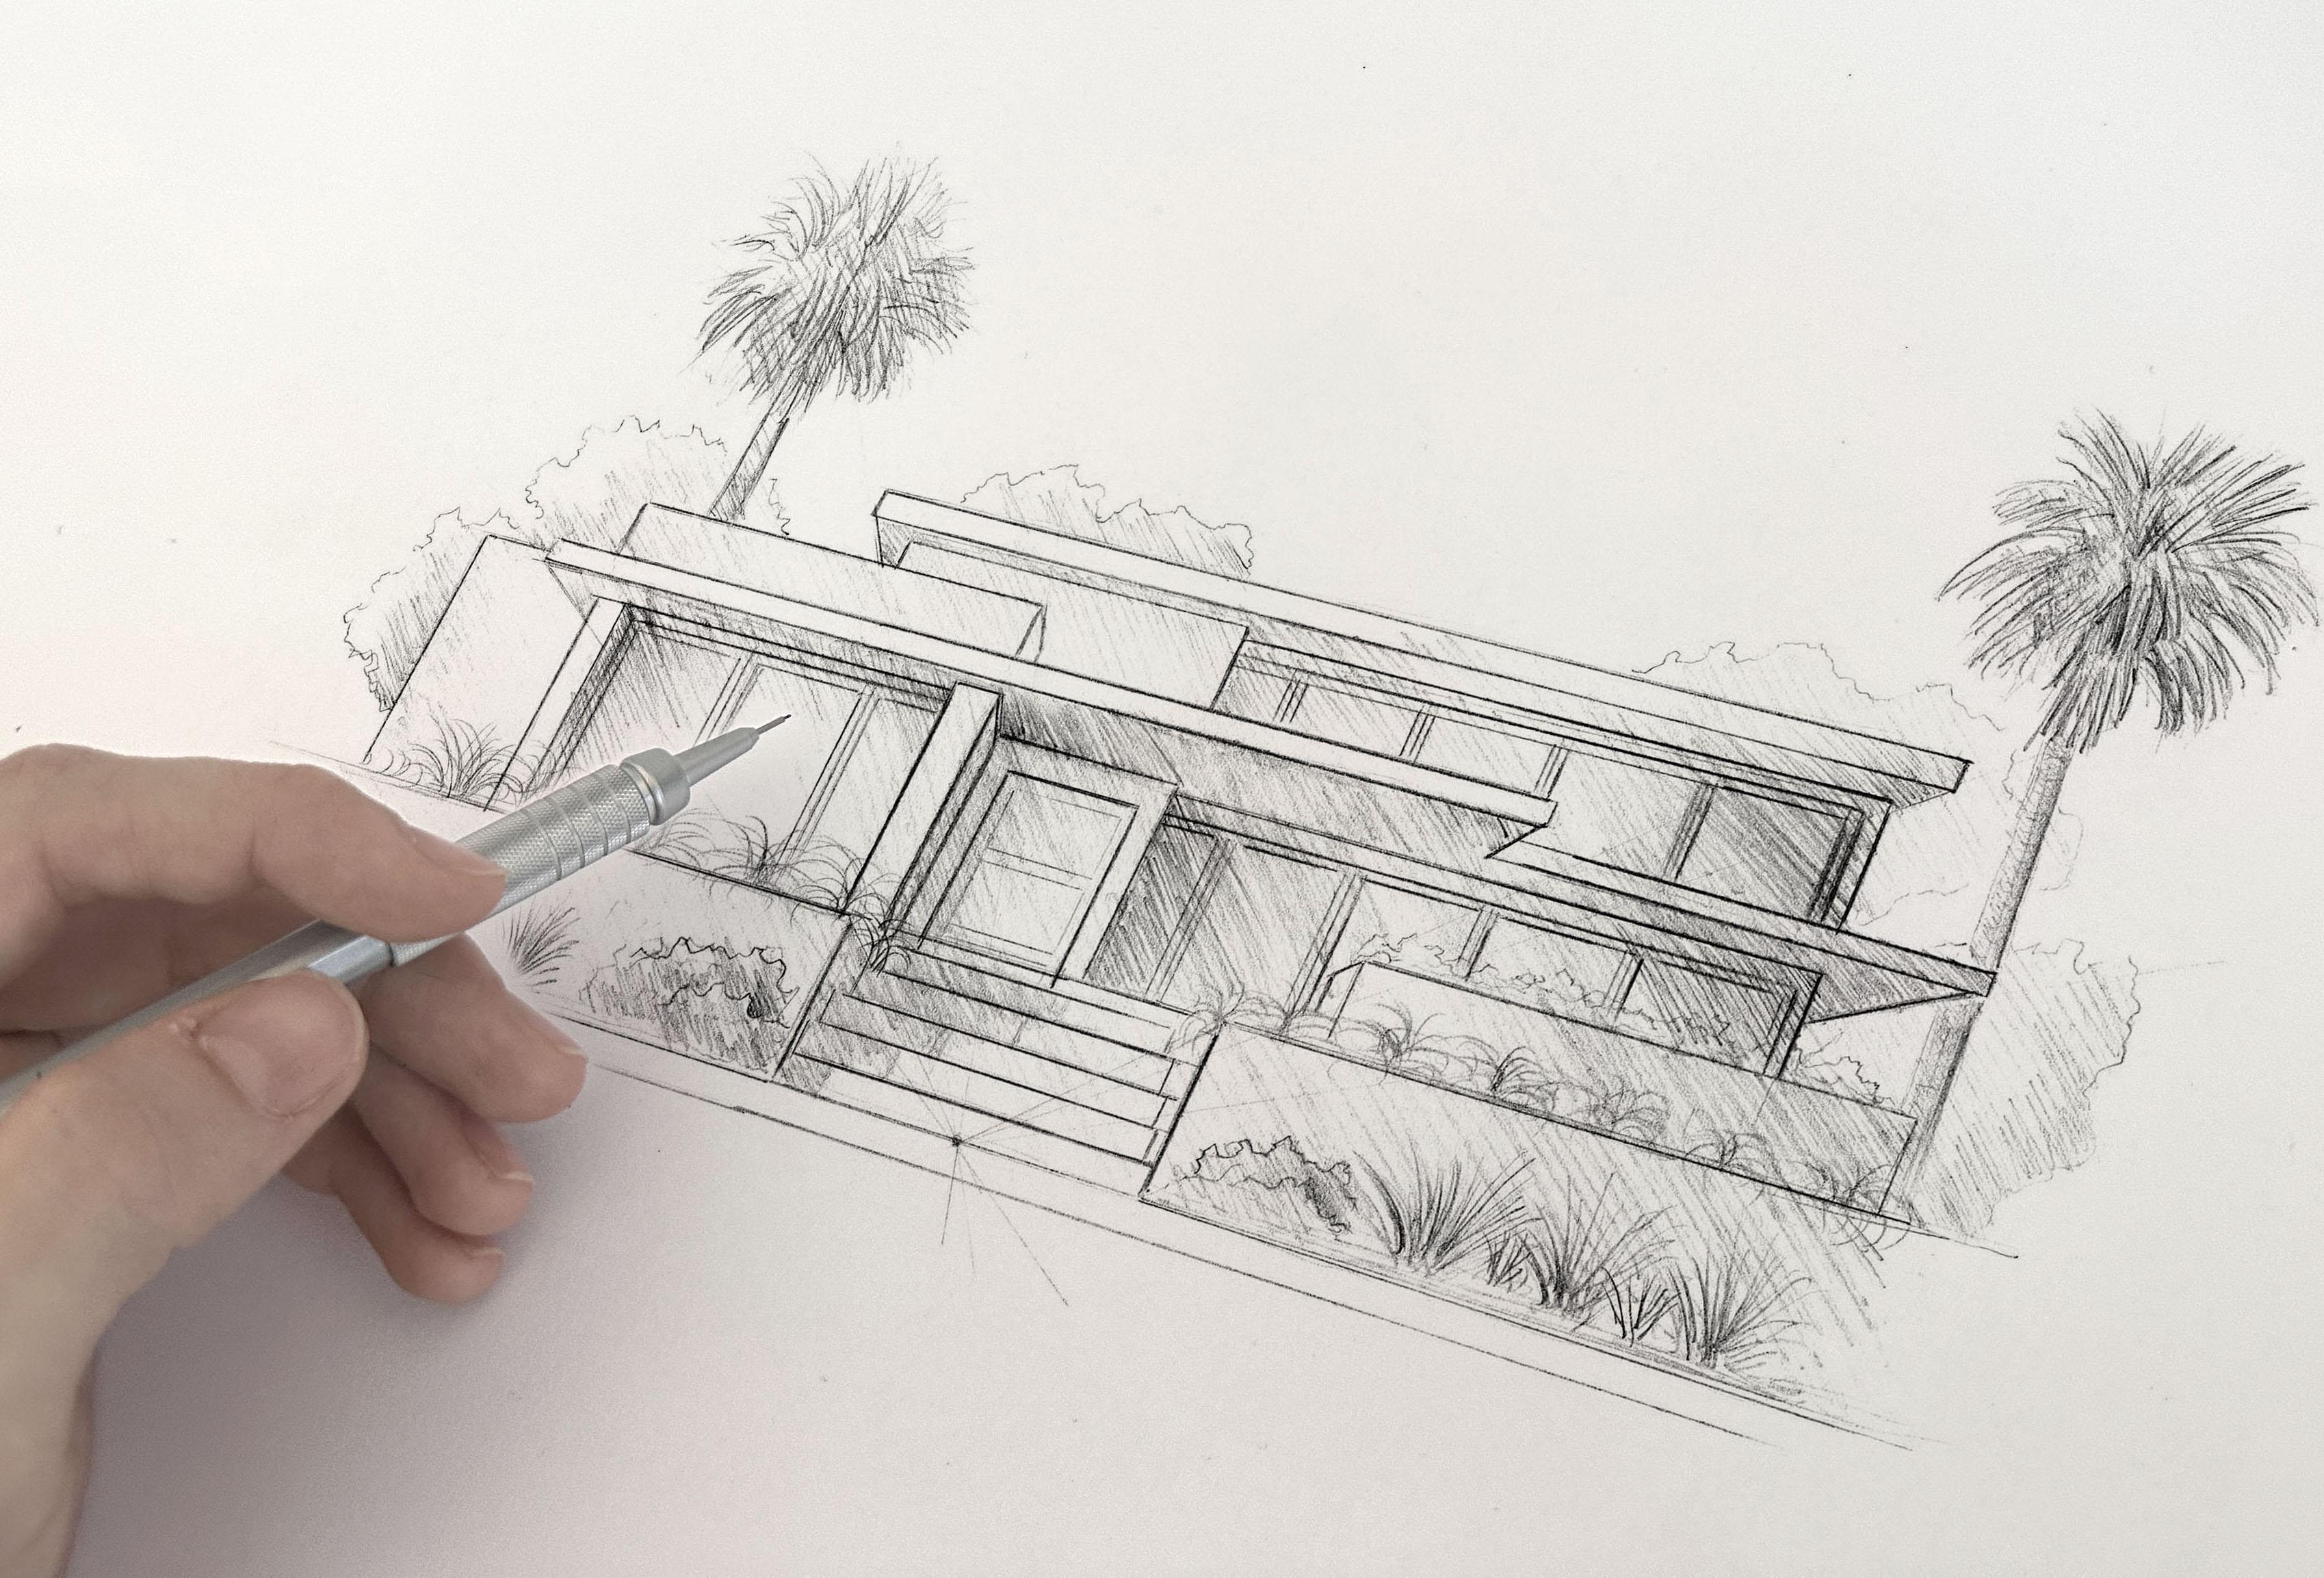
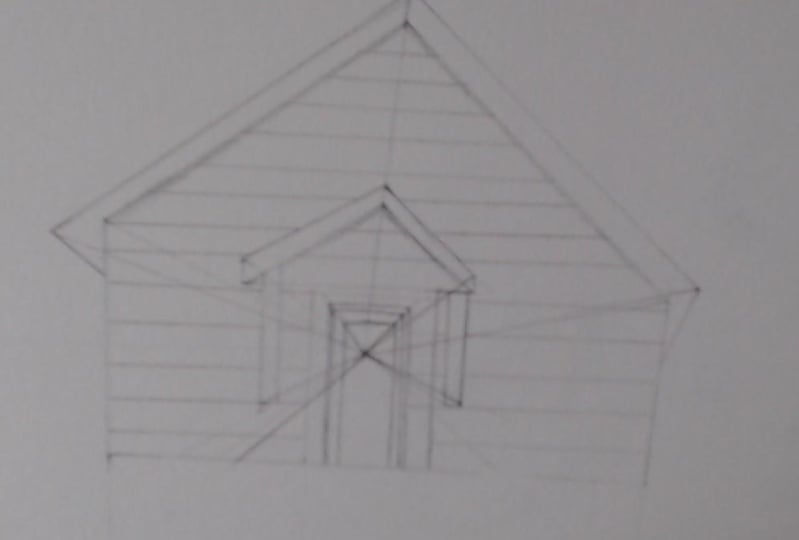
7. Draw a House: In this video, I'm going to
show you how I draw houses in one point perspective where the vanishing points are
located behind the house. As I said before, one
point perspective is ideal for frontal views. So in this case, I'm going to draw the front
facade of the house. The first thing I do is to
start with basic shapes. I use light, loose lines to sketch the outline
of my building, windows, doors, or any
other structural component. Starting with simple shapes
will allow you to easily make adjustments and refine
your drawing as you progress. The lines on the
sides of the house converge to the vanishing
points in the middle. Once you have the basic
structure in place, start adding more details
and texture to your drawing. Consider the materials and
textures you want to portray, brick, wood, glass, et cetera. Use hatching and
shading technique to give depth and realism. Oh Here's another example. Start with the main elements
on the front facade. All the side lines converge
to the vanishing point. This is really the part that will give depth to your drawing. Remember that all the
parallel lines in real life brced to the same vanishing
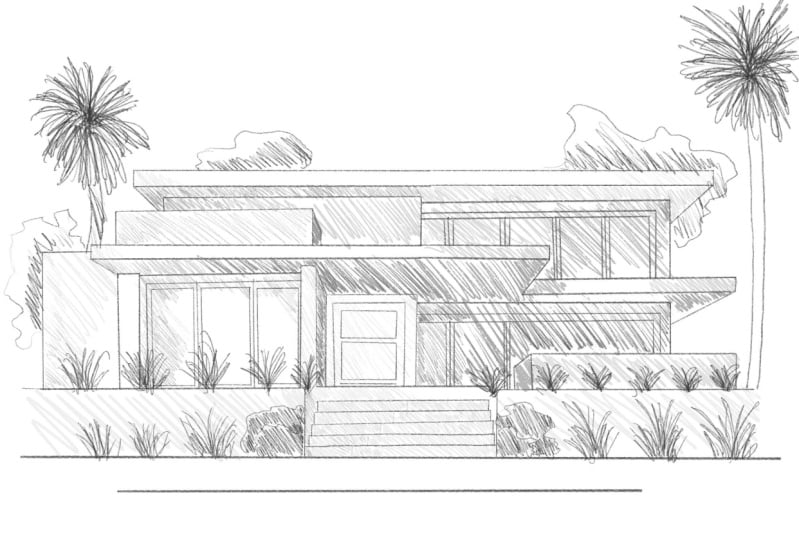
point in the drawing. And last example, let's draw a beautiful
modern house. I start by constructing my drawing slowly
with a simple sketch, then I draw the main shapes. Then I place the vanishing point accurately and trace
those converging lines. Lastly, details and shadings. And
8. Draw an Interior: In this video, I'm
going to explain the basic rules for
drawing interior. In the end of this video, you will have the concept of one point perspective in
this kind of drawing, followed by examples
of a living room drawing and an interior of
a sumptuous place in Italy. One point perspective is
great for scenes where the viewer is looking directly facing one
side of an object, and in interior drawings, we are usually facing
a wall or a window. Here are some quick examples. In here, we are facing the
wall with this window. So all the lines of the right and left
walls, the ceiling, and the floors are converging to the vanishing point on the
center of the window wall. Make sure your
vanishing point is strategically placed and let the line converge towards it. In this one, we are facing the wall or the bed
from the front. So all the other walls line
sit to the vanishing point. In the last one, we are
facing the floor of the room. So we actually see the plan of the room but with
depth and dimension. I am now going to draw a more complex interior using
a one point perspective. All the rules are the same. I am facing this wall, and all the object, furniture, windows I will draw
will be converging to the vanishing point
here in the center. As this is a high
ceiling interior, we have stairs here
and huge windows. I will leave it here. Let's continue with
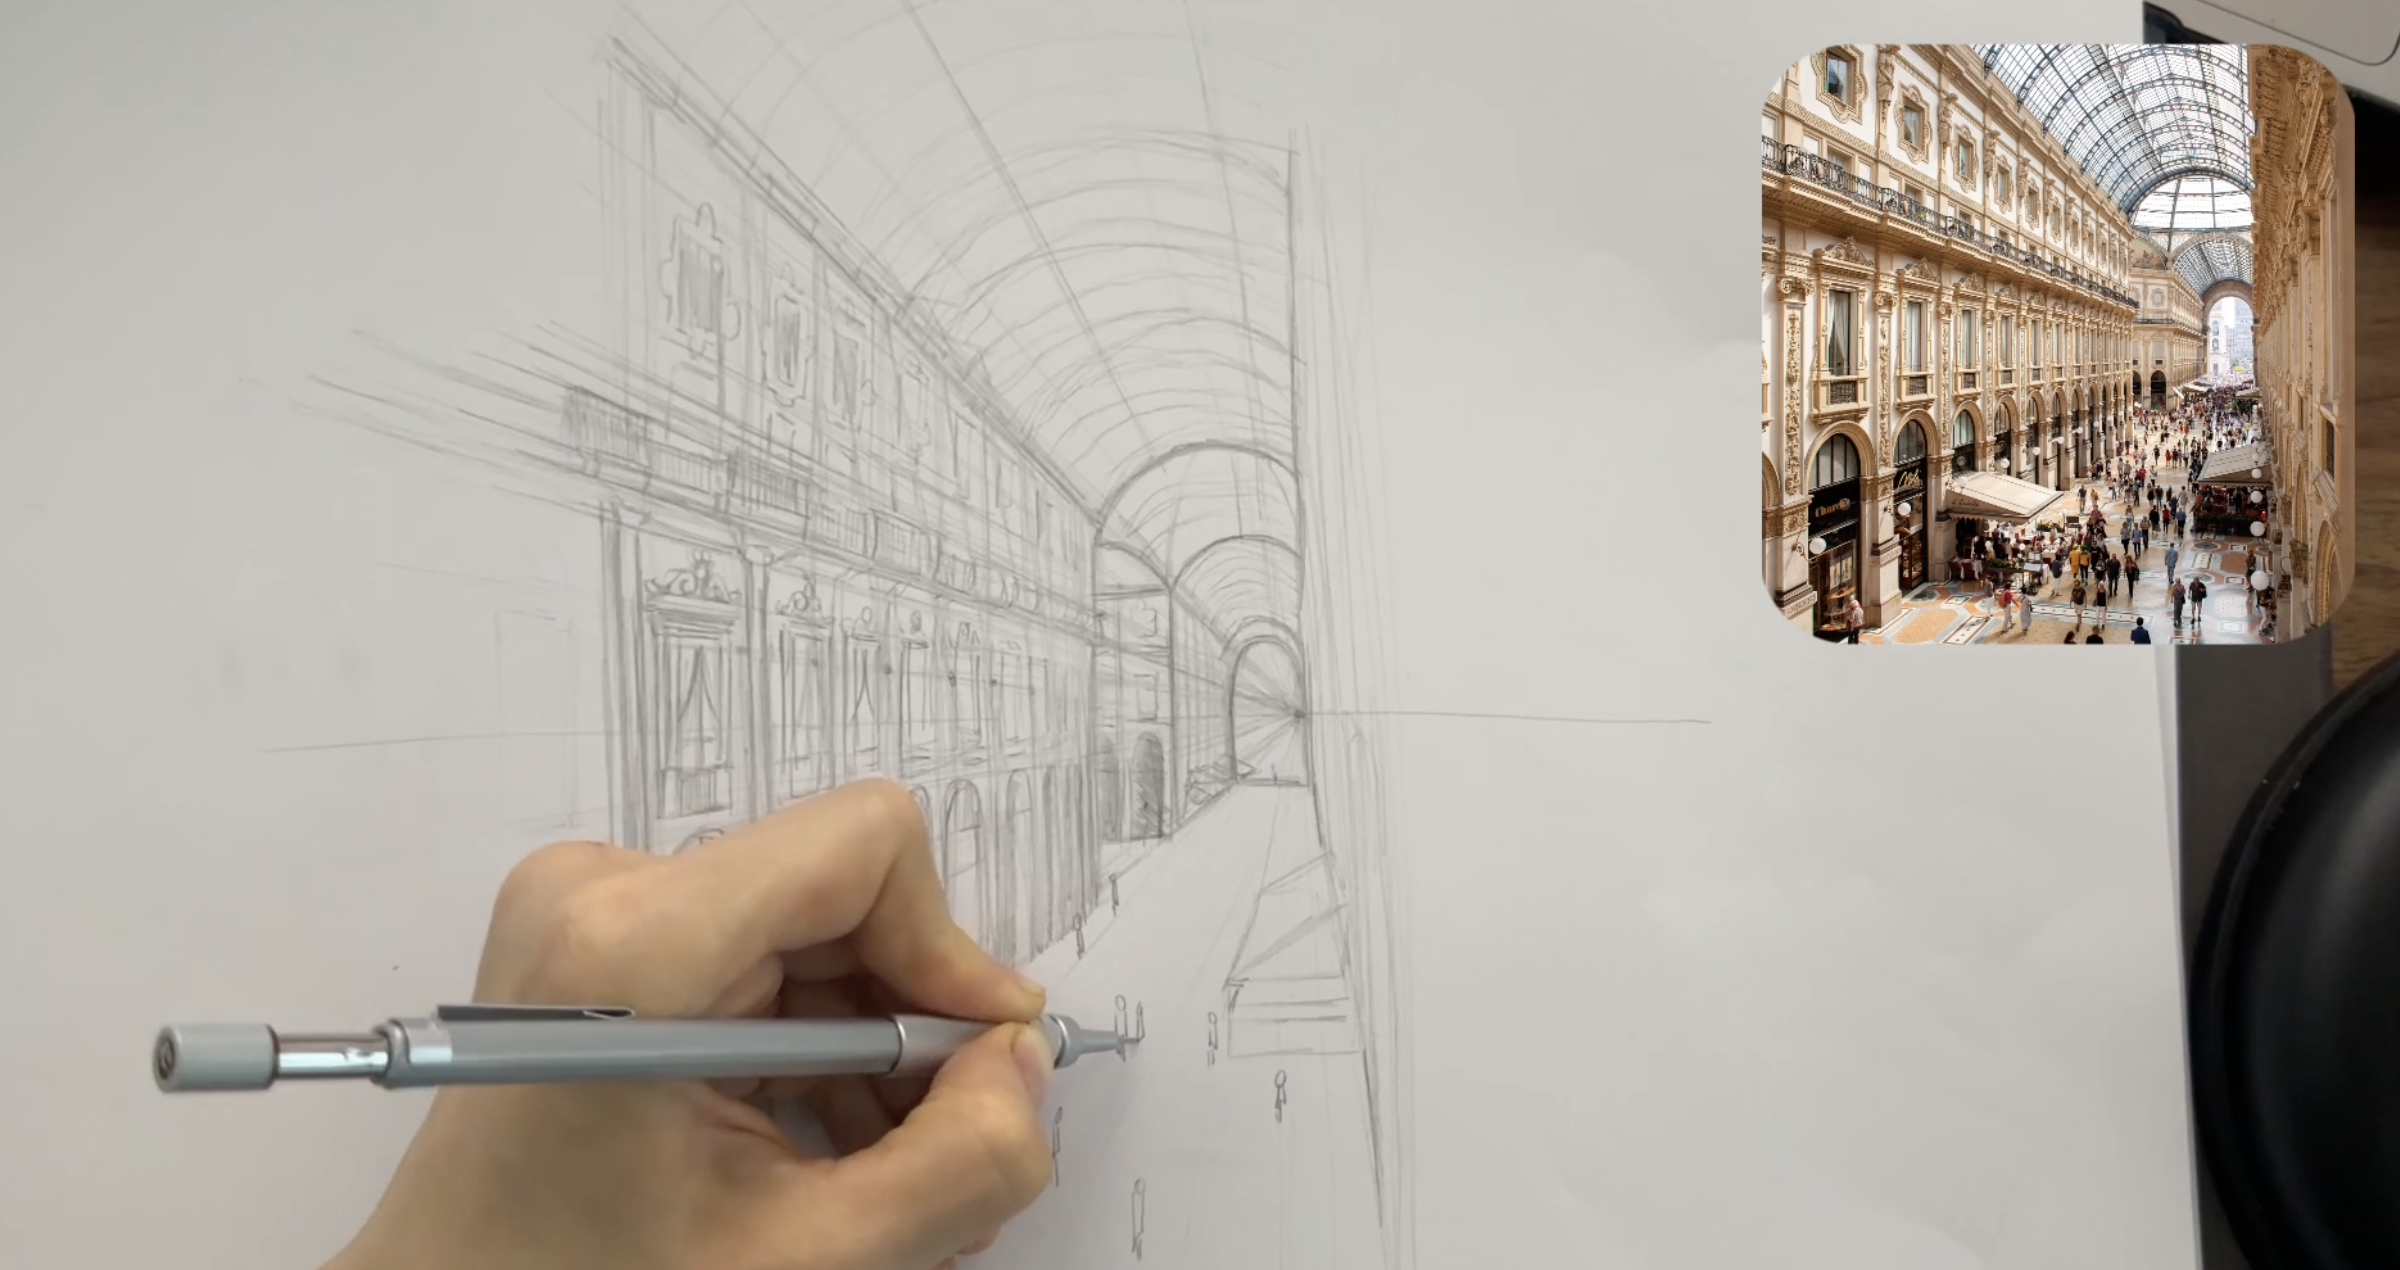
the next drawing. So here we have a
picture from Italy. The easiest way is to start by placing the horizon line
and Vanishing Point. Remember, the vanishing
point is the dot on the horizon line where all the lines converge
and seem to meet. Now that we have
the vanishing point placed on the horizon line, we can start drawing the main
lines of the composition, the columns and windows
of the shops on the left, the beautiful arc
shaped ceiling, and the other entrance we are
facing on the other side. After we sketch the
main construction, we can take each area
of the composition at the time and further
add elements to it. Vertical line from reality remain vertical on the drawing. But all the parallel line converge to the vanishing point. These shops and columns
give a specific atm. They each represent a
module repeating module that fits inside a
bigger rectangle. The drawing process
become much simpler if we place complex elements
into simple shapes. So I start by drawing
in perspective one of these rectangular modules and then by using the diagonals, I can place the next modules
correctly in perspective. What I do here is that I draw a diagonal from the
lower corner of the previous module
through the middle of the vertical line
of the next module. And where this line intersect
with the upper line, the one that converge to the
vanishing point is a place where the vertical edge of
the next module will be. Then I repeat this process until I have enough
modules sketched. As you see, with the
help of diagonals, we now have a row of
rectangles that are sketched proportionally following the same one
point perspective. This was the construction
part of the sketch. We can now start
drawing the arches. I will start by drawing
the first arch inside the initial rectangle that we've constructed
in perspective. I first draw the
diagonals inside the upper square to
find its center. I also sketch a converging line through the intersection
point because the center of all the
other arches will also be placed on the
same converging line. Starting with the center
by placing the diagonals, then drawing the arch
inside the shape. Here above the arch, we have
this beautiful window with many decorative elements
that also seem to become smaller and smaller as they are further
away from us. And I'm just continuing the same way with the
rest of the arches. Starting with the center
by placing the diagonals, then drawing the arch
inside the shape, suggesting it inside the shape, suggesting its depth, and continuing down
with the columns. We can start to notice the foreshortening effect
of the perspective. We see less and
less of the arches. The last one are so small that we don't really
need to sketch them. You see how everything
relates and one element help in sketching
the next one and so on. It's because all elements
are connected between them. They are not isolated
object in space. Now it's time to quickly
draw a few people. I will play some small round shaves to show their
heads and their bodies. And that's all. Two
9. Final Touches: So this is the final part of our one point
perspective journey. Now that we've seen
the basics and created some incredible scenes, I'm going to talk about six
professional final touches that will make your
work stand out. First one, line
weight and emphasis. One of the simplest
way to enhance depth in drawing is by
adjust line weight. This means using thicker lines for objects that are closer to the viewer and thinner lines for those that are farther away. Watch how I make the lines
of this front edge a bit thicker and the lines
in the background thinner. Notice how this creates
a sense of depth. It's a subtle but
powerful effect. Two, shading and lighting. Let's add shadings
to create dimension. Think about where the
light is coming from and imagine how it interacts with
the surfaces in your scene. For example, if light is
hitting from the left, the right sides will be shaded. This instantly adds a
more realistic touch. Three, adding texture
and surface details. Adding texture like bricks, wood grain or tile patterns really brings personality
to your scene. Here I'm adding some simple
bricks line to the wall. It's atlagam but it makes the scene feel much more
grounded and realistic. Four, fine tuning
perspective line. Sometimes as we refine, we notice little twigs we can make to keep the
perspective consistent. This small adjustment go a long way in making everything
look cohesive. For instance, I'm just
fine tuning this line to make sure it aligns perfectly
with our vanishing point. It's a small change, but it creates harmony in
the whole scene. Five, adding people or
small details for scale. To give our scene
a sense of scale, we can add small details like people, plants, or furniture. This not only bring
the scene to life, but also help viewers grasp
the dimensions of the space. Six, final cleanup. Our last step is to clean up. Erasing any
construction lines or stray marks will give the drawing a polished
professional finish. Once I remove extra line
construction crisp and complete. However, in some cases, it's also nice to leave
those construction lines. It gives the nice effect
of an unfinished drawing, and I believe it's really
beautiful in some drawings.
10. Conclusion: Congratulations. You made it. You have learned how to draw
with one point perspective, it's technical rules and tips then practiced with
different exercises, starting from basic
geometries to indoors, streets and city views. I hope you also enjoyed the
resources where you could see the most important points and try the examples with
a clear guidance. If you are still
interested in perspective, I will have another course about two point perspective
this time really soon, where again, I explain the rules with a lot
of different drawings. Thank you all for watching, and if you want to
have free resources about sketching
and illustration, you can check out my website
and my YouTube channel. Don't hesitate to write to me. I always answer, and I would absolutely love
to see your drawings. Thank you again. Stay
inspired and see you.
 Nur Ornek, Sketch Design Craft