Transcripts
1. Introduction: Have you always wanted
to draw portraits, but just don't know how sick and tired of trying to draw
your friends and family, but ending up with
stick figures. Well, fret no more
because today, I'm going to teach you how to draw portraits from reference. My name's Hugh, better
known as Kelle Loops, and I'm a watercolor artist from all the way in the and
down under Australia. I've been making art
ever since I was a kid and can
proudly pinch myself and say that I am a
professional artist that specializes in portraiture. A few common mistakes a lot of beginners
make when drawing from references is figuring where
to start and tending to focus on unnecessary details and overcomplicating
the process. What I like to teach my students is how to simplify anatomy, breaking complex forms
into digestible, simple shapes that make
it far easier to begin a portrait drawing in a
much less daunting process. This class will be broken
down into four lessons, each with a similar structure to demonstrate this approach
of shape simplification. The lessons will
be short classes to demonstrate a
front on profile, a side profile, and then a
three quarter angle profile. The fourth and final class will be filled with little tips, tricks, and codes on how
to polish your drawings.
2. Getting Started: Comes to drawing
from observation, I think what makes it difficult is figuring out where to start. Sometimes a blank canvas is the most daunting and
overwhelming part. Do I start with the eyes, the mouth, or the nose? The tendency is to jump
straight into small details, but that often makes full
portraits much harder because we start hyperfixating way too early on these
little things. But what if we made it
simpler for ourselves? What if we broke down
the drawing process into more digestible steps
using simple shapes? What if we started with
the larger forms first and then worked our way down
to the smaller details? For example, from afar, I can roughly
imagine a circle for the scale's forehead,
a triangle, or trapezoid for
her jaw and chin, a rectangle for her neck, a trapezoid for her torso, and another circle for the
back and top of her head. This is the approach
I encourage, looking for simplified,
approximate shapes and laying them down
to give us a place to start. While it might not
be exactly accurate, it at least gives us a
starting point to work from, and this is the
exact approach that we'll be exploring in
the next few lessons.
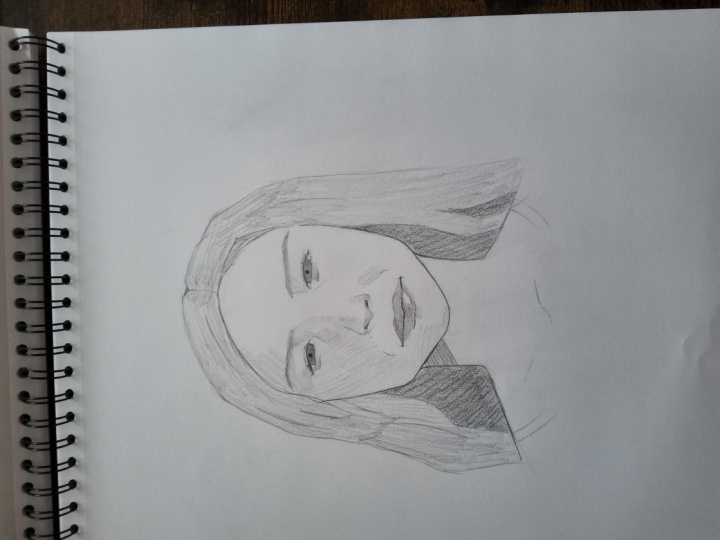
3. Drawing a Front Portrait: First, using a
fairly light pencil, I start by drawing a straight
line right down the middle. This will be my center line, and it's going to help me keep everything placed symmetrically. Now, let's ignore the
small details and imagine what larger
simple shapes we can see. These don't have to be perfect,
but just rough shapes. So think circles,
squares and triangles. Here, I'm seeing a
circle for her forehead, a rectangle or trapezoid
for her midface, and another trapezoid
for her chin. Then a rectangle for her
neck, another rectangle, ortrapezoid for her shoulders, and this upside down U shape
for her hair and skull. It's given us a rough placement of where the larger
body parts are, her head, her neck, her hair, and her shoulders. So let's progressively look at more details and now
look for mid shapes. I see a triangle
or trapezoid for the nose and a smaller triangle for the underside of the nose. There are trapezoid
like shapes for the eye sockets and
an oval for the lips. With that, her main
features are placed down. So now let's move on
to smaller shapes. Eyes themselves feel like
little triangles or diamonds, and the tip of the nose
has more of an oval form, while the sides of the nose
look like small circles, and the bottom lip
has these two ovals. With just these
simplified shapes, it already feels like a face. Up until now, we've only
placed shapes loosely, but it looks a
little off because we haven't considered
proportions, which is key to making a
face look recognizable. Let's try and establish some proportions by
mapping out guidelines, referencing different
landmark features of the face to each other. Ing at the reference, I can
see that the inner corner of the eyes vertically line up
with the sides of her nose. That means my initial
nose was way too narrow, so I have to adjust
it and widen it. Vertically, I can also
see that the corners of the lips line up
where the irises begin. So similarly, I drew the lips way too narrow and
need to widen them. There are other points
you can line up to, like the ends of the eyes,
the side of your eyebrows, or even where the neck begins. You can keep going with these guidelines until
you're satisfied, but sometimes there just aren't many more, and it's
okay to move on. Now let's look horizontally. If the ears are visible, they're great to line up with,
but here they're hidden. So I check the eyes and I
draw horizontal lines across the tops and bottom
of both eyes to keep them symmetrical
and the same size. I realized I drew one eye
smaller than the other, so having this guideline
helps to correct that easily. I also check the eyebrow
placement by drawing horizontal guidelines
across the top or the bottom of each eyebrow. Once things are feeling
proportional and symmetrical, we can now start
committing to the lines. With a sharp, darker pencil, I go over my linework using those reference shapes and guidelines to refine
the features. Remember, our initial shapes were flat and straight edged, but the human body
is full of curves, so that when committing
to the lines, we have to soften and
round out the edges. I keep refining the outlines, adding small details,
especially around the eyes, and once I'm happy, I can start erasing the initial
shapes and guidelines, leaving only clean,
darker lines. And just like that, a bunch of basic shapes has turned
into a portrait. From here, we can
keep adding details, refining, and adjusting things until
we're happy with them. That's our fronton
portrait finished. In the next lesson,
let's look at how we might draw a side
profile portrait.
4. Drawing a Side Portrait: In this lesson, we'll be using the same approach but
with a side profile. First, let's find those
big macro shapes. I can immediately
see a large circle for the forehead and skull. There's also a triangle or
trapezoid along the jaw and the straight line at the front doubles as
our center line. Then a rectangle for his neck and a trapezoid for
his shoulder and back. Now let's look at
some mid shapes. I can see a triangle
for the nose, a triangle for the lips, a trapezoid for the eye socket, and a triangle for the eye, and can't forget that ear. As we begin to look
at smaller shapes, I can see irregular
shapes for the hairline, ovals for the lips, and
another oval for the chin, as well as circles for the
tip and side of the nose. That's all the shapes
I can really see. So let's try to establish some proportions using
guidelines again. Horizontally, I can
see that the bottom of his ear lines up with
the tip of his nose, and the top of his ear
lines up with his eyebrow. The eye sits just
below that guideline, so I need to move the
eye socket further down. Vertically, I notice
that the lips are closer to the tip of the
nose than I first placed, so I have to move the
lips a bit more forward. The eyebrows also begin at the same vertical
as the nose bridge, the nostril, and also
the front of his chin. The side of the nose lines
up with the outer corner of the lips as well as
the start of his eye. Now let's quickly have a look
and zoom in on the ears. Is a super complicated shape
and they look really weird, but we can also
still simplify them. The overall ear shape
is an oval, but inside, I can break it down into a
circle and two triangles. These shapes might look
strange on their own, but as references,
they really help. As you can see, once I
commit to the lines, I use those shapes to
draw an ear like this. Once shapes and proportions are in place, I commit to the lines. Using a darker pencil, I draw his face and
facial features, softening those flat
edges into curves. Remember, it's very
rare that you'll ever see straight edges
in the human body. I refine these outlines
and add small details, especially around the
eyes, lips, and nose. Then I raise the guide lines, leaving only the clean
line work behind. And just like before,
we've turned a bunch of simple shapes into a portrait. From here, I can keep refining, adding details, and polishing the drawing until
it feels finished. And here's the
finished portrait. In the next lesson, we'll
look at how we might tackle a more complicated
three quarter portrait.
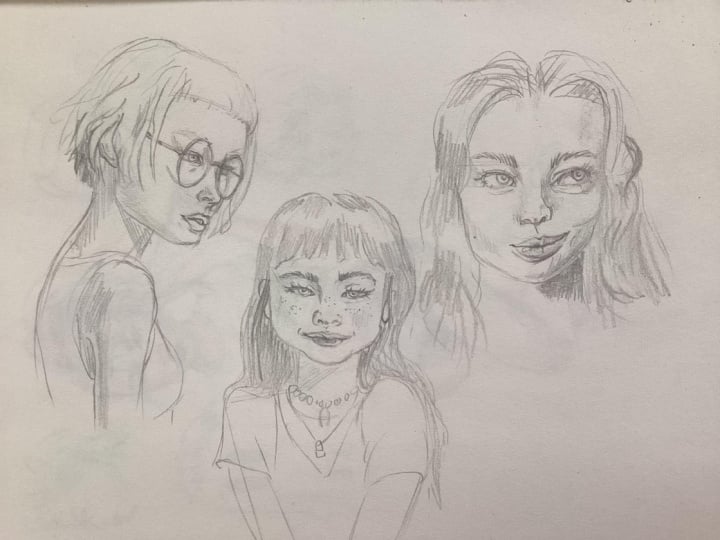
5. Drawing a ¾ Portrait: With this final
portrait, let's tackle a slightly more tricky reference and do a three quarter angle. I'd like to start
with establishing that center line that runs
down the middle of the face. I also draw a line that
connects the eyes, and that will be our
horizontal line. These lines give us a sense
of the face tilt angle, but is also useful later when
placing those guidelines. I got the angle slightly off in my drawing and made the
horizontal line a bit too flat, but it still works in the
end, and you'll see why. Start, let's look for those
larger macro shapes again. At first, I can see a
rectangle for her midface, a trapezoid for her chin, a large oval for her hair, a rectangle for the neck, and also a triangular shape for her shoulder and an
oval for her forehead. And that gives us the
overall larger shape and silhouette of our portrait. Next, we look at the mid shapes. I start off with a triangle for the nose and another one for
the underside of the nose, and then an oval for the lips, trapezoids for the eye sockets, and ovals for the ear and chin. Looking at smaller shapes,
inside the eye sockets, there are trapezoids
for the eyes, circles for the tip
and sides of her nose, and a few circles for the lips. That's really all the important
shapes that I can see. So now let's establish
proportions. Along the vertical parallel
to the center line we drew, I can see that the
inner corner of the eye lines up to where
the side of her nose is, and slightly further out from that reference line is where the outer corner of her
lips should be placed. I need to adjust both
her nose and lips. I can also see that her
eyebrow begins further in than the eye and also lines
up to where her nostril is. On the other side, I can see that the tip of
her nose lines up to the other corner of her mouth as well as where
her Iris begins. Her neck also starts a bit further out, so I
adjust that too. Horizontally, there aren't many guidelines since
the ear is hidden, but I want the eyes and
eyebrows to stay symmetrical. So I draw parallel
horizontal guidelines for the tops and the bottoms
of both eyes and eyebrows. This keeps their
placement and size equal. Now that the shapes, features, and proportions are set, I can start committing
to those lines. I draw in the face shape with
curves and rounded edges, especially around
the cheeks and chin. Once the outlines for the
larger forms are done, I move to the details, eyes, nose, lips, and so on. When the line work
feels complete, I can then erase
the guidelines and leave only the
clean lines behind. And just like that,
she's come to life. From here, I can
keep on refining, adding details, and polishing until the portrait
feels finished. And that's the third
and final portrait. In the next lesson, we'll
look at some little tips and tricks you can use to
make your drawings look a little more polished.
6. Cheat Codes: Tips & Tricks!: This last lesson,
I want to share a few little tips and
tricks or as I like to call them teat codes to help
make your drawings look much more polished.
Let's start with the eyes. From observation, you might be tempted to draw
them like this, I guess technically
it's correct, but let's try make them
look a little bit nicer. A lot of the time, I
find less is more. It's about choosing
which details actually matter and
simplifying the rest. So to polish up an
eye, here's what I do. I darken and thicken the upper lash eline and I do the same for the outer iris, pupil, and also the outer
edges of the eye crease. Then I soften the
lower lash line, leaving it as just
a faint outline. This point, that's all you really need for a
convincing eye. But if you want to add
more, keep it subtle. For eyelashes, instead of
drawing every single lash, just suggest a few that
will be enough for the viel to recognize
them as lashes. You also don't want to draw
lashes as straight lines. Instead, make sure the
lashes curve slightly outward and also
upwards, and finally, add a soft cast shadow
over the upper half of the iris for a more softer,
natural looking eye. Next, let's move to eyebrows. Rather than a blocky
eyebrow shape or harsh uniform strokes, I like to try and keep
it looking natural. Draw a few hairs that follow
the curve of the brow, but show some variation, different thicknesses,
some grouped together, and even a few stray hairs
that break the clean shape. Now onto noses. If you draw
every part of the nose, it can end up looking
a bit cartoonish. Instead, try and simplify. All you really need
are the outer edges, the underside, and the nostrils. You can add a touch of shading for the tip or the nose bridge, but erase the rest
and keep it clean. And finally, lips. The full form might
look like this, but really you only
need a few key details, the corners of the mouth, the inner lines
where the lips meet, a bit of the bottom lip, and just a hint of
the upper lip shape. Raise the rest and you'll get a softer natural looking lip. One tricky part though is teeth. Teeth can quickly look very scary if you draw every tooth, avoid outlining
them individually. Instead, group them together as a single shape and then
use some shading or a simple line along
the bottom edge to suggest the teeth without
overemphasizing them. Keep it simple and it'll
look that much better, and those are my cheat codes.
7. Final Thoughts: That's the end of our class on how to draw faces
from reference. This is the same approach
I use not only for faces, but also for bodies, objects,
and even landscapes. While it might not be the
perfect technique for everyone, I hope you take away the
value of starting simple, seeing the big picture before getting caught up in
the small details. Jumping straight
into trying to get everything perfect can
feel overwhelming, so it's just much easier
to put something on the page first and then
refine and adjust as you go. As you start creating
your own portraits, I'd love for you guys to share your own drawings in the
Project Gallery below.
 Hieu Nguyen, kelogsloops