Transcripts
1. Introduction: Do you ever love
revisiting supplies that maybe you've put
away for awhile? I do. I work with supplies. I'm obsessed with them. I play with them for
quite a long time. Then the next shiny object, I'll come around and
I'll be obsessed with those supplies for awhile. It'll go for quite a long time, maybe a year or two
before I'm like, hey, maybe I should pull this
back out and work with it. That's what I've done today. I'm pulling back out my
oil and cold wax supplies. I'm recreating and re-imagining super fun art to do
in this workshop. I'm Denise Love and I'm an
artist and photographer. I can't wait to show you all the different projects that I've got in store for you. I actually started this workshop thinking I'm going to
cut all these pieces up. I'm not trying to create a
masterpiece right upfront. I'm not going to try to get
the perfect composition and try to get the
perfect colors and try to get everything
just right. So when I peel the tape, it's all perfect and
I've made a masterpiece. That puts so much pressure
on myself to do that. A lot of times I just end up
disappointed and I'll walk away from a supply and I will come back to it for six months. Today I'm taking
that pressure off myself and hopefully you. We're going to start with the process of we're
going to cut these up. We're going to experiment with some interesting
color palettes. I'm pulling some from interior design book
that I really love. You can use my same
inspiration or you can be inspired by books of interiors or whatever it
is that inspires you. We're going to get outside our comfort zone and experiment with new color palettes that we
haven't thought to use before. I'm stepping out my side, my comfort zone too, you're not going to see
my traditional blue, green, or orange, pink. Well, you may see a
little bit of that, but it's not going to
be quite the same. We're going to be inspired by these color palettes that
are already out there for us to pull from and create art without thinking
too hard about it. We're going to mark make, we're going to do
some stencil work. We're going to layer paint, doing 2-3 different color
palettes and just create. Then we're going
to set those aside for the night and let them dry, and then we're going to
come back and re-evaluate. Did we end up with
something amazing? Because surprise surprise, there's actually pieces that you create this way that
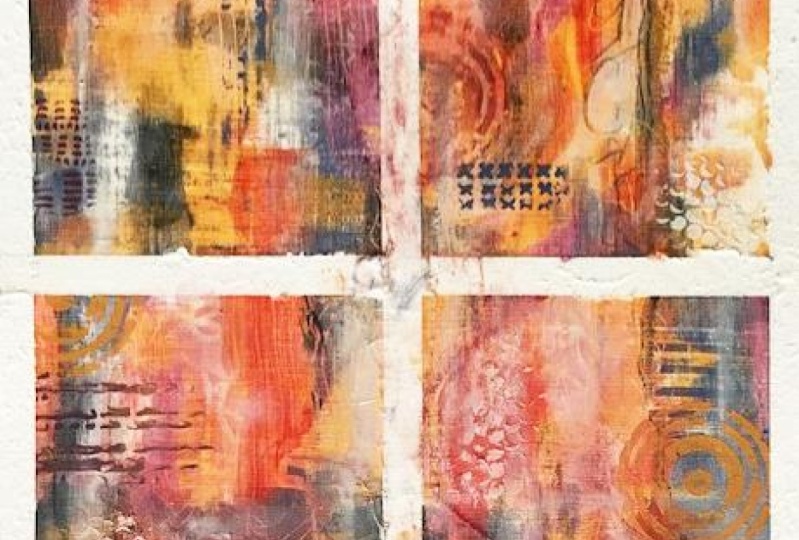
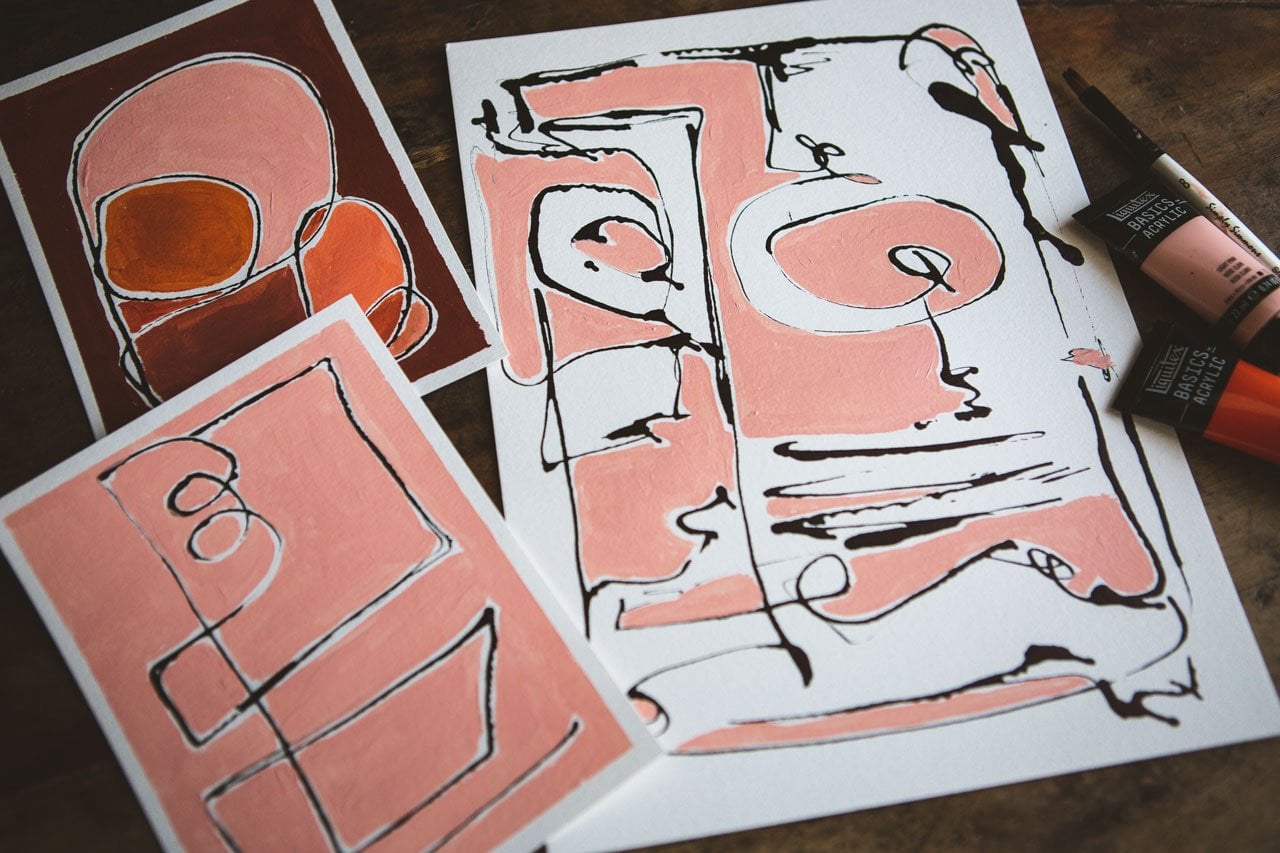
end up amazing. This piece right here, my new favorite piece of art. I would not have created it if I had not been doing this
workshop and creating these projects and using my leftover trash
paint on a piece of paper that was like the
very last of the paint. I was just trying not to throw away most favorite piece ever. You're going to end
up with surprise, some pieces that are amazing. Then you're going to end up
with pieces where you're like, let's cut these up. That's what we're going
to do. We're going to create not thinking
too hard about it. We're going to end up with some beautiful pieces that we can just finish
like they are, we're going to end up with
a few pieces that will cut into some stripe samplers. We'll also create a really
cool weaving project just to do some paper
weaving and try it out. Then we'll also search out compositions within
the larger piece. Like is there a small
piece that is amazing in the bigger piece
that you here about. I've got a lot of
fun projects today, and taking the stress
off of yourself by just knowing right up
front we're creating these with the possibility
to cut them up. You're going to have
so much fun painting compared to sitting down, trying to really
work hard to create the perfect painting
your first time. Hope you enjoy this class. I'm excited to have you here. Let's get started.
2. Class Project: Your class project
is to come back and share some of the projects
that you did in class. I can't wait to see which
techniques really spoke to you. Whether it'd be the mark-making, adding in some collage
elements, layering the paint, searching out pieces that you
could cut out after you'd already finished the
painting if you didn't love the piece that you created, doing some stripe collage, doing the paper weaving. We covered a lot of fun different elements
in class today. Come back and show
me what you create. I can't wait to see those, and I'll see you in class.
3. Color Inspiration: Let's talk about
color inspiration, because I know that
for a lot of us, color is the hardest part
of creating our art. Maybe you have a favorite
color palette like I like orange and pink and also
light blue and green. Everything that I create tends to come out using
some of those colors, all my favorite pieces. But what if you're ready to step outside your comfort zone, or you just don't
know where to start, or maybe you need
some new inspiration to create your next set of art? I like to be inspired by
beautiful coffee table books. I like interiors because I actually went to school
for Interior Design years ago when I was a kitchen bath designer for
many, many, many years. I didn't stop doing the interior stuff until I started my little creative
business 10 years ago. I tend to still love to
look at interior magazines. I like to look at art magazines. I love interior books. These Hans Blomquist books
are some of my very favorite. His style and the colors
and the antiqueness the old settings just really plays right into the type of photography
that I like to make. The type of rooms that
I love to look at. The type of art that
sometimes appeals to me more so than the type of art that I end up creating with
the brighter colors. I saw an artist onetime say, the art that you create
is not necessarily the same as the art that you're
attracted to collect. I took me a minute
to understand that because the styles that I'm
interested in collecting, I just automatically
assumed that that would be the
stuff I would create, but it doesn't really
work out that way. I end up creating bright, abstract looking things and
sometimes that's not what I collect when I buy photography
and art from other artist. That was freeing
in my mind to me, that I wasn't failing
at not creating exactly the aesthetic I tend to like to decorate with
and things like that. I thought that was freeing. This Hans Blomquist in
the mood for color, perfect palettes for
creative interiors. This book is amazing
and if you only get one book to be inspired by as we're flipping
through this one, you can see why I love it. This one is beautiful. I want to be inspired by
color palettes in this book, possibly to create the art
that I want to create today. I want to have a
direction to go. I feel like it's easier
if you're inspired by a color palette that
you see and you're like, this is gorgeous, that you'll then have more fun trying to recreate
those colors and recreate pieces of art using those colors and that
style and that aesthetic. This is all about colors
and the interior, but you hang art in interiors and so I
think it's appropriate. This book just has
the most yummy, delightful photography that goes right in there with all the yummy color
like this right here. This sap green with
this dark blue base. Look how beautiful that is. That right there I am thinking, maybe we should
bookmark that page. I want you to borrow
from the library. You can look online. If you get one book, I love this one. Find a book that
you find inspiring. Then start just tearing little pieces of paper
and marking some of these pages as you're
looking through it that you're like,
this is amazing. This is really cool too. It's one of my favorite
aqua dusty blue colors. It's got like a touch of
like a dusty pink in there, with some brown and
yellow and white. I mean that right there is
a nice fun color palette. Every page I can just pull colors right
out of that and say, here's what I'm going
to create with today. Look at these,
this is beautiful. We've got neutral gray. We've got this yummy, like a burgundy
purply pinky color. We've got this yummy yellow. We've got some greens in here. There's lots of stuff
that we can play with. Like on this page. That's not my color
palette at all. But how gorgeous is that? Maybe it could be
my color palette for a series that
we're going to create. Look at these, look at these. I just want to live in
all of these rooms. This right here, gorgeous, still the same different purply pink and that
yummy aqua blue. I love that scene. You can even see some paint
colors that he is talking about to experiment with. Look at the texture on this wall that is
just so incredible. Like I wish I owned that wall. Just cut it out and
bring it to me. Look at this, we've got
different shades of yummy blue, love that. We've got some greens that
we could be throwing in. I do like things that
look like old wallpaper. That right there
really appeals to me, especially if you're going
to be doing some type of collage elements
in any of these. That would be super fun if you get your hands on old wallpaper. I like walls that look like
they have been aged by time over 100 years in
an abandoned house. These neutrally colors with these different shades
of brown and green. Yummy. Yummy with
this green color. I'm going to take
some inspiration from a favorite book and it's
probably going to be this one. You can just see as
we're flipping through all the amazing color
palette, look at this one. A traditionally a blue
and white person, but I'm feeling this little
blue and white and this tad of green and bluish-gray that are
showing in that photo. How gorgeous is that? Swedish, I'm all about Swedish design that vary that
simplicity that you get. Look how beautiful this is with these dried flowers and
that pretty ocher tone. I've got some good
ideas in here, I'm feeling definitely
maybe going to have a few color palettes, possibly out of that book and then because I loved
that one so much, I've also got the in detail book and inspired by nature book. There's another one
that he just put out that I'm sure I'm going to add to
my list of books. I've also used this as
inspiration in my photography. Because I just find
when I sit outside on the porch under my umbrella with a dog hanging out with me. I let my mind relax and look
at the beautiful imagery and the colors that
all of a sudden I have inspiration for
a new class idea. Now these are a
lot more neutral. I may or may not
pull from this book, but look at this, a dark ocher yellow,
lavender, dark purple, not my color way at all, but little bit of
blue with red stripe, or white, some
gray, ocher brown. We've got a really
beautiful color palette right there that I might take inspiration from totally outside my comfort zone, which is what makes
it so exciting. Now I have a color palette
to like strive for. I'll sit outside and I'll just start flipping
through the books. Look how beautiful
that is right there. Now if you want to get one of
those and use that and end up with this when you're done, you could do that. But I'll let my mind relax. Then I tell you every time I've done that and I've really
been in-between ideas, I have come up with
the best workshops, and been inspired by some color, or color palette, or set of images
for the still-life. This inspired by nature one is a little more neutral also. I almost think that in the
mood for color one is the most exciting for coming
up with color palettes. Look at that, now that
rust is gorgeous. See that blue and
that pretty tan tone. If you get stuck
for color palettes, you can look for color
palettes online, you can check Pinterest. Look at that. They'll see this is like
a deep eggplant with some blue and white and that
bluish green color in there. How yummy is that? Now if I actually had one
of these houses and they looked that decrepit and I was living in it
day in and day out, I'm not sure I could resist not painting it and making it look new and fresh and clean again. But if I had a barn that I could have decorated like
these decrepit places, they'll be perfect
for photo shoots. That would totally be my
studio and I would invite other people over
it to be like let's shoot photos, look at my barn. Some good, good ideas. This is my inspiration. I'm going to be inspired by
some favorite books of mine. I'm going to open it up and
pick a color palette and say, let's see what we can create. Possibly co-create like one or two different
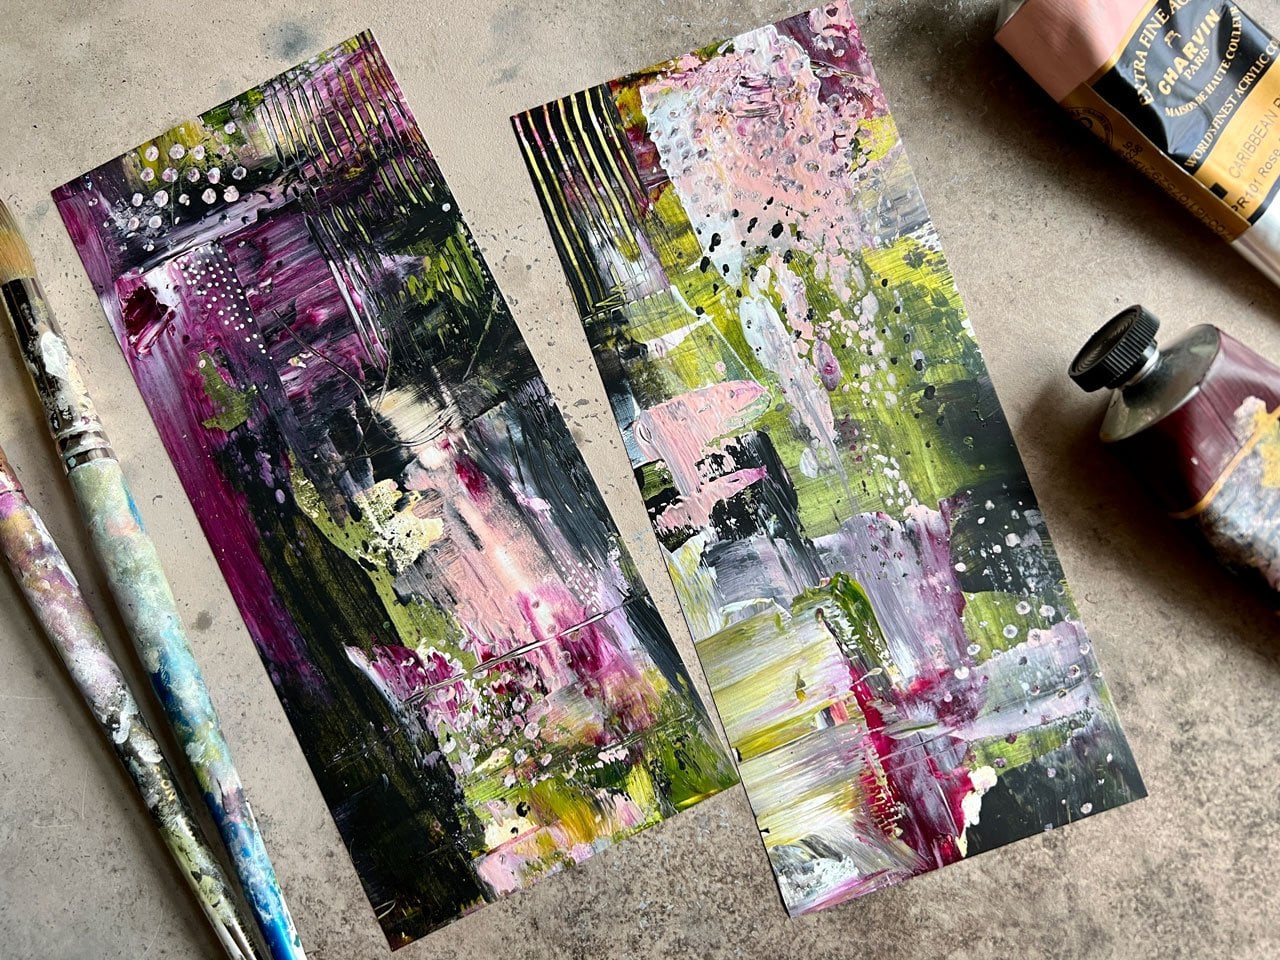
whole sheets of it. Because almost now my very favorite inspiration
pieces that I did. These were two different nine by 12 sheets that I ended up cutting up and they were
a little different, but still in a similar
color palettes. I realized as I was
cutting these up, that I want some that are more than one
sheet and a colorway. You might paint two of each colorway but
different patterns on it. Then we would have something
to maybe cut up and combine with other possible
things that we paint, or weave, or who knows, cut out some interesting
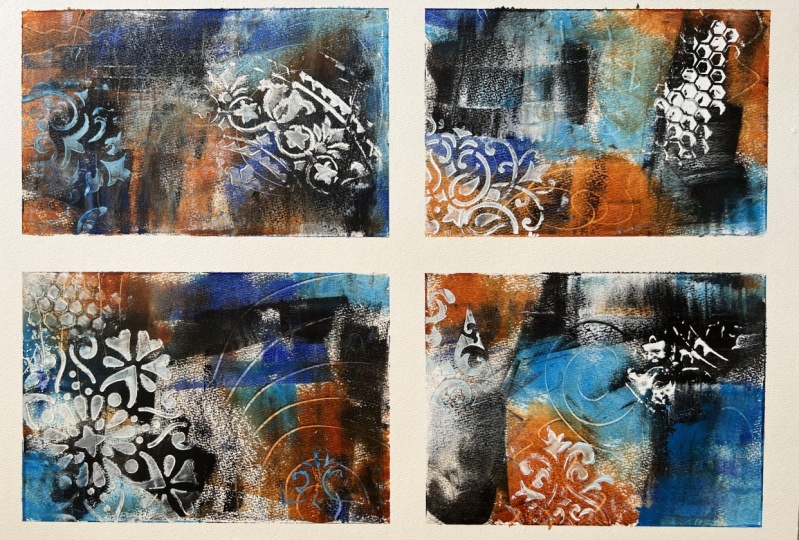
part of that painting. But I do like having
more than one because after I started cutting
this up, this right here, which let me tell you what's
the ugliest large painting was my very favorite in
the cutout pieces because it had marks and it had all these interesting
colors and that was offset by some neutrals
and some darks. In the end when I
re-imagined it into a new piece of art and ended
up being my very favorite. I don't want to limit
myself in colors. I want to have as much fun experimenting and
maybe end up with 100 pieces of paper
that we can then pick and choose from at the end. I want you to buy a couple
of pads of paper with the expectation of you're
going to free your mind, come up with several
color palettes. That's why I said, if you
find something online, that's like a little
color palette generator, maybe you have some
favorite photos that you can pull a color
palette out of. Maybe you have some favorite
books, or magazines, or interiors that you can look at for color palette
inspiration. Because if you're
sitting here looking at just a handful of oil paints, you're going to be like,
I don't know what to use. Should I mix up some
of this and this, I don't know, like
what should I do? I have 100 colors to pick from. Whereas now I'm like, I'm trying to create a brown, this cool green, a
neutral color up here, a little bit of yellow in it. Now I feel like, I've
got something to strive for and a color
palette to create. Then I can paint and mark make
and draw on and set it to the side and let it
dry and move on to the next piece without putting too much
pressure on myself. I recommend you
find something you find inspiring and use that as some color palette inspiration
because on these pieces we're looking to create a
bunch of different pieces, a bunch of different
color palettes. I want you to not get hung up on making a piece of art out of this first pieces
that we're painting. We're painting these
first pieces to give us some choices so that we can re-imagine it into
something amazing. I'll see you back in class.
4. Supplies: [MUSIC] Let's take a look at the different supplies that
we'll be using in class, and this is a mostly
what I'll be using. I can certainly possibly
spring something up on us in class just because I
happen to think of it. Let's start talking about different materials that
we're going to be needing. I do recommend when you're doing the oil and cold wax
that you're wearing gloves because
it's really messy. It's very hard to
get off the skin. Some of the oil paints are going to have
materials in it that are toxic that you don't
really want to get on your hands if
you can avoid it. Definitely, some gloves. I forget to wear
gloves to a lot of the classes when I'm working, but with the oil and cold wax, trust me, you don't want
to forget the gloves. [LAUGHTER] We need some
oil paint obviously, and it really does make a
difference on the paint. You want a better grade
paint if you can. The better the paint,
the more pigment, the more refined oil, isn't it? It just ends up giving
you a better result. I've got lots of
different brands. It just depends on who's got
a color that you like or if you've ever worked
with any before or if you're just
hitting the art store, pick something that's
in your price range, but isn't at the bottom of the line is what I
would recommend. I've got Gamblin, I've got old Holland, I've got Rembrandt, Charvin is my very favorite. It's at the top of
the line price-wise. It's got the neatest colors. But if you're in
the mixing colors, that really doesn't
matter in that respect, but I do like the Charvin. I've got Winsor Newton, I've got Holbein, and there's plenty of
other brands out there. I just went willy-nilly pick in over the years colors
that I found interesting but when it comes down to it, you could probably mix most of the colors that you wanted to mix and just start
out with a basic set. But I would start out if you could with a basic nicer set. You need some oil paints. These are traditional
oil paints. I don't recommend the
water-soluble oil paints because they're really
weird and waxy, and when you're mixing it
in with the wax they're just strange and I
don't like them at all. If you pick up
water-soluble ones, just know you may get different results.
It's not my favorite. [NOISE] Also, have a great big white because I don't know, I always seem to need white. Then we'll also need cold wax. There's a couple of different
brands of the cold wax. I am using the Gamblin
cold wax medium. There's also the
Dolin's cold wax. There may be another
brand out there, but this is my favorite. It is a beeswax and
solvent mixture, and this size can, this is 16-ounce can, this goes a long way. If you just get one
can of this stuff, 16 ounces is a good
quantity to start with. We'll also need
something to spread that oil and cold
wax mixture on. My favorite tool is the
silicone bowl scraper. It is a messermeister
silicone scraper. It's for making
bread and scraping things out of a
dough ball thing. Then also have the
silicone catalyst wedges. I've got the straight one, I've got the one
with the cutouts, and then I've got some of
these little harder ones with little cutouts on them. Then I have this
random bowl scraper but I'm telling you
out of all of those, this is my favorite and this
comes in different colors. Even if it's not orange, but it looks like this.
[LAUGHTER] It's great. [LAUGHTER] This one's
probably my least favorite. It was just a random bowl
scraper I found on Amazon. The catalyst wedges,
you get those at the art store and they're
pretty readily available. I do like the wedges with
the different cutouts on them because we can make lots of yummy marks
in our oil paint, so I love those. This is not my favorite, but it is another
option that you can use instead of
the bowl scraper. I don't like this one at all but you have to decide some
of those things yourself, whatever you got access to. Those big silicone
scrapers are really nice because we can just
keep wiping that paint off. They clean up pretty easy. I could scrape the
oil paint off of here if I wanted
it really clean. I also have some palette knives. We can put paint on
the palette knives and this is what I'll be
using to mix the paint up and then I also have a few clay tools because this is my favorite
tool to make marks. I like this end that looks
like a real sharp point. I like the end on the other
end of that one that's just like a little
scooper looking thing with comes to a point. That's my favorite clay tool but you can use a variety of sharp pointy objects and including another
thing I use a lot, especially in my
acrylic painting, is a mechanical pencil. I can use that to
draw and make marks too in my oil paint. Anything sharp, this is like an ice pick but maybe a
little bit smaller diameter. [LAUGHTER] Anything
that we can drag and mark-making scrape,
those are great. You could also use
a wood skewer. I have bags and bags of skewers over here with my art supplies. Those are fantastic. Another spreader
over here that I just happened to notice in my little stash of
supplies over here. You can use some of
these catalysts, wedges that have
the handles too, anything like that is fine. One of these things,
actually this is a new object for me. I didn't even know existed, but I'm like, "Where have
you been all my life." [LAUGHTER] A lot of
times after you've had oil paint for a while, it's almost impossible
to get the lids back off like this one. It's already on there and
I can't even open it, even trying really hard. This thing is a lid opener. Clip it on, squeeze it, and then look at that. You can get these lids off. [LAUGHTER] Greatest
invention ever. I actually have a lid over for my jars and the kitchen
too and I'm just like, "Where have you been
my whole life?" This is a little
paint lid opener and I highly recommend it. I also have some
blue painter's tape. I will be using that to tape
around stuff because I don't want to go to the very edge and have paint get
all over my table. I'd rather bring that paint a little bit in from the edge. I'm not taping these pages down, but I'm taping the edges so
I can then put these down on the floor to dry overnight
because with the oil paint, they don't dry very fast. You can't just apply heat gun to it and
dry and speed it up. You got to actually let that sit out and dry a day or two. What I want to do in class
is tape a bunch of pages, paint a bunch of pages, set those all out to dry, and then come back
tomorrow or the next day and continue on
with our projects. I want to get really creative
with the painting part, so I got lots of options
to pick from later. Another thing that's
pretty fun that I want to use possibly is some stencils. Punchinella is one of my
very favorite stencils. This is the leftover material
when they make sequins. It's metallic
because sequins are metallic and this stuff is amazing. It's easy to push paint through and then let
it do its thing. I've also got just some regular
stencils and you can just pick some up at the
craft store or you can look online
for fun stencils. I've just got a
little variety to possibly play with.
I'm a little bit obsessed with this Moroccan
feel here on these stencils. I'd like to possibly work
that pattern into something. Then later we'll see
how that worked out but basically, we can rub paint through here
using a palette knife. For instance, we can do that whole little squeeze
the paint through. Then I tried to clean
the stencil up as much as possible when I'm
doing that, but usually, when I'm using stencils
with oil paint, I tend to just figure that's probably going to
be the oil paint stencil but oil paint does
stay wet pretty long, so we can use some Gamsol
or mineral spirits. This is basically
odorless mineral spirits, which is why I like
it. Gamblin makes it. We can use the Gamsol on our little cloth and we can clean up our
stencils that way. I do like having the Gamsol. Even though it says odorless, it does have a
slight odor to it, but it's not like a
mineral spirits odor. It's just something
kind of neutral. [NOISE] I also have some other little raised stencil things that I got as a pack of
fun things at Michael's. What's fun these
are called premium textures by Craft Smart. I have a couple of
different packs of these because I was like, my goodness, these would be amazing in my oil and cold wax paintings because I can paint a
thin layer on there, and then I can dab that
into that layer of paint. That's what I love
oil and cold wax. It's a thickness, it's like a frosting. It gives us the
opportunity to use things like this to
punch a pattern on top but look at that pattern
right there, amazing. We got a wood pattern, we got a little
crosshatchy pattern here. Look at this one with
the little chevron. See little pebbles. [LAUGHTER] These you could at least have the outside chance
to getting your hands on, these are craft smart, premium texture sheets, and they were not
expensive and they are perfect for
oil and cold wax. The last time I did
oil and cold wax, I did not have these. After looking around and it's
been awhile since I played my own cold wax after looking around finding these options, see this is way more decorative. Look at that pretty
pattern there. The drawback to this is
going to be hard to get the oil and cold wax
out of that. We'll see. This is a cool pattern here too. Because even on the rubber
stencils that I have, the foam ones, the oil and
cold wax sits up in there, but these are like silicone. I feel like once they're dry, maybe we could bend
them and get a lot of that paint out of
there if we needed to. There were perfect for
what I wanted to do. If I ruin them, that's okay. They weren't expensive
and they had some really cool
patterns that I could experiment possibly
with. That's fun. I also have some
refined linseed oil, which we could use to thin down oil paint if we needed to. This goes a long way so if you have a real
thick paint that you've just had for a long time that's maybe dried a little too much, you could reconstitute that a little bit with linseed oil. I also have the Gamblin, this is Gamblin also, the Gamblin Galkyd light. This, you can mix it in with our oil and
cold wax mixture, and it speeds the drying
time of our paint. A tiny drop or two
per color is plenty. The stuff goes a long way. You don't want to overuse it. That's the three
liquidy supplies. I've got the gamsol for cleaning up the odorless mineral spirits. Then if you have the
galkyd or the linseed, we'd be able to thin the paint and maybe thin the paint
and help it dry faster. This is the dry fast medium. Those are fun. I will be
working on the projects on paper because it's easier to store paper and when I'm
done with these projects, I tend to keep them
and frame them, or keep them and
store them, or I could cut them down
to the size of a cradle board. I can
mountain to a cradle board, paint the sides, and then that's a
finished piece of art but I find that if I start off on something
like a cradle board, I get stuck myself
looking at it, thinking, I don't want
to ruin this board. I find that if I work on
paper instead of the board, I eliminate a little bit of
those barriers for myself. Because I genuinely
love to cut up art. [LAUGHTER] In the past year to year-and-a-half
of making art classes, it truly gives me the joy that I've always wanted
to have at my art table. I have some pieces that I created in the junk
art collage class. These were oil and
cold wax paintings that I thought were
just failures. I cut them all up and made
these pieces out of it. If you watch junk art collage, that inspired this class
because these were so amazing. I want to show you how I created the oil and cold wax sheets of paper that I was cutting up. Because if you're
like, oh my gosh, I love that too, I
wonder how she did it, now we're going to look
at how we did it and make several different cut
projects to go with it. Super fun. I'm using the arches oil paper comes 12 sheets per the
pad and the kind of paper that you use
is fairly important because it's already
primed for oil paint. If you're using regular
mixed media paper, you'd have to prime
that a couple of coats with like a gesso and then use it with a couple of
coats of gesso underneath. I'm going to go ahead and use the arches because I tend to stock up on any arches paper I can find when it goes on sale. Then it's in my closet, I don't have to worry about it. I forget if it was expensive or not and I don't feel
bad about using it. [LAUGHTER] But if you just got watercolor paper and
you're determined to use that, coat that with a couple of
coats of gesso and then let that dry and go from there and just see
what it does for you. I will be working
on the arches oil. I have two different sizes here. I've got the 9 by 12 pad, which is a 23 centimeter
by 31 centimeter. I also have the
larger 12 by 16 pad, which is 31 centimeter
by 41 centimeter, and because my purpose
is to cut up art, I may do quite a few on the large pieces because
there's more that I can cut up. I could do great big random
something on it and I can come through and cut out little pieces of
art out of that, I could cut up stripes, I could cut it into all
kinds of amazing things. Then this size is actually the size that I used when I cut down the pieces for my original inspiration
pieces for this class, they were on the 9 by 12 pages. You can see this size pad
cut up into smaller parts, you're going to end up with a piece of art about this size. You're not going to
get a piece of art as big as this piece of paper. So bigger paper will equal
bigger art basically, unless you collage these
together and you keep on going and then of course you
can get as big as you want. [LAUGHTER] You also are going to need something to
mix that paint on. I'm using disposable
palette paper. I've got gray and white. Some people say that
the gray matters because it shows
you a truer color. I say it doesn't
really matter to me and one day I might
change my mind on that, but this happens
to be what I got. I'm going to be using that. I'm going to mix all my
oil paints up on that and have some of these to use. You could also use
a mixing palette. If you've got a glass
mixing palette, that'd be fine for that. I just find that for oil paint. As much as I leave and come
back to different mediums, I don't want to use a
glass palette or something like that because by the time I came back to it, they'd be dry. I'd rather use a
disposable palette pad. The colors that we mix up
will stay good on there. Probably at least a good day, but the oil paint mixed
with the cold wax, mixed with a little
bit of Galkyd light, they will start to dry. If you're mixing it, try to
use what you've mixed up. If I use any collage
pieces because I do have in my mind maybe we
could collage a little. If the collage is going
on the bottom layer, I'm going to be collaging
with my Yes paste. You could also collage
with matte medium. If the collage
material is going on a layer that's already got wax down and it's
going on top of that, then we can simply use our cold wax medium on the
top and bottom of that and sandwich it in between the cold wax and that will
be the glue for that piece. Just thought that'd be fun. If you want to experiment
with mark making, definitely anything for mark
making that you want to do. I like these water-soluble
graphite sticks I could mark make with that. That's something fun and new, so I'm still excited about it. You can also add
pigment or powders, any of your mica powders, graphite powder,
colored pigment, you could add those in
with the cold wax and make a layer with those powders
rather than oil paints. That's always fun
to experiment with. I'm just trying to
give you lots of options on what you
could be doing. That's basically most of the supplies that I'll be doing, I'm not trying to
create in this class a masterpiece of art
on the first paint. What I'm trying to do
is just create a bunch of sheets that are
going to be the base for possibly other
pieces of art when I cut these up to
create those pieces. Super fun, it takes
the pressure off. I'm not stressed about
composition and color, and did I get it right or not? Now I'm playing with
interesting marks, what colors do I like, let's get these pagers filled so that we can
let them be drying. I can't wait to see what
we create in this class. It may spring something else on you in class if I think
of it as I'm going, but that's the majority
of my plans right there. Let's get started painting. [MUSIC]
5. Overview of Techniques: Now, let's take a look at some different things that we
could do with the cold wax. These are some very
old cold wax pieces. I'll be honest, sometimes
when I'm making art and things
aren't working out, I get frustrated and
I'll put this down for a long time and not come
back to it for a while. But I'm so inspired by
these pieces that I made in that junk
art collage class that I'm like, whoa,
whoa, whoa, whoa. Now I'm so excited about these, I want to come back to
cold wax. You know what? If I hadn't done those, I might not have picked the
cold wax up for another year. Who knows? Because this did not turn out
the way I wanted. These are a bunch of old ones. But I wanted to
show you how to do the cold wax so that even when you come up with
the ones that you're like, oh, it's terrible, now you can do some really
cool things with it. What I like about it
is it's very thick. It's very textural, it
has a different look and feel than acrylic paint. We can do so many things with the wax and then let that dry, the oil and cold wax, that's what I mean, but look
how terrible these look. But what I want you to notice is now we can
experiment with color, we can dig into it
with our sharp tool. What's really cool is even no matter how long
these are dry, I can come back and scratch through this
and make more marks, and so how cool is that? We could scratch back underneath
layers and reveal color. What we could do is we
could add a color and we could add another color and
we could add another color, and because of the
way the wax is, we can basically add
those colors on top of each other while
they're all still wet. You will get to the point
where you're like, okay, I've just got too much going on here and now I'm making mud, so then you'll have to stop, put that piece to the side, maybe let it dry overnight, and then come back
tomorrow and continue on with whatever your idea was. But I really like once it's
dry, we can come back, scratch, mark-make, so maybe while it's all wet, we're not doing all
of our mark-making. Maybe we'll come back and mark-make while
they're already dry. These have been
dry for two years. That's about as drying
as it's going to get. It's because it's wax, we just have that
opportunity to come back and continue
working on things. We could also come back
and continue adding more layers of wax
on top of old wax. There's nothing saying I
couldn't take this up and continue adding more paint and more paint and more paint. Even though you have a
piece that you're like, oh, I don't like that, it's terrible,
that does not mean that it's ruined and it doesn't mean that it's done. You could come
take that back up, keep adding more
layers of paint later. Come back when you know new techniques or you
have new ideas. These you can keep
working on forever, and so I've got lots
of scratches, layers, mark-making, dragging through it with my palette knife
and scraping bag. What I really like
also to do is when it's dry but not dry to
the extent of these, like next day dry, then it's still not
fully cured basically, you can come back and scrape paint back off and get
fun scraped areas. That's super fun. That's one of my favorite
things to do actually, is to come back and do some scraping back and get
those colors underneath. If this looked like it
was painted on top, it wasn't, it was scraped. This blue was scraped off and this was scraped
off the next day, and this was a lot of scraping. See, sometimes the
scraping works great and sometimes
it works terrible. These little dots here, that's where I took
something that had dots on it and
just pressed it in. That's where I was
talking about these yummy plates with
the texture on them. We can compress that
in and make a texture. You got do it when it's wet. I did it with something
that had dots on it, but that's where
these come in handy. We can just tap that right in and get a texture or a pattern. I love doing that. That gives you a really good three-dimensional layer to that, that I don't like
this whole painting. When I started scraping, I felt like I ruined it. But definitely, if I start
cutting stripes out of here, I can see very
exciting little areas. I also could have taken a viewfinder and came back
and cut pieces out of this, which when I was creating these, that wasn't on my
mind cutting up art. That's really just become
a real true love of mine in this past
year-and-a-half or so. But I could come back now
and look at these and say, is there anything in
there I'd like to save even in this one, like maybe something
like right in here? I didn't like this whole thing. I think why I like doing
that too is because I'm a photographer by nature. I love to frame things up in my little viewfinder on my
camera and take that photo, and you can't really do that
when you're making art. You're just putting
everything down. You're trying your best to
get the composition good. Maybe you're doing
abstract and you're not really thinking too hard about
it and when you're done, you're like, didn't work out. Now I can come back,
frame that out to an exciting piece and say, oh, I love that. Then let's re-imagine
the rest of this. We may be doing that. If you end up with something amazing, we could definitely end up
with something like that. Here I've got just some
different marks and scribbles. They're harder to
see in this piece, but there's some twirly
lines and some scraping, and overall it's a failure
as a piece of art, but I can see some
different strips that would be super
cool, a lot of this. Then here we go. I'm
just layering stuff on. I've still got the tape on it. I thought this is
not going anywhere, and now I don't even want
to look at the wax anymore, so I'm just going to give up. Look how terrible that is. But I did one in those pieces I like so much
where it was brown and blue and blue and brown. That came out gorgeous when it was in stripes and
little pieces. Now I'm like, okay, maybe I could do
something with this. Again, not successful in
my mind, not successful. I was actually trying to create really beautiful
pieces of abstract. Now I could come back. I do see pieces out of this that could be amazing if I cut that out in a strategic place or I definitely got some
colors and marks in here that would make cool pieces of my
re-imagined cut up pieces. Lots of marks going on. You can see I've experimented. Here, I did a
little half sheets. You can do this too if you
don't feel like you want to do whole sheets
like I'm going to do. You could do little half
sheets and then end up with some fun things that you
could separate and cut out. I actually fairly do like these, but I think I could
like them even more re-imagined in some pieces. I also used some stenciling. Let's see if I've got
any stencils in here. Also use some stencils. I must not have brought one in here with some stencil work. I also used my stencils
on a few pieces, so I'm going to
definitely do that. Today we're going to do
a little stenciling, maybe with some punchinella
or with the direct pattern, and we can just do with
our little palette knife, and we could scrape
paint right through it. I mean, I could even
do it on this one just to show you how
that's going to go. Then we pick up our stencil, create three-dimensional
marks that we can end up with there. Super fun with that also. Then again, I would definitely
keep a paper towel handy, and if you've got
any on your knife, just keep your knife clean there and then set
that to the side. Super fun with stencil work. Now, the stencil work
might be an option that you need to come
to on the second day. After some of this has
dried a little bit, do the stencil work, let that dry for a day and then come back and
continue to work on it. Oil and cold wax is a little different than a
traditional paint medium because we're having to let
these layers dry in-between. Oh, here's the stencil work. That's what I was looking for. That was fun. I had a red, white, blue thing go in there. Not sure why I thought
I was going to like that in a piece of art
because I really don't. I think I was going
for red and teal, that red and teal combo, but it just did not work
out the way I wanted. If this were in other colors, I actually think I would
love this because I like the way this goes off like that. It's almost like you
had one of those firecrackers pop off
and went that way. I could see myself liking
this in other colors. I don't like the
colorway I picked. But I can also see stripes of this actually looking amazing. Or if I came back and cut
out a section of this, maybe I'd like it better. I do like the composition, I do like the stenciling and the mark-making in the layers. I don't love the
colors that I picked. That's the problem
I have with that. But I have lots of
little half sheets. I have some that
are total failures. I was trying to do opposite colors like red and
green and stuff like that, but I just thought
that was just awful. But see now, I could
have just kept on layering on top of this, so it wouldn't have been a total failure if I had
just kept working it. At some point though, I just get tired of working
the same thing and then getting frustrated with how it turns out. But you know what? With this workshop, I'm super excited because we're going to paint
some fun stuff and I don't care if
it turns out good or not because
that's not the goal. The goal is to create interesting patterns,
interesting marks, interesting colorways, and if I don't love it
when I peal the tape, I can then cut it up into more interesting pieces
that I will love. That's the goal. Because I have a different
goal in this workshop than I had originally when
I was doing oil and cold waxes a
couple of years ago, I really think I'm going
to love this so much more because now I have fun ideas that we can do in this class. I'm thinking of a
weaving project, I'm thinking of a
striped project, I'm thinking of a
collage project. I'm just thinking of so many different things that
we could do with this. I'm thinking of paint
the whole thing, cut out the parts
we love project. I feel like the ideas are just flowing and
flowing and flowing, and I'm really
excited to hop back into this medium because I
love the oil and cold wax, probably the most out of
some of the different things because I have a
couple of artists that I follow that I'm like, I love their work so much. I've got a few pieces
collected here in my house and I've wanted
to paint like them, but maybe I didn't
quite get there. But this is maybe
my way of utilizing that art medium and being more original than copying
somebody else anyway. I have taped up a bunch of paper and I tape it up
because I can then touch the edges without
getting stuff everywhere. It keeps my table
clean because I'm now not trying to get
paint off all on the table and I can throw it in the floor and let it
sit overnight and then pick it up
tomorrow and not worry about getting my hands
on the paint areas. These are the 9 by 12. This is that bigger, I think 12 by 18. I think is that bigger size. But I went ahead and I thought, let's do just some
small ones and then we'd be ready to
jump into the big ones. Now that we've looked at all the different ideas,
scraping, scraping back, layering using stencils, we're going to actually
get into painting a couple of these and just
see what can we end up with? How can we start it? What can we do? Then that'll get our feet wet for doing the larger pieces. I'm going to see you
in the next video, so let's start some samplers.
6. Mixing Colors: Let's start out by
mixing up some colors. I already told you
that my inspiration for some of these is going to be my in the mood
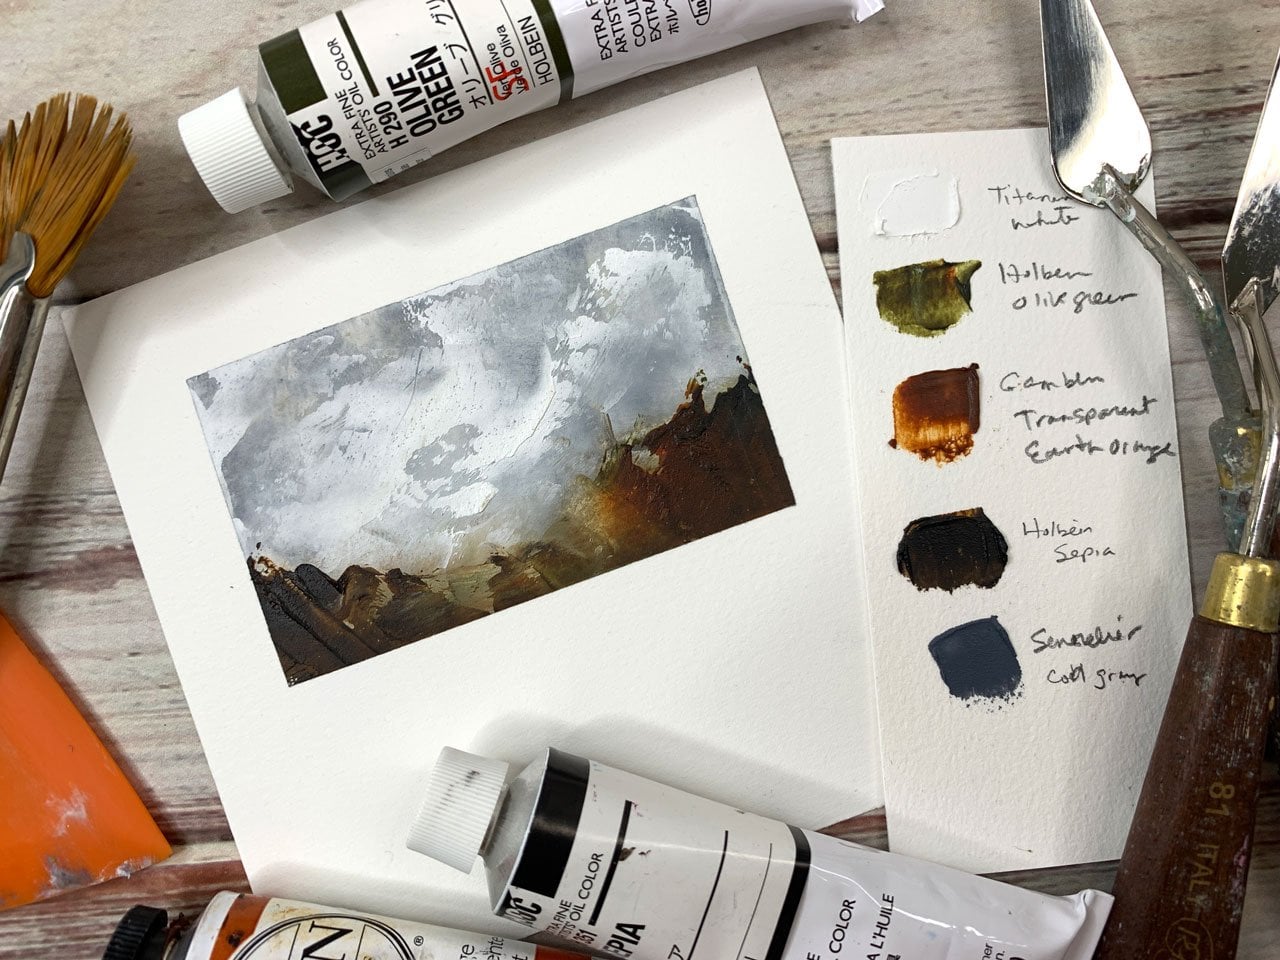
for coloring book. I really loved this blue
and gray, and sepia color. There's also a little, tiny bit of a rosy or a peachy tone that could be like the dirt possibly in there, so I could actually pull in some color similar to
that if I wanted to. Let's just take a
look at the colors. I was trying to keep the book in here while we
were mixing colors. Let me just move this over here. Then we can still see our
picture while we're doing this. I told you I had a jar opener, a lid opener downstairs
in my kitchen. Let me tell you, this is a hand saver because if you ever set your oils down for any length of time
and you come back, these lids are basically glued to the container and
they will not come off. I have this little one made
by Golden to open paint lids. But if you get the bigger
one, this lid is too big for that little thing
and this thing was definitely glued on there
and I couldn't get it, so I went and got my
lid opener and that saved my hands
because then I could just get that open. If you've got some bigger
lids that this will get, get one of those that's
got different lid sizes and gives you some hand
grip, total hand saver. I might not have cared about
that when I was younger, but now that I'm
old, it matters. This transparent Earth oxide, that could possibly be
that color in there. If I'm looking at those colors, Prussian blue, that's
a good choice. I'm trying not to go out
and buy more oil paints. I've got plenty of colors over here if I needed to mix stuff. Indigo, that's actually
the color I was looking for and couldn't find. See how easy that
makes that to open? Indigo, do we want
indigo instead? I'm pulling indigo.
Let's do indigo. I'm pulling Indigo,
Prussian blue, indigo. Maybe a little bit of both. I'm pulling indigo,
that's the one I wanted. Now I've already
got that lid open, but we'll close it back up. Let's do some Earth oxide for this dark color I
can see in here. I'm going to do indigo
because I wanted Indigo. I do have a creamy
color in here, although this doesn't
really have any cream, so maybe we should just
leave that creamy color out. This is sepia. I thought the sepia
could go in there for these darker tones and could mix in with this dark color too. Then I got white because
that's very white. Really we could pull a gray in because there's a lot
of gray in there. If I want to make it gray, I could do that with black
and white obviously. But I've also got some of
these little grays here, so might as well
pull a gray out. Why not? This is Gamblin
transparent earth oxide. This is Winsor & Newton Indigo. This is Holbein sepia, and this is Old
Holland warm gray, and Winsor & Newton
titanium white. I would recommend, if you're going to buy colors, get the big white and
the little colors because you can do a lot of
different things with these. What you want to do, if
you're going to mix colors, let's say you want to mix two of these together to make
some other color, usually, I will do that
before I add the wax, and then I can do all my oil, mix them that way, but
you don't have to. You can mix them all
up and then you can mix it with the wax if you want. Then you can mix different
colors out there. There's a lot of dark in here, so we're going to maybe lighten some of these up
with that white, maybe. That gray is so pretty
I can already see it. I think it's feeding into
my graphite obsession, if you've watched any
of those classes. It's like a graphite gray. I've got my paint can opener. I've got my little thing of
cold wax that I just opened. See, the wax is a beeswax
and solvent mixture, so it's very soft,
it is very pliable. You want to mix
about 50 percent wax to 50 percent paint, and that's not real exact. The drawback, if you add, say, an absolute ton of wax
to very little paint, is the wax could
eventually crack. Too much wax and you have that
it's-going-to-crack problem. The ratio is usually 50
percent or less of wax. But I'll be honest,
I get real liberal with the wax and
sometimes I follow that and sometimes I don't follow it as much as maybe
I had planned. I've got Galkyd lite here, and that is our mixture that
we just add in a drop or so because it is going to make this mixture dry a
tiny bit faster. If I just go ahead and maybe get a little bit
on my palette knife, I can drop a drop or two
in which let me tell you, much easier than pouring
it on because I guarantee, you pour half that bottle
when you didn't intend to, and you just want a little bit. Everybody is going to have their own formulas for mixing stuff so if you've got a formula
that you like, you go for it. There's a lot of forgiveness here with
this type of thing. You don't have to be
exact to what I'm doing. Once you get all
your colors set, you've done any mixing
that you want to mix, now we can just add our wax in. I have, over here, a
roll of paper towels because I want to wipe this
off in-between each color. I want to keep the
colors pretty pure, and I'm mixing just a tiny
bit to get started here. I want you to mix a little and then paint some and see
how far does that go. Then what you could do
is if you're painting several paintings in a
day like I plan on doing, like I want to paint
lots of paintings today, some of them may end up being masterpieces and then
that would be fantastic. But that's not really the goal, and I'm not going to be
upset if I end up with no masterpieces
because my goal is to re-imagine what we paint
today into something I love tomorrow or the next day. Go ahead and just mix
these up really good. If you're doing more
than one painting, lost my train of thought there, pick all of the colors out
that you plan on using that day and mix those
in the morning. You don't have to be
mixing paint all day. You can just go ahead
and mix them up. They're not like acrylic paint. They're not going to dry
before you get to them, unless you're waiting a
month between paintings. But if you're painting
a bunch today, just mix all your colors
up in the morning. Now because I'm just wanting to show you how to get started, I'm just going to start off
with the first set of colors. Go ahead and clean off your palette knife in-between
what you're doing. You're going to use a
lot of paper towels, so just get a whole roll ready. I just don't even
worry about it, I'll go ahead and use what
it is I'd like to use. I don't use my good
microfiber clothes for this because
there's no way to wash that oil paint
out of there. I'd just be throwing
these away and I prefer to be able to
keep on using these, washing them, and using
them with the old paint. I'd definitely ruin those,
so I don't use that. I definitely use shop
towels or paper towels. The shop towels are my favorite. They're little more
expensive, but they do soak up things really nice. But if you've got paper
towels from the Dollar Store, anything like that,
that'll be just fine. Now we are ready
to start painting. That was about 50 percent
wax to 50 percent paint and a drop or two
of the Galkyd lite, which is going to
help it dry faster. If you do too much Galkyd lite, it gets really weird and
waxy and it's yucky, so be very sparing with this. If you need to get
a little dropper, so you can drop them in, or a little knife like I was, you could just add
a drop or two. I have found that the
easiest way to control this. Then we are ready to use our bowl scraper
and get our paper out. I will see you in
the next video.
7. Sampler - Layering Colors & Stencils: Let's dive into making
some samplers here. If I run out of paint, I still got all my
paint colors over here on the table so I can
mix up a little more. I'd rather you mix up
too little than too much and re-mix a
little if you need to. Because if you mix up too much, you got a ton of paint
you just wasted, and oil paints are expensive, so it's better just to use
what you can that day. Have a junk piece of paper or
a junk cradled board where you can just put that
extra paint on because those junk boards actually sometimes end up
being my favorite. In my case today, my junk board is going to be probably one of these larger
pieces of paper that I can just smush paint on because I just want to use
up all the paint that I can. So I'm going to save
a piece of paper to the side as the junk piece. The junk piece is still
going to be used in a cut-out piece of art
so it's not going to be a trash piece per se. I'm just calling it junk because the leftover paint at the end of the day that
we'll want to do that with. Now a lot of times
you're looking at this and you're thinking, "It's a white page,
what should I do? How do I get started?" I like to just get started
scribbling on my pages, and you know what
if you do these and you end up with
four masterpieces, feel free to keep
them as masterpieces. You don't have to
reimagine things. But I find that if I start
off this project with the idea that I'm
going to cut it up, and I don't care
if it's perfect. I'm not going to be upset. If it didn't end up the
way I initially thought, then I take the
pressure off myself. Now I'm like, "Does it
matter if it's perfect?" No, it doesn't matter
if it's perfect, so I'm okay with that. Then let's just start making for little abstract so I can
start off with any color. My inspiration right now is
still our Swedish heritage. Blue and gray, and white book. I've got that
sitting over here to the side so I could
look at it if I wanted. Not trying to really
create that exactly. I was using that more
as my inspiration. But I can definitely refer
to it if I'm thinking, where do I need to go? What colors do I need? Let's just go with some
four little abstracts, and this is how we apply the paint a little
bit on my scraper, and we're going to spread
it like it was icing. Like we're icing a cake,
and with abstract, especially with the cold wax, I don't want them all
to look the same, so I'm not starting in the
same spot on any of these, so let's just start in different spots and just
work that wax around. I don't want it super thick, so I'm working in thin layers, and then if I've got paint on here that I don't
want to be on here. I can scrape that off with
my scraper and save it. Like don't have to
waste all this paint. So that's a lot of paint. I could put that right
back on my palette. I'm ready to pick
up another color. So maybe, this indigo, let's see what this indigo and I could mix these if
I need them whiter, I could have mixed
in with the white. I do love this yummy deep blue for some reason it's
such a yummy color. Is it going to show up next to these other colors?
I don't know. We'll see. I'm just
going to work it. I'm just going to keep on
going adding some more colors. Let's do some of this white. The white mixed with
the blue look at that. I didn't have all the
blue off of here. So I got a lighter blue
genie color. That's fun. I actually like that, so I'm
just going to go with it, and you'll see if I pick
up other colors of wax. This is all wet. It's
not going to dry like an acrylic paint and you're going to be working wet on wet. You're going to mix
up some colors. Maybe you're going to see some of the underneath mark-making. If it bothers you, like for white to be
mixed up with say, the brown and the blue
and the stuff like that. If you think, that
would drive me insane. Start with the white and work your way up to the dark colors. Go back to your
painting basics there, and whatever is the lightest
color start that first. I knew that I was not trying to get the white
to truly be white, and I'm okay with the
colors mixing and doing some super fun
stuff here on my palette. So white was not my goal. If white is your goal, start with white so
that it's still white. Otherwise, you're going
to be mixing it with other colors like
we're doing right now. I like how that mixed in there, and some of the way that I like this mixing is especially
with this wax is I can just drag this right
on top of a section, really light, just
lightly dragging it, and look at that super yummy
texture that just gave us. Let's just drag on here. Look at that oh, my
gosh, that's gorgeous. That's the moments that make me excited when I get
a piece like that. So yeah, keeping it
white, not my concern. But if you do want to
keep your colors clean, you can scrape this off between the different colors
that you're adding on here. Now see this transparent Earth is definitely a bright
pop or something. I don't know if
that's good or bad. Let's just reserve
judgment there for later. Because weirdly enough, some of the ones I thought
I don't like that. When I cut up for that piece
that I was showing you, there's some red
and some blue and some little tracks of color
in there then I'm like, those are actually really pretty little surprises
that I did not expect, and when I cut that up and re-imagine those
in those pieces, I'm like that turned out amazing and I wish I had worked more of those pieces now, and who knows how
I even made those? That was so many years ago. I don't know what I did. I don't know what those
colors were, how I did that. You're going to have
that too you're going to be like, how did I make that? Let's just scrape some of
this paint off of here. That down in there, let's see. Still got plenty of
spaces to put some color in like in this blue. I need my table to
be a little bigger. I always need twice as much
space as whatever I have. Even if I had more space I would need more space. It's never going to be enough. I used to own a
great big studio, but now property prices and everything are so
insane that I'm like, "Okay, you've just got to
make what you got work." I keep reinventing
my spaces here, trying to make everything still work that I got
because I'm like, "Well, you're going
to be here 50 years." See now that's pretty.
I'm feeling that. That's a little bit of what's so good about the colors
still being wet too. Now, I can very lightly
do some dragging, and dragging on top of that
just ended up super cool. Look at that. See,
I'm feeling so much better about sitting
down and playing with wax than I've not felt the first couple of
times or many times, the first many
times I've done it. Now I'm like excited again and I'm just like
ready to revisit this. Sometimes you just got to get past all the years of struggle to get
to the years of joy, and I feel like that's
what I've done. I've got through all those
years of really hard struggle to get to the joy
that I now have it at my art table and that
I hope comes across to you as a student that this
doesn't have to be hard, it don't have to make you mad every time you sit
down to do something like I have this desire to create and I'd sit here and I'd be angry when I'm at my table
because nothing amazing, it's coming out of it, look at that as my base right right. But yeah, it gets so mad. Not be like, "Why do I
even do creative stuff? Why do I even have a
creative business?" I hate everything. I hate everybody. But now I'm like if
hitting working out, does it matter? Not really. I'm just pushing color
around, and when I'm done, I can cut it up and make something that I'm
going to love, so let's just not worry
so hard about it. Let's put some more
of this orange oxide. I feel like I'm
getting to the point where I want to
do some scraping. I've got enough on here. I'm going to start
doing some scrape back. Now I know this looks nothing at all like my inspiration photo. But that was not the goal. My goal here was not
to create that photo. My goal here was to be
inspired by the color palette. I'm not trying to
copy or recreate or do a master study like I've done in the past
and other workshops, my sole goal is to create using a color
palette I find inspiring, and if you start
with a color palette that's already out
there that you're like, "Oh, I love that." It's a lot easier than
starting from scratch. I never would have come
up with these colors. I would not have
created this piece of art on my own if I
just thought up, what colors do I use? I love being inspired
by color palette, even though when
I'm creating it's not going to look like
what inspired me. I'm going to start mark-making. This thing has a
nice little edge. It's not super sharp,
but it's a nice edge. If we just slam that
down into our paint. We're going to get some really
beautiful lines in there. Let's see if it'll focus
on that so you can see it. We'll get some really beautiful
lines in there. Love it. If once you're doing like
a little set like this, or setup too like larger
ones if you do like a different element
and you're wanting to all go together but still
be slightly different. I could have made some darker. I could've used some lighter. I didn't have to
have them really all the same color tone
here is I finished, but use some of the
same elements too. That's how we end up making a series where they look
like they go together, but try to put that element in different places on each piece. I love that. Now what I
love about the silicone is once I think I'm
done getting paint, I can just wipe the paint off and that's how I clean that. I don't worry about
paint up here. I could scrape that off if
I wanted, but who cares? It's actually pretty up there. I wish that was on a pilot. I can hang on the
wall because that's a really pretty look there. I could also take my
mark making tool, and now I can come through, make some favorite marks, and if it were thick enough and there were colors underneath it, I would see some bleed through of maybe the
colors underneath it. I may just see that there's a scratch there and white paper. I may have to look in the light and see that there
were scratches on that. Just some ideas for you. Start scratching
in favorite marks and lines and patterns, and let me tell you,
you might get so excited at these pieces
when they're dry. I'm really feeling one of these is amazing and I
might not cut it up, and we'll reveal that
when we peel the tape. Once you do some mark-making, we could go ahead and do some stencils
lying on top of this. Let me get some pieces here. I got a couple of stencils
over here beside me. Let's see if there's
anything in here. I got these just in
a random piece here. This right here was a
lot of little pieces, I believe in this big thing. But it came from the
crafters workshops. That's a really good spot to get stencils the
crafters workshop. StencilGirl is also a really
good place for stencils, and this was a big
stencil that I cut into the little pieces because there was a
lot going on here. Look at this stencil
that's pretty cool. These were more like grunge, and I liked to the grunge, so I thought, grunge might look good. This is really nice. It's like a punchinella but it's uneven and it got
some variations, whereas the punchinella is
all circles so I like that. I also like this stencil
that looks very Moroccan. But I don't know that I
want to make this Moroccan, but maybe we could if we wanted. I've got a whole
box of stencils. As I'm making different
little pages further on, I maybe using some of
those stencils for that, whatever it is I come up with. But let's just try one of these. Let's try this one. Why not? Let's try this one. This one just looks like, I don't know if
something's smudged, some smudgy paint drips,
something, maybe. Maybe I want that right
there. Let's just see. You could do it in any color you want because it's
already so thin and I don't have so much
paint on my Canvas, my paper. I do still have
the flexibility at the moment to steal
layer this on top without it
making a big mess. But I'm pretty much done with what I could do on this one I think after I put this on here, because this is thick
and we'll have to dry. It doesn't have to be perfect. I don't have to fill
every nook and cranny, but I want to get as
much on it as I can, and I've run out of white, so I'm just going to go for it. Let's just see what we get. If we don't like
it we can scrape it off and we can
paint on top of it. Look at that. That's
really cool. I love it. I love that. What
you might do while your stencil still has
the wet paint on it. Go ahead and wipe
that stencil off. Let's go ahead and
clean it off now. You don't want to wait
and let that dry. You're basically going
to ruin that stencil, but it doesn't matter if
the stencil is dirty. I just don't want
any thick paint left on it and there we go. That's how I'm going
to clean the stencil. I don't care about the
extra color on it. I just want the stencil
itself to be free of heavy paint.
How cool is that? Super easy to clean
your stencil? That was fun. We
could try some of the other stencils on
here if we wanted. Just to see what we get, maybe we'll do this punchinella. Even though I said if you're
using an element on it, see if you can use the same
element on all of them. You don't have to. Maybe the
element here is stencil. But I actually am
a little obsessed with how good that just
looked that Punchinella did. Just go ahead. Look
at that. Oh, my gosh. See, punchinella, everybody
needs punchinella. That punchinella is amazing, and it's a really good way to use up the rest of
our paint here.
8. Sampler - Finishing Up: Because I can just scrape
that right through. I can scrape it
along my stencil. My stencil is pretty clean. Look at that. Just get a little of this
here. How about that? Look at that. Again, you just wipe off that
paint while it's still wet and just save your stencils. Then any leftover will just dry. Look, they just wipe off. Look how easy that
was to clean that, but you can only do
it when it's wet. We have done stenciling. We have scraped through. We have pounded a
shape on there. So be creative. What are some other
shapes that you've got? We can use all stuff
to make a shape. Maybe different palette knife. Maybe any other sharp objects. Maybe any other sharp objects. Maybe the bottom of a jar. Just be creative. Maybe the top of a jar. Look at this. I've
got one of these. I've got a little circle. Look, we could go down. While it's wet, we still have enough paint on there to
create a shape or many shapes. This is stuck in my art room, so I'm not really careful
about being precious with it. Just wipe the lid back off if
you use a lid or something. You don't want to use your good kitchen glasses
or anything like that. But maybe the lid of a jar, the lids of something,
make some circles. Because we can press into wax. Now, this will have to dry
at the minimum 24 hours, maybe even more than that. I'm going to take
my gloves off for a second because
I'm going to peel the tape just to see
what did we get? My hands are clean, so I'm trying not to get oil paint all over
my hand as I'm peeling these because there
is paint on that tape. Have a spot to throw the tape because I don't want
to get the paper wet dirty after I do this. Just because I'm painting
junk pieces in my mind, what if it's the perfect, most magnificent masterpiece, the best things
I've ever created? I don't want to
ruin it by getting that paper dirty until I decide, not a masterpiece. Look at these. Oh, my goodness. Look at these. Maybe I do have
masterpieces here. Oh, my goodness. Look at that. Look how gorgeous these are. What I love about these is they don't have to stay
the way you painted them. Because look at that,
if I go this way. Look at those. I love this one. Oh, my goodness.
I love this line. Maybe out of this, if I have two that I'm like, whoa, maybe I keep those two. Maybe the two that I'm
like not so whoa about, maybe those are ones I
re-imagine into something else. But I love the colors. I got to tell you, I
actually a tiny bit doubted myself going
so dark and not really matching
my inspiration as closely as I was actually maybe intending,
but not really. But look at that. The inspiration that we went from to the art that we created. Because I was not so invested
in making a masterpiece. I think that's what allowed
me to actually create a couple of pieces that I just
found completely amazing. I'll be honest, these two
I find completely amazing. Definitely, I'm
going to keep those. These two I'm like, oh, that's pretty good. But I'd be okay to cut that up. So if you want to try
this particular colorway, grab those colors
that we started with and some punchella. That's amazing. Indigo
paint with the punchella, look how great that is. You may end up with something
don't even want to cut up. We're going to have to
throw this in the floor and let this dry for a day or two. Then if I want say, keep two of these and not
keep the rest of these, I can varnish these with game bar or I could
put another layer of just the clear cold wax
on top to protect it. If you have pieces
that you love, after doing some of this, feel free to not cut those up. Those are going to
be two pieces of art right there that
I'm like, whoa. Let me tell you too, some
of my loving these may just be constant art practice up here in my art room
so that you end up just working more
and more and more, and you get techniques
that you love, and you're just getting
better at freely creating without thinking
too hard about it. It just gets easier, really, the more you're
your at art table. I can definitely see myself
creating a ton of art out of this workshop now that my very first samplers
were so amazing. The reason I wanted to do
these upfront was to get all the different techniques
to try that I'll be using on pages going forward. Definitely I like
scraping things. Definitely, I loved
a lid to stamp into. I really loved
both scraper lines that I stamped into those. Those three elements right
there just made these amazing. So go ahead and
slice up a piece of paper into fours with some tape and pick
out a color palette, or two, or three or five. Start creating some
little pieces just to get used to mixing the wax, working with a color palette, the different techniques
that we're going for. If you're wanting
to scrape back, then you need to let that dry until tomorrow and
then you could come back and maybe add a
little clear wax to it, which will soften it up and then you can
do some scraping. So lots of different
techniques that we utilized today that create
these but super easy. None of the stuff that
I just did was hard. I really like how easy it was. Also what I like was
I did not try to cover every 100 percent
part of the paper. There's one or two spots here that look a little
bit like white paint, but it's maybe the paper
showing through underneath. You don't have to cover the
paper 100 percent either. So another little texture popping through is
a little tiny bit of that paper, and
I love that too. So paint some samplers. I want you to paint several of these,
different colorways. Start testing stuff out and then we'll get
to something big. I'll see you back in class.
9. Cleaning your stencil: Cleaning your stencils. I do talk about this a little bit each time I use a stencil, but I just wanted to show you how I'm going
to clean my punchinella, so that it stays fairly good for the next time
I want to use it. The oil and cold wax, it's really easy to clean off. I'm not looking to necessarily get all
the color or whatever. I just want it to be a clean
enough stencil to use it. Going forward, you want to do
this right after you use it because the oil and cold wax is still wet for quite a while. It's not like
acrylic paint where it's drying almost immediately. I just take a paper towel
and another paper towel, and just clean that paint
right off of there. Now, it's ready to
use over and over. I do this with all my stencils, even the ones that
I use like this. If I'm using them with
the oil and coal wax, I'm Just real careful and
just clean any paint off. That is a good way to
keep your stencils clean enough to keep
using them going forward. Do clean your stencils off at the end of a
painting session. Don't leave that
a couple of days, all that paint
will dry on there. Then same thing with the tools. I just take a paper towel
and clean those off. I don't care if there's leftover paint residue from
the last painting session, but I do want them to
be clean enough and maybe just pick out the edges of your silicone things
so that you have enough tooth there to drag the next time you
pull this out to use it. Because these are
silicone tools, they just wipe off. Then above that, any paint
that you have leftover, you could scrape that
off if you wanted, but I don't even care
that it's there, so I don't even bother. Be careful with anything
sharp that you're using on your tool because
you'll scrape it. But I could scrape
these off with say this other side
of my clay tool, and you can see that paint
just comes right off, but I don't even care that
it's there, so I don't bother. I just want the edges clean. Just a little note
there on cleaning your tools as you're
going, do it every day. Don't leave them
overnight for a couple of days sitting with
stuff all over them. See you back in class.
10. Sampler - Pigment & Collage: For this next
little set of four, I'm going to do another
set of four because I want to introduce you to two
other little techniques that we didn't talk about in
the mixing of the paint or in the first sampler set. I want to do one more sampler
set to introduce you to two more techniques
and then we'll start painting larger ones. l'm actually wanting
to be inspired by this poppy photo and I'm
assuming it's a poppy, it might be something else. It looks like it's got
a really deep gray. It's not quite indigo, so I'm actually going
to use a warm gray, this is by Old Holland. I like this yummy, lighter pink, so I'm going to go with this
blush tint by Sennelier. There's a green in here, so I'm going to use Terre
Verte, Winsor and Newton. There is white in here, so I'm going to pull the big
thing of white back out, which is already over here. I got some sanguine
powder in my sketch box, so I don't know what to do with sanguine powder,
but I thought, you know what, I
did not show you how to mix pigment in with wax. Let's mix this powder in with wax because it's a yummy color. Then we'll have a pigment mixed and that's my inspiration
color palette. Let me tell you, part of these not working
out for me in the past, have been me not
knowing where to start with the colors and pulling random things and going, oh, I made bad choices. This picking a color palette from a book or a photo or
something you find inspiring, really made that last set go so much faster and easier that I couldn't wait to
paint the next set instead of being angry
here at my art table. It really does make the
whole process move smoother. I've also just pulled a
couple of old book pages and a piece of old lined
paper because I thought, what if we do a tiny bit of
collage work in this set? Because we did not talk about
collaging in the other one. Got a little stencil here. This one is more of
the harlequin pattern, those little diamonds, so l really like that. Maybe that'll be what I stencil with the sub-sanguine powder. I'm going to go ahead and
get these colors mixed. I am keeping it simple
for myself and not like mixing a bunch of colors up separately than they're
coming out of the container. But again, if I were going
to mix a different color, like if I wanted to make a gray and I didn't have any gray, I would take white and black
and mix those together first and make my gray. Then I would add wax to it to make it the
cold wax mixture. Let's go ahead, got
my wax over here. This stuff lasts a long time. If you ever get wax that
looks super grainy, like this is super smooth, you can see there's no
little grainy dots in it, if you ever get some
of the wax and it's really grainy, that's bad wax. You need to just close
that back up and return it or contact Gamblin and let them know that
you have a batch of bad wax just so you don't continue using it if it's a real grainy and it's not smooth because it's not
supposed to be grainy. Now, I'm going to
go ahead and put a little dab of wax
out here by itself. We're going to mix
that with powder. I'm going to wipe
this off really good. This is my Galkyd light. Again, this is going to aid
us in drying a little faster. It's already drying pretty fast. But I really want to start
cutting stuff up tomorrow, so I'm hoping that I can make a whole bunch
of these today and then tomorrow I'll
have a whole bunch of stuff I can cut up and go with. I just added two drops
and like I said, don't be tempted to pour the bottle because two drops ain't going to be
what you end up with. I learned that the hard way, you end up with half
the bottle out there. Let's just start with
this sanguine powder. Again, if you're using a powder, l just got it on the table, but that's okay. It
can be underneath. I can actually just spread that out on the paper to be
underneath everything. If you're working with a powder, you don't want to
be breathing any of these powders in, wear a mask. I'm just going to dip
out some powder and I'm not really measuring how
much that powder is. I can always add some
more if I need to. I don't want powder everywhere, so I'm just going to wipe
up some of this powder. Then I'm just going to
very gently mix the powder in and then we're ready. It's a little bit different than mixing it with
the oil paint. I probably could have added in some linseed oil to really make that like an oil paint that I
was mixing in with the wax. But for this, it's
really not necessary. I could just go ahead
mix the pigment in, still going to take overnight to dry so just mix whatever color pigment you
want right in with that wax. Some of these come out waxier
than others like that green. I don't think I like it, but I'm going to use it on
this particular painting. You can tell when it's maybe a student grade paint versus
a professional paint that was really waxy and I was
looking to see if it was a water-based oil
paint, but it's not. Feels like a water-based
oil paint though. It's got that super waxy feel. It's strange. It's hard to describe
until you see it yourself, so I don't know that
I love that green, but we're going to use it
in this and just use it up. No sense in wasting it. It was just an
interesting observation as I was mixing here. One other thing
too that we could have done that I did
not do in that last one is drag through with
one of our tools. Let's say three new
techniques in this. I don't care if there's powder on
there, it doesn't matter. I still could start this
off with some scribble. Anything on this bottom layer just really doesn't
matter so much, so I'm going to go ahead. l'll also need some wax
by itself out here. Let's just grab a
little bit of that because that's what I'm
going to use to put a piece of collage down with so clear wax for the collage. Let's just get started. I'm going to do this one very similar really to the
first sampler set. I'm going to start
by laying down some color and I'm trying to put it in
different places on each piece. I've started with a dark color here on this one too,
but that's okay. Then l just spread
it out a little bit, making it a thin layer rather than a real
super thick layer. I don't want it to
be super thick. Let's come back with some of this
yummy salmon color. If I've got pigment on
the page that might mix in a little with
any oil color that I'm painting out here also but that's okay because
I don't mind that a bit. My tape is sticking to
the table. There we go. I like being able to move the
papers around as I'm moving around and I don't know if
you're this way or not. Laugh with me if you are. The longer I paint,
the worst things get which is why I don't want to
paint a bunch of these today, so by the end of the
day, l'm totally disgusted so that
tomorrow I'm like, look at all this paint and papers that I
have ready to cut up. Not really feeling green here, but let's just see what
we can get with green. Because I might be pleasantly surprised even
though I'm thinking. I like picking a color
palette to help me step outside my comfort zone because I'm really comfortable with other things and
not that right there. I do like having other things. At this point before I
even do anything else, I could go ahead and
do some mark-making. Not using the drag tool because really how much
paint is there for me to drag through
it at the moment, not a lot, but there
is plenty to mark on. You could try doing all this with a palette knife too, but let me tell you it's
just so much easier using the scraper.
11. Sampler - Adding Collage & Finishing: You got to be real careful where you throw this down too or you'll end up with a
paint line right there, like you can tell where that
paint started and stopped. What if I did a
little scraping now? I had some white here to
school. Look at that. Now, we have some
fun stuff to scrape. I'm cleaning it off a little
in between each time. Now, I love scraping through. That was nice. If we had done that
with this bigger one, I would've gotten some
bigger scrapie lines. Look at that. Look it there. Oh, yeah, look at that scrapie line. See now I don't have to be upset that I'm not
making a masterpiece because I am excited
with the marks. Let's just throw in a
little bit of paper. Just tearing a little strip of music because I just
want you to get a feel for waxing something. Usually, with
something like this, I'm going to put a
little bit of wax on it. It's all wet, so it's
not like it's not already waxed on the page, but let's put a little
bit of wax on top. Let's just pick a spot. A little bit of clear
wax on top of that. I am being very light-handed, I'm not trying to
scrape into the paint. But because my paint
is still pretty thin, I run a less into
less of an issue. But look how easy
that was to just slip in a piece of collage. Let's do one more here. We don't have to
collage all of them, but I do want you to get a
feel for doing some collage. We're just going to put some
wax on the back to let it glue itself to the wax
that's on the page. Then just use your
palette knife to pick it up if you throw it
down like I just did. I want it straight, so before you really
bring it down, you've got a second
where you can adjust. I do want it to be inside
the painting, I don't want any of it to be
where the tape is, and then just come back very
gently and smooth that down. Then we can continue painting. That's how easy adding in
a piece of collage is. We could also, at this point, I could continue painting or I could go ahead and
add some stenciling in. I can paint on top of my collage work so that we're really pushing
it back into the work. I also, maybe want to do
some circles in here. Let's get this thing again. I like the circles. We can have too many patterns, but I don't know. Because I'm really just
going to cut this up, I do feel like this is definitely going to be the
pair I'm cutting stuff out of because I'm not seeing
any of my super favorites. Another thing when this is dry, you can actually draw on top
of this with oil pastels. If you want it to continue
mark making on top you could use oil pastels right
on top of these pieces. Now it's too quick to use it on top of them
while they are wet. But if you needed some additional
mark making and stuff, this would definitely
be a go-to item for me. They're creamy, they're oily, so they work really well. The thing I don't
like about these, is they don't
really seem to dry. So that's definitely a last
mark making thing on top. Now, we've got some collage. We have mixed some paint with our pigment powder that I haven't figured out
exactly what it is, so I'm not sure what I'm
going to do with that. For regular art pieces, but it was some powder
on my desk because that's something that
came not too long ago. Look at that. Ops,
I just smeared. When we smear something,
if you're like, "Oh, I messed it up,"
you can just scoop it back off just like that. Not a big deal, it's
very forgiving. That's one of the things I like about the oil and coal wax, is it's very forgiving. I am scraping the paint
over the stencils, so it is mostly cleaning my
stencil off as I'm going. Because that was
still wet it did pick up my piece of collage so
let's spread the collage down. I'm working on wet on wet on wet that will dry and
not come back up later. But while I'm working
on wet on wet, it will still come back up. You just got to be careful and very gently tap it back down into the wax. That is that. I really want punchella. Where did I lay the
punchella at? Here we go. Let's do some punchella
instead because I love it. I love a punchella. You only get one
stencil this is why I recommend the circles
I like circles. I love the way that it can give you solid circles
and broken circles, so it's not perfect. You can make it
perfect if you want, but I like the imperfection that we get doing it that way. Now, anywhere that you
have stencils that's going to take extra time
to dry because I'm laying thick paint
on it is really thick. That little bit. Oh,
yeah look at that. I'm not feeling as
good about these as I was that first set, and glad because that first
said I'm like well shoot, I don't want to cut these up. I love it. I love the colors. I love the pattern. I love that we tried big scrape-through marks with
our different tools. We tried pigment, powder in wax, and we tried collage. Three more techniques
that we didn't talk about earlier that I
want you to give a try, along with a color palette
that's outside your norm. I do want to put all of this
paint on something else, but for the moment,
I'm going to move it out of my way so
we can look at what I ended up with and then we can all agree that
it'd be fun to cut it up. Oh, my goodness. Again, I'm trying not to get paint all over just in
case I have a masterpiece. I got tape stick into my hand. Once I peel the tape, I start to change my mind. Even if I'm doubting myself
while the tape is on there, I started looking at
it thinking, "Oh, wait, this is pretty good", but I'm not
thinking that about this. Now, I'm feeling pretty good
about how this turned out. I don't see any masterpieces
that I want to keep. I do like the collage in here, and I definitely can see
pieces of this that I love so I think using this into something
we cut up would be fun. That was super fun
and we went with our inspiration color palette with the peonies and the gray. I do feel like I was successful in creating the color palette. But now that I've
done the piece, I can say, "Okay, not my favorite color palette." That's why I like using
color palettes for inspiration because
you're going to discover things that you love, that you never even thought of, like on that first
set of love that, or you're going to discover
stuff that you're like, "Oh, okay that does not
work out the way I thought. I don't love it the way
I did it or whatever." Then you'll know that maybe that's not your
favorite color palette, but I like doing it
because the experience of learning what colors you do love together and don't
love together is a valuable learning
experience helps you getting used to working with color and
discovering things that you love. That's how you nail
things down into your own personal style when you make these decisions
for yourself. We're going to let
this little set dry and I'm going to get to
painting some bigger pieces. I'd really encourage
you to do tons of these samplers trying
different color palettes. Then you can use those
color palettes as inspiration for
your larger pieces. So I'll see you back in class.
12. Larger Art - Gray Yellow Red: Let's get into painting
something bigger. This time I'm going to
take my inspiration from a prior piece of art, I'm going to take it from
this inspiration piece. I want to paint some
more with this brown and this pretty light blue and just create maybe another
set in this color tones because I love it so much, why not, just see if
we can recreate it and then you know how I did it. This has a blue so
I've got indigo. I'm sure my colors are slightly different, which will be nice. It's a change but at
the same time similar. I've got the indigo, I've got some yellow, so I've pulled ocher. I've got some pretty red in here and I've got several
different reddish choices that I could pull from. I could pull from a pink but
I'm not feeling it's pink. I could pull from, well, I feel like it
could be more like this. I pulled out the golden
barrack red from Old Holland, but maybe it's really
the Naphthol red from M. Graham & Company, that looks closer so
let's go with that. There's also a
fleshy color in here so I'm thinking that's this
flesh shocker by Sennelier. It might not be,
but it might be. We can also play on
top of here with some of our oil pastels
if we wanted to. But remember the oil
pastels if we use those, have to go on the very top. I do have the oil pastel
box over here on my table just in case I get
inspired as I'm going. I'm just going to create. I'm not trying to
actually copy this, I'm using it as an
inspiration color palette for us to go by. I really love those so much, I want to scan them in and maybe even print
them larger, we'll see. That pretty blue, I believe, is this Richeson Oil ice blue, which is a color that's
almost drying up and I couldn't get the
lid off at one point, which if I'd had my
handy-dandy lid openers, I probably could have, but I don't guess I
did so I actually cut the bottom of this
tube trying to use it. Let's see if I can even get that open with my handle here. I just could not get it to
budge no matter what I did. This thing is amazing. I could not get that
lid off to save my life and it actually cut the bottom. Telling you people, lifesaver. This is real thick too, but look how pretty
that color is. I think that's the exact color, but you know what
I thought what if, now I got it open, we
don't have to do it. What if we try to mix
a color like this and just see how if
we could get close and so I thought before I mix the other
colors on my palette, what if we played with some
color mixing and just tried, I've got some Prussian blue. Let's just put a little
of that over here. I want that color anyway. Then, I'm almost feeling, because in my watercolors, I've mixed green,
gold, and a blue and got that gorgeous aqua
color that's my favorite. I'm wondering if I go
with a green gold color. This is the Shiva Yellow
Citron by Richeson Oils, but it's that green gold that I have a little
love-hate relationship with and a whole lot of white. Let's just see. Let's mix the color and see if I mix a blue and
a little of that green, can I get close? There's a blue. Let's just try dab of the green. With color mixing, you want to do a
little at a time. If we mix it and we're,
not quite there, a little bit more. Then if we're, it's almost there but it's too light
or it's too dark, we can then add more color, or we can add more white. See that's almost green. I could have picked
a different blue. Maybe I started off with
the wrong blue hue. Look at that right there,
I think I'm getting there. This is what color mixing
charts are really handy because they're not exact, but you'll get close. I'm feeling pretty good
about that color there. Might be even a little greener. Look how pretty that is. Then maybe more white. If I just put some
more white out here, that's a pretty color. I almost feel like
there's a little more of a gray to it so I might could add like a tinge of
black to gray it down some, or I could find
that pretty gray. Here's a cool gray, and just see if I add a
little gray in there, what do we think? This is just cool
gray by Sennelier. I just want to grab a little
and just test it out. That's a pretty
color right there. This is a tiny bit more gray, but I'm okay with the color I ended up with, look
how pretty it is. See this one is almost gray so I might actually should
have started with gray, maybe this gray here and white and added a tad of blue to it. We're going to use that one. But let's mix up one more because I don't want
you to get discouraged. That's a gorgeous color, I'm going to use
that for something. But what if I did white, a little bit of the gray, and a tiny bit of the blue? It might have even been a
different blue than that blue, but I'm going to
go with that blue. Here let's just
go with the gray. There we go, let's just take it. That might be even more gray than that was in that,
that's all right. See, that's closer right there. There we go, that is a gorgeous color. I could even take a tiny
bit of that yellowy, greeny color in there. Yes, see I love that too. I'm definitely going to
use those two colors. Let me just get a clean palette. We're going to mix these
with the oil and coal wax. I've got that, not worried about that little
bit of white still showing because it'll mix right in. I've got this yummy,
lighter color. I'm going to start fresh
for us for a moment. Now I'm going to mix
all of these colors in with my cold wax and add my other colors
that I was thinking. I was thinking there
was a flesh color. That's got some extra
oil that came out, but that's all right. That will still mix right in. I've got a dark brown. I'm thinking that's
not dark enough. This is the burnt sienna. Is there any burnt
sienna in there? Let's just do the
sepia, I love sepia, so that'll be my
dark brown today, would be super dark brown. I'm not trying to
match it exactly, but if I can just get close. Here's the original. See, look at that. The blue-gray that
I really loved, this Richeson ice blue, is one shade lighter
than the one I mixed so that's mostly neutral gray and white with a tad of blue. But I could have
added more white and got even right on
the money with that. That was fun to discover. Here we got yellow ocher. This thing I'm telling you, try to cut off the bottom of
that blue and I'm just sad, I didn't know this
little thing existed. My yellow ocher is super thick. You'll tell which
ones are my favorite because they're actually
beat up pretty good. There is some random red. See that's bright, bright red. We'll just test it out. I've got the blue, the flesh, the ocher, that's the sepia. I want the indigo. Indigo and sepia look real
close, don't they? I feel like that's all my
colors there so let's go ahead. I'm going to get a tad of
my gal kid on each color and then I'm going to
mix a little bit of our oil, coal, wax. Once you got your colors ready, you are ready to start painting. I want you to use all of our different things
that we talked about on these bigger pieces; mark-making, layering
your colors, some stenciling, maybe work
in some collage pieces, drag through with
some different tools that you can drag through. I want you too, if
you've got any powder, maybe mix up a color with
some powder and try out that. Now that would have been
a good color for that red if I had mixed in that
powder with that. Then I want you to
just start painting. I work on a pair. I might work on two of
these at the same time and just go back and
forth with these and I'll probably
move the other papers I have underneath here
just out of the way. When you're doing both of these, you might have a different
goal for each page, but I like them to be
coordinating a little bit so that when we cut them up, we've got some good stuff going. If you run out of a
color and you think, oh, I need more of that color
then just makes them more. I'm doing thinner layers
here in the beginning. I've got plenty of little
towels over here ready to mix. You know what? I didn't mix white. I do like white. There's no white in those
others really, so we'll see. At this stage, I'm not looking to have
a perfect composition. I'm looking to lay
my first layer down. I'm not thinking about
where things are going. I'm thinking how can I
cover all of this page more than anything and work in a few of
these colors that I loved and I just got oil paint
on the edge of the paper. So let's just clean that
off before we make a big, big mess which I am prone to do. Usually when I'm up here,
I'm wearing a t-shirt, not wearing anything
super important that I don't want
to get paint on. I have an apron that I
wear a lot of times. If you're messy painter, you don't want to
get stuff ruined, definitely put an apron on. I'm still working in real
thin layers right now because remember with the
wax we can layer for a bit. But once it gets to where
we're basically creating mud, you got to set that to the side and let that dry
for the next day, but I want to make as many
of these as I can today. Because let's go with some blue. Because I want to
really start making more with these tomorrow. I don't want to have three
or four days of painting on this particular collection. But you can be painting
on these for months. You could just keep on adding
layers until you're okay, I think I'm ready to do
something with this, or that's what that I needed. That was the last of that. Definitely going to make a mess going back and forth here, but that's okay. That's because some of the fun with art marking making a mess. You can paint with
other things too don't just get stuck with your
bowl scraper if you feel, I want to work with
a different tool. Get creative with your tools that you're working with also. Then before you get too far, come back in here with
some mark-making. Let's go ahead. Maybe draw through
this a little bit, and we could start putting
in some of our texture. We can come back in
here with a color that we didn't have
in here already. If you think you're
really loving the piece and you want to add final marks and start thinking
about composition, then definitely do that. I feel that puts so
much pressure on me. When I get to this stage
that I almost don't want to put that extra pressure
on me if I don't have to. So I'm okay with
creating like this. But if it's a piece
that you love, like I love that first
set of many pieces that we just created. If it's a set like that and
you think I love it so much, not even going to cut it up, feel free to finish it
off and say I love it. I am digging these colors. What if we come in here
with the punchella? What did I do with my punchella? Where is it? What if we come in
with some punchella because I didn't do that on
my original inspiring piece. What if on this piece I come
back with some punchella? Look at that. Oh my goodness. That's what I want. Let's go with that because I can see some parts out
of here that I love, I can see some there might. I'm going to go ahead and
call that one a keeper for what we're doing
13. Larger Art Finishing Up: We're going to finish
this one with some other. We could do it with
red looking here. Let's get crazy. Red and teal. Oh, my goodness. That right there might
have been the ticket. We're definitely going
to call these keepers. Because I don't want
to waste the paint, I'm going to go ahead and do another one with the paint
that I already have mixed up. Let me throw these on the floor and make some more
with the paint that we already have here because I don't want to waste the paint. Here we go. Let's just do another set
completely different. Let's start off with this
other color that I mixed because look how
beautiful that color is. I might want white. I might need to
make some white up. Look at that color. Holy cow, new favorite color. Look at that. That's actually like that is my favorite color. I like aqua light color,
polish aqua color. Look at that color. Oh, my goodness. I just liked that
color so much more. Putting it down on
the paper then I did even mixing it that I am going gaga over this. I don't know what that is,
but we will get rid of that. Greatest color ever. I don't even mind coating
most of the background in that color because
greatest color ever. I got something real
thick in this paint. Must have been something
who knows what that is. That was super fun. That is the best color ever. Definitely try mixing
up that color. Now I love this color so much. Let's go ahead with the indigo. Somehow I got red in there accidentally, but look at that. That was a fun surprise. It's going to get red. Look, there's more red. Red it is accidentally,
but that's okay. Sometimes you discover things
accidentally that you're like just blew my mind there. Again, don't worry about
messing something up, even if it's the most
favorite color and you just totally got excited
and then you're like, "Oh, I ruined it." Don't get too upset. At this stage, we are
not finished with these. We're simply covering our
page with paint, basically. I'm using up the paint
already mixed up. There's some crazy colors left. Maybe I'll throw a
little bit of a red in this one so that it matches. But I don't necessarily
want it all to be red. Can't say that I
want it to be that yellow or that
flesh color either, but that's what I
have over here. I do have this other gray. Let's just see. Because really
with the cold wax, we're looking for layers. We're looking for
things that are going to shine through underneath. This is how I ended up
with so many pieces that are just like tall duds as I would have leftover
paint and think, "Let's just try to use those," and then I'm like, "Yeah,
that didn't work." But you know what
really they did work because now I've come back and created
new stuff with and I'm like totally, opened up my eyes and changed my mind on what I thought
worked and didn't work. We're going to use this up
anyway. Let's just go for it. Not even worried about it because can be a piece
in a bigger piece. Drag some across and get
some of that drag texture. Look at that I like the drag texture because it's so that'll make a
really cool element. Let's just get this red in here, that'll make a really
cool element when we cut, when we have these
textural pieces at some of my favorite tiny little stripes on some of the
stuff I've created. You'd be amazed. That one's a little crazy. This one's super crazy, but I like this one better actually because I
can see that texture. Let's come back through
here with some texture. I've got a little paint on
here. That right there. Very gently, I'm not even
pressing down at all. I'm just letting the little
scraper do its thing, but I'm not really
pressing down at all. I'm just dragging. Because we get some cool colors. We get some cool mixes. Now, we could do some mark-making and you're really going to see it because there's layers there underneath it. We could do some
little hash marks. If we like hash marks, you could do some long
squiggly lines, scribble. Could be a lot more
careful than I am. I'm just doing some
real fast mark-making. Let's get some
scribble here too. Now you really see
the scribble here. It's the layers, it's the marks, it's the combination
of all these things. Now we could take
one of our scrapers. We could add some good mark-making scrape
marks. That was nice. Let's go ahead back to this one. I'm loving this one now. Look at that curved at
the end, but that's okay. I like that. I also like some punchinella we only
have yellow and red. Feeling like red punchinella
little bit of red. Look at that. Just a little bit. Look at that. That just got way
cooler, didn't it? See you doubted with me I know early on we were
all doubting it, but crazy colors, just using up the rest
of our paint palette. Look at this delightful,
surprising crazy combo. Look at that. I'm feeling
good about this one. I need to wipe the punchinella off so I'll do that in a moment. Just wipe your paint off as you're going because
it's still wet, so it's very easy to do. Now, I still have
a little bit of yellow so looking
at our two pieces, do we need to do
anything else to this? Feeling like I could have a little more yellow in this piece here because there's
not hardly any there. I could do this with a
palette knife if I wanted. Look at that. If you're like, let's
try a different tool, let's just put this on
with the palette knife. We'll get a different texture
than we got originally. Always fun. I think I'm going to call these good
because I'm liking them. I don't think they're a
masterpiece in themselves, but I do think there's
enough going on that we will be able to work
with that tomorrow. We'll call this our extra
paint scrap paper sets. When you mix up a
bunch of color, if you've got a bunch of color left on your color palette, make another set,
use all that paint. There's still a little bit
of paint left on my palette, so I might just scrape
that on a piece of junk paper for some
extra marks and stuff. We'll just keep adding
to that piece of junk paper the more
pieces that we create. But those are pretty fun completely different
than I expected. I want some dark brown stuff now that I can mix in
maybe with this later. We'll see, we're going to
put these to the side to dry and continue on.
14. Larger Art - Orange & Pink: I'm going to paint
one more set of these with you and then I'm
going to paint some more not on camera just
to give a whole set of these that I could play
with for making other art. I just wanted to say, if you've mixed all your colors
and you thought, oh gosh, I wish I had a lighter orange or I wish I had a lighter pink, you can mix up your colors after the fact if you get
them all mixed, you can take some of the color
that you mixed up because this time I'm going to use
orange and pink and ocher, which is my own personal
favorite color palette. I thought that'd be fun
to play in for a bit, and then I'll go back to
my book as inspiration. But you can take a
couple of colors and once they've got the
wax already in it, you can still mix up another color even with
the wax already in it. It's almost easier with the wax in it if you wanted
to mix after the fact. But look how pretty that
is as an additional color. Definitely, if you're playing and you're
getting everything going, don't be afraid to get some
additional colors in there. These are pyrrole
orange by Holbein, my yellow ocher
by Winsor Newton, and this yummy pink is
light magenta by Holbein, and then I've got my Winsor
Newton titanium white. That is like a neon orange. I'm glad I'm using it first. This is a color. A lot of traditional painters use like an orange or a
red as their base coat, and that's a really
cool color that shines through underneath
all the other colors. That's why I have this orange
because I have used it under tons of cold wax
paintings, and I love it. I'm glad I picked that
one to start with. I'm just getting a
real nice thin coats. I'm pressing down a little
bit on this to really get that color smashed into
my paper. Yeah, I see. I like it. I'm just going to start
in both that way. I have two sitting here. Working on pairs
because I make a mess. Getting paint over there. Really is it art
if you didn't get messy while you're doing it? If you didn't get it on
everything including yourself. If I run out of orange before I get this whole piece coated, I'm not going to worry about it. Now I'm just going to do a
little abstract painting, pour color in, in
different areas and just see what can I end up with? Well, I have white on there accidentally. That's all right. If you do all this
and you're like, I don't like any of
that but I just did, you can scrape it all off
with this little scraper too. This little scraper
thing, it's amazing. I would not call these
completely finished paintings, but they are definitely at
a point where I could do a lot with them when I
maybe re-imagine these. I'm actually going
to stop on these. I love the pink, the orange, the ocher. I'm actually loving the
colorways that came out here, and it's completely
different than the colorway that came out here. Super fun. I have leftover paint, so I have an extra piece
of paper here that I'm definitely going to be
putting that paint on. I'm going to make one more of
these with my extra paint, and then I'm going to set all these to the
side to dry overnight. Maybe even two days if I come back and they're
still too wet tomorrow, but because it's got
the wax mixed in and then hopefully you've mixed the Galerkin light
into your colors, just a tad of it, we should be dry to the touch tomorrow to be able to do something else
with these possibly. Paint as many of
these as you can, as you have pieces of paper, paint as many as you can. I want you to go ahead and
just use all the paint. Do the different colorways. Get inspired by different inspiration
sources like the books, perhaps some of your
favorite colors. Try out a color combo that maybe you've never tried before, and just see, what
can you end up with as some pieces that
we can then cut up. I want you to not get bogged
down in the composition. I don't want you
to get bogged down thinking things are ugly. I don't want you to get stuck before we get to the next part. That is the point of these. They don't have to be pretty. We are up here spreading
color around for the simple reason that we need these to get to the next stage. Look how fast this is. Just using this up. Don't forget to try out
our different techniques. Dragging through with tools, dragging through with
something sharp, using stencils, mixing
your paint colors into some different colors. I am trying to keep in
mind light and dark a little bit so that we've
got some nice contrast, which is why I like having a little pop of a lighter
tone or some white. Use some drag through here with our tool just by not even
pressing down very hard, just let the tools wait, do its thing as you
drag it across. I love the way that looks. Then as we drag that across, we can make more marks, we can do stenciling, I could've gotten some
punch yellow going. Look at that. I'm telling you, I freaking love
the punch yellow. Every single time, it's amazing. I'm still just using up
the very last of my paint here. Look at that. Now, see that might be
my favorite piece and it was the very last jump part. Then we can clean off our tool. We could come back on the top and do a few
lines and marks. Yeah. See now this last piece with trash paint and it
might be my favorite. I do love it when that happens. You wouldn't even got this piece if you just didn't have
that leftover paint. Sometimes just do
that one last piece and see what you get. I love dragging that through those little
stencils, circles. Look at that. That's
a cool texture. Yes. We can do some
little marks if we want. We could come back and do
extra little drag through. If we covered up our drag
and we liked the drag, we could drag through something. We don't want to drag
through anything. Maybe we'll drag right
here. Super cool. I love what's showing up
from underneath on that. Maybe we'll just
drag a little right here. Yeah, look at that. Definitely like my
little drag tool, so we're just going
to clean that out. Sometimes you'll
have some paint in the center, gets stuck in there. It doesn't matter,
it's a silicone tool. We can just come back even after they're dry and get
that paint off. There we go. Now we got
our third trash piece. I want you to paint as many of these as pieces of
paper you have. If you need to just
source some paper, you can just source some paper. I want you to have at least
two different colorways to play with for the
projects going forward, more if you get excited
and you're having fun painting because I'm getting excited
having fun painting. I love this last piece. That might be my favorite. Then we'll see what we can
do with these going forward. We're going to have to let
these dry to the touch. That might be tomorrow, it might be the next day, but we should be good
to go pretty quickly. It does dry faster than
regular oil paint. I'll see you back in class.
15. Larger Art - Purple: I decided to come up
and paint some more. I wasn't going to film it, but I've picked a color
inspired out of my book here. I thought, why not film it
since the two bigger ones I've filmed were done with color palettes that weren't
from my inspiration book. But I think I want to try
to do something like this. It's like a titan. There's a greenish gray in here. There's a deep,
dark, yummy purple. I like the colors that
are going on in here. I'll probably pull out another color because I can see some other color like a
grayish green in there. I pulled some colors out and
I've already started mixing them to go with my
inspiration color palette. In that greenish gray, I might just go with this cool gray to
get a gray in there. It's a little bit lighter
than that though, so I could mix that in with some white and just see
what I can get. While I was mixing. I have a trash page here
and I thought I should just use the trash page to
get started on one of these. I can just rub this paint off onto my page to get started. That's another way
you can start if you don't want to
scribble or if you're just getting confused and going, how can I get started? That's a good way.
Use your trash piece to get started because I'm using my trash piece as a last use all the
paints up piece anyway. Why don't we just start
it with the paints? Then that's a good way to see, do we like these colors? Are they going to
do what we want? Are they dark enough like that? That purple was almost
an eggplant color and that's not eggplant. Now I'm wondering
if I should say, mix a little bit of
indigo in there and really get the right color. I'm going to mix a little
bit of gray here. Like that. I'm going to go ahead and
put some wax in this gray, maybe I'll like it. Then I feel like that
purple really is very bright and I should probably get some indigo
out to go with it. You look at that. Now that's more of an eggplant. This is a fantastic way to test colors and clean
your palette knife as you're mixing colors. Just say, is this even going
to be something that I like? I forgot to put my
gloves back on. Even though I've called that my trash palette to get started, I could actually use it now as my starter piece and just
start layering on top of that. I took my gloves off to
tape off all these papers. But oil paints are pain
to get off your skin. I do actually make it a
habit of keeping gloves on. I can actually just go
ahead and get started. Just filling in. Now I don't have
to worry about it. I do like this eggplant. I'm glad I had made that deeper. It was really very vivid
in a way that I don't think I would've loved
it. Look at this. I've got some
transparent earth oxide because I felt like I had a tiny bit of that color
may be shining through. I'm not going to
use a lot of it, but some of it is fine. I've got this pretty gray. We could come in with some gray. I could start layering
in a little bit of this, some mark-making. Let me finish covering
this up though. You get with those yummy
marks and stuff like this. It's easier when
it's not raw paper. It's easier when it's coded and the paper is not
showing through. I got some yellow. Let's just start layering some
colors now. Look at that. I don't know that my
goal is necessarily on this first piece
to be all light, but I could do a light piece
and some darker pieces. Then we have some stuff to
contrast because I noticed on that one that I did earlier, all the pieces were similar
in contrast and color. I came back up and
I painted one. It was basically mostly
brown because I want to be able to have a contrast
piece that I can cut up. I like a lot of
those marks right in there and it's thick enough
where I could go ahead, start doing some marks in here. Marks just add some interest, especially later when we pick out pieces of this
that we really love. Marks just really
add more interest in texture and layer in there. I love to see the
marks and stuff. I like the circular shapes. Sometimes that's the
bottom of my paint can. We can also go ahead, do a drag or two. Which I forgot to do on
some of the earlier pieces, we could try our stamps. Look at that. It was denser, definitely. My favorite. Little
do lolly there. Oh, my goodness, super funny. You see how it gets
in the grooves. All you can really
do is wipe it off as you're going and that'll
clean it off pretty well. This is also a fun mark. That was super fine. I could
come back in if I wanted. Do a little dragging, make it nice and contrast
either. See that's fine. Again, I'm cleaning these
tools as I'm going. Let's do that. I could do
stinting on top of it. But let's go ahead
and let that be that. I'm going to set
that to the side so I can think about it. I always like to do more
than one at a time. That's what I'm
getting started here. Let's just do another one. I'm going to go backwards, or the opposite of
what I just did. I just started off real dark. Maybe on this one and
I've got paint on my spatula that I am
letting get on the paper. Let's start off with
light and go dark on this one so that we've
got some contrast pieces. While I'm not thinking of coloring composition
super hard at the front beyond my inspiration
palette, obviously, I'm thinking contrast, are
they all the same shade, will I really get anything out of that contrast that I can use? I'm thinking along those lines because I do need there to be contrast and some differences. That's really cool now. I think I want to go ahead
and mark-make. I like that. This has got enough difference
in contrast between the two and there's so
much paint there that we're going to go ahead
and paint another one. But check out that pair, completely different than
what we've already painted. I like the eggplant
purple shades. I like this, it
started off light and had these yummy Earth oxide, this tera transparent
earth orange. I love that. I'm going to go ahead and give myself
another one of those. Maybe mostly in the light, we'll see and just
use up my paint here. This one is completely
different than I just was playing and moving around paint and trying
to use up what I had, which I still have a
little bit more left. But I really like a
scraped a whole bunch of it off and then dragged that back in there
and really made those colors mesh in
super cool together. It's really, really dark. I might want one that's really
light to be a contrast, but that's super-duper cool, so I'm loving that one. I'm going to continue just
painting and using up my paint and then I'll
see you back in class.
16. Paintings Recap: Let's do a little recap of our paintings before we move
on to some other projects. I actually intended to start
this whole process with the intention of cutting all the pieces up.
Because in my mind, that's what I liked the best
from my inspiration pieces was all the yummy
little bits that fit together after
I cut it up and re-imagined it into
a new piece of art. But I think because I thought I'm going to cut
everything up that I freed myself from the pressure
that you get when you're trying to create something amazing and it doesn't work out. Doing that allowed me to get
a few pieces that I'm like, holy cow, that's so amazing. I have to keep it. I
can't cut that up. Then several pieces
that I'm like, let's cut this up. I was thrilled
actually to have some pieces that I loved, loved. This is that first
set that we did. It was inspired by a color palette in the
mood for color book. Let's just revisit that
color palette for a moment. I've got three color
palettes out of here. This was the color
palette that I picked off of this Swedish
heritage tones. Even though it's not exactly like really light
with lots of blue, there's other
colors all in here, this is what I was inspired
by for this color palette. I've got some of this dirt color in the edges that's orange. Got a lot of gray in here so
even though it looks white, it's not truly white. We've got a lot of
this blue in here. I pulled together that
color palette and we ended up with the most
gorgeous set of four. Out of this set of four, I really loved the two here. The two here I love, but I don't love love
and so I thought, oh, I could cut this up
and see what I can get. But these have to stay
just like they are. They're amazing. That's what I really
love about this process. If you stop trying so
hard to create something amazing and maybe
we're just going to create with the intention
of possibly cutting it up, you'd really take a
lot of that stress and pressure off
yourself so that you can just create, have fun test colors, and try
new color palettes. Then when you're
done, you're like, whoa, don't even know
where that came from. Totally didn't expect that, out of the blue, I
was experimenting. But look how amazing that
is when we finished. I really like this
part right here with the circle and the lines that we created and the darkness of the little punchinella
pieces on the side. Just magically it came
together and I was just letting the
art flow out of me without the pressure that we
usually have going on there. This one is a 50, 50 keep
and we're going to cut up. I want you to evaluate the
art once you create it and keep the pieces that you're
like, that's crazy amazing. This is another piece that I created from
a color palette. These color palettes
are way outside my normal comfort zone of
what I would be picking. I like that. We're stepping outside
the box and we're going for stuff that we wouldn't just normally
gravitate towards. This color palette was
inspired by this poppy set. It's not a poppy. I'm not sure what it is. It
looks like a poppy. I just pulled green,
pretty gray, and blush color and stuff out of that and that's the color
palette I was working with. That's another part
that took a lot of pressure off working with a color palette that's
already established, and that you are like, oh, I really love that. It's not something that
you're just going to go to your paint box and
pull those colors out. Now, you're like, okay, I know
I like this color palette, what can I create with
those colors myself? This is what I created
from that color palette. I know now that not every color palette
is going to work for you and this is not my personal
favorite color palette, but somebody else may
think, oh, amazing. Because this is not my personal
favorite color palette, none of these are
jumping out at me is amazing like they did
on that first piece. They're just not grabbing
me in the same way. This is a set that I have no problem cutting up and saying what else can
we create with that. I love that freeing feeling that I get by trying
out a color palette that's already out there that I can
just pull from creating with the intention of not
making a masterpiece, but I'm going to cut this up and make a
different masterpiece. I had so much fun
painting that I painted all of these in one day. Then I left them overnight to
give them a try out today. On the bigger pieces,
the color palettes, I had three different
color palettes that I painted with you, one of them was inspired by my inspiration pieces that
I did a long time ago. Then created this fun
collage abstract with, and I was really inspired
by the colors that were in this section down here so
I thought, you know what, I love those colors, let's just see what
we can create. I think in that when I was actually
thinking that teal and red is such a cool color
combination that I'm always trying to make
something I like. I don't know that I've ever been successful up to this
point in creating anything I like
beyond that cut up piece because the painting
was not my favorite. But check this out. I've got some really good
options to work with. I actually really liked this, but I'm still willing
to cut it up. I think I love this one. I like the drag through marks. I like the randomness
of the red. I like that there's a big bit
of red here on this side. I do actually really
love this one so it's on the fence if I would
cut it up or not. What I would recommend, especially if you
look at some of these and you're on the fence, photograph all of
them so that you have a photo that you
could get a print from later if you
cut it up and think, oh, I wish I hadn't done that, you could still get a print. I've already photographed
all of these. I just took my nice camera
with some good lighting, just like this light
that's on the table. I just photographed each
and every one of these so that I can look back later
and think what the heck, that was the best
thing I ever created. Why did I cut that up? I can print it again. If I create today and if
you're on the fence about one like I'm on the fence
about this one a little bit. I might save that one for a later project and I might cut up all of the
other three that I'm like, yes, I can cut that up. Yes, I can cut that up. Yes, I can cut this up. I'm on the fence with those. But this one I'm
thinking is a keeper. Now the second
palette that we did was going back to my
traditional orange and pink. Out of those two, the third one I painted
with my trash paint, the leftover paint at the end is actually my very
favorite. I love this. That's a keeper. But I do feel like there
are two that I could cut up to create with. The last color
palette that I tried, I pulled back out in the
mood for color book. Let me just open this one up. It was this color
palette right here, which is a very soft yellow and eggplant purple color palette, which is not a color palette
you've ever seen me use. It's definitely
outside of what I normally would
gravitate towards. But holy cow, look at
these. Look at that. Now, this one, there
are a couple that are definite keepers and then there are several that I'm
like, let's cut that up. For me and I painted just a junk brown one to
mix in to my collage ones slash definitely junk. This one, how amazing
did that turn out? This was actually my
last trash piece. It was the one where
I was using up the paint that I had leftover. I love that it's lighter than the other ones that
I was doing because I had very little purple left and so I just tucked the purple in
on the edges a tiny bit. I'm insanely in
love with this one. This is a keeper and I'm
not going to cut it up, but it's just so gorgeous. I can even turn this to
the side and just think, how stunning is this? It's so beautiful. Anyway that I take
it, it's beautiful. I loved it so much that I made it the little
cover of these videos. Is it not just the
most beautiful piece? Don't waste the leftover paint. This was the leftover paint that I just would have thrown in the trash and it made my very favorite
piece of all of them. Now on this, this is
definitely a cut up piece. This is definitely one
that I can cut up. But these two, check that out. The two that we
painted and we used the yummy punchinella to
do our patterns and stuff. I also want to talk about
with that punchinella. On most of that, I was actually pushing paint
through those dots. But on this one I had very
little paint leftover so I was just smashing
that punchinella down into the paint and making a pattern in the paint
itself and you can do that. You can just scrunch your
stencil down in there, take your palette knife and
just smooth the stencil down and then pick the stencil up and look what that does. It creates a pattern
down in the paint. Now I wish I had done that
more so even in layers on top of the paint
because it gave the coolest effect. Super fun. You can see some of that here. We've got it down in the
paint and then we've got some stencil areas
that are raised. I liked that little combination. I just wanted to
take a little recap here of what we
painted in class. Talk about if you end up
with amazing pieces, great. Then if you paint
with the intention of cutting up and not having
that pressure on yourself, that when you get these amazing
pieces, it's even better. Because for the most part I was creating stuff like this to say, let's have some stuff
that I can cut up and re-imagine. I
had a lot of fun. These took one day to
dry and they are dried. They're tiny bit almost like tacky like a
crayon feels like, but they're not wet so we
are ready to jump into doing some projects with
these fun paintings for the ones that
I want to cut up. Then, yay, for the couple that
I created that I thought, holy cow, that's amazing. That made it even more exciting. These are some of
the best things I've painted since I've ever started with the
oil and coal wax, and I've been doing
the oil and coal wax for five or six years now and I'd say this enjoyable
paint session that I've had, and I ended up with the
most incredible pieces. Release yourself
from the mindset of I got to paint
something amazing. I got to worry about
the composition. I got to get these colors right. I want you to pick a
color palette that you're not comfortable
with and I want you to just create with the knowledge that
this is going to turn out blah and we're going to cut it up to make it
something amazing. Then when you end
up with something amazing before you
even get to cut it up, don't cut those up. Keep those. These are exciting and we will start cutting these into some other projects for the ones that
we want to cut up. I'll see you back in class.
17. Reimagined Art - Wonky Stripes: I thought we would just
start off cutting up some of our pieces of art and just
jump into our first project. This set is my least favorite so let's turn it into something
that we're like, oh, look at that. It's only my least
favorite because I think in the end I
don't love the colors. I'm just hoping as we
re-imagine pieces, that I will love the
colors in because I have a whole lot of
existing bad art that I have created in the past that we
looked at as we were just figuring what it is
that we're trying to create. I'm looking down at
the pile thinking, maybe this re-imagined with this piece here might look
pretty cool actually. I'm opening up all my
old art as options to blend in and I want
you to do that too. If you've got other
old art that's maybe not cold wax or something
that you think, oh, that would be cool if I did this with it or that with are used
as part of that collage. Because even though I am taking this first project and
cutting it up and saying, okay, I'm going to put some
of this stuff in there. In addition to that, we can also get out our tub of scrapbook papers
or wallpapers, old art, anything at
all that you think, oh, that's cool and I can work
that into the strike collage. Feel free to get that
stuff out too and see maybe a stripe or two would look good and
some of this other stuff. I'm going to keep those
down here beside me as an option and I've got plenty of old scrapbook papers that
we might pull something in. I'm just keeping my options
open and because I used old boot pages here
as a collage element, we could also use some collage elements
of old book pages. It might go in my closet
and pull some of that out. I'm actually going to just jump in and cut the edges off of this and your early art might be something that
you're willing to sacrifice. This one I did years ago and at the time I thought
it looks like a garden. I did so good, now I'm like,
what the heck is that? At this point, I'm ready to say, "Okay, I don't
have to keep this. I can give some of this up." I think we're going to cut it into different sized stripes. I'm going to pick some big
stripes and then I'll cut some little stripes and we could make a pair if
we have enough pieces. You can be more strategic, if you see a section that
you really truly love, cut that out first and then cut out a bunch
of strikes around it and then on these just cut yourself some
different sized stripe, so we've got some thin, we've got some thick. Then we've got the really thick. All right, so here's
our first choices. Those down, let's cut
some of these up. I might decide as I'm cutting, to go ahead and
make this the same width as these so that I'm not trying to
cut it with scissors. Because if you were watching
that Junk Art Collage class, I was trying to cut them all
down with scissors if they were different size and if we go ahead and make these
the same size, I can decide which part of this I like and I can
cut one of the edges off, so let's cut this off. Then let's decide, I like this part here more
so than just this pink edge, so let's just go ahead. It's wax so I can just take my thumbnail and put
a dividend there. Hopefully I cut
these the same size. Let's just now the
newer wax pieces versus the older wax pieces. It feels like I'm working
with wet crayons. I can tell it's not
completely cured, these take a couple
of weeks to cure, but they are dry but I
am getting some white on my fingers and so getting
paint on your fingers, but you're still
wanting to keep going. Get a microfiber
cleaning cloth and that will clean those
right off your fingers. Faster and easier than trying to wash your hands with
soap and water. On here I actually
like this section, so maybe I'll try a real
fat stripe and look how easy that cuts
with that piece of collage on there and look
how cool that looks. That will make a
beautiful bookmark so another little
option that you can try there and so let's just cut. Maybe I'll keep some big
pieces off of that but I do like that one too and cut some little pieces off
of one of these others. Let's just cut this one up. I liked doing the little
sand borders because it's really good for
getting your feet wet. You get four little paintings, you get test out colors. Then it's not going to go to
waste if you decide later, almost cut that up. Like all this going on here. I like all that going on there. Well, I guess we'll strip
off the side here. Oh, yeah. I can feel the white paint is a tiny bit still
wet I can feel bad. But that's okay, it's not like working with wet
paint it's a little bit different but it is
tacky it's like tacky paint. It's a weird feeling working
with the tacky paint. All right, so let's cut
a few thin stripes. Maybe I'll keep a
thicker stripe in here. Then we can cut some stripes
down to again later. We don't have to cut it and say one and done
now we have to use it. We can keep cutting these down later and because I'm using
enough stripy pieces here, I'm sure I'm going to have
more than one piece worth of cut up stuff. Consider making a pair when
you're creating like this. Some are finished cutting these up and I'll be right back. All right, we got all
our slices over here, I've finished cutting these up. I'm going to be using YES!
paste to glue these pieces onto a piece of nice
watercolor paper. I'm not going to use my nice oil paper because
it's expensive and I want to just create a piece now on a nice piece
of white paper, so I'm gonna be using
my Canson 9 by 12, 140 pound watercolor
paper as my base. I just want to be able to
glue these pieces down to a nice clean piece of paper and let that be my
finished piece of art. Now I'm going to make a
stripe collage out of this. You can definitely
experiment and play. I also cut up a couple of pieces of a book page to
just see will that fit in? Do I like it? Do I want to try it? You could do different
collage papers in there and just see what do we end up with if we
work some of this stuff in? I don't even know where
that old paper came from, I think it was just
from the thrift store. Just start playing
with the pattern, the design, the thickness
of your layers. I tried to have mostly
a nice even edge around my piece of paper and because we have enough scraps before
I glue anything down, I might go ahead and see. Can I make two? If I'm using a big stripe off this one
piece of art at the bottom, maybe on this other one I
can do that at the top and, and be a pair without being
exactly matchy-matchy. Perhaps I could even
decide that maybe I want one of these over here and I need to do
something else over here, so I could switch and change out stripes as I'm looking at this and figuring out
what needs to go where. I just like the differences
that those create. They don't have to be even, and they don't have to match, and they don't have to
be perfectly straight. You could certainly have some stuff going back and
forth, being mismatched, being uneven, and creating that collage stripe in a way
that you find appealing. Let's just throw some of these out of whack a bit and just see what that
would look like. See, now I'm seen that. What if we did
something like that? What do we think of
that? Do we like it doing its own thing, or do we like it
nice and straight? Now I need a come
here and vote button. I do know that I
like the straight. This, because the top is
such a big piece there, I do like the uneven though, I do like the unevenness. I'm thinking just to have something a little different than anything else I've done. Let's just make these
a little wonky. We can have some white
space in-between. We can have our stripes
off back-and-forth. We can start the top off, not in the center, and then glue each
of these down, a tiny bit wonky, and just see what we get because that's
pretty cool right there. Your choice on this. You could go wonky, you could go perfectly straight. I do know that I love
the perfectly straight, just to look back at the pieces that are
inspiring this project. They're really
beautiful, straight. They make a finished
piece of art. They're going to photograph
really beautifully, so I could print these on a
larger print if I wanted, which is something I
especially think I want to do with this one
here on my right because I could see this being a great big piece and
a nice quality print. A good photograph of it
with a nice quality print, I think I love that because I'm just obsessed with
that piece of art. That being said, if
you want to be able to photograph it and maybe
make prints out of it, probably better to
do it straight. If this is just a one-off
piece that you're like, let's just try it
and see what we get, then try it wonky. I've got my glue
out using my YES! paste. You can glue these with heavy gel matte
medium if you want. I'm just using a
palette knife on this. You can use heavy
bodied matte medium. You could possibly
use a glue stick. You want it to be archival, you want it to be a nicer
quality glue stick that's going to stand up to
the test of time. But what you probably
couldn't do with this really thick stuff is use the thin
matte medium because this paper is really
thick and we have now put really thick coats
of waxy paint on top. You can't really use
a real thin glue. Well, you probably could. I'm lying, you probably could. Just use a real thin layer on
the back and glue it down, but let it sit there for a bit. But usually my rule of thumb on glues is the
thicker the paper, the thicker the glue. It just works out nicer. What I really like
about the YES! paste is that I still
have a moment or two. Even after I glue
all these pieces, I still have some time
to move it and shift it. In something like this
where maybe I'm going to be doing a wonky stripe
like I'm doing, I want a moment to
be able to adjust these before that glue sets
in and dries completely. That's what I'm going
to be counting on, that I can glue these down and still slightly adjust them. If I'm doing it straight,
I still want to be able to adjust
them a little bit. But this is my favorite
glue for everything. It's like a glue stick in a jar. It's just like working
with frosting. It's amazing. I'm laying them down gently. I'm not smooshing them down at this point because I want the option to still
shift a little bit. I got them stuck down. Look how super fun that is. Now once you get these on here, I want you to take
just a piece of scrap paper and instead of smearing these
down with your hands, I want you to do it with
the paper so that you can really get
everything nice and adhered down for both pieces. The glue that we've
used, it dries clear. But if I see any
glue sticking out, I will just go ahead
and take my fingernail and get it off because even
though it dries clear, I don't like big, heavy glue dollops anywhere. Look at that. That looks super fun. I really love that
they're not even. That was a fun
thing to test out. I also love that there's
some random collage, like a piece of
book page in there. Keep that in mind when
you're collaging. Tear up all book pages or collage paper are all pieces of art and
throw that in there, especially if you collage on any of your cold wax
paintings because then that pulls that element into
our larger collage piece. Mix the colors up, mix the lights and the darks. I tried to have the main
piece of art that we started with and then I ended up wanting a contrasting
piece of art. Paint lots of
different paintings and lots of different colorways and stack up all the
different pieces and then pull two
pieces together. They may not be
exactly matchy-matchy because I would not say that my faux flower garden and my
pink and gray were the same. They were definitely
had a contrast and a different coloring to them, a different color palette, but because there was
this little bit of green in our original piece, I thought maybe we can pull that together and it would work. Like opposites is an interesting
way to think of that, pull a color out of that in
something that's completely, or maybe it's a
complementing color. We can think of it that way. But I do love how interesting
it is after you get the two different pieces of
arts combined into one piece. Feel free on this to do something like
this where it's all hodgepodge and
it's on purpose, or you could do everything
straight and butted up to each other so they just flow as one big piece of art that you painted in
different stripes. Either way, you're going
to get something super fun and amazing and you're going to turn some
art that you're like, "I really didn't like those
colors," to something like, "Look how fun that is," That actually is super fun. Then as far as composition, I do like how the bigger
pieces are opposite. But we could check out
what would this look like if I turn this over, though I do like that actually. Don't be afraid to look at them from
different directions. Maybe they'd be cool as a set in this direction because that is actually pretty
cool right there. I might even like that
better because now it's a long and
they're [inaudible] . That's actually super cool. I'm glad I did that. Have some fun with this project. I want you to pull
together a couple of color ways that contrast
or opposites or pull one color out of
the piece that you started with and just
see what can you make, glue in these together. I hope you have fun
with this project and I'll see you in
the next project.
18. Reimagined Art - Cut Our Favorites: For this project, I want
to talk about cutting the pieces out of the larger
piece that we might love. If you end up with a large
composition and you're like, something's just off about it, we can search out little
treasures in that piece of art that we're like, now that works. Now we have the control
to edit out parts that just aren't working for us to include parts that are
to focus on composition and the movement of the piece. For this I particularly
like the way the punchella red circles
come through here. I like the way the yellow
is merging in from the sides and that
could be a composition. To look around different
pieces of the art, I like this here with the
stripes and that red coming in. I'm using some little
pieces of mat board that I got at the craft store because they're cheap and
they're really nice to look at how a piece might look as
a framed piece of art. Because sometimes
you just need to frame it a little
differently to be like, wow, look at that. I also cut these out myself. This is just a piece
of watercolor paper that I've cut a square in. Then I could come around here and say, are there any
little micro collages that we could pull out of here? That's cool with
that mark-making. I really love being
able to re-examine a piece with these and pulling
little pieces of art out. Because I identified
this piece here, I could go ahead and just take A because it's a double mat, I could make it a
little tiny bit bigger and cut the bigger square out, and then I could
double-mat it like that. But I could just take
like a pencil and decide, that's the one I love and cut this out with
a pair of scissors. It should be really easy
to see with the wax because I just dug
down into the wax. Then for something like this, I'm probably just going
to take my scissors, cut along that line
we just created, and just cut that piece out. If you are concerned about ruining a piece
of art and you're like, oh, no, what if I
cut the wrong piece? You could photograph these and then cut up your
print until you're like, this is the one I want. Then you didn't cut up the
original piece of art. You can get lots of
different pieces of art out of things that way. Then you can come back and
use that as your main guide. If you decide you loved it and you're ready to cut
the piece of art out, you can do that and I don't care if
these get stuff on them. I'm just using these because I did just
get paint on that. Don't pretend that
these are going to be used later for anything other than your guide because you're going to
get paint stuff on them. But now check that out. I love that and I might even love it enough to
want to pair out of it, and so now I can re-imagine
larger pieces of art into smaller pieces
that I find amazing. Because I actually did
like this right here with the stripes and the red
coming in from the side, so let's just cut that out. I know it's not
going to be perfect, but it's up underneath
that smaller size. Let's just go ahead and
commit this piece right here and the longer you
let these cure, the less residual paint you'll have that might come
off onto say, your fingers. Just know if I'm ending up with a little bit of paint
on my fingers today it's because I'm working
on these pretty close to when they were painted. The longer you leave it, the less residual paint you'll have come out
on your fingers. Now check this out. I actually like it that way now that I've turned
it, I flipped it. But check that out. I love it. Oh, my goodness. Look at those two. Those are pretty cool. Now I have two
cool pieces of art that I have cut out of
the bigger piece of art. If I want, I could trim the
white edge off of this. It doesn't matter if
I'm a hair different because these would be matted right up to the edge. But if I want to
photograph these before, then I could just
cut that white edge off but check that out. That wouldn't have
been my color choices, but that's some super fun pieces that we've cut out of
this larger piece. Because I have still
some art left over, this could be collage elements
for some other pieces. This right here, look
at that right there. That's a beautiful
piece in itself. Could be a little micro collage, but check this corner out. Could be an element in a
larger collage piece and this could be the
standout piece. Oh, my goodness, I'm loving this little corner. I like the little bit of yellow and the little bit
of red and teal. That one's pretty cool. We could just cut
this whole thing up. It could be gift tags, it can be small pieces of art that
we send to other people. I'm really liking this
piece here and this piece, but let's leave this
for an option later. If I wanted to see if
I had any other pieces that I could connect
up with this series, I could come back into my other pieces
before I cut them up and just see is there anything else that I want to
cut out of here? These have a lot more going on, but I like this one here because I like the
darkness movement. I like the yellow coming
in from the side. That's pretty cool right there. Don't be afraid
if you're looking at it to start
flipping it around. Don't just look at it
from one direction because you might see something different coming in
from a different viewpoint. Like if we did that same
corner but this way, now we've got these cool
stripes up here from where we banged our bowl
scraper into our paint. Then we've got some
good movement with this set of brown dots and
the little yellow down there. That's even better composition. If I cut that out too soon, I would not have gotten that
composition out of there. Look around all the pieces and cut out the ones that
you think are amazing that you would definitely want
to keep as a piece of art and cut those out before you
go to any other cutting out. Because you may have
something amazing sitting in there that you
didn't want to give up. I could look at this with a
little bit bigger viewfinder. I think the smaller one
worked better for that, but I did like that
little corner there. I could definitely
pull this out of here. I'm feeling that. Let's just claim this corner. Got little pencil here. It will be completely different really than the two that
I've got over there because even though I was
using the same color palette, I was combining them in a
little bit different way and I ended up with a completely different look by doing that. Look at that. This is like peeling tape
and having a reveal. Let's put our little mat board around it and just see. Look at that. That's a pretty cool
piece of art right there. I love that. We did good on that one too. But you'll see here too
there's a little bit different than the
other ones I cut because I went to more teal and this is more
grayish in that blue rather than that teal. Completely different. But check out how
amazing that one is. Now I just want to look, is there another one in here
that I can have as a pair? Because if they're framed
up as a little payer, how cool would that be? That would be pretty cool. I'm liking this
mushy paint here. Do we think that
would make a cool? That might be pretty cool. If we're putting that
right next to this, it might be a cool pair, but completely different because I do like what
that paint is doing. Should we look at it
from another direction? I'm not liking it
from that direction, maybe from this direction. Let's see what we have come in. Now see if I go right there, pairing that right there. I'm liking that. Let's just get that in there. I just love, love
to cut up stuff. I should have been like an
elementary school teacher. We should have been playing
in art and scissors because kids like to
cut stuff up too. Oh, we would have
had so much fun. You can use a paper
cutter on these if you want to be more exact. I'm just doing these
for me and you, but look at that. Oh, my goodness. This one is gorgeous and it's really pretty
next to the little pair. That one's pretty stinking
cool, that one's cool. Now I want a clean piece of
mat board to photograph these with now that I've
got this piece of mat all gummed up with paint. But check that out. That is amazing. We've got those
two out of there. Search out the art before you decide on another project that
you're going to do with it and see if there's any pieces that are insanely amazing
that you may have to use. Look at that stripe, wouldn't that be gorgeous
in one of the stripe ones? Oh, my goodness. Got to say that. These two pieces are cool. Got a little baby stripe there. The little stripe pieces
that you end up with, you could actually just take
all these little pieces and make a big stripe piece and see just what
you end up with from random paintings that
have a leftover piece. How cool would that be? Today's goal for this particular section
is to cut yourself out some miniature
little masterpieces out of your big
art and just see, what can you create? Searching out fun compositions in the bigger piece that maybe the bigger piece isn't
working out at all, but maybe the little
pieces are like, perfect. I can't wait to see
what you cut up. I'll see you back in class.
19. Reimagined Art - Paper Weaving: On this project, I'd like to try something
a little different, and I'm trying to use up all the different
paintings that we painted in class to
do these projects with so that I didn't paint something
and then you're like, wait a minute, what
did you do with that? But we'll see how it works out. Here's what I've got left
over that we haven't already used or decided, looks amazing, or cut up
into other pieces of art. Here's what I've got left over. I like orange and purple
so I'm okay with maybe combining some of
the orange into this so it's a pinky purple
look to it on that one. I'm okay trying this out. If it doesn't work,
it doesn't work, but I thought I would try. I've got the two purples, the two orange and pink and the brown that I had is a
contrast possibility, which I did not end up using
in my stripe that I created, but I could use it
in another stripe if I decide to make some more
of those striped pieces. But I want to do something
completely different. I'm going to be working on a larger piece of Canson
watercolor paper. This is 11 by 15. You can go as big as you want. You can try much
smaller if you'd like, you could have that piece of paper and cut it in half
for like this size. But I thought, go
big or go home. I want to try a weaving project. It's decide or determine how big we can go really by how many pieces we
can weave together. But I thought maybe we
could at least start off just giving it a try. I'm going to cut
all of my papers into some stripes
and you don't have to cut all of them up because I think maybe even three
pieces might be plenty. But I'm thinking this brown. Let's just cut those up into, I would say stripes all the
same color to be honest, because thinking
with this weaving, it might be easier. But then again, it
might be nice to have different sized weaved
pieces in there. Let's do different sizes. Let's just do different sizes. Never mind, you know what? Let's just go for it. You can decide as you're
creating your weaved piece, what you think it needs to be. As we're weaving, I might
be more inclined to say, oh, this works better or that
works better. I don't know. So let's just cut these
into big stripes. These are fairly big
pieces because I'm using that 9 by 12 paper
and it's most of the page. If I want it to be even bigger, like we might cut this
other one the other way, these I'm cutting
from this direction, so they're only this tall, but what if I had cut
them for this direction, they would have
been even bigger. So experiment with
that and see what are you thinking you want your
weaved piece to look like? Because this is different. This is something
that you can do that you're not going
to see a lot out there. Let's cut this the long way. I particularly love doing
things that are unexpected, out of the ordinary. You're not going to see every
artist out there making one of these unless
you took my class. But here's the point. I want you to start
thinking outside the box. What else can I do
with these pieces? You can paint it and say, I don't know how
that worked out. Now that I said I cut
that the short way, look at that, I actually cut that the long way, so I lied. These are the long ones. Do I want these to be short? Now I'm just like,
let's just cut them all along and we can cut some shorter ones out
of there if we need to. But I want you to
think outside the box. I want you to get art that
nobody else is getting. I want you to get excited about creating
and I want you to create things out of stuff that maybe you thought,
that didn't work out. Look at it and say, okay, that didn't work out right, but what else can I do with it? What else can I make with this? Can I just make a
collage piece with it? Cut them all up, build
them in your collage box. Can I make a weave piece out of it like we're about to create? Can I make a cut up stripe one? Because let me tell
you that right there, you're going to see
that again from me. This is now the second
time I've brought that up in a little
bit different way. I wanted the project
to be a tiny bit different than my
original piece, so every time I do it, I change things a tiny bit. Look at that stripe. Cool. Every time I do that, I want things to be slightly
different than what I did before and I want to
keep things exciting, give you some fun,
new ideas too. But I want you to start
thinking about your own art, like okay, now this
didn't turn out. What can I do with it? Can I just cut a lot of little
pieces out of it and make those little mini
collage pieces or many art pieces that I can
do something else with. I can sell, I can send
it in little cards. Just all fun you can
think to do with art even if your
original piece didn't end up like you wanted,
don't get disappointed. Think how can I cut that
up into something else? I wish I had been cutting up art way longer than I had
because it really is the thing that gives me the most joy up here when I re-imagine it into something
else and I'm like, wow, totally didn't expect that. Now that I'm cutting
these oranges out, probably going to like these
in here. I don't know. Don't be afraid to abandon your idea if you're thinking not quite
what I was expecting, don't be afraid to change directions and make
some other choices. You don't have to.
Nothing is locked in. There are no decisions that
you can't back out of. Some of it could just be the
mood you're in that day. Let's take this, I got paint residual
all over my fingers. Let's just go ahead and clean my fingers off with
my microfiber cloth. I'm telling you these are the most amazing invention ever. They're cleaning cloths, they're over there in the
home cleaning section, most stores. Let's work right here so I don't even have to
touch everything too much. What I really love about them is I use them for everything, wipe my brushes off on them. They're perfect for anything
that you could want to do in your art studio.
They're amazing. With paper weaving, we're taking pieces of paper and we're weaving
other pieces through it. It's going to take
a little bit of deciding and moving stuff around and which way do
you really want to weave some stuff and do I
need some little pieces, and if I get something on this piece of
paper in the wrong spot, do I need to start over on
a clean piece of paper? Maybe. Because I just got brown paint
where I didn't want it. But can I take my eraser and
erase that paint over there? Maybe. Hope I've got
more paint on it. We're going to lay this out, decide what we want and then I'll start on a
clean piece of paper. I want it to be
clean when I'm done. I want it to actually
be a beautiful piece of art and the weave in part, we might end up with some dirty fingers and I
might attach it later. Really this is the
shape we're getting. I'm thinking we could
start with this. We could weave
things in so you're going to go under
over, under over, so you can see how
this is going to be a challenge getting under over, under over the pieces. But just take your time and
just see, what can we get? This is if I weave the purple through and then some of these, once we attach
these to our paper, we can trim all these edges. What else do we have in here? Now you're going to
have to go opposite. So if I went under here, the next layer has to be over. Let's say, do we like the purple or do we like the crazy pink? Or do we like the pink and the brown and leave the purple out? Let's see, maybe we like the pink and brown and
leave the purple out. What we could do is when
they're all straight, we can weave them and
then we can push some of the weaved pieces in some
uneven directions too. Maybe we like the brown and the pink, what do
you think of that? I'm just going
opposite over under, over under and then
I'll pull these down. It's like we're weaving
our own piece of fabric, but we're doing it
with cool paper art. Do we like the
brown and the pink? I want it purple. Now I can see with the bigger
piece of purple. I may need to cut
the other purple up. But now that I just did that, I can see that I did the purple. Let's just start weaving this. Now that we've made
that decision, that's going to
take you a minute. I'm just going to come
in from this end so I can weave these in
the opposite way. If I went under
on the first one, I'm going to go over
and then pull those in. They're not going to
pull super tight. We're working with
real thick paper here, but we will get them
pulled in pretty far. If you need to, you
could work with clips and clip these papers down. Like with bowl clips, you could try
something like that. Let's just go opposite what we did and see if we
come from the end. We're getting it's a
little easier to go over under in the opposite
way than we just did. See, it's pulling together
nicely when you do that. This two will determine for us, oh, we're going to
need this big piece of paper or do I need
to go smaller? Let's just get it started. Then we can make
some final decisions because as we're weaving, those pieces of paper are going to hold
themselves together. I don't have to glue
them all immediately. I can start pulling
and pushing and just seeing what we end up with. Look how cool that is. I like this part of this with this [inaudible] pattern on it. Just going back and
forth over, under, in the opposite way of
whatever we just did. Look at that. That's pretty awesome. That's pretty beautiful, actually. Oh, my goodness. Now I'm not worried about the pieces sticking
up because I can glue these down onto
my final piece of paper once I get for sure
what I'm wanting to do. I can definitely
tell on the purples. We can pull those in and out. I do like how they're
doing that fun, not quite even look. That's fun. I could match that on the bottom side by just
cutting these with scissors. I like that right there. What do you think of that?
That's pretty amazing. I could match that
with the brown. We don't have to have them all stopping at the same place. I do like the unevenness of
the brown and the purple. You just decide if that
bothers you or you love it. I do have some paint here that as I was pulling
I pulled some paint. What do we think of that? I'm liking this. One other thing that
we might consider, we don't have to
attach this to paper. We can attach this
to cradled board. This could be a
finished board piece. Paint the board. It's a colored out
here that you love. Then this piece can be
glued on top of that. Get a board as big
as this piece. I might consider that. I'm not sold completely on
this having to be on paper. Let's just look. Do we want to pull these in tighter or
like the different links? I actually love
this circle pattern even more than
what I got up top. What if we can cut the
top off of that one? Look how cool that is. My goodness. The top ones
are still a little shorter. Don't want to even that
up. Let me look at that. It's almost like I
need one more brown. Do we have one more
brown? Let's see. I do have another
piece of brown. Of course, now I've
already cut some of that. That's okay. Let's just see. This is why I don't glue
it down immediately because I may need to
look at the composition. I may need to make
some decisions and start moving
and changing stuff. Yes, I think that last piece of brown made that
look a lot better. Now I wish I had not cut
this piece, but I did. That's okay. Do I have a piece left over
that's longer? I do. We could replace that with the longer piece
and think about it. I'm loving that like there. Before I decide what I'm actually going to
attach that to, I'm going to go look
at my cradle boards and see if I've
got one of those. I'd have to have a bigger
piece of paper which we could paint if we wanted
to have it a color, or I could have it
melted nice and clean, but I'd want all of the paint
residue off my fingers, and I'd want to be very
careful about gluing it down. Let me go and see if
I've got a cradle board. I'll be right back.
20. Mounting To Cradled Board: [MUSIC] I do have a cradleboard, this is 11 by 14, which works really nicely with the size collage that we've
created, the size weaving. It does go off the edges just a tad on the ones that I've
pulled to the extreme, but we can simply trim that at the very edge of our piece. What we want to do is
take the wrapper off, paint this whole
board and the sides in a color that's
in this preferably. Could be the brown, could be the purple, could be this lighter
orange color. You can see it on
the board [NOISE]. Let me just take this. This is unprimed board. But even the raw wood
will give us an idea [NOISE] of what this would
look like on a lighter color. Check it out. That would look super cool right there in the middle
of our board. If we painted this a lighter whatever this
orangey color is, we can just use a
craft paint for that, paint that that lighter color or a color coming out
of your piece, that would be super cool, and then we can glue this down. I'm going to paint this board
and I'll be right back. I have picked a yellow ocher. If you're wondering what
paint should you paint with? Should it be a craft
paint or a nicer paint? What is your end purpose? If your end purpose is just to do something fun and
crafty for yourself, then a craft paint is fine. If your end piece is to be
a beautiful piece of art, that maybe you want to hang in your house or give
away or sell or use in some way that's
more fine artesque, then use a nicer acrylic
paint as your base coat. I have picked yellow ocher because yellow ocher
was in our piece. It's a very vivid yellow, which I don't mind. The color is, it's
probably 80 percent dry. I painted it, I went to eat lunch downstairs. I put two very thick
coats of paint on here. It's not maybe 100 percent dry. If you're sticking
this down when it's not completely dry [NOISE], you'll have some
paint come back up. But I'm not really
worried about that, I can touch up if I need to, I want to tell you how I'm
going to finish it off. I'm going to use my Yes! paste, and I'm going to strategically put the
paste on the back of here, and then stick it down exactly
where I'd like to have it. Then I will trim these pieces that are
coming off the edge, I'm going to trim
those slightly, but I'm going to wait till
I stick it down to make sure that I don't trim
it in the wrong spot. Then all the pieces will be attached exactly
where I want it. If I put a little
bit of a Yes! paste on the edges here and
stick those down, then all of my piece of art will be completely stuck
down really nicely. When the paint is dry
and I stick those down, I could then smooth
it out really nicely with a piece of paper to make sure that everything
is smoothed on. I'm going to go ahead
and glue this down and call this project
good because I'm actually super thrilled with the way that this weave piece looks on top of the
piece that's behind it. It's got the sides painted. I just put two
coats on the sides. I could have done a deep
purple on the side, that would have
been really cool. You can get creative with how you finish these
and paint the sides. But how super cool is that? I want to see you
do a weave project just because it's unusual. You can pick two contrasting
pieces of art to cut up. You can do different
size stripes. It's very interesting to weave
and see the way that they combine and visually look from further back when you see
the different patterns. I did like it [NOISE] that one had quite a bit
of pattern on it, that purple one, and the other one was a
little more neutral, but there's still a lot of
movement going on in it, so you might paint like a
junk piece that's all similar one-color mark-making
it with something sharp and then just have that
as a fun contrasting piece. That might be fun. I want
you to give this a try out. Doing the collage weaving project is super fun. This is a really beautiful
finished piece of art on a cradleboard
ready to hang. I can't wait to see
what you do with this. I'll see you back
in class. [MUSIC]
21. Final Thoughts: What do you think?
Did you have some fun aha moments in this class? Have you sat down and started painting a few
yourself and thinking, okay, I'm not going to put
too much pressure on myself? Let's just create,
and I know that tomorrow I'm going to come back and cut some of these up, and that's going to be super
fun because we're going to re-imagine it into a piece
of art that we really love. Did you end up like me with several pieces that you were like pleasantly
surprised and like, oh, this actually
turned out amazing, I'm going to keep it just
like it is and not cut it up. [LAUGHTER] I hope
you did because I feel like creating
with the intention of cutting things up relieves all the pressure that we put on ourselves when we create art. If we know just right up front, it doesn't have to be perfect, it just eases the mind and lets us put on some music and
just start creating, and then when we're all done, it's a joy to see what
we ended up with rather than an angry fest of I
didn't get nothing I loved. [LAUGHTER] I hope you have fun doing some of
these projects. I hope you take some of this philosophy of
create with abandon and don't worry about
the outcome because we can always re-imagine
it into something else. I hope you take that
mindset going forward. I want you to really start to enjoy hanging out
your art table and experimenting not worrying about different colors and things
because you can pull from a source to have
colors and just say, okay, what can I create today
with this color palette? I'm going to cut
these up later so I'm not too worried about
it. What can I make? I hope you have fun with that mindset because
you're going to end up with some amazing pieces of art because you let
yourself relax. You didn't think
too hard about it. You went with the
flow and loosened up. That's the best way because then you surprise
yourself with some of the things that you
end up with and you're like this is so cool. I hope you experience
some of those moments. Take that mindset with
you going forward. I can't wait to see what
you create in class, so come back and share
some of those in the projects and I'll
see you next time.
 DENISE LOVE, Artist & Creative Educator