Transcripts
1. Class Intro : [MUSIC] I think as an artist for day
drawing is a gift for myself and also
for the person I draw. Hi, my name is Ritika. I'm an artist and a calligrapher
from Tamil Nadu India. I love creating portraits both on traditional and
digital medium. I also do other forms
of art and calligraphy. This is actually my
sixth Skillshare class. In this class, I'm going
to teach you how to draw portraits in
traditional medium. This class is all about understanding face
anatomy, proportions, measuring tricks, and also understanding and drawing each
facial feature in detail. With these techniques, you'll be able to draw
portraits with these. I started drawing portraits
in freehand without even learning the face anatomy
and the facial proportions. That is why it led me in drawing portraits that were
really out of proportion. So it was really
frustrating for me and it took hours just to make
the outlines correct. Only after few years, I learned the right
method by studying and analyzing the face anatomy, and also studying in detail about eyes, nose, lips angles. So after this class, you'll be able to draw
portraits easily. That is why I structured this
class in such a way that we go through each facial
feature one at a time. In this class, I'll
be talking about all my favorite
tools and supplies, then they can jump on to the process of selecting
a beautiful reference. Later we will see in
depth about face anatomy, measuring tricks, sketching a face with
geometric sketching, learning on how to draw
each facial feature; eyes, nose, ears, and lips, and then at last will be
shading the portrait. This class will be great for beginners and intermediates, and also for those people who
are drawing portraits with grid method and wanted to
switch it to freehand drawing. Getting a better
understanding of facial features so
that you can draw more accurate and
proportional portraits can be used in a
variety of contexts, like cartoon drawing, commission portraits,
illustrations, foster making,
stylized portraits, and character join
and so much more. Recently, many artists
prefer drawing grid portraits because it is more accurate and time saving. Yes, it is time saving
and also accurate, but I think as an artist, it is important for you
to know how to draw a freehand portrait so that later on and
whenever you need, you can draw portraits. You can even practice
live drawing if you know how to draw
freehand portraits. You cannot simply rely
on grids every time. I love to draw portraits because when you create
a portrait of a friend, or a client and when
you present to them, the joy that you see in their faces is
something different. That feeling actually
gives me the push to work better in my
upcoming projects. I'm thrilled to meet you in this class so don't
forget to follow me on my Skillshare and my
Instagram page so that you keep updated regarding all
my classes and my works. So without further ado,
let's get started.
2. Class Orientation & Materials: [MUSIC] In this class, we're going to have a
lot of fun creating many projects like
the face anatomy and the facial features. The aim of art is not to represent only the
outward appearance, but also to represent
their inward significance. That is, you should not only look at the outward outlines and the sketches but also their facial expressions
and all those details. You don't have to stress much
because I'm going to take you through every step
of drawing a portrait. For today's class,
we'll be learning and creating a lot of projects. First, we'll be
starting off with the face anatomy using
Andrew Loomis method, and then we'll be sketching a portrait using
geometric method. Then I'll teach you how to
shade and draw the eyes, nose, lips, ears, and hair. At last, we'll be shading
the complete portrait. I think as a beginner, it'll be easy for you if
you learn it right from scratch than just starting
off with the grid portrait. Grid method will help you save more time and bring
more accuracy, but it will not definitely help you to improve your
drawing skills. The methods and the techniques that I'm going to teach
you in this lesson will definitely help you to understand the human
proportions and also the facial features
in detail one at a time. Start with me, follow a lesson, and then draw the
assignment based on that lesson so that
you don't feel lost. First are actually the papers. There are actually two
categories that you can use, rough and smooth
textured papers. I prefer using rough papers for my pencil drawing works and smooth textured papers for my color pencil
drawing techniques. It will differ for
each and every person. It will also differ based
on the shading techniques. You can follow along with me or you can just
prefer and choose one paper that is
suitable to you and also for your
shading method. Be it rough or smooth
textured papers, make sure you choose
120 GSM or above. The one that I'm going
to use in this class is Fabriano Accademia
200 GSM sheets. One more important
thing is you can find a free downloadable workbook
in the resource section. You can check out all the materials and the
supplies in that workbook. Also, you can use that
for your practice. The next thing we
need are the pencils. I'm going to use Staedtler
graphite pencils. I'll be using HB, 2B, 4B, and 8B. 8B is a charcoal pencil. Along with it, I'll also use Conte a Paris 3B
charcoal pencil. The next tools and
supplies that we'll be needing for this
class are the eraser, sharpeners, and blending tools. You can have a regular eraser
and a regular sharpener. In addition to that, have a kneaded eraser
for lightening the graphites and also
for erasing fine points. Then you can also have
a mechanical sharpener. It will give you a sharp point for the graphite and
the charcoal pencils. Then in addition to that, I'll be using Tombow
Mono Zero eraser. It is very good for
erasing fine lines, and small areas, and small dots. You can use that as well. At last, we'll be using
makeup brushes for blending. This is also good for
smooth and light blending. [MUSIC] I highly recommend
you to have a printed copy of the workbook for the
ease of your practice. You can also have a printed
copy of the reference image, about which I'll
be talking to you in detail in my next lesson. Grab your tools and supplies, also your workbook
and the printout of your reference image.
Let's get started.
3. Choosing A Reference Photo: [MUSIC] The next step before we get started with our drawing is to select
a good reference image. A good reference image is
important for a better outcome. In the next few minutes, I'll be showing you some
of the important things to consider when selecting
a reference image. Since we're going
to draw a portrait and also eyes, nose, lips and ears, I
recommend you to choose one mode for each. The first thing
to consider while selecting a reference
image is to look for an image with good lighting
and with good clarity. I'll walk you through the
process of selecting the image. This is a simple face and
it has a good lighting. The face is actually
turned towards one side, so it might be difficult
for a beginner. This is again like the same, it has a good lighting and
it is of good clarity. But the face angle is different. This is a straight face, so it might be easy
for a beginner. If you're not a beginner, you can go for any other image or any other face angle as well. This is again, a good one. Next, I'll tell you the don'ts. You shouldn't select
a picture with a lot of makeup or with a lot of edit because you might not
be able to see the details. Also you should not select
a picture with lot of darkness because you can
only see the shadows in it. This is a picture
with a lot of makeup, so the face details
might differ and also it will not help you to
shade it accurately. Look for an image with good lighting and
select a simple image. This is the image that I've chosen for my portrait drawing, because I think it
is a simple and a straight face
with good lighting, and it also has all
the details in it. This is the one that
I'll be drawing and showing you in this class. Next, this is the
image that I've chosen for drawing the ears. For the eyes, it also has good details
and good lighting. This is for the nose, lips. I'll be attaching you with all these images in
the resource section. You can also check out
my Pinterest board for all the references
and even more. This is the portrayed
drawing workbook. You can find the e-copy of the workbook in
the Resource tab. In this workbook, I have mentioned the names
and specification of all the tools and supplies that I'll be
using in this class. That includes the pencils I use and also the
ones that I suggest. You can also find about the
erasers and sharpeners. Then I have included the
Andrew Loomis method, the general face structure for three positions of the face. This side three-fourths, and also the straight face. Here is the outline of the image that I've
chosen to draw. I have also included
the interpretation of the Andrew Loomis
method of our portrait. Next are the worksheets where you can sketch
and practice. You have the geometric method
process of the portrait, which I'll be explaining
you later in the class. I have included the
image that I've chosen and also two more. Next we have the eyes, along with the geometric
method of the eyes and also the completed eye
sketching for your reference. Here as well, for the nose, I have included the
anatomy study of the nose and also the finished
sketching of the nose. Next you have the anatomy
study of the lips and then the finished
image of the lips. Next, I've also included
the anatomy study of the ears and also the
finished drawing. These are the anatomy
study for the hair. Next for outlining the hair, you have the geometric sketching analyzed from this portrait, and then the completed
outline of it. Grab your e-workbooks from the Resource tab
and if possible, have them printed
for your practice.
4. Portrait Study & Measuring Tricks: [MUSIC] In order to
draw better portrait, first I recommend you
to do a portrait study. That is first you should analyze the general face structure and analyze the positions of eyes, nose, ears, and lips. By doing so, you'll
get a clear picture of the face anatomy and then it will be easy for you to draw. For that I want to introduce to a method called
Andrew Loomis Method. Let me show you how to analyze the facial
features with this method. This is the general
Andrew Loomis Method for the straight face. It'd be suitable for
both male and female. I'll draw and show
you how to do this. First draw a circle and
then mark its center point. This will be my center point. I'll draw a line that is
cutting through the middle of the circle and then a line that is cutting
vertically in the middle. [NOISE] I've drawn a horizontal
and vertical line that is cutting
through the middle. After this, I want you to divide this into
three equal columns. I'll first make an
approximate mark and then check if this is making
the three equal parts. It's almost equal so I'll mark this in the same way I'll
mark it here as well. Then I'm going to draw a horizontal line
from here to here [NOISE] Then I'm going to join these two points [NOISE] After this pick this measurement from here to the middle line, and place it here and
I'll mark this point. After this, I'm going to
draw another line like this and then I'm going to mark the center point here [NOISE]. Now, this point where we remarked is actually
the chin part. I'm going to connect
these two lines [NOISE]. We are almost done [NOISE] I'm also joining this
point to this point. This is the general
face structure based on Andrew Loomis Method. It is the same for both a
male and a female face, but actually it is only
applicable for the straight face. If you're going for the side
face or a threshfold face, the structure will vary. For now, I'm going to
teach you only this. Now I'll explain
where the eyes, nose, and the ears are
actually present here. This midline that we first
drew is actually the eyes. This is where the eyes
will be located and then this is actually the forehead line but it
might differ for some people. It might be placed
up or below based on their face but this is
usually the forehead line. This is where the nose
is actually present. Here we'll have the lips, and this is the chin. Here we'll have the ears. This is the general
face anatomy. Based on this, I'll
explain to you how to analyze our reference image. Here you can see
that I've placed the general structure on
this reference image. While you draw, you
can use this to analyze the face positions. You can see the eyebrow line, nose is present here and the
lip is actually ending here. This is what I was saying, it will differ for
each and every person. For doing portrait, you can actually take this as reference image and place
it above your image. You can use this method
to start right from base, or you can use this to
cross-check the measurements. Before starting or sketching, I want you to note down few
other measurements as well. This is the outline that
I'm going to draw and show you and here is the
general face structure. I want you to note
down few measurements. See the starting of the eyes and the nose both lie on
the same line as well as the center of the eyeball to the start of the lips all
lie on the same line. You can also note
down the gap between the two eyes is almost
equal to one eye. By understanding this, it'll
be easy for you to draw. This is the general
face structure and the general placements. With this knowledge, let us go first sketching up portrait.
5. Geometric Method: [MUSIC] The goal for this lesson is to show you my process of sketching
the portrait. Now since you knew this
Andrew Loomis method, you can use that for
cross-checking the measurements. In this lesson, I'm going
to teach you how to draw a portrait with the help
of geometric method. Geometric method is
nothing but breaking down complex subjects
into simple shapes. That is how we are going
to draw a portrait. Let me show you how to do that. Now I have my reference image. I'm going to just
trace it above it. I'm not going to consider
all the curves in the face, instead I'm going to take it
as a single line like this. Don't consider all the curves. Just imagine them
as a straight line. Now I've traced almost
the outer part. Now I will also trace the
positions of facial features. So I'm drawing this as a line and some basic shapes. This is actually the geometric
sketching of this image. This is actually done with
the help of tracing method, but we're going to use this as a reference
and we're going to start drawing this basic
structure on our sheet first. Now here I have the
geometric sketching and here I have my
reference image. Now I'm going to draw this
geometric sketch on our sheet. I'll also measure
the distance of the lines so that we can
draw it more accurately. [MUSIC] You can see I'm not
drawing all the curves, instead I'm just
recreating the lines. That is what we do usually when we draw using
geometric sketching. I'm also measuring
all the heights and the lengths of the face. [MUSIC] Cross-check the
measurements wherever you feel you are not
drawing it right. [MUSIC] Now I've finished the
geometric sketching, I'm going to draw all the
placement of the eyes, nose, and lips now. That is also going to
be based on lines and shapes and not curves. I have the eyebrows here and this eyebrow here. Next, the nose line. That is right here. [MUSIC] While cross-checking, I could see a gap between
the chin and the hairline. Those are the things that can make a portrait more accurate. So I'll draw that shape as well. [MUSIC]
6. Sketching A Portrait : I've drawn all these
positions of the eyes, nose, lips, and
the ears as well. From this point, I'm going to build the outline based on this. You can see I started
with basic lines and then first drew the outer
part of the portrait, the hair and the shoulders. After that now I'm
drawing the eyes. While I drawing eyes, make sure to recheck once or twice to keep it more accurate. Also check the distance of the eyebrow and the eyes, the nose and the
eyes, and so on. I'm checking the height between the eyes
and the nostrils. The reference image that we chose actually has
very small eyes. Make sure to draw
it just like that. Now you can see me
that I'm focusing on all the small details. If you have any doubts, you can measure it even with the scale and cross-check
the measurements. Now I'll start drawing the lips. Before you start drawing
all the details, make sure you erase the
geometric sketching very well. Keep it light so
that only you can see and you can make
corrections later too. Now I'm measuring this
distance and marking it here. Also, check the vertical
line, if it's center. Now I think I'm going
to erase this and draw because I can see the gap between the
nose is not accurate. You can even draw
the center line on your resident image
and measure and see. I'm marking the point and then redrawing it. I'm checking the nostrils
position with this line, and see the spacing
between them. Now let me draw the lips. The starting point is here and I'm also measuring
the midline. It is almost here. Now we have seen how to
sketch a portrait using tracing method to study and
geometric method to draw. In the next lesson, let me
show you how to analyze each facial feature in
detail and to draw them.
7. Planes and Tonal Values: [MUSIC] In this class, I'm going to talk to you about
planes and tonal values. First, let me tell
you what are tones. These are the tones
on which I call, guys, tonal variations. This one here at this left
end is the low value, which has very low light. It is very completely dark. This one over here
on the right is rich in value because it
has lot of light in it. The tonal variations
start from here to here. These are the shadows and
these will be the highlights. Gradually, the light will
increase step by step, and this is called
the value scale. Our portrait will have a lot of tonal variations with
a lot of darkness, shadows, and with a lot
of highlights as well. Before analyzing our portrait, I want you to know
about planes as well, so let me show you
what are planes. Every object that we see can be simplified into
a basic shape. Here is a basic shape to
explain what are planes. This is a basic shape
and it has six planes, but you cannot see on the other side because
it is a dirty image. This is a plane. This is another plane, and this is another plane. Likewise, our human face has
also a variety of planes. This is a simplified
plane of the human face. It is a bit complicated one, and this is again
a detailed one. Then here we have the last one which is similar
to our human face. You can see that
there are a lot of tonal variations and
lot of value changes. This is, again,
another example of a human face with lot of planes. Here you can see, this is one plane and this
is another, and so on. The variations of the tones will differ based on the
light direction. Here in this image, the light direction is
from this side so that you have a lot of highlights
here and shadows over here. Likewise, in this space, you can see the faces
turn towards this side. Here again, the light's
direction is on this side, so that you have a lot
of highlights over here and shadows over here. Again, this is a face
with top-angle lighting, so you have highlights over
here and shadows over here. The range between
the highlights and the shadows are
mid-values or mid-tones. Let me explain the tones and
the values in our portrait. Now I will explain
the tones, shadows, and highlights of the
portrait that I've chosen. This is the image that
I'm going to draw, and I'll explain you
the tonal variations, shadows, and highlights. This area, which is dark, is actually deformed shadow that is formed due
to the lighting. These are the highlight region, all these areas where
you can see light tone. These are all because of
the direction of the light and due to the light hitting the portrait
in this direction. Now, these are the areas rich in value or the highlight, this is because of the lighting which is
in this direction. This again is a cast shadow. Cast shadow is due to this
hair that is hiding the face. We can find our cast
shadows here as well. This is the cast
shadow of the nose and you can find our cast
shadows in a lot of places. Here as well, this is again, a cast shadow that is formed
on the neck due to the face. The next one is deformed shadow. This is a form shadow, and these areas are
also form shadows. These are the things that
you have to analyze on a portrait before you
start drawing it. In this lesson,
[MUSIC] we have seen in detail about planes, tones, and tonal variations. In the upcoming lessons, I'll show you how
to draw eyes, nose, ears, and lips, and
also to shade them with the knowledge of
these tones and values.
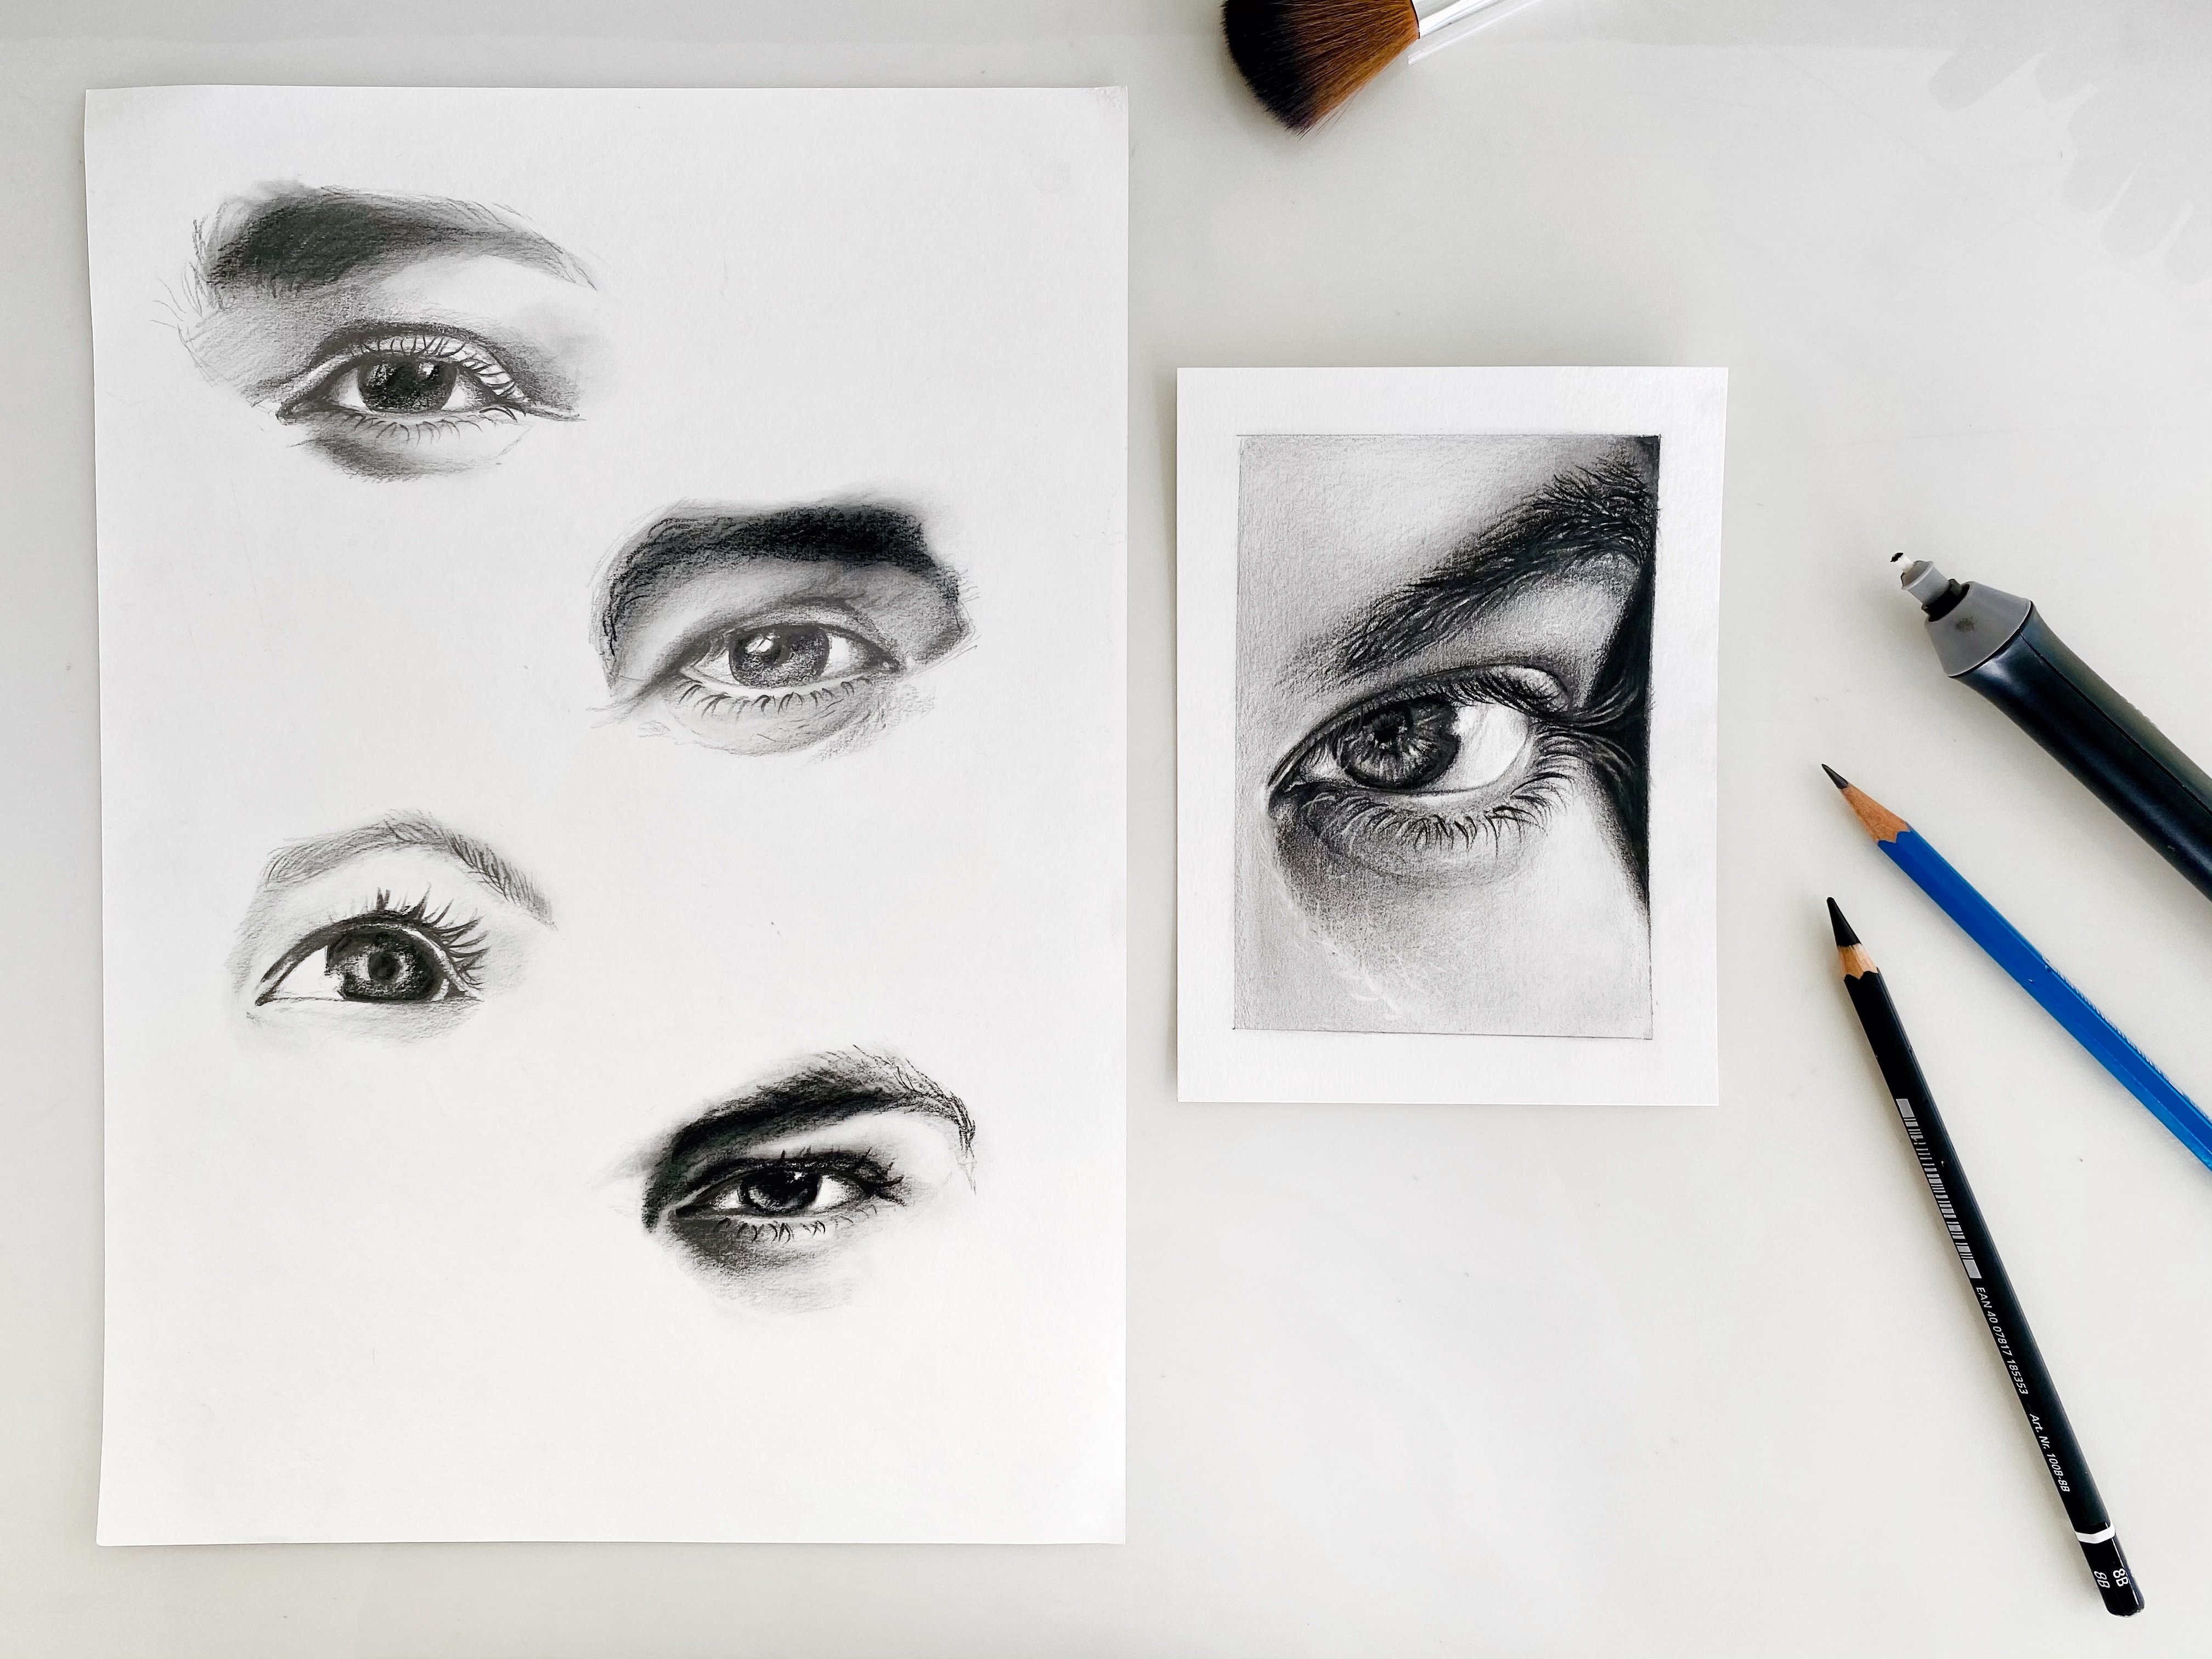
8. Eyes: Contour Drawing: [MUSIC] So far we have seen the gender
face anatomy and we've also seen how to
sketch a portrait. In this lesson, I'm
going to teach you how to draw and shade the eyes. If you want to know even more in depth about drawing
and shading eyes, you can check out my other
class on Skillshare, which is completely
dedicated for eye drawing. There I teach you four
different eye study and one detailed eye
drawing and shading. Let's get started. Here is the image that I
have chosen to draw. If you see this,
you might wonder how to draw this and even
you might panic a bit. But if you understand and
analyze it how to draw it, just like how we did
with the portrait, it is easy to draw. I'll show you how to sketch
this by first studying it. Here I have my reference image, now I'm going to mark
the line of the eyebrow. Just like we did in the
geometric sketching. Then I'm going to
identify the midline, that is starting here
and ending here. After that, I'll also
draw a line so that we'll see the height
of the eyeball. Then I'll also mark the end of the eyebrow and the
end of the eye. Same way I will connect
from here to here. You can also trace this outline, which will help you
to draw it better. Now I have this basic structure. This way we can
draw this easily on the paper and then we
can draw the eyes. Now first let me draw this basic structure
that we analyzed. I'll first start with
the eyebrow line. Also, ensure that you're drawing the lines with the same angle. Then I'll draw the starting
and the ending of the eyes. Now, I'll connect these
two points and these two. Next, I'm going to mark
the height of the eyeball. This is the height. I'm rechecking if the lines
are of the same angle. Now you can see actually
the height from the middle line to
the upper eyelid is actually bigger than
the lower part. This is usually the same
for almost all the eyes. Also one more thing
that you can see, the eyeball is not
actually a full circle, it will always be cut either by the upper
or the lower eyelid. These are the things
that you can note to keep it accurate and realistic. [MUSIC] Now I've drawn the
basic structure. From this, I'm going to draw all the details and
sketch the eyes. [MUSIC] I lighten these lines and now I'm going to
focus on all the details. [MUSIC] This is the upper eyelid and make sure to
check the distance. Here we have the tear duct and now I'm drawing the eyeball. [MUSIC] The main purpose of this basic
structure is actually to see the distance between the
eyeballs from the midline. That will help you to
ensure the distance. [MUSIC]
9. Eyes: Shading: Now that I've sketched this, so let's get into
the shading part. Now I'll use the 8B
pencil to draw the cornea and also for the eyelashes. You have a dark circle
here that is fully black. I'm going to shade that with
the 8B charcoal pencil. Then here we have the highlight. While shading the iris, I usually start by
shading it off dark. Then I reduce the
tones gradually. Now I'll use a brush to smudge the charcoal and fill
in all the gaps like this. I'll again add the next
layer of charcoal. There are a lot of lines in the iris, so make sure to draw all those. Then I'm going to
dab here a little, since we have a
highlight here as well. Now I'll start
shading the eyebrows, see to the angle of
the eyebrow hairs, and I'm going to
regrid the same angle. Draw thick and thin lines, don't draw everything
in this same thickness. As we go to the end, you can see the eyebrow
hairs change in the angle. So observe that and draw. The angel is different here. I'm going to draw accordingly. Now I'll smudge it to
fill in the white gaps. Now I've used 2Bs and
4Bs for the mid-tones. So we can darken it later, too. I'm going to smudge
this with this brush so that I cover all the
white pores in it. Don't smudge it very hard. Just a mild brushing will do. This will make up
for the first layer. After that, we can
shade about this. [inaudible] shadows, I prefer using 4Bs or
even you can use 8Bs. Here I'm going to use 8B because
I have a very dark line. That is actually the
shadow that is formed. I'm using the 8B pencil for drawing the
lashes because I want it to be very dark and I want
to have a high contrast. Depending upon the tones, choose the pencils and don't leave this white portion
of the eye pure white. Just shade it with the 2B or 4B. It's not always pure white. Here I'm dabbing the
graphite a little. Now I'm almost done with
drawing and shading the eyes. Wherever you need highlights, make sure to remove the graphite with
this kneaded eraser. I see a lot of highlights
in the lower eyelid. So I'm going to dab the graphite and make
the tones lighter. That's it in this lesson. I showed you how to shade
the eyes realistically. In the next lesson,
let me show you how to draw and shade the nose.
10. Feature Study: Drawing Noses: In this lesson, let me show you how to draw a nose with these. Like in the previous lesson, I'm going to analyze
the outline of the nose with the help of
some basic lines and shapes. After that, we can build the details using
the basic structure. Let's see how to do that. Now, I have the reference
image of the nose. What I'm going to do
is analyze it with the basic shapes, like a circle. Here I have already
marked the circles. You can consider this part as one single circle and
this as another circle. Here you can mark it as another big circle that
is overlapping these two. You can also draw
a straight line to identify the center point. For sketching the nose, let me first draw
this basic structure on the sheet after that
we can build the outline. First, I'll draw this
vertical line, then a circle. I'll also draw a
horizontal line like this, which is here. Now I'll draw these two circles, see the distance
between the line and the circle and try
to draw the same. Now, here I have the
basic structure. I'm going to lighten
this up and going to draw the details of the nose. This is the end of the nose, I draw this line. You can see the nostrils is just below the circle and
within this circle. With that as your identification
draw it like this. Same way, here you can see the nostrils are starting
inside the circle. I'm going to draw like that. The end of the nose
lies within the circle. [MUSIC] Now I've completed the
outline of the nose. Let me show you
how to shade this. I'm going to use [inaudible]
charcoal pencil for the nostrils and for the rest of the tones I'll be
using 2bs and 4bs. [MUSIC] Now I have shaded the nose, you can see that all that realistic finish is because of the minor
details that we're given. The small highlights
that we did with the kneaded eraser and all
this matching that we did with the soft brush and also all these tones that are
finished by 2bs and 4bs. In this lesson, we have seen how
to shade the nose. In the next lesson,
let me show you how to draw and shade the lips.
11. Feature Study: Shading Lips: [MUSIC] In this lesson, let me show you how to
draw and shade the lips. Just like in the
previous lessons, I'm going to show you
first how to analyze the lips using the basic
shapes and basic plans. Let me show you
how that is done. This is the image
that I've chosen. First I'll help you
understand this outline. Here we have the mid line and you can draw the vertical
line just like this. After that, you can draw
the basic shapes like this. You can consider this as an oval and here
add another one, and a big oval in here. Based on this, you can
draw this first and then we can build the
outline with the details. Let me draw these
basic shapes first. This is the [NOISE] horizontal
line and vertical line. Then I'll draw these ovals here. [MUSIC] Then I'll connect
this point to here and from here to here. [MUSIC] Now I'm shading the lips, and for this darkest
portion I used AB pencil, you can see it is completely
dull and here as well. I'm going to use AB here. For all these stones, all these mid and
the light ones, I'm going to use
2B and 4B pencil. The areas where
you can see lot of darkness use 4B pencil for that. After each layer, make
sure to smudge it lightly and then
build upon layers. [MUSIC] We are done with our lips
drawing and shading. In the next lesson,
let me show you how to draw and shade the ears. Before going on to that, make sure you draw and practice all lips until you feel
confident about drawing. Let's see how to draw the
ears in the next lesson.
12. Feature Study: Sketching Ears: [MUSIC] In this lesson, let me show you how to
draw and shade the ears. First, I'm going to
draw the outline, add some big forms like
geometric sketching, and then we're going
to add in the details. Here, this is the geometric
sketching of the ears and later we'll be shading it
with all the details in it. Let me show you
how this is done. [MUSIC] After drawing the geometric
sketching of the ears, I've built the outline with the help of those
basic structures, then I've started
to shade it with the 4B pencils and
for the shadows, I've used the 8B pencil. You can see here we
have the shadows. All these places are very dark, and that is why I'm using
the 8B pencil here. Then for these areas, I'm using the 4B pencil but
the tones are mid-tones. Understand the
folds of the ears. Now you can see here
we have a fold. After that, we have a highlight. Just like that, I'm shading it. Later you can now create
the highlights with the MONO Zero eraser. Now I'm focusing
on all the folds. Enhance the shadows and
the highlights well. [MUSIC] This is almost done. While shading the ears, the main thing that you have
to consider is the angle of the folds and the
shape of the fold. Based on that, shade
the ears and also don't forget to create the highlights
and enhance the shadows. Here we have the highlights. I have created all those with the kneaded eraser and this
Tombow MONO Zero eraser. These are the areas with the shadows that I have
drawn with the 8B pencil. The rest of the areas
I've used 4Bs and 2Bs. In this lesson, we have
seen how to draw and shade the ears using geometric
or block method. In the next lesson,
let me show you how to shade the face.
13. Shading Details: Eyes, Nose & Cheeks: So far we have seen
how to draw eyes, nose, ears, and lips in detail. We've also seen the planes of the face and understood
it very well. That will be enough
for us to shade the face naturally
and realistically. Let us see how to shade the face in detail
in this lesson. I usually like to start
with the eyes shading. I'm starting with the eyes
with the charcoal 8B pencil. I'll be using this
for shading the iris. While shading don't forget to leave the highlight in the iris. That is the most important
thing while you draw the eyes. Similarly, the
other eye as well. Make sure you keep a
sharp pencil for this. Now I'll shade thin eyebrows. Use a sharp pencil
and draw fine lines. See the angle of the eyebrow
and draw the eyebrow hairs. Before drawing the lashes, let us first shade the base. Wherever I see midtones
I'm using 4B pencil. Here, here, and all of these areas I'm
going to use 4B pencil. I don't want it to be
very dark like 8B. Now I've shaded the darkest
portion of the eyes and the nose using 8B
and 4B pencils. Now I'm shading the
second layer with 2B pencil to match the tones and also to
give in the details. After adding this layer, I'll be using kneaded eraser
to create the highlights. I'm shading the forehead
with the HB pencil. Later you can darken the edges wherever
you find the shadows. Observe the angle of the
shades and then shade it. I'm rotating my paper constantly wherever I have
different angles. Wherever I need
highlights I'm using the eraser to lessen
the graphite. I see a lot of highlights
surrounding the eyes, so I'm erasing all these areas. For all the fine points I'm using Tombow Mono Zero eraser, and for wider areas you can
use the kneaded eraser. For the areas in the
chin and the cheeks, for all these areas, I'm using this eraser. I'm darkening all the edges wherever I have shadows
in my portrait. I'm using 2B pencil now. If you have a lot of lines, you can just match
it with the brush. I'm darkening all the
places wherever I have shadows in all these folds, especially the
eyes and the nose. Here is an edge, and we have a shadow here, so I'm darkening it. For this I'm using
only 2B pencil now. Depending on the
shades and the tones, you can switch the pencils. Smudge it lightly wherever
you feel it is required, and then add the details. Now here at the side you
can see the tones are dark, so I'm going to use 4B pencil. See the angle of the shades. The angle is like this, so I'm going to shade
it in that way.
14. Finalizing the Face: [MUSIC] Here in this chin portion
I have a highlight. I'm lightening the
graphite with this eraser. Make sure you use the clean
portion of the eraser. If it is already
filled with graphite, it will not erase properly. So I'm slowly rubbing the eraser to create the
highlight and the mid tone. [MUSIC] I'm also enhancing the shadow a little. You can see that tone is
actually darker here than here. Let me lighten this area
and darken this side. [MUSIC] Now let me shade the lips. The lips' tone is
actually very light, so I'm using only
HB pencil for this. If needed we can switch to 2B. But keep it very light. [MUSIC] Understand this curve and see
the angle of the shading, and then try to draw, and shade it in the same angle. [MUSIC] Here in this portion, I have a very mild tone, so I'm lightening, these tones. [NOISE] Now, we have almost
shaded the portrait. Now, I'm going to look into the fine details and lighten the tones
wherever it is required. Here, the shadows
are actually little more dark than what I drew. I'm using 4B pencil to
increase the tones. I can see a small
highlight here. For the eyes, I have
to draw the lashes, which I'll be drawing it now. Keep a fine point and draw
it with thin strokes. Same way for the lower lashes. Leaving this highlight
portion in the iris, I'm shading it completely dark. Also I see this fold is dark, so I'll darken this with 8B. Then this lip line
is also a bit dark. Now the highlights. Here are the tones
are really light. [MUSIC] This edge is also very light. I'm erasing the tones here. [MUSIC] There's also a bright
highlight in the nose. [MUSIC] I'm enhancing the tones
on the lips a little bit. [MUSIC] Like this. Shading is all about giving
the right tones. If you give the right highlight, right shadow, it's almost over. [MUSIC] There's a small
highlight here in the chin that will differentiate
the face from the neck. [MUSIC] The face shading is done. Let me also shade the clothes. [MUSIC] In this lesson we have shaded our portrait so simply shade, blend, and repeat. If the tones become flat, repeat the process and enhance the shadows
and the highlights. In the next lesson, let me show you how to draw and
shade the hair.
15. Drawing Realistic Hair: [MUSIC] In this lesson, let me show you how
to shade the hair. First, I'll be going
with the lock of hair. I'll be first adding
the mid-tones, then the highlights
and the shadows. The highlights and
the shadows are the most important
part of this lesson. Let me show you how to
do this in this lesson. [MUSIC] First, I'm starting
with this lock of hair. Here, we have
mostly the shadows. So I'll start off
with the 8B pencil. [MUSIC] I'll be shading this portion completely with the 8B pencil. [MUSIC] Now I'm drawing the darkest
portions of this part. Draw just fine lines or create
a base tone on like this. Now I have the basic tone. Then later you can darken
the lines like this. Now here, I'll give a base tone. You can even blend this well and then draw
the fine lines. By smudging it like this, you can easily cover up all
the white space in the paper. Now it'll be easy for you
to give in more layers. Focus on each strand
and draw in thin lines. To differentiate each strand, create a dark line between
those two just like this. Now I'll smudge here and there, and then I'll erase to
create the fine lines. [MUSIC] Let me shade this strand. First, I'll draw basic lines
and then I'll smudge it. [MUSIC] Now I'm adding in the details. [MUSIC] See the direction of
the strands and draw the lines in that
particular direction. [MUSIC] Now almost the hair
shading is done. Remember to have your
pencil very sharp and also your eraser so that you
get the fine lines. Now the shading is done.
16. Final Thoughts: Just to you now you have mastered
some really good tips and tricks on drawing
portraits like a pro. Just a reminder, you can
draw any portrait with these methods but these models are just like a guide or a base. Practice many faces with
various facial expressions. Practice portraits until
you feel confident about them and remember
each face is unique, so play around with your
stuff and materials and try different things and
explore your creativity. You should definitely
share all your works and assignments and also the
portraits that you chose. Thanks for joining me today
on such a lovely day, create more and spread love.
 Ritika Sridhar, Artist, Illustrator