Transcripts
1. Introduction: Creative people
have so many ideas, it's no surprise we keep so many notebook sketches and open bookmarks that inspire us. But doesn't this ultimately leave us feeling
distracted and scattered? What if I told you that it
doesn't need to be that way? That being a prolific creator
doesn't need to be messy. And all it takes is
one simple software. Hi, my name is Pamela
Calero and I'm a communication artist
and visual storyteller. I art and design studio with a poetic and conceptual
approach that allows me to give
visual form to ideas, to simplify projects that
think outside the box. Some of my clients include
Doctors Without Borders, Germany, and ID Barcelon. My work has been
featured in Mary Clair, Spain, Women of Type. And I have shown and
presented my work at the Valencia Museum of
Illustration and Modernism, The Contemporary
Museum of Art, Bogota, the University of Gratz, and The University
of Manchester. In this class, I will teach you how to arrange
your practice in notion a management and not taking software
that allows you to organize your
workspace projects, notes, sketches,
doodles, and life being multidisciplinary made me feel pulled apart and scattered. Not to mention it's
a little distracted. Younger me would have
benefited so much from knowing how to
manage several projects, ideass, and tasks
simultaneously. I've learned how to juggle it all through trial and error. And a trial and success in my
path was discovering notion and learning how to
use this software to organize all areas
of my practice. If any of this resonates with you and you want
to get organized, then you're ready for a
notion for creatives. This class is for anybody
looking to get organized. It's for creatives
who want to cultivate their ideation and
for prolific creators who want to organize
their practice and not be burdened with wondering
where they wrote things down. And although this class is a great place for
notion beginners, I also created it
for those who are familiar with the
software but want to learn how to use the program for creative endeavors,
productivity, and organization. We will go over an
introduction to Notion to set up your
workspace and inbox. We will also cover how to build your second brain
in Notion and how to digitalize your ideas in a custom made
digital sketchbook. By the end of this
class, you will be able to build digital
containers for your practice to
make your ideas and projects neatly accessible
in your notion workspace. If you don't organize your
idea catching system, you're missing out on using good ideas and
inspiration later. That's why notion is such a
powerful organizational tool for creatives, the and class.
2. Class Orientation: Remember, we will
create an inbox, a second brain, and a
digital sketchbook. Before we go into
how to build those, let's go briefly over
the purpose of each. An inbox is where new
information lands. Think of it as a tray where things are before
you review them. It might be a reminder to make an appointment or an article
you saved to review later, but haven't had the time for. Once you do revise them, they will be gone from
your inbox because A, your appointment will
be calendarized. B, you will read the article and let it go if that's
the end of its cycle. Or you will move it to your second brain because it is a source that
you want to keep, because it's
valuable information or you want to refer
back to it later. Your inbox entries can potentially move to your
digital sketchbook if you decide something is actually an idea you want
to create later, or you will recognize
a new idea as such and place it directly on
your digital sketchbook. There are no absolute rules, but this system
will allow you to sort out information and group similar types of information so that it is easier
to find later. Assigning a place for everything
is a small chunk of time compared to the effort of wasting time
looking for things. Before moving on to
the next lesson, make sure you have downloaded the illustrated
guide and the link to the class notion template and I'll see you
in the next list.
3. Class Resources: Today's main class
project is to get you familiar with the
containers and categories. We will create a notion, you can find the
illustrated guide in the class resources so
that you can start to think about how we
will categorize information in the
class resources. You can also find a
notion template to follow along the class's
main topics in it. You will also find a
recommended bibliography if you want to learn more
about creative systems. What's great about
the class projects is that you will learn
about storage systems as we go along and together we will create your inbox
and second brain. And you will learn when and how to use each of these systems, as well as your digital
sketchbook, the class project. These different spaces allow
us to deposit information, revise it, and keep it, or discard it if we
no longer need it. You can follow the
illustrated chart provided in the project resources
to understand how to classify the information
and determine if it goes in your inbox second
brain or digital sketchbook. In the digital sketchbook, you will see your ideas
before they take shape. You will have a
personal database that nurtures your work
and your inspiration, so you never run out of ideas and have all of your
notes in one place. I will guide you step by step through getting
familiar with notions, workspace, and setting up intentional spaces
within notion. We will create an inbox, a place where new
elements lend in until you sort them out and
place them where they belong. Then we will go
over the concept of a second brain and how
to set up your own and notion to expand your memory
and leverage technology to create links
between remembering, connecting, and creating
a second brain is a methodology for storing the references or inputs
we come across with. For the class project, we
will cover the value of digitizing your ideas and how to create your
digital sketchbook. Feed it so that
you can categorize your ideas and access
them anywhere. Anytime I will show you
how to get pre organized to later on get organized in
not with the work spaces. You will create a
notion you will no longer create
from a blank page. Lose time looking for
ideas or fragments of projects because you forgot
where you wrote them down. Your creativity will thrive because you won't have to keep different mental
and virtual tabs of where your projects
inspirations and tasks are at. On the contrary, you will be able to assign
them properties to filter them and
browse them according to their subject
medium, et cetera. So you will no longer
read from a blank page. And my friend, let me tell you, this gives me a lot
of peace of mind. Make sure you have your
sketch books, notes, et cetera, and I'll see
in the next lesson.
4. The Myth of the Messy Creator: In this lesson, we will
explore the myth of the messy creator and
why creativity thrives when there's a container for
all of our mental clutter In the process of
making art supplies get mixed, spilled and splash. But that doesn't mean the mess has to be within the creator. The myth of the messy
creator is actually hurtful because the word messy
has negative connotations. If we found another
word to talk about that creative process
and artistic discovery, what if you knew where
all your materials were? What if you knew where
all your ideas were? You would create at any time. You would just need
to go and fetch one. You will never run out of ideas because you'll see
your old ideas. And these ideas will propagate
and inspire new ones. The concept of Sm Plas in
French means putting together. This culinary term allows us to keep many tasks in
mind simultaneously without the burden of
remembering where you wrote something down and actually seeing your ideas come to life. Our creativity
thrives when there's a container for all
of our mental color. Because our brains
are for ideation, not for storing information. Take a look at the studios of Jumio Quiting, qui
to name a few. This prolific artists had spaces within their spaces where similar kind of objects were placed or certain
activities took place. Food for thought.
Organized artists who keep a clean workspace and an organized thought
process are in a better position to create better work and
create more of it. If your life and
space are organized, you can allow yourself to
make a little bit of a mess. A studio is a workspace and
it is meant to be used. If you are open minded, you're willing to experiment. It's even better if once you're done with that
piece or activity, everything goes back to where it belongs and you
can go back to ground zero where everything and anything is a possibility. Organization can
also be creative. You have to find the balance and systems that work
for you over time. I've also learned
that my caring and loving of objects performs
better when I put similar things together
that way when I need something or I'm looking for
possibilities of materials, I will look into my marker's
pencil case and maybe find an amazing marker that is the missing touch
I was looking for. This is the magic
of missing pla. Now you're ready to
get pre organized. Before getting
organized the notion. In the next lesson, I'll walk
you through how to create categories and containers
in your physical workspace. Make sure you have access
to where you work. It doesn't matter if this is your studio desk
drawer or desktop.
5. Getting Pre-organized: In this lesson,
you will organize your physical working
space to practice your compartment creation
and get pre organized. Before we go into notion, when we know where something is, we work faster because
we don't have to waste our valuable
time looking for it. The same goes with our ideas. My order makes sense for me, but it also helps explain someone else where something is. If for any reason I
don't have access to my space and I
need to ask for help. It's not an absolute
system and I do need to tidy up
every once in a while. But now it's much easier
since I know where things go. I began to do this after I realized I would buy a material over and over again because I couldn't find it
when I needed it. Later, when I was not
in the need for it, I realized I had five samples
of the same black marker. Now what I do is place
all the black markers in one pencil case because
it's a tool I use a lot. So black markers go here. What are some of the materials or tools you use most often? This may vary depending
on the type of work or medium you
usually work with. We can organize ideas in
the same way we organize our studio office home and
notion is perfect for that. Before you move on
to the next lesson, let's organize your
physical working space. It can also be your
computer's desktop, so you can keep what you use
the most at Arm's reach. And reassemble your
materials by categories so that you can find what you're looking for when you need it. The next lesson, you'll be
getting familiar with Noch.
6. Getting Familiar with Notion: In this lesson, you'll learn how to set up your notion workspace. I will guide you every
step of the way, so don't worry if your need to notion if you're familiar
with this software. This lesson is a great refresh
with helpful ticks and how to use notion for
creative endeavors, productivity, and organization. The goal of this lesson is to get you familiar with notion. We will go over the settings
and technical parts of this software to
later apply it to organizing our mental
and digital spaces. When you know where things are, you can get into the creation process faster and smoother. You can also apply
this principle to ideas and store them
in digital cabinets. So you can use what you want when you need it or search for that notion is the
ideal digital workspace where we'll create the
container for our ideas, sketches, tasks,
inspirations, and doodles. You could have a similar
set up in Google Docs. But what's great about
notion is that it's like an integration of several
softwares such as Google Docs, Excel, Asana, Evernote, all in one place and it's
free and pretty. Neurasthetics is real and Notion is perfect
for visual people. Go ahead and click on
this link provided in the class resources To
create your Notion account. You can create a free account and quickly register
with your e mail. Once you create your account, you can review the settings. On the left menu, you can see your accounts profile,
change your photo. You can also set the
settings to select the appearance and
set which page opens. Upon start, I highly
recommend you download the desktop app and the mobile app so you
can use it on the go. All of the information is automatically synced on all
of your different devices. You will be able to integrate other software and select an
emoji for your workspace, Change your workspaces,
language name and domain. This will impact the URLs
you create for pages you create and Share Notion has
a subscription upgrade. But I highly recommend you
start on a free version and work your way up if you ever need more space
in the free plan, you get a maximum of ten
invites at the same time. The upgrades are
very affordable, but I use the free plan because
my collaborations are in small groups and I
grant and remove access to people when
a project is complete. More about this in a little bit. Now that you're set up, go ahead and click on
the link provided in the class resources to
access a class notion template. Once you click it, you will
land on the class's template. Go ahead and click on Duplicate. I created this page
with this intention, and if you wish to do the same, you can update the
sharing settings by inviting and granting invites access to edit,
view, or comment. An important thing
to bear in mind is that when a template
is duplicated, it is no longer linked to
the original motherboard. You can customize it,
but it won't sync any updates from the
original creator's page. Congratulations on
duplicating your first page. Duplicating a page
means you can cost to mice it and it
will automatically appear on your side bar. This is where all
of your pages go. There are lots of
free as well as paid notion templates online. If you click on the three dots next to the page
on the site menu, you can add it to your
favorites or rename it. Favorites mean that it will be more accessible
on your side bar. Ideally, here's where the pages that you use the most should go. You can always remove a page from your favorites if you need. Now, let's create a new page. You can quickly do so by clicking on the New Page
button on the side bar. You can add a title at an
icon or let notion select a random icon for
you by clicking on the shuffle button or even
upload your own icons. You can also add a cover
by uploading an image. Choose one of the colors
available in Notion or upload one from the integration notion has with on splash, which lets you access this royalty free image
browser from within notion. Setting up your notion
work spaces will save your future self time
and energy because you won't have to worry about
where you have stored things. Bear in mind, your
notion will look more robust over time because
it has to be fed. First, we need to add
information to it. Before you move on
to the next lesson, make sure you have set
up your notion account.
7. Table Views, Shortcuts & Commands in Notion: Now that you have your notion, account and space set up, you ever get to start
using and creating basic block use and media. Let's quickly go back
to our classes page. I will use this as
an example of how notion uses blocks
to build pages. If you're familiar with
board press or square space, think about the block
and column system. If you're new to it, it's okay. It's simple to use and I will walk you through
getting a hang of it. All of the things you see
in notion are elements. If you rest your mouse pointer on the left line
of every element, you can see six dots that
enable the drag option. Give us a try and let's switch the order of the
first two elements. You can always use
Commander control said notice how a blue line displays when you hover over an area where you can drop
the selected element. Now let's go back
to our trial page. On the three dots in
the upper right side, you can make the
page full width. I usually use this
because it gives me better visibility and the
filling of a website. Your BFF's in notion are the
backslash and the at handle. With the handle, you
can set reminders, link a page and tag people. And the backslash
displays the commands, go ahead and type backslash. This displays the basic blocks from which you can choose from. You can also create
a page through here. It will be inside this page
and also on your site menu. Let's try adding a
header and a text. This is where Notion starts
getting interesting. Notion gives us order, organization and flexibility
you can add to do list, other list forms,
a toggle list and other features that set
it aside from a word doc. You can also turn elements
into other kinds of elements. I will try this by converting
this into a toggle. All elements with a
triangle on the left are toggle elements and contain
more information in sight. This is very helpful for using lots of information orderly, I can drop in other
elements inside. Let's quickly go back to
our class's workspace. What makes notion different
and more robust than Excel is the fact that databases can have pages
within their boxes. Databases don't need
to sound intimidating. It's just a different
way of storing, organizing, and
displaying information. This database has underlined
elements which let me know more information is inside that and that it is
a page of its own. Click on it and notice
a new page opens up. Let's go back to a trial page. I want you to create a database. Notice there is an in
line and full page option I highly recommend you
always work with in line. Because a full page database
has restrictions that don't let you add other elements to that page besides a database. And this is no fun with
an inline database, you can move it around
and change its width. I have to say that notion gets easier and more fun
when you play with it, so don't be afraid of
moving things around. Style wise, you can
change the style, the text, and the
background color by highlighting the text. You can change a text
block color by clicking on the six dots on the left
and changing the color. This gives us a nice
color coordinated option. Another thing that's great about notion is the fact
that you can create multiple views for
a database and choose which works best
for your information. Or use multiple views of that
database at the same time. This turns information
overwhelmed into a visual experience. You can create another
view of this database by clicking on the three
dots and select Gallery. First, this view gives us
the feeling of flash cards. Before you move on
to the next lesson, make sure you understand how
to create multiple views in your notions databases
in the next less.
8. Creating your Inbox & Calendar in Notion: The goal of this lesson is
to create your Inbox in a digital inbox has the same function as a
traditional physical inbox, A container where things are put in until you have the
time to deal with them. Remember, you can refer back to the illustrated guide provided
in the class resources. If you are unsure if something goes in your inbox or elsewhere, click on the inbox page available in the
class's template. You will see it's empty because they want to walk you through how to set it up and create
it with your custom needs. Go ahead and add an
in line database to think about which
type of notes you take. For example, appointments,
book accommodations, tasks, websites,
references, movies. We want to create those into
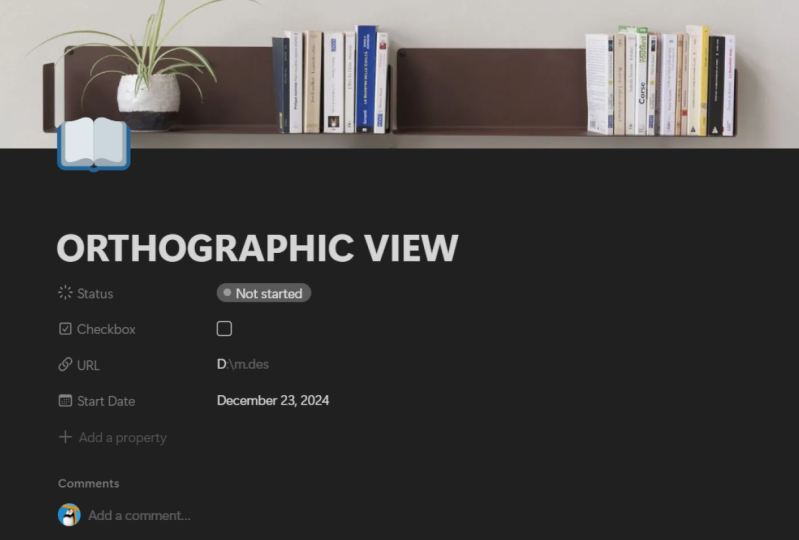
multiple selection tabs. You can also add a property for the URLs to keep track
of the websites. Another interesting
property to have is Status. We can add not
started in progress, and add a checkbox to get the small pleasure of
taking things off. It would also be helpful to have the property of
date because we have appointments and those
are entries that ideally would be reflected
on your calendar. Go ahead and copy the
database and paste it on the same page just
for you to try out. You can link the
database or mention it. You can see it's a
mentioned database by the arrow next to it. This is very helpful
to change the view. We're going to past the
linked database and put it right next
to our database as a calendar view because we
want to try and set it right next to the database and have the views next
to each other, you need to add another
element to create the column system notion. Doesn't let us put
one database next to another unless there is a previously created
column system. We're going to do that by
creating this elements and add a second element to
align it with the columns. You can dragon drop the
elements where you see a blue line and you can
also adopt the width. Inbox is a great
tool for dip work. We all run into new and
exciting inputs all the time. I won't tell you to
ignore and toss them because I know creative
minds live off novelty. Learning new things
is very rewarding, but you don't have
to do it at the exact moment you run into them. You can place that
book recommendation, that URL, movie title, et cetera, in your inbox and look into it when
you have the time. Before you move on
to the next lesson, make sure you have your
Inbox set up and you understand your calendar
view in your inbox page.
9. Building your Second Brain in Notion: In this lesson, we will
cover the benefits of having a second brain and
you will learn how to create and
manage your own. First, let's go over what makes an inbox different
than a second brain. What makes an inbox different
than a second brain? Remember to go back to
the illustrated guide in the class resources. If you ever have a doubt. An inbox is where new
elements land in. Once you revise them, you can either add it
to your calendar or decide if you want to toss it because you don't
want to keep it. Or you can add it to
your second brain because it's valuable
information. A material of one
of your interests, or a store you often refer to and you want
to keep it handy. A second brain is a methodology for storing the inputs
or references we come across with finding
interesting information and resources is a
good thing because it means your mind is
open and receptive. But being permeable, sensitive, and attentive can be
a double edged sword. Because many times new or
multiple stimuli distract us. This is why it
helps to work with the system inbox second brain because you can keep
the information. Once you have reviewed
it, go ahead and open the second brain page
from our classes template. You will see I have included an example of a vent
diagram of my fields. I added this to
show you what sort of information is
helpful to keep. It could be either
content, snippets of text, screenshots, articles, books, podcasts, or any other form of media that you
like to consume. A criteria that
makes it easier to discern whether you
want to keep something, are the different interests
and areas of your life. What makes you, what makes you? For me, it's a combination of work and other areas of life. I reference and
consume content of, I reference and consume visual
content of empowerment. Take a minute and
write on a piece of paper the different fields
and entries that make you. This is a great
starting point to ideate the categories
for your second brain. It doesn't necessarily have
to be all related to work, but if you're interested
in home decoration and perhaps you're also
an interior designer, there are areas
that are going to overlap and bridge
your creativity. You can keep my
example or deleted, or even take a photo
of your version of your van diagram and
upload it for reference. Now go ahead and add an inline database and
create the categories. For me, it's helpful to
have the properties of medium topic time checkbox. Let's use the example
of Monday hour one from the classes
bibliography available in the classes template. It's a video entry that talks about how to set time aside at the beginning of the week to prepare your work ahead and be more mindful and productive
through this methodology. In the topics property, I'm going to add time
and productivity. I'm adding these categories. And once they are created, I could add another entry
that has the same filter. And we'll just select it
from the list as a thought. Creativity is an inherent
trait in humans and we put it to use when we want
to do things differently. Now we're going to go ahead and add a gallery view
for you to try out. I recommend that you keep the view of your second brain as a table because it makes it easier to navigate
the search tab. If you see the search tab, you can select the way you want the database to filter
information for you and only display certain kinds of
categories or filters. I'll show you an example. In my real second brain, you'll see only some of my
entries are tagged. That's because I prefer to enter the information and
later go back to it and organize it by mindfully checking
the properties to assigned to each entry. You can choose what
works for you. Think about the notebooks, note apps you keep with you. This is information storage. If you rely on notion
to keep those for you, you can dedicate your
time to creation and not be bothered with wondering what you wrote things down. Remember the references and inspiration material you want to keep to consult whenever needed. We'll leave in your second brain the container for your
favorite bits of information. If you're not sure how to start feeding your second brain, start by rolling over the
bookmark pages on your browser. Before you move on
to the next lesson, make sure you have created the categories to filter the themes and topics you usually work
with or are researching. Typenote, A random filter in your second brain is perfectly
functional and valid.
10. Digitizing Your Ideas: This does will teach
you how to create your digital sketchbook
and organize it with filters and
categories to compose your notes intentionally
from anywhere at any time. Notion's inflection point for creative function is that it allows you to transfer
your doodles, written notes and sketches
into a notion database. This means that with a notion, you can create a
digital sketchbook to have all your sketches and notes in one place and see them grow into a
project over time, or to revise them when
you have the time or resources to develop that idea. Because catching an idea is not the same as
carrying it through. The purpose of this
digital sketchbook is for you to learn
how to use notion to visualize your notes as data and create a digital and searchable
sketchbook or idea book. And notion that allows you to categorize your entries
and save time for your future self
when you want to efficiently look for
something this way. If you're looking to create something related to friendship, for example, you can browse your ideas and see if you
have a related entry. This means you will
be able to use your own creativity as
inspiration for future projects. Analog sketchbooks are great. A digital sketchbook doesn't
mean you have to quit paper. But carrying and
filling out lots of sketchbooks can
get messier time consuming if you're constantly referring back to them and
search for good insights. If you do the revising
and rolling over of your notes into notion
once you will have this task done
forever and you can continue carrying a sketchbook
with you anywhere you go. And you can go over it a
couple of times a month to see what's worth
highlighting and bring into your
digital sketchbook. This makes it easier
to revisit your ideas, ***** and sketches
anytime you want, because the truth is it
doesn't make sense to save something or write it down if
you never refer back to it. Let's set up your
digital sketchbook page and notion you can create a property for
a specific project in the digital sketchbook, but I also recommend you create a separate sub page for a more robust project
you're working on. For note taking, I
sometimes wonder what makes a project a project and how it is different
from an idea. I'd like to think a project is a sum of ideas that look for a conceptual idea to weave together all other container
ideas information. Whereas an idea can
exist independently by digitizing your sketchbook and creating filter tabs
for your entries, you will create a flexible
system that will optimize your creativity and allow you
to access your old ideas. Go ahead and add an
inline database. Even if you change
it to glory view, it is always a database. The only thing that
changes is the view. An idea is different than a sketch because
you can jot down an idea or upload a photo or a digital version
of your sketch. As usual, we want to
make sure we have the right multi selection,
category and property. I'm adding medium,
topic and deadline. The topics can vary
depending on what you usually address or would
like to talk about. It's perfectly valid to upload a rough sketch
because you want to make sure you capture the idea. I copy and paste it. This here just to
show you what it would look like once
you had images. I also added the result column as an example of how ideas look different when you
first write them down to when you finish
their development, you can see I uploaded
a photo of a meme and later developed it into an artpiece with
an added message. In the board view, you
can see different entries I've created and browsed the categories by
filtering this property. This is helpful when you are bringing Storming for ideas or ideating a pitch as you can
refer to your own ideas. And this means you're taking inspiration from
your own creativity. You can also turn a series
or entries into a project by adding the suitable entries to another page or database. Say I have a bunch of
entries about self love. I can create another page where these ideas
grow over time. Don't worry if your digital
sketchbook looks empty. It will grow over time as you roll over your ideas into it. Remember, your digital
sketchbook needs to be fed the same way a
file cabinet is empty. Before you put in the
files and folders, you need to spend some time typing in and registering
the information. A great way to start your digital sketchbook is to go over your current sketchbook
and type in or photograph and transfer the
ideas you want to keep. For later, you can add your notes entries and set the
properties and filters one by one or add them all first and organize them after you have a number of entries
in your digital book. As your digital sketchbook
starts to grow, you'll see how affirming
it is to see your ideas before they take final
forms for your creativity. My digital sketchbook has been a turning point for my
creativity because I can always look for an idea
to remember what I already thought of or
inspire my ideation. It is also great
when I feel like I'm not coming up
with fresh ideas. Because I can
browse this and see I have in fact, lots of ideas. And I can prioritize what I create first and
refer back to it. Now you are ready to browse your ideas and see
your creativity drive.
11. Conclusion: Congratulations, you made it. You completed notion
for creatives. And now you know how
creativity thrives when they're second container for
all of our mental clutter. We went over how the concept of and Plas applied to ideas, allows us to keep many tasks in mind simultaneously
without the burden of remembering where
you wrote something down and actually seeing
your ideas come to life. Now you know where to store your inputs when they
come into your inbox. How to vivify your archive of sources and references
in your second brain. And how to digitize your
idea catching system in your digital sketchbook to make your ideas searchable
and accessible. The brain is not linear and this is not necessarily
a bad thing. Creativity works this way To dedicate more time and
energy to creativity. We can use digital tools
to help us contain all the information we want
to consult at a later time. Notion is perfect for that. You can't control
ideas, but with Notion, you can design an
optimal environment for good ideas to multiply, thrive, and meet you when you are ready to
develop them further. I hope this class helps
you become more organized. Remember your
creative potential. And discover how our ideas
and information can be sorted in a similar way to how we organize our
physical spaces. I want you to
practice smart note catching and to never miss
out on your good ideas. I would love to see how your
digital sketchbook looks. A good starting point is
at least five entries to get you familiar with
properties and categorizations. Feel free to upload your screenshots no matter
where you are in the process. We would love to see your
work and give feedback. If you like this class, please leave a review and follow me. I hope you feel inspired
to continue creating, getting new ideas and revisit your old ideas to make them come alive. Thank
you for joining me. I'll see you next time.
 Pamela Calero, Creative Director and Visual Artist