Transcripts
1. Welcome to Notion 101: Hello and welcome to Notion
been the one to beginners. My name is Nancy and I will be your instructor
for this course. I'm an educator and I've treated thousands of people
to build apps, websites, and
automations without ever writing a
single line of code. In this class, I want
to introduce you to a powerful new code and
productivity tool called Notion. Notion is a powerful
productivity tools that has become increasingly popular
over the last few years. It is a platform
that allows you to take notes, organized projects, and create databases
all in one place power users have built their entire second
dreams are notional. Template traders are now making
thousands of dollars and passive income
every month just by selling Notion templates
on their digital store. If you want to go, I
started with this tool. This class is the best
introductory course you will find. In this class, you'll learn
all the basics of motion and get started with using
it to its full potential, will start by setting
up your account and getting familiar with
the notion interface. You'll learn how
to format text and images and collaborate
with others on projects. You'll also learn a few
intermediate features such as Notion databases. By the end of this class, you'll have a solid
understanding of notion and you'll feel confident to be
able to use it for your work and personal
productivity. So join me now and productivity to the
next level with motion.
2. What is Notion?: What is Notion? Notion is basically
an all-in-one tool. It combines the functionality
of a task manager, a database, a Wiki, a note-taking app, and
so many other things. Notions, clean UI means that you can get
started very easily, but it's advanced
features also allow you to build complex
systems where such, whatever the build or notion, it always starts
with a blank canvas. So why should you
use Notion first for increased productivity by
having all of your information, documentation, and
tasks in one place, you can work much more efficiently and get
more done in less time. Next, for better
organization notions, flexible and customizable
databases allow you to keep a track of your information in a way that makes
sense for you, helping you always stay
organized and on top of things. Next, for improved
collaboration with your team, you can easily share information
with other people on your team or even the public notions,
collaborative features. Next, for a better understanding
of your data notions, databases allow you to turn your information
into visualize data, making it easier to
understand trends and patterns and
form relationships. Finally, for easy integration
with other adults, usually integrates
with a wide range of other tools such as
Google, workspace, Trello, and Slack, making it easy to continue using the
tools that you already love. So let's get started with using Notion to create
a notion account. Simply go to the notion website, notion.com and click
the Sign Up button. You'll need to provide
an e-mail address and password to
create your account. Once you've signed up,
you'll be taken to your notion dashboard
where you can start using Notion right away. The notion interface
is designed to be intuitive and easy to use. On the left-hand
side of the screen, you'll see a list of your
Notion pages and databases. Once you create them at
the top of the panel, you'll see the notion
toolbar where there's a bunch of settings where you
can access all of notions, features and settings and customize your workspace the way you want it to look to start creating a new page or database, simply click the New
Page button on the left. If you're searching for
existing pages for databases, simply use the Search option
on the left side toolbar. Now that you have
your Notion account, Let's get started
with building on it.
3. Formatting and Adding Content: Let's get started with building
your first notion page. In this video, I'm
going to introduce you to some basic
features on motion. First, we learn about headings
and how to customize font, such as bold, italicize,
and underline. We'll learn about
lists and toggles. And finally, we'll learn how to add links and attachments. So let's get started by giving this page a title and an icon. It's important to note
that whenever you press Enter a notion, it will create a
new block for you. How do you know if
it's a new block when the cursor is hovering, just see the six dots
like this one here. If there is, it means
that that's a block. Let's say that this
is block number one. I'm going to press Enter and
create the second block. Now I can actually click
and drag this block with these six dots and drop it right next to the
first one, like so. How do you know it's
going to drop next to it? You will see that little
blue line over there, that little blue
line on the right. That means that the second one is going to be
dropped right there. And now two columns have been created using these two blocks. In the first block I'm
going to add a heading. To add a heading, you can either press the plus button like so and search for
heading, heading one. Or you could simply press forward slash and
search for heading one, like so, the same thing. Finally, you can also type one hashtag space and that also converts
it into heading one. So now that there is a heading, I'm going to type something. Again. I'm going to hit Enter,
then type some text. Let's say that this
is my homepage that I will keep revisiting
every single day. It's very helpful to have a list of my top three goals
for that month right there being displayed
very clearly for me to see every day and
be reminded of that. So I'm going to enter
those goals here. One way to do it, of course, is by adding lists. You can do that by
basically just typing one period and space just like you would
on Microsoft Word. And then that creates a
list, as you can see, the other way to
do it is forward slash and search for list. And you can search for bulleted lists or numbered
list and toggle list. So here what I'm going to use a toggle list instead
of a numbered list. Let me show you
what happens then. I'm going to say goal one. I'm going to add three of them. So basically a toggle list
hides information inside it. You will not know
what is there inside that list competent
unless you open it. How do you open it? You press on this green triangle. It's empty. Now we can add goal saying, let's say that is my
goal one for this month. Now the toggle triangle has turned into black because the content is not
empty anymore. If I press it, it will collapse. And I can go ahead and do the same thing for
Goldwyn goal three also. Now let's move on to
adding images on motion. I'm going to head over to
the second block here. And this time I'm going to say forward slash and
search for image. Now it allows you to upload
an image either from your computer or you can search for something
from unsplash. It's up to you how
you upload it. To format your text better. All you have to do is
select the text, like so. And just as in Word, you do get a bunch
of options here. You can add a link,
you can add a comment. Can also bold, italicize, and add some color to the text or to the
background, like this. So this is how you
can add headings, format text, and add
images on Notion. We've also checked out
toggle list so far. Now let's check out how to
add links and attachments. The easiest way to
add links is to add the URL in a new block, like so. And it will give you
an option to create a bookmark written,
embed, or dismiss. If I just said dismissed, then it will be left as a text. If I created a bookmark, it will give you a
preview of the site to add attachments
in your notion page, all you have to do
is attach a file. So I'm gonna say a forward
slash and search for the file. And that's it. I can either upload
the file from my computer or embed the
link from somewhere else. Let's say that I'm saving some important receipts in my notion, this is how you would
add them on your page. So there you have it. This is how you can get started with motion on your
very first day. And notion is perfect to be used as a tool for
your documents.
4. More Types of Content : Here's a few examples
of other types of content that notion supports. First, images and videos. In the first video,
we've already seen how to add
images on notion. That notion also supports a
wide range of video formats, including direct and beds
from YouTube and Vimeo. Second, files and attachments. Please remember that
notion supports adding your files
on the document. All you have to do is click on the Plus or forward slash
and search for file. And then either click
on the upload button to upload it from your computer, or you can even drag and drop the file directly
onto an osha third, and adding external content
notion also allows you to embed external content
such as google Maps, Google Sheets, and other
embeddable content. This feature makes it possible
to embed live data and interactive content
into your Notion pages and databases to embed
external content, click on the Plus button
or forward slash embed, and then paste the
embed code or link. If you want to add
fancy graphics, all clickable buttons directly
onto your notion page, you can use a tool called
indifferent to add widgets and even directly
embed audio notion workspace. Hope these tips
have been helpful to supercharge and ocean build.
5. Pages and Databases: Notion has two main types of content, pages and databases. Pages are usually
used for text-based, an image-based content
such as four nodes, articles, blog posts, etc. But of course, you can also
embed databases into pages. Databases are usually used
for more structured content, such as lists, calendars,
databases, and dashboards. Let's go back to our build to create a new page on Notion. As always, just type forward slash and
search for a pitch. So that option pops up, just click on Enter, and a new page has been
created for you. I'm now going to
create three pages to organize my goals and
long-term vision. To duplicate the first page, all I have to do is select the block and just
click on Duplicate. Or when the block is selected, just say Command D or Control D. And now
you have three pages. I'm going to quickly go
ahead and rename them. I'm also going to reorganize these blocks with a better look. Now I can always open
the pages and add cadet. That's how you create
new pages and add sub pages inside an
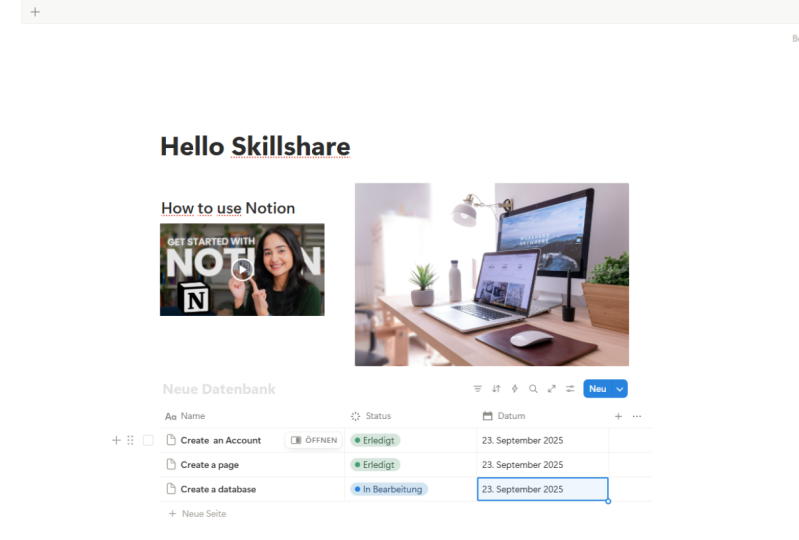
existing page in Notion. Now let's see how to create a database just as we
created a page earlier, all we have to do is forward slash and
search for a database. Now when you search
for database, you have a bunch of options. Database, Inline database,
full page and so on. For now we'll go with inline to view Inline Database
as a full-page. You can always do
that by clicking on the open as Will Page
button right here. If you add an Inline database, you can always view it
as a full-page later, I'm going to rename this
database as Task Manager. I'm going to customize
this database to have a few properties that might help me build my task manager. So I just renamed the first two columns by just
clicking on the headers. Now I want a deadline
column for my task manager. So I'm gonna go with this little plus button right next to the category column. And I'm going to
click on that and search for a date column. So this date column is now
only going to accept dates. When I click on
the Header again, I can rename it to deadline. And now you have a
deadline column. When I click on the cell, it
will only open a calendar. You cannot enter other types, such as text or
numbers and so on. It will only accept a date. Finally, what else do you need for a task
manager database? Well, you should be
able to check off tasks and say that
they're done, right? So to be able to
check off tasks, I need a checkbox. So again, I'm going to click on the Plus button right here. I'm going to search
for a checkbox, and there it is. The checkbox column should be
called done question mark, which is to say,
is this task done? Then I will check it
to say yes it is done. So the thing about Notion is that instead of this
ugly big column, I notice click and drag the column right towards
the beginning, like so, and click, drag the column edge to collapse on itself like this. This is only possible
for checkboxes to make it very clean
and neat look. Now going to go
ahead and populate this database just to show
you what it might look like. So there you have it. This is how you build
databases in motion. In the next few videos, you'll continue to
see how powerful notion databases are and you'll learn more about
how to use them.
6. Introduction to Databases: In this video, we'll learn more about properties in
Notion databases. To do this, let's get
back to our belt. Let's head over to
the first database that we created
here, Task Manager. Remember that Notion,
databases are much more powerful than a spreadsheet
like Google Sheets. This means that you can
customize the type of input that you can add in
every single column, e.g. in this case, we have this task name column
as a text property, the category column as a
multi-select property. You've seen these little
icons next to the heading of the column that shows
the type of column that is, this is a calendar icon next to deadline which says that
that's a date column. Let's go ahead and try to add a new column, as we saw earlier, to add a new column or a
property to a database, all you have to do is
click on this plus button. You have a bunch of
options that you can add. You can see the text. You can see this hashtag
which is number dropped down. A single drop-down is a
single select option. A drop-down is a
multi-select option, the status option,
calendar for date, a person that from your
workspace that you can mention. Sure. I'm the only person, but if you have more
members of the team, then you can add them as well. You have this clip to show files and media where you can add pictures and other files. A checkbox, which we've already added in the previous video, a URL, e-mail, phone number, formula, relation,
rollup and so on. You can see that Notion
databases are very powerful. You can very clearly customize a kind of input that
you can accept. And every column here
we've already added a new date and a
checkbox column already. So I'm going to
let it be for now. But let's say that
you want to change the type of your column. Let's say from a multi-select
column in category, I want to change it
to a single select. The way you would do it
is click on Category, which is the header
of the column, and search for type. Here it's a multi-select column. Just click on that and
choose single Select, which is just select instead. And now the column
has been changed. This is how you would
edit existing columns. You can also edit the
name in the same way. And when you click
on Edit property, you can customize a
property even further, e.g. these are the options right now, if I click on the option, I can change the color of the option or the
name of the option, like so and type
enter, It's all done. So this has been how to
customize Notion databases. It's very important for you to get comfortable with
using databases in Notion because they can
completely transform the way you use Notion
very soon in this class, I just want you to be comfortable with the
different types of properties that are on Notion
databases such as text, URL, single select, multi-select
date files and media. And the other basics.
7. Sorting and Filtering: In this video, we'll
learn more about filtering and sorting
data in Notion databases. Let's go back to
our first database. Let's say that the tasks are not ordered in an
alphabetical order. Simplest way to sort data in an ocean database is to simply go to the top of a database and search for the sort
option right here. When you click on Sort, I'll give you a bunch of
options by the properties. Here, I want to sort the task
name by alphabetical order. So that property is the task name by default
because it's a text column, ascending and descending
refers to alphabetical order. And then ascending alphabetical
order means from a to Z. So if I click outside now, you can see that it has
been sorted according to 12.3 because that is the
right alphabetical order. Now of course, you can
choose to categorize it by other properties such
as category ascending, again, alphabetical
order or deadline ase ending would be the first
task will take priority. And finally, done is ending would be not done and
descending would be done. So I'm gonna go ahead and
remove this sort rule. Click outside. Now I'm gonna show you an
incredibly powerful tool in Notion databases and
it's called filters. Let's say that you only
want to see pending tasks. Yard database. You don't want to see all the tasks that
are done anymore. You only want to see the
tasks that are not done. So I want to filter these tasks by the ones
that are not done. We already have the information
about the status of the task as done or not done in the first
checkbox column. So what I'm gonna do
is I'm going to head over to Susan other option, top of the database,
click on Filter. And I'm going to say, I want to see tasks
that are not done. So filter the tasks
by the done column, where done question mark where that property were
done is not done, right, where the task is not
done, where it's unchecked, and now only the pending
tasks will be shown. Let's see if I check
this checkbox. That is not appending task anymore because
the task is done. So now your task list is empty because all
the tasks are done. Go ahead and throw this photo. Now, everything else is visible. The better way to use filters is by adding a new
view to a database. What do I mean by that? I'm gonna go ahead and
leave the filters as it is. The than Flutter
has been cleared. I'm gonna go ahead
and click on Done three dots and delete
filter and leave it. Leave this table as it is, leave the Task Manager as it is, and unchecked my first task. So no salt, no
filters right now, the best practice
in motion is to leave the first table as it is. What I'm gonna do when I want to filter or sort the
information differently. The top, there's a plus
button next to table. That is what sets apart Notion databases
from Google Spreadsheets. Let me show you what it will do. I'm going to say plus, and by default it has already created a table that's
highlighted here. The view name is empty. And I'm going to say
pending tasks only because that is the only data that I want to see
in this table. And should I show
database title, should I show vertical
lines and so on. You can toggle it on and
off and play around later. I'm going to say
Done. So now it's basically the same
table as before, but here, because
it's pending tasks, only, what I'm going to do
is click on the Filter. The same thing as before. We're done is not done. So now when I go to views
and click on the table, I'll see all the tasks here. But if I click on the Table View and click on pending tasks view, I'm going to see only the
pending tasks, right? So now you can add as
many views as you want. Pending tasks, only
completed tasks, only, upcoming tasks only. So this is a very smart way in which you can
categorize your data. Remember that none of your
data is being removed. It's basically the
same amount of data that is just being
shown in a different way. I'm gonna do this one more time. I'm going to add a new view. This time, I'm going to search for Category eight tasks only, and I'm going to say Enter. And now a new table has been created because this is
only category a task. I'm going to say
filter by category, this type where the category
is category a only. I'm not going to select
category number two, only the tasks that are tagged
as category AR display. Now if I go back
to the first table and task two is also
tagged as category a. Even though it is done. When I go to Category a task, it will be shown because
it is only being filtered by category a or not. So this is how you can use sort and filter on Notion databases. This is just the beginning of an incredibly powerful
tool in your arsenal. In the next video,
I'm gonna show you one more way in which you can customize data that you
see on your Notion databases.
8. Database Views: So far we've explored the basis of motion, formatting text, inserting images and videos, and explore the
basics of databases. In the last video,
I taught you how to use filters and sort
in the database. In this video, I'm gonna
show you a final way to customize how you see data
in a notion database. Let's go back to our first
database before we continue, please remember that
each of the items on a database can be opened
as a single page. When you hover over the item and click on the Open button, it will open up as a new pair. You can view it as a
full-page like this by clicking Open in
full-page button. This is basically
an entire page for you to add content in. You can add images,
text and beds and so on just as you would in
any other notion page, you can even add colors
to your pages in Notion, not just two pages
within a database, but to any notion page to add a cover simply
hover on the top, search for an icon
and add cover. You can add an icon
if you'd like. Here I'm going to
click on Add cover. Just as before. You can either change the color to something
from the gallery. That notion gives
you upload it from your computer or
added from Unsplash. This is similar to adding
an image inside a page. Let's say this is a
finance related tasks. So I'm going to search for
finance image on Unsplash, and then I click on the
image has been added. So now let's go
back to a database. The reason why databases are much more powerful
than spreadsheets, because when you
restrict the kinds of inflammation that can go
on every single column, it makes it possible
for you to display this data in different
kinds of views. What do I mean by this? Let's say that you have a date column in any
of the databases. In this case, we actually have a date column in the form of a deadline here in April. So what I can always do is go back to the views on the
top click on the Table. View. I want to search for water depths can be displayed
in calendars, right? So I'm going to search
for calendar view, which is right
underneath the table, is going to rename
it as calendar. So I know that when
I click on Calendar, I will see a calendar. Again. I'm going to
double-click outside or just on the Close button here. And now you can see a calendar. This is February, but if I go
to April, March, and April, you will see that task one, task 2.3 are arranged in the
order of their deadlines. Now I can click and drag task
one 6-8, just like this. Now if I go back
to the table view, the first one, you will see that the deadline of task one has
been changed to April 8. If I change this to
April 27th here, I'm gonna go back
to the calendar. Now you will see
that it is being reflected on since February, March, April, April
27th right here. So remember that this is
basically the same data. It is just being shown in
different ways to make it easy for you to find patterns and make
sense of your data. Let me show you
other types of use. I'm going to go to Calendar
and press Add view. This time, I'm going to
search for a gallery. Sure, the name can be by image. So when I click on my image, I will see the tasks by image. They're organized
by their images. And before clicking outside
or on the Close button, what I'm gonna do
is I'm going to customize this gallery a little bit because as you can see, it's basically empty, right? It's just a white big box. I'm gonna go ahead and
customize this a little bit. And instead of card preview
being page content, what does page content media, there's anything
inside the page. You will see it that, well, there's nothing inside the page and task three, so it's empty. So instead of page content, what I'm gonna do is
I'm going to flip it to page cover because we know
that one of the tasks, at least it has a cover. I'm gonna go ahead
and do page cupboard, and I'm going to say
dot interests outside. Now you can see that task two is being shown by the image. If I go to task three and add a cover, then
leave it like that. But because every time you
add a cupboard notion, generate some random image, if you're happy with
that, you can leave it. I'm gonna do the same thing
with task number one. Now you can see there's a
beautiful gallery here. Next, I urge you to check
out other views on Notion. Usually the calendar view and
the gallery view are very, very useful for most people. But if you click
on Add view once again and explore some of
the other view options. You can play around and
see which ones you like. The bold option here
is a Kanban board. If you're familiar
with what Trello is, you know that you
can easily click and drag cards from one
column to the hour. That is basically what
a kanban board is. You can show the same task. So the same data in a board
view or in a timeline view, which is a Gantt timeline, a calendar view which
we've already checked, a gallery view, which
we're familiar with also, and also a list view, which looks a little better than a table for many use cases. So we've learned
all about filtering and we've learned about
database views in Notion, both of these options are
incredibly powerful and mastering them will help you gain more expertise of motion.
9. Collaboration: In this video, we'll learn more about collaborating in Notion. Notion allows you to
share your pages and workspaces with the whole team to share a single
page on Notion, simply go to the top right
button called Share. Makes sure that share
to web is toggled on. If you want to share
it with the public. And if you want to sell
this page as a template, I made sure that
allow duplicate as template button is toggled on just as in Google
Docs or Google Sheets. You can always click
on copy that link and share it with anyone
who needs to see the page. If you don't want the space to be publicly visible though, you can toggle off the share to web option and invite someone through the
e-mail option instead, if you want the entire
workspace to be shared, which is to say all the pages on your entire notion workspace, then simply head over to
the panel on the left, look for settings
and members and search for add members
to Workspace right here. Do remember that workspace
collaboration is a paid feature so you will
be billed per person. Next, let's check out how to use comments in Notion just
doesn't Google Docs, you click and
select the text and search for the comment
option or simply type Command Shift M or
Control Shift M if you're on Windows and the common swaption
will pop up like so. You can see, you can even mentioned the person on your
team to take a look at this. Here. I'm the only person, so I'm
assigning it to myself, but you can assign it to your
other colleagues as well. Then you can click on this
button to enter the comment. Finally, remember
that notion gives you an entire Version history of what has happened
on this page. When to view the
version history, suddenly head over to the
clock option on the top right. Click on View all updates. You'll see exactly what
has happened so far. It's just been me
editing this page. But if you have
more team members, you will see exactly what
edit was made by whom Fen. You also have a handy
analytics option to show how many times this
page has been viewed, on what dates and
times and who was viewed it and was edited
it from the team. And when.
10. Next Steps: So this has been an
introduction to Notion, and I'm sure that it has
given you a great place to start using the tool
for the final project. I want you to complete the
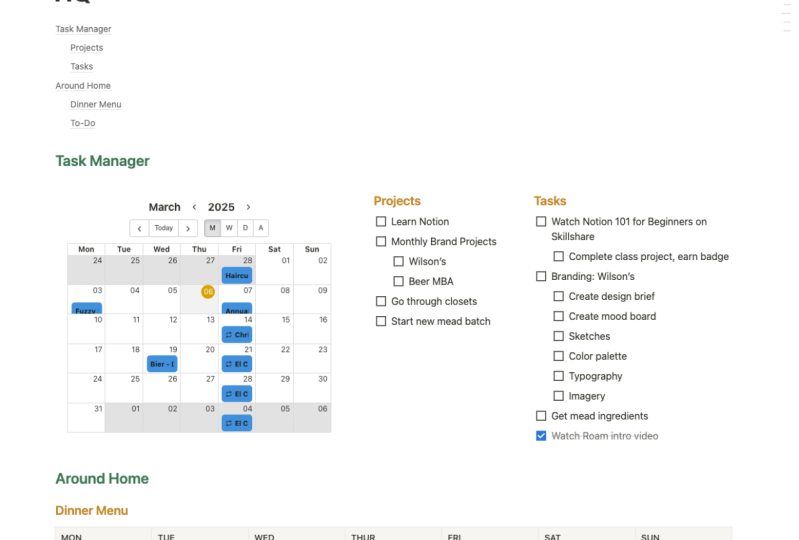
bill that we just started. You will now move ahead to build your own personal HQ
system in Notion, here's what your parcel HQ should have at the
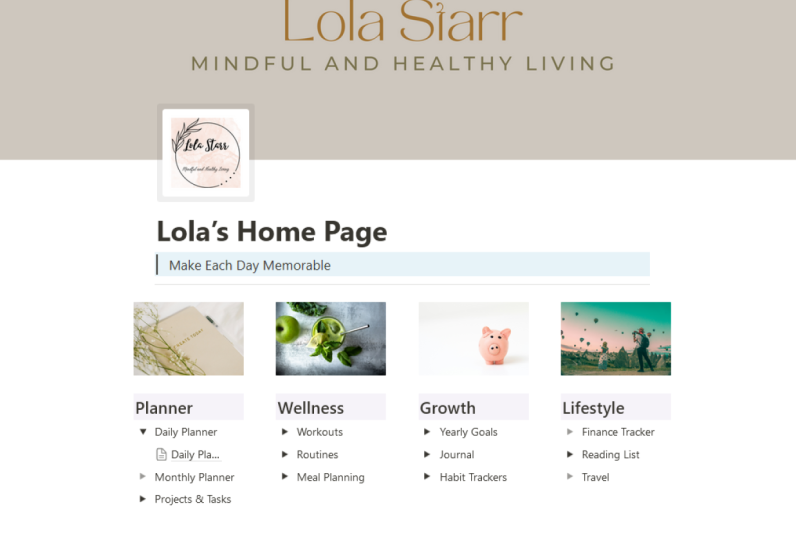
end of your build. First, a homepage. This will be the main homepage
for your personal HQ. It can have a brief introduction
as well as the table of contents linking other sections
and pages if you'd like. Next, a task manager database, and it should display
only pending tasks. And it will also have
other views such as calendar view,
board view, etc. You can also add
a project tracker database inside
one of the pages, a parcel information page, or all your personal details
such as contact information, education, work
experience, and so on. You can turn on the
public sharing for this page to create a
public CD if you'd like. Next, you can also have
a hobbies and interests page for travel,
photography, cooking, etc. You can add a
personal growth page for learning resources, certifications, and so on. It'll be very helpful to
add a note or journal page for your reflections
on various topics. Notes from the books
that you read, articles, important notes from events
or condensations and so on. Finally, you can also
have a tools and resources page to add clippings of interesting
tools and apps that you come across once
you're done building it, Personal HQ will be an
incredible second dream within notion that you can store all the important
information safely. You can download the
Notion app on your phone and add the motion widget
to your home screen to display the personal HQ page easily on your home
screen for easy access. So you can keep revisiting
this page throughout the day. So simply create a
new project under this class and shared a
link to your personal HQ, or simply share screenshots so I can give you
feedback on your build. If you found this class helpful, please tag me on Twitter at Vinci Krishna and add pictures
of your Notion setup. I'd love to see them. Thank you for
learning for me and I will see you in my next class.
 Vensy Krishna, Notion Ambassador and No Code Educator