Transcripts
1. Introduction: What's up, friends, I'm Tony. And this class is the
perfect place for you to learn the skills
you need to gain clarity and organize
your thoughts using Notion if you're
new here some years back, I graduated as an engineer in Boston and went straight into data science for
a couple of years until I decided to come
back to Venezuela, where I'm working on business intelligence half of the time. And then the other
half of my time I'm spending pursuing
my real passion, which is learning
how to learn and inspiring others to do the same. And that is what brings me here today and also to
my YouTube channel. When it comes to
Notion, I've been using the app for a long
time and it is such a powerful and
versatile tool that it has become part of
my day-to-day life. In this course, you're learning
how to use Notion from scratch with a class structure that is aimed to
accelerate your learning. You'll then be able to build
so many different things from a CRM tool, a reading list, a study database,
simple to do this, or even Kanban boards, calendars, Gantt
charts and more. Notion is the right
tool in which you'll be able to build pretty much
anything you can think of. This class is aimed for anyone who has never even
heard about notion. For anyone who has already
familiar with the app, but wants to learn new features or get
inspired with more ideas. The only things you will need to be able to take this class or a computer and eagerness to learn new things for
class is assigned. So then you take
one lesson each day by spending around
10 min on each one. That way, the new
knowledge that you learn will settle
in your brain after a good night's sleep
and you'll take advantage of rest and recovery. We wanted to start off the
class by creating a page in basic elements than nesting
pages, links and backlinks. Then also into styling pages. We'll move into databases
and properties, database views and linked views. And finally, we'll
finish up with, there's also going to
be a final project which you will build
your own notion database more structure on anything you can imagine
using properties and pages that incorporate everything that we'll be learning
throughout the class. You'll be able to
follow along as I build my own example of a
modern day reading lists, would you should feel
free to adapt the project to anything you can think of,
anything that you'd like. But when nothing else to that
today, Let's get started.
2. Class Project: One more note about
the final project. We're much more likely to finish the things
that we started. So for that reason, I'm going
to encourage you and highly encourage you to start
the project right now. So go down below
on this section of the project below and click
on the creative project. Add a title in that some
content to the project. And for the content
you can simply add it, hey, this is going to be
my final projects soon. And then throughout the class
you can either it through the improvements
of the project and then progress and
improve your project. As you go through the lessons, are going to be much more likely to complete the things
that you start to sway. Highly encourage you
to do that right now, and I'll see you in day one.
3. Day 1 - Pages & Basic Elements: Hello my friends and
welcome to day one. I am really excited to have
you here and excited that you're going to start
learning how to use Notion, which is such a powerful app. So before we start, I want to emphasize that
consistency is key to learning. When we start to
learn something new, we usually find ourselves in the valley of disappointment. But if we keep coming back, we eventually realized that our progress actually
exceeds our expectations. So it is very important
for you to keep coming back and to
stay consistent. The first thing we need
to know about Notion is that it lets you use building blocks to build pretty
much anything we can think of that we love
to use on our computers, such as documents,
databases to do this, journaling documents and
whatever you can think of, they will love to use
on your computer. And as you might have guessed, the first thing we need to
do is to download notion. So for that we're
going to head over to Notion dot S bow
forward slash desktop. And you're going to click on
the button that says Mac. If you're on a Mac right
now, or the Windows, if you're using Windows
and then you follow steps, it'll just ask you to use your either your
email address or your Google account
or your Apple ID. But then once you
have downloaded notion you're going
to see something. And actually you're going
to see the sidebar as well. So you're going to
see something like this because notion has some default pages already
right off the bat for now, the first thing that we're
going to do is that we're going to ignore these
pages and we're going to hit on add
a new page, right? So what we have here
is to the left, we have the navigation bar. We have a search
option which lets us search pretty much
throughout our pages. We have updates, tells us some things about the updates
to the pages that we have. Settings and members templates which will go on later on
throughout the course. And then you have this, which would be
like your table of contents are pretty much like the most important
pages that you have, or the root directory of
the pages that you have. Next, you have an option to import from other applications. Then you have your trash for
the pages that you delete. In the middle, you
have the actual page that you're at right now. And then up to the right, you have different options. You can share your page. This is helpful when
you want to invite other people or when you want
to work with other people, then you have this
comments page, which is also useful
when you're working with other people and seeing the comments that people post, then you have the
updates that tells you the updates to
the patient, the rat. Then you have this
Favorites option, which when you click on it, you're going to see on your
navigation bar to the left that excited to have
favorites section. And finally, we have
these three dots, which are simply more
options that we're going to look into
throughout the course. For now unimportant one might be this one, the delete option. If wanted to delete the up the
page that we just created, would hit Delete and
then that would be taken to the trash when
the trash right now. So we can go back to our first or the main page that opened up. Once we've downloaded the app, again, we should just
create a new page, the one we just delete it, and this would be
our new page format. For now, we're going
to just simply create an empty page
so we can not empty. And we see that we can start
typing whatever it wants. And we can add a
title to our page. So I'm going to say my new page. We can also add an
icon to our page. I'm going to add
the mountain icon. And then we can also add
a cover to our page. We can, that's a random cover. Then we can just change it
to something that we like. And I like this one. Then we can reposition our background to
whatever we like. And that's how we have
created our new page. So we started typing
right off the bat, right? But this is actually what is called a block or a
component in Notion. We have, if we scroll like this, we can see that we have
two blocks right now. And this one, the first one
we created simply plain text. If we just start typing. That is simply plain text. But we also have an option to create a different
type of block. And there are two ways of creating a different
type of block. One is to click on this
plus button to the left. And then this window
opens up and you can select the type of
block that you want to. Or there's an even
quicker version, which is the one I
use all the time, which is using the
forward slash. So once you do forward
slash command, you'll see the same window. And when you start typing, let's say that we wanted
to create a to-do list. If when you start typing two, do you see that the search
appears to what you're searching for and then you click Enter to create
that type of block. So this would be a new
to-do to-do list item. Now we can see
that we still have two different elements
or two different blocks, but one is a plain text
and one is a to-do item. Another important
thing to know is that you can actually turn, when you click on this, these three dots to the left, you can actually turn
items into something else. So you can transform them. Let's say that we wanted to turn this back into a plain text. And that is how
we would do that. It's useful to think of
notion as using Legos. You use different or
individual levels to build a bigger structure. Here it is the same way. You use different blocks to
create a bigger structure. And blogs can be
different types. So now I'm going to create, let's say a to do list
again, another one. So item one in the to-do list. There are also e.g. bullet bullet lists.
You can say bullets. And then that will create
Item one of the bullet list. We also have numbered lists, so we could use the command
forward slash command, or we can also use other
keyboard shortcuts. And e.g. this one in
the numbered list, you can do one dot or
full stop and then space. And that would create
a numbered list where you can explore
this Command window. And then you can see that
you also have headings, e.g. so heading one, this
would be a main title. Then we can add some
plain text here. And then we could
do Heading two. So if we do forward
slash and then two, that will create a heading to heading to and then
some more texts, texts in this section, e.g. and then we can create
a heading three, just forward slash and three. And that will create
a heading three. Now, if we highlight
these again, we can see that each one
is an individual block. Something really cool about
notion is that you can reorganize these blocks
however you want to, when you use this button
back to the left, the three dots button. So you can use,
you can reorganize them however you want to. You can even section than
Procreate different, a different column if you
reorganize it to the left. So as you can see, this is how the components are
organized right now. And if I wanted to add more
to this column to the right, I would simply hover in added
to the column to the right. Then I can see a
structure again, if I'm curious, then I'm going to add this one to the first column
to the left again. You can see how easy it is to reorganize your
content in Notion, we saw how we can
add some plain text. We saw how we can
add some headings. So heading one,
heading two here, and heading three over here. And we also saw how we
could do checklists or bulleted lists or numbered
lists to your pages. There's also another option
that's called the toggle, which is super useful. And here you can use the
forward slash command and type in toggle. Or you could right off the bat, do the greater than
symbol and the new space. And that will create
a new toggle. And what is it
toggles it simply as same component as is simply another component that
you can add content inside and then hide it
when you don't need it. So content that you can hide. Now, when you hit the toggle, it hides the content
and you can see that it is closed right now, but when you open it, it
is the same component, but with hidden content within. So that is super useful to use. So there you have it. Those were the basics on how
to create a new page and the basic components that you
can use on your new page. And since the final project of this course is to create
a database of your own. And I am going to be creating, my data is going to
be a reading list. I'm going to turn
this title into my reading list and then this
page is going to be the one I'll be iterating through and improving
through and turning this into a reading list
by the end of the course. What I ask from you is
that to change or create your brand new page or
whatever you wanna call it, whatever topic you want
to create about it. And then add a screenshot as the final project or
as the class project. Then since you open the
project in day one, you will be that much more likely to complete it
throughout the end. So create the project
with your first page. And then throughout
the course you can improve on that project. You can take a screenshot of your page and then you can even share it by turning
this shared to the web, toggle into turned on, and then sharing
this link as well. And then you can improve on that page throughout the course as you turn it into a
robust notion database. But that was it for today. Thank you all so much
for watching and I hope to see you on
the next lesson.
4. Day 2 - Nesting Pages, Links, Backlinks: Hello my friends and
welcome back into day two. So the first thing I
want to talk about is about the elephant in the room. When you look at yourself
and what do you think? It clearly learned what it was very little that it
couldn't move its leg. But it then it never questioned again that statement
as it grew stronger. And now, of course, it can move its
leg fairly easily, but it doesn't even
try to move it because that is what it learned
when it was very little. Something similar to that
happens to all of us when we have limiting beliefs that we didn't think we
could do something, but we never tried
it again later, we never persisted to realize
that we actually could. So I want to encourage you to keep thinking about
the elephant in the room and to stay curious
and keep asking questions. There is a sense
saying that says that the biggest obstacle
to learning is the belief that you
already know it. So let's try to break
our limiting beliefs by staying curious and
keep asking questions. Okay, so let's go back to our main page and I'm
actually going to hide the navigation bar on that
button on the top left corner. And now we're going to
talk about how Notion has a tree structure in
the sense that you can nest pages within pages, and you can do
this indefinitely. There are no folders in Notion, there's no saving in Notion, everything gets saved
automatically to the Cloud. But let's look at how you can
nest to pay within a page. And for that you simply click wherever you want to and
just create a new block. And we could do forward slash
and just typing page enter. And that will create a
new page right here. So you can do, you can
do Enter and that will create a new page with an icon. And this is some
texts inside my page. And now we can use these
buttons up to the left, you can see the path
of your page right, within my reading list. We have my new page. We can hit the back arrow and we can go back
to our main page. And we can see that
we have the page when just created down here, when we click on that, that
would open a new page. There's also a command or a
shortcut, keyboard shortcut, where you could do
command and then square brackets,
opening square bracket. And that would take you
to the previous page. It is really useful to know
the keyboard shortcuts. So if you want to
learn more of those, you can hit on this question
mark button to write. To the lower right corner. You can click on keyboard
shortcuts right here. And this will take you
into a notion webpage. We can see all the
keyboard shortcuts it has. This is the one I just used. So Command or Control
plus the square bracket. And that takes you back
to the previous page. You could use closing square bracket to
go forward to page. But the idea here is, since I'm creating a reading list,
I'm going to call this, I'm going to give this
the name of the book, of a book that I want to
add to my reading list. So sapiens, this, I'm going
to use the world as the icon. And this is some
texts about sapiens. Now I'm going to add a color. Let's see which cover I like. Let's do this one. Then I'm going to reposition it to something that I like better. Okay, safe position. Whoops, reposition. Let's save the position right? So now I have within my
reading list, I have a book, and let's actually create
another book, another page. And I'm going to call
this one Thinking Fast and Slow. This
is another book. I'm going to give
it a brain emoji. And I'm going to give
it a cover letter if this one just reposition it. Okay. Yeah, that'll work. Now I have my reading list as a main page and then a couple
of patients within that. So this would be two
branches of this tree. If we were to go back
to that analogy, once you understand
that notion is pretty much essentially all about pages and then components or the building
blocks within pages. This can go and you can turn this and you can
use this creatively. But if you can turn
this into something extremely powerful and
extremely versatile, and these would be
the fundamentals that if you know very well, you can start using notion
in many different ways and you can start building a lot of cool things with Notion. Another cool thing
to learn about the tree structure is that
you can actually link pages. So e.g. if I wanted to grow that saying in
savings in this book, and I wanted to create a section called related books, right? And then here I wanted
to link back to, let's say that
thinking fastest flow is a book that is
related to this one. So I could do
forward slash link, enter and then write down the name of the
book I want to link to. And I would click
on that page later. And then I have a link that
will take me to that book, to this different page. And then I also have here highlighted that I
have a backlink, which means that there's a page that it's
referencing this page. Click on the back link
and I would see sapiens, which is the original page
that is linking to this one. Now with the tree structure
and noticing that you can nest pages within pages and you can use links between
those pennies. That opens up another level of functionality that
is super useful to use within your
creations in Notion. Now let's change this mean. Reading, listen to something a little
bit different, right? Let's organize
this a little bit. And I'm going to teach you another keyboard shortcut that
it's really useful to use. So e.g. let's say that this is heading one and I'm noticing this a little big tool to
compare to the other ones. I want to turn this
into heading three. You can, within the text
that you're typing, you can still use the forward
slash command like this. You click forward slash or you typing forward slash and then it takes you
to the same window. And if you write down turn into it gives you options to turn into
anything you really want to. So if I wanted to turn it into, let's say a heading three, I did turn into a nice
selected heading three. And that would turn into a
heading three, of course. Well, let's say that
this was too small. I'm going to turn it into
a heading to return. It's enough if you write just, if you just write
downturn and two, and that will take you
to the heading to. Now I turn this into heading
two and I'm going to turn this one as well and
we're heading to turn. But you can also use
the three dots to the left and turn it
into a heading two. Awesome. So now you have this sort of dashboard that we have
because we have some books. I'm going to save books. I'm going to move
this toggle to the, to this other heading two. And then when you say yeah, then I have my books
within my book section. And when I look at this small
dashboard that we have, we see the structure of the
components that we have, and we start to understand how everything works
a little bit better. But this starts turning into our reading list and start staring into the page that we're eventually going to turn
into a database and you'll see how that works
on later videos. So that is it for today. We learned that we
can nest pages within pages and we can
link between them. And we can create this
dashboard that we just created. Remember to upload
a screenshot and the link of the page and your progress in
the final project. And I hope to see you back
here on our next lesson.
5. Day 3 - Styling Pages: Hello my friends and welcome
back into day three to day, we're going to talk about
the forgetting curve. It turns out that we
forget around 80% of what we learned within the
first 24 h of learning. So how is it that we do to remember what we
learned through time? Well, if you look at this graph, there are two elements
in the graph engage in active recall and spaced
out intervals of time. Active recall is
pretty much engaging 100% of your attention
into the topic and re-learning it will
reminding yourself about that topic and then doing this over spaced out
intervals of time. So I'd say that you
come back the next day, you come back two
days after that, and then three days
after and then five days after and
spaced out through time between engage in active
recall and dive into the concept that you're
learning and you're trying to remember throughout time. And that is how you tackle the forgetting curve and that
is how you make it stick. Going back to our
notion learning here, that means that just refreshing your
knowledge through time and not just coming back and
learning something once, but actually reviewing
that with time. In here you can see the painter we created actually changed the order of things and change the names of things and just
added some random text. Just so it looks a little better because today we're
going to talk about styling the pages
that we have in Notion. The first thing to
know is that you can highlight text, plain text. And you can have different
options here that you can use. You can bold text where
you can do it in italics. So let's say that
something pops up style. I'm going to turn
this into italics. And then this one, I'm going to scratch this one. I'm going to underline
writing however you'd like. So you can style your writing
however you'd like to. This disruption. You can turn the texts
into different colors. You can turn the background
two different colors. I'm going to turn this into
yellow so it highlights, however, this are the different
options that you have. You can even use code
snippets like this one. But that is how you can
style, style your text. And of course there are
keyboard shortcuts for this. So if I highlight this and
do Command or Control B, that would bold this, or if I do, that would
make it italics. You underlines. And then Command Shift X
scratch sits, scratches. It's, it's it makes
it scratched texts. And there you have it
different ways that you can style the texts that
you're using it. Now in here you can see we have our little dashboard
and that is perfect. Right now we have our
books underneath here, and then we have
some other things. Oh, by the way, you can
check toggles or you can check the checklists to scratch them when
you're done with them. But this would be our
tiny little dashboard. You can also turn,
as I mentioned, the background of your text. So let's say, I'm going to say that a green, It's
my favorite colors. So now I have my toggle. There's a green button
or green toggle. And then if we went
into these books, let's say we wanted to change the structure of
these books, right? So if, let's say that I wanted
to add different sections, I fast forwarded it a
little bit and I turned this book page into
something like this, right? So I have, I showed related
books is duplicated. So let's delete this. Okay, so I have, I'm
going to turn this into a turn to into heading to what I have right now is pretty much just
reading schedule e.g. read chapter one, chapter two, so we can check these off. We have some key
takeaways that we are going to be
writing as our book. We're going to have a
key summary of the book. And let's say that
we wanted to also have an About the
Author section. This little thing right
down here is a quote. So you can, you can
add a quote like this, adequately like this, and
that will change that format. And this down here is a table. You can add the plane table. And you can add
data to the table. Data what I did to, to send to this table right here is that I added because it doesn't let you center it when you try to center
it in the screen. So what I did is that I added
a blank element and then I moved this to the right
of that element and then a structured at that column as I want it to width the width. But if you look at the
structure right here, we have different components
sorted out this way. I want to delete this one,
just going to leave one. And then I have my
related books section, which takes me back toward
thinking Fast and Slow book. I'm gonna do Command
square bracket to go back. But that is how we
can style our pages. We can use our quotes. If we want to. We could
use a table with 12. And then we can even add. If we wanted, we come back
to a reading list and say, let's add some emojis. Let's do checklist
for checklists, to-do list, and then
intentions. That sad son. I don't know why I
relate that with intentions than we could do
our toggle, toggle list. Arrow maybe can have
a narrow emoji. Our meeting, we can
say we're taking notes in a meeting that we had. So let's say we're
writing for that meeting. But now you can see how
you can start styling your websites or your web pages, sorry, or your Notion
pages, different ways. And now basically I have
my reading list and I have a couple of books inside it when it comes
to styling pages. Here's another
example of something. It looks like an article
or something that I was learning regarding
regression analysis. Where you can see how
you can even embed links when you copy a link from, let's say that you're copying on the link
from somewhere else. It gives you the option to add an embedded and embedded
version of that link. So you add it like this. I have some headings, more links embedded, some
emojis on the titles. I'm highlighting some
texts on mute texts. There's another option
that you can add code. You can add a block of
code if you wanted to. Then you have
images that you can copy and paste into Notion, more images would code snippets, uh, highlighting more
tech, more titles. You can see the different
options that you can have. And also they're
sleeping or call-outs. So you can do call out and do force F
call out and do Enter. And that will take you into this color version
which are default, I think the default
emoji as a light bulb. But this would be a way of highlighting or calling
out text in your pages. But there you have it
different ways that you can structure in different
examples of how you can turn a page
into something more interesting by
styling the page. But that was it for
today and for day three, remember to post the
update of your project. And thank you so much
for watching and I hope to see you back here
on our next lesson.
6. Day 4 - Databases & Properties: Welcome back my
friend into day four. And I want to remind you
that if you're here, that means you're
being consistent. So remember the curve of expectations versus reality
in terms of your progress. If you're being consistent, you're on your way to seeing that exponential growth
in the long term. So keep at it because
you're doing great. Let's go back into our main page here, into our dashboard. And today we're going to
talk about databases. So I added some
texts about here. But what databases are, and we can see that they
are a collection of pages. That means that you can
grab your pages and you can collect them
into a database. And each database serves as
a container that lets you organize multiple Notion
pages in a single structure. So a container that
this is a key, this key word here, right? Container unless you organize multiple pick Notion pages in a single structure and each
database is a page in itself. That means that you can
nest them in pages as well. So as we saw before, you can nest pages within pages. And you can, you can
turn a database into a page and you can nest them into a different
page as well. So let's look into Jo, jump right into what a
database is and how we can use it to create
our reading list. So down here I'm going
to click down here. And I'm going to do,
Let's do a divisor first. If you do three times
the minus sign, that asset division right here. Or you can also do
the forward slash and add a divider this way. But radar, we're gonna do for each session we're going
to write down database. And we can see that many
options list right away. But the important
ones are this one. So we could do a database
inline or a database full page. For now let's do a
database inline, which means it's
just going to create a database right where
we are right now. Because a full pH would be, if we clicked on this button, Let's turn the database
into a full-page. But if we went back here, we have our empty database. We're going to call it read to lead because we're talking
about our reading list. And we have as a, as a default, we have three different pages within this database for Betty, their blank, so we have nothing. We're going to delete
those three pages. We have an empty,
completely empty database. Since I mentioned that you
can organize so you can add pages in the container
of the database. You can even scroll
the pages that you had created before and add
them just like this. So now I have a database
with my two books, which were before just to separate and completely
unrelated pages. Right now I have in my
database two books that are the same type of element if you want
to call it like that. Now, a database, what it
does is that it links these elements by what
are called properties. And if you think about database
simply as a spreadsheet, just as a table
as you would have in Excel or Google Spreadsheets. You can see in here
that you can add different tags are different
columns to the spreadsheet. So let's say I wanted to
add a column and they have different options of what type of column
I want to add. Let's say that I went
to add some texts. And now that I added
a text property that I can rename
if I wanted to. So I can, I can rename this if I wanted
to do something else. Something else. But
for now let's just keep it as a text property. And with the title
text, text, a text. Awesome. So now I can write down
some texts in here. I can say this book
was great grapes. Right? So now I have this row, which is the book Sapiens and
have that is great because I have an attribute that
is a text attribute. This is interesting. This is interesting slab
some texts columns. And now when I open this page up and it
opens up to the right, you can use this button up here if you want to see the full
page or a center peak. But I could do a
central peak like this, or I can do a
full-page like this. And it's pretty much
the same thing. It has a page within that database which is just a
new patients we saw before. When we go back, we see
that we have our database. We have our database
in line down here, and then we have
different properties. With the different properties, we can change this one, e.g. this one is a
multi-select right now. So that means that you can
add tags to this book. So let's say we wanted
to add tag and say, let's say we wanted to
talk about the genre. So let's say history.
This history, or we could say that it
is nonfiction as well. Since we are adding tags, that means that we can
add unlimited amount of tags right here. And we can change even
the color of these tags. We can call it Latin or brown. And then blue or nonfiction. And I know thinking fastest
those nonfiction as well. So I can just start adding
different tax to this. And I could even
call this genre. And for this one I'm just
going to live history on. But now I have, as you can see, I have is pretty much a table that I have with
different books. And different entries and then different
properties right here. If we double-click on the
edges of the columns, it fits them, fits them. So let's say we wanted
to add another, a select, select
version that says, let's say if I status, we're going to talk
about the status of the book and we're going to say if the book was read or reading or let's say ready to read. So I have three status in here. I could say that
it's being read. That is has been read, that immersive has been read. I'm going to do that in green. Reading. I'm going to say it's
going to be yellow. Then ready to read. It's going to be read e.g. so now I'm going to say that
this one is ready to beat. And then this one I
am reading right now. So now I can add different
status to the different books. And let's say another
property, Let's say e.g. this one status, it was
already a property itself. Right. So if I could add, it's the default property
because it allows you to add different status to
those different categories. So if it's to do, you can add
not started, not started. So you have different brushes. The default is not started. But this one is less. You pretty much do the
same thing as before. You can do in progress. This one that I'm reading,
it's in progress. And this one is ready to
read, so not started. But now you can see
different attributes that you can add to
the table itself. And that would be the
properties itself. And you can look at the
properties in the pages. On the top part of the page, you can add more properties
here that say date. And I'm going to save the date is going to be the date that
I've been reading the book. So let's say that I started
last month on 1 September. And then I'm going
to include and then date save September 28th. So this is a date range that it took for me to
read that book, e.g. but you could add more
properties like this. You can add e-mail,
phone, URL, a checkbox. Checkbox is literally
just above, so you can check or uncheck. And there are some
advanced features as well that you could look
into notions documentation, but those are not, we're
not going to talk about these ones in this
course specifically. But with the ones that
I'm showing right now, that is pretty much the
ones that you will need the most and the fundamentals and that will take
you the furthest. But there you have it. That is how you create
a database of e.g. in this example, is a database of the books that we're
reading for a reading list. I'm going to delete the
definition from here, this title from here. And actually both divider,
so I'm gonna delete them. But now I have my dashboard
and I also have a database. The one last thing we're
going to do is that we're going to turn this
into an inline, turn it into a page
from the inline, want to turn it into a page. Now you can see that the
database is pretty much just the patient we open up and we see the same
thing as before. I'm going to add an icon of an open-book
since I'm reading. And then I'm going
to add a cover. I like, Let's see this
one for the book. And now I have my my read to lead database with the
books that I want to read. But that was it for today. Thank you all so much for
watching and remember to post the project progress and you've been doing and
the screenshot and the URL of your database with
different properties. And tomorrow we're
going to check out how we can change the views of this database is some more functionality with the database, which is going to be
really interesting. So I hope to see you back
here for the next lesson.
7. Day 5 - Database Views & Linked Views: So welcome back my friends. At day five, I am so
excited to have you here today and that
you're being consistent. And to date, Let's start off by reminding you about the
elephant in the room. Just keep remembering to
stay curious and to keep asking questions so we can
break our limiting beliefs. Going back to our
dashboard notion here, let's look at our reach league database and actually
change that up a bit, right? I added a lot of books, or this is actually the reading, my original beat to lead database with the actual
books that I've been reading. And the thing is that the difference is that
here we have the pages, so different, different ones. We can also see that we have, Let's see, I know it's
sapiens says is around there. Here we have sapiens. Then we have the author
as the text property. I also added a category, which is the genre of wireless. Then I added a column which is a select type or a select type. I added a notes column,
some reading wishes, the reading dates
for the readings that I've been for the time
that I've been reading it. Recommended by WHO I heard
the recommendation from that. So that is also a text property as to how the status property
and a type property. But this looks
really messy, right? And that might happen
to you wants to start creating data
in your databases. You don't just want to
be dumping data and information into that
table like it is. So if we wanted to look
at this a different way, we could do, we could create
a different view, right? So this one would be simply
everything in our database. But if we click on this
plus button right here, we could see that we can create different views of
that same database. And let's create a table view. Another table view rights. But for this TableView is
going to be a little bit different because I am going to use these two
functions up here, filter function and
the sort function. Let's say that I
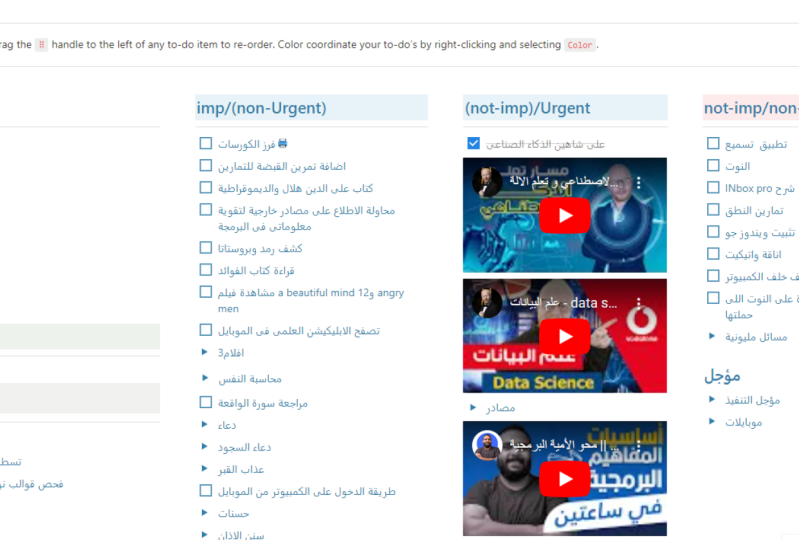
wanted to look at only the books that I have
a strong intent on reading. So that would be intent. Number one. I would go down here
and I would look into the categories or
the properties. And then we'll click on intent. And I would say,
show me the ones, only the ones in one. Now I can see my filter up here. If I don't want it to, if I didn't want to see
that filter would click up here and that
would hide the filter. And then I could also use
a sorting system, right? Because if I wanted to
sort this, these books, let's sort them by, let's say date or
the reading date. Yeah, we could do reading and we could do
ascending or descending. So let's just keep
the descending to see the one that I read. The one that I
read first all the way to the ones that don't
really have a field on that, on that, on that shown
or that included. So I'm going to hide
this part right here. I'm going to say
filter and hide it. And then I also don't want
to see all the columns. I'm only interested in
seeing, let's say the type. I want to see that first, I would rearrange that, added all the way to the top. Double-click on this
line so it fits. I wanted to see the name, the author, the
category, the intent, and let's see status, but I don't want
to see the rest. So how would I do that? I will click on the
three dots here. And I would see properties. I'll click on Properties and
I want to hide the notes. I want to hide the dates. I want to hide the
recommendation by and yeah, let's
see, like this. So now this is way cleaner than the one
that we saw before. And we can see that the other
view is still down here. It's a lot messier,
but I already have a table view with the
much cleaner version. We can also create different
types of views in overall. So let's use, we have
different options. We could do board
view, timeline view, calendar view, list view,
and then gallery view. So let's create a board view
to see how that looks like. Awesome. So I'm going
to say card preview, a monad quick page content. In each one of these pages, I added the screenshot or love the image
of the book cover. So that is why I have
this image like this one. We can say fit image
if we wanted to. Let's fit image. And then we actually don't want to group them by category. We want to group them
by, let's say status. So now we have finished
reading ready. So this one ready
would go first. So I'm going to start
organizing my view the way I wanted to write ready. Then reading would be the next one finished
with the next one. We read is another
category or haven't been nice recall or
watching if it's something, something if it's media or if it's an audio or visual
thing that I'm reading. But there you have it. This would be another version
of the view that we can add and we can have the page
content as the preview. Another view we can
add is a timeline. This one's pretty
cool because we could do shown timeline by reading, remember that this property
was reading dates that I had. And if I created the timeline, it adds that property as a default because it's
the only dated has. And now I could go
back here and I could see the timeline of
when I was reading. I'm going to look at it by ear. And now I can see
when I was reading those books and how long it
took me to read those books. And when I click on
each one of these, it'll take me into the page
of whatever I'm clicking on, whatever book I'm clicking on. Let's see what our view we have. We have a calendar view. This one works very similarly. It shows a calorie
group category by reading the reading
property as well, because it's the only
date property we have. Then we can go back
let's say to we could go back all the way to if we
went back to June 2022, we can see Thinking Fast
and Slow is down here. So I could go back to this book and there I would
have that book. Let's say we could
add a list view, which is pretty much
similar to a table view, but it's simpler, way neater. And we could, we could add different properties
in here as well. You could say, show me the
intent, show me the author. And then when I go back here, I would see all of
that in a list view. And finally we have
our gallery view. And this one will be, you will see the cards of
the page that we have. And since I have the image
that I copied and paste from online into this
page here you can see the preview has
that image as well. So again, you can start
filtering here again, you can sort them
different ways. And then you could have in the ways that you can
handle your database. One other thing that I
wanted to talk about today is that you can actually show, Let's go back to
our smaller version of the retool the database here. We could add, that's it
and sample the same thing, the same thing as before. You can add different views
in here as I mentioned, but also you can add it before. If you go back to your
dashboard or to any other page, you could do forward slash
linked view of a database. And I could do read through
this V2 lead in here. And that would take me or that would bring me a
view of this database, but it is a linked view. So notice this arrow in the emoji on the left
of the week to lead. That means that it's
the link to view and I could change this view. So e.g. I. Just wanted to show the the name and the
date or the name, let's say and the status. That's the only thing that
I wanted to show here. And now I'm just showing
this in this would be just the linked view
of this database. So the original database
is this one. So e.g. if I did T fast and slow, and I went back here
to my original page, I would see T fast and slow. But it's in this in this database that
I'm seeing right here. It's not in this one because
this one is simply a link to view to that database which
I can edit in here as well. I could edit here as well. And then when I went back here, it would make the change because it's simply
a linked view. There's another cool feature. I'm going to delete
this one related to this linked view where I've seen things that when
you copy and paste, Let's say that we wanted to
actually copy it this way. Copy link to block. You can copy the link to block and you can
paste it in here. And it'll give you options. You can leave it like this, or you can paste it and sync it. So that would bring
the content in it. It'll sink the content in a
way that if I edit this text, you can see that it's being
edited up here and down here. It's the same type of content. And it's the same content,
just that's shown as a view, but it's the same
block in itself. So there you have
another way of seeing the same thing that happens
with a database that you can link it and show it
in a different view in somewhere else and then
edit the same database. You can do the same thing
with content blocks. But there you have it. This would be back to my main database of my reading list with
the different views. Go ahead and create
your own database with your own pages and
your different views. And you can add
timeline, a board, a board view, a calendar
view, whichever you like. And remember to upload that into the final project of the course that you've
been working on. And that was it for today. And I'll see you back
here on our next lesson.
8. Day 6 - Templates: So welcome back, my
friend. And today's six. So before we start, I wanted to remind you
about the forgetting curve. So remember that we forget
around 80 per cent of what we learned within the
first 24 h of learning it. And we can tackle
the forgetting curve by spacing out through
intervals of time, different study sessions
for review sessions in which we engage
in active recall. And that is exactly what you've been doing throughout
this course, coming back each day to review the same
thing and then build on top of the thing that you learned on the previous session. Going back to Notion,
we're going to talk about templates today. And templates are all
about not repeating the work of something that
you're doing on and on again. So e.g. if we wanted to
have in this database, we wanted to add a new, let's say a new
page, this database we could add click on here. And we can see that
opens up a new page. I'm gonna do that central peak. And then it just
does a blank page. So I'm gonna delete this page because I don't
want a blank page. What I want to do
is I want to create a template for this database. And let's make the
example of doing something that we already
have created before. For sapiens, it is a structure
that we want to repeat throughout the pages
of this database. So when I go back to
here and create a new eight and then two page, or the untitled one
which we created before. So we're going to edit
this one we created. And then we want to add a similar structure to the
one that we had before. We have this key takeaways. I want to have this to the left. So I just structured my
template this way. Let's see. And that would be
a template book summary quote about the author. I wouldn't want to have this link in here just
yet as a template. So I'm going to
delete this link. I'm going to say add links
here to other books. And now I have this template. And we could have, we're going to have an
untitled because we won't have any title and we'll change it to the new
one that we create. And we're going to add a, let's say a reading, reading. We're going to add a book to it. So now we go back
in when we do new, we have our template down here. So whenever I create
a new book in here, let's say limitless,
limitless book. And then I have the template
already created for me. That is how you create a
template for a database. There's also something
about templates related to just
templates of a page. So when you create
a new page, e.g. I. Do forward slash
and then page in here and I create a new one. You have this option to
empty with icon just empty. And then this templates option, because notion has so
many different templates already created for you. So you can check out these different templates
that notion already has. And you can look
into everything, all the options that
it has and you can build on top of these just to get an idea and to get
inspired by something else. And finally, we're going to talk about what our template buttons. So if we do template, do forest left in template, we can add a button. And what this does is that it will create a
piece of content, every piece of blocks or set of blocks that look the same. And that way we
don't need to re, create the same thing that we're doing over and over again. So let's say e.g.
that every day we were creating a a journal. So we're adding our intentions. I'm going to say H,
three intentions. And this would be
a numbered list. And then we're doing a writing
section where we write out what we did throughout
our day and we have a callout with the
most important thing that happened that day, right? So there's changes callout. So I would do this would be the name of what
should this button be called. I'm just going to say
new journal entry. And then I close this. And now I have a button down here that creates a
new journal entry. So what happens when I
click on this button? We have the template
that we created. So when tensions, I would
have day one intentions. This important thing
happened in day one. And then when I
click on this again, the same thing happened again. So I would get the
same template of the same content blocks that
I added to that template. But I would say day
two intentions. And something happened
in day two, right? But I could do this
over and over again and I don't have
to repeat myself. It's like a copy
paste version of of a simple task that
we don't have to repeat doing if we have
this template button. But yeah, that is simple for today because it's
simply how we can save time by not having
to do copy paste. And it's simply a
better version of doing copy-paste with the
templates in the database, with the templates
of the pages and now with the templates of
these specific buttons. But that was it for today, guys. Thank you-all so
much for watching. Remember to post the updates to your final project in your final project that
you have uploaded. And I hope to see
you back here on our final and concluding lesson.
9. Day 7 - Conclusion: Thank you all so much for watching this course
and for completing it. Not everyone completes the
things that they start. So congratulations,
because you're an outlier, it's important to remember
the value of consistency. So keep coming back so you
can see that the results that you get are larger than
your expectations. Also always remember
the elephant in the room and that you need to keep asking questions to
break limiting beliefs. And finally, you also know how to tackle the forgetting curve. And don't forget around 80% of what you learned within
24 h of learning it. Because you engage in active recall and spaced
intervals of time. And coming back to Notion, we learned how the
fundamentals are really powerful and there are a lot of other functionalities
in motion. In this course, we followed
the Pareto Principle, the 80 20 rule, that says that we get 80% of the outcomes based on 20
per cent of the results. So I focused on the 20% of the fundamentals that
would take you a long way. Because I use Notion pretty much every day and it's
all pretty much just pages and components and building blocks and all the
more complicated functions and complicated
functionality that it has. I barely use it at all. So that is what you will
learn throughout this course. And congratulations
again for finishing it. If you like the course, please feel free to leave a review because that goes a long way for me and I would strongly
appreciate that, but with nothing else to add. Thank you all so
much for watching again and I'll see you around.
 Tony Alamo, Spark Your Brain