Transcripts
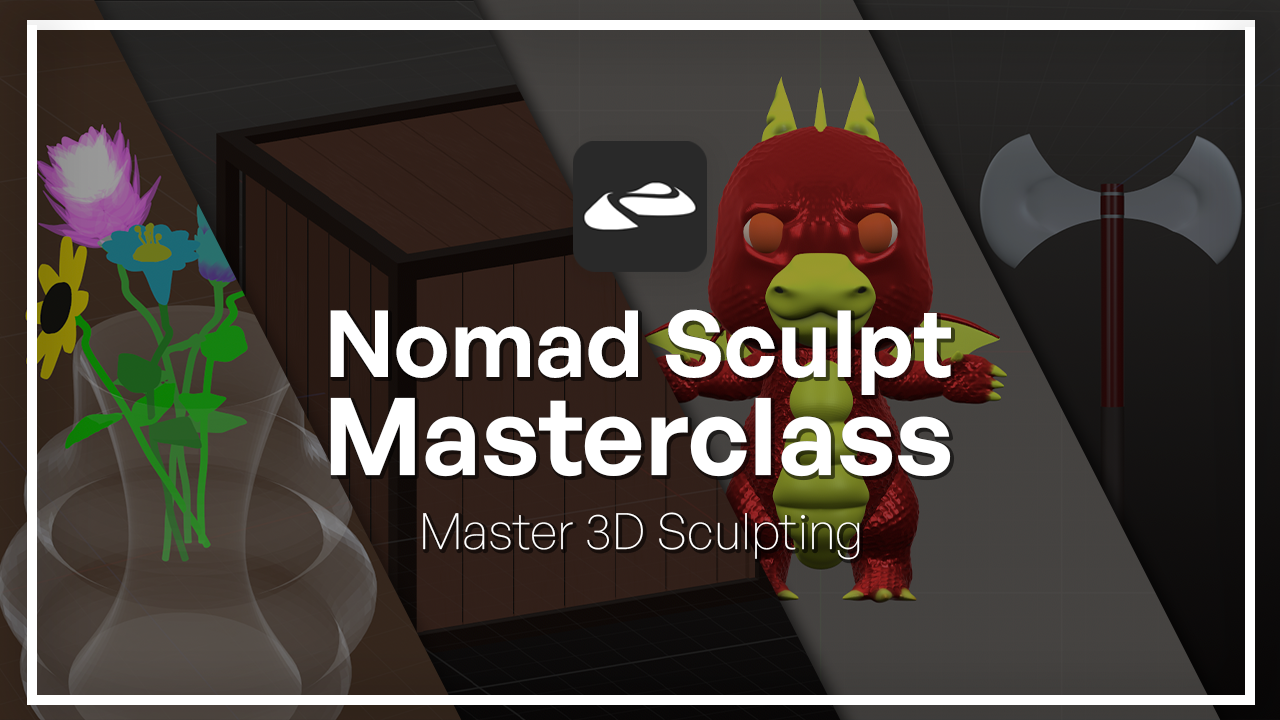
1. Welcome to the Nomad Sculpt Masterclass!: You ever wanted to sculpt
your own three D models, characters or creatures, but
wasn't sure where to start? Nomad Sculpt makes it
possible to create your own detailed models
quickly and intuitively. And in this course,
I'll guide you step by step from your
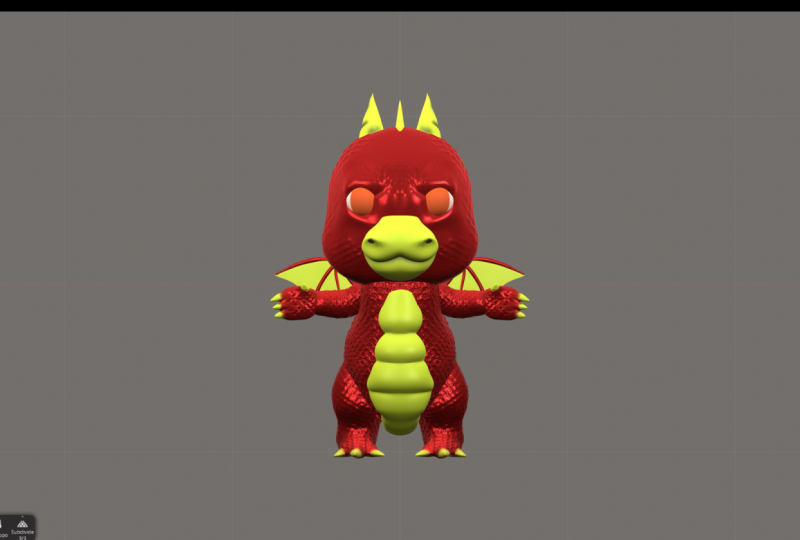
very first sculpt, all the way to a portfolio
ready baby dragon. Hi, I'm Jacob Martin, and I work at the intersection of technology and creativity, and I've spent years cultivating skills and a career around XR, UX, game design,
web development, UI, and three D R. I actually
started my career in IT, which gave me excellent problem solving skills and instincts, but it always felt like these creative tools were
a little out of reach. The moment that finally clicked is when I discovered
Nomad Sculpt. Helped me turn my
imagination into form and that experience
reshape my entire path. That's why I'm here
as an instructor at Skillademia so that
I can help remove similar barriers that you
might have to expressing yourself in a spatial
three D canvas. My goal is to help remove those
same barriers so that you can explore your own creativity in three D without friction. We'll start with the
essentials, the interface, the core brushes,
scene navigation, and importing and
exporting your work. We'll build stylized props, perfect exercises for
practicing planes, silhouettes and
admissive materials. Then we'll explore
organic sculpting with plants and many gardens. Finally, we'll build
all your skills together to sculpt and
refine a baby drag, paint it, light it, and produce a clean turnable
for your portfolio. This course just doesn't teach you how to
just three D sculpt. It teaches you how to think
like a three D artist. You'll always understand the
purpose behind each step, when to push detail, and how to prepare your models
for whatever you want to create if you're ready
to follow a clear, encouraging and practical path, then let's get started.
2. Introduction, Primitives, Tools & Scene Management: Hi. In this first module, we're going to
treat nomad sculpts like an abstract playground. No characters, no
finished props, no pressure to get
anything right. You're simply going
to push, pull, and paint on simple shapes
and observe how they respond. If you ever feel turned around, you have a companion document to check that includes the
quick interface guide, the core brushes reference, and a lesson overview
document that highlights all the
steps that we've taken within this module. Whether this is
your first time in three D or you're just
curious about Nomad, this module will
gently guide you comfortably towards sculpting
and navigating the scene. Let's get started with
our first module, primitives primer
preview Piazza. Before entering the scene, go up to this folder icon, and you're going to want
to click it so that we can import the dot num file
provided for the module. Open up Nomad like I have here, go to the folder icon. Scroll down, click Import, find the directory
that you downloaded the file open, click
Keep topology. Then click New
Project. All right. Click the folder again
to make it retract. Then press the home
icon here. All right. So in this module, we're going to be
covering all of these core brushes
with these primitives. First thing we'll do is
we'll turn off symmetry. If this is on any of your
tools as we go through them, then just go ahead
and turn it off. I will remind you to turn
it off as I turn it off. So we're going to be covering these brushes and
navigation a little bit. So the clay brush
with the sphere, the move brush with the cube, the drag brush with
a low polysphere, the brush with the cone, the flatten with the cylinder, the smooth brush with the torus, and the crease with the plane. All right. So a little bit of navigation like we were talking about the
home button here. What we're going to do, I'm going to show you how to pivot around the center point of the spatial environment that you're going to be
sculpting within. What you're going to just simply do is you're just going to click your left mouse
button and just start to turn this round
and round and round. As you can see, this
will show you what side of the object
that you are facing. All right. Go back to home. This not only does that, but if I was to pivot this way, and then I was to click here, it'll take me directly to back. So there's many ways
that you can navigate through just depends on what your needs
are at the moment, but it's great
because it gives you the room to be able to adapt to whatever you're sculpting and whatever your
creation needs. So we can even go here and it'll go to the
bottom. You get the idea. We'll be using that and
it'll become all of this over time will
become second nature. For now that we've covered
a little bit of navigation, let's go back to
the home button. So like that, let's do the clay brush first
with the regular sphere. Go ahead and adjust your
radius and your intensity. I've already adjusted mine here. We're going to just simply
click on the clay brush. To zoom in, we just
want to double click on the empty space here and to zoom out, we
do the same thing. You can use your scroll
wheel to zoom in, but it's not quite as accurate. But it is useful in
certain situations. But for the most part,
you're just going to select again as follows, and then double click to
zoom out and in. All right. See? You got it. We're going to be covering the clay brush. Let's go ahead and just freely. Doesn't have to be perfect,
whatever feels right. Make a abstract form. You could even think, oh, I want to make something
that looks like a yarn ball. So to create a more
dynamic effect, we're going to increase
the intensity. And as you notice, when the intensity is lower, the effect is more subtle. But when we increase it, it's incredibly
apparent that it's making changes. Do
that at your leisure. But for now, we'll just
go to home button and move on to the move
brush and the cube. What we'll do is again, we'll select the
cube and this time, we'll pivot again using
the left mouse button. We'll click right outside of
the perimeter of the shape, and then once we double
click, it'll zoom in. Go to the move brush over here, adjust your radius
intensity to your liking, and then just start
to move around. Pretty awesome, right?
Now, as you can see, there's little triangles
and shapes here. One thing that we can
do is we can come down here to wireframe
and select that. Now we have almost
a mesh map overlay. This isn't something permanent
on the shape, of course. It just gives us a mapping
or grid to see how we're affecting the mesh faces and all of the different
surfaces of the object. So these squares here
are our mesh faces. So we're just going to
continue to pull these. Maybe we'll increase
our radius All right. And you can just distort
this as much as you like, pull it in, out,
whatever feels right. And what you want to do is you want to take your
left mouse button, and maybe you'll zoom out
a little bit and pivot, turn this down, turn it back up, and now we're at the
back using that. So if you don't have
anything selected, it'll pivot around the center
of the spatial environment. If you have something selected, then that becomes your
orbital pivot point. So just keep pulling on that. Awesome. Moving on to the
next brush, we'll go home. Next, we'll do the drag brush, go here, select the radius, turn up the intensity, select the drag brush if
you already have it, then select the mouse. Remember, we will click right
outside of the perimeter, not directly on it, but right outside of it, double click. If the first double
click does not work, just do it again and
usually it'll work. Little troubleshooting tip, or if it starts to not zoom in, you just want to
scroll in and out, especially if you're using
the desktop version, just a little
troubleshooting tip there. Moving on to explore
the drag brush, we're going to start
to apply that to the surface of our
shape, just pulling. Maybe it will increase
our radius some. We had to turn off symmetry. Just keep pulling it, making it into some abstract
form, whatever feels right, experimenting with the
different intensity and how much radius that we are affecting and this doesn't none of these have to
look exactly like mine. They can look like your own
individual interpretation. The idea is just getting a
feel for the brushes and their capabilities and
learning more about their differences and how
some of them are similar. And as you probably noticed, this drag brush is very
similar to the move brush, but it's almost like
it's more liquid or rounded where the other was
more square and static. All right. Moving on
to the next brush. We go to brush. We're going to use brush
with the cone here, select the cone just as
before with the other shapes. Then we're going to go
over here to brush right here and how we scroll
through our brushes is we use scroll wheel as you see
me doing here to adjust it, if it looks like
this, we just drag it over so it's very customizable. Getting back to our shapes, select, zoom in, and then
we'll start to experiment. As you probably have noticed,
this one is similar. The brush is similar to the clay except it's a little
more rounded, making this more
bulbous comparatively. You can see our strokes are almost like a highlighter pen. We go back to home, select. This is more rounded like
a ballpoint pen almost. Right and just experiment
without that, brushing over it, even pivoting to the
bottom, going in circles, whatever feels right,
doesn't have to look anything like mine as long as you're
using the same tool. Remember if you get turned
around, we go home, then we go to our flatten
brush, scroll down. Here it is, select our cylinder, zoom in, pivot up to the top. Then we're going to
take our flattened brush and we're going to start to bevel out the edge
and flatten it out. See how it's affecting? You can even do it over here and it doesn't have to
look exactly like mine, but the flattened
brush is really meant to flatten out,
of course, surfaces. So over here, these
might look intimidating, but they're really
self explanatory. Something I had to learn early on is that they
are what they do. So it's like this
drags, this moves, and you'll understand the
differences as you use them. If I go to this side over here, as you can see, it doesn't
have that much effect. A little bit of an
advanced tip with some of these more rounded
object rounded faces, it doesn't have that
much of an effect on it because it's like it
has a flat surface, even though that flat
surface isn't really, I guess, even plane. But we'll learn more
about that later. It's not that important, but just to show you the difference, one thing we can do is if we
go over here because we have manipulated the way
that this part of the mesh looks and
if we keep going, what'll end up happening and maybe if we increase
our intensity and radius, it starts to make it to where we can have more and
effect on the mesh. Moving on to our next
shape, we go home, then we go to smooth
tool, select a torus. Zoom in and then start
applying the smooth. Remember to turn your symmetry
off if it's turned on, we'll be covering that in a later lesson and
then just start to apply that and see how it's
affecting the mesh faces. This is why one of
the reasons it's so important for us to
have the wire frame on, especially when we're
using certain tools like smooth because it really
gives us a map and analysis to take stock of what is occurring with
our mesh object. As you can see, it's
smoothing it out, seemingly causing them to be closer but when you
smooth it out so much, then it starts to have
less of an effect. See how these they're
moving closer? But this isn't as
much. But we'll be going more into depth
than to smoothing. Just wanted to show you how the tool works because
it's frequently used. If we sculpt something and
we need to polish it out, smoothing is a great
tool for that. Going back to home, then we'll
go over to our list here, we'll scroll down to the
crease. Oh, here it is. All right. Then we'll
select the planes, make sure that our symmetry
is off if it's not, then select right outside
the perimeter of the shape. All right. For this one, I want to draw a smiley face. Just keep using the crease. That's one of the eyes
that I'm drawing. Maybe crease that. As you can see, just as the
brush indicates what it does, it's making a crease
within our object. This is useful for
clothing, faces. We use it frequently
for a number of things. But today, we're just
going to be doing a simple happy
face for finishing the first module just to
see how the crease works. All right. Great. All right. Going back to home. All right. In this module, we've covered an array of
different brushes that are used frequently throughout the sculpting process
within Nomad Sculpt. We've covered the clay brush. We've covered the move brush. We've covered the drag brush. We've covered the brush brush. We've covered the
flattened brush, the smooth brush, and
the crease brush. You're welcome to spend
as much time as you like with these shapes
and these brushes. And if you ever
need to go back and there's something you don't
like while you are sculpting, there's this convenient
back button here. Thank you for joining me
for this first module, and I look forward to
teaching you more, and I'm happy that
you have decided to use Nomad Sculpt as your entry
into three D. Thank you. See you in the next lesson.
3. Exporting Models for External Use: Welcome back. In
the last lesson, you imported the primitives
primary preview scene as seen here on the screen. Up until now, a lot of
what we've been doing is a bit abstract doing panels, icons, and basic brushes. But in this lesson,
we're going to turn that abstraction into something
more concrete, literally. We'll sculpt rocks and make your foundation rock solid before we move on to the
next lesson, of course. We'll set up a clean scene, make two simple rock sculpts, and send them out of
Nomad as a test export. Before continuing on
to that next scene, what we'll do is we'll save our current scene by just simply going back
to the folder icon, going to this icon
here, save as, and then you'll save it in this underscore format here,
followed by your name. That way we can preserve our original scene and the scene that you
experimented with. I've already got that save, all we're simply going to do to create a new scene is come here, create a new scene, click yes, and then we'll be met
with this sphere. First thing we want
to do is come back. Retract the folder menu, then we're going to go
to a new menu here. This is our hierarchy.
You're going to select that. As you can see, our sphere is documented here within
this scene hierarchy. You're going to go over
to this three dot menu, select it, and then delete it. Now, you may be asking
yourself, well, I thought we were going to
be making rock sculptors. Well, this is where
I teach you how to add your own primitives. What you're going to do is select this button here to add, and then you're going to
see a list of primitives. First thing we're
going to do is we're going to add this quad sphere. Just like the one
that we deleted, but just showing you how to bring primitives into
the scene yourself. Then we're going to validate it. This basically just
validates its existence. I'll go more into that
later about some of the initial values that we can set when we are populating a primitive and
adding them to our scene. But for now, we'll
just click Validate. All right. So make sure
that you have grid on. Grid will help us to be able to see the
scale of our scene and also get an idea of where the center
of our object is. It just gives us more
spatial awareness. Moving on, we're going
to turn wireframe on. Then we're going
to start to select our brushes that we need
in order to make our rock. The first thing
with this sphere, we want to do is make it more boulder like,
go to the bottom. What we need to do is add
a few more layers to it. This time, we're going
to have symmetry on. Symmetry basically
creates almost like a mirror on the other side. That way, we get consistency on both sides of our shape when we need it or want it
or when it's useful, and we create these
consistent layers, almost like there's
another brush that is a twin to ours that is matching
our mirrored movement. We're just going to add
some layers on. All right. Then we're going
to go back over to our brushes, go to flatten. We'll flatten it out a bit. What I suggest is going
pivoting this direction. That way you can also see
how flat you're getting it. Now, you don't want
it too flat and we can easily change that by using the clay brush and maybe we'll smooth it out a bit. All right. Go to home. Then what
we're going to do is get the clay brush again and just give it a little
bit of texture. We'll turn down the
intensity some so it's more subtle and just start
going into random places, but still sculpting around the brush around
the sphere, I mean, but then we'll go to our
brush tool, zoom in. All right. Once you've
got enough around, you want to go back and turn off symmetry and just give
it some randomness. Now, we don't want
to put too much, we still want it to look
like the semblance of a rounded ball and I'm
just barely pulling on it. Barely adding brushes. All right. Looks pretty good. We'll smooth it out just a bit. We don't want to get rid of too much of our texture
by smoothing it out. And then we'll go
to the move brush. We'll turn down the radius, go to front or home, and then you'll start moving
it inwards, outwards. Very similar to the way
that you use the brush. And once we're done with that, we'll go back to home like when we saved before,
we're going to save again. This time, we're just
going to click Save, name our project X All right. So you can name it Ex or Export Rock test,
and then click Okay. All right. And then
what we'll do is we'll click the folder
icon once more, go back to this hierarchy button here and we'll add our sphere, which is the box, of course. All right. Now, this is a little new, but
don't get scared. All we're going to do is just
validate and you may think, well, it's occluding
what we just made. They're in the same spot. All we have to do
is go back home, and then we're
going to go over to our brush panel and
I'm going to show you small introduction into a new tool that we haven't
learned quite yet, but we're going to
be using frequently. This is the Gizmo tool. You'll see that
once you select it, it gets these radio
directional points. What you're going to do is
grab one of those points, see as I have this
arrow highlighted, and we're just going to
simply drag it over, maybe zoom out a
little bit using the scroll wheel
and there you go. This, of course, we'll move
it up and down side to side, if we pivot this way, Gizmo tool can also scale
our device on certain axis. It's very useful
and we'll be going over that in more
depth as we go along. Come to center with the cube. We're going to go back up and use the tools
that we've been using. I recommend first,
since the cube has these hard edges is
that you actually go to the flattened tool
and just think about the way a brick or cobblestone might look and
that's what we'll create here, something that would go well
with our boulder over here. Okay. We're going
to turn symmetry off for now and then just take your flattened tool and adjust the intensity to your
liking, go closer. I'll show you what I'm doing here is getting the edges
and flattening them out. Maybe I want to increase
the radius more. I really want it to
have a cube shape, but resemble more of a brick or a rock or
cobblestone like I mentioned. Turn up the intensity. I just like to randomly go around these edges
because we're going to use more tools to
distort the mesh. As you also probably noticed, I keep going back and forth. It can be really useful
to have a top view and not that far though
and have a close up view. If you do go too far, it's as easy as just zooming back in and if you
go off center, remember, all you
got to do is just click and you'll go
right back. All right. Going to our next tool,
click the clay brush. And just try to go
in the flow of which you already have set
with the flat brush, but also filling in some of the spots that it did not touch. Maybe we'll increase our
intensity. We're back to home. Then let's once again
use our move brush. Don't move it too much just enough to where
it looks rock shape. Then if you like, just make some of these
areas be more pronounced. What we can do is we can
go to the crease brush, and I'll show you
a way to use that. You see this indention here, what we're going to do is
make that more pronounced and then you'll start to see the mesh starts to
fold in within itself. You can just make little creases where you've already
made shapes. Just try to find
what's poking out, what's dipping in. All right. And your rocks may
not look like mine, but I'm sure that
they look great. And I'm really hoping that this sets the stage for
a rock solid foundation. Before we end this lesson, as I showed you how to import, I'll now show you
how to export now that we have our
rocks completed. We'll save. That way we keep
the status of our progress. Then in that same folder panel, we'll go down to Export and you'll see all these
different formats. They all have different programs in which they are
typically used for. We'll go deeper into those
as the course progresses. But for now, we're
just going to keep using our dotnom file
since it's familiar to us. What we're going
to do is make sure that all this is here. So that way, all of our
elements are exporting. And then we're just going
to select Export Nomad. As you can see, I've got a directory for my
dot nome files. And then I'm just
going to go over and select Save as easy as that. Then, if say, I
wanted to import it, as you can see,
it's right there. All right. Thanks once again for following
along with the course, and I'll see you in
the next lesson.
4. Beginner Hard Surface Modeling: Blocking a Stylized Lantern & Boolean Cuts: Welcome back. In this module, we're going to turn
simple primitives into a small stylized
lantern scene. We'll start with a cube, build a step lantern
body with cloneed cubes, carve out the windows using
invisible booling cutters, keep everything clean with
good hierarchy and naming, then hide the lantern and build a candle,
wick, and flame. At the end, we'll add the optional tourist loop so that the lantern
can be carried. Let's start with the
base lantern cube. First thing you want to do let's go here, open up a new scene. Yes, then we'll go to
our hierarchy here. Then our three
button menu, delete, our hierarchy holds all of the objects in our scene
so it keeps them organized. We'll be using that very frequently throughout
the course. But for now, I'm going to
teach you how to create the primitives that we were experimenting with
in the last course. First, we'll go to add, we'll select this box or cube here. Don't worry about all
these settings for now. We'll go into that in
more detail later. For now, we're just
going to click validate. Then what we're going
to do clone the box. Then over here where
you see the eye, we can make our first box invisible without even
really selecting it. Right now we have
box one selected. So if we make both
of them invisible, as you can see, they're
not visible any longer. Not visible. But if we
go back, there we go. What we want to do is first make our first box invisible and then we're going to
take our second box and we're going to learn
to use a new tool, the Gizmo tool here. When we go to select something, as you can see, we
have these arrows. It's like a spatial positioning. What we do is we can actually click these arrows
and move our object around straight right in the direction in which they're pointing on
their different axes. Get it back to center, so it's center with
our other cube. Once you have it
center and you're done experimenting
with the Gizmo tool, and remember, you can press over here and go back what
we're going to do. Is then go to box
one and just in the same way that we can
move around our objects, we can also scale them
on different axes. You're going to take
this green dot here, select it, and then drag down, and then make your cube into
this thick planes like mesh. Go back to front. Then what
we're going to do over here, as you can see, even
though this is invisible, we have an approximation
of the invisible mesh. Go back to box one, and then
we're just going to try to estimate where the bottom
of our first box is. That looks about
right. All right. Now that we have
that, go back to box one and then we'll
use another new tool. Go to paint. Of course, this is exactly what it states. It's our paint tool,
and we have the liberty with the paint tool to
paint directly on the mesh, or we can do something even easier by painting
the entire mesh. First thing we'll do is go here. This transparency ball is with these squares on
top of it, go here. Then we're going to select what we want
our texture to be. I'm going to select this
subdued plastic material. Select X, and then what you do is select the
color that you'd like from the color spectrum here and all you do is while
you have it selected, click here and then Walla color that you choose is the
color that the mesh is. Go back to front. As you
probably have noticed, I have these pins here. Quick tip, when you
have them selected, you can move around
the environment and they will stay pinned. You can also retract them still, but as long as you move
around and they're expanded, they'll stay open and what you can do, and
then it disappears. For now, we're going to just keep the hierarchy
pinned because we're going to be
looking at that throughout the course
of this lesson. Getting back into
making our lantern. We're to go here, then we're
going to select Clone. Then we're going to go
back to our Gizmo tool. Back just a little more. If you get lost, remember, you can always double click and then we'll try
to match that up with the bottom of that and
then we'll pivot up, turn on and off your
grid as you see fit. It is helpful when you're
trying to find a level plane. I'm going to turn off
my grid in order to demonstrate what we're doing
here with more clarity. What I'm going to do is you just go where this yellow ring is, and then you just pull
ever so slightly. You're just going to
keep repeating that, matching and lining them up. Pulling just a bit, clown again. Remember, you can
always go back if you make mistakes or get a
little ahead of yourself. One, two, and then we're
going to make one more step. For the purpose of this course, I'm only making five steps. If you'd like on your model, you can make as
many steps as you like and even make
these more thin. Now that we've got box one, box two, box three, and box four, and box five, what we're going to do is we're going to
click all of those, and then we're going
to join them with this join button here on our hierarchy menu,
and there we go. Now instead of multiple boxes to manage, we only have one. What we want to do
next is clone that, then bring it up, go back some, and again, try to approximate
where the cube is. All right. Then we'll take box two that we
clone from box one. We'll make it a
little smaller and then what we'll do is make
our other box visible. Next, we're going to click this three dot menu here and you're going
to see some options. We, of course, have
the clone option here, but we also have it
easily accessible here. For this, we're going to click
name and then we're going to rename that into lamp To. You want to keep your
naming conventions, which is what this is called, very simple and
self explanatory. I like to use a camelcase style. The reason it's called camelcase is because it's like a camel, with humps and have
these brackets, so it makes it easier to read. We're going to come over
here and do similar, but instead, bottom,
rename this. I'm going to work on our center. First thing we're going
to do is hide these two, our top and bottom,
rearrange that. What you're going to do is
hard press like I'm doing on the mouse right now and put it at the bottom just to
keep things really tidy. If they start to
become one like that, just go ahead and
hard press again. Now what we're going to do
is clonee the lamp center, then go to the right, here, move it out
ever so slightly, scale it down back to front, make our other original
cube center invisible, scale this down
about right there. Go back to lamp center,
make it visible. Then we're going to move this
out and up back to front. Let's go ahead and
color it because I find that having
coloring really helps. What you want to do is
think about what you want the metal part
of the lantern to be, what color you want it to be. For this, I'm going
to select here underneath the metal
materials, the kx. Then I'm going to pick
the color I want. I'm going to choose
a grayish color, something that'll really
show up nice with metallics. And we can also
manipulate the roughness. I recommend just
keeping it like it is then while we have
that selected, paint. And you'll understand why I did that in just
a few moments. If your cube is centered, you want to move it over here, move it just a little
down so that we can get better arrangement,
go to wireframe. As you can see, the wireframe, it not only helps us understand what's going on with the
mesh when we're using things like the flatten tool and the move tool and all those other tools that we used before, but it also helps
with our placement. Take this cube, align it
here right on the corner. Then what we're going to
do is start to stretch that until it's longer or
wider than the cube itself. Go back to front.
Maybe we can make it somewhat smaller and move it over here,
go back to front, then clone, move over and put this one in a
parallel with the other. We're going to select
both of those, go back to front, make sure
everything's lined up. Clone. When you clone something, it's automatically going to
select what you just cloneed. We clone two things.
Let's select those. Then we're going
to line those up. So that they're even
between each other. As you can see the other
side is reflective of that. Then what we're going to do is we're going to
take all of these, and then we're going to go here and select this
join button here. Now we only have one object to manage
instead of the four. What we'll do for clarity
is we'll name this and rename it and
just add tool to it. Something else if it makes
more sense, for stencil. Something else that we
do is smart to do is to make abbreviations or
make shorted versions. I'll just call it
stencil or tool for now. Then what we'll
do is clone that, make this one that we
just cloned invisible, we'll select this one, we'll make it invisible, but make sure that the
original one is selected, not the clone, then we'll
also select our lamp center. Then we're going to do
something really awesome. We're going to use the
stencil that we just created. And basically cut
into these making these shapes into our lamp center with
the click of a button. We just go up to this
booling operation and being that we have
both of those selected, click booing because
that other one was invisible and we
use the booling button, now we have these symmetric
holes in our object. Next thing we're
going to do is make the other side because we clone this and we're
going to be reusing it, we're going to
make another clone of it, then we're
going to go back, make that visible, and we're exploring the
Gizmo tool a little in depth as we learn how to do all of these complex
task and cloning. Another thing the Gizmo tool
can do is it can rotate. This yellow line here allows
us to rotate our object. I want you to try and rotate
this to a 90 degree angle. In the bottom corner, you'll see the percentage but you don't have to get
exactly right by that. It just helps you
gauge a little bit. Let's see. Are we aligned? Another way to do it, go back is you can actually
open the Gizmo tool up here and what we want to do is you can see you've
got scale rotation. That way we can automatically
change the values. Go to that green
button, the Yaxis. Looks like I need to
move it over a bit. We'll move that
over, move it back, so it's going all
the way through. And then line our cubes
to our wireframe. Then we'll do the
same thing that we just did on the other sides. Make this invisible, have
both of them selected, go to Boolin, select the
booling button again. As you can see, now we have all our opening windows
and you might be thinking, Oh, but there's filler in here. We'll take care of
that in just a moment. By doing the same operation,
except this time, we'll add another cube, validate, make that cube
just a little smaller. Then just like we did before, we'll make the cube invisible, keeping this visible, but
both of them selected. Bolein, then click the Bolein
button, and there you go. Going back to front, we've
got our lamp center selected. Let's give it a paint upgrade. Change the color.
To what you like. This is what I'll be using. If you want these cubes on
your own model to be bigger, as long as they're symmetric
and you're creating this cross or T shape here, then that's what you
want to create with the boolings then clearing it out with the final
cube that we create. Now that we have
that, let's take a look at our other parts. Let's move our tool we've been using down here,
keeping it invisible. Go to our bottom,
moving it down, it isn't, and there we go. Now what we need to
do next is go back to our lamp top because we need
to create an apex here. But as you can see, we
joined all these, correct? What we need to do is we
need to go to separate. Separate, of course, we'll
separate our joined parts. And another advantage
of joining and separating is when you join
and separate the objects, it also puts it in these
collapsible organization here, so it's easier to
manage as well. We're going to go
here to the fifth, which is the top clone and
to create that apex point, we'll continue with
what we were doing earlier by moving
up, scaling down, clone, scaling down, moving up, clone, moving up, scaling down, just continuing to do that. To save a little bit of time, what I'm going to do is
now add another cube. Then I'll briefly show
you how you can change dimensions of your
cube without having to use the Gizmo tool as
soon as you populate it. You're going to click
here, scale it down here, and then click the other green, and then the other
points here, and here, then we're going to go over to validate we're back to
our familiar Gizmo tool, Zoom back, place this on top and then scale
it down the center. It's close to as even a
symmetric as possible. One thing you can do is if you
go here to your drop tool, we can use that to go here and then paint the
top the same color. Now that we've got that, we're
going to add another cube. We're going to take
this cube outside. We're going to validate it,
make it a little smaller, then make it invisible. Just so I can show you that we're going to make
those into window panels. What we want to do is go here to where this
materials button is. Then we're going to
make a glass effect. First thing we're
going to do is go to refraction and go to additive,
customize the opacity. All right. Now that
we've got that, we can create our candle. Rename this first
into center glass. Then we're going to make
all these invisible. Then we'll go to add, click
the cylinder, validate. If this keeps popping
up, remember, you can just always drag
it out of the hierarchy. Then what we're going to do
is name this, go to the top, scale it down, go to our center so that we can have an understanding of the
scale of our candle. Great. Then we're going to
make our candle taller, drag here on our Y axis. Then we're going to zoom
in. Now we're going to learn a new tool called
the planar tool. It's the opposite of the
flatten tool in a lot of ways. What we're going to
do with symmetry on, we're going to turn
down our radius. Okay. Let's go to our move tool, turn off the symmetry
and just pull down making it deep
but not too deep. Then we're going to go
back to our planar. By using that, it
makes it deeper. Take our drag tool, turn down the radius, and
turn down the intensity, pivot to the top give it the shape as though
it's been melted some. What we also want to do
go to the flatten brush and flatten out that
edge just randomly. Go back to home. Well, that's
all for lamp part one. We've got our candle ready. Now in part two,
we'll be moving on to make our wick and
fire. See you there?
5. Sculpting the Candle, Wick & Final Refinement: All right. Now that we've built the candle shape and
hollowed out the top, we're going to use the
grab and plan our tools and move forward to finish
the rest of the candle. We're going to add
a candle wick next. Then we'll sculpt a
simple stylized flame on top using a sphere. The first thing we'll do to help as a leveling
measuring tool, we'll go up to add, and
then we'll select plane, pivot up top, and
as you can see, plane has been populated. Click validate, then so that
we can have a better visual. Something I like to do is we're just going
to paint it red, go down to paint
like we did before. Painted the red of your choice. Whatever is going to be
the most noticeable. This won't go into
our final model, but it'll help us for leveling, using the tube tool
and just help us measure where we're going
to be working spatially. Next out of the paint tool. Go to the front, then go
over to your brush panel, select this new tool to
tool called the tube tool. As we go there, we'll see all of these different options
for curve and path, for this, we're going
to select the curve. Then what we're going to
do is go back to Gizmo. Try to get a close
approximation of where it is where you want
our wick to be, go back to front, pivot upwards. Then we'll go back to the
tube tool I mentioned earlier. Click on the candle. Then we're just going
to start to draw up. If if this menu ever
gets in your way, for instance, here, just click this arrow
and it will move. Now what we want to do is we can click this green button
here and that is the same as validate it's pre
authorization rather. Let's go ahead and validate it. Then we'll go back
to our Gizmo tool, pivot to the right. One thing you can do also with
the Gizmo tool is you can move it from the center just
to move it around freely. Normally, you want to use the arrows because
it's more accurate. But if you're just moving
something over like that, it can be quick, then we can
just adjust it by rotating. Zoom in, place it down, back to the tube tool. Put another tube, click
the green button, go back up to the hierarchy, make the previous
tube invisible. Then this radius button here,
we're going to click that. Then if we go up to the orange, we can start to narrow out. All you have to do is just click this orange dot here and then drag it over and then
we'll narrow this one out, keeping the bottom brunt but the top pointed upwards.
We're going to validate. Make sure it's going in
the right direction. Then come back to the tube
that is currently selected, clone it, then we're
just going to rotate it to where it
looks like a wick. First thing we're going to
do take these two here, and then we'll
just delete these. If you made any mistakes or one that didn't come
out right, it's okay. You just go back
just like I did, and I had a better idea
of where the tube was supposed to be within the spatial environment
on the candle. Let's delete these.
Then what we'll do is we will use our
join button here, join them, and then
we'll separate them. That way, it's very organized. To keep things organized, we'll rename them now that
we have them created. Select all of your WIC objects. Then we'll come back
over to our brushes. Select charcoal almost black. Now that we've got that,
take the drag tool. If you want them
a little higher, for instance, one
lower like this. All right. Now that we've got our WIC, let's go back to home. Then what we can do
make our planes tool into its actual name,
make it invisible. Go back to our candle, you select all of
our wick sections. Then what we want to do is add a quad sphere, scroll back, go over to your tools panel, scale your sphere down, temporarily take the
wick out of the candle, turn off the candle
or make it invisible. Then go to your quad sphere, find where your wick is, make your sphere much smaller, zoom in, make sure
it's small enough. You want it to be probably about here because
we're going to be forming it and it's going to deform and be a little taller. You want to keep
it here, validate. Then we're going to turn on our wireframe just so
that I can show you. As you can see, it's the
same as in our first lesson, the same amount of meshfaces,
the same complexity. Sometimes to do more
complex shapes, we have to increase the
amount of polygons. Polygons are mesh faces
pretty interchangeable, but we have to increase that
amount and how we do that, so we can go over here to
this voxel button press Okay and now it's got way more. We can customize this
in the settings, but I won't be going into
that until a later lesson. This is mainly just a preview to show you the voxel capability, just in case you need a
higher detail polygon count. Higher count usually means
a higher detailed model. So that's where the
terminology comes from. When you think of low poly, it has less of these. All right. Going back to the
lesson, go to front. We're going to turn
wireframe off, and then we're going to
go to the drag brush. We're going to turn up the
radius, keeping symmetry on. Then we're going to try to give this a pear shape that's dented or like an egg sculpting
a single flame. But really just giving
overall shape to our flame. Whatever it doesn't have
to look exactly like mine, as long as it looks similar,
and similar composition. Now, go back to
wireframe and you see our shape is vastly different and it's displaced,
which is what we want. Turn off wireframe,
back to front, collapse your hierarchy menu. Then what you want to do is go to the move brush,
turn off symmetry, and then just start to
make unique adjustments return to the drag brush, turn down the symmetry, turn up the intensity, go back to front, then we're
going to start pulling out. You want to make sure that
when you're at this phase, that the symmetry is off and
just making dips, pulling, just thinking about the way that you want your
flame to look, we pull these out to the side so that that way we can
take this surface top, pull it up, bring this
in just a little. Make some flames over here. As you can see, Nomad Sculpt
has a great way of figuring out what surface you're
intending on touching. All right. Then we're going to go over to
this smooth brush and start to just smooth it out. Turn down the intensity to about 40% and then
sprays over it. But not too much because
we don't want to shade it, smooth it out so much
that it ruins our form. But if you do happen to do that, you can just go
back and fix that. Maybe even give
us another flame. And see if you notice
any of these lines, it doesn't have to be perfect, but it helps to smooth them
out, at least for this fire. Back to home now that
we've got our fire. Now, what we're going to do, make sure that we
have it selected. I'm going to name it,
red, underscore, fire. Then as you probably assume, we're going to go over to paint, go to red, painted red. Then to give it transparency, we'll go over to this
tab, the material tab. You can go ahead and
close paint by just clicking in the space,
go to additive. As you can see, now it's clear. We can control the opacity. Want to keep it about
right here so it's lit up so experiment with
those as you like, but I'm just going to keep mine here right now. All right. Then we're going to go back to the hierarchy,
clone our red fire. Then we're going
to go over here, go to the orange paint. Rename it, then go over
to our Gizmo tool, scale it down ever so
slightly, clone again. Go ahead and rename
this while we're here. Then once again, we
go back to our paint. Back to yellow Fire. Make the yellow one and red one or
orange one, much smaller. Select all of the fire
layers that you just made. Then what we'll do is go to add and we'll select this
group icon here. Because when we do that,
it sets things up in a very organized way in where we can collapse and
expand our group. We're going to
rename it and we'll just rename it Fire Group. Another thing you can do is
go to the red fire, of paint. You can turn symmetry
on if you want, maybe give it some
of those other colors right on the bottom, and have the radius. But if you liked it the way
it was, that's fine too. Is just a little extra detail. You can always use the
De tool to get a color. Like I mentioned, it doesn't have to look exactly like mine. Just sewing the techniques to bring your own interpretation
to life. All right. Now that we've got
the painting done, we're going to go and save. Want to save our
progress as we go along. Just click Save, then go home. Go back here and if we
select just the fire group, then we go down to Gizmo tool, select here, go back and
just try to scale it down. You select that. Actually keep it selected, then select all these. Then we'll add them
right to our candle, make our candle visible. Then we can adjust all of
these all at the same time. Go home, go to our lamp top, make it visible, go down
to our lamp center, make it visible, lamp
bottom, central glass. And if you want to keep the center glass
off, that's fine. You think this looks
better for your setup. But from now, you've just gotten your first
model completed. Should be very proud
of yourself and enthusiastic and ready to
move on to the next lesson. I look forward to
creating it for you.
6. Complete Axe Workflow: Planning to Polish: In this next module, we're going to be creating
this X you see here. Seems intimidating, but I'm going to walk you step by step through it and
you're going to have something close to
similar to mine. As you can see, it's quite
flashy and metallic. First thing we're going to
do is go up to our folder, pure, create a new project. Yes. And instead of deleting the sphere like we did last time, we're
going to use this. Let's go ahead and name our project just
for good practice. I've named mine X module. Now collapse that and we're going to be
using a few new tools, but a lot of them we're
already familiar with. The first thing
we're going to do is go over to our move tool. Then we're going to
increase the radius and intensity as high as they'll
go, have symmetry on. Then we want to try to make a straight vertical
line pocision ourself you can even be a
little bit outside of it. Then we just squeeze
those together. It should almost look
like at this point, a doughnut without a hole in it. But then we'll go
over to flatten. Smooth. Turn on the wireframe. Turn off the wireframe. Keep it on if it's helpful. Sometimes in the way of seeing these blemishes,
it just depends. Go to crease, then try to
draw that inner circle. Smooth it out, lower
the intensity, lower the radius,
making circles again. Then we're going to head
over to the Gizmo tool, click back, thin it out till it's almost
razor blade thin. Go to home, we're going
to take our Gizmo tool. We're going to rotate
to 90 degrees. One thing you can do is look around and if it's not
exactly 90 degrees, a little trick you can do
is go up to the Gizmo tool, and as you can see, it's at 86. Just click on that
90 and there we go. Then if we go to front, it's now front facing. Then we go up to the
move tool once again, and then we're going to
create an oval just by dragging and moving it around. Looks close. Right. Now, what we'll do is turn down our radius so
it's not so distracting. Make sure you're at
home. Then we're going to use a new tool
called the Trim tool. We're going to
turn symmetry off. Then we're going to try to come right to the center
and what it's going to do is when we
create these holes, it'll trim it off and
delete it for us. Come to about the
center of the object. If you need the wire frame
to help gauge where that is, then that is fine too. Front here. And then go to the bottom, try to get the same or close to the same curvature
as you did before. All right. Turn
off the wireframe, make sure you're at home. Then we'll use instead of using this ellipsis
or the circle, use this square or
the rectol here, turn back on wireframe, find your center again. Then as you drag this, try to get it evenly
between the two blades. Right. If you've got a little bit of trim where it's
not exactly even, do the same thing. There we go. Remember to save
as you progress. So that way, you can always go back in case you
made a mistake, but you can always use this back button here to do
the same. Go back to view. And remember, just
with these menus, all we have to do is
just scroll up and down. Now the next thing we're going to do is look at our hierarchy. We're going to name
this axe blade, then we're going to come up and we're going to add
another primitive. We're going to add a cylinder. We're going to go back
and as you can see, these nodes, they load, we want our cylinder
to be a radius that conform to the space that we just cut in, go
a little closer. If the ends of the blades here are
intersecting with this, that's totally fine. We're
going to lower this. Go back again, lengthen our cylinder before
we validate it. If you validate it by accident, you can always press the
back key for that as well. Let's see how tall it is in
proportion to our axe blade. Two, validate label and name. Let's go ahead and
give this some color. Click on the X, go back to
this paint panel over here, click on your materials,
select this material. Then just click the paint
icon or the paintbrush icon. Experiment with the
roughness. There we go. And as you can see, all the work that we did when it
looked more like a doughnut is showing giving our axe a little bit of depth. What we'll do is we'll
go back over to crease. Now that we've got
everything painted, we'll turn on symmetry, go over here, and then just
retrace our line once more. All right. Now that we got
that, smooth it out a bit. Turn down the radius,
try not to affect the top edges. All right. Onto the next part, we'll
go back to the hierarchy, go back to our handle,
we'll clone it, then we'll do a boolean
cuts like we did last time, but we'll use our
handle in order to make that cut so that
here around the axe, the surface is more rounded. Have this selected, then
go up to axe blade, then go up to booling. Click Boling. As you can see, it's just a
little more rounded here. Go back to home, go back to
the cylinder or the handle. We're going to clone that. Then we're going to go
over to our Gizmo tool, make it slightly larger. Just go ahead and paint it. I'm going to make mine
into a leather color. Then we're going to
take this, scale it down, put it at the end. Scale it down just
a little more. Go back up, rename it. You can keep AX handle and just add what material it
is or some indicator. We're going to clone
it, then bring it up, zoom in, scale it
down, bring it up. Maybe we want to make it wider. We'll come here,
use the drop tool. Maybe it will make
that little darker. Copy it again, make the
size a little bigger, scale it down, drop tool, go back to our
cylinder paint all. You just now created
an axe, using clones, little bit of pooling cutting, and using creases to
make it more stylized. See you in the next lesson.
7. Complete Crate Workflow: Frames, Planks & Alphas: Hello again. Welcome
back to Nomad. In this lesson, we're going
to make this stylish texture crate using a few new
techniques and new tools, and we're going to
streamline a lot of it using our Gizmo tool here. So, let's get started. Let me first make my showcase version
invisible. Then we go up. And if you need to go ahead
and create a new scene, Go ahead and do so once you've done that,
join me back here. All right. Remember to
create a new scene, all we do is come over here and just click New,
back to the lesson. Next, what we'll do is
add a cube, validate. First thing we're
going to do is we're going to make the RIM here. All right. So let's go ahead and paint
it the color that we want. Go to materials, then
select this bronze. Then you find the
color that you want. I'm going to go with a
darker copper color. Maybe you'll turn up
the roughness just a little bit, paint all. Now we have a reflective cube. Now, go to the front, what we're going to do
is add the word crate with underscore just so that we can have easy
naming conventions. It can be create
this, create that. We can even go here and
just go ahead and copy it. We Control C or here. That way we can be even more efficient with our
naming conventions. Next thing to do is clone. Then what we're going to do
is collapse our hierarchy. We're going to span that one
that we just created out. Then we're going to go
to our right over here. While our Gizmo
tool is selected, we can move it manually, but we also have this panel
over here, of course. This will allow us to be able to manipulate it with
precision in real time. See how it rotates
it with the Y axis, this, allows us to do
the same with scaling. What we'll do is
go to the Y axis. Then for the scaling,
then we'll put 0.9. Go back up 0.9. 0.9 on the Z axis. It's important to know our axes, but if we get them
confused at any point, it's easy fix with
the back button. So what we want to do
is make it to where that there is a border
that is around this. Then we're going
to go back here, clone, go back to our gizmo. Now that we've got
our scaling, correct, what we should do is
then start to rotate so that it is going through
each of these sides. We have one of these create ones going through each
of these sides. Instead of us having to
manually rotate each one, we can go here and there we go. Clone take the Y back to zero, then go to the Z axis. And there you go. I did all
this just in this one menu. Then just like before, we're going to use our
Boolean operation. We're going to take all of
the crate duplicates that we just manipulated their
scale and rotation, and then we're going
to select all these. Then we're going
to go to Boolean, quick Boolean, and there you go. Got our first part of our crate. We'll rename it crate cage
then we'll add another cube, validate, scale it
down just some. Again, scale that down just a little bit. Paint both of those. Do another boolean. Paint this one lighter color and go up to skin. The reason we did
that twice is because it gives it a nice
bevel on the inside. All right. Turn
on the wireframe. Let's narrow out. You're probably thinking,
what are we doing next? We're creating the wood paneling that is going to go on
each of these sides, we're going to do
it efficiently, and I'll show you exactly how. The first thing we're
going to do is clone, go here to the front, scale down just a little, go to the side, and similar to exactly what we did
with the first cube, we're going to do
the same thing here. Do another boolean. Maybe we'll make that a little taller, so it fits in our
little grooves there. Then what we'll do
is clone it again, instead of moving it like this, what we'll do is come over
here and we'll grab that, go to the number and
keep going going going. There you go. This will doing it manually, you'll know and you'll grow an instinct for when you need to do that and when you need to use our matrix menu right here. Now that we've got that,
what we want to do is take one of these out go up. Because when we copy these, what we're doing next is we
are trimming off the top and bottom so that on the top
and bottom of the crate, we don't have overlap. So it's consistent
looking on each face. Let's go ahead and do
that. Let's go down to our trim tool. Go here left. Another thing I wanted to
show you was this camera. If your camera is
in perspective, it is more first person, like the perspective of, say, if you were looking at it
in real three D space. Not to say that
orthographic isn't, but it gives you more of a two D perspective
and that perspective, it dictates what has been cut. So if I was to go
here and cut this go to view, seems a little off. So it's just a good
idea to stay in that. If you're not in it,
just a little tip, just go to orthographic. Go back to left, go
to the trim tool, go down to our rec tool, and what you want to do is this first row of
horizontal squares. You want to try to get to
close to that line as you can. You have a little
bit left, just go ahead and just
trim it right off. All right. Now that
you've got that, what we can do is go down to
the Gizmo tool, take back. Make them a little taller. Then what we want
to do is bring them over here, over here, grab our other panel sets,
take them over here. Remember to save
your progress as you go along, save Okay. Now, turn off the wireframe. Now what we want
to do is go here. Then we want to click Add. And the same as we were using radio school in previous lessons or as we will be using
in future lessons, we're going to be
using this array, which is very similar. So what you want to do is just click array
and you're going to see this array object
be parenting your box, close the hierarchy menu, so that way we can assess
this array menu here. X axis has two counts. With this tool, if I
was to increase it, see it almost builds a ladder. So what it does is it
creates an array or list, so it creates duplicates that we don't have to
clone and position every time that we
can position the same or very similar to the
way that we do this menu. So if you did well with this, this is very similar
controls. All right. So what we want to do is we're on the X axis here.
We want to increase So come to the Z axis or it'll
either be the Z or the X depending on what side you
have each of these sets, whether it be the broken
square or the unibody square. So in this instance, have them here, drag it back
if it's projecting that way. Then we're going
to deselect this. And we're going to
go over to size. What this offset will do is help us to decide the gap
in between each. I want to have just
small creases, then we can, of course, come over here and fill in. Maybe we'll take this over some and don't validate it yet. What we're going
to do is come over here and do the
same exact thing. Add array, over to the Y axis or the Z
axis and do the same thing. How many did we have over here? Seven. That typically means
we need about seven here, then space them together. Add a eighth one to
that. All right. So then when you're happy with them and you've got them
validated, come over here. We'll validate, yes. Do the same here, validate yes. And then we'll name this. One thing I wanted to
show you quickly was to select everything say
in this list here. You just select the
top parent here, double click it, not over here, but over here and
it should select or deselect the entire category. Name NI panels. I'm going to go ahead
and join those together. But first thing, join name. That way, when we look at it, we know exactly which set it is and then
what we're going to do just so that we can easily fill in the
space in between, I going to add another cube. We're going to go up here, go here, paint it a dark
almost black color. Then what we're
going to do is just come over, validate it. All right. Let's rename that. Crap core. All right. Awesome. Now, what we're going to
do is get these arranged. Let's go ahead and make the crepe cage and be
parenting the crap core. The next thing we're going to do is we're going to texture these. You should find within
your materials, you should find a
provided texture file. I'll teach you how to make your own textures
in a later lesson. But for now, I've just
provided one just so that we can get
familiar with texturing. There's different
ways to texture. But with this example, we're going to be using what's
known as an Alpha image, and we're going to
paint on the textures. The first thing we need to do is come over to
our paint tool. We're going to use our drop tool to make sure
that we have the same color. As are wood panels. Then on your desktop or
another designated location, I've got mine on
my desktop here. All you're going to do is just drag and drop it into the scene. Then once you do
that, you're given a bunch of options that
might seem confusing. But don't worry, we're just
going to select textures here and it automatically
knows use it as a texture. We got two options here. You can do this, make
it look more animated like and how you select them is you simply
just go beside the option. For this, this is going to use the white in the image
and turn that into color. Almost like giving our brush a filter that we can
project onto the mesh. What we'll do with this
one is we'll go back here to make it blank
and go to roughness, select the same having symmetry on so we don't
have to do so much. As you see it affects
the other side. I think that's a
little too intense. Let's turn down the
intensity and just go slowly and be intentional. There we go. Se it's starting to look
more like actual wood. You just slowly paint it in B when you paint
these textures, it's going to be sensitive
to how long you're going, how hard, but we're just
painting the texture on. Go over to your open panels
and we'll do the same thing. See, I've got a little bit of difference because
some of them are a little harder than the others. Then we're going
to take our panels and line them up here. Another thing to
mention before we end the lesson about the hierarchy is when you have it
folded in like this, makes it more organized and makes it easier to select
collective objects. Well, I hope you
really enjoyed making this crate as much as I
enjoyed making this lesson, and I hope that you find your own creative variation that has a similar proportion
and look to mine. But with your own
individual touch. I look forward to seeing you in next lessons where
we'll utilize a lot of the tools that we've learned
within this module and previous modules to catapult your skill and
creativity even further. In the following lessons, we'll be covering more of
these interface settings here. That's coming up. So I've tried to get you
familiar with some of those settings so
that we can build on that skill and expand our
tool set of capabilities. Thank you. Se you
in the next lesson.
8. Organic Sculpting with Reusable Parts: Lathe Tool Vase & First Flower: Welcome to the next scene. We're going to create
some flowers today. First thing we're going to
do is delete this sphere, then we'll add a tube, scroll back tube longer. Click this radius button
and it'll give you different options for you to be able to change the radius. We'll just make this top a
little more narrow and you can even add points just by
clicking on this yellow line. Try to keep it consistent. There's our first stem. Then we'll validate it, name it. Then we'll make it
invisible for now. Zoom in, then add cylinder,
add one of those. Then we'll make
adjustments to it, creating our petal or the
foundations of our petal. Go back to the top, validate, then go over to the move tool, turn off symmetry,
turn down the radius, and start to form
our first petal. Give it a little bit
of a slope pulling in, not just out into the mesh, increase the intensity just a
little more, smooth it out. See how that keeps happening. What we need to
do is first undo. Then look at our wireframe and see the wireframe mesh
is pretty simple. What we need to do is we need to make this have more density. Go to Vauxel, zoom in,
turn off wireframe. Now when we go in, you can see that we're not
having that issue so much. I just keep smoothing out. Rotating around the object. You can see now
that it's giving it cleaner edges without us having the previous
aforementioned problem. Another thing, see, I had
the smooth edge brush on. Just keep smoothing it out. Another thing you can
do is to come over to the flatten brush and turn down the intensity on that, zoom in. If you go to the edges after you're done smoothing it out, that'll also help with
some of our edge problems. As well as give it a
little more dimension. Go to smooth. Continue smoothing or
you just flattened and any other areas
that you might have missed? All right. Great. Now, what color are we
going to make our flour? I'm going to make mine
this teal color, I think. A all dry brush, if you want them a little bit, you want your petals
to be a little more long, a little more narrow. Then what we're going to do is add a new kind of
object called radio. You see, once we add radio, it gives us almost a
mirrored reflection or a radial reflection of our
single object we just made. If we change the access point, it changes where it duplicates. Since we're making the flour, we want to do radial Y. To increase that number, what we do is just
increase the number here, just by going back and forth. Then once you've completed, you just validate
it like before. Let's go ahead and
join all of these. Great. We've got a
great surface here at the bottom so that we can
start to move it down. Axle, smooth out some
of these mistakes. Turn up the intensity, turn down the symmetry, turn down the radius. Then we start to make
our little first flower. Smooth that out. Make sure
when you're smoothing, not to smooth those
edges, though. Then we come back to home. Let's go to our gizmo tool, get the shape a
little more narrow. All right. So we've got our
tulips. We can come here. Oh, can't separate them. After you voxel them together, you won't be able
to separate them. Instead, what you'll have to do is you'll have
to go over here and just go back
in case you want to change something
or make mistakes. But as you can see, doing the
radio form was fairly easy. So what we'll do
is we'll go back. Just so I can
demonstrate what we just did and remind you
of that handy tool. I'm going to go here and then we'll go to
our tube tool and we'll start creating
more of our flour. Make sure you get
this to your liking. Making a little Hawaiian flour, give it some randomness
and its curves. You can add some pivot
points then validate. What we'll do too close. Then we'll add a sphere, scale that sphere down. Come back. You can
easily click here to get the Gizmo tool to
come up at any point whenever you are
sizing up your object before validating,
making it small. Move it right over
here. Zoom in. Then we'll take our tube
and our quad sphere. We'll join those oxyl clone, then we'll rotate another one or the one
that we just made. Let's make sure that we name these and name it to a convention that
makes sense to you. Then just clone that
and do the same thing. Pivot it, do the
same to this one. We can just clone those so
that way we can make more. I'm trying to make sure that these make sense in
their placement. How if you notice they
were overlapping, we can even change the scale of them just to give
them even more of a difference and also to help with the not
overlapping so much, making it aesthetically
pleasing. All right. Make sure
we've got that centered. Go to the top. We're
going to add a cone down. As you can see, we can
change the scale if we want, get it to be about the
size of the flower itself, maybe a little bit less. We're going to invert
it rotating it, go over and up. See, not in the
center. What I can do though is I can go up here. And use my move tool
before we proceed with using the cone we just
created, do the next part. Then we just gently
move everything back. One of the great things
about plants and organic forms is they don't
have to be exactly perfect. In fact, that adds more
character to them. I want to go over here and just start getting
it inside of there. If your rotations got
off, select the next one. Now that we fix that, we'll go back to the cone, go to the Gizmo tool. Try to get it as
close as you can. All right. Then if you have any of its
mesh exuding from the flour, what we want to do is
go to the move tool, make sure that symmetry is off, then we'll just move it in
just like we did the SIMS. Go to the side, and then
we'll start to fill it in. Make sure that it's still
staying within the flour. Go to smooth. Go to this
new tool called stamp. I'm just give this a
little bit of texture for later and just keep spreading on top of that
surface we just created. Then we'll go back to paint. Painted the color
of your choice, and you can paint multiple
objects at the same time. Let's go back to our stem, make sure that all of
this is deselected. Gizmo tool, then this will bring up all the objects we just made. Match it up with our
stem, and there you go. We've made a great first
step with our flowers. See you in the next
flower lesson, we're going to move quickly to assemble a few more
flowers and get the stem to match
our flower so that it's more congruent with
its shape. See you there.
9. Sculpting Additional Flowers: Continuing from
where we left off in our last lesson
with the flowers, we're going to place our placeholder stem
with an actual stem. First thing we'll do, go over to the tube tool like
we did before. But this time we'll have
a bit more precision. Take the tube tool,
go over to curve, then just draw straight down. He's given us a tube. What we want to do then is take this orange dot
here, narrow it out. Go up here. Then what we can do is just move all these and as you noticed, I made this a little longer
than it should have been. All we got to do is just overlap these and then
it'll combine them. Boom, overlap. Take this up just a
little, move this over, go over to our hierarchy, go back to the stem,
rename the stem. I'm going to rename
mine, proxy stem. Rename the tube. Blue stem, it's not
blue necessarily. That way we can keep
things organized. Collapse, validate, go
back. Let's go closer. Remember if you made
the same mistake I did, you can always go back. Then we're going to
go up to this orange, narrow it out to it's
about a little bit bigger. Go over a view. Just line it up. Then we're going to validate. Then we'll go over to our
tools panel, go over to move. Make sure that your
radius is about here and your
intensity is about 41, 40, move a little closer. Then we're just going to
start to pull that up. Give me a radius
a little smaller. Go up top and just pull
that in up top again. We don't want any of the edges of our stem to be
protruding out. Now, trying to make the
leaves for our stem, go back to home, go over
to our hierarchy menu, then go up to quadspere just like we did with the sphere in an earlier lesson where it
started off as a sphere, but then it ended
up being something did not look like a sphere
within our X lesson. We're going to do
something a little different, go ahead
and validate. Then use this trim tool here, go to line, turn off symmetry. Then I'm just going to
start to draw a line. It doesn't matter
where you draw it, but it helps to just have an angle that you want
the line to go in. What'll happen is you
can rotate it around. What we want to do
is we want to cut this sphere and make it
into an inverted dome. All I do is just
release, and it's gone. Go up, go to our
Gizmo tool, zoom in. Get this right
outside of the stem. Then we're going to go up, go to our move tool,
turn up the radius, go to the bottom, we're
just going to start to push up and push down, lower radius. A little more here closer to the stem inside of
the inverted dome. There we go to the
bottom, increase our intensity and
increase our radius, we're just going
to try to almost flatten it out just to give
it a little bit of shape. Then we'll go down to our
Gizmo tool, go to front, make it more narrow, go back to our move tool, take the top here and
just drag it out, so it looks like a
petal or a leaf. Maybe we'll lift the sides. Increase your radius
accordingly. We bring it in. Take your drag brush,
increase the radius. We want a little more
point curve in it. Smooth it out just a little bit. Then what we'll do we'll go down to the crease brush
here and we'll make our ins. Let's make our first one. Let's give it some color. Find a natural green, go here, change it to that skin material, go the green paint all and we'll just
start applying that. Now, as you can probably see, it looks a little messy here in the mesh. Turn on the wireframe. What we'll do, we'll click Voxel and that'll make
it a bit thicker. Then we'll turn off wireframe,
go back to our crease. Looking much better now. Go to smooth, turn
down the radius, just so that we can
get that cleaned up. The intensity,
clean up our edges. After you revoxl, it
gives you more polygons, more faces to work with. Get this cleaned up down here. See how that's looking better, smoothing out the edges. Even smooth underneath
while you're there. Don't smooth out the
bottom too much. We want to there'd still be a subtle indication there
that there's veins there. Now we continue, go back
to the crease brush. Let me just draw those in. All right. Go to smooth. Then if I want this a little straighter,
just move it around. There we go. If I want this to have a
little bit of a drop off like that, go
over to smooth, just raise right over the there's still an
imprint that they're there, but it's not as now
to draw our next two, we're going to zoom in, go here, go to the curve and then just draw from the stem
to the flower. Leave. We'll do just go up here, click this top one, and
this allows us to have more options for what radius
we're going to affect. As you can see, the
only one was selected. This one was the only one we
were limited to changing, but we can expand it by just clicking and see
now you have even more. For this, we're
just going to use these two, narrow it out, arrow the bottom, and
just match it up. Making it narrow
but not too narrow. You may even notice
on your leaf, there's some more smoothing
that you want to do. For now, what we're
going to do is validate. Go here, paint all over here, go to the smooth tool, select our leaf, turn
down the radius, Sometimes when it's
just too close, just like to go far back because once you use the
smooth tool enough, you'll get the feel for it. Let's go ahead and make our stem green as well while we're at it. Paint all, go over here, rename clone then what we're going to do is go
over to our Gizmo tool, turn it 90 degrees. Forgot to do one thing. Just
rename it STEM for now. Deselect, Blue Leaf one and STEM Join join now. Then we're going to do the
same deselect to these, join try to line it up. If you have trouble
using the arrows, sometimes it's just more
useful to grab the center here. Just manually move it. Make sure that's connecting. One thing you can do too is that if you notice the
Gizmo tool is down here, we really want it to be
center here, correct? The center is called
our pivot point. Our pivot point, how we can
fix that we come over here to pivot in our menu
panel over here, select that, select center, then select pivot again. There you go. Simple as just
a few clicks. Go closer. Pivot it up, move over. There we go. We've got our
first flower completed, we don't have so much to manage. We're going to take all of
our stem parts and join them. Then we'll do the same
with our inner flower. Then we'll take clone our stem, drag, click and drag outside of the blue
flower hierarchy. Go home. Then we'll make our next flower. What we'll do take
this one over here, go to our blue flower,
make it invisible, all of its parts. Then we're going
to go up to add. We're going to add a sphere, validate go up to our MOV tool, increase the intensity
and the radius, make sure symmetry is on. Now we're just going to move similar to what we
did with the leaves. But we don't do quite as much. Pull down. There you go. We made our first
petal. The drag tool. Go to the Gizmo tool, bring it up. Tilted. Then just like in
our last flower, we're going to use a repeater, so we go up to radio. As you can see,
when you use radio, it goes on different axes. Put this right here.
Scale it down. Let me get a small as that top stem. Okay. Now what you're
going to want to do when you have that moved up here the stem so you
can see what I mean. Going to go to that. Stem, click all of these. We just made Join, then add another sphere, validate, go back to home, take it up here off to
the center a little bit. Zoom in. This doesn't have
to be exactly on there. We're going to fix that in just a moment if
yours is not exact. Then what we're
going to do is come over here to the move tool. We're going to start to
make our first pedal. Go to the gizmo, in and out, mount too thin, go
back to the move tool, lower intensity, go to front. Start to make it look
like a flower petal. Moving these out.
Turn symmetry off. Just make it. Fold in just some stick this in. Go to you smooth.'s
go all around it. You want to have
smooth about right here a lot of the time. Out's a little bit softer now. You need something a
little more aggressive. Okay. Got our petal done. Let's pick what color we want. I'm going to pick
a pink, I think. Then we go to paint all. Get a lighter pink than that. A Gizmo. Pivot it open
just ever so slightly. Go back to your hierarchy
menu, put a ad. Then we're going to click Radial again. Turning that around. Centering the pivot
just to make sure. All right. Great job. Now that we've completed
flower part one and part two, let's go on to part three, where we'll take
the stem that we just created and make
an additional flower. Looking forward to creating
these flowers with you.
10. Petal Variations, Detailing & Final Balance: Continuing from
where we left off, we are going to make
our second flower. We made this first one
here, very animated, ready for you after
you're done with the course to go back and
modify however you see fit, but already looks
very expressive. So what you're going
to do is you've got your copy and clone
stem that we made. I went ahead and taken the liberty of renaming
mine purple stem, and I'll show you what we'll be making by the
end of this module. Something else I did
is as I went along, each of these stems is a little bit different
color of green, so it's easier for
me to arrange them. But we'll get to that. Got
something that looks like a hibiscus or something and a sunflower. Well
let's get started. First thing we're going to do
is add a sphere, validate. Let's move it over so it's already close to where we
want it to be destination. Zoom in, go to the front. Rather, it just
stay in the back. Zoom out just slightly. Then we're going to come
over here to the Trim tool, go down to our rec tool, make sure that square
here is deselected, because if it's selected, you can't customize the
square and its dimensions. But once we unclick that, you go any shape of right
angles that we want. About this much, only leaving a quarter of the sphere left. Go back up to view so
that we can pivot around, go up to the move brush, turn on our wireframe,
turn off symmetry. The reason I turn off symmetry is because
if I were to pull it it's a little off center, right? It's because the axes
that we just cut, I go back to the Gizmo tool, the axes that we just
cut that on made it to where that our pivot and our shape are a
little different. Sometimes turning symmetry off and just taking your
time and trying to achieve symmetric results
is a good practice anyways. In this instance, it's
really necessary, just wanted to explain that. We're going to go back again. Going to go to the left, go back up to our move tool. Pivot upwards. Let's go ahead and give it
a little bit of a dimple, I guess, give it some character. But just subtly touching
it. Turn off symmetry. Pushing each side up, secure the back, increase the radius, increase
the intensity. And see because we pulled
in first a little bit, we already have some
curvature on the inside. Side maybe pulling out just slightly. I will make the
bottom little bigger, but still keeping
the top narrow. Trying to get it close to symmetric, but not
exactly there. The way flowers in real
life are. All right. Then we're going to
go and paint it. Want to go and select skin
or something organic, paint all, turn off wireframe, go with a smooth brush, I'm going to start
to smooth it out. You can keep on
wireframe if that helps. But I find that having it off sometimes really helps me to see some of the things that I might miss while it's on. We're going to go to
Vauxel Keep smoothing. The vaxl will make
our mesh thicker, turn on wire frame as you can see the
difference from before. One thing while we're smoothing this out that I'd
like to mention is that a higher polygon count
makes for greater detail, but the higher the polygon count is when it comes to three
D modeling or gaming, making games, it's more
taxing on the system. We don't really have
to worry about that. If you go up top, you'll see
how many vertices we have. These vertices are
the lines here. The lines connecting is what
makes up our mesh faces. Keep on smoothing out. If you want to keep
it a little rough around the edges,
turn this down. Another thing is you can
use edge smoothing that's more specialized
raise over the edges. This is going too fast,
you can press shift. While you're pressing
shift and going up, should go a little slower. Another thing you can
do to get some of these edges out is turn down your intensity on
your flatten brush and turn down the radius of it. And and because I have it
so intensity is so low, I almost acts as a little bit
of a stronger smooth brush. So some of these brushes at
different intensities can be modular and do outside of what you
think they would do. Just a little advanced tip. G over to smooth, and
then as we smooth it out, it should be a little
easier. All right. Looking great. Turning up the
intensity of that smooth. And with things
like flowers that don't have to look
exactly perfect, once I get to the stage, and I need to do some
final smoothing. I just keep smoothing
all the areas until it looks
exactly like I want. Now let's go down to our Gizmo
tool, thin out the brush. The petal, thin out the petal. There we go. Take this back, give it a more of a in case you want your pedal
a little thicker. Then we'll take our move brush, trim down the intensity, turn down the radius
to about here. Then we'll give our
pedal more shape. Turn down the radius here
just so that the radius is about the radius
within the petal. Our petals bottom. You can have this any
color that you want. Since I already
have a purple one, I'll do a different color and
make sure that I go here, and then I name it Sian go ahead and take the
stem that we're going to use and rename that. Another way you can rename, of course, is Control R. Right now that we have that,
let's go to our paint brush. You can do this if you
like. I'm going to select the next color here. I'm going to increase
my radius just ever so slightly to decrease
my intensity. Try to create almost
like ombre effect. A Okay. Now that we got our
flower petal painted, go to the drag brush,
get the shape we want. We'll make this tip over some Then you might think, well, I have to make all those different
petals and clone them. But you can do that. But I find that just using the radio is a radio option is best, like we did last time, we're going to go
here, go to radio, then go to the Gizmo
tool, go to the flower. Start to adjust it
to your liking. What you want to do too is if you need to just
click something quickly, you can see it selected both. Double click that one object. This way, it moves our
entire radio setup. And it will also zoom
in if you trip aplica. What you'll see
is that if I move the flower then all of them
mirror that same motion. Yours doesn't have
to look exactly like mine as long as it's resembling this function
of Nomad Sculpt. Grab and rotate. Take sure there's a point. Scale our flour down and you
can even increase how many. The more you have though, you'll have to rotate it. All right. Go back to radio. We want to refrain from validating now because we
might want some variance, just a small variance in between our different
layers of petals. What we'll do is clone, as you can see, it only
cloneed the radio. I do. You need to have
both selected. Clone. Go over to the Gizmo tool
here, find it. Okay. We might want this smaller. Describe here where
this yellow ring is and scale it just a little. See how much we've scaled it. Let's rotate it. Maybe we'll make it a
little more slender too. Here, zoom in. Clone just keep going to each one and cloning it, going up, deselecting the radio curving inward. And maybe once we've
got them stacked up, we want to show off
some of that purple. If we have any overlap, we can automatically fix that by either scaling or folding
these in and out, just being imaginative
as we learn. Clone, move it up, scale it up, rotate. Then what we'll do? Take all these,
clean up our scene, all the radials flower petals that we just
created, we'll join them. Then we'll take our tube tool, draw up skinny, take
an aerial view. Or view. I just combine those. If you have this
issue happening, just combine them or the
mesh looks like it's almost tearing, validate to Gizmo. Try to put it right in
the center, scale down. Turn off our stem,
making invisible. Go up to our tube, go to smooth Boxle smoothing it out. Use the flatten brush just
to make it easier to smooth. Clone. Actually, rename first. Clone. I put about three of those
on each side of that. Now, I'm going to
paint those orange. Go over to our Gizmo.
Let's find it. Let's go ahead and join
these. Go over to pivot. If your pivot point, sometimes it has this
offset that you don't want, this can be a great
way to fix that. We're going to press
Center, and there we go. Zoom in Mount center. Raise it up. Awesome. Now what we want to do is go here just so that you
can get a general idea. Go here, Awesome. Then take this here, see where our stem
is, pivot it up. Go to our stem, and you
can move your flower back some so it doesn't have
to be so far away from it. Go over to the drag tool, turn up your radius
some, go here. Then we're going
to drag that here. Then what we want to do is add
another sphere, find that. Go to our Gizmo tool. Come up about here. You want it to be right
underneath the flower. Now that we've got it there,
we're going to go over to our trim tool after we
validate turn off symmetry, go to the line here. It's another way you can
cut and just look at the overall general direction of our sphere that
we have selected. We're going to take
it and cut it so that the top plane of our half sphere is pointing
generally up, boom. Then we're going to
go over to our gizmo, move it up, scale it
down about right here. It our liking. Then we're going to
go to our drag tool, turn the radius down
about right here. I'm just going to start
dragging it up some, making sure that we in
these little crevices, we don't see any
of the top face. Then we're going to go to
our drop tool, paint that, go back here, paint all Awesome. Now that we've got
that, I'm going to name that C base for cyan. That way we don't have
to keep putting cyan in. Then what we want
to do is take that, let the stem parent it. This is the parent and
these are the children, then we take flour
and do the same, making sure they're on
the same hierarchy here. Then we're going to clone this. Then we're going to
go to our Gizmo tool, move it over, prop it up, give it a brighter green. Going to change this to yellow. L add, add another sphere, let's add a cylinder. Cylinder home, then
out the cylinder, bringing it out here. Validate. Go ahead and just
bring it up like that, about 90 degrees, bring it
up here, scale it down. This one is just an
extra one just to get that sunflower
that we want here, zoom this out or scale
this in on the Xaxis, go to our move tool tensity, keep the sentry on. It's going to be a low
poly sunflower in a mag. Just in this, go here, yellow, paint all, paint. Go back to your dismoTol, lay it flat, then get a here, add, go to radio, take this out. You see what happened there
because of the fact that yellow stem was
parenting the radio that we created with the flour that was being parented
by it at the moment. It was using this as
the radio center. But when we took it out, it used a slight offset
in order to do that. This is actually correct here. What we want to do is increase that just a little
validate, yes. Rotate. Let's go to pivot here. Nothing happens because
that's our group parent. Join, but then once it
becomes one object, we can use the pivot
tool to correct that. Add another cylinder,
scale it down, validate, get to
about 90 degrees. Remember, one thing you can
do is come over here and change just to show
you an example. Throw it out, zoom in to
see if it's back here. Clone, make that one thinner. Very thin. Paint all, here. Let's go ahead and
take care of this one. There we go. Then what we
want to do is join all these. Go over to pivot
again, fix the pivot. Let's get our sunflower range. Scale it down if it's too large. Just like I'm doing here in reusing parts that I've already made, you can do the same. Go back to the stem,
go back to the base, go to our move tool, to mold it to it, the radius. Pulling it in the
direction of those edges. Lower the radius,
lower the intensity. Your connector has
become disconnected. God or stem. The great thing about three D modeling is that you can see all the different directions and sides and or
drawing, which is great. You can only see one, gives you different way of
thinking about it. Space and Take these two, Join. Let's go ahead and
fox these smooth. Like I did here,
reuse a mesh and then modified it so that I have some variance in
between my flowers, even though I use the same mesh that I had already created. If you'd like, you
can go back here, maybe smooth these out a bit. You know voxelize mine just so they look a little
higher detail. But after you voxelize, often, you have to
go back and smooth. All right. Now that we've got our
three flowers remember to save now the last thing we're going to do is go over to this new tool
called the lathe tool. What we're going to do is create a vase for these.
Go over to curve. Starting from this line here, we're going to draw half of the shape that we
want our vase to be. I'm giving mine a very
hourglass style shape Walla. We have our base. Let's go ahead and scale it down some how tall we want it to be. Back here. You can always switch
back and forth here when you're using some
of these tools to get back to your
Gismo tool easily. First thing I'll do is go here. Then I'll create the opening
by going about center here. Take this. I'll show you
what it looks like on top. Take this, and then how
big we want our opening. A here. Let's make. Maybe a little rivet here. Then we'll narrow it out here. All right. Then what we
want to do is validate. We'll go up so that
we can create glass. We'll go up here to our
material panel, go to additive. You can change the reflectance and the opacity is what
you really notice. Well, let's just
say that you don't like your opening like this one. You can go back. Go
back to additive. And there we go. Turn
the opacity all the way down. Move this. Let's say I want an
actual hourglass in it. Shape. Do that too. Go here, decide the opacity
that you want, then validate. Zoom in, rename, find our stem. And the reason we're making
the stems the parents because it's going to be
your natural inclination to go for the stem. And so it's just easier
because it's at the center of our overall
collective objects. So often we make the parent
either a empty object, which I'll show you later
or we'll make it the stem. So move all of our stuff This is one of the reasons
I made the greens different colors because
if they were all the same, would be a little confusing
all these same stems. But this makes it
less confusing and gives us little pops
of variance in color. All right. Go up and click Save. Go to home, and let's
see how they look. Awesome. Alright. Hope
you've enjoyed this lesson. You've been doing incredible
if you've gotten this far. We've learned how
to make a vase, using the lathe tool. We've also learned how to make this different kinds of flowers, using the radio, using
proper naming conventions, and I hope I've passed on a
great deal of information, and I look forward to teaching
you in the next lesson.
11. Stylized Creature Sculpting with Blueprints: Blueprint Setup, Body & Shell: Hello. Welcome to what might be the most challenging but
fun lesson we've done yet. Today, we're going
to be building this baby dragon piece by piece, texturing it, creating a shell, as well as learning
a few new tools and how to use some of the tools that we're
familiar with in new ways. We're also going to be labeling these as we create them so we can try to
keep them organized. So we're going to be going
over MATCAP and IT to help us to see different lighting and utilize it so that we can create a better
detailed sculpt. With that said, the first
thing I want you to do if you haven't already
is upload this file. When you upload the scene, it won't come with the
dragon, of course, or the wing example here, but it will come with
this blueprint here. If you need further reference, I have one here, you
should have one up top. And if you need even
further reference, you can just go to the
side conveniently. I'm going to keep these off, but just know that you can pause the video and just come back here just to look at the
diagram without the model. Because what we're going to
be doing is creating this. This is our framework. The first thing I'm going to
do is delete all my files. Make sure to save as you go. I'm going to be saving
as I go as well. You can save whenever
you feel like you've gotten to a great
stopping point. This is also a great way to
just back up your files. If you like the way
something looks and you want to go back to that,
just a little reminder. Without further ado, go to the front view and
we'll get started. First thing we want to do
is get started on the body. What you're going to
do is come over here, deselect, then you're
going to add a UV sphere. Turn on wireframe. Then what we can do
is if we go here instead of voxilizing and
all that that we did before, we will still do that, but we can decide our
division from here. For this lesson,
we're going to try to keep our subdivision to 100. Know that every time
that we make a object, we're going to subdivide it to 100 because that way we can maximize what we get out of our model without
having so many polygons. All validate it, name it. And name it body for now.
Turn off wire frame. Then we're going to go over
to the Gizmo tool, come here, make it smaller
after centering it, get it about here
where it's touching these vector lines on
the dragon's chest area. Then go over to the drag brush, make sure you've got
symmetry enabled. You want to get your radius to about imagine the
circumference area of this side or the
length of this edge. Bring it in some, pull up. You see, it's like filling in the lines if you're coloring
or filling in the dots even. But in this case, we're using
mesh in order to do so. I since we're trying to really compose
our body form here, I want to make sure
that we've got the radius that we need to be able to adapt the radius
to pulling in our needs. Make the radius bigger and
you see it just pulls. When the two symmetric
drag brushes are pulling and they overlap, you see it's very
centralized here. But if I was to pull here, then it pulls in the
opposite direction. Keep going down until
you fill in that line. Turn it on wire frame,
go to the side. And now we're going to do something very
similar at the side. Now that we've got
our side shaped. Go here, adjust your
brush as needed. I'm going to keep
mine here for now. With this, you're
going to want to make sure because as you can see, they're a little
bit ones bigger, the side is bigger than
the back panel here. That's on purpose because
we're going to do smoothing and it's
going to change, especially on the
side a great deal. We want to use this as
our projected area. Plus, we're going to put a
shell right on top of it, just get it to about that shape where it's not
too big, not too small. Right now we're just doing
the stomach bring that up, bring the back up so that by
the time we get to the head, this area can cradle that head. We're going to be using
the back panel here a great deal. Go there. One thing I want to show
you briefly is I have this selected body say that I want to zoom into
it quickly. There I go. Wanted you to get used
to the environment first before showing
you too much, but it can really
help you. All right. What we want to do
too here is we're going to create the buttotera. I want to turn up your
radius a great deal. Go down to the brain area. If you have any pulling here, we can just use the drag
tool to pull that down. It doesn't have to be
perfect quite yet. I You may have to go back some to
fix that mistake. Nothing's wrong with
making mistakes. You need to use the back
button to correct them. Turn off symmetry if
you're flat right here. All right. That's the
kind of shape that you want where it's heavier here, but lower, higher
here, the slopes down. It may look large, but we're going to be reducing
it a great deal. Go over to the Gizmo tool, shrink it down some. Then we're going
to go over here. As in the original
that I showed you, I'm going to be using metallic. If you remember, we can change our material by just
selecting here. Of course, for metallic, I'm going to choose metal Just so that it's easier
for me to show you some of the grooves and some of
the things that we are doing. You don't have to use that.
You can use something else, but it does have a cool effect. So go back to home, zoom in, go back to
paint or go to paint. Let's select the color we want. With the drop tool, it doesn't just have to be a color on a mess. It can
be any of these. So let's do a red
dragon this time. Like I said, you choose
any color that you want, any color that's offered here, then you're just going to
proceed to go to paint A. The front, the side, get it smooth, turn up our
intensity, turn up our radius. Turn off wire frame, see
up things happening. What we need to
do is now that we have our shape fulfilled, and colored, we're going to
proceed to unify it in a way, or to make the mesh
richer with polygons. We don't want to exceed them, but it is necessary to get richer details and refine them. What we're going to
do is we're going to go over to our mesh menu. You're going to find
subdivide. I've added it here. You can do that by going
over to your settings, going to shortcuts, and then you just activate it,
if that's easier. I'm going to be going here so that way you're
familiar with it, but just a little hack
that you can use. Because we have
these other menus, our voxel remesh is the
same as what is here. Dynamic topology, that
helps us to unify. Normally, you're going to use
one or all three of these. It just depends on part of
the process that you're in. But if you try them
out and doesn't work, just remember you can press
your back button here. But for this lesson, a lot of times we're going to
be using subdivide. I like using this first for using oxo remshing
and dynamic topology. Just a personal preference. It's just less polygons. So I suggest that.
What we're going to do is you see this bar here, that's indicating that it has
a low amount of polygons. So body has this many
faces. We're polygons. What we'll do, we'll
come over here, we'll go to subdivide, and now it's indicating that
that has increased. Go over here, and as you
can see, more polygons. It's now 39.8. All right. But enough math.
Let's get sculpting. Now that we've got that,
turn on our wire frame, and now it's starting to
be a bit more effective. Turn it on symmetry and just smooth out everything
you just push and pull. Smoothing out is also
good for things like this where you have
something that you want to be a
little more flat. You don't want to use it as
a way to flatten things, but if you have meshes
that are overlapping, or in this case,
we're setting things up in an oriented way so this drooping can be dealt with by smoothing it
out, much better, see? This is one of the reasons that when we're setting up our shape, it doesn't have to
be exactly perfect. It's all about the progression
of making our creation, not being the perfect shape
the first time we make it. Almost looks like a
dragon egg, honestly. Then what we'll do is now that we've got
that smoothed out, We can do a little more shaping
to it, bring this down. Try to. Then go to the flattened
tool, turn it down. So if you got any trooping there and the smoothing
didn't take care of at all, you can just use a flatten
tool with symmetry on and it'll get you a flat plateau on the bottom of your
stomach and abdomen area. Then we just graze
over the shape, getting out some of
these blemishes. And just do it as though almost like you're petting
it so that it gets some better structured
flat surfaces on the side. Go over to smooth. Now that we've got all
this smoothing done, go over to the move brush. And see now that we expanded it and then reduced it
by sculpting into it, pushing and pulling, it's much easier to get that
shape that we want. The front, as you can see, has followed suit
with what we did in the back. All right. Go back to front, go to home, zoom in, turn off
your wire frame. Then we're going
to make the tail. It might seem like we
should make the head next, but the tail is integral
part of the body. We see the way that the
shell goes all the way back. That way we can already have
that completed and painted. What I want you to do is go to the Tube tool, go about here, and then I want you to
find the path right here and then start about here. Then we're going to go here
and just creating a line, maybe a little bit outside of the front of our
stomach and abdomen area. Then we'll just keep
pulling that line, adding points, take it to the end of the tail,
create that curvature. Now, what you can do
is you can validate here or you can validate
with a screen button here. Let's just do this for now. Okay, we're going to
go back to the front, make sure that it's
center, we anticipate. Sometimes when you're in
a spatial environment, it'll look center
from one perspective, but it'll actually be
a little bit offset. So you want to make
sure that before you proceed with manipulating your mesh that your object is
where it's supposed to be. Then what we're going to do
is start creating our shell. The first thing we need to do this create a tail
part of our shell. You're going to click
here so that you have more radius options besides
the one it just gave us. Then you want to make
this at any point, if these panels get in the way, all you have to
do is go to them. This time it's the middle panel. Remember, if you
click away from it, as long as you
haven't validated it, it's going to keep our path
points in our line here. If you're in the middle of doing something else with the mesh and you come back to it,
it's a great option. That concludes this lesson
for dragon part one, and the next one we'll be continuing to do our
shell for our dragon.
12. Shaping Appendages: Now that we've got our
shapes, trajectory, and form, we can start
to make our tail shell. First thing we want to do is go here so that we have access to all the
different radiuses, lower this, maybe combine
it with that one. That way, it's not so high. Then we'll go and
move that back, move this back so
that it's hugging, our body mash and almost
matching its curvature. Let's go ahead and give it
some color so it's easier to see so that we can
have that done. I'm going to choose the yellow, but I'm going to change
my material to plastic, down the metalness, the
roughness, paint all. Side here. That way, our radius
in the back of our tail shell aren't in the way and they're not overlapping,
try to widen it out. Getting the shape that you
want it or the starting shape. You want it to conform to the
shape in which the body is. Here it starts to slope, so we make it to where the
shell also starts to slope. But we also give
it a little bit of an hourglass shape or a
vase, either going to work. Move that in making sure that it looks somewhat
symmetrical and just be steady with it so you can get those straight trajectories
when you move your mouse. All right. Now that we've got that, let's raise up our division to 100. That way, it'll be
nice and smooth. Bring this in creating
a slope here. You want it to be
flat or flattish, and just slowly go in. And when you go in, it's
going to change the way that the yellow is
appearing through the red. So we just go back and
change it to what we want. Making sure this is
like this so that he's not too big
but not too small. Go down here. I want
to make this somewhat larger Then we go back here to our body, go to our drag tool. Don't worry about
this fragment here. That's just reflectance from the diagram panel, ignore that. Then what we're
going to do is go to this back area here where
we see there's space, and we're going to
try to go right underneath and
just pull it down, making sure that
you have symmetry on, go a little closer. Don't be afraid to change views, going closer and backing up because both perspectives
have their advantages. What you want to
do is just make it wrap around where
the tail starts. Moving the buttocks backwards. Move this down more so
it overlaps. Move here. And then flatten this out because since this
isn't a human and it's cartoonish or maybe somewhat semi realistic depending on
what you're modeling, we want to create anamorphic
features in this one, but we want it to not look exactly like it should
if a dragon was real. We're not going for realism, gives us a little more
room for creativity, creating the back, but not
giving it too much structure. I want to look like the tail is coming right out,
but not too far. About here, going to
make this very small. Zoom in, so you can see
what that looks like. As small as it gets. All right. Now we're
going to validate it. Then let's get this menu
more visible for you. We're going to go to the
Crease tool, zoom in, adjust our shell,
make sure that it's ametric you should be guided by these two points
here that we created. If you need to make
those a little more pronounced, you can go here. Just so that you know
where the top is. And this has to cradle the head that we're
going to build later. There we go. Just so you
know where the top is. Go back here. Make sure
you got symmetry on, drag it up to those points. Maybe we'll move this in some. Go to the smooth brush. I want to smooth it out
some, but not too much. I still want those subtle
indicators of the shell. Go back to the body, increase the intensity,
increase the radius, and we can just
start to paint over. Go back to drag. Making sure it
matches those lines or at least close
to it. All right. Now that we've got
everything we've made so far smoothed out. We can move back into
working on our shell. Go to the crease and see everywhere we're going to create creases within the shell. That's why I mentioned
a moment ago, these lines here that
are somewhat visible. We keep those because we're going to draw right over those. Basically, anywhere that you see a sharp angle or a sharp
dip that is spaced, for instance, here, here, here, maybe we'll put one here. You want them somewhat
evenly spaced, just where they look
good with the object. As you notice, it
also brings it in. An trick I want to
show you to get better lines is something we're going to be using
later in another form. If you see all of these
different menus here, they may look intimidating. And we're not going to get to cover absolutely everything, but we are going to use some of the most useful
and accessible tools. So for this, what
these do is they make modifications to either the mesh or the brush that you're
using at the time. For this instance,
we're just going to go to this brush icon here. Stroke is already
automatically selected. There's other settings, but we're just going to
worry about this for now. We're going to go
down here to this, it's called the label
lazy rope stabilizer. As you can see from the
message that prompts up, it makes strokes lag behind the pointer position according
to a certain distance. This can be used to
draw smooth lines. Basically, it makes it to
where when we draw the line, there's a line that
follows and at the end of that line is
what is actually drawing. You'll see. What we'll do is we'll turn it right
up to about 80 ish. We'll come here. There we go. We'll start from the center and span out where we can
get our sides and see it helps a lot with
those side angles and see it's about as long
or as the shell is wide. Go lower, see a dip
here, just go slow. It's all about being mindful
in your own creativity, being intentional about every single stroke
that you make. Even if that stroke
is a mistake, that's the intention of experimenting and learning
manifesting itself. Keep drawing those segments. And once you start
to as you just saw, once I was able to get a
proper line established, then I can start to
go on the outside and make these deeper if I want, go to my move brush, make this a little wider. Let's go to our side panel just to check on our tail or
our middle plane here. If your tail isn't quite
long enough, don't worry. Make sure your tail is selected. Move, turn up the intensity, Make sure you have symmetry on, make your radius about
half the size of the tail, maybe a little over and
then just start moving. That way, it doesn't
get too long and then just start
putting it on that line. All right. Now, if you're
already at that line already, you didn't
have to do that. But if it isn't long
enough, don't fret. We just make the intensity high, but by just carefully pressing
it and nudging it over. All right. Now that we've
got our shell and our body, let's start to finish those final details
on our shell up. We're going to go down
to the inflate tool, which will, of course, inflate. Go to front, check
to see how much. It's already a bit
bulbous already, but we're going to go right below the center
of each segment. That way, it creates this
shadow a little bit. With these, you can go
and then come back. But I recommend starting inward. Go to the right
and go to segment, making it a little bigger. You notice too, that every
time we do this, move that. Every time we do this, it has a tendency to blow
just it up between where the creases are because
what it does is it isolates parts of the mesh. I'll show you through wireframe
example, let's go closer. These are much smaller. See how small these are. You have to look very closely. But the bigger the mesh gets, these faces are just
a little bit larger. Try to fix my tail. Go to flatten Brush
if you're having this issue. See
how that came out. All right. Yours may not
look exactly like that. I'm going to go
ahead and trim this off using the trim tool. This lasso is
amazing for trimming off excess mesh either intentionally or when you
have to do a quick fix. Smooth after you're done
cutting it and smooth it out. It starts the mesh starts
looking disoriented in any way, doesn't have to look
perfectly polished. Smooth edge is great for edges, but it's also awesome for things that the smooth
brush may have trouble with. There are adjustments
you can make. But for this lesson, I'm
just going to be giving that quick tip because if you're anxious to get
a model out quickly, sometimes just using
the smooth edge in combination and just
toggling back and forth can save you
a lot of time. Come over here and you see all those lines that we don't want seem to
be less visible. All right. Back to
home. All right. Now that we've got our
body and our tail shell, we can move on to
the actual tail. First, now that we
have this established, let's call this that we just
created, the tail shell. Assess our shell, make sure that it's in the
shape that you want. Just by pushing and pulling. If you need this
top smoothed out. So you have round like I did, that's a really easy
way to achieve it. Before we move on to the tale, I want to show you the different almost filters that
you can use in order to help your model render
for modeling and sculpting. I'll give you some options. The options that we're
going to be using through this lesson are as follows. If you click here on your shading or what I like
to call the environment, your scene environment tab, you'll see that this is It. Just ignore these. All you need to pay
attention to is this It here. And MCCAP. The difference is, imagine that It is just that we
have a spotlight. We're in our workshop, I guess, our virtual workshop. Being able to spot how it's
going to render within the real world or
within simulations that we might want to develop or game development or animation. We McCAp it gives us
more of a clay filter. This can be very helpful for details or depth that we
might miss while in LIT, for example, if you go here, I don't think that these
creases are deep enough. So go back make them
a little deeper. And you see the light,
it looked nice, but it made it to where it
out shadowed and outshine the shadow that we
needed to make sure that these creases were correct. Okay. But you can start off and lid and you just
switch back and forth. A lot of it is just toggling back and forth in between
one filter and the next. Remember, just go here and here. There you go. We're going to switch back to MCCAP just so that we can get familiar with that as
we do these next forms, go back to front,
go to your shell. To move if that's
lower too much. Zoom in, close this. Next, we're going to be making
the arms and the hands. Might seem intimidating,
but I have created a lesson that is going to
guide us through it with ease and it
might even be fun. We're going to do some painting, and I'm going to teach you a really awesome
painting technique that's going to make
the fingers and toes Airbrushed. They have
this airbrush effect so that you can
easily distinguish the fingers and the hands and the toes and the rest of
the feet and the legs. First thing we'll do is go to a tool that we use quite
frequently already. We'll go to the tube tool, go to Path, start about
here in the center, go to this other line here, put some curvature in our arm, make sure that closed and be spline those aren't selected, we won't
be needing those. Close, what it would
do is make a loop, so it would close it. I think it was thicker. Go to the Gizmo tool. That's another thing about the tube tool that you got
to be careful with. Sometimes it'll just draw right there right where you are, but sometimes it will
be at a distance. That's one thing that's good
about using these panels, especially while
you're starting to learn is you can recognize that. Remember the shortcut here to
get back to the tube tool, make that a little bit. Then we're going to start
connecting that here, creating a little bit of
overlap with the hand. Putting it right
where the elbow would be. Then we're going to go here. Here. If you've noticed
probably every time that we increase the
impact of our radius, that one of the
orange dots connected with the line pops up everywhere that we have
influence in the radius, just so you can
expect that when you turn them on where
they'll appear, I've just been trying
to get used to you seeing them before really explaining just
in case you didn't understand that exactly as
we've been going along. Then what we'll do is we'll
start to adjust the radius, making it bigger here, you want to move this down. You may even want
to put one here, so that way you can pivot in
and make a little shoulder. This doesn't have to
be exactly this size. I can have some
varying shapes in it. Just determine what you want. I think that's pretty good as
long as it's centered here, we're going to go back here
and then make that 100, just like we've been
doing before, validate. We get accurate
color over there, use the dropper tool
like I just did. We want that to be metallic. Remember, you can
always go over here. You don't have to go
to paint every time. It's always available. It just won't give you the paint
strokes, of course. We'll go back and change it. For now, just to remind
us, just select this one. And when we go back to IT, we'll be able to do a
comparison, paint all Okay. G here. And now we're getting into
right and left body parts. For now, what we're
going to do is just put arm, underscore. Okay. Go back to your environment, scene settings, you shading
right here, go to lit. Then we're going to smooth
this out. It's fine. If you're doing larger areas, just having your smooth
brush larger is fine. Just doing our initial shaping. Getting it smoothed out. Maybe we want it a little
bigger in the shoulder here, go to the inflate tool, you can just hold down
your mouse button and just pivot or just go a little bit and it already
makes a big effect. Turn down the intensity. Go to the flatten brush. Make it a little flatter on top and through the middle of
the bottom, smooth edge. Now that we've got
that, subdivide it, go here, subdivide, smooth, collapse your menu, and then
just start to smooth it out, go a little closer,
see how it's looking. That's another thing. If
you're a little off center like I was just a minute ago, that button is so useful. All you have to do is just click it and we'll get
you right on center. If you notice you want to
smooth out of top here, just go ahead on the body. Let's look at our
wire frames. Okay. So usually, what we want to do is
these don't have to have the exact same topology or you
see how they seem smaller. We want them to be
relatively close. Ideally, we wanted
them to be the same, but the closer, the better. The less issues
that you may have with mesh tearing and just
a lot of other issues. But you won't really face
those you don't if you the mesh or mesh is
consistent in their topology. So just keeping
track in your mind, how many times that
I subdivide voxiize, like what is my average going back and checking your
wireframe occasionally. But you get used to it and it
just becomes second nature. And so so for instance, if this was if these
were so small that while the wire frame was
on and this was black, like it was so covered
in vertexes, right? That that and this was
like it looks here, then that would be bad topology. Just a little topology tip. The higher the topology count is in games or even in Nomad scold. The more performance that it's going to demand
from the device. So to optimize performance, we keep our topology as
clean as we can. All right. Getting back into the
arm and the hand. We're going to turn
off wireframe and then go up here, click add. Okay. We're going to click
this UV sphere here. Going to go ahead and
just make it 100. Then we'll go back
to the Gizmo tool. Something to show you or
remind you of is we can go here too. Change the scale. It doesn't have to all be
done through the Gizmo tool. We have a lot of
versatility in how we not only use our tools, but how we access them
and then it makes it to where the sculpting process
can be more adaptive. You want to take that and you want to get it
about that size, then make it smaller, maybe about here where
it's proportionate, bigger than these example
hands here in the blueprint. We're going to go ahead and
color it, validate. Name it. And just like we did with arm, we'll just name it hand. Zoom in. Then we'll take it. Now that
we've got the Gizmo tool, we'll just start
to flatten it out. Not too much. Where it looks almost like
a non beveled hockey puck. At any point, you need to turn off these planes because
they're getting in the way. They're just a cist so that you can have an idea
of what that looks like. Going back here. Go to turn back on
the middle plane, and the vacuum plane depending
on which one I need. Go over to move
or the drag tool. Start to just flatten that
out some so that this is the bottom of the hand or
the palm area is right above or right below where
this drop off is at the arm. Making sure this is higher, about the same distance. S, don't forget to turn down your intensity because
when you do that, it allows you to make
more subtle pulls, creating upward movement here, backup so you can see, I will turn my symmetry off, but sometimes it helps me even if there's not
another shape over here. I don't know if it helps you. If it is confusing
while we're doing this, we can turn it off,
I'll turn it off. I don't need it when it's
not actually active. It also seemingly,
if you have it off, it also makes a Nomad scope
a little more performant, but maybe that's just me. Now you've got your slope. You're going to turn on symmetry or But if it's not manipulating the other
side, don't worry about it. It's because I turned my
sphere and made it so small and then just take and go
over to the Gizmo tool. Your sizing, just in case first time didn't
get it exactly right. Just take a second to make sure that it's fitting
with your object. Okay. Now that we've got
the shape of our hand, what we'll do or
the basic shape, at least, go to
the flatten brush, and we'll start to
flatten out the sides. Turn up your intensity,
turn up your radius, see you have to constantly pay attention to
that. Just change it. Until you get perfect
flatness that you want. Do the same here. Smooth, smooth out
what we just did. Notice, too, that always makes our objects seem
a little smaller. That's why sometimes, especially with larger objects like
the body that we did, we exaggerated some so that we have room to make changes and adapt Now that we've
got that, go here. Smooth that out. Maybe we
want to make it a little more narrow now that we know what the shape of our
hand is going to be like. Give this arm a little dip. Pushing, pulling. All right. Smooth, her straighter edge. Now that we've got that,
we can create our claws. Go to the drag brush, turn down the radius. Let's keep the
intensity about 40. First thing we need to do is our thumb pull up a little bit, establish where
it's going to go. And then go over to the inflate, go to that same spot and start
to move around in circles. For this, let's
actually revert back to our MATCAP filter. Much more visible
without that sheen. As you probably have noticed, it seems as though some
details are easier to make in MATCAp and some details
are easier to make in LIT. That is intentional.
So Just keep reverting back and forth
to your own discretion and come back to the video
when you're ready. For now, we're going
to take this nub that we made and to make sure that it goes
in the right direction, what we've done is
we've tried to create a starting point for that thumb. Because as you saw, when I
when you're pulling the drag, it's either if you pull it, it probably pulled it too much. Maybe not enough, maybe
in the wrong direction. This establishing the starting
point for our thumb gives us a lot more control
because it has to go in this offshoot almost
direction compared to the natural shape of our sphere that we created
to make this palm. Okay. So going back here, with your inflate, inflate it just a little
more moving in circles. Go to the drag tool, increase your radius to about the size of the
nub we just created, maybe a little more after
you pull it out some. Now remember to pull it out some and then increase it because it created a little
apex point for me to make it the
pulling even easier. We don't want to pull it
up top or from the bottom because that makes it to where we have more mistakes
that we have to fix. It's feasible, but you're also at risk at pulling it upwards
or pulling it downwards, thinking it's in the
right direction. But as soon as you
change your camera, it isn't in the right
direction. Go to the side here. We're going to pull it
out just ever so much, maybe make it a
little bigger here, making it look like it's webbed, but also keeping it in
line with our hand. Raising up the back some so
it has a little formation. Trying to keep our area
flat and lower the radius. Okay. Then we'll do our fingers. I should look almost like a really big mitten,
at this point. This will also give us a chance to adjust our thumb
if it needs it. This needs it a
bit, pull it back. You want it pointed straight up. There we go. That way it's coming
off the side, diagonal, but from the front perspective, it looks like it's straight
up, right? All right. Then what we're going to do
is start doing the same here, go to inflate again and turn down the radius to about what you want
the finger to be. We're going to make three
fingers spanning one, two, and three here
across the top. Start to go in circles, maybe come to the side, turn up your intensity. Turn down the radius because the inflate tool can do
a lot with a little. Creating our little nubs. This way we can map
them out before we make them so they're not too far apart from one
another nor too close, and make sure they're going in the natural direction
that they're supposed to. And I got mine too far away, so I have to go back, put
another one and play on words. The rule of thumb, for me, when I'm creating hands is just making sure
there's enough space. So here between where
my dot is and the line. That way I have some type of reference and say that I still want a little
more room there. All I got to do
is before I start to span out my fingers is
go to the flatten tool. Go back to the inflate, then you can just
make small circles. Go back to the flattened tool, flatten that out,
make it a little smaller because they
start off small. But as soon as we stretch these, just like demonstrated here, this little nub
that we started off with that we created
with the inflate tool, I started off small, but now
it's much more substantial. What we're going to
do now is go here, it at the correct angle, take our drag tool. And just start to pull out. Nomad has a great way of determining because you see my radius is still pretty large
and it's still over this, but it has a great
way of determining what we intend on picking up. Now we've got them in the
general direction that we want. We can pull them out, zoom in. All right. Maybe give
us some knuckles. And we're just going
to pull those out, so they're just subtly there. If you make a mistake like that, smooth tool, it's
great for that. Turn down the radius or
intensity of our smooth tool because we're about
to use it again and then we'll smooth out
everything we created. We'll have to drag it again, but at least we've got a
good head start. All right. Now that we've got that, check out looks in the wireframe, see if there's anything
that we didn't notice that we need to
smooth out back here. Maybe make that a little flatter and you can
push right into that flattening that
out so that our slope, now that we've got the
start to our thumb and our fingers while we're here, let's go ahead and
adjust our dips here because it's a
lot easier to adjust them while our fingers are short than when they are tall and we've
stretched out the mesh. Yeah. Moving that back just imagine you're
pushing right into it. Narrow our fingers
out from the bottom. That'll also help
our dips. All right. Now that we've got our
shape, just like before, when we got our shape, basic shape formed, we're
going to go up here, we're going to subdivide
once more, okay? That way, we can pull these
and see much smoother, much more high resolution, smooth these out before
we stretch them, just in case they get shorter, see how that's happening. That's fine. That's
actually going to help us have a
cleaner mesh when we do pull it out, the fingers. Okay. Now go over to
your crease tool. We're going to put some
creases between these having increase your intensity, put two creases
in between these. They're not going to stay
there, but they're going to help us to have
better pulling. Now, go to the move tool. Turn up your radius.
Let's try to get them all three,
just a little bit. Straighten them out
to your liking. You want to take that
hand, lower the radius, just enough, go to the top of each of these fingers and try to move them
in the same direction. You want to make them to
where this one is longer, a little bit than the next. Then we'll take our smooth tool. And go over these, go to smooth edge, turn down the radius, zoom in. Now that we've used those
creases, we get rid of them. Start to use smooth
edge on the area. Go back to your mop tool. We make this little more
pointed like our others. Let's turn off our panel. Just so that we can see what it looked like and fix anything that needs to be
fixed like that. Turn down the radius, turn down the intensity, just to fix little mistakes. You see this, go the drag tool, pull these in top, see any little
dimples like that. Sometimes you can just push them down and then smooth them out. Go to your move tool,
put up the radius, and then try to get
that on a slope. That way they just naturally, the curvature just
goes right into it. Go to smooth, smooth
out the top of it. Make sure that your dips right
here within your fingers, the crevices are
somewhat similar. Go to the flattened tool. Turn up your radius,
turn up your intensity. And then just start to flatten
out what we just lowered. It'll help with that flow
I was talking about. This way, you want to
go a little bit linear. Closer that you get,
you want to narrow your radius down closer
you get to the fingers, go back up to the fingers. Then we'll just subtly
graze the sides of those. That way they look more pointed without us having to
pull excessively. You start to see your mesh tear, turn down your radius in that because we don't
want that back affected either putting a
mask in front of it or just being careful about that radius
help a lot with that. Go here. Smooth. All right. Move tool up, drag those
back just a little more. Want to make sure that we can't see any of the top of the wrist. Or try not to dip there maybe, maybe a dip here, smooth, making it
look like a claw. Smooth it out. All right. All right. Done a
lot of work here. Now for the fun part, what we're going
to do after we get all our smoothing done is
going to do some painting. The first thing
we're going to do is you might think
to yourself, well, how am I going to get those tips to blend well with this red? We're going to use the mask
tool in a very unique way. This way, we can have not
just being able to paint, paint on things, but painting them instantly like we did
with all these components. Here, we have a way that we can paint that gives us
almost like layers. The first thing we're
going to do is go to mask, collapse our menu,
make our radius very small or just small
enough, increase the intensity. Okay. And before I proceed, I'll show you we can paint on objects directly, as
you've seen before. So I'm going to be using this, the drop tool, if you remember, we can paint like that as well, not just paint all, but with this, what
we're going to do is we're going to use the mask tool in order to
paint different segments, but make them look
more flowy, I guess, flowy airbrushed and
distinguishable between what is the palm area and what are the actual claws or talons here. We can do that by using color. The first thing we'll do
to use the mask tool to paint is we'll start painting on the surface,
painting on the inside. Then we'll paint around those. Increase your radius a
little more so we can get more coverage area where
we have a bigger space. Now we're down to our fingers, decrease the radius, decrease it even more so
we can get on the insides. Go down to this blur button and you'll see that it blurs it. That's what we're going
to do here and here. That way, it's not so dark. Now, this isn't our paint. This is just
something to protect our object that we
don't want painted. The parts of it that
we don't want painted. Continue to fill in the rest
except for the fingers. We're going to
paint around those. Inspection. You go to unmask, decrease the intensity
and decrease the radius, and this will start to
unmask a little bit. Then anywhere that has a mask on it that's
a little too close, this will also help with our painting and what
the effect we're trying to create because we want it to be darker
here and a little bit lighter around our
fingers and thumb. Go closer or farther away
from the area when needed. Turn up your intensity
when needed. As you get closer, you'll notice things you need
to do or like to do. Okay. Just the top areas or the top of the mask
that we've drawn around. If it's already dark. You might be thinking, well,
we just painted that black. No, we just gave it
some protection. So what we're going to do
is come back over here. We already have yellow selected. If you don't, go
ahead and select it, paint all invert and see. We've got a little gradient
here that's forming almost. We're going to then clear. Then we're going to here, and then what we're going
to do is keep it mask. Don't clear it yet, and
then we'll start to go to smooth or smooth edge
while the mask is on, so mask it s. The darker it is, the more that's going
to be unaffected. See how that's almost
coming straighter. The jagged line here. We're going to go back to mask, invert again, smooth edge, smooth edge, Mask, clear all. Smooth edge. Let's subdivide it. Smooth it out, turn
up your intensity. Got a mask, blur, sharpen. Then anything that
looks a little messy, we're going to just
cover it up with red, but we're going to
make sure that it blends Go over to your paint tool,
select the color. Turn down the radius, turn down the intensity. Make sure that your
mask blurry enough, test it out like
a swatch almost. Blending, blending, blending. Making it look a
lot like our thumb. The thumb needs some work too, but we want it to look like it's naturally emerging
from the hand. Go back over the mask tool. And just mask over this area,
then you go back to paint. Start to get that cleaned up. As you rotate, you might start to notice subtle
touches you want to make, getting rid of some of
the yellow you want. Clear, see how it looks. Cleaning up any patchy
areas that we have. Maybe making some subtle
paint movements here. See how I'm just taking
that and I'm just moving it like a centimeter. That way, if the mask didn't
exactly do the trick, It at least introduces the ability to make
little tiny strokes. In the middle, you can make a
little bit brisker I guess, maybe is the word or broader. On the outside, we want
to a little small. Not too big. Smooth it out. Almost making it look like fire. Go back to the paint.
Do the same here. Go in the shape of
the cone itself. Straight up. I went too far. That's usually an indication
when you're making a big your pull or that you went too far
with your paint line, it so to be a little closer. You also might have noticed
that as I move closer, it changes my brush. So sometimes you have
to adapt that brush. I had to change mine up
And some of this painting, after the lesson has completed, you can go back over
and do yourself. I'll show you how
to clean that up. He's more subtle
going in closer. So if you want to do
this to the thumbs too, That way, the blending
isn't so fragmented. In the same way that we pull up to create that ombre effect, we pull down a
little bit below it, maybe lower our radius
to balance it out. All right. Turn down the
radius again while it's red, go back over. All right. Now that we finish that, in our next lesson,
we'll be doing the legs. I'll see you in the next lesson.
13. Head & Facial Structure: Welcome back to Nomad Sculpt. So far, we've covered this it and unlit or the
unlets like this. We won't be using that, but so far we've covered the
MATCAp and the It. We've been using
MATCAp so that we can use that filter to have a
more clay like appearance. We've been using it to have
a more lit environment. So it and unlit to expand, it will be what it will
probably look like in game or within a three
D animation software. We've also covered
the mask tool, learn how to paint
with the mask tool by using that and our paint
brush and paint tools. We've used the smooth tool and we've used the tube
tool extensively. We also covered the
crease tool and we learned how to
use the lazy rope stabilizer so that we
could get cleaner, more accurate and easier to
make lines. And strokes. Now what we'll be covering
is we'll be making the legs, and we'll also be making the wings and the
head and the horns. Sounds like a lot, but honestly, it may not seem like it, but we've done the
hardest part already. This hand that we made together in this body
area are probably the hardest thing and most difficult in
this entire lesson. And now that we've
grown more expertise, the following things we will
learn will be even easier. First thing we'll do
is make sure that our back panel is
activated, go down. That way we have our
blueprint active. We're going to find the
smooth tool or the tube tool, just like we did
with the arms here. In the last lesson, we're going to do the same here. Use path. The difference if you do recall between path and curve is curve, you can just go any direction. I use that sometimes. Usually though I will
use path because it is more accurate. G here. All tools and their
different variations have different use cases. I just highly suggest using path in a lot of circumstances. Once you have that drawn, you overdraw like that or
just click somewhere else, remember, you can
always combine points. You can validate here or here. When I say validate here, it's validating the
shape that we want, and then we validate
a second time with the tube because we have to make other
adjustments, of course. Go to the side, move this while we make
those set adjustments. What we're going to do
is go a little closer, put your tube tool about
there, the bottom face of it. Bottom face, side
face, top face. Just like we covered in
our primitives lesson, we're going to see this,
put it about right here. Then we're going to increase the distance of this and put it
right about here. And I want you to do
that from the back. That way, it has
this pivoted angle here because the
thigh in the back, it's going to want to be bigger, so we're going to pull from
here in just a few minutes. That's why we place
it so awkwardly. But here, then we're going to make it so that we
have several radius, put a middle one,
make it bigger. You see that front
is already creating that knee like shape for us and the back here
is also bulging out. That's exactly what we want. Create another point here, move it down right
above that last point. This way we can get the
curvature that we still want and established and
the bulbous effect of expanding our thigh. About there. You want to make it pretty large and it's
created curvature up here for where our knee would go and still straight back here. Go here, do the same. That way we can take this top edge just gradually move it in. All right. Let's go ahead and
give it some color. Now that we've got a shape
that we're established with, you need to take a second just to finalize your
shape, go ahead. Go ahead and paint all. That way you can
see what I mean. We're going to
move this forward. Wanted to have a knee. And see even just giving it
color or the wire frame, it looked somewhat right before, but as soon as we added color, we were able to see
all the dimensions of the shape we had made, we saw that we need to do
a little more work on it. That happens frequently. Let's see. Making check your side view, making sure that
everything seems right. I know it doesn't have feet yet, but we're going to get to that. First thing to do, drag this down all the way
down to the feet, here, making that go
up, balancing it out. All right. Already got a little bit of our heel
there, as you can see. Now that we've got a shape, we can now go here, sometimes it can be easier to make these shapes at
a lower division. And sometimes it can be higher. So as you see, I have the lower division, the default division that
came with, which is 30, which is how many cuts that
it has and how divided it is, how many faces it has
because of those cuts, or edges in the mesh. So what we're going to do is now that we've got our shape, we're going to
increase the radius, making it much smoother,
just by design. Validate. Take the drag
brush, move that out some. Make sure you're on the right
side, checking the back. You can keep it like that if
that's just enough for you or you can go down to inflate. Remember, you can
always move this like I'm doing here
just so it's easier. So we can find brushes
easily like the inflate. Once we have it, we'll just go here and start to move
it around in circles. And then don't want to do
too much, smooth it out. The way it's got a
little bit more of a ball shape almost at
the end. All right. So while we got
our smooth brush, let's go ahead and just smooth
everything a little bit. Move. And see even that when we moved it in before and
we didn't have it colored, it looked like it was this edge was all the way over,
but it was not. What we'll do to correct that
and then just move it over. Go back to the smooth brush. Any creases that you have like
that, they just disappear. Go in the back. Don't
forget about the sides. Right underneath
them. All right. Go back to the bottom. Then what we're going to do is we're going to go to
the flatten brush, turn it down, go to the side, make your radius about the
size of this edge here. See how this edge, the reflectance
here gives us a lot of clues about the curvature, the way that this
light reflects. It's not exactly right,
but it gives us an idea. Turn up the intensity. Then what we're going to do is start to flatten
out these sides. Maybe I'll move this
over just a little bit, so That way, it looks like a foot should
spanning out from the outwards, spanning in from the inwards. All right. Go to
the flatten brush, raise over that,
the bottom part, smooth it out, turn
down your intensity. You don't want to
smooth on all the time. It's on high intensity. At first, it might be necessary. But as you start
to get your shape, just to try to buff out things like the stroke that you made with
the flattened brush, you'll see that it
doesn't have to be at full intensity
and it's still impact. That seems good. Then what we're going to do is
go back to the bottom. We're going to go
to our drag tool. We're going to increase
intensity all the way up. Then we're going to
decrease our radius, and then we're going to
make these web like feet here and the same way that we made web like fingers
and the thumb over here, but it's not going to take quite as long because we've
already done it once and the feet just
need to span out straight. They don't have a lot like
the fingers and the thumb, they have to have a
directional requirement, that is not just so
linear and forward. So, go to the drag tool. Let's go ahead and rename
this while we're at it. Leg foot underscore. And you see that
with our naming, we've got all the ones
that will have right and left sides to them or companions to them
have an underscore. That way we can keep
up with things easier. There's also another
reason after we finish this foot and leg, I will reveal that to you and it'll all
make even more sense. So go back to front, have your drag tool
selected, collapse. Here, pivot to the bottom, but pivot about here. Then go here and start to just pull that out then
turn on your symmetry. Pivot center. If you have problems with symmetry or the Gizmo
tool being off, remember that you can go
over here and all you got to do is pivot and
line or line again, and then it should
align properly. Go back to symmetry, go back to the drag tool. In this case, that didn't work, but just a little hack and tip
in case you have problems. You shouldn't run
into those issues, but if you ever have it Gizmo tool or the pivot
point is off center, that's an easy way to fix it. Getting back to our feet, what we'll do to compensate
for that lack of symmetry is we'll just make this as big as our
symmetry would be and we'll just be careful. Want to make that look in the
shape of a boot like that. Now you see that I
spread that out, and now it looks
like a boot, right? Want to adjust the
incline on it. Taper this back,
use the move tool. You'll find that
when you're using, that's why they're
right beside each other because when you are using one, you're essentially using the other in combination frequently, have it not too intense, pull it up, keep pulling. Instead of just pushing in, you can also pull up and
then we can push in. It makes it more feasible. Pull these in. Make this a
little flatter. All right. Then we'll go to the smooth
tool, smooth it out. That way, if we have any of
these dimples here or folds, go a little closer. A right. Let's switch and check in
our McCAP using that filter, go to this sun button here
to our shading panel. Go back to MATCAP just to check. We'll stay in MATCAP
while we're pulling these fingers or these toes. Now that we've got our
shape, let's assess it, pull Make sure that it's the
specifications that we want, pulling this down,
giving us more of a flat surface as best we can. G the right to make sure
that we have a flat surface, what we'll do is we'll
go to our trim tool. You'll scroll down
to the wreck tool, then find your area. Then we'll go here, not too much, but
not too little. There you go. We've still got the
curvature that we want on both sides and we have a completely flat
surface on the bottom. Go up, turn around. Go to drag and let's drag
this over while we're at it. Remember to pull up sometimes, pull up a little
bit, go in the back. Whatever the edge in which our mesh is going
with this dinosaur, we want to pull and
push towards that. You see me just
pushing that a little bit and pushing this in subtly. I almost creates
the impression of there's a bone there,
even though there's not. You just want to create
those impressions. Make sure to not touch the
bottom like that because it'll mess up your mesh shape
that we just established. One thing you might notice
is that it's hollow now, and that's going to
be a real problem. And you might be
thinking to yourself, I don't know how
we'd ever fix that. Well, there's an easy way. If you have any mesh tears or any holes like this in
any of your meshes. Usually this happens with
complicated projects like this where you're
using a lot of tools, and trying to get something established quickly so you can put on the details. And after you get
your leg finished, we'll go and fix this. Just flattening mine out. Making sure the angles
are like I want, that's not too big,
not too small. It's important that this foot
area here has a lot of room topically because
we're going to be pulling the toes out to create the toes
just like we did here. Getting back to what
I was talking about just a moment ago
about fixing the mesh, we're going to go into
our materials tab or our mesh tab where
we've been subdividing, we're simply just going to go
over to Miscellaneous here. Scroll up. If you're not already
there. Don't worry about any of these
settings right now. We're just going to
skip right over those. Don't let them intimidate you. And this is just one of those
things that, like I said, when it says that
it does something, that's what it actually does. That's not the case.
In all but most cases. And some of them we
don't know. We know what they do. Quadrmsh. You probably don't
know what that is. If you do, great. But for now, just
focus on just this. Okay. We have this selected. All we do is just
press close holes, and bam, our mesh is repaired. We didn't have to
pull anything or fill it ourselves, nothing like that. All right. Smooth. Now that we've got our shape established, Making adjustments, giving
it more dynamic shape, pulling things up. All right. Now that we've got
that, let's go ahead and get those
toes started. G to go here, pull
down our radius, make sure that your
intensity is up to full. Then we're just going to start
pulling just a little bit. Go over to our inflate, inflate each of these, go over just a few times, making little small circles
in its area at the tip of it, go to the bottom, our
toes a little more depth. Then go back to the drag tool, and then we just start
dragging them over. Making adjustments. Making sure it's at an angle that we like. Go to the smooth tool,
lower the intensity. See, you want to pull it out longer than you
actually want it to be because it's going to shorten some whenever you
go back to smooth. Because the mess is starting to compress
and become cleaner. Okay. Now that we've
got that established, you see that was much
easier than the hands. Probably because you've
done some of that before. And the hands in a
game or a animation, they're going to need
the fingers to move. So they're just more complicated than the
feet are, right? Because they have to have
certain slopes. All right. Getting back to this,
continue to smooth, go to smooth edge,
smooth out our edge. All right. I should
look like web feet. Then we'll go up here to our mesh menu, subdivide,
much smoother. Turn down on our smooth tool, take care of any blemishes. The more you do this, the more you get far away and you'll notice something, right? But I still have to go in close. You just adapt to the situation. All right. Got to
voxel. Try to get it. That way we can get
it even smoother. See? It's starting to
look like actual clay. That's a great thing
about McCAp is that we know that it
looking like clay, it tells us that
it's very smooth. Got a wire frame just so that
we can see the difference. You see this has been decimated and manipulated
almost just as much. But the denser it is, usually, the more
polished it is. But we don't want it too dense. This is probably as dense
as we're going to get this, if you notice the contrast. Go back here. Then we're going to start
doing our painting. As you might have guessed,
we're going to go to mask. But this time, what we'll
do so we don't have to do so much coverage area is
we will just paint it. How you can do the
mask by making it the entire object
mask is just click here and it will just invert it and cover
it all day long. All right. Then what we'll do is we'll go
over here to unmask. And we will start to unmask
our talents here, our feet. All right. Go back to our
grab tool or drag tool. Then we can start to move those out without the
rest being affected, of course, because
the mask is on there. We can start to get those
in the right direction, maybe making them a little
wider or that one at least. All right. Now what we'll do is go over to our paint tool. Get the color we need. Go back. Start to color those in
just like the tops of them. I'm going to show you
another technique to get that effect and it'll
be much quicker. I won't be as detailed, but it'll do the
trick for the feet. What we want to do next is
go over to our mast tool, reduce the intensity,
reduce the radius. If you press too hard, it'll
go right into cell mass. You can just get out of that by just depressing or
not pressing as hard. Go back to our paint tool, select a little bit
of a darker yellow. Select the red to
make any corrections. A Go back to your
mask tool, clear. Find your color. Make
your radius smaller. If your mask, make
sure to clear it. Make any corrections. Feel any spots you got. Turn down your intensity. Go back to your red once you've
got all of it filled out. When you got your
intensity down, just go around the spots. Maybe don't have a separation or too clear of a separation. Make that spot right there or this that has that flaring off. If you want some more
red in the tips. But you want your
blending to make sense. Okay. One final check. All right. We got that. We got the heel. We're not going to be putting
a spike back there. We'll just leave it as is so that that way we don't have too much
overwhelming color. We want balanced
color in our model, go to the front. All right. So we just did our leg. It doesn't have to look
exactly like the image. I can look a little
more narrow like mine, or it can be a little bigger, say I want to come over here. I'll make mine more
narrow this time. But freedom for your
own creativity, right? Just as long as it anatomically looks
very similar to mine, that's what really
counts in that you put your best foot forward
and creativity out there. And the next lesson we'll
finally go onto the head. Before I conclude, I did promise that I would indicate why we did all of these and why we don't have our right
and left side over here. You may be thinking, Well, I guess I have to
do that next. No. What you need to do
is go over here. Then what we're
going to do is take our leg and our hand and our arm, and we're
going to clone them. First, we'll take our hand, both our hand and
arm, we'll join them. Then what we'll do
is coming over here, we'll see this mirror like menu that looks
a lot like our icon. Here, it does something
very similar but different. Make sure that you've
got your arm selected, this will be the
last thing before this lesson concludes
and then we'll move on. Then what you'll do with the
clone selected clone it, and then with the
clone selected, what you'll do is select flipped object
here on the x axis, it will take our clone
object and it'll flip it. That way, you don't
have to create two of the same limbs twice. Now, we'll rename these in the next lesson as we assess
everything that we did. But next, we'll just
do the same operation. Clone this, then go over to our mirror panel,
and as you can see, our mirror panel,
it has addressed the symmetry for this object. Go down here, then we'll just
click Flip Object and BBAM. Now, you have all
your limbs done. You've almost got the tail done, and then all that's left
is our head and our wings. We'll be doing those
in the next lesson. Stay curious, stay creative, and I look forward to
taking the next lesson.
14. Wings, Tail & Final Polish: Welcome again back to Nomad. In the last lesson,
we did the legs. We went over our mirror
tab a little bit here showing that we can clone the right leg
to make the left leg. This lesson, we're going to
be doing this tail here, along with our wings, our head, our horns, and our tail spikes. First, let me go
and delete mine. Go to body. Then you want
to go to the tube tool, go to path. Collapse your menu. Then you're going to start to draw right at the
top of the hip here, trying to meet closely
to the end of our tail, about right there, right
below the tip of the tail. Just go ahead and move
that, get some accuracy. Now, you can't move around
too much because as you see, it's not in the same place. Go back to path. Remember here. Then validate. Let's get our tail much smaller. The end of our
tail much smaller. Now we're going to
align it, go to Gizmo. Let's get it right
in the center. What you're trying to do
is that tip needs to be as close to the tip of our
shell like I've done here. Let's get rid of our panels for a moment so we can have some room,
at least one of them. Move this over. Then we're going to raise our
divisions to 100, giving us that smooth shape. Then we're going to go back to our panel,
turn it back on. Come here, go back
to our tube tool, make all of our radiuses available so that we
can thicken our tail. W hugging the lines here, and you want it touching
the top surface of shell, the tail part of our shell. Add another one here, this way, we can pivot this up instead of moving our mesh
upwards that way. Try to do the same thing here, giving us more flat surface.
We got a wrinkle in there. We'll just move it down some so we don't cause that wrinkle. You want the tail
to be wide but not too wide, go up top here. And make sure that it is
the width that you want. Then we're going to validate it. Let's go ahead and
give it some paint. Then we'll go up
to our drag tool, turn down the intensity, turn down the radius,
go to symmetry, then start to pull that
towards the rest of our tail. Next thing we'll do is
make it wider up top so that matches our incline
here or our slope here. Let's go ahead and align
that from the side. All right. So now
that we've got that, just keep pulling, getting
it where we want it. Then we'll go back here. Make sure our tail
is like we want. Try to get it as
center as we can. Might be a little
bit off center. Go to smooth. Smooth
that a little bit. Go to inflate, decrease the
intensity. Make it bulge out. If you lock something like
this, you won't move. Just a little tip in case you
need to stay in one area. I don't use it that much because I'm moving around so much, but if you're doing
some detail work, sometimes it's really helpful. Just wanted to show
that. Then we're going to go over to the flatten
tool, go up to the top. You just start to
make little circles. Maybe we'll make a little point there, so it's still pointy. Smooth, smooth all
that out on your tail. You'll notice that as you
go around, you'll see, I want to smooth this out
a little bit on natural. If you got any
rings on your tail, should be able to
smooth them out. I see that's gone. All right. Now, the last thing we
do to finish our tail, we come on the sides here
and we go to our drag tool, lower the radius, and then we just start
dragging these down. Remember to have it symmetric so you don't have to
do the other side, but remember to check
it just in case. See? This is down a little farther than I
want, but just there. Okay. Just a little bit. All right. Now we got the tail. I notice you're probably noticing that with all
the parts we have, it looks like a toy. We can combine all of
these later after you finish the course
and make them into one mesh like we've
done with other meshes. But generally, you want to keep them it depends on what
you're doing after the fact. But generally, if you're taking them in the game
development or if you're taking them into a
three D animation environment, you're going to want
to keep them separated and keep their
hierarchy aligned. We'll worry about
hierarchy in the end. I usually would worry
about it as I go, but I want to focus in more
on the sculpting aspects, and I'll show you the
hierarchy once we finish so that
everything makes sense. All right. Speaking of
the rest of our project, let's go into our
head section now. Or should we doing? Let's do the wing next. All right. Go up here to
the wing, how I did that, go home, go back, scroll up a bit, then
just go forward a little. Another thing. Once I get there, I usually will go to
the backing plane. And there you go. Now
we're really close to it. I took a little bit, all right. Now that we're honed in on that, we're going to find
the tube tool once again, take the path, and then we're just
going to start to draw that in, go from here to here, start to make our line The more you have of
these, of course, the more control you
have, but you don't want unnecessary pivot points
here or path points here. If you move around the scene, just like I showed before, that it will just
come off center. So it's whatever your camera
is looking at at the moment. All right. Now that we got that, we're going to go to validate. Radius. We're going
to make this small. Make this small and then adjust and just fit it within the side these
vector lines here, just like we've
been doing before. The only difference is this
time we're going to take this top part and we're going to extend it out right beyond. This one, put it out right
there, throw it a radius. Then you want to
make this sharp. But not too sharp because
we're going to round it out. That's why I didn't take
this all the way down. Plus it does that, you go here almost where
it's going to close. Then just radius for these, validate, make sure this
is in the right place. Get your move brush. Then we're going to go back to the To tool path and then here, validate and just do
the same thing we just did just in a shorter format. What you want to do with this is shoulder it like we did before, a little bit, so it comes
in and intersects with the other that we're going
to draw right here. This one, I'm not
going to worry about the division so much because
it's such a small area. As you notice, it
already looks so smooth. Draw another one here validate activate all
of your radiuses, actually activate that first one so we can get
its neutral size. And All right. Now that we got that, let's go ahead and get
everything coordinated. Make sure that our
layouts right. Everything is thin
enough Validate. Then we go over here, find where our new tubes are. Let's name our tail
while we're at it. Go ahead and take the
tailsell and just put it in. Here's our you tubes. Just take all three of
those and join them. This is demonstrating that it doesn't have to be perfect
because we're going to go back and smooth
it out and change it. The more variation
that our dragon has while still being anatomically
the output that we want, the more creativity that
it has embedded in it. Now that we've got those
combined, name it. Let's name it wing frame. Okay. Then we're going
to subdivide it, tilize it, and then smooth it out. Let's look. And see those are becoming
sharper just by the smoothing. It's just like coloring in the lines or connecting the
dots, like I said earlier. Go to inflate. Let's go ahead and make this
a little bigger. That way when we plug it in, it flows nicely. All right. Remember to save
as you go along. Save. Smooth. Go to FoxtllRmsh here
where we just were, and then go over here and then go all the
way to the bottom, then we're going
to unify it with this uniformation right here. Show you the wire frame. It's more dense
than we're used to. Well, not really.
That's looking good. Now all of our issues seem
to be mostly buffed out. Don't worry about how
skinny those get. They're supposed to
be. You may want to move them and drag them
a little bit more. Remember to go to the
front before you do so. Get them in the right place that you want them. All right. So now we're done
with that. Let's go ahead and give it some color. And see if you want
those it thicker. Just go through
and inflate them. Then what we'll do, go to home, then we'll go over here to add. We'll add a quad sphere
instead of a UV sphere. Then we will go to the side, go our kismoTol, then it out, almost like it's a disc. Move it over, scale it down, go up, go up here. Turn off wireframe. See how thin it is. Make
sure that it needs to be more thin than the wing
frame that we created. We're going to thin
it out even more. Went to scale zero. When
it goes to scale zero, what you want to do is just
pop it right back and then it should looks like a disc. Now, we're going to take this, put it over here at this point. Then we're going to go
over to our drag brush. We turn off symmetry,
increase our intensity. And start dragging our
edges to meet the wing. Remember to adjust your
radius as you go along. Even when you scroll
back and forth, you have to adjust your radius because the camera has changed. Go down here and do the same If you start to
notice that happened, it's probably because you
pivoted right below it. It may look like
you're in the front, but go ahead and
select that if that happens and then
just shape it up. Move it over just a little bit. We want a little bit of the
mess showing over here. The full thing is going to show, but this just ensures that
it's close to center. It's really hard to
tell because it's paper thin and we've
got this in the way, but at least gives us a
better vantage point. Okay. Drag brush, moving this here, fixing this. You may want to that's one
of the reasons because we want this to be center and so we're dragging
it in the right place. Then take this And if your circle was too big, then you can cut this. So if you made your circle
smaller and you're able to drag these to meet
the vector lines, great. But what I like to
do is what you can do is go to additive and
there we go. It's clear. This is going to give
me a lot of accuracy. It lets me see where everything is and it's temporary, right? Okay. Go to the gizmo tool, push this over
just a little more ever so slightly
trying to line it up. You can look at the top
of the gizmo tool line up there and it'll give
you a small indication. See, it's very tedious. That part, at least. Okay? If you can't get it
lined up, no big deal. Okay, then we'll go
over to our trim tool. Or let's do our split tool. Because one thing of
note is our trim tool is great and I know our split
tool it splits them in half, so we'll have two
different pieces. But the split tool, one
little secret about it is that it generally
does a better job at cutting to keep
topology looking great and that's especially
important in all projects, but our edges are going
to come out looking potentially a lot cleaner
because this is so thin. That's the issue.
This is so thin. All right. We've
done this before. We're going to go
down to polygon. Then we're going to start
to draw the rest in using these stencils that we're going to create to cut off
what we don't need. Then we'll go here to
the split, delete. Okay. Then we'll just
do the same thing here. With the split tool this time. Go over here and do the same. Making sure that we have
clear separation between our parts that we're
getting rid of. Again, this doesn't have to be the perfect shape quite yet. We're going to go back and
buff everything and move everything around a
little so that it fits with the ideal
shape that we want. Go here, validate. Delete, go here the bottom, go to the move brush, turn up the radius, turn up
the intensity a little bit. Scoot that down some. Moving to center. Et's go to our wing tip and
go ahead and fix that before we proceed with getting the
rest of our shape. I'm going to go to inflate, inflate this just some, so we
got something to work with. So it doesn't look so
weak. Inflate here. That'll also help the wing frame came through as well
when you do that. All right. Let's turn this plane off just so that we can
see what is going on here. Get it straightened
out. All right. So let your wing make any adjustments that
we didn't see before? Then go over to the Trim tool. I'm going to lasso these out. Straighten out where our meshes so that we don't see our points. Then we're going to go over here and we're going
to give it some color. Let's use the draper
tool to get our color. Then we'll go back to our
material tab and go too. And something else, we've
got a hole in this. It may not seem like
it, but you see it. If you remember from before, what we do is go back over
to our mesh tab right here. We'll go to Miscellaneous, and then again, close holes. Awesome. We got our wing done. Go back to the front.
Awesome accomplishment. With that accomplishment
entailed? In towed, we will then name
our object wing underscore. Then go back to
our middle panel, backing panel, activate
those, make them visible. So far, we've got the tail done. We've got our wing
finish. And don't worry. It's still together even though
it doesn't look like it. What we'll do now is we'll take the wing frame and put it inside of the wing so the wing is parenting the wing frame. Then we'll take this forward. Zoom in, just so you can see what you've accomplished
and there's no confusion, thinking that, oh, I
messed up my model, no, no, it's just
hidden in there. For now, what we'll
do is we'll just make that invisible because we
don't need it any longer, or for now, go back to our body, zoom in on it, back up. Then we'll start with our head. We're going to go up to, add a UV sphere, take
up our division. Validate, go up
right over the head. You want to make it small, trying to get it to fit within these four corners of the head. That way we have at
least some starting shaping as we're
populating our sphere. Let's go ahead and name
it while we're at it. Now that we've got that, let's
continue with our shaping. It's already there, already at that line. Go to the front. Then we'll go to our drag
tool and we'll start shaping just as we've done with obtixs
we have created before. Remember, this can be a
little lower than this. That egg like appearance. Move down your radius, move your head a little inward, and pull down Put your flattened tool, decrease the intensity,
increase the radius. Put your smooth tool. That way, it's looking
like a head and less just a sphere that we
just moved around a little. Just go and smooth it all out. Drag brush, that's looking more like a head because it has the curvature that we need, the flat lines, the shaping. So just continue to
shape that using the flatten tool then
smoothing it out. If you drag that
out, that's okay. We'll just move it right back. We're going to have some
horns there anyway. Smooth it out. Go to
the back of the head, do similar or we're going to
drag it in just a little, smooth it out.
Looking pretty good. Then we're going to go ahead and give this
one some color. It's very easy to
click like that, but luckily, remember, if
you make any mistakes, we just go and use
the back button here. Now that we've got that,
we can do the mouth here. We're going to make
another sphere. Then we're going
to scale it down. Remember too, we have two
ways that we can scale. We don't have to
just be reliant on the direct contact with
the Gizmo tool itself. We can use its settings
to be able to scale it. See what size the head is another reminder we can also do the same
with where it goes, here, then here, then we met
it up with the mouth just about then just like the head and some of the
other parts we've done, we start to get a little
bit of our shape here. Making it either
bigger or smaller. This case, we want it smaller, we're going to be
stretching this out. Validate. Go drag and just start
to drag your mesh. That shape is we've done before. Making sure your symmetry is on. In this lesson, we're
keeping symmetry on for most of the lesson. Because we're making
a symmetric object, it just makes sense. Getting your mouth the
way that you want it. That looks good to me.
Maybe pushing it back, creating a little flat
plateau is on the front. Then we're actually going
to go to the flatten brush. Turn down the radius. Let's start to create our
everywhere that you could see a flat surface or flat
ish surface residing, we're just going to
graze over that. The front, you want
to do more making these very apparent lines.
Those won't be there. The permanently, we're just sculpting things to where they have the dimensions
that we want. Now that we've got that, of
course, we can go to smooth. We've got the shape that we want with all the
dimensions we want, so we can get rid of all
that and buff it out. Okay. I'll take that and make
it a little higher and move this backs. There we go. Remember to save every time
you get to a certain point, what we'll do next is take our quad sphere that
we just made into a mouth, and then we will rename it. Then just like we
did with the body, where we put parts that
were directly connected, they're all connected,
but when you think about them what their
innermost connected to, we just put them together. The head and the mouth. Let's make our planes invisible or one of them,
give this some color. And zoom in, determine get this here. We want to create a little nose. We take that one shape and
we're still sculpting it. Okay. Now that we've got that, go over to inflate, turn out the intensity, then we're just going to start
creating our nose holes, our nose for nose holes. Okay. Put a little
crease around there. Just a little one.
Go back to inflate. That way our crease stops
it from going get too big, where our mouth area
is going to be here. Then we're going to go to this. Here, do that a little bit, where we do the opposite of
inflate, which is subtract. Then we go to PlanR so that
we can make our fake holes. Click that so it doesn't
continue to fill it. All right. Well, it looks like we're
having some trouble filling those holes are creating those nose holes
because our mesh is so it's not dense enough, right? It's coming out pixelated. So you come over here, go to
subdivide, and there we go. Then we're going to go
back to our planar tool, make sure that it is
selected, the radius down, turn the intensity up,
get rid of these men, and then just start
making small circles. I know they seem a little
big, but we'll fix that. We're just trying to
get an opening here. Another thing that I like to
do sometimes that helps with the planRTol when we're creating these pits or you can
go over the drag tool, lower the intensity
as much as you can, about the size of the area that you're trying to affect,
and then just pull it back. Just some adjust it, then go to planR then that
makes it a little smoother. What we're going to do now
is go to the paint tool. Then we're going to go all
the way down, go to skin. We're going to
start to paint in. You don't want it all
the way filled in. This middle area. That's what you really want
to be the darkest here. Now that we got
that, we go up to our smooth tool,
smooth it out some. Okay. Then remash it, see what it looks like. Let's keep it like that.
Seems good. Let's see. Turn the wire frame off,
then go to drag tool, increase our radius,
decrease our intensity some, decrease the radius even more. Try to pull these out
so they're slanted. And then we pull the
back. There we go. Maybe we'll narrow them
out just a little more. Sometimes you have
to pull things in the opposite direction that you intend to coordinate them there. Using Nomad Sculpt, it's all about knowing
how to adapt to your situation and just getting enough experience to
be able to do so. But as you probably
noticed, in time, the more that you try,
the more everything becomes second nature. Okay. We will go to
the flatten tool, flatten out front. Smooth. That way, any unwanted extra dimension that we added to
it through that stretching, we can start to
correct. All right. Now, we go over to
the Crease tool, make sure symmetry is on, then it's quite
intense 56 or so. We've got this unlike
before or like before, what we're going to do is
start in the center and go up. A Let me sure. This is something else
that I meant to mention. One thing you can
do that's really cool is we can make
these creases, but we can also
simultaneously paint. If this is not
already turned on, go up to this paint brush here, not the small one, but
this larger paint brush, and then we can start to make some small modifications
to our painting, including having it on whenever we're using
a standard brush. Now that I have that
activated, we can go here, Let's start to give it a smile. It's going almost all the
way, but not exactly there. That way we create a
little bit of fake shadow, and there's a little
too much here, we're going to go smooth, of course, smooth it out. Maybe we'll take some yellow, make this really small right here, increase the intensity. All right. That seems better. It
doesn't seem like much, and it doesn't look
like anything's changed from this angle. But then when I go up,
it's less apparent. One thing I like to do too is
go back to the crease tool, turn off stroke painting, just so you know where
it's at, and then we'll go right back
over that again. With the mouth, you can
almost keep going just until that black that we had
looks less like lipstick, more like a fake shadow, and it brings our mouth in a
little bit without us having to sculp Cress can
become very intuitive. All right. We got our mouth
done, check in with our head. Let's subdivide that
so it's a little softer because we're about
to make our Is zoom in, go to the planar tool. Then find your eyeline
here as you see, you want to be about
right above it, and then you want
to draw right here. I think you want
to draw circles, but you actually want to draw almost like the shape
of a case idea, something like that. No. We will get our
circles, but like that. This way, we can be able to
manipulate it into a circle. Make our radius a little bigger, and then we'll just keep going. Go back to our drag tool. Bring that back some,
give me a little pit. You want to try to make
the radius about as big as that opening that
we made a little bigger and then just start to go and shape it, move it up. See by giving us
that extra space, causes us to make it so that we start to form
our front of our face. Just move those back. Creating the sockets
for our eyes. Going back to our planar
tool, lower the radius. Smooth. Start smooth out
all that work you just did. There we go. Let's take the grab tool or drag tool and move our eyes up. There we go. We got
nice little pits. For our eyes, want to make
sure they're far enough apart. Then we're going to go
over to our inflate tool, go to front, then not
all the way around. You're intensity, radius just, all the way around, but on most of these points right here. Adjusting to what
size it is already. That way, whatever size
we're inflating matches, a little bit on the inside
to give a little more shape, and you go over to smooth, smooth it out, just some just so that we can see
what we're working with. Go to the crease
tool, we got that. Then on the outline of that, start to draw a crease or two creases really
one underneath. Smooth edge, crease again. Smooth edge, giving our
face a little more shape, looking like the eyes
naturally belong there. All right. We got
most of our head. We'll come back and
finish that in a moment. We got to create
the eyes back up, add a sphere to it. Add a UV sphere. All right. For the Is, we're not
going to worry so much about the divisions per se. We're just make them
a little higher. Maybe about 80. Go over here, make it small. Small enough to get
an I, line it up. Go ahead and validate it. Okay. So get a little smaller,
see where it's at. You go to make it a
little flatter we can always just move it forward
a little. What we'll do? Paint it even though
it won't show up here. Go over to our materials, go to skin, paint,
clone forward. Then we'll go to additive
shrink it down just some so that we can see through it. I'll try to get it
about that size. Maybe a little smaller. Then we'll determine
what color we want. I think since I've got
all this red and yellow, I'm just going to get
my dragon orange eyes. Then I'll go here, back to
the materials, go to this. There we go. We
get our first eye. Here, name it. Simply I underscore,
then name this Iris, make the I parent it. Then just like last time, we're going to join these. Then we're going to
go over to mirror. We're going to clone the eye
while we have it selected. Once we have mirror
open over here, we're going to flip the object. Then we're going to separate it. Take those out of the
I group it created, so we're not too
confused. Delete. Let's go ahead and
start naming these. We're going to
call this one Iris again. Separate. Separate, just so that you
can see where everything is. That parent that, of course, what we'll do is take
the two parent objects, which are the eyes, and then we'll put them right
into the head hierarchy. All right. Arm, let's go ahead and rename
that. Which arm is it? The right one. Simply
just put R there. Do this, and the same here. We're about to finish up, do the wings and the texturing and put our wing in
place and you'll have yourself dragon that you made with my guidance and your creativity
and determination. All right. You see how
that makes a lot of sense, clean up our hierarchy while we're over here
before we finish up, go ahead and move your arm and the body and your leg in there. Then when we fold
everything out, everything is nice and neat
and tidy and organized. We do that, go back to head. And then we'll get started
on the final pieces, which is our horns. First, we'll check out to see if our head is absolutely complete. Do any smoothing we
need to do here. I've got some before
we move on, back here. Let's get our head more like
a shape. In case it's not. Let's actually take
the liberty of moving our head down and
cradling it on the body. Trying to make sure we
have everything done before we move on to the horns. Go to our body, go
to the move tool, and then just start
to move everything upwards so that it anatomically makes sense for
our cartoon like dragon. Making sure the head and
the neck area and the back all connect pulling up. That way, everything looks bright and we can finish nicely. Even if the edges look complete, just keep pulling them up
until it looks just right. All right. Go back to our head, smooth out underneath. I
just noticed that. See, we made all those edges. One thing I wanted
to demonstrate, go to the move tool, bring down our radius a lot. We're going to go up We're going to move this
over a little more. Making sure that we can
see that inflate that we did make it more
apparent up top. Turn down the intensity,
you go to the bottom. Subdivide. And so I want to show you that now
that we've done that, go to the drag brush, and we can start to give it almost like facial expression. See, Mad, sad, hopeful, feeling dangerous,
whatever your feel is. You don't want to
move around too much, but it makes it easier
if you want to give your dragging a specific
face facial expression, or if later, you want to
take it to animate it. Being that our structure
is established. Pick this, move it
forward just a little, and then I think we're done
with the head, finally. I know you're ready to see what all what looks like when
it all comes together. Then what we're going to do is we're going to go
over to our tube tool. Go to the side, go to
where the horns are, get the angle that you want. I think I'm going
to do longer horns, maybe I'll just do shorter ones. But you can do longer
ones if you want. There's going to be
the same structure. Whatever fits your vision, validate I'm going to make all of our radius or some of
our radiuses available. Then we're going to make this small shoulder this, create a little shoulder. That way, it just
goes in easily. Now that we got that we'll
increase our division up to 100 validate let's go ahead and subdivide, paint, grab our color. Another thing you can do on your own future projects is
if you have a color palette, you can import it on a
mesh or import it into an image and then put that image onto a panel like this, right? Just something
worth researching. If you're looking
for specific colors. I personally like to just
get in here and explore what colors Nomad has and
just see what comes to me. Here, go back here
and as before, paint all If you like that horn, you can keep it just as it is. I'm going to try to put
some creases in mine. Just like before,
we're going to go to Alpha or we're going to
go to the shirk brush and then we're going to go
to the paint over here. We're going to change
this to black. Then I'm going to
start to color in. Maybe you'll turn
down the roughness. I'm just going to put
some random carvings in mine just to give some randomness to it
since it's so symmetric. Okay. Oop. One thing that I almost forgot to do with you is we
got to make these. Don't worry. They
won't take that long. Okay. Let's finish up the horns while
we're at it, though. Just like before, we're going to clone it, go over the mirror, go all the way down, and ban, we got two horns. Put those in head to
normally label them. We're just going to join them. Collapse the head,
go to the body, add cone we can change
this just like any shape. Change that close
to what it was, maybe a little higher.
Do some shaping. We're going to make little rounded triangles out of these. Here, scale down, go down, match up with where you want it placed, validate, zoom in. Make it a little wider. Let's get rid of
our middle plane so that we can actually see it. At this point, you
probably won't be using the middle plane
too much all these planes. All right. Now what we want to do Is go to the trim tool, go to this line and the line you're going to
have to be careful with. But all you do is where
the white half is, it is going to cut that. You want to try to get it as
straight as you can and bam. Then what we're going to do is we're going to go
to the smooth tool, smooth it out just a little, inflate, move it
around in circles, maybe move up our intensity, Looks like we got to
fix the holes again. Close the holes. There we go. Now we can get
back to inflating. Just a little bit. So you starting to make that
round tip that we want. Ironically, we go right
back to the flatten tool, even though we just
made it flat of sorts. Let's see. Flat end. Then you're just going to
start to ride around that. I want to give mine a dip. Yours doesn't have to have one, but I like that for this one. As long as it looks
close to mine or anatomically closed,
go to smooth. Oh, dips gone. That's okay. Still looks good. Got our shape, go up here, subdivide,
smooth again. Urge to finalize it out. I came out flat like this and not smooth. Mold it a little bit. Smooth. Flatten. It takes a little work sometimes. All right. Go ahead
and paint it. A Go to the side, just find out where you want it to start
just dip it in there. Then what we're going to do is clone and just keep cloning this after you
keep moving it up, stay to the right or the left, keeping these going and pointing
in a similar direction. We'll go back and adjust it. The main thing is right now
you're just making sure that they're center and high enough and that they're
somewhat evenly spaced. See how many we've got so far. If you want to give yourself, yours some unique horns
after you finish the lesson, like I've given mine back here, just to give a little
extra character. Feel free to do so. Go here. The scale hasn't went down. It's just farther down than it should be,
but it's center. Lone Goshen, if you want it a little
wider, just go here. Clone same as we did last time. All right. Let's.
See what I did? I didn't stay center, so it came out
looking rather odd. Here we go. Rotate. Let's get this clean out the way so we can see all our work. Awesome. All right. Now that we've got all of that done and all this
hard work done, we can do, which
is our final step, is we will come and we will
lastly learn a new tool or a new way to use a similar tool to the brush and the
clay that we've used a little bit in the past. What we're going to
do is you're going to come here to the layer tool, and then what you're
going to do is come over here to where we change the lazy stabilizer,
lower that sum. We're going to create a brush, we're going to go
over here to Alpha. Then where it says none, we're going to click that
and on your desktop, you're going to find the included scale
scallop style tile. So when I click
that, it's going to come up with this scales looking object and
you see it here. I'm going to X out and I will
show you what that does. It adds layers. If I go here, and
then I drag this, it's giving scales
because I have the lazy rope stabilizer. Not only did that help us
with things like our creases, but if we have this pattern
that we're painting on, this texture that we're
painting on that repeats, we don't want them to
be too close together. So if you've already uploaded this and you have your
settings that way, it feels very much like you're
painting on the texture. That's essentially what
we're going to be doing. This texture looks
rough, but don't worry. We're going to smooth it
out with our smooth tool. Continuing with the body,
going to keep going, covering, going to
our different parts. Or head doesn't have
to be everywhere. Just want to make it prominent. Around the face, this is especially important
around the eyes. I want to make it not as
much but everywhere else. So like I just did, just make your radius
a little smaller. Especially around the eyes. We decrease our intensity. It looks intense, but you'll
see soon as we clean it up, it's going to be
nice and smooth. Go to your leg. We're going to what I
like to do sometimes is texture and then copy again so that we don't have
to texture this over again. The same thing we just
did a few lessons ago with the legs or a lesson
ago with the legs, but we're just going to texture one so we don't have
to texture two. One thing we need
to do is we need to protect the
painting that we did. So we'll go over to mask, and then we'll just paint
over those, mask them up. I don't have to be perfect. If it covers the
red a little bit, that's what we want
anyways so that we can give protection
to our paint, to our claw areas. That happens, remember,
you can always invert. Now, what we're going to do is the same thing
we did as before, if we go back to the layer tool, make sure your layer tool that your radius and especially
your intensity is lowered. Because if it's
heightened, watch, it'll do say if I heighten this all the way up, go to my leg. Yeah. The scales are just coming off of him. We don't want that. Keep your intensity down and we turn back up the
radius for the larger parts. Then we can just keep going. One thing, we need to
mask this down here. I almost forgot to do that. Just mask underneath
the foot entirely. That way we can
just make strokes up and down the sides of the legs without having to worry about ruining our flat foot. Going through and
taperi
15. Class Project: Now it's your turn to sculpt. For the class project, you'll create your own three
D sculpt and nomad sculpt. You can choose to
sculpt a creature, a stylized object, or any
form that interests you. When you're finished,
take a screenshot or render of your sculpt and upload it to the
project gallery. I'll be checking the projects
and sharing feedback. I'm looking forward to
seeing what you create.
16. Congratulations! What’s next?: Congratulations on finishing
the Nomad sculpt course. You've gone from learning
the interface and core brushes to
creating stylized, props, plants, and a
portfolio ready baby dragon. Remember to revisit the cheat
sheets, reference packs, and practice files, and keep
iterating on your designs. Thank you so much for
sculpting with me and Nomad.
 Skillademia Academy, Creative Skills for the Future