Transcripts
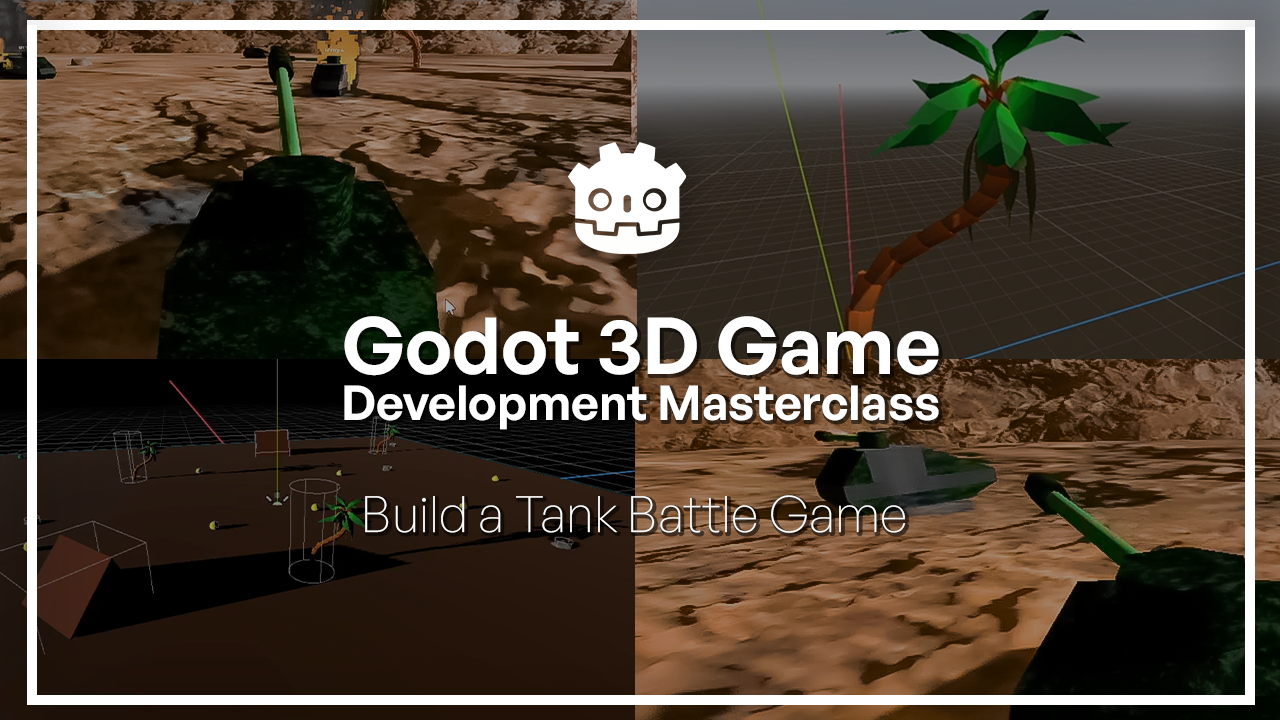
1. Welcome to the Godot 3D Masterclass!: Building a three D game
might sound complex, but with the right
structure, it becomes a process you can
tackle step by step. Welcome to the Godot D
Game Development course. I'm Steve Carstensen,
and in this class, we're going to build a complete three D game together
at using Godot. You'll learn how to
work inside the engine, understand how three
D scenes function, and gradually bring
a playable game to life through a real project. I'll start by learning
how to navigate Godot interface and working
with basic three D objects. From there, you'll move into physics, player
controls, camera, lighting, sound, UI, and AI, all the core systems that
make a three D game work. Each chapter builds
on the previous one. You'll create tanks,
environments, enemies, and gameplay systems
step by step, learning not just what to do, but why things work the
way they do in Gdo. This course is designed for beginners to
intermediate learners. Don't need prior experience with Godot or three D
game development. We'll start from
the fundamentals and build everything together. By the end of the course, you'll have a fully playable
three D game, and more importantly,
a solid foundation you can use to start building
your own projects. Let's get started.
2. Installing Godot: In this very short lesson, we are going to download and
install the GdoGame engine, which is what we're going to be using for the rest
of this course. So open up your
browser and go to G DO engine.org. You can also get it from steam, and as of the recording
of this course, the latest version is 43. So we simply click
on that and we go to the GDOEngine and you'll get it for your relevant
operating system. Now, we are not going to use
the Net enabled version, so simply get the
standard Gudo Engine. The net enabled binaries
will allow you to use C SAP, but as we are going to be using GD script throughout
this course, that might make things
a little confusing because they're two totally
different languages. However, the C Sharp
code and function calls on API and all that stuff
is actually very similar so if you wanted a bit
of a challenge and you wanted to try and
mentally convert GD Script to C
Sharp in your head, you can do that, but
I will not be held responsible for any insanity that happens as a
result of that. So, let's get GdoFurt three. And Gadot does not require
any sort of installation. You can simply download it and copy the executable
wherever you like. So you can put it on your
desktop or whatever. I'm going to stick
it with all of my other Gadot installations, and I will be back
with you in a moment.
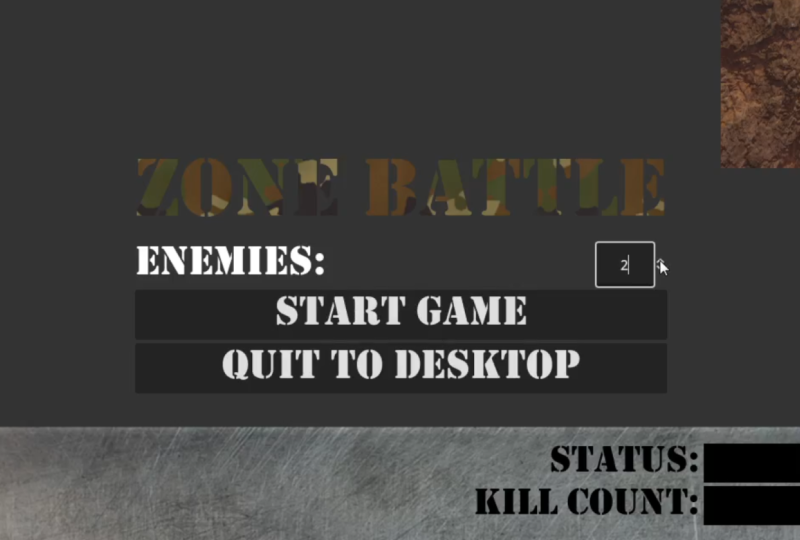
3. Overview of the project: Zone Battle: Throughout the lessons
of this course, you'll be learning
how to recreate this retrostyle
tank battling game, similar to the classic
battle zone game published by Atari in 1980. We'll start with the basics of creating a tank,
a three D arena, moving the tank via user input, and then creating a
configurable spawn system of AI powered enemies
to battle against. Okay, so with that out of
the way, let's get started. When you first load up Gado, you will see the
project manager. And this will give you a list of all the projects that you've got available to you that you've
already been working on. Or if you're just
starting out with a fresh install,
you'll have nothing. So I'm going to create a new project. So you
can either create one. You can import one
from a specific place, maybe from a previous
version of Gadot or a different place that
Gado isn't monitoring, or you can scan a
particular place for any projects that may
already currently exist. So we're going to do create and when you create a new project, you have the opportunity
to give it a project name. So we're going to call
ours Zone Battle. And we are going to
create a folder for it. And what that will do is it will go to the folder that we
tell it to put our project in and then create a subfolder specifically
named after the project so that we don't have to
worry about accidentally attempting to create a project and a folder that
already has stuff in it. So I'm going to change
this and I'm going to put it elsewhere. It's going to go into
Larngdo three D, and we're going to
give it a new folder. Actually, we don't
need to give it a new folder because we're
going to create one. So we select a new folder, and it's gonna be Larndo
three D and then Zone Battle, which is the name
of our project. So for the renderer, this is going to depend on the platform that
you're targeting. So compatibility means that it should pretty much
run on anything. And then mobile, of course, is for mobile devices. The rendering and various effects and different
supported features of three D tend to
be scaled back on mobile devices
because they're not as powerful as PC hardware. So basically, if you're
targeting phones, especially lower end phones, use mobile, and it
tells you right here. So it supports
desktop and mobile. The three D graphics
are less advanced, it's less scalable,
so on and so forth. We are going to go with Forward because we're going to be
developing on a desktop. And as an aside, I would not recommend attempting to follow along with this
course if you are attempting to run Gadot
on Android device, especially if it is a phone. You will get the most out of this course by
working on a desktop. So with that out of the way, we leave our Version
Control metadata with Git. We're not actually going
to be doing anything with Virgin Control
in this course. But if you were
to want to upload your stuff to source control later on after to back it up, the data
will already be there. So now we'll just
do create Ed Okay. Now that we've got our
project created and loaded, we are going to go through the basics of the
Gadot user interface. And for that, you can join
me in the next lesson, and we'll learn about how
the various Windows work, and then we can get started
on our game. See you there?
4. Navigating Godot: The Main Window, Scene Tree, and Inspector: Welcome back. Now that you've
created your project file, we need to get familiar with the Godot
development environment. The main window here is where the bulk of your development
is going to take place, and it's important enough that we're going to give
it its own lesson. So the lesson after this we'll discuss how to
navigate this window. Next up is the file system. The resource folder
in the file system represents your root
project folder. And we can verify this by right clicking on it and
selecting Open File Manager. And you'll see it
takes us right to the zone Battle folder that we created when we
started our project. Here is our project dot GADOFle which is the physical
project file, and here is the icon dot SVG, which shows up over here. Any files, resources,
scripts, scenes, whatever that you either drag into or directly
save to this folder, long as Gadot knows what they
are and knows how to import them will show up here
in your file system. You can even create
new folders in here and organize your
project however you want. Next up is the scene tree. The scene tree is
where we keep track of the hierarchy of nodes that make up the scene that we
are currently working in. Everything in GADo is
represented by scenes, and scenes are merely
collections of nodes. Nodes themselves are simply small or sometimes not
so small components that do various things, and everything that you could
possibly want to use in a GADoGame is represented
by a node of some kind. So, for example, if we wanted just a three D object that was represented by a
position in three D space, here we could create root node, and it would give
us a node three D, and a node three D is literally just a position in
three D space, which, of course, we haven't
really discussed yet, so that's not going
to make any sense. But in addition to that, we can add other nodes underneath it as
children of that node, because at the base of
every scene is a root node, and then there are a bunch of nodes that are attached
underneath it, and all of those will
make up your scene. So we can create
a whole bunch of these and they are all
considered part of this file. We are definitely
going to be looking at a more in depth way of using the scene tree in future lessons and dealing with the hierarchy of nodes
and so on and so forth. But for now just know that everything that is in
your GodoPject is going to be represented and stored and displayed in
this particular tree. Finally, we need to talk
about the inspector. The inspector will
allow you to modify all of the visible data
in any of your nodes. So for example, since a node three D is a
position in three D space, we can alter its position, its rotation, and its scale. So we can move it around
like this and so on, and you'll see that the
value is update here. But also, if we wanted to
change this directly, we could. And that goes for pretty much any type of node
you could possibly have. So, for example, if we wanted to add something different
like a camera, you can see now that the camera
has its own set of data. But since a camera is
also a node three D, it will have all the
data available to node three D in addition to all of its camera specific data. So again, everything you
could possibly want to modify for an existing node
is available in this window. And we're going to
be using this window extensively in order to set the information of our nodes as well as investigate it
while we are debugging things. Speaking of debugging
things, at the bottom here, we see a bunch of tabs that
are not currently expanded, but one of them is the debugger, and it is extremely useful, and we are definitely going to be using it when the time comes. Down here, you also have audio animation and Shader editors, as well as the output console. Any output console is
useful if you want to echo stuff to the console
while the game is running, or if you want to look
for any error messages or anything like that.
So there you have it. That is Gado's Editor
in a nutshell, and all of the
various features of the editor that we're going to be using
to create our game, we will definitely
be investigating in greater depth
in later lessons. And in the very next
lesson, as I promised, we're going to look
at the editor window. So I'll see you there.
5. Navigating Godot: The Game Window & Basic 3D Space Navigation: Mm. Welcome back.
In this lesson, we're going to look
at the basics of navigating around
Godo's three D space, as well as looking at some of the ways
that you can configure the viewport windows
and orient things such that you can see what
you're doing and how to work. The first thing I'm
going to mention is that the bulk of these controls, as well as any
keyboard shortcuts that we may stumble across
throughout this adventure, are basically the same
as they are for blender. One of the ways that you can customize this
is if you go under Editor settings and you
go to Editors, three D, and navigation, not only will you see all
of the various settings, but also there is a option called Navigation
scheme where you can change it from Gdolablender, to Maya or Modo, if those are more
comfortable for you. There are also key bindings
that you can change as well, but we're not going to
delve too much into that. What we're going to learn here is enough to
get you started, and then you can dig deeper into the control schemes at your leisure because they
can get quite in depth. So the first thing
that we are going to note is how to maneuver
around this window. And the first thing you can do is you can hold down
your right mouse button, and that will orient your view camera based on its
position in three D space. Then if you hold down
your middle mouse button, that will orbit the camera. And finally, if you need
to move the camera, you can hold down Shift and
use the middle mouse button, and that will maneuver
your camera around. So a combination of these
three things will allow you to orient your camera such that you can see whatever it
is you're looking at. You also have this little gizmo in the upper right
hand corner of your screen that
will allow you to quickly snap to a
particular orientation. So as you can see, if I click
on the X, the Z, or the Y, it will immediately snap it such that that axis is
pointing directly at me, and then the other two
are oriented likewise. That way, you can also tell at a glance what your
orientation is if you don't necessarily remember
the colors of the axes. So the Z axis is blue, the red axis is X, and the greenish
yellow axis is Y. So by quickly looking at this, I can tell that Y is straight up and down so that I'm
looking straight down. And this is reinforced by this little
indicator over here, which is top orthogonal. What that means is that I'm on top of whatever
it is I'm looking at looking straight down because I'm looking down the Y axis. And then if we click this
again, nothing will happen. Um, and now we are
on the bottom. So if I were to click this for X, that will bring that around. And then if I click this,
which is the opposite of Z, that'll bring that
to the forefront, which means that we're looking
at this from the rear. So you can also change these orientations
rather than playing with this little control by
clicking left clicking on the three button or the
three dots in that corner. And now you can pick
one of those views, and you can also see the various key bindings
for those views, if you want to switch
to them quickly. So if I wanted to go to left, I can select that from the left. And if I wanted to go to rear, I can select that from
the rear and so on. And in so doing, it switches it to what's called
orthogonal view, and that basically means that
you're looking straight on and it's not taking any depth
calculations into account. So normally, if you
go to perspective, you'd be able to see
the perspective view. And that's basically
mathematics. If you don't know
anything about that, you don't really have
to worry about it. Generally speaking,
you're going to be working in perspective
view nine times out of ten because it gives you the most realistic notion
of what you're seeing. Basically, once you get better
at working with three D, you'll know when you need
to use orthogonal view, and you'll be able
to switch to it. If I attempt to tell you
under what circumstances orthogonal views are used, you probably aren't
going to get it. So just don't worry
about it for now. Work in perspective and
everything will be great. And we also have the option of providing multiple viewports. So if I click on the
little view button here, I have the option to
split my window into two or three or even
four viewports. And once I put a
camera into the world and we'll see how that works
in the lesson on cameras, I'll be able to change one of these views so that it shows
me what my camera sees. And then that way, I'll be able to work and understand what the
player is going to see, how my changes are reflected
in the player as well. So if we click back to this, we'll go back to Viewport one. And yeah, that should do us. So now that we can maneuver
around in our three D world, I'll show you how to
actually maneuver our friend of the cube
in three D space, but that's going to be a lesson in and of itself. I
will see you there.
6. Primitives and 3D Space – Rotation, Scaling, Translation: Welcome back. We are now at the point where
we can start looking into the manipulation of objects
in a three D space. And fortunately for us, we don't actually have to
create those objects ourselves. At the bare minimum,
if we are not using three D models that either we've created or were
created elsewhere, we can rough out
stuff using what are called primitives in order
to provide placeholders. And that's exactly
what we're going to do for the time
being is we're going to create our objects
made out of placeholders. So the very first placeholder that we're going to learn how to use is the mesh Instance. And technically, mesh instance
is not a placeholder, but it provides placeholder
primitives for us to use. So we could either create
a new three D scene with a node three D at
its root or we could go to other node and select
the mesh instance three D, and that's what
we're going to do. So what exactly did we do here? Well, we've created a new scene, and at the root of that scene is a mesh
instance three D node. Now, the mesh instance
three D node, in addition to being
difficult to say, it is a node three D, which means that it's got a position and orientation
in three D space, but it also has
additional values. And one of those values
is the mesh property. So if we expand this drop down, we see all these different
meshes that we can create. And the one that we
want is new box mesh. Boom. Now we have a box. If we didn't want a box, we could make it a
capsule or a quad, which is a fancy way of
saying a flat rectangle. We've also got a prism, which is a triangle. So yeah, this will
allow us to create a whole bunch of different kinds of well, there's even a Taurus. That's a neat one.
I got a doughnut. Let's make some doughnut tanks. That'll be hilarious looking. Maybe I'll make some hovercraft enemies towards the
end of the course. Anyway, let's go
back to our box. This gives us a cube and
is a wonderful thing. Now, if we click on
the cube itself, it's going to open up the mesh and allow us to change
things about it. And before we do
that, we need to note that these mesh objects, whether they be cylinder
mesh, plain mesh, whatever, they are what's
called a resource. So Gadot actually works with two different kinds of objects. One is a node, and that is a thing that will be
put in your scene tree, and the other is a resource. And a resource is basically
a fancy collection of data. And sometimes we need
resources inside of our nodes. So, for example, a mesh instance
three D requires a mesh. What is a mesh? Well, a mesh is a collection of points and faces that when rendered by the Gadot game engine
makes us see a cube, and that data is held in a file, which is our mesh resources. A slightly more or a slightly less confusing one
would be icon dot SVG. An SVG file is an image file. And what is an image file, but just a bunch of bits
that determine Well, in the case of SVG file, it's actually vector art. But if it were a bitmap, it would be a collection of data that indicates
the colors and the positions and a few other
values within the Bitmap. So we would need
that bitmap file for textures or sprites
or anything else. So for example, the
sprite would be the node, and it would require
a bitmap resource. That is a fancy way of saying
that mesh requires a mesh, and a mesh is a resource, and that's how we do it. We'll be creating
resources later in the course when we work on our user interfaces
and other such things. But we have things now that we can change as part
of the resource. So if we want to change its size in the X and the Z directions, for example, to make
it bigger, we can. And again, we have our
little circular arrow here to set things back to
normal if we want it that way. And we also have things that can indicate texturing and a bunch of other stuff that we're going to be looking at later on, but we're probably not going to change it within
the mesh itself. We're going to
change it elsewhere. But now that we have a cube, we can orient it
and move it around. And the first thing that we're
going to do is we're going to expand the transform property of the node three D portion
of the mesh instances data within the expector
and we're going to look at position,
rotation, and scale. These three groups
of numbers are what determine the
cubes position, rotation and scale
within the worldspace. An object's position
in worldspace is indicated on three axis, which are represented by lines. So as you can see
here, the red line, the X goes from left
to right, the Z line, which is blue goes towards
off to the horizon, and then the yellowish
greenish line, the Y axis is up or down. Changing the value in one of these axis or on one of these axes will change the
object's position in space. So right now it is at what
is known as the origin, which is dead center, zero, zero, zero,
as you can see. Now, if we wanted to
move the object up, we could change its Y to, for example, one, and
now it has moved. We can also change its position using
these arrow controls. So right now, what we
see actually is all of the controls available
to this object, so we can do whatever the
heck we want with it. But we can also limit the controls with these
buttons up top here. So if we only want
to move our object, we would click on this button
to put it into move mode, and that would hide the
other rotation controls, meaning that we wouldn't
be able to rotate it, we would just be able to
move it along the axis here. So the arrows are pretty
self explanatory, but what is mildly confusing
are these little rectangles. And these rectangles are a short handed way of moving something along
a particular plane. So, for example, this one here, this blue one will move the object in
relation to the X and the Y coordinates
or basically along the horizontal plane that
these two axes make up. So let's put this back to zero. And if I were to start
moving these around, you can see that my X and my Y values are changing
over here in the inspector. If I were to do likewise
with this green one, it would be on the X
and the Z axis and ditto for the red on
the Y and the Z axis. So this provides a quick way of moving the thing in a
particular orientation. So, for example, if you wanted to just slide something around on the floor without
accidentally dragging it up into the air, you could either
move it along like this or you could
move it like this, depending on which
way you were looking. And it gets a little
easier to orient one of these things if you are looking at a
particular direction, and now I can go Ds. So changing an
object's position in physical three D
space is known as translation and is represented by the position property here. In addition, and we're
going to look at them a little bit
more in the future, but a collection of
multiple values such as X, Y, and Z is known as a vector. And there's all sorts of
math that we're going to be doing with
vectors in order to move things and do physics calculations and all
sorts of other fun stuff. But we're going to be looking
at that in a later lesson. Step is rotation, and
rotation can be set with the rotation mode or simply
putting this back into select mode so that you can do whatever you can
reorient them all. But let's go back
to rotate mode. And rotate mode will allow you to rotate the object
along the three axis. So if I wanted to rotate around the X axis, I
would use this red one. And then if I wanted to maneuver orient it around
the yellow axis, I would use the yellow
one, and then blue, of course, is the Z axis. And one thing you'll
notice, as well, when you hover over
these buttons, you'll see that there
are hot keys that it is displaying that will allow you to get extra
functionality out of it. So, for example, if
we were to hold down the control and then we were to attempt to
rotate this thing, it would snap to the grid. So as you can see, it's
not smoothly rotating. It's jumping from
point to point. And that's a bit more obvious if we were to go back
to move mode because each one of these
grid intersections is a coordinate on the grid. So if I hold down control
and now move this here, you'll see that it snaps to the center of
that point there, which is 000 negative one, I'm guessing, in
the Z direction. Yeah, well, zero,
zero, one, actually, because positive Z
is going towards you and negative Z is going
back into the horizon. We. But as you can see, it's snapping to the
individual grid locations here, whole numbers. And you can, of course,
change that snapping. Well, not there,
but you can change that snapping under
your editor settings. That's not it. Alright,
let's go back. And finally, we have scale, and scale is kind of odd because scale changes the size of an object in a
particular way. So right now, all three
of these are locked. So if I change one
of them, it's going to change the other
ones as well, which means that it's going to uniformly scale in
all directions. If I unlink them by
clicking this button here, then I can change each
of them individually, which means I can stretch or squish along any
particular axis. Now, the problem here is that these values modify the
values defined here. So if I say that my cube
was one by one by one, and then I scale it in the X, Y, and Z directions such that it's two and two, Oh,
that didn't work. And that's because
I should have done that before I linked
to them again. What is happening is that
it's taking that one by one by one and blowing it up by this factor so that it's
actually two by two by two. Now, if I were to change this
so that it was X is two, it's now functionally
going to be four. S one, two, three, or one, two, three, four, because it's multiplying the original base size of the
object by the scale value. And this gets confusing because scaling objects
can break the physics because the physics
calculations think the object is one size when
it looks like it's another. But generally,
what you would use scaling for is to fix an object that was not set to the correct scale
when it was being created in blender or whatever. Generally speaking, when
you make an object, you want it to be at its correct
scale within worldspace. So these worldspace coordinates that we see here in the position
and so on and so forth, these are all in meters, but
it's completely arbitrary. We could easily look at them as feet or yards or whatever. The computer doesn't
care one way or another. It just knows that
this value is one, and that's all that it is. But when we create the objects
in our modeling software, for example, you need
a frame of reference. So, for example, a human is what 1.5 meters
tall, give or take. I'm sorry. I'm from the US, so there's these crazy
metrics values are, you know, we're not
familiar with them. But let's just say that
a human was 1.6 meters tall and that a jet was
like 10 meters long. Well, if you were modeling a
human and a jet in blender, you would want to make
sure that the human was 1.6 meters long, and the jet was actually 10 meters long so
that you'd be able to put the human in the jet and everything would
be the right size. Let's say that for
whatever reason, the modeler created the
jet at a different scale, maybe it was supposed to be a miniature or
something like that, and then you needed to use
it as a full size jet, and then you imported the
two of them together, and the person is infinitely
bigger than the jet, you would want to either scale the human down or
scale the jet up, and hopefully the physics
would not break yeah, that is generally why
you would use scaling. Most of the time, though, you're going to leave scaling at one and then change change the
size of your primitives. At least that's what
we're going to be doing. It's the least
confusing of the bunch. So, respectively, here
is our rotate buttons, and then we also have
our scale buttons, our scale button up here. So we would be able to scale this way, like we
were doing there. And then, of course, the
rectangles work the same way. It's just instead of moving it, it's going to be scaling it. So, yeah, that is
how to manipulate the basics orientation and whatnot of a three D
object in three D space. And in our next lesson, we're going to
look at materials, and then we are
going to construct a tank and start moving the tank around using the stuff that we learned here. So I
will see you there.
7. Materials: Welcome back. In this lesson, we are going to
take a brief look at the basic functionality
of a meshes material. Material is a resource
that basically defines a lot of different aspects of how the object looks
from its texturing, to its lighting, to its transparency to
a bunch of things. Dough will allow a bunch of different effects
that normally you would have to use a
shader to create. But because of the powers of their materials, you don't
have to worry about it. So let us add a
material to our object, and we can simply click on the mesh to open up
the mesh's properties. And about halfway down, you will see the material drop down, and we're going to create a new standard material
three D. As you can see, there's three different
types of materials. Shader material will require
you to write a shader to specifically handle how you want the object
to be rendered, and that is way beyond the scope of what we're
going to do here. So let's go with a
standard material three D, and now you can see that our
block has changed slightly, and that's because
of the default settings of the material. So if we click once
on the material, the materials drop
down will expand. And wow, there's a
lot of stuff in here. So the first and most
important one that we should look at is the
albedo or albedo. I don't exactly know
how that's pronounced. But the Albedo controls both the texture as well as
the color of the object. So our object is completely
untextured, as you can see. And if we want to
change the color, we can click once on the color. And then as we change
it, you can see the color of the object
changing in our window. We're going to
reset that. We can also add a texture
to the object. So let's grab our icon dot
SVG and throw it over there. And now you can see that
your object is textured, although the scaling
is not particularly good because this texture was not made for this
object in mind. We could fix that by opening the UV and changing the scale. So we'll do that just
to see how it works. And I believe that Yeah. It looks like it's Whoops. It looks like it's going
to be two and two. Maybe not. Try
three. There we go. So UV refers to
the coordinates of the texture as it's looked up and projected
onto the object. UV coordinates start from zero, and then they go
to one all the way at the far corner
of the texture. And depending on where on the face of the texture
we are attempting to render, Godot will look up the pixel at that point and then
project it onto here. But again, since this
texture was not properly mapped in blender or
wherever to this image, we had to adjust that down
here to get it to fit. So we can remove that simply by hitting our
friend the circular arrow, and then we'll go up here
and we will clear it. Actually, let's put
it back for a second. Because you can tint it by changing the
albedo color as well. So between those two things, you can get a nice
amount of control over how your object
actually looks. So what Gadot actually does
is it takes the texture, and then it tints it
based on the color. So if you just want
the actual color, you'll leave that as white. So let's clear this out again. And the next one that is interesting to
us is transparency. So if you want a object
that is semi transparent, you can change it you can change it from disabled to one
of these different values. Alpha is the most
straightforward. Now, of course, it's
not going to look any different because our
albedo is fully opaque. So if we go back and we expand our albedo and then
we change the Alpha, which is the transparency, now you can see
that the object is getting more transparent and
we can actually see through. I'll change that back. Another interesting
one is metallic and its corresponding roughness. So these two will
allow you to make the object look more
metallic, hence the name. And then the roughness will determine how well,
rough the object is. And in so doing, determine how much light is actually coming
off of the thing. We're not getting a
completely accurate picture of the settings with our cube, and that's partially because
of the environment lighting, which we are definitely going to change in a future lesson. But if you want to see what
it's supposed to look like, all else being equal, you can look at the preview
at the top of the material, and it will show you the
results of the settings. So if we were to
change this albedo, let's say to slightly
dark or gray, and if we move the metallic
down well, metallic is good. We'll move the specular down a little bit and the roughness down a bit more. That
don't look good. So, yeah, as you can see, changing these values will change the look of your object, and it'll look especially interesting once we actually start getting lighting involved. Another one that we're
going to be using eventually is emission, and emission will allow the object to emit
color and glow. So if we enable it, and then we change the
emission color to say green, now the object is glowing green, and if we change the
energy multiplier, now it is really glowing. And we have a bunch of other
interesting settings as well that we're going to go into more depth later on when we
decide to pretty up our game. So what we're going to be doing in the next lesson is we're going to be building the player controlled tank
out of primitives, and we're going to be
using the albedo and the metallics and the roughness to make it look halfway decent. And then in later lessons, we're going to revisit some of these material settings and add textures and bump maps and all that goodness in order to make our game
look really good. Feel free to play
with these values. There basically is no way
for you to break them. And then, you know,
worst comes to worst. You just go back up to
material and say, clear, and then you'll get
back to no material, and then you can start again. So let us move on to the
next lesson where I'm going to walk you through building our tank and prettying
it up a bit, and then we'll create the world, and we'll move around in
the world. See you there.
8. Building Complex Objects Out of Primitives: the Tank: Welcome back. What we're going to do now is we are going to flex our newfound primitive
manipulation skills, and we are going to build all of the components out of primitives that we are
going to use in our game. This is generally not what you would do for a
professional product. You would usually have an art
team that would be creating your meshes and whatnot
for you to import, and we will be looking at
that later in the course, importing some better looking
models to use in our game. But when it comes to prototyping and just getting stuff
up and running so that you can see it
working or just to have something in place
so that you can start coding your
movement script, for example, this sort
of thing is invaluable. Also, if you are
actually going for an extremely retro
low poly look, you may actually want to build your stuff like
this in the first place. So ultimately, in this lesson, what we are going to do is we are going to build our tank, and then in our next lesson, we are going to build the
playfield and also look at saving off individual
scenes to duplicate objects. So let us get started here
with a new three D scene. So simply click
on three D scene, and that will give
you a node three D. And this node three D is basically an empty node that is purely a position
in three D space, as we've already
seen, represented by our transform object over
here in the inspector. We are going to rename it, so click on it
once to select it, and then click on it again, or you can right click
on it and select rename, and we're going to name it Tank. And we are eventually
in future lessons, going to duplicate this
tank to make our enemies. So and also, it's just a
good idea to save your work. So why don't we
select Save Scene, and we'll put it in the root
of our resource folder, which means it's going to go
in the root of our project, and we will just select Save, and that will give
us our tank scene. Now, if you see this error
message here, don't panic. This is a bug and
Gadot that has been there since sometime in
the four dot two era, and it doesn't look like
it's been fixed yet. Again, as of the time
of this recording, we are in 43 stable. So, again, if you see this
error, just ignore it. It doesn't actually
affect anything, and it will be fixed eventually. Knock on oh, we are going to use a grouping of mesh instance
three Ds to build our tank. So the first thing
we're going to do is we're going to right
click on Tank, and we're going to
do Adhild node. And we are extensively
going to be working with the Mesh
instance three D node here. Also note that once you've got this create new
node window open, you can actually search if you
know the name of the node. Otherwise, you can simply expand the node trees until
you get what you want. The bulk of what we're going
to be working with is in the node three D
branch, so to speak. Least until we work on or
at least until we start building our user interface and start working with
sound and stuff like that. But anyway, right now,
we'll just click on mesh three D, and we'll
create a new one. And now that we've
got a mesh three D, we can add a new primitive. So we're going to drop
down that folder, and we need a new box mesh, and there it is, our
good friend the cube. Now thing we're going to do is this cube is going to be
the center of our tank. So I am going to give
it a new material, a new standard material three D, and I'm going to
change it to gray. So expand the albedo,
click on color, drag the thing down a
little bit until we get something nice and gray
looking, and there we go. Generally, what you want
to do when you're going to change the size of these
primitives is you're almost always going to
be working directly in the inspector because Gadot
at least as far as I know, does not have any tools for
directly stretching and squashing the objects
within the window. So let's go here and
we'll say that it is now a 0.5 still let's make it 0.25. Now, what I'm doing here
is purely artistic. Ultimately, what
I'm going to do is cobble a bunch of
these primitives together so that they
resemble a tank. Feel free to change
any of this stuff, change the colors, change
the change the proportions, make your tank look
however you want. There's only a couple
of things that you're going to need to do the exact
same way that I did them, and that is mostly when it
comes to parenting the turret, and we'll deal with that
when we get to that point. So this is going to be
0.25 meters in height, and let's say it's going to
be Whoa, that's too big. It's also in the
wrong direction. Let's say, 3 meters
give or take, or do we want five?
Yeah, good question. Alright, let's go with three and see where the wind takes us. And 1 meter wide is fine. Now, in order to make the
bottom half of the tank, you might be tempted
to simply do Control D and
duplicate your mesh, drag it down here, and then
start manipulating it. But you would have a problem. Because since you duplicated
the existing node, these nodes share the
same mesh resource. It will not duplicate the
mesh resource itself. So if you were to change this
now, let's make this five, it's going to change
both of them because they're operating off
of the same mesh. So what you want to do here
is you want to change. So you'll go to the
drop down for the mesh, and you'll select Make Unique. And that will allow you to change this mesh without
affecting the existing mesh. And we are going to do that. So we're actually going to reset all these so that
is a cube again, and we are going to change the material color because
now we want it to be green. And we have the exact same
problem because, again, it's sharing the
material, so we want to change this and make
this unique, as well. And now if we change
the albedo color, we should have There we go. Now we can get a nice
green without it affecting anything else.
Click that once to close. Alright, so the
width is the same, and we are going to make
the Y at half a meter. And what you can do
here is you can use the arrows to change
the orientation, and you can click on
this thing to give you the orthogonal views
so that you can align things about as perfectly as you're
going to get them. But you can also do it
through the transform. By punching in the
numbers directly. And for the most part,
that's what I tend to do because I know how big the
things I'm making are. So in this case, we've got the Y is a half
a meter in height, so that means from zero to the bottom is
going to be 0.25. So if I change this to 0.25, that should align
it incorrectly. And that's because, right. Well, make it 0.5, and that's
also going to be wrong. Is it zero point Okay, well, it serves me right for trying to
do math in my head. Alright, we'll just
drag this here. And if you zoom in far enough, you can see that it's about as close as it's gonna matter. I'm also going to mention in
one of the reasons why you would not want to do
this for an actual game, although in our case, since
our game is low poly enough, it's not really going
to affect anything is you're going to have
issues with optimization. So, for example, once
we finish our tank, we're never going
to see this face of this cube because it's going to be hidden by the bottom
half of the tank. And likewise, we're
never going to see the top of this green cube because it's going
to be hidden by this gray block, as well. And even though we're
never going to see them. Gadot is still going to
attempt to render them. So what we're going to
be having happen is Godot is going to be rendering a bunch of stuff that
we never actually see, which is not going to
cause a performance drop in our case because our game is so low poly that
it doesn't matter. But you would ultimately want
to build these meshes in an external program
like blender such that these invisible faces are just not part of
the model at all. But again, all we're doing is prototyping, so this
is perfectly fine. So we'll just shift this back a bit to make it
look kind of cool. And then we will duplicate this mesh and we'll move
it back a little farther. And what we're going to do here is we are actually going to change the mesh to a prism, and we are going to give
it its own material, again, new standard material. We want it to have
the same color as the other materials, though. So we're going to expand this. We're going to go to Albedo. And then when we
click on the color, now we have a little eyedropper. So if we click on the
eyedropper and we go here, we can get the exact same color, which means that now these
two things are matching. So one of the handy settings for the prism is
this left to right, which allows you to skew
the top of the triangle. So if we set it to zero, that is going to be a
perfectly right triangle. And now we want to spin this fella around so
that it looks like this. And let's make sure that
the transform is correct. So this is off a little bit. So we want it to be 180
even, and there we go. And now we're going
to need this to be the same height
as this one here. So the height is one
half in the Y direction. So we'll change this to one
half in the Y direction. And we want it to be not quite as wide in the
X direction as well. So let's make that 0.5. And we can bring this in, and it's still it's
not that it's too big. It's that the other
one is too far over. So if we move that
there, and then we click on this and
move this over here, looks pretty good, although
we've got to bump them up a little bit in terms
of the transform. Still haven't quite
figured out what that Y position is
supposed to be. Zero, 3.75 maybe. That
looks pretty good. And then this mesh needs
to be over slightly. Should be 0.5, negative 0.5. There we go. That
looks pretty good. Although I would
like to know, okay, this material is actually
looks like it's too dark. So we want them to be the same. So we'll open this
and the albedo. Alright, there's that hex, and then we look at this one. We go here, the albedo. Yeah, they are
different numbers. So we'll copy this one. Wait? No. Are they
the same number? Copy that one. Go here. No, they're not the same color. I don't know what I was I don't
know what happened there. It's probably because of
the lighting, actually. Okay, there we go.
That is perfect. Now, we're going to
take this one here and we are going
to duplicate it, and we are going to spin it around and use it for
the other part here. So once again, we'll
expand the mesh. We will expand the transform. We transform we will change
the Y needs to be 180 now. So now we've rotated that. We want that there, and this
one is going to be 2.5 ish? No, well, I made
the same mistake I made before. I need
to make it unique. There we go. And what was
that T two is too much. 1.5. Looks pretty good. Move that over. 0.75. Cool. Alright, so this is the
bottom of our tank, and it's looking pretty good. Now we're going to
duplicate these three. So we select one by
left clicking on it, and then we shift left click
to get all three of them. And then we can duplicate them. And then we can rotate
them along the X axis. So let's go 180 degrees, and now we move them upward. What was the negative
value of that one? So we can copy this. And once we've selected
all three of these, we can actually modify all of their positions
at the same time. And we need to reverse the
sign there. Boom. Perfect. Okay, so let's hit Controls, make sure we save our
work in case our computer explodes because we don't want to have to do that
all over again. And now we are going
to make the turret. But before we do, it would be a good idea to group
these as the body. So we are going to add another
child node to the tank, and this one is just going
to be a node three D. We're going to call it body. And we are going to move. We're going to select all these, and we're going to move them. We're going to drag
them down here to reparnt them under the body. And that means that
now if we need to manipulate the entire
body in any way, shape, or form later
on, we can do that. But we are more concerned with doing something similar
for the turret. So let's create
another node three D, let's call it turret. And this time,
we're going to add another mesh instance three D, and this one is going
to be a tube trail, which is an oddly named mesh. But what it is is it's a
kind of sort of a cylinder, but you can change the number
of sides on the cylinder. So if we make it, say, six,
we now have a hexagon. If we make it 12, we've got a whatever that thing is a dodecahedron,
I think they're called. So we'll move that
back down to six, and then we will once
again grab the color well, you know, we don't
actually have to do. So I will show you how to copy the entire material in a
moment. So we will take this. We will change the
radius to 0.125, which is too small. Let's say 0.25. That's better. And then we
will change the height, which is technically the So if we change the
number of sections, yes. So there is and we can
actually verify this, and I'll show you in a moment.
So let's move this up. And if we go to view,
Okay, it's not under view. It is under the No, it's not under the three dots. Where was that thing? Okay, it was over here and under.
These three dots. If we go here and we
change from display normal to display wireframe, boom. Now we can see the and
I'll re center this. You can see the polygons, the triangles that make
up your primitive. So in this case, what we've got here is we've got two sections, which is the top and
the bottom half, and each section
has multiple rings. So if I change
these down to that, now we've only got two
sections, two rings, rather. So this is a way of reducing the number of sections
in your thing. And for some reason, it
won't let me do one section. It requires two regardless. And we can actually
change the shape of this thing using the curves, but we're not going to do that. So the section length is good. And actually, no,
let's bring that down. To 1.25 that should flatten it. Yeah, there we go.
Okay, so we take this. So here's the turret. And Alright, I'll put this
back into normal mode. Boom. So what we've got
here is we've got the turrets original
root node is here, but then we moved to the
mesh instance up here. So we actually want to
change the mesh instances transform to be zero, zero, so that they're centered, so that it's centered exactly where the turret
is supposed to be. And now we'll move this
back and we'll move it down so that it is right up against The body as close as we can make it because we don't want any light
peeking through the bottom. We go to one of these body
segments, not that one. We go to one of
these body segments. We can now copy the material and go here and
then paste the material. And now we don't have to worry
about screwing around with the eyedropper and make sure we get the colors
right or anything. So paste, boom, there it is. And now we're going
to make another one of these for the barrel. So this time, we're
going to use a cylinder, and we are going to rotate it. And we can rotate it
like this, as well. So if we do this,
we'll go like that. Now, ideally, so this rotation is going to change when
we play the game. We're going to make it
so that we can raise and lower the barrel. But for now, we want it to
be nice even 90 degrees. Open the mesh. Paste
the material again. We are going to change the Whoa. Alright, so the heights. Let's make it 1.5. And we will change the top
and the bottom radius. So as you can see, if I
change the top radius, it actually kind of
turns it into a cone. Alright, so let us actually
let's make it 0.120 0.1. Yeah, 0.1. Looks pretty good. Now we simply drag this fella along
here until it is, once again, as flesh as we
can make it with the turret. And if it goes inside a
little bit, that's okay. It doesn't have to be perfect. It's just we want to get
it as good as we can. Alright. Looks pretty groovy. I don't know. I still
feel like that's too big. Let's make it 0.05. There we go. I like that. And now let's add a muzzle. And the muzzle is basically going to be the
same as this thing, so we can duplicate it. And we're going to make the mesh unique again so that
we can modify it. We're going to change
the transform. Uh, we're gonna give
it a rotation of 90. What just happened? Hmm. Interesting. I don't
know where that went. Alright, position is zero, zero. Alright, you know
what? I'm going to just delete that
and do it again. Alright, we're gonna do
this the old fashioned way. We'll just add another mesh
instance three D. We will give it a tube trail. Once again, we will paste
in the correct material. We'll change the radius to, let's say, 2.5 for now. We'll change it momentarily. Sections. We will
reduce them again. Radial steps down to six. And then transform 90. Oh, I see what I did last time. Alright, I see my problem. Instead of changing the rotation,
I changed the position, so it put it at 90, which was off the camera. Alright. Clearly, I
need another cup of coffee before I attempt
to teach today. So, let us move this out here. Now, as you can see, obviously, that is way too big, although it might be cool to some people. But I am going to move that there and then change
the radius again. So let's make the radius zero, one. That looks a lot better. Okay, now we have a tank, and it is a good looking tank. And the reason that we did the turret this
way is because we want a central point for the turret to be able
to maneuver around. So since the turret
is centered here, normally, so let's look
at the barrel here. Normally, if I were to
rotate this barrel, well, let's rotate it you can see that it's rotating around the center
point of the mesh, and there is no way to
change the anchor point of the mesh itself such that Gadot would consider this to be the
center of the mesh. It's always going to be here. So that is why we
use a node three D as basically the anchor point of the entire object because
now if I rotate the node, the tankar rotates
exactly as it should. And now that I think about it, we're going to have to do
something similar to be able to rotate the turret itself.
So let's do that now. We'll add another child, which is a node three D, and this one will be turrets rotation or rather
barrel anchor point. And then we take the
two barrel pieces, and we drag them down
here so that they are parented to the
barrel anchor point. And now if I rotate this, the barrel can
rotate up and down. Although, since we did that and the barrel is
in the center here, what we actually want to do is move this down a little bit. Alright, we'll change that. And of course, the barrels
are offset incorrectly now, so we'll deal with this. We'll adjust it just a
little bit like that. Now these two under here. And again, you can
select both things at once so that you can
move them together. Now we've got that right there. And now we are now if
we rotate the barrel, the barrel rotates fine, although we should
actually move it inside just a little bit so that we don't see that
seam. So there it is. And we're eventually going to want to lock the barrel rotation so that it doesn't go
through the bottom of the tank, but there it is. Alright. Control S again. We have a tank. There is
only one more problem, and that is that we want the
base we want the origin, the root anchor point position of the tank to be on the ground. So since that is why we created our body parts parented
to a tank node, because now all we have
to do is move these up. Oh, let's do it in
the position here. We move these up So now the tank offset
is at the base here, and that's exactly
where we want it to be. Alright, that was a lot. If you want to continue
practicing with maneuvering around the
Gado three D space and manipulating
mesh primitives, feel free to either change your tank around or
add more pieces to it. Otherwise, I will see you
in the next lesson where we are going to build the
playfield. See you there.
9. Building the Playfield: Welcome back. In this lesson, we are going to build the playfield so that
we have something for the tanks and
their enemies to run around and we're going
to create a new scene, so we can go under
scene and a new scene. And again, it's going
to be a three D scene, so a node three D. And we're
going to rename this one, and we're going to call it arena or playfield or battle
ground or whatever you want. Then we will add a mesh instance
three D. And once again, we will give it a box mesh. Although, in this case, you
could also use a plane mesh. Although in my experience, I found sometimes
that the planes don't actually register
collision correctly. Sometimes Gado's physics
gets a little wacky. So we go with a box mesh, and we're going to
change it in X and the Y directions to 100. Well, not the Y direction,
the Z direction, rather. And we can thin it out a
little bit, make it 0.5. Not that that really matters. And then once again,
a new material, and this one is going to be brownish. There we go. We have a playfield.
Now let's give our playfield a
little bit of color by adding some trees and some hills and some
rocks, as well. So we'll add a new mesh
instance. Actually, no. We will add a new node three D, and we will call it tree. Okay, come on. Right
click. There we go. And this tree is, again, going to be a pair
of mesh instances. So the first mess
instant mesh instance, it's not an easy word to say. Mesh instance is going
to be a cylinder. And that cylinder is going to be a dark brown to be
the tree trunk. And we will make it. Well, the radius is fine
and we'll make it 3 meters. I'll slide this up
here such that it is flush with the ground. And we will also add
a sphere on top. So another mesh instance, this one will be a sphere mesh, and the material will be green Now, of course, this
sphere is way too small, so we will collapse
the material, and then we'll go to radius,
and we'll make it, say, two, and the height
will also be two. And at this point, you can kind of make
them however you want. So if I were to make this five, it would look like this,
which is pretty cool. I originally made them
perfectly spherical, which also works, although
now that I think about it, I kind of like this
a little better. So we'll do that. And
we will once again make sure Alright, now
we have a tree. Now, we want the trees. We want to be able to use the
tree as basically a prefab such that we can copy and paste and place as
many trees as we want. But in order to do that, we need a way of
commonly referring to every tree because let's say that we copy we
just did Control D, and we copy and paste a
bunch of these trees. And then, for some reason later, we decided we wanted the tree trunk to be
blue, for example. Well, we would have to go
back and we would have to change all of those
trees manually. And if we put 100 trees
in our playfield, that would be a lot of work. So we're just going to right click and select
Save branch as SN. And then it's already so it automatically defaults the file name to the name of the node. So we'll be fine here. We'll just hit tree
and once again, ignore that parsing error. It just never goes away. And now we've got a tree. So if we wanted to, we
can now drag more trees into our scene, and
we have two trees. So I'll do that a
couple of times. And you can make a veritable
forest if you want, but I'm just going
to put three here. And we're going to do the
same thing and make a hill. And it's not gonna be the
greatest looking hill in the world because of the
limitations of our meshes, but we're going to make a prism, and we are going to make it big. And we are going
to make it brown. Make it a little bit more
brown than the playfield. And we should rename
this to Hill. Now that we've got this,
we can close the material, and we can change the transform because
we want to rotate it. And then we'll even that
out to negative 120. And we will even that
out to negative 120. Which actually isn't
entirely correct, but it doesn't really. Negative 115, it looks like. No. Interesting. Okay, regardless,
we now have a hill, which is still not big enough. Let's make it seven all around. And this is just purely
personal taste here. There's no amazing yes or no. This is why this needs to
be this size kind of thing. I'm just doing it because that's kind of
what I want it to be. You can easily change
these yourself. And also, given the fact that the hills are literally just
like triangles, they don't need to be super detailed for the purposes
of our prototype here, but you can easily add more mesh instances to the hills and make
them look rockier. But we'll just put
this over here. And once again, we will
right click Save as seen. And now we have a hill, so
we'll add another hill. And we can easily make a rock
by doing the same thing. So I hit right click and duplicate and we'll
call this one rock. And we will save that
branch as a scene. Alright, there was
an error message there. Save branch of scene. What was the error
message? The error message was can save the branch of an
already instantiated scene. To create a variation
of a scene, you can make an inherited scene based on the instantiated scene. So we don't want to do that. So I guess we'll just
make the rock manually. We will be looking
at instantiated scenes in a future lesson. So for now, we'll just
go back to Arena. Child Node instance
three D. Rock. And let's make the rocks
slightly different. We will make the rocks
as a as a sphere, but they'll be small
and they'll be half buried in the half
buried in the ground. Albedo is gray. And let's make the radius 0.75. And we will also save the
rock as its own scene rock. And we'll hit Control D
to duplicate the rocks a few times and we'll
move some around. So now we have our arena, and the hills are kind of off, so it's actually a good
thing that we made a scene out of them so I can
show you how to adjust this. So let's take a look at's
double clicking doesn't work. Alright, let's move over here. And So what we can do is if we double click on this little icon
that says Open Editor, we can open the Hill
scene in the editor. But and in so doing, we can edit the scene, and then all of the other scenes will update to take
this into account. So let's take a look here. We've got our transform,
which is odd. Keep losing track of it. Okay, so let's actually bring the red forward. There we go. Okay, well, instead of
screwing with this, the easiest way to fix it
is to simply move this down a little bit so that the bottom is clipped off by the terrain. So now if we save this and we go back to Oh, we
never saved our arena. We better do that
scene, save Arena. A Hmm. Okay. No. We still have
that, is that correct? Okay, yeah, it's
just the shadow, no. Right there. Okay, now the hills are
properly flush with the arena. And again, you'll
notice that we changed the Y position of the hill directly within the
hill scene itself, and then both of the
hills were automatically updated when we saved it and
went back to our main level. Okay. Oh, this is our level
as amazing as it looks. And if you would
like to continue to practice creating scenes and putting prefabs into the level, why don't you
spruce it up a bit? A good thing to do would
probably be to close off this border with hills so that when we eventually
implement collision in physics, the tank does not fall off
the edge of the world. In our next lesson, we are
going to add a camera, and then after that,
we're going to get to the good stuff. So I
will see you there.
10. The Camera3D Node: In this lesson, we are going to take all the scenes that
we've initially created, and not only are we going to assemble them into
a master scene, but we are going to look at the camera node and how it is essential to bring your
three D games to life. So we've got our tanks. We've got our rocks. We've got everything that we built
in the previous lesson. Now, if we were to
attempt to run our game, we wouldn't get anything
particularly impressive. So let's do that. First problem we have
is that we haven't defined what Godot
calls the main scene. So as I mentioned before, everything in Gadot is a scene, and Godot needs to know what the default root scene is that it's going to load and run
when we start the game. So for now, let's simply
make it the arena. So if you try to run the game without having set
a default scene, Godot is going to give you
this dialogue which says, No main scene has been defined. Select one. And if we say select current since the arena
is our current scene, that is the scene that
Gadot is going to load when the game starts.
And we get nothing. And the reason we get
nothing is that we are playing in a
three D environment, and Godot cannot render a three D environment
without a camera. So as you may have guessed, a camera in Godot is a node. And we want to attach the
camera to our player. So let's go back
to our tank scene, and we're going to do a
right click Add child node. And what we want is camera three D. Now notice that
in a lot of cases, there are also two D versions of the same nodes that
we're working in. And this is for flat two D
sprite based environments. So if you were doing a a Bitmap
based side scrolling game or an old school Japanese RPG, you'd be using Camera
two D or two D nodes. But since we're working entirely in three
D in this course, we only want the
nodes for three D, at least until we get to
the user interface portion. So we will select Camera
three D, and we will add it. And now we have a camera
attached to our tank. And you can see now
that we have a camera, in fact, let me delete it so
you can see the difference. It was a little bit subtle. So now that the camera is
gone, we see nothing here. And now if we add
a camera again, we now have the option to preview our camera
in the front window. So if we click this or
the main window, rather. So if we click this, now
we can see what we've got. And, of course, it
looks like garbage because we haven't properly
aligned our camera. So let's do that.
We'll uncheck this. But actually, rather
than uncheck this, let us go back up to view, and now we'll go
to two view ports. And as you can see,
our top view port is what you can
see in the camera, and our bottom viewport is the same three D view
that we had before. So we can use this bottom view to orient our camera and we can see it updated in real time what our camera is actually seeing. So let's drag our camera up because a camera is
just a three D node, same as the other ones
we've been working with. So we can manipulate
it in the same way. So let's rotate it
around to the front, and I'm going to fine
tune that a little bit to make it equal
to negative 90. And I'm going to drag
it back slightly. And we'll move it up a bit, and then we will tilt
it slightly downward so that we can see our tank
in all of its glory. And of course, the camera has a various group of settings that we will be
playing with in future lessons. The most important of which
is the environment setting. But you can also change the
camera's field of view, and it's near and
far clipping planes, which most of the time you
don't really want to do. You'll notice that if
you set it too close, that the tank eventually disappears because the
camera what the near and far clipping plane
determine is where the camera starts rendering and where the camera
ends rendering. And that's a three D
volume in and of itself. So anything in that
volume will get rendered. So let's reset those again. And this is also an
extremely important setting, and we'll determine which camera is actually being rendered. So it is possible, you may have seen this
in other three D games to have multiple cameras,
multiple camera views. And one of the ways to
do that is to simply manually force the camera
into a different orientation. But a more common way is to
simply have multiple cameras and let you only view the image seen by
one of them at a time. So if we had two cameras, and we might let me I'll
add a second camera, and we'll see this in real time. So duplicate. And the second camera, let's move it over. Well, let's go like that,
and we'll do a preview, and of course, we see
nothing interesting. So if we go back here, it
is the current camera. And then if we go here, we can change this to
the current camera. Now that's not going to change
anything here because we are automatically
previewing our main camera. So this doesn't actually
update properly. That may be a bug,
I may be doing something wrong. I have
no way of knowing. But if we now go
and run our scene, we're going to get nothing again because I
didn't change it. So this is actually a good
opportunity to tell you how to change scene your
default scene in Gado So if we go to
project settings, and if we go to run, you can
see the main scene property. So we can change this, and we currently have it set to Ana, which has no camera in it. And if we change it to tank, which has the camera,
now if we run the game, we will see our tank in
all its unlit glory, and we are seeing the view from our initial camera because
it's the first camera, so it's the default
because neither of our cameras are
set to current. If we set the second
camera to current, and then we run the scene again, we should see the view
out of the second camera. And there it is. So, of course, this doesn't do us any good because all
we see is the tank. And this is because the tank is not currently in the arena. So let's go back to the arena. Now, we could drag the tank
directly into the arena, and there really isn't
anything wrong with that, but I like to keep my structures separate
and hierarchical, which is a word that is
not easy to pronounce. So we're going to create a
new scene, and once again, it is going to be
a node three D, and this one we're
going to call game. And the game, as
you may imagine, is going to include the arena, and all we had to do was drag it in because we
already created it, and then we'll just
drag in a tank. And now if we save
our game as a scene, and the first swing
we're going to do is we're going
to clean this up a little bit and remove
this badly oriented camera. And now that we've
done that, Gadot will default back
to this camera, but we'll set it
to current anyway just to keep things consistent. And now if we go
back to our project and we change the current scene from tank or the default scene from current game to tank, no, if we go back and we change the default scene
from tank to game, and then we close that
now if we run our game, we should see everything
that we would expect to see. And we do. Now, of course, we haven't put any lighting or anything like that
into the environment. So, of course, it's
completely dark. We have no skybox,
none of that stuff. But rest assured we will be prettying up our game
very, very shortly. But before we do
that, we need to learn a little bit
about vectors and how to organize some of this stuff so that
we can actually move around in this game world. And at that point, we'll need
to see what we're doing. So then we'll look
at environments and lighting. I
will see you there.
11. Vectors: Welcome back. In this lesson, we are going to take a look at the mathematical concept
known as a vector. And the reason we are going
to do this is because vectors are used constantly, heavily and everywhere
in video games, especially when it comes
to three D environments. And since we're working
solely in three D, and we're going to be doing
a lot of physics work and moving objects
around in three D space, it's a good concept to know. So I have set up a
two D node here, and the reason I've
done that is that it is slightly easier to illustrate vector concepts in two D than it is in three D, but the math and the concepts
are all exactly the same. So if you understand one,
you understand the other. We have already been
working a little bit with vectors,
as you can imagine, under the transform
property of our nodes, and let's go back to our tank, and we can see that a
little more correctly. We have the position,
the rotation, and the scale values, and these are all vectors. A vector is a
mathematical concept that is defined by a direction
and a magnitude. And magnitude is
simply a fancy way of saying how long that vector is. So if we go back to
two D and we go back to this blank node that I created, I will be
able to show you that. Now, what I've done
with the grid here is I have turned on the grid itself by pressing well, actually, I didn't press
anything to do that. But if you press this button
here to do grid snapping, and then if you go under
the three dots and select configure Snap and make sure that
pixel Snap is set, then it will snap whatever
you're doing to the grid, as I showed before when
we were doing three D. And what I've
done is configure the snap to one pixel
for the grid step so that we can see the
coordinates much easier. So I'm going to add a child
node here called cast two D. And notice there is a
cast three D as well, but like I said, taking one dimension
out of the equation makes it a little easier
to conceptualize. But again, the math
is exactly the same. The only difference between cast two D and cast three D is that the cast two D does not have a Z component because
in two dimensions, we're only working in X and Y, but in three dimensions,
we're working in X, Y, and Z. So fortunately for us, a ray or a ray cast is a vector. So as you can see
here, it is an arrow. Now, you're going to if you were to throw one of these
into your game, you're not going to see
this arrow in your game. This is only for
editor display and debugging purposes so that you can actually see where
your vector is pointing. And it's a little bit off because there's a
value called target position, and that kind of
skirts around we're attempting what we're
attempting to show. But generally speaking, we treat all vectors as though
they start at zero, zero, even though
obviously for a ray cast, you can tell it to start
wherever you want. But mathematically speaking, it doesn't matter
whether a ray or whether a vector starts
at zero or starts at 34 16 or wherever else
we decide to put it. All the mathematics are
the same and assume that vectors start at the origin of whatever local space
they are originating in. And that is another thing that we should talk
about a little bit, and that is local space
versus global space. So as you can imagine, three D space and two
D space as well is broken up or at least the positions are
defined in coordinates. And we've been using coordinates
all along, for example, by telling our tank that it
is located at position 000. This is a set of
coordinates in local space. And now, local space
is relevant to the object that you're
working in or rather it is its own self
contained space. And then that space can be defined relative
to a larger space, which nine times out of
ten is global space. So, for example, in this case, if we assume that
our game node that we created in the previous
lesson is global space, and if its origin of 000 is the dead center of everything
that our game uses, and then we say that our tank, the entirety of our
tank is located at 7.34 relative to the
origin of global space. Well, since the tank has
its own local space, the tank's body is located
at 00 or actually, I don't think it is. Let's
check the transform. No, the Tank's body is located
at 0.626 in local space, which you would then add to the Tank's global
position to get the actual global
position of that object. So it's all hierarchical. You can drill down and have
multiple local spaces. So, for example, the
Tanks turret has its own local space because it has multiple
objects underneath it. So the tanks origin or the
turrets origin of zero, zero, the barrel is
actually its position is in reference to the tanks position and so on and so forth. All that is really
complicated, actually. But all that is basically a extremely fancy
way of saying that this 00 may actually be a different set of
coordinates in world space, but when it comes to
vector calculations, none of that matters. So, vectors will
have a magnitude, and what the magnitude is
is the length of this line. So let's change this such
that the endpoint is here. So for a ray cast,
which is a vector, the endpoint of the vector is indicated by the target
position parameter. And in this case, we have 56 by 24. So that is this coordinate here. It's 56 X and 24 Y. Now, the magnitude of the vector is the
length of this line, which is calculated
mathematically speaking, by the Pythagorean theorem, which is not easy to pronounce, because it forms a
right triangle here. Fortunately, we don't really
have to care about that because Gadot provides us with vector classes for
GD script that will calculate everything you could possibly want to
calculate for a vector. You can calculate its magnitude. You can calculate things
like dot products. You can add them
and subtract them, which we'll look at in a moment. But it's a good idea to know these concepts at least on a basic level so
that you can be like, Oh, in order to do
this with a vector, I need to do these two
particular things, and we'll look at a few of
those things in a moment. But right now we're
just talking a little bit about vocabulary. So the coordinates are the point of the vector relative to the
origin of the vector, and then the magnitude of the vector is the
length of this line. Now, obviously, the magnitude we can use to do all
sorts of neat things, for example, if we wanted
to find the distance between two objects
in our game world, if we assumed that
one of the objects was the origin of the vector, and then the location
of the second object in world space was the
endpoint of the vector. If we calculated the
magnitude of the vector, then we would know
the distance in meters of the objects
between one another. And we're going to look at
that a little bit when we talk about targeting and firing
bullets in a later lesson. So let us add a second ray cast. And we'll move the
first one down here. And actually, we'll make
them a little bit smaller. But anyway, we'll go down to
this one and to that one. Now, vectors, before we move on, a vector with a magnitude of one is called a
normalized vector. And we use normalized vectors
a lot in input reading and also anywhere that we
don't want the vector to be, for lack of a better term, tainted by the length
of the vector. And we're going to look at that when we talk more about input. But since vectors are
mathematical structures, we can add them and subtract
them from one another. So I'm going to take this vector here and I'm going to add
it to this vector here. Now, visually speaking,
what that means is that, I should have left
that where it is. But anyway, visually speaking, when you add two vectors,
this is what you'll get. You'll take the first vector, and by adding the
second vector to it, you will be basically putting it on the very end
of the vector. And this new endpoint is the equivalent
of a third vector. Oops. Let's try that again. So we'll put this back at zero. And actually, let me
change this one so that it is slightly more clear. So if we add this
vector to this vector, we will functionally get
this vector because what you do is you add the coordinates
of the two endpoints. So this one is 24 32, and then if we add 016 to it, we get this third
value which is 24 32. And this is important
because when we and we're going
to see this in about two lessons when we
start moving our tank around, the way that we're
going to move our tank is that the tank's velocity or its speed is
represented by a vector, and we're going to
change that speed by adding more speed
to that vector. As a second vector. And
that'll be a little bit clearer when we actually
look at it mathematically. But this would be how
it is in visual space. Now, the other thing
that we'll take a quick look at is how
to subtract vectors. So if we were to take
this third vector here and subtract it
from the first vector, we're going to get the
equivalent of the second vector. And I'm going to
spin this around. Which would mean that it's a quick and dirty
way of figuring out how two objects
can face one another. So if we wanted to figure out the vector we wanted to
figure out the direction that something at this
position would need to look in in order to see
something at this position, you would subtract
the two vectors that represented
their positions. So vector math is a very
lengthy and complicated topic. But for now, all we really
need to know is that vectors are
represented by a point in three D space
or in two D space. And by either adding
or subtracting them or calculating the
length of the vector, you can get various properties or effect various things
in the game world. And like I said, in
a lesson or two, when we start moving
things around, you'll see how that
works in code.
12. The CharacterBody3D Node: Welcome back. In this lesson, we are finally going
to start diving into the things that make
our actual game, and we're going to start coding. But before we do, we're going to go out of
order a little bit, because if you recall, when you run your
game, it's dark. Now, we're going to
talk about lighting and environment in
a later lesson. But for now, we're going to look at a very
quick and dirty way to get the lighting
that we've got by default in this
scene into our game. And that is done under
the environment. So the three dots
next to these buttons here will bring up
the preview sun and the preview environment. And we like the way
it looks already, so we simply click
Add Sun to SN. And that Gadot will copy
all the settings that the current sun is showing in this preview window into a directional light node
and adding it to the arena. And now, if we start
our game, it's lit, although not as lit as
it could be because obviously we have no background light
from the environment. But again, we're going to
look at that later on. Right now, we just need
to see what we're doing. So, let's go back to our tank. Gadot will let you
attach scripts, which are mini programs
to any node in your game. And by the interaction of those scripts is
how you get a game. So we are going to
add we're going to click on the root
level of our tank, and we're going to go
to this button here, which is attach a new
or existing script. We are going to keep the
language as GD script, and it inherits node
three D. We are actually going to change
that in a moment. Yeah, let's do that now. Okay. So our tank is currently
a node three D, and up until now, this has been fine, but we
actually want to change this. So we're going to
right click and we're going to do change type. And we're going to change it
we're not going to do that. We're going to change it to a character body three D. Now, what is a character
body three D? A character body three D is
body a physics body three D, which is the base of all
physics based nodes in Gadot. And we want physics because we want to do things
like be able to move our characters around and
have them collide with one another and do physics. Now, since our tank
is going to be controlled by our scripts and by our controls
that the player uses. We don't want the tank to be
affected purely by physics. So we're going to use the
character body three D node, which is a node that
will only interact with the physics systems
in the way that the script that we attach
to it tells it to. And that doesn't make a heck
of a lot of sense right now, but stick with me and it'll be all clear in a few moments. So we change the
type of the tank to a character body two D
or character body three D, and we immediately
have a problem. Gadot is going to warn us that
this object has no shape, so it cannot collide
with other objects, and it can't interact
with other objects. And right now we don't
care about that. So we're just going to let Gadot continue to warn
us and complain, and we'll just ignore
it for the time being, and we'll deal with that later. So let's again, we'll attempt to attach a script to
Gado and now we can see that it inherits from character body three
D. This is because GD script is a object
oriented scripting language, which means that you can tell the objects in your
game like your tank, that it inherits behavior
from a different node. So what we're doing here
is we're telling Gadot that our tank is a
character body three D, but it's going to
have some extra stuff that we're going to add. So we want all of the behaviors and all
the code and all of everything that
the character body three D comes with by default, and then we're going
to add some additional functionality on top of it. And it's going to ask us, where do we want
to put our script? And I like to keep
things organized, so I am actually going to tell it to use a different folder. I like to put all my scripts
in their own folder. So we open, and then we created a new
folder called scripts, and now we're going
to put our tank script in that scripts folder. You can also do likewise
with the scenes. Usually, what I'll do
is I'll have a folder for scripts and another
folder for scenes. But, yeah, for now,
it's perfectly fine. We're actually not
going to have too many more scenes in this game, so that level of organization isn't
going to be necessary. But maybe I'll move things around once we
actually start adding sound effects and
textures and whatnot. Gadot is actually
smart enough that if you move in most cases, it's smart enough that if you move objects to
different folders, it will be able to update your scene tree and all the relevant links without you having to
manually update them. So you can move your stuff around all you want,
and it will not break. Okay. So now that we've
created this script, we have a blank script. And at the very top, we have the keyword extends
character body three D, and that is how Gudo knows
that our tank script, which is now attached
to our tank character, is going to inherit from character body three
D. We can, if we want, give it its own class name
so that within the game, we know it is of class type tank and then we
can refer to it as such. So yeah, let's do that. Now, I have the default
script template turned off. Normally, you're going to get a few extra comments and some default functions
defined for you, but we're going to redefine
them shortly anyway. And then in the future, you can either turn on the template or leave
it off either way. But yeah, this is how we start, and then we'll just hit Controls to make sure we
don't lose anything. And before we move on
to the next lesson and start talking about controlling
our tank via user input, let's look at the very basics of how we're going to interact with a character body three D. So the character
body three D has a function known as
physics process. And since it exists, Gado's input or Autocomplete is going to attempt to
create it for us, so we can let it,
and then that way, we don't have to worry about remembering its
function signature. And as a variable, it takes
the amount of time that has passed between calls
to physics process. That is expressed as a float, so it's probably
going to be like 0.012 or something like that, W, of course, one
being a full second. Physics process is called at a rate of 60
times per second, which is what the physics
engine that Gadot uses runs on. Fortunately, we do not
have to scale any of our velocity dealings
within physics process on character body
three D by Delta because all the under the hood calculations already
takes that into account. But for other types
of physics objects, we will, and we'll deal
with that when it comes up. But anyway, we do not have to define a variable called
velocity because one is already built into
character body three D. So if we simply spell it correctly, we can assign a new vector
three to that value. And we do that by using the vector three
constructor keyword. And as you can see, again, Gadot is attempting to tell us this is how you
define this variable, and these are the values that
you have to put into it. So we actually want
this third one because we're going
to provide the X, the Y, and the Z ourselves. And so if we were to do this, we would be providing a velocity of zero, which, of course, means that our tank is not going to move, but we're
not going to do that. We want our tank to
move in an X direction. And so in this case, it's
going to move exactly along the X axis because that's the way
it's currently facing. So we're going to
change this value to, let's say, ten, just
for the heck of it. And now the character
body three D has a method called
move and slide, and move and slide will
take the velocity, and it will do a whole bunch of different calculations on it, and then ultimately
move the tank. And since we are
forcing the velocity to this constant value
every physics process, then it's never going to slow
down or anything like that. And if we hit the
play button here, you can see now that our
tank is moving forward, and it will continue to move forward until the heat
depth of the universe. And again, notice that
it is not falling, and that is because we have not assigned a downward vector
to it to simulate gravity. So again, the Y, the up and down velocity,
and the Z velocity, which is in and out, are going to remain
constantly at zero, and the tank will move
forward to a velocity of ten. Now, what does ten
actually mean? Um, I'm not 100% sure. The values provided to the velocity calculations,
as far as I know, they're not in, like, meters per second or feet per second
or anything like that, or units per second,
they're arbitrary. So one of the things that
you need to do in order to fine tune your
physics process is to start with a value and then keep playing
with those values until they actually resemble something you want,
unfortunately. I'm going to do some
research on that, and if it turns out to be
turns out to be wrong, then I will update
in a future lesson. But for now, let us move
on to the next lesson, and we will see how to capture keyboard controls in order to change this and
actually make the tank move in the way that we
want. I will see you there.
13. Reacting to Player Input – Movement: Welcome back. In this lesson, we are going to
learn how to query the user's keyboard controls in order to maneuver our
tank in three D space. So all motion or all
input reading in Gdo is done by way of
what are called actions. And we can view the
actions set for a project under the project
settings and the input map. Now, yours is going
to look like this by default because GADO has a
bunch of built in actions, but for some reason,
it refuses to show them to you until you
click this button. And here you can see a
whole bunch of them. So the ones that we are
the most interested in are the ones for
the user interface, which are specifically UI left, UI right, UI up and UI down. And you can see here
that they are mapped to a bunch of different
control configurations. So UI left is mapped to the
left arrow on the keyboard, as well as a particular Joypad
button or a JoyPad access. So it doesn't matter
control device you use. If you plug in a
joystick and you press the relevant button, you're
going to get I left. Or if you press
the left arrow on the keyboard, you're
going to get I left. Or if you map it
to a mouse button, which you can do manually,
it'll do that as well. But we're not going to
do any of that stuff. You can actually create
your own, though. So, for example, if
you wanted to overhead map display to the key, you could create a new
action called map and then map it to the MK,
and you would be good. So the first thing we're going
to do is actually provide a reference to the player's
tank within the game object. And it looks like I've
already renamed it here, but this is what it
originally looked like. So it was tank, and then we're going to rename
it to player Tank. And the reason that we rename it is because
eventually we're going to have a
whole bunch of tanks to represent enemies and such, and we don't want to have
to know which one is which. So this is going
to be the player. And one of the other reasons that we provide a name to it is so that we are able to manipulate it directly with the controls, which
we'll see in a minute. If we go to the game script and we use the export keyword, we can get any variable that we define under the export keyword to show up in the
inspector over here. So, for example, if I
simply define a variable called X, you will not see it. But if I were to
export that variable, and if I were to spell export correctly and use the
correct annotation there, oh, yeah, it provides it
requires a type, so there we go. Now, if I were to do
this, the variable X shows up in the inspector and I can change
its values here, same as we would for
the transform or any of the other stuff that
we've been using thus far. So in this case, we are going to create one called player, and we're going to lock
its value to tank. And in so doing, we
have forced Gadot to acknowledge or to limit anything
that we drag into here. So, for example, if I wanted
to drag Ana over here, Godot would not let me. But if I were to drag
player Tank, which is, of course, a tank, Ooh. Gain, drag. There we go. Now we have this assigned.
So when we quit, when we manipulate the player
variable in our script, it's going to call the methods from this
particular script, which is, of course, a tank. And the reason that the class name is available to us is because
we defined it here. So let's save our game. Script. And also, it looks
like I started recording after I attached the
script to the game object. So if you're following
along at home, the very first thing you
should do is actually attach a script to
your game class, the same as we did
with a tank with our tank script to the tank object in
the previous lesson. So now that we've
got this available, we are going to make the game responsible for collecting the input
and not the tank. And the reason that
we're going to do that is because
we're going to have other tanks later on
to represent the enemies, and we don't want to
have to separate out the code that reads the
controls for the player tank, from the enemy tanks and
all that other stuff. So it's better to just have
a generic tank and then let the game manipulate the
player's tank directly and then let the UI manipulate the enemy tanks directly so that they'll have
a common interface. Now, all nodes in Gado have a predefined method called
unhandled key input, and that is what
we're going to use. This method gets called whenever
the user presses a key. Whenever the user
releases a key, whenever the user
holds down a key, anything key event related in Gadot, this
method gets called. And the reason we're using this method rather than straight up monitoring the
user's key input in, say, the process
method or whatever, is that these methods only get called when
the key status changes, so we're not constantly pulling and repoling and querying. So one of the
fundamental rules of computer programming is don't do any more work
than you need to. B as lazy as possible. So we don't want
to be constantly having Gadot say,
Is the key down? Is the key down?
Is the key doown? We just want the key
to be like, Hey, I'm down and then have
Go Gadot react to it. So that's what we're
going to do here. So in this method, we are going to
define two variables. We're going to define
one called turn value, and it's going to
be a float, and we're going to define
one called move value. And it's also going
to be a float. And these values are
either going to be zero, negative one or one, depending on the
state of our input. And as you might imagine, we are going to manipulate the tank based on these values. So what we want to
do, for example, is if the left mouse or if
the left arrow is held down, we're going to want the
tank to rotate to the left, which would be in the
negative direction. And if we're going to hold
down the right arrow key, then the tank will rotate
in the positive direction. And if no keys are held down, the tank will not rotate at all. And we do that by using
the input Singleton, which is responsible for dealing with all
things input in GIDO. And we're going to use a
function called G axis. And Gaxis takes two parameters. It takes a negative action
and a positive action. And you can see the
function definition here in the hinting
underneath my input. So let's give UI
left and I right. Now, what is all this nonsense about positive and
negative actions? Well, it is possible
for an input value to have a range of values
because it's possible, for example, if you're
using a controller to push a little bit to the left
or all the way to the left. And Gadot represents that
with a value of about zero to one to show how much to the left the
stick is being pressed. And we want to combine that with the value in
the other direction, which isn't really possible. Or maybe it kind of is. I mean, things get funny when
you're dealing with analog. But what we're doing is, since we're using the keyboard, the input strength of the left command is
either going to be zero, which means the key isn't
being pressed or one, which means the key
is being pressed. However, we want
to differentiate which one is negative and
which one is positive. And since I already said that we want left to be
represented by negative, in this particular case, the input get access
function is going to query whether or not the left
action is happening. If it is and it's
the negative action, then it's going to
return negative one. And since we is the
positive action, if it's holding down right, then we're going to get one. So this bit of code is going to either
return negative one, zero or one, depending on how these buttons
are being held down. And if you hold both of
them down at the same time, they cancel each other out
and it comes out as zero, which is also what we want. So we're going to do the same
thing for the move value, although in this case, it's going to be UI down and I up, which seems a little backwards, but Gadot represents forward and backward with the Z coordinate
and the Z coordinate, and I'll actually
show you this here. So the Z coordinate is
facing in this direction. Which is toward you, and this
is the positive direction. So Z going down is positive. Z going up is negative. So normally we would
think of up as positive, but it's actually backwards. So that's why we flip
it in the script here. And Gadot is complaining
because clearly, I don't know the difference
between a plus and an equals. So now that we
have these values, we can verify that we're getting what we want by printing them out.
So let's do that. So now if I start my game. Well, the tank is moving
because we didn't remove any of the code from our
previous lessons. So let's just ignore
that for now. It's not going to go
anywhere. But you'll see if I press up and release the up that the input
strength is up. And down. And now if I do right and left, we get our zeros and our negative ones exactly
as we want them. So let us remove this code
from physics process, and we'll put the pass keyword here to indicate that this
is an empty function, and we're going to have
to define some values and variables in order
to make our tank work. So the first thing we're
going to need to do is we're going to need
to define a couple of values to determine how fast our tank is going
to move and rotate. So we're going to export a
variable called turn speed. And one thing to note
is that, technically, Gadot uses snake case for its
capitalization conventions. But I have been a Sea
Sharp and Java programmer for the last 15 years, so I have a tendency
to use camel case. I am probably going to
inconsistently switch back and forth between the two throughout the entirety of this course, so do not follow my example.
Pick one and stick with it. But anyway, Turnspeed
is going to be a float And move speed is
also going to be a float. And I'm also going to show you a neat little annotation trick that if you're familiar
with older versions in Gadot was added sometime around the 4.2 era. I'm not
entirely sure where. But if you want to
add a tool tip, so let's let's go
to our tank here. You can see that we've got
turned speed and move speed, and if you hover over it, you get a tool tip, and it says, No description available.
And that makes you sad. So if you want to
add a tool tip, just use a double hash tag. A single hash tag is a comment, which means Godo will ignore it. But if it's a double hash
tag, it's a tool tip. So let's turn speed in degrees. Rather tank turn
speed in degrees. And it's a slightly
different color, so you can see that
it's an annotation. Now if we go over
here, have tool tips, and it is wonderful. Ever since I found
out about that, I've been in love with it. I annotate everything now. So, as promised, I did actually do a little bit of research, and I discovered that
even though Godot refers to the three D grid units as meters and kind of acts like it's the same unit of measurement as it
would be in blender, which also uses units,
Godot doesn't care. It's just a unit. You can
consider them inches, meters, freedom units, whatever
you want to call them, and the calculations will
all work out the same. So yeah. We're just going to arbitrarily
consider it meters. I don't really think it matters. And we're going to provide
some default values here. So our turn speed
in degrees is 20, and let us just
actually say degrees. And the reason that we
define that that way is because rotation can be handled in GADo in both
degrees and radians. Internally, in the engine, everything is done in radians, but it does accept degrees as input values in
a lot of cases, and you can convert between the two of them pretty easily. I personally and a lot of times when you're doing three D modeling and
stuff like that, it's just easier to
think in degrees because when you say angle,
what do most people think? They think 45 degree angle, 90 degree angle, right
angle, whatever. And all of that is in degrees, but everything else
is in radians. So it's usually a
good idea to indicate which value you're expecting when you're creating
a variable like this. So yeah, de turn speed degrees. And move speed is in
units per second, so we don't really have
to define anything there. Equals ten. So again, ten units per second. Now, we're going to
need a pair of methods that are going to
update those values, and we're also going
to need the values themselves because these
are just constants. This just means that, hey, when the tank turns,
it's going to turn at 20 degrees per second, but we need something to
actually monitor what the tank's current
rotation speed is. And we're going to see
why that is in a moment. So let's just define a variable
called rotation speed. And that is a that is a float, and then we're going to have another one called
movement speed. And these values are the
ones that are going to get modified by the input,
as we will see in a moment. But the first thing we need
to do is we're going to need to define a couple
of more functions, and one of them is going to
be called set turn speed. And it's going to take an
input value, which is a float. And for now, we'll just set it to pass so that it
doesn't do anything. It's called stubbing
out a function. We can define them without
actually providing any information so that we
can set up the framework. And we're going to
have set move speed. So now we have these values, we can go back to game, and instead of just
printing out these values, we can take the player's
tank and we can set its turn speed based
on its turn value. And we can set the player's
movement speed based on its movement value. So
what does all that mean? What it means is that when
the key state changes, so when the user presses
or releases a key, this information is
going to get calculated, as we previously mentioned, and then those
values are going to modify the existing turn
and movement speeds. So if the tank is
not moving at all, its rotation speed
is going to be zero. Which is going to be reflected by the fact that the turn
value being passed in is zero. And if the tank is rotating
to the left, well, the rotation speed
is going to be the existing turn speed
modified by the direction. So it would be negative 20 for left and positive 20 for right. So what we want
to actually do is set the rotation speed variable equal to the tank's
turn speed in degrees multiplied
by the input value. So again, since if we had
pressed the left key, the input value would be
equal to negative one. That means the rotation
speed would be 20 times negative one,
which is negative 20, which means the tank would be rotating negative 20 degrees, which would rotate it to the left and the
same for the right. And we're going to do the same thing for
the movement speed. So the move speed is going
to be equal Well, uh, Movement speed is going to
be equal to the move speed, and this is actually
where I created two variables that are
ambiguously named, so you should not do that. Let's call this forward speed. Now, let's call this
one move speed, and this one is forward speed. So forward speed
is equal to move speed times input value. And now that we
have these values, we can modify the tanks existing values with those new
values in physics process. So what physics process does, as I mentioned before, is it gets called 60
times a second, and this is where you do all
of the manipulations of, say, velocity or rotation or anything that would affect
the tanks physics values. So in our case, that would
be the tank's velocity and, of course, the tank's rotation. So the first thing
we're going to do is we're going to set the tank's rotation equal to its current rotation
plus the rotation speed. So how do we do that?
Well, there are two ways. There is a variable within the node three D
called rotation, but there is also one
called rotation degrees. And as I said, since I
like to work in degrees, and rotation degrees is a convenience variable
specifically for that, I will set rotation degrees
equal to a new vector three and we're going to start
it out with three zeros. So what this means
is that there is absolutely no rotation at all. But what we want
to do is we want to rotate the tank along the y axis because the Y axis is the one that
is straight up and down. And if we were to rotate
the tank along that axis, the tank would actually
spin in place. So as you can see here, since
it's the light green line, and this is the light
green rotation, if I were to move this, then
the tank would move like so. And that's what we
want to do in code. So we go back here
and rotation degrees, and we want to change
the Y component. So the Y component
is now equal to the rotation speed times Delta. And that's because
we want to scale it by the amount of time that has passed between frames,
which is what Delta is. Otherwise, the rotation speed, which is 20 or negative 20 would be getting
called 60 times a second, which means that every
one 60th of a second, the rotation would update by 20 degrees in
either direction, and we do not want a tank
that spins around like a top. So this should actually work. Let's run our game and see. Now, if I press to the left,
absolutely nothing happens. And if I press to the right,
absolutely nothing happens. Well, that's broken. Alright, let's see what the problem is. The problem is most likely that we are not doing
move and slide. I don't think that's the
case, but let's check. Nope, that is not the case. Okay, I see what the problem is. The problem is that
I'm unconditionally setting the rotation to a value, whereas we want
it to be equal to the current value
plus the new value. Because what this is is this will give us either
a 20 or negative 20. And if we change the
rotation just to 20, we're not going to get
a consistent rotation. We're the tank is
going to lock itself at either 20 or negative 20, and that's going to
be the end of it. What we want it to do is we want it to gradually
change over time. So if the rotation was zero, then we add this so that it's negative 20 ish over a second. And then in the next turn, it's negative 40 over a second
and so on and so forth. So this should actually
fix the problem. And we have it backwards, and that is because we need
to reverse the values here. Perfect. Now we have
a rotating tank, and we do the exact same
thing for movement, almost. So what we need to
do is we need to set the character body three Ds
built in velocity variable, which apparently I
can't spell velocity. And the velocity is going
to be equal to something. Now, there are a couple
of different ways to determine how to move a
node based on its facing. The most straightforward is to take a forward facing vector, multiply it by the
value of the movement, and then set that
to the velocity. And while that is perfectly
acceptable, most of the time, Gadot actually
recommends that you don't do that for a whole
host of mathematical reasons. It also gets a little bit complicated because you have
to take the orientation of the tank into account and the fact that Gadot
considers Forward to be in the Z direction
and all sorts of other nonsense that is probably
making you look at me, go, What the heck is this
guy talking about right now? The easier way is to use an internal tool or an internal object called
the transform basis. So every node in Gadot has an internal variable
called transform, and transform is exactly
what it sounds like. It's basically this object here, which determines the object's
position and rotation and scale and probably
a few other things that I'm forgetting
about in three D space. And Gadot manages all of those calculations through its physics engine
under the hood. And one of the
internal variables of the transform that it gives us is this thing called the basis. The basis is the result of all those calculations prior to any extra modifications
that you may make. So I'm going to show
you how this works. Whoops. Control K.
We're going to comment those out and let
us go back to game, and we're just going to
change this a little bit. Print player dot
transform dot BASIS. Now, I'll just tap a key and
it'll stop running game. And this is the basis. The basis is a
vector of vectors. And what it gives you
is the orientation of your object in a whole bunch
of different contexts. The most useful one to us is the X context
because this vector determines the X and
the Z orientation of our tank after the
rotation has been applied. And in order to move
the tank forward, we want to move it
in the X Z plane. So that would be a combination
of this direction and the blue direction forward and back in the direction
the tank is facing. So if we go back to our script and we can
get rid of this, the tank's velocity will be
equal to the tanks basis, the X component of
the tanks basis, multiplied by the
movement speed. And what that'll do
is that'll scale, the X vector by the move speed, which is exactly what we
need for the velocity. Now, if I call move and slide, that should allow
the tank to move forward in whatever direction
it happens to be in. So let's cross our fingers. And, uh, no. It's because move
speed is a constant. We actually want forward speed. And this is why you need
to name your variables in a judiciously
responsible fashion. Okay, there we go.
Now if I press forward, the tank moves forward. If I push back, it moves back. If I rotate the tank and now move it forward,
there we go. Let's aim for the tree, and we'll go right through the tree. And that's because we haven't enabled any kind of collision. And the only reason it looks like we have
collision is that since we are not applying any velocity in the Y direction, the tank is not being affected
by gravity in any way, so it's not going to fall. But now we have a moving tank, and we can move on to the next lesson. So I
will see you there.
14. Reacting to Player Input–Controlling the Turret: Welcome back. In this lesson, which is going to be infinitely easier than the last lesson, we are going to leverage
what we learned in the last lesson in order to
manipulate the tank's turret. So the first thing we
need to do is we need to provide a couple of extra
variables to our tank. Specifically, we need a
turret rotation speed. And we also need a
turret angle speed. Because the turret is
going to be able to both rotate and also
raise and lower. And as a result of that, we're going to also need
a turret move speed. And finally, And
turret. There we go. We're going to need a maximum
angle for the turret so that we can't have we can't
have it spinning all around. Turret Max angle degrees float. And let's call that 15. And we are going to need some similar functions to manipulate the turret the same way we did for
turning and moving. So let's do rotates. Turrets. No. It's gonna require
an input value. And angle turret. I can't type save
my life, can I? And now that we have these, we can alter the
rotation and angle speed in exactly the same way we did for the turning
and rotating. And just to keep things
simple, the turret angle, the raise and lower
speed is going to be the exact same speed as the turret move speed,
the rotation speed. If you as an exercise, if you want to change it so that it uses
a different value, that would be a good
exercise for you to do in your off time. Alright. So before
we can manipulate these values via the
controls and also add them to our physics process, which we are going to do, we need references to the
turret part of the tank. So if we go back to our
three D value here, our three D view here,
in our previous lesson, we actually created a node
to represent the tank, which contains the mesh
instances of the tank, and then we also created
a barrel anchor point, which hinges the
barrel to the turret. Now, we need to get hold of references to these values
from within the tank. And there's a couple of
ways to do that In Gadot. But nowadays, in four dot
two and four dot three, the easiest way to do it is
to use object references. So we are going to export
a couple more values. And since both of these
are node three Ds, we can clamp the type
to node three D, so we're going to
export the turret, and we're going to
export turret hinge. And now that these exist,
we can go to the tank, and we can drag the turret over here and the turret hinge, which is the barrel
anchor point over here. And then we'll bunch
these up a little bit. So the turret rotation degrees is going to get modified
in the exact same way that the tanks would by creating a rotation vector and using the turret rotation
speed times Delta turret rotation
speed times Delta. And we're going to do
the same thing for the hinge, but not quite. So the current hinges
rotation degrees is going to get modified by
a vector three, but we're going to be rotating it along
a different angle. We are going to be rotating it along the Z axis so that it moves up and down because the Z axis is here
moving in and out. And then if we were to
rotate it with the blue one, which represents the Z, it's
going to go up and down. So that means that the X and the Y properties of the
vector are going to be zero, but the turret
rotation speed delta of or rather the Z component is going to be turret
rotation speed Delta. And we're going to
do one more thing. We need to clamp the
rotation degrees to our maximum angle range, and we do that with
the clamp F method because we're going to
be working with floats. So Turrent hinge rotation degrees And we want the Z property because
that's the up down rotation. Hinge rotation degrees Z is
equal to the return value of clamp F. And what we want to do is clamp F takes
three parameters. The first one is the
value we're clamping. The second one is the minimum of the range that
we're clamping to, and the third one is the maximum range of
what we're clamping to. So that's going to be
negative max angle degrees and max angle degrees
respectively. So now if we attempt to rotate our turret ras or lower our
turret out of this range, this method is going to
clamp it within that range, and we're not going to have
the turret spinning in a vertical direction, which
is exactly what we want. So now that we've
got all this done, we need to modify our
game method or our game unhandled key input
method in order to get all this to work. So, how are you
going to do that? Well, what we're going
to do is we are going to assume that if the player has
their control key pressed, they are manipulating
the turret, and if they don't have
their control key pressed, they're manipulating their tank. So we need to check
our input Singleton, and we're going
to use the method is physical key pressed. And then we are
going to search for the control key,
and there it is. Now, if the control
key is pressed, then we want to use the turn in the move values for the turret. Otherwise, we want to
use it for the tank. So we've got player set, player rotate turret with the turn value and player angle turret
with the move value. However, this will work, but there will be a bug. And one of the great things about getting more experience
with programming is that you'll be able to spot bugs before you actually run into
them while you're testing. So let's say that we press
down the control key, and we press down
the right arrow key, and we're rotating the turret, and then we release
the control key. Well, this is going to jump from this section
down to this section, which means that it's
not going to update the turret rotation speed with the current value of the turn. So instead of passing zero here to stop the
turret from rotating, it's going to go
straight down here. So what we need to do is
we need to explicitly stop the tank's movement and rotation when we're
manipulating the turret. And we do that by explicitly passing zero as the turn speeds. And if we're
manipulating the tank, then we want to force the
turrets values to zero. And this should work. So now if I move my tank in the normal
fashion, it's great. Now if I hold down control, Well, something's wrong.
We are close, though. So you can see that if
I hold down the control and the tank is both
rotating and turning, so it looks like
I'm accidentally using the same values somewhere. T rotation speed,
turret angle speed. Uh huh. And here it is. Instead of using the
turret angle speed to angle the turret, I'm using the rotation speed. Now, that should work.
And there you have it. And as you can see, if I
attempt to angle the turret in a value that is greater than the angle range that
we set, it doesn't work. And you can even and, of course, now if I'm moving a tank and
I hit down if I hit control, the tank stops moving and
the turret keeps going. Okay. So as you
may have noticed, we can currently
drive through trees, rocks, and hills,
and that's bad. So in our next lesson, we will learn how to
set up collision, and after that, things are
gonna get interesting. We can start wreaking some
havoc and destroying stuff. So I will see you
in the next lesson.
15. Collision: Welcome back. This lesson is going to be
infinitely simpler than the last two and even
simpler than the previous one. So if your head
was spinning from all that vector math
and rotation nonsense, this one is going to be
a bit of a breather. So we are going to
look at collision, and we are going to fix
this little yellow warning. So, this has been complaining ever since we turned our tank into a character body three
D that it has no shape. So we're going to give it one. So let's go to our three D view. And I clicked on the Z, and well, first of all, I made sure that it
was and that's not it. I made sure that it was
a two view port view and clicked on the Z and
clicked on the Y such that we have this nice top down and forward facing view for us. And so, as I mentioned before, our tank is a type tank, which is a character
body three D. Which is a physics object, and physics object require collision shapes in
order to function. And since we never added a collision shape
node to this thing, we've had this
little yellow icon that has been mocking
us this whole time. So we're going to
add a child node, and we are going to add a
collision shape three D. Boom. Now, collision shape
three D requires a shape very similar to the mesh primitives
we've been using. So we're going to
go with a box shape and now we have a whole bunch of widgets that will
allow us to indicate the size and
orientation of Xbox. So the first thing we're
going to do is we're going to drag this
up a little bit. And then we are going to and for some reason,
it is snapping. This must be a bug and Gadot. Sometimes it snaps on the snaps on the grids, even
though you don't want it to. So let's see if I
can there we go. I don't know why it was
locked into that before. But anyway, you can use
these little pink circles to change the size and
position of your box. So what we want to do is we want to make
sure that the box covers the entirety of our
tank in both directions. So we want it to cover the
tank in this direction. And looking down, we want
to make sure that it is long enough to cover the tank
in this direction, as well. So now that we have a box
surrounding the tank, when we attempt to have the tank move using the
Move and slide method. Let's look at that
again. So since we have in our physics
process move and slide, Godot is going to attempt to collide our
collision shaped box. And as you can see, the little
warning is going away now. It's going to attempt to collide that collision shaped box with any other collision shaped
boxes that we happen to have in our game level. And
right now we don't have any. So let's make our trees, rocks, and hills collideable. So our tree, let's
go back to our tree, and our tree is a node three D, so let's give it a
collision shape. And if we attempt to do so, we get both an error
and a warning. The warning, of course,
because we don't have a shape. But the error is that
our tree is not of the right kind of node to actually make use
of a collision shape. So there are three types of physics bodies that
use collision. We already have a character body three D, which is our tank, but then we also have
let's change the type. A static body three D, and a static body three D is a physics object
that does not move. And not only does it not
move, it will never move, which means that Gadot is
not going to attempt to apply gravity or anything else
to it, but it can collide. So now that we have
a collision shape, let us change the collision
shape to a cylinder. And now we can change the size of our cylinder and
move it upward. And again, it's snapping
for some reason. This is an obnoxious bug. There we go. I don't know
why it keeps doing that. I dislike it very much. But again, we can use
the handles to indicate the size of the cylinder. So now our tree is completely covered by a collision Oops, by a collision shape. And actually works. So, yeah, you can see that it's surrounded
by this cylinder. And we're going to do
the others as well. But now, without any
additional code at all, if I run into the tree, boom, I cannot run through the tree. So let's add collision shapes to our rocks and to our hills, and then we can move
on to the next lesson. So, again, we're going to
have to change the hill. So we can actually change
the hill to a child node. So we're going to have to get to a static body
because it's a mesh, which means we're going to
lose all this information. So we're actually going
to have to get tricky. We're going to add a child node, and it's going to be
a static body three D. And then we are going to right click on
this and we're going to say make scene root,
and now they're flipped. The static body three D is
huge, and we don't want that. We're going to change
that in a moment. But now the hill has been parented to the
static body three D. So let us go back to transform, and the transforms are fine. For some reason,
this thing is huge. I don't know why that
is, but we're going to give it a collision shape. And let's go with a whoops. Let's go with a
double view again. And once again, that's
not right. There it is. Double view, boom. We've got it down and up. And I'm guessing, ah, yes, it's because those positions are off, so let's change that. We'll reset this to zero. And now we've got
this here, like so. So we want to keep the
rotations the same, but we want it to
be locally to 00. And now the static
body three D is not even remotely as large as it was before, which
is what we want. So we will and we'll move
this so that we can see it. And since this is
square at its base, we'll add a box like
we did with the tank. And then we will simply
stretch this fella out And we will rotate it
so that it is angled to the same kind of angular orientation
as the hill itself. And perfect. And we will
do likewise for a rock. So again, we're going to
need to add a child node. Static body three D, make snoot. We will reorient. Well, that one was
actually correct. And we'll give the static
body its own collision shape. And we will also make
that one a cylinder. Mm. 'Cause in spite of
how small they are, we actually don't
want to deal with the physics interactions
of driving over rocks. We just want the player
to not be able to move along them or over them. Saves us a lot of
headache. Okay. And the very last thing
that we're going to do is we are going to
set the collision masks. So what is a collision mask? A collision mask is
a set of flags that tells Gadot what to collide
and what not to collide. And so under our tank, we can see that there's
a collision tab under the character body three
D. And if we expand it, we've got a whole bunch of layers and a whole
bunch of masks. The layer is the collision layer that the object belongs to. So let's rename some of these. So edit layer names. Layer one is going to be player. Layer two will be obstacles. And layer three, even though we don't have any yet,
we'll be enemies. Now we can say that the player
is on collision layer one, which is player,
and it collides. And if we uncheck this, it will not attempt to
collide with itself, because that's both
silly and impossible. But if we click
on two and three, that means that
anything that is set to the collision layers of
either obstacles or enemies, the player will collide with. So if we go back to tree and if we expand collision
and we set it to obstacles, and then we leave
the mask on one, it's going to collide
with the player. And now we will do likewise for the hills and put them on
the obstacle layer as well. They will collide
with the player and the same with the rock. And functionally speaking,
that hasn't changed anything. Oop. The, uh, well, what's wrong there? That's odd. Did I move the tank in a way that I shouldn't
have moved it? Well, one of the
hills has changed. Oh, I see the problem. I
moved one of the hills, and now it's directly
on top of the tank. So let's move that one. Let's go back to the arena, and we'll find the hill that was directly on
the center there, and we'll just
move it over here. Then we've got a
second hill over here, which is weirdly
oriented. Change that. It should be better.
Okay, now let's start the game again.
Okay, much better. Now, if I run straight
for this rock, I will hit it and stop. Boom, and there we go. And now we'll do likewise for
one of the hills. Go straight past this tree. And boom, we've hit the hill. And as you can see, since I'm hitting the
hill at an angle, I'm sliding along it, and that's what move and slide does. If you didn't want to slide
along the object you're colliding with and just
have your tanks stop, there is a method called
move and collide. And I will show that
to you very briefly. We're not actually
going to use it, but we have move and collide, and move and collide
actually takes a whole bunch more parameters
than move and slide does. At the bare minimum,
it takes our velocity. But. But it does not scale it under the hood
the way moving slide does. So we have to modify our
velocity via our Delta. Now, if I go back and
attempt to slam into a hill, my tank is not going to
move along the hill. It's just going to stop. Boom, and there it goes. Now it can still rotate, but now if I push forward, the tank will not
slide along the hill. So depending on
what kind of game you want to do, that's
personal preference. You can either
slide or not slide. We're going to go
back to sliding just because it's
slightly easier. And now that we can
collide things, we are going to start firing
shells and blowing stuff up. So I will see you
in the next lesson.
16. The RigidBody node–Firing a Shell: Welcome back. In this lesson,
we're going to get violent, and we're going to
implement the controls and the very complex three
D math that will allow us to fire shells
at our opponents. But before we do that, there is some reorganization
that we need to do. So once you start dealing
with three D math, the orientation of
your models matters. It matters very much. And the fact that
we have our tank facing along the X axis
is going to start giving us problems because
Gadot actually assumes that the positive
Z axis is forward. So at the bare minimum, you'd have to rotate all of your angle calculations
by 90 degrees, and that's insane.
We're not doing that. So we are going to take all of our subcomponents of our tank because the tank
itself is not gonna be rotated in any funny way, but we're going to
take all these items, and we are going to rotate
them 90 degrees on the Z axis. And that's completely incorrect. We're gonna try that again.
Let's go to body here. And it is 90 degrees along
the y axis, not the Z axis. And I've actually got coffee sitting in
front of me today, so I have no excuses. Alright. Now, of course, it's correct, but since the turret was offset, the turret needs to
be manually adjusted. So I'll just drag that
over such that it is at zero X and thus
perfectly centered. And, I did this wrong. It's actually 90 degrees in the opposite direction.
There we go. Now, of course,
the camera is off, so we're going to
have to reposition the camera completely,
and that's no big deal. We'll just use our little
green fella to maneuver it in the correct X Z positions. We will make sure that
transformly speaking, it is directly on the X, and then we will simply rotate it so that it's facing the
tank the way it should be. We'll even this out
to negative 180. We will preview it. Looks good. Ooh. Actually,
that turret it's a little too far forward.
Well, let's bring it back. Yep. Okay, now we are good and everything is
properly oriented. We'll make sure
that our Alright. Our collision box
is slightly off. Also, I think we made
it a little too big. We'll just shrink that a touch, not that it matters
a huge amount, and we're good in
this direction. Okay, one other thing
that I'm going to mention is that after this
lesson or during this lesson, the inspector for
our tank is going to start getting cluttered because we're going
to be adding, like, another four variables here that we want to
be able to play with. Fortunately, there is a
way to deal with this. We can use a couple of
extra export notations in order to organize
our information here. Now, the first one
that is extremely useful is called Export Group. And that takes it takes a label. So and once you do this, everything that is
exportable that comes after that tag will be
put into the group, so now you can collapse
it and re open it. And if you want to
clear the group, then you would just put another one of these here
and take the label out, and then everything will go
back to where it should be. Now, of course, Gadot likes to put the
groups at the bottom. So even though we've got
no group, group, no group, all the no group stuff is
going to go on the top, and all the group stuff is
going to go on the bottom. Other one, which is a
little bit less useful from a visual point of view
is called Export category, and that makes a completely
new gray header over here. And that may be what you want. You never know. So there you go. We're going to cram up the stuff for the
turret into its own group. And we've got turn speed, move speed, that's good. Turret back angle,
blah, blah, blah. All that stuff is, in fact, turret related, so we are good. And we're going to leave
it like that for now. And before we carry on, we need to make one
modification to our existing code due to the
rotation of the tanks model. And that is we have to change the fact that we are calculating our velocity by using
transform basis as the basis, we are currently
using the X property, but we need to change that to Z. And once we do that,
our tank should be maneuvering around the
same as it was before. H Alright, we are good. Now, let us create
and add the shell. So, of course, the first
thing that we have to do is we have to create
the shell model itself, or rather the shell scene. So we're going to do new scene, and it is going to
be a three D scene. But instead of using a node, we are going to right click, change type, and we
are going to change it to a rigid body three D. Now, what is a rigid body three D? Rigid body three D,
like the character body three D and the static body three D that we've
been using thus far. Is a physics object. Only in this case, it's a physics object
that can actually take forces like gravity
and pushing and so on. And we are going to have it affected by gravity and also the initial
muzzle velocity of our gun in order
to be able to be fired and collide
with other targets. So we're going to rename this and we're going
to call it shell. And we are going to
switch back to three D, and we're going to add a
mesh instance three D again. And this one is going to
be a tube trail mesh. And the reason
we're going to use a tube trail mesh is because we can manipulate it
such that we can make it look like
a shell without actually doing anything else. So we're going to left click
on the mesh to open it. But the first thing
that we have to do as we were doing before, is actually rotate it so
that it's facing forward. So we'll go back down to
transform and we will rotate it along the X axis so that
it is now facing forward. And because we can, we'll increase the
radial steps to ten, which means it's going
to be slightly rounder. We could actually bump that up even further if we wanted to. But the more polygons
that an object has, the slower it is to render. So we'll just push
that back down eight. It's not really going to
matter in the long run. So for the bottom one here, we're going to change it such that we are facing sideways so that we can
see what we're doing. And actually, for this top
one, let's do top down. Okay, now we can see
what's going on. So we're going to change
the sections to two, and we're going to
change the radius and the section length. Now, we want this to be able
to fit inside the tank. And actually, let's
save our work and go fix the tank while I've
got it on my mind. And what do I mean
by fix the tank? Well, the first thing
that we're going to need to do is we're
going to need to indicate where the shell is
going to fire from the tank. Can either add a node three D, but there is something that is slightly more useful for us, and it's called a marker three D. And a Marker
three D, as you can see, is a child of node three D, so it basically is just
a node three D. However, the marker three D is
basically a reference point. It's kind of hard
to see from here, let me see if I can stretch
it out a little bit. Yeah, not easy to see. But a marker three D is basically the equivalent
of a three D point. And even though it's kind of hard to see in these windows, because of the Gizmos, let me see if I
can. There we go. Okay. So if I unselected, it's a little easier to see. So right here, you can see
that it's basically a set of cross hairs that indicates where the point is
in three D space. And this does not
show up in game. This is just a
reference so that you can tell where it
is without having to select it cause normally, if I were to select a node,
then it would be highlighted. But in this case, the marker always shows you where it is. So I've angled and positioned the marker such that it
is inside our barrel, which is what we want because the shell is going to be
firing from inside the barrel. This actually causes us a
mild couple of complications, but it looks better
in the long run. I mean, so we could actually
put the marker here, and then we're going to
we'd spawn the shell here And that's totally fine, but then it means the shell
is basically going to appear in front of the barrel
and then fire outwards. And just for the
sake of realism, we actually want
our shell to appear inside the barrel and
then fire outward. So game development is
all about compromise. Okay, so now that we've
got a marker and it is parented to the barrel and everything we can go
back to what we were doing. So let's go back to our shell. But first, before we do
that, we got to see how big how a barrel actually is. So it's got a radius of 0.1 and a section length of 0.2.
Let's remember that. So we want the radius
to be slightly smaller. So let's say 075. And I forgot it already.
What was the radius? What was the length, rather? Section length was 0.2. Let's say, 0.175. And a quick way to tell whether
or not this is correct, is that we can
take our shell and we could drag it into
our main game scene. And we could put it right here. And, uh And that looks to
be about the right size. Perfect. Okay, so
we'll delete this. And we will go back
to what we're doing. So let's go back
to the shell, and we are going to
change its material, standard material, albedo, and we're going to
make it a dark gray. And we are going to modify a
curve. So what is a curve? A curve is a curved
line that will affect the object depending
on the type of object it is. So in this case, it's going to apply the curve to the section of the
cylinder that we're in. So we're actually
going to bump it down to two or maybe one, let's say, and now we are here,
and we can drag this and then click to add another point and
then drag this downward. And now you can
see that the shape of the cylinder has actually
changed to follow the curve. And let's add, we add
a second section, and we'll actually move this
out a little bit so that the shell is slightly more
Woop, that's too much. And then we'll click on
this little handle here these are Bezier curves,
I think you call them. And, uh then we adjust
that a little bit, and now we've got an actual
bullet shape for our shell, and it's facing in
the wrong direction, so we need to face it
in the right direction. So we want to rotate the mesh three D 180
degrees along the y axis. And now it is facing in
the correct direction. Good. Alright, the shell is
going to need two things. It's going to need
a collision shape. So we've already got one of those down here in our history. Let's click on that. Give
it a collision shape. The collision shape
is going to be a We could either give it a capsule or we
could give it a cylinder. Let's give it a
cylinder because we've been using cylinders
thus far, anyway. Transform. We're going to have to rotate this fella 90 degrees. And now we are going to
resize it so that it fits, same as we did for
our other objects. And in this case, the
angle at the front of the shell does not actually
matter in terms of collision, so we're just going to
leave that the way it is. And finally, the shell is
going to require a script. And we'll make sure to put
it in our scripts folder. And we're going to name
the class as shell. Now, shell is going to
need to do two things. It's going to need to keep track of any
collisions it has. And once we actually
fire the darn thing, we're actually going
to want it to look in the direction of
its flight path. And that is actually
really easy. We can do that right now. So in our physics process method, we simply want to use
the look at function. The look at function takes a target and it also
requires the up. So what is the target? Well, the target is where the shell is traveling
and where the shell is traveling at any given point is the shell's global position, which is a vector indicating
where it is in the world, plus the linear velocity. And the linear
velocity is the vector that indicates what direction the shell is moving
in and how fast. So if you add those
two together, you'll get the direction that
the vector is moving in. So this will run every frame. And basically every frame,
the shell is going to update its position or its rotation and basically
its angular orientation such that it is looking in
the direction it's firing. And that way, the
shell is going to arc along with its path
of motion rather than just bounce all over
the place the way it would as a a regular
physics object. If you didn't do this, actually, the shell would be pointing in the direction it was firing because we're about to orient
it such that it'll do that. But it will not actually
arc downward in flight. It'll just kind of,
it'll just kind of, like, fly straightforward
and then land. And that's a little boring. We don't want that. And we are also going to need to
keep track of collisions. So we do this by hooking up
what is called a signal. Now, a signal is a message
that any Gado object can send out and any other GA Do object can connect to that
signal and listen for it. And when the signal is emitted, then anything that is listening
for the signal will call a method that you're
going to specify. So, in this case, we want
the collision shape. No, we don't actually
want the collision shape. We want the shell. Need
to do a couple of things. The first thing we need to
do is we need to indicate to the shell that it is going to be monitoring for collisions. And we do that by expanding the solver group and
clicking contact monitor on, and then we have to indicate Max contacts has to
be greater than zero. Max contacts is a
parameter that says, how many collisions is this object going to check for before it just
doesn't care anymore? And we want it to
have at least one. You can up that
value if you want, but your shell is really only ever going to hit one
target and then explode, so it's not going to
matter in this particular. Then once we have
all that set up, we can click on the shell, and then we can go from
the inspector to the node. And the node is
going to show you all the signals that this particular node is
capable of emitting. And because it is a rigid body three D with a collision
shape correctly set up, the shell is going to
emit these signals, and the one that we are
interested in is body entered. So whenever any
other physics body enters the collision
of this rigid body, it's going to fire this
method if we connect it. So we're going to go down
here to the connect button. It's going to tell us it's
going to ask us what object we want to put the function on and what we want the
function to be called. And both of these defaults are fine, so we'll just hit connect. And now, whenever the shell hits another object that
it is capable of hitting, this method
will be called. And we're going to fill out
this method in a little bit. But we also need
to make sure that our collision layers
are set for the shell, and the shell is not going to be part of
any of the layers that we've already
defined because it's neither a player nor an
enemy nor an obstacle. So we can actually
uncheck all of these so that it's not considered to be
part of any layer. Because the shell is
going to be fired from both the players
and the enemies. So we want it to be able to
collide with the player, and it's going to be the
same shell for all of them. So we want it to be able to
collide with the player. We want it to be able to
collide with obstacles, and we want it to be able
to collide with enemies. And one thing that
I forgot to do is I forgot to give the arena
any kind of collision. So the shell is going to fall through the ground
if we don't do this. Let's go back here. Let's go to our Mesh Instance three D, and we need to change
that to well, actually, what we need to do is we need to add a static body three D, and we're going to
call it ground. And we are going to add the mesh instance three D
that is the ground to it, and then we're going to add a collision shape to the ground. Otherwise, the shell would fall through the world,
and that would be bad. So box shape. We It's gonna be hard
to grab those. Here. And we only want this shape to
collide with projectils. So ground collision. Let's give it its own layer. So this is the ground layer, and it only collides. Well, actually, it
looks like we're gonna need a projective layer, aren't we? Okay, so shell. Alright so the shell is a shell, and it collides with everything. And we will just
verify that our Mm. Okay. Yeah, 'cause sometimes
sometimes when you change the collision
masks on various objects, if you don't do it
right, it can cause all sorts of silly behavior. So let's just make sure that we are still good with
our tank moving around. Boop, yeah, everything is good. Okay, so let's go back
over to our game script, and we are going to modify
our control handler here. And we want to check for
another game object, and that game object
is UI except, which is mapped to both the
enter key and the space bar. And we're going to use
the I action pressed method because that will only fire on the frame that the
key has been pushed down. If you continue to
hold the key down, that action will not
continue to fire. So that will ensure that we get one shell fired
per key pressed. So if input is action
just pressed I accept player fire Shell. And we have not actually created the fire shell method
yet, so let's do that now. Oh. In order to fire a shell, we need to have a
reference to the shell. So back within our tank, we are going to provide
some more export variables. And let's do an exports group so that we can
organize these things. We've got an export
group turret. So there's a good
back to the tank. Here we go. All right. So the first thing that
we're going to need to be able to export is what
we call a prefab. And this is basically a link to the scene that we're going to instantiate whenever
we fire a shell, which is our shell scene. And since we don't have to
define the type of this scene, it's okay if you
leave this empty, but it's good to know that the type of a scene is
called packed scene. So now if I want to, I can simply drag my
shell scene over here. It's going to get automatically
loaded and cached in this variable when the tank is instantiated as part of the
game, which it currently is. So now, when we fire a shell, we are going to create a new
one of these shell objects. So we have var shell, which is of type shell is going to be equal to the
shell prefab dot instantiate. And once we do that, we actually need one more thing up here that's fairly important, although it's okay if we implement it a little bit
later, but we'll do now. We're going to define
a signal that the tank fires whenever it fires a shell. And the reason we're
going to do that is because from within the tank, we don't have direct
access to the world because the tank is a
child of the world. We can get it by calling
the tanks parent property, which is a built in
property of a node three D, but that relies on the fact that we know
what this hierarchy is, and we know that the player would be able to get the parent, which is the game,
and then we would be able to get Ana
from within the game. But there is a whole
bunch of ways that we could break this hierarchy
during production. So this isn't
actually a good idea. We want things to be encapsulated
as much as possible, which means they
don't need to know about anything other
than themselves. So all we do is we tell
the tank to fire a signal, And we're going to
give it a reference to the shell that
has been fired. So that means after we
instantiate our shell, we emit this signal, and we pass it the shell
that we just fired. And right now nothing happens. This signal just goes
off into the ether and disappears and exists until the heat depth
of the universe, or you finish your game,
whichever comes first. So what we need to do is we need the game to listen
for this signal. And there's a couple
ways to do that. We can either connect
it the same way that we did with the collision
shape in the shell, but I still haven't
really decided if I want the tank to always
be existing or not. So let's just define
a ready function. Now, ready gets called whenever a node enters the scene tree. So it is, for all
intents and purposes, the function that you call
when the node is ready, and you want it to
do a whole bunch of stuff before it actually
starts doing things. So, in this case, we want the players Shell
fired a signal, and we want to connect
it to a method that we're going to
call on Shell Fred. And of course, God O is
grumpy because we haven't defined that method yet,
so let's make it happy. Funk on shell fired. Now, since this method is called in response to the
signal that we defined, it requires the same
parameters as the signal. And since the signal takes a object parameter
of type shell, we need to define this as part of our
signal handler, as well. So now we've got
this method will get called when it receives the signal that the
shell has been fired. And all the game needs to
do is add child Shell, because we want the game
to add the shell to its scene graph with
all the other objects. So if you monitor during
the playing of the game, and we can see that in a moment, then it will appear here. So let's do that.
Let's run our game. And you can monitor what your game is doing
while the game is running. And it's a little easier to do when the game
is in Windowed mode, which is why I haven't taken
it out of Windowed mode. So if we go back over
to our editor and we go to the scene graph
and we click Remote, this is the actual scene
graph of your running game. Local is the one that you're
working with in the editor. Remote is the one
that is in the game. So now if I go back
to my game window and I press the Space Bar, you can see that
we have a shell. It has been added
to the game world. And now, if I back up, we can actually see it. It's right here. And that's because we haven't given it any forces or anything
like that yet. So all that happened and you can't really see it
from this camera angle. All that happened
is that it just fell and hit the ground, and now it's doing all sorts of crazy nonsense because it's
colliding with the ground. So we can see that slightly easier if we go
over to the shell, and we go to access Lock
and we hit linear Y. And this means that the shell
will not go up or down, regardless of what kind of physics had been applied to it. So now if I fire a
shell and I move away, you can actually
see where it is. And that's probably
because well, I don't actually
know why that is, but we're gonna fix that because this isn't really
what we want anyway. So let's go back to Shell, and let's leave linear Y locked for now because
we want to be able to debug where our shell is appearing when we
first spawn it. Okay, one thing we need to fix before we carry on is that I forgot to provide the up vector
for our look at function. So whenever you do look at, and there are also a bunch of other functions that
require a reference vector, usually the up
vector, basically, you just have to provide
vector three dot up, which is a constant vector that indicates up in the Y direction. And Godot uses that
for all sorts of calculations to make sure that everything is
oriented correctly. Okay. So the first thing
we need to do to fire our shell correctly is to set it to where it
is supposed to be. Because right now, what
I have the feeling is happening is that when
we spawn the shell, it is simply spawning
at 00 within the world. So we're gonna change that.
And in order to change that, we need a reference
to the firing point, which is the marker three D. So var shell fire
point marker three B. So now we simply
drag this over here, and we have a reference
to the firing point. We also are going
to need to define a muzzle velocity for the
shell. So let's do that. Thanks This is how fast or how much velocity we're gonna apply
to the shell when it fires, and we can make it an int. We can make it equal to 20, and then you can change that value later on if you decide that it's either too fast or too slow. And before we actually start placing the
shell on the world, there is also one other
thing that we should do. And that is we should provide a value here called
Ignore layer, which is an integer. And why are we going to do that? Well, because as I
mentioned before, every shell is going
to be fired by either the player
or enemy tanks, and we don't want the shell to collide with its own
team, so to speak. For the player, that means
we don't want a shell fired by the player to be able to test for collisions
with the player, especially since we're spawning the shell within the barrel
of the player's gun. We're going to need a
little bit more logic for the enemies because if we simply disable the collision on an enemy shell
against other enemies, that means the
enemies will be able to shoot through one another. So when we get to the point
where we're doing AI, we are going to basically
have the tanks not shoot when they don't have
a clear line of sight to the player and any
other tanks are nearby. There are other ways
to solve that problem, but that's just how
we're going to do it. What that means is that
we have to provide the layer index of the
collision that we want to disable whenever a
shell is fired because the same fire shell
method is going to be used by both players
and enemy tanks. So in the player's case,
it's going to be layer one, because, as you recall, the values of the
layers start at one, even though it says
it's bit zero, which is kind of obnoxious. So we've got fire
shell equal to one, and then within the tank, we're going to tell
the shell to set its collision mask value
equal to the ignore layer, and we're going to
set it to false. And that means that
if a player fires a shell and we pass in
one as the ignore layer, it's going to go to the shell. And it's going to set the collision layer
or the collision, did I do it layer or
did I do it mask? Collision mask. That is correct. I want to make sure
it's the right one. So it's going to go
to collision mask. It's going to set layer
one equal to false, which means it's
going to turn it off. So that means a shell
fired by the player will not collide with the player,
which is what we want. And we can ignore this
error because we hadn't saved this function before
we put it over here. So it was grumping
that the signatures didn't match, and
now they're good. Once we've done that,
we can actually start positioning and
orienting the shell. Now, we don't want
to do anything to the shells position or rotation before it's
been added to the world. Otherwise, we're going
to get an error message, something along the lines of Is inside trees equal to false. And while it's not really
that big of a deal, we kind of don't want Godot
to be throwing errors at us. So the shells global position. Is equal to the Shell fire
Points global position. And now, if we go to our game, and to make this a
little easier to see, we're gonna rotate our barrel. And we fire, there is our shell. Now, of course, it's facing
in the wrong direction, and it's not moving or
anything like that. And we're about
to fix that next. Orienting the shell is
a little bit trickier. In fact, this took
me a couple of hours to figure out prior to filming, so you get to benefit
from all of my pain. So we are missing
something in terms. Okay, so I called
it turret hinge. Should be turret
joint, but whatever. Boop. Is that better? That is better. Okay. So in order to
rotate the shell, we need to take into
account in the X direction, the turret hinges Z rotation. That doesn't make
a lot of sense. Let's take a look at it. So if we go back
to the tank, Boop. Well, let's look at
it from the top. So the barrel anchor point, which we've referred
to in the script as the turret hinge is right here. And because the tank
is facing forward, which is in the
positive Z direction, we rotate the hinge
with the X rotation. But because the tank is actually rotated within its
local space 90 degrees, we're actually really rotating
it with the Z direction. So that is just annoying
as all get out. So the Z rotation, in this case, is the up down rotation because when we originally had the
tank facing to the right, uh, that was what
moved it up or down. So that will angle the shell
in the correct direction. However, we need
to angle the shell such that it is facing upward, and for some reason that requires us to
reverse the rotation. I don't know why
that is, but it is. Then we need to
take into account the turret rotation
in the Y direction. Because the turret hinge does not actually rotate
in the Y direction. The turret rotates. And we'll take a
look at that again. Let's go back to three
D. So the hinge, which is right here ish does not rotate when
the turret rotates. So in order to get the shell to be pointing in the direction
that's going to fire, we have to take into account
the turrets rotation. So once we do all of that, the shell is going to be facing in the
proper orientation. So let's go over, like so, and we'll fire. And it's gonna make a
fool out of me, isn't it? Alright? Let's see
what the problem is. Well, that was fun to debug. Okay, so for some reason,
the master project, where I got this working yesterday with the
exact same numbers, is not doing the same thing as this version of the project with the
exact same numbers. Yay. So the way I was able to get this fixed
is to do a couple of things. First, we went
back to the shell, and we made sure that the orientation was done in
a slightly different way. You may have noticed
that initially we rotated from the X axis first, and I'm not sure why we did that. We shouldn't
have done it at all. But I reset the rotation and
changed it such that in Y, we moved we rotated it such that the shell
was facing forward and in the Z direction that
the shell was facing forward? What happens if I change
this back to zero? Strange. So I guess the base orientation of
the mesh required it such. Not really sure why that is. And I also double checked that the tanks orientations
were correct, and I parented the
turret underneath the body instead of directly
underneath the tank. I'm not entirely sure why that had an effect on it.
It really shouldn't have. But, yeah. So once
all that was done, we're able to effect the
rotation by the original Factor for the Z, which was the negative value of the turret hinges rotation
up and down, which is fine. But in order to get the Y
rotation to work correctly, we had to add the turrets
rotation to the tanks rotation. Otherwise, it would have
been oriented correctly only if the tank was facing straight up or straight
forward or backward. So now, if we go like this and up here and
then hit Space bar, and then we'll move the barrel
away so you can see it. Now we have a shell
perfectly oriented. And if I orient the
tank, Same thing. So the moral of the
story is that sometimes you just got to play
with the numbers to make sure that everything
lines up correctly, because visually
speaking, a lot of these orientations work where
mathematically, they don't. And that's bad. So the
next thing that we have to do is we have to provide
what's called an impulse. And an impulse in physics is a one time force
applied to a body. So if we wanted the shell to be constantly moving forever
and ever and always, we would apply a
force, but we don't. We only want it to have an
initial explosion so that it's propelled and then gravity
and velocity take over. And that is called an impulse. So an impulse is a vector three. And in this case, and I'm not entirely sure
why it's done this way. You would think that it would
be in the other direction, but it's not, and I
don't really care. We start with the back vector, which is to the
rear of the shell, and we're going to multiply
that by our muzzle velocity. And then once we've
done that, we can apply that impulse to our shell. Unfortunately, that's not
all there is to it because vector back is a
normalized vector, which means it's only going to be one in the
negative Z direction. And it's not going
to be oriented correctly to the
tanks orientation. So it's going to be a basically, to make a long story
short, we have to rotate this impulse with the
tanks orientation. So we can do that
right under here. So if we take our
initial impulse, which is a straight back vector multiplied by our
muscle velocity, so let's take a look at that in our shell so straight
back is one unit here, and then we multiply it
by the muzzle velocity. So it's actually way
back there somewhere. But now we have to
orient it to the shell. So let's go back to our tank. So that means we
have to rotate it along and hopefully
this will be correct, given that I just changed
all the orientations, but we have to rotate it
along the right axis, which is the X axis to the
orientation of the shell. And then we have to
do likewise with the up axis because we're
angling the shell upward. Although, in this case, I think that since we've
added these two, we don't have to
compensate for this. So let's just
change this back to shell rotation Y and
see what happens. And then once this is done, we can do shell, apply, and we're going to use
a central impulse, which means the
impulse is going to be applied directly to the
center of the object. It's also possible to
apply it off center, but we don't really need that. So impulse that should
fire the shell. Now, watch it not work.
Yep, it's slightly off. At least Ah, and part
of the problem is, I don't think we disabled the, we still have linear Y checked there, so let's uncheck that. Maybe that'll fix this. Phew. Yes, yes, it does. So now we've got our
shells firing and they are correctly
firing at our angle. And life is good. And you can see that they are backwards. Awesome. So we're going
to have to fix that. And then once we do, we
should be good to go. Yeah, the shells are backwards. That's hilarious. Alright, we'll double
check why that is. Okay, stupid mistake. So there is one more
parameter for the look at function that my original code had that this version
of the code didn't. And that is a true. So Look at has a third parameter that
says use model front, which means that it will orient towards the Z axis,
which is forward. Otherwise, it treats
it camera forward, which is negative, so
the exact opposite. So if we set this to true, then that's why the shell was flipped around
because it was assuming that the Z axis which controls forward
and back was flipped. So now, after all that nonsense, Boom, we have a correctly
angled shell that fires. But we're not done yet. We
have a few more things to do. So the first thing that
we need to do is we need to have the shell handle
its on body entered. So we want the shell to explode whenever
it hits something. And we haven't done anything
with explosions yet. We're going to do that
in a future lesson. So for now, we're just going
to use the free method. And what are does is it takes the object out of the
scene tree and puts it into a separate queue
that Gadot will then destroy at its leisure. And in addition to this, we've had a bunch of errors down here every time
we've fired a shell. And the first one is that the node origin and the target were the
same for the look at. So we don't want that.
For some reason, in the initial calculation, the global position and
the linear velocity are exactly the same because
the shell isn't moving yet. So we're going to
calculate this. Let's call it impulse
vector. It's a vector three. And it's equal to
this value here, global position and
linear velocity. And if the global position is equal to the impulse vector. Well, if it's not equal to the impulse vector, then
we want to do this. And that will solve that
will solve our error. But we also and I don't know if this
actually affected anything, but I had it in here. Well, I had it in here anyway. There's a function called
Is ed for deletion, and that will return true
if we've called free. So we don't want to
attempt to adjust this if it's no longer
in flight, so to speak. So now, if I shoot something, the shell will disappear
once it hits it. And you can see the
shells are no longer hitting t
17. Environment: World Lighting & the Global Sun: Welcome back. In this short but no less
interesting chapter, we are going to look at how
to modify the appearance of the environment using
the world environment and the directional light nodes. So as you can see
here, I have deleted the directional light
that we've been using as our temporary sun for the
last couple of lessons, and I have also changed the background
color such that it looks a little bit
like a sunset. Now, this is entirely in
preview if I were to run the game you can see
that we have Nodite and the sky is gray and does not look at all like
the sunset that we created. And that's because these
are purely previews, and they are controlled by
these two buttons here. We have the preview environment,
which if we turn off, there goes the sunset, which covers the ground,
horizon, and sky. And then we've also
got preview sunlight. So if we turn that off, then
our sunlight goes away. And if we turn them both off, we can't see much of anything. So what these are for
is to let you tweak your environment settings
and get them right before you add them to your game world, because in previous
versions of Gadot, you had to actually tweak
the settings manually and then run the
game every time you wanted to see how
different they looked, and that was just a
drag for everybody. Let's click on these three dots, and we will get
these settings for both the preview environment
and the preview sun. And we can change all of the stuff here that
we want to change. So for the sun, for example, we can change its angle. We can change its azimuth,
whatever that means. We can make the sun really hot if we wanted to
be on tattooing, for example, and change the
distance of the shadows. And once we've got
a sun that we like, let's do some long shadows. Once we've got a sun that we like, I'll put this back to one. We can then add it to the
scene as a directional light. Now, we're going
to be looking more about looking more at
lighting in a future lesson, but sunlight is simulated by a directional
light. So here one is. And then notice that since I added a directional
light to the scene, I can no longer mess with
the sun in the preview pane because since the scene already contains a
directional light three D, it doesn't allow you to
use the preview settings anymore because it's using the settings from what's
already in the scene. And we can do likewise,
for the environment. So as you can see, I change
the sky color to orange. I can make it even darker
orange if I wanted to. Or if we wanted to be on an alien planet,
we can make it green. And there is a slight
limitation here in that even though you can
alter the ground well, you can alter the
ground color here. If you wanted to,
you could actually alter what's called the Horizon, which is this little glowy strip in the middle between
the sky and the ground, but you can't do it
through the sun preview. So let's decide that
this lime green sun is exactly what we and then we'll hit Add
environment to scene, and we get a world
Environment node. Now, the World Environment
node has a number of options, but one of them is
that we can modify the environment settings
that we played with up here, and that is in the
environment resource. So if we click it,
we'll open it, and the one that we were
playing with is the sky. So if you open the sky and then you open the sky material, the sky material is
a procedural sky. Now we can also use
skyboxes and stuff, and we're going to look at that in a later
lesson as well. If we expand the sky, you got to dig really
deep into this one. And then if you
finally go down and open the sky
settings themselves, here are the settings
that we had changed, and now if we want to change
the horizon, we can do that. Now you see I got more of an
orange horizon back there. And you can also
change the ground, so I'll change the ground,
and I'll make it red. So now we've got a truly alien planet
that we're messing with. And you can also change the angle of the sun here
if you need to, as well. And that is very deep in. There's also a number
of other settings, similar to that for
the materials that we looked at before
for screen space, ambien occlusion, and also
fog and volumetric fog. And these are kind of
tricky to get right. But, you know, if you want to if you want to fight in a
snowstorm, there you go. Now, this environment will actually affect the entire game because if you go into game, since that environment
is part of the arena, and the arena is part of game, then when we go into the game, we will see it, and it
looks kind of crazy. But you can also override
that or at least add to it by adding a
environment to your camera. And in fact, this used to be the only way to do
it in Gudo so it's kind of nice that you
don't have to deal with this anymore. But
it's still available. So let's say, let's
go back to our arena. Let's go back to
World Environment. And did I turn off the fog? Yeah, it looks like I
turned off the fog. Okay. So let's say that
we want our world to be, for lack of a better
word, normal, but in a particular level or
through a particular camera, we want a fog setting. So we can add an environment
directly to the camera, and that will give us all
of the same settings. So now we can simply go under
fog and we can enable it. And now if I run the game, it should combine the
two, and it does. Actually, it looks pretty
good. All things considered? So, yes, that on its
most basic level, is how you alter the environment and the
lighting in your scenes. And again, we're gonna look at directional lights and
such in a future lesson, but that will give
you the basics. We'll see you in the next lesson where we start coding again.
18. Gameplay: Adding Enemy Tanks Via Inherited Scenes: Welcome back. In this lesson, we're going to take
a look at creating inherited scenes so that we can subclass our tank and provide a new tank that has
additional functionality. So let's take a
look at our tank. It's a pretty cool
tank, and we've got scripts that will do things, and it'll fire, and it'll
move and all that good stuff. But for an enemy tank, we're going to want
additional information. We want the enemy tank
to be a different color. I'm going to make the
enemy tanks reload slower. And also, they're
going to need to be controlled by an
AI state machine, which we're going to develop in the next lesson, I want to say. If not, definitely no less than two lessons down
the road. Probably next. But anyway, the long
and short of it is that we want to add an additional
AI module to this tank. Now, we could simply copy the existing tank scene and then add our new
information to it. But since it's an
entirely separate file, if we make any changes
to the original tank, they would not propagate
to the new tank, and we want them to do that. So we're going to use what's
called an inherited scene. So we go under scene,
instead of new scene, we'll say new and
inherited scene, and it's going to ask us what scene we want to inherit from. So let's inherit from the tank. Now we've got a new scene, and it's our tank. The name is in white, which means that it's unique. But all these yellow names, these are the original
nodes from the tank, but they're colored in
yellow to show that they're inherited
from the other scene. Now, if we were to
change the other scene, the information in this
scene would get updated. So, for example,
first thing let's do is let's save this and
we'll call it enemy tank. Now if I went to the tank and I went to the reload timer and I changed the weight time to
five, and then I saved it. Now if we go to the enemy tank, the reload timer is now five because it's inheriting
from the original tank. So let's set this back to two. However, it is possible
to change this stuff independent of the
original class or the original scene, rather. So if we go back to enemy tank, we're going to rename
it to Enemy Tank. And we're going to spell
it correctly. Here we go. In addition, we can actually change the data in these values, and it will override what
comes from the original tank. So the original tank,
the reload timer is two, but on the enemy reload timer, we're going to
change it to three. Now we hit save, and if we go
back to the original tank, the weight timer is still two, but on the enemy
tank, it is three. And we're going to do likewise, we're going to change
the color slightly, and that's the wrong
tab. There we go. So if we go to the body, we are going to select
that's not the right one. Where is it? Which one
is it? There it is. We're going to change the color. Well, we can change the
color of the original mesh. However, as I mentioned before, that is saved across scenes, and it's a little complicated, so we'd have to make it
unique to this scene. And, we don't really
want to do that. So let's look at a new feature, or at least new in the sense that we haven't
looked at it yet, the surface material override. What this does is you can provide a completely
new material here, and it will override
this material. So now we've got our
standard default white, and we'll go down to albito and we'll change
it to a dark gray. And we'll save. And now, solely for the enemy tanks, they have a gray body stripe. And now we'll be able
to tell them apart. So now if we go into the game, if we want to drag
one into our scene, which we do, we'll
take the enemy tank, we'll drag it up here, and then we'll use the
thing to move it over, and we'll put it here and we'll change the
way it's oriented. And now in our scene,
we have an enemy tank. And if we look at it, it's got the information that we can't see because it's
it's not exported. So we'll just click this to
open it up. And there we go. We're back to our enemy tank, and we can verify that its information is the way
it should be. Reload timer. Is. Now, if you did want to
change information from here, you can right click on it and
select editable children. And that would allow you to
alter this information here, and it would be saved to this particular
instance of the tank. So we could actually change the tanks colors directly from here and have
them individualized, even though they're all on
the same team, so to speak. Okay, so that is the
end of this lesson. Join me in the next lesson, and we'll continue on
with more cool stuff.
19. Destroying the Tanks: Welcome back. In this lesson, we are going to
learn how to set up the enemy tanks such that they can be destroyed
by the player. And the first thing
we're going to do is we're going to move the enemy tank so that it is slightly more
visible to the player. That way we won't
have to search for the dude every time we start up the game. Okay, much better. So the first thing we need
to do is we need to change some additional data
on the tank that was inherited from the player
that we no longer need. So if we expand the
tank, actually, no, we should do it
from the tanks scene so that it affects
all the tanks. So first thing we need to do is we need to
go to the camera, and you'll notice that the
camera is set to current. This is bad because we only want the player's camera to be
current, so we uncheck this. Otherwise, we'd be
seeing the game from the point of view
of the enemy tank, and, you know, while equal
rights for tanks and all, we only want the player to be able to see
what they're doing. In addition, the tank is currently set to the same
collision layer as the player. So we need to uncheck this, and we need to check this so that it's on the enemy's layer. And we don't want it to Well, we do want it to collide
with other enemies because we don't want tanks
to go through one another, but we also want it to
collide with the player. And that should cover us. Now, the other problem is
that the tank is currently inheriting or the
tank is currently set as a tank in the script. And as we mentioned in
the previous chapter, the tank is going to have some additional information that it's going to need to
handle in the script. So we're going to go over
to the inspector and we're going to go
all the way down to the bottom where
it says, script. And this shows the
script that is currently attached
to the enemy tank. And I was pleasantly
surprised to discover that they
recently upgraded this. So if I go here and I
select extend script, which is exactly what we want, it'll automatically
generate a new script inheriting from tank
called enemy Tank, which is exactly what we want, except we want it in
the scripts folder. Okay, so now we create
this. And we are good. In previous versions of Gadot, you had to manually unattach the script and reattach
it or at least manually create the
script and then set the class name and then
attach it in the inspector. And it's just more
streamlined now. Got to love open
source software. So we are going to name
this new tank script, if we can ever spell
it correctly, AI Tank. And we also are going to change something about tanks in
general because right now, it is possible for a shell
to hit not only a tank, but also the obstacles
or the arena floor. But the only thing
we want to be able to destroy is a tank. And there's a couple
of different ways of indicating that only
tanks can be destroyed. We are going to look at one of the most
straightforward ones, and that is groups. So if we go back to
our tank script or if we go back to our tank
object and we go under node, we see both signals and groups. So if we switch to
the groups tab, you'll see we have no groups. So we'll create a new group
and we'll call it sllable. Now, it's going to automatically be put under the scene groups, which means that it's only
valid for any objects within this scene and it's not recognizable outside of the
scene. We don't want that. So we're going to right
click on it, and we're going to convert it
to a global group. That means that any scene in the entire game is
ddable to this group. Now, if we hit Save and
we go to our enemy tank, we can see that the enemy tank, by virtue of being
a derived tank is automatically in
the sellable category. So now under Shell, our shell script, originally, we have this on body entered method that we
haven't done anything with for a few chapters
now or a few lessons now. So the first thing we want
to do is we want to actually define the type of the
body that is coming in, and we want it to
be a physics body three D. And this
basically will attempt to forcecast any object that is passed into this method into a
physics body three D, and that will work because
the only thing that the shell can collide with are other
physics body three Ds, which include the static bodies, rigid bodies, and
character bodies. So, we still want the
shell to disappear. But now, and actually, if we didn't do this, this is
partially for convenience. It's also partially that
variables that have their types specifically defined are slightly more efficient
for Gadot to access. But if we were to create
a if then statement here, and we were to go body
and then hit a dot, well, we have no autocomplete
because Gadot does not know what kind
of variable this is. So if we force it to a
physics body three D, then now if we go down
here and we hit the dot, we now have autocomplete. And the method that we
want is called I in group. And I wonder if
you can drag this. No, you can't. So we're gonna have to type
it in manually. So, if the body that we pass in is in the
group shellable, then we want to
destroy the body, and we can do that with
the body's three method. Now, if we run our game, we should be able to blow up
the enemy tank. Still foggy. Boom. Try again. Boom. No. Boom. Alright, I'm not sure if I'm
hitting the tank or I'm I've got an
error in my script. There we go. Direct hit. Might want to make it a
little easier to hit the tank and experiment or inspect
us to investigate. That's the word I'm looking
for. We might want to investigate why that was
happening. But, yeah. So that is all for this lesson. And in the next lesson, we are going to give our
enemy tanks some smarts so that they can fire at the player and attempt
to shoot him back, 'cause otherwise,
the game wouldn't be very fair or fun, would it? Alright, see you there.
20. AI: State Machines: Welcome back. In this lesson, we are
going to learn how to create a state machine
that in the next lesson, we're going to attach
to our enemy tanks such that they can drive around, search for the player,
and then shoot at them, and then we'll
actually have a game. So what is a state machine? A state machine is a class or
an object or what have you. In Godo's case,
it can be a node, and we're going to
make it a node. But regardless, a state
machine basically monitors a state.
And what is a state? A state is well, it's a state of being, really. So, for example, an enemy tank
can have numerous states. It can be searching
for a player. It can be attacking the player. It can be dead. Basically,
a state is a way to describe what the tank is or should be doing
at any given moment. And we can transition
from one state to the next based on various factors. So, for example, if the tank
hasn't seen the player, it could be in the
searching state, which means it's going to
be moving around the map. And then once it has
spotted the player, it can switch into
attacking state, which means that it will
be attacking the player, and then so on and so forth. However, we're going to
do this intelligently. We're going to do a self contained state machine
that can handle theoretically any state
without having to be coded specifically
for the enemy tank. That way, if we wanted to add a state machine to our
trees, for example, to have them grow or to catch on fire or
anything like that, we would be able to
do it very easily. So the first thing
that we're going to do is under our resource folder, we are going to
create a new scene, and that scene is
going to be a node. And we're going to call the
scene name state machine. And this is basically I
can't spell to save my life. This is basically just a way of skirting around creating a scene manually
in the scene tree. We could have easily done it up here by going to new scene, but it doesn't really matter. So we'll click on Okay. And
now we have a state machine. So if we double click, we
can open the state machine, and as you can see, it is an empty node with
absolutely nothing attached. And that's boring. So we're going to add a
script to our state machine, and it's going to be
called State Machine. We're going to make sure it
goes in the scripts folder. And now and we're going to
see how in the next lesson, you can drag and drop that state machine onto
any object that you want. So the first thing
we're going to do is we're going to give it
its own class name. And what does a state
machine need to do? Well, state machine needs to
monitor whatever state it's currently in and then determine when it's time to
change the state. And fortunately, most of that is dependent on
the state itself. So our state machine
merely needs to keep track of what
state it's currently in. And I probably just said that, but I'm getting
old. For our state? Well, actually,
before we do that, we need to actually
create a state class. So let's go under scripts. We're going to add a new folder specifically for
our state machine. We are going to drag the state machine script in
there, and fortunately, Gudo is smart enough to recognize that we've
moved our resource, so we don't actually have
to change where we don't actually have to change any
file paths or anything. Nothing will break.
It's glorious. So then we will
create a new script, and it's going to inherit Well, it's not going to
inherit from anything. So should we actually do it
this way? Yeah, why not? We can always delete that.
State machine, new script. State and then create. Now, a state is not
going to be a node, and that's because
the states do not need to process
themselves independently, nor do they actually need
to be in the scene tree. We just want a straight up
standalone GD script class. So we're going to call it
name, class name. Eight. Now, we could make it a node, but we're only ever going
to have one of them in play at any given time
for a state machine, so we could just as easily
make it a class and assign it within the script,
which we're about to do. Basically, every
node that you add to the scene tree has
a processing overhead, so we don't want to have any
more nodes than we need. And before we do anything else, now we can go back and we
can tell the state machine that it has a state
of type state. So this state variable is the state that the state machine is in at any given moment. Now, since the state
machine is a node, we can give it a
process function, and that means that every 60 or so seconds or basically as many as the
game is capable of handling, GIDO is going to
run this function. It's similar to the physics process function that
we looked at before, except that the
physics system is always guaranteed to run
at 60 frames a second. The process function is not. GIDO tries to run it
at 60 frames a second, but if your computer slows down, the process function is
usually the first one to fail. So we are going to tell the Well, we're
gonna check first. So basically what
we want to do is we want is the state
ready to change? If so, change it. If not, process it. Yeah, we're gonna have an error there this is all comments. Now, fortunately, all this is done within the
state class itself. So we will define a function called is ready to change state. And it's going to
return a Bleion. And our state class is
just going to be a stub. It's going to be
an abstract class. And GADo does not enforce abstract classes unless you're working in C Sharp,
which we're not. But you're never
going to instantiate the state class by itself. We're always going to
be overriding it in child classes through object oriented programming
and inheritance. And I will explain
that in a moment. We've technically been
using it all along, but I'm going to explain it
in more detail once we do. And this one is going to
return false by default. Because a completely blank state is never going to change state. Then, of course, we're going
to need a process function. And this time, I'm not putting
the underscore in front of it because actually, I don't know why Godot uses underscores for some of its
internal functions like that, but we're not going to do that, mostly just because
then at a glance, you might think that it's a
node process, and it's not. And actually, one
thing we're also going to need is we're going to have to pass the state machine into each one of these methods. We could actually, once
we create the state, just provide a reference to
the state machine itself. Actually, no, we don't have
to pass in the state machine. What we do have to
pass in is what's called the monitorable object. And that's not easy to say. So we'll just call it
monitor monitorable object. And the monitorable object, we're not going to
actually define a type for because it can
literally be anything. So process does not necessarily
have to do anything. And then we're going
to have another method that is going to be
basically an event handler, so on change state. And once again, we'll need
the monitorable object. An unchanged state
is going to get called whenever we
change our state. So let's talk a bit more about
this monitor table object, and I'm going to avoid saying that word as much as possible
cause it's not easy to say. And actually, you know what? We can just change it
instead of monitor tub, which implies, you know, that there's something
special about it. Well, we'll call it monitored
because that's what it is. And it's also easier to say, Monitored object. There you go. What is a monitored object? So the state machine is going to monitor
whatever it's attached to. In this case, it's going
to be the enemy tank. And the object that the state
machine itself and thereby the states is monitoring is what determines whether or not
the states will change. So, for example, since if we're monitoring the enemy tank, we might want to go from
search state to attack state depending on whether
the tank has seen the player. So that means that
the state machine needs to be able to
monitor an object. By default, our state machine is going to monitor
its parent because the state machine is always
going to be attached directly to the object
that it is monitoring. So we will create a variable
called monitored node, and we will create a function, a ready function for
our state machine. And within the state machine, the monitored node is
immediately going to get assigned to the parent
of the state machine. So if we were to add our state
machine to the enemy tank, which spoil or we will
do in the next lesson. If we were to add it right here, the get parent method
would return the tank, which is exactly what we want. And then we're going to pass that monitored node into
the state functions. So let's do that.
Now that we're in process or now we can
fill out process. If the current state
is ready to change state based on whatever status
is in the monitored node, then the new state is
going to be equal to, well, we don't know
that yet, do we? Because we have well, actually, did the state did we define
that? No, we didn't. Okay. So there's one more method that the state is going
to need to define, and that is called
Determine Next state. So each state is going to know what the states are
that it can transition to. And we are going to
return a string. And the string is
going to be the name of the new state that we
want to transition to. And what format is
that going to be? Well, we will see in a moment. So a default or rather
a, so basically, this abstract state that
we're never actually going to instantiate is going to return the string
default by default, because Part of the design of my state machine in general
is that I want it to have a default state
that is going to be the initial state that
the state machine is in when it first starts up. And we will define that shortly. But now that we have
determined next state defined, we can say, Well, actually, we don't
have this yet. Okay. So we'll get
that in a moment. Pass. Otherwise, if the state is not ready to change state, then state process based
on its monitored node. Alright, so what do we do here? Well, we are going to need a list of states that the
state machine supports, as well as their names. So in order to do that, we're going to
export a dictionary. And if you've never used
a dictionary before, a dictionary is a list of items, and I will show you how
that works in a moment. Basically, it's a list
of key value pairs, and a key isn't attached to a specific value, so
you can look them up. The best way to describe it is kind of
like a phone book, right? I'm showing my age. Phone books probably don't exist anymore. But let's say that
you had a book of all the phone
numbers in America, and the key might be
the person's name, and then the value would be
their actual phone number. So if you knew their name, you could look them up by name, and you would get the
phone number back. So in this particular case, the dictionary is
going to be blank, but once we create a new state machine in the next chapter, we'll
be able to fill that out. But for now, what we want
is we can replace this now with the syntax of accessing a string or accessing a
value in the dictionary. So the state is going
to be equal to states, and you access the value of a key with the bracket notation like you would for an array. States determine actually,
no, it's not states. It is state. That's why we're
getting any auto complete. Determine next state. And if I recall correctly, yeah Alright, should we should give it
the monitored object. The monitored object
is almost always gonna be necessary.
Determine next states. Because we want to be able
to do it fancy enough that the state is determined on
various states of the object. And we're getting an error here, but now that we've saved it, that should go away.
It's not going away. There we go. Alright, now, unfortunately,
we can't run this just yet, but there is one
more thing that we need to do before we move on to the next chapter so that I can actually implement this and
show you how it all works. And that is we need to add
a setter to the state. First of all, what is a setter? A setter is a function
that Gadot will call, if it exists to define to assign a value
to a particular variable. So, for example, if I define a setter function here and they always
have the same signature, it always takes the value. Whenever I attempt to do
something like this and I say, state equals whatever
this is going to be, Gadot will call
this function and pass whatever this is
going to be in as value. So the one thing we
always want to do in our setter is assign the
variable to the value. But in this case, we also want
to call the state handler. So we now say state on change state with a
monitored object. So whenever we do this, it's automatically going to do this. Now, if we didn't
define the setter here, we could easily put this here. But as you can see,
we are going to want to assign the
default state in ready, which I might as
well do right now, state equals states default. And since I'm also
setting it here, if I didn't do this
within the setter, I would have to remember
to put it here. So if there's, like, boilerplate code that you would
need to do every time you changed a
variable's value, setters are invaluable, and we're going to be using
them a great deal when we look at user interfaces because every time
we set a value, we're going to want to
fire a signal to notify the user interface
that the variable has changed so that we
can update the display. Anyway, this is now done, but since we don't
have any states, it's not going to
do us any good, so I can actually run it
and show you how it works. But we can now move on to the next lesson and implement the state machine
for the enemy tank, and I will remedy to that
Post Haste. See you there?
21. Adding a State Machine to the Enemy Tank via ECS: Welcome back. We are now going to add our
state machine to our enemy tank and set up a default state so that the
tank can process its state, even though it's technically
not doing anything. And then once we've got all
that framework in place, then we can start
actually creating the actual artificial
intelligence that will cause the tank to run. So let's take a
look at our tank. And the first thing
that we're going to do is we are simply going to drag our state machine onto our tank. Boop, and there it is. Technically, what we're
doing here is a form of the programming pattern known as the entity component system. And Godot kind of sort of
pays lip service to it in its general architecture in the sense that the enemy tank
is considered the entity, and all the stuff underneath it are considered components. If you're familiar with unity, it's more solidly structured in unity where you have a game object that you can
add various components to. And the philosophy is that the components don't have to know anything about anything. They can just deal
with themselves, and that will be the end of it. And the entity is
kind of sort of responsible for letting them do their thing and also
reacting to what they do. So in this case,
the state machine, it's a component of the entity, which is the enemy tank. And other than the fact
that it's going to read stuff from the tanks data, the state machine doesn't
have to actually care about anything that the tank is doing, although that may change. Who knows? We're going to
be designing this as we go. But in a nutshell, if you have items that are
attached to a master item, and those items are fairly
well siphoned or isolated off, siloed off from one another. You can consider that an
entity component system. So in this way, we don't have to like I said, in
our last chapter, we don't have to have
the state machine know a huge amount about whatever it's attached
to because it's only purpose is to
monitor states. So let's create some
states for it to monitor. We'll go under state machine, and we will create a new script, and it's going to
inherit from state, and it's going to be
called Idle state. Okay. And then we will double
click it to open it. Now, what is this idle
state going to do? It's not going to
do a darn thing. It is purely a placeholder
state so that I can show you how this
architecture works. So now that the state
machine exists and we already have our states
dictionary defined, we can fill this thing out. So what we'll do is we
will click on this, and now you can see that it'll ask me for a new key
and a new value. So I'll click on the
little pencil here, and the key is going
to be a string. And as we've already used it, we need to define
the default string. Now, what's the
value going to be? Well, dictionaries in Godot are awesome because their values
can literally be anything. So in this case, we want our value to be the Idle state script
that we just created. But before we do that,
let's do one other thing. Our idle state is going
to need something. So if you recall, we have a
method called nhange state. So we want our Idle state to report the fact that it
is now the current state. So in unchanged state, we're going to add a
print statement that simply says Idle state. So when we switch to the state, it's going to print that
out to the console, and we know that this
whole system that we put together is
actually functioning. So our new value is going
to be a new object. Fortunately for us,
in Godot, scripts, even scripts that haven't been instantiated or turned
into nodes or anything, just the scripts themselves are considered objects in Godot. More specifically, if
I recall correctly, they are considered resources. So what we need to do
here is unfortunately, the only option we
have is new GD script, and we don't want that
because it's going to assume literally a new
blank empty script. So we want to scroll all the
way down to the bottom here, and we want to go to load. Now, I can also do a quick load because I've
done this before, but you haven't we're going to go through
the whole process. So it's going to ask
us to open a file. Now, if we go into scripts, State machine, we Z nothing. And that's because,
oddly enough, a GD script file is not a recognized file type
for this sort of thing. So we want to go down to the
bottom and select all files, and then we can select
our idle state. And the last thing
we have to do is we have to click
Add key value pair. Now our idle state script is assigned to the string
default in our states list. And this means we need to do one more thing in
our state machine. In our ready function, we need to actually
add the dot Nu because since the GD script is basically a class resource, we need to instantiate a new
one into our state because our state object is
a state and it's not a script resource. So if we do this, now that we have a state machine
on our enemy tank, that means that
when the enemy tank enters the scene tree at
the beginning of the game, it's going to call
its ready function, and it's going to
go down the list of the nodes inside it and
call their ready function. And when it gets to
the state machine, the state machine is
going to grab the parent, which is, of course, the
tank as its monitored node. Then it is going to set the
state equal to the state that we have defined in our
dictionary under default. And in this case, it's idle state, so we're
going to get that back, and then we're going
to call new on that, and that is going to give
us a new state object. And just to and actually, we don't even need
to print that there because once that's assigned, it's going to call change state, which means we
should see the word idle state in our console. So let's see if this works. And there it is, Idle state. Alright, now that we've got
that framework in place, we can actually start
creating states for the enemy tank so that it
can actually do things. We're going to need to add
some additional components. There's that word again
to our tank entity, and then once we do
that, we can work with them within the state.
So let's get started. Before we do, though,
a quick note, the Idle state and the other states
that we're going to be working with make heavy use of inheritance of the object oriented
programming paradigm of which Godot is a huge
utilizer, so to speak. So what that means is that
if we create a base class, which we've done
here with a state, and then we create a child
class that extends that class, by pure virtue of
extending the class, we get everything
within the class. So if I hadn't defined
this function, the idle state would get all of this functionality for
free, and it still does. But then if we redefine
our change state method, which we did, this gets what's
called overridden by this. So if we hadn't done this
and we had simply used the existing called the existing on change state method, nothing
would have happened. So what we're going to be
doing is we're going to be creating a bunch
of child classes to override the state class
and then overriding the base functionality with the inherited child
functionality. And we can still get
access to the super class or the parent classes
functionality by using the super keyword. So, for example, if
I wanted to call the base change state method, I could simply say
super on change state. Of course, I would have to
pass at the monitored object. So we might be doing
that in some cases, but most likely we
will probably not be, but that functionality
is available to us. Okay, enough theory.
Let's get cracking. Before we begin, a quick note. You may recall in
the previous lesson, I fixed a slight bug
here where I had to add the dot Nu to
the state setup. I also had to do likewise in the process method for when we changed states because
originally this was missing, and once we changed states, that would
have caused the crash. But it didn't cause a crash
in our previous lesson because we never actually changed states, but
now we are about to. So, ultimately, our tank is
going to have two states. It's either going to be moving around the map and
looking for the player, which will be called
the hunting state, or it will be shooting
at the player, which will be called
the Firing state. So one of the first
things that we need to do is we need to
create those states. So we create a new script, and they inherit from state, and it's going to be
called Firing state. And we'll open that sucker up. And then we're going to do,
likewise, 40 Hunting State. Now, there's a couple of things that we are going to have to do in order to lay the groundwork in order to get
all this working, and we'll do all that and then we'll do the
code for the states. The very first thing that
we need to do is we need to add both of those states
to our state machine. So if we left click
on the state machine, you'll see that we had our
default idle state here. So now we will add a new state or a new
key value pair string, and it's going to
be called firing. And of course, the value
is going to be an object, and then we will drag
the firing state in there and then click to add
the new key value pair. And then we're going to do likewise for our hunting state. So we'll call it hunting. And we'll add that. And now our state machine can
recognize all of our states. So in order to handle
the hunting state, we're actually going
to do the firing state first because it's the easier
of the two to implement, but there is one thing
that we're going to have to create in order
to do the hunting state. So pathfinding is extremely
complicated topic, and Godot has its own built
in pathfinding navigation, but we're not going to use
that because given the fact that we are manually handling
the way the tank moves, it's going to produce
a lot more code then I would like to dump on you learning what's going on. So I'm going to do a simpler
version of pathfinding, a little bit more
straightforward. Then you will be able
to either look into Godot navigational meshes on your own time or just research
path finding in general. But the way that I am going
to show you how to do it is it's definitely one of
the industry standards, even though we're
going to see a very, very stripped down
version of it. So the first thing
that we're going to do is we're going to go
back over to our arena. And as you can see here, the arena has a bunch of
different obstacles and whatnot. So we are going to create a new kind of node
for the arena. So the first thing we're
going to do is we're actually going to add a new node three D. And the reason
we're going to do that is that just to keep things
from getting cluttered, we're going to want to group all the nodes that
we're about to add under this node three D. So let's rename
it to Path nodes. And why am I doing
that? It's because I'm going to create
a new kind of node, which will be called a NAPoint and we'll see how to do
that in about 2 seconds. And what's going to
happen is that I'm going to dot the map with these NAVPoints
and the tanks, the enemy tanks are
going to follow these NAVPoints to
move around the map. And this is one of the
original standard ways of doing AI in a lot of first person shooters
and other games like that. It's a lot simpler
than attempting to use a singular navigation mesh, which is what Godot also
allows you to set up. Basically, it's a lot
less points to deal with. And we're going to do it
this way because it gives you an idea of what a more complicated
solution would involve. And it also gives us a little
bit of a chance to flex our burgeoning
vector math skills rather than leaving
everything to the Godot. So let us create a new scene, and we are going to make
it a three D scene, and we're going to
change the type of the scene to a
static body three D. And we're going to rename
that three D to Nav Point. And as we've done before, we're going to add a
mesh instance three D to that AVPoint so
that we can see it. And we're going to make it a capsule mesh because why not? And we are going to alter
the material so that the navigational
mesh is actually visible, fairly well visible. We'll give it an albedo
color of yellow. And we will also expand. Okay, the mesh is fine. We'll change the
height to 1 meter, which makes it a sphere. Interesting. And then we'll
reduce the number of rings, because I mean, ultimately we're actually going to
hide it in a few minutes. So it doesn't need
to look fantastic. Then we will add, of course,
a collision shape three D, and that is going to
be a sphere because we've actually created a
spherical object, anyway. Alright, so we've got these, and we can shift
these up a bit so that it's not immediately
on the floor. And we don't need to
attach a script to this in any way. But we will save it. Now, we're going to
change a couple of things that we haven't
actually changed before. The first thing we're
going to do is, of course, we're going
to set the collision. We're going to uncheck
the mask because the NavPoint itself does not need to check for
collisions with anything. And we're going to add a new layer and we're going
to call it NAV Points. And we are, of course,
going to change the NAVPoints collision
layer to NAVPoints. And then we are going to go
to the Mesh Instance three D, and we are going to go down to the visual instance layers, and we are going to
uncheck one and check two. And we are going to change the layer names so that
layer two is NAVPoints. And why did I do that? Well, the visual layers are similar to the collision
layers in that you can group and it's also
similar to groups in that you can group things
together and then cull them. So what we're going
to do is actually, we're going to go
over to the tank, and we're going to go
to Camera three D. And now camera three D has
this cull mask here. And basically, any layer that is checked and they're
all checked by default, the camera will view. Now, we don't want these navigational messes
showing up in game, and the only camera that we're going to be
using is the one on the player or basically the one attached to any of the tanks. So we are simply
going to go here to the NAVPoints
layer and uncheck it. And now, our NAVPoints will not get rendered
by the player's camera. So let's now that
we've got a NAVPoint, let's add some to our scene. We will add them, and
we'll drag them onto the path nodes node so that they get attached
to it as a parent. And let's make sure this
is straight up and down. We'll zoom out a
bit. And what we're going to do is basically we're
going to put these points, and I'll just duplicate them
with Control V or Control D, and then we'll place
them in various we'll place enough of them
so that you get the idea. What we're going to do is our tank is going to move
from point to point. It's going to search for all the points that are
within its movement range. It's going to pick one at
random and then it's going to turn until it's
facing that point and then it's going to
move towards that point. Basically, all we want
to do here is we just want to create a bunch of
points or create a bunch, create a bunch of NAB points to give the tank
somewhere to move. Now, of course, if we have
the NAVPoints set up such that there is an obstacle
between the along the path, the tank is going to
collide with the obstacle. So we want to space them
far enough apart that the tank is going to be able to find them when it scans
for new points to go to, but not such that it would
be possible to actually go. So, for example, if the tank were to go from this
point to this point, we want to make sure
that the line between them does not include that rock. So we're going to adjust this a little bit, and we'll do that. Okay. And that is enough for that is
enough for the arena. So as you can see, you can actually see the NAVPoints here. But if we were to start
the game, which I'll do, let's double check where the
Let's go back to the game. Okay? So the player's
tank is right here. So now if we were
to start the game, You see that none of the
NAVPoints are showing up in the player's viewport because the camera is culling them
out, but they're still there. Okay, now that that is set up, we are going to modify
our enemy tank so that it can detect the player and then attempt
to shoot at him. The first thing that
we'll need to do, obviously, is go
to the enemy tank. But what we want to
do now is we want to add what's called an
area three D node. So we'll go to the enemy tank. We'll add a child node, and we'll add an area three D. And an area three D requires a collision shape just like our collision shape three D. In fact, they're
basically the same thing. So we'll add a child node here, which is, of course,
a collision shape. And we only care about things within a XY radius of the tank. So we can just do a cylinder. Now, this could also
be done by checking the distance between the global
positions of both tanks. But it's less code
to do it this way, and also it passes everything
off to the physics engine, which is more efficient. So the collision
shape is going to, um well, first of all, we're going to
reuse it up a bit. It doesn't really
matter how high it is, but just to keep things
visually consistent, we'll make it about as
high as the tank is. And then we need to change its radius to the radius that we want the tank to be
able to see the player in. So let's drag this fella
out until it's about, let's say, 15 Now, this is completely arbitrary. It's just a radius that I've decided that I want the tank to be able to
detect the player in. You could easily
make it ten or 20. I would not make it less
than the distance that the tank's shell will fire because you can make it
you can make it bigger. It's perfectly okay to have
the tank be able to sight the player before the
players within range. But, you know, we'll
see how that works out. So right now, we'll
keep it at 15, and we will change
the area three D, and we will call
it targeting area. And there is a bug with Godot where an area three D does not detect things that are static unless both monitoring and
monitorable are checked, which is kind of obnoxious. Because normally you
just want monitoring checked to see if things
go into the area. And so we'll uncheck
monitorable for this one, but we're going to be doing a
similar thing for movement. And I'll revisit that discussion when we get to
movement, I guess. I'm kind of jumping
ahead of myself here. But now that we've got
our targeting area, what we want to do is we
want to first of all, change the enemy tanks targeting
area collision to well, we can turn it off
for one thing, or we can turn off its
layers for one thing. It doesn't actually
have to be on a layer, but we only want it to collide
with the player layer, which not only does it rhyme, but it also means that the area is only going to care if
the player moves into it. So now let's go to node
and to area three D, and of course, we want the body entered and the body
exited methods. So we will connect those
to the enemy tank. And for some reason,
the connect button does not want to cooperate. Now, just to prove that this actually works,
we're going to do two things. We are going to
print the name of the body when it enters the
when it enters the area, and then we will print the name of the body when it
leaves the area. And you may be thinking
at this point, well, how can I visualize all this
stuff that's happening? I mean, how do we know the
extent of our casts and our collision areas and stuff while we're debugging our game? And I think I showed
you this before, but if I didn't, I'll
show it to you again. If you go under debug and we
do visible collision shapes, we can see the collision
shapes of all of our objects. So now if I start the game, now you can see you can see all the collision
shapes that we've set. And here is the targeting
range for the enemy tank, and here is the collision shape of one of the navigation nodes. So now if I drive
my tank forward, I've gone into the enemy
tanks targeting zone, so it says player tank, and now if I back out
of the targeting zone, it triggers the other method
and also says player tank. So we have a slight
problem in that the body is only in scope and therefore
valid within this method. We need to be able to access whatever the tank is targeting
outside of this method. So, of course, that means we're
going to need a variable, and we'll call it target, and it is going to be
a type character body three D because that is the
type of our player tank. So target is equal to body. And when the body has
left the targeting area, target is equal to null. So if at any point outside
of the tank script, we need to access a reference
to the player while it's in the targeting zone, we
can use this variable. And in fact, we're going to
use it in our state machine. So let us go to
our firing state. First thing we're
gonna do is we're going to give it a name. And while it's on my mind, let's do likewise for
the hunting state. And we need to go back
to our state machine, and we need to change
its default state from this dummy idle state that we created to the hunting state. And once we're there, we need to define a few things. So if you recall,
we had a bunch of helper stub methods
within state. So the first thing is that we need our should
change state method. So in the hunting state, we want to change out
of the hunting state if the tank has
found an opponent. So what we can do here is we return the result
of a bullion check. And the first thing
we're going to do. And so this is actually valid. When you override a method, even though we didn't define a variable type for
an input parameter, we can define it
in a child class. And in this case, we want to do that to help our auto complete. We're going to specifically cast the monitored
object to an AI tank. Now, we are going to
return the result of monitored object target
being equal to null. And so if monitored object
target is not null, then that means that
we should change from the hunting state to the firing state because
we found a target. And conversely, we want to do the exact opposite
in the firing state. So we should change out of the firing state if the
target is equal to null. And then, likewise,
we need to be able to indicate what the next state
is for each of our states. So for the hunting state, it's always going to transition
to the firing state. And for the firing state, it's going to always transfer transition
to the hunting state. And just to help us
with our debugging, we are going to echo because we're going
to override on change state anyway
for both of these. So we're going to
when we define it, we're going to echo what
the state is that we're in. So in the hunting state, we're just we're going
to print hunting state. And then in the firing state, whoops, we need
the whole method. In the firing state, we are
going to Echo Firing state. And now we can verify
that both of these are working if we go
back into our game. Now if I maneuver
towards the tank, we have a problem.
What is our problem? Alright, invalid access to property key firing
doll doll do. Okay. Did I not set these up correctly?
Let's take a look. Ah, I didn't use the word state. So so as you can see, the error here is that I'm
returning the word, well, this one was not spelled
right in the first place, but it should be just firing
instead of firing state. So let us go like that. And then for hunting state, we'll change it to hunting.
Now, that should work. So, as you can see, since
we've already set up our state machine to transition
to the default state, the fact that we set
our default state to the hunting state means that
once it's set and changed, Godot will echo the hunting word here to show that we're
in there by default. Now if I go, Uh,
it's breaking again. What did I do this time?
Okay, it's not on the thing. Why are these hunting state Hunt Aha
determined Next state. Oh, I changed the wrong ones. Ugh. Okay. Determine next state. Firing state. Determine
next state. Hunting. Alright. Once more with
feeling. There we go. So since I've gone into
the targeting zone, it's switched over
to the firing state. Now if I move back out, it goes back to the hunting state, which is exactly what we want. Alright, so now that we
have our target and we can switch back and forth between the firing states and
the hunting states, what do we want to do next? Well, as we saw before, we have a process method. And in our state machine, basically, in its
process method, we check to see if we
should change state, and if not, we should process the state that
we're currently in. So we need to override
the process method for each one of these states. And since we're working on
the firing state right now, that's going to be
the first one we do. So first of all,
let's make sure to Change all of these
signatures such that they specifically cast the object because that's what
we want to do. And, of course, we're
gonna have to override process in the hunting
state eventually as well. So in the firing state, once we have a target,
which is the player, we are going to want to rotate the enemy tanks
turret towards the player, check to see if it has
a clear line of sight, and then shoot the player. And in order to do
that, we need to add a couple of extra nodes
to our enemy tank. The first node that
we're going to add to our tank is called a cast three D. A cast is basically
an arrow that points to a target position within the world designated
in local coordinates, which means it uses the same coordinate space as the tank. And we're going to nickname
this one line of sight. And we need to have
the enemy tank be able to modify it and access it
from within its own script. So we will export a variable
called sightline, which is, of course, a recast three D. And then we will
drag this over here. So a cast is basically a line, and it will trace from its point of origin to the destination
that you give it, and it will be able to report on the first thing that
it hits along that path. So for our line of sight, if we trace a line from our enemy tank to
the player tank, and let's go back to
game for a second here. So if we trace a line, so this will be our
line of sight raycast. If we trace a line
from the enemy tank to the player tank, if there is nothing in the way, then if we say, Hey, what is the enemy tank or what is the ray cast
colliding with, we'll get back our target. If there was, say,
a tree in the way, the line of sight would report the first thing it
hit being the tree, which means we don't
have a line of sight to our players tank. So basically, we want to
compare what the line of sight ray cast is pointing at, and if it's the target,
then we know we have a clear line of sight.
So how do we do that? The first thing we do is we
go back to our enemy tank, and we go to line of sight, and we want our ray cast to collide not
only with the player, but also obstacles
and enemy tanks, and not the ground, not
shells or not Nav points. That way, it can
detect if there's an enemy tank or a
tree in the way, or it can find our
player when we find it. We're going to do
all of this within the firing state because the firing state is
going to contain the logic that is going
to determine whether or not the tank should
fire at its opponent. And the reason we do
this here is because if the tank loses sight
of the player, then we want to
transition out of the firing state and go
back to the hunting state. And that information
is incorrect. Let's go back to enemy Tank, and we'll get the correct line, get the correct code. Ah, okay. It's not that. It's this. Okay. So what do these two
lines of code do? The first one takes our monitored object,
which is, of course, our enemy tank, which is the entity that our state
machine is attached to, and it updates its sight line, which is the line of sight cast, its target position property, which is this variable here, and it sets it equal to the position of the target that the monitored object
is currently pointing at. So as you recall, from
a few minutes ago, we set the target equal
to the player tank if it went into the
let's go back here. It set the target value equal to the player's tank if it
enters the targeting area. And we don't have to worry about checking for
null values or anything because
the tank will not be in the firing state
unless it has a target. And we need this method
to local because the monitored object's
target position is local to its own space. So we need to convert it to the coordinate space of
the monitored object. Otherwise, it would
be in global space and the values would be wrong. Then we call the force
cast update method on the sightline to tell Godot to immediately update the cast, because if it didn't, then Godot would update the
cast on the next frame, so we would be off by a frame. We want it to happen
immediately so that we're checking
for the right thing. Now, if I run the game, since we still have our
collision variables or we still have our
collision shapes set, we don't actually
get anything here. There is a way to
turn these things on. Let me see if I can set it. Okay, I figured out
what went wrong. The line of sight cast
was originally at the base of the tank because
that's where it falls to zero I originally started
at negative one Y, which was down here, so we actually had to move it up such that you could actually
see it when it pointed at the opposing target. So now we gong Nat
and we run our game. Now you can see the cast from the enemy tank
directly to our tank. And what we need to do next
is we need to check whether or not what the cast is colliding with is
the target or not. So we do that by saying, I monitored object, sightline, and the method is
called Get collider. So if we call Get collider
on the sightline, and we need to see if it is equal to the target of
the monitored object, which is, of course,
our player tank. And actually, before
we even do that, what we can do is, let's just go like this and then
we'll comment this out. We will simply print what
it's colliding with. And we won't do it that way.
We will do it monitored. We'll spell it correctly object. Siteline dot Get
collider. Dot name. Now, we drive over here, you can see that it's colliding
with the player tank. But if I go here
behind this hill, The ray cast is now
colliding with the hill. Because the ray cast
is going through the Hill's bounding
box before it hits us. That means that the enemy tank does not have a line of
sight to the player. So let's get rid of that,
so we'll go back here. So if the enemy tank does have a line of
sight to the player, we want to rotate the turret until it is facing the player. And in order to do that, we actually need a second ray cast. Let's deal let's
comment that back out. Now, where are we going
to put this ray cast? This ray cast is actually
going to be on the turret, and it's going to be facing in the same direction
as the barrel, because we want to be able to see whatever the
turret is pointing at. So add another child node here, and that is going to be
a raycast again, Hmm. And this one is going to
be the targeting line, and it is going to only
collide with the player, and it is going to be as long as our aiming area
or targeting area. So how big was our
targeting area? Our targeting area is
a 15 meter radius. So that means the targeting
line needs to be 15. But since the tank
itself is rotated, that means we need to rotate
the targeting line as well. Now, as you can see, we've got a line stretching out
from our turret as far as the targeting
radius goes. And we're gonna change that slightly because we don't want this to be the way
it is ere we go. Okay. So now if we go back
to our script and we can uncomment this again, we are going to need, obviously, a reference to our
targeting recast. Enemy tank, target
line, target line. And let's just do a
quick sanity check to make sure that if we
rotate the turret, we will be able to rotate the cast correctly.
Yeah, there it goes. Perfect. Let me go
back to our script. Back to the enemy. No, back to the firing state. And we check if the monitored objects target
line get collider. If it's not equal to null, then we know that we are
targeting our player. But we want to check
to see if it is equal to null because
if it is equal to null, then we want to
rotate the turret. And how do we rotate our turret? Well, we've already got a method for that. Monitored object. I think it was I don't
remember the name of it. It was in the tank. There we go. And it was set turn speed. And in this case, again, it can either be one
or negative one. So if I set it to one, that is going to
indicate that it's always going to turn in
the positive direction, which may not necessarily
be what we want. What we would need
to do actually is determine the orientation of the object of the player to see whether a negative would get it there
quicker than a positive. But I'm going to leave that
as an exercise for you. So let me see if I can
clarify the issue here. So here is our tank from above. And let's say that
the player is here. Well, if we always rotate the turret in a
positive direction, it's going to go around
this way, which is fine. But if the tank was over here, then that means that
the turret would have to rotate all the way
around like this, and we actually want it to
rotate in this direction. So there is a method
called angle two, and we're going to
look at that when we deal with the movement
in the hunting mode. And once we've done that you should have enough
tools at your disposal. If you want a little side
lesson, so to speak, you can modify this code so
that the turret will turn in the proper direction to take the least amount of time to
rotate towards the player. But anyway, and
then we will need an else because if it is actually colliding
with the player, then we want to make sure
that the speed is zero. So we'll set the turn speed with the input vector equal to
zero, which will stop it. Now, if we there we go. Oh, it's rotating the tank.
We don't want to do that. We want to rotate the turret. So the method is
not set turn speed. It is it is rotate turret. So we'll go back to there. And instead of set turn speed, we'll do rotate turret. But you did see that
it was working. So we go here, and now the tank, since the tank is not
looking at the player, the tank will rotate its turret until the targeting
ray cast hits the player. Boom, and there it is.
And now it's stopped and it is locked onto the
player. It's not perfect. In fact, probably if you
shoot from this angle, it may not, it probably it
probably will hit the player, and we'll do that next. So, if the target line
collider is not null, which means it's
pointing at the player, we want to stop the rotation, and then we want
to fire a shell. Monitored object. Fire a shell. And we want the enemy tanks layer to be the
ignore layer that we use. And that is layer three. Yeah. So we set the
ignore bit to three. And now we should
have a problem. Well, our player should have a problem our players about
to get hit by a shell. So let's see it rotate around. And, yes, we have a problem. And the problem that we
have is that even though we instantiate the shell and we fire it and we send
out the signal, we never actually connected the signal for the enemy tank, which will attach
it to the world. So you see if you recall, in the ready function
of our game, we attached the shell fired signal coming
from the player, which, of course,
when that happens, it adds the shell to the world, but we didn't do that
for the enemy tank, which means that
once we get here, we're going to get
some errors because we cannot operate on the tanks global positioning because it is not inside it
is not inside the world. So if we go back to game,
we're going to do this in a slightly hacky fashion because eventually we're going to spawn multiple enemy
tanks, but for now, we can simply type get node enemy tank and then we will connect
it's s
22. Adding a State Machine to the Enemy Tank via ECS Pt. 2: Mmm the first thing we need to do is we need to force a few movement variables. So in the change state
for our firing state, which gets called when we
transition to the firing state, we want the tank to stop all of its moving and all of it's rotating and whatever
else it's doing. So we'll set the rotation speed and the forward
velocity equal to zero. That means that as soon as
the tank spots a target, it will stop everything
and then immediately go into checking
for its targeting. And we're going to do likewise
for the hunting state. Now, what is this idle property? This is a variable that we
need to add to our enemy tank. And it's a boolean. And it indicates whether
or not the tank is in the process of moving from one navigation
point to another. Basically, if the tank is idle, then we want it to find another navigation point
and move towards it, because we never want the tanks to be sitting completely idle. Although, I mean, maybe you do. In fact, if you're feeling adventurous after
we finish this lesson, maybe you can modify the
tanks such that they periodically stop and, you
know, maybe just look around. But for now, they're
always going to be moving and patrolling and
looking for the player. So in our hunting state, we are going to again, when we are on change state, we are going to force
the tank to idle, which means that on its
first processing pass, it's going to find a new
position to move towards it. And we're going to need a
list of those positions, and I'm actually getting
ahead of myself. So let's go back to
the tank scene itself, and we're going to
need another area. And this one is going to
be our movement area. And this is the one that has
to be both monitoring and monitorable because if
we uncheck monitorable, which is a very
difficult word to say, even for a native
English speaker, it will not detect our static navigation
points for some reason, which doesn't make a lot of sense because monitorable means that this area is detectable
by other collision shapes, but we don't want it to be detectable by other
collision shapes. So logically, we
would turn this off. But there is a bug and Gadot
where if we turn this off, it won't detect static
objects. So we'll leave it. And in its collision, we want to turn off its layer, and we want it to detect
navigation points. So we'll switch that and we will add a
collision shape to it. That shape, of course,
being a cylinder. And we'll move the cylinder
up a bit and, of course, change its we don't need a tight to be
as height as it is, and we'll change
its radius to 20. Ally, let's make it 25. And this is kind of arbitrary. Basically, this is
the radius that is going to search for
navigation points within, and we want it to be wider
than the targeting range just because we don't want to have to fill the map with points. We want to be able
to have them spaced relatively far apart
from one another. But this is completely
adjustable. Now, what we need is we need for this movement area to be able to trigger functions
on the enemy tank. So we're going to connect,
again, the body entered. And body exited methods so that it hooks up some
functions for us, and I don't know why it
keeps disconnecting that, but there it is. Boom. And now we can go back up
here and we can define an array called
nearby Nav points. And it's going to be an
array of node three D, although we don't
really need to get this fine grained with
determining it or declaring it. We can just say, and it's
an array or we can remove this entirely and just
have it look like this. But generally
speaking, you want to define the types of your
variables, if you can. So, when the tank is near enough to a
navigation point that it is inside
the movement area, it's going to trigger
this function. And when that
happens, we want to append the body to our
nearby NAV points. And when it goes out of that
range, we want to erase. From the nearby Nav point. So this variable will always have a list of the
correct nodes within it. Now, there's also a
method called get overlapping nodes that we
would be able to use as well, but this is slightly more clear for instructional
purposes. So now that we have this, we can go into our
hunting state. And basically what we want to do is if the monitored
object is idle, We're gonna want to do some
things, but before we do, our enemy tank is going
to need to be able to keep track of its nearest
navigational point. Also known as the target
Nav Point, either way. And actually, the NAPoints
are static body three Ds. But again, you don't have to get this fine grained
with the definition. But here, this one,
you probably should. Alright. Let me go
back to hunting state. So, if the monitored
object is idle, then we want to give
it a nearby NavPoint. So its nearest NAVPoint
is going to be equal to monitored object. Get random out points. And we have not defined
that method yet. So let's do so. At least in a stub. We'll
stub all these methods out, and then we'll look at how
to actually implement them. Uh huh. Much better. Alright, back to hunting State. And once we have a
navigational point set, then we actually want to say
that it is no longer idle. So idle is now equal to false. And on the next frame, we're going to check to see
if the monitored object or. Has reached its destination. Well, we're gonna check to see if it hasn't
reached its destination. If it hasn't we're
going to do some stuff, and I'll put that
stuff in in a moment. But if it has, then we want to set it back to idle so that I can pick a new
navigational point. Okay, so if it hasn't
reached its destination, then we want to see if it is currently facing
its destination. And if it's not facing
its destination, then we want to rotate it
until eventually it will be. So every frame it's
going to check to see if it's facing
its destination, and if not, then we said it's rotate speed monitored object. And we have the same problem here that we had
with the turret, so we're just going to
set the turn speed equal to one so that it's always going to be turning positively. And if it is facing
its destination, then we want it to move
towards its destination. So monitored object
Set move speed one so that it's moving forward towards its
destination. Okay. So now, once we
implement these methods, we will have a moving tank. And of course, we also
need to make sure that we appropriately turn off the move speed and
the rotation speed. So if it hasn't reached its destination and it is
not facing its destination, then we need to set
its turn speed, but if it is facing
its destination, then we want it to stop rotating
and set its move speed. And then, of course, once it
has reached its destination, we set it's move
speed equal to zero. Oh, now, let us
implement these methods. So we have has
reached destination. Rich, of course,
returns a bullion. And for now, it
can return false. Then we have Is
facing destination. And was it just those two? Has reached is facing, and then get random Nav Point. Well, we've already we've
already done that one. And I suppose I should keep the naming
conventions consistent. Told, I'm terrible about that. The Alright, so how do we get a random
navigational point? Boom. So what we're
doing is what is this? It's probably the wrong
one. Nearby Nav Points. Alright. Aah. Name is
slightly different. Nearby Nav Points. Right? What am I missing? Here we go. Okay, now everything is lined
up with my notes. So in this method, what we do is we declare a NAVPoint and we set
it equal to null, and we check to see if our nearby NAVPoints array
that we're maintaining here, if the size is
greater than zero. If it is, that means that
we've got NAVPoints nearby. And there should always
be nearby NAVPoints. If there isn't, then we
did something wrong. But it's just the sanity check. So we loop through the NAV
Points well, we do a loop, and basically we're
checking to see as long as the NAVPoint that we have selected is equal
to the nearest NAV point, or if it's null, that means
we need to get a new one, because what we want to
do is we want to not attempt to go to the same
NAVPoint that we were just at. Basically, it'll keep
trying to select a new navigation point at
random until it gets one that isn't the one we
just came from or the first time through the
first time through the loop, so to speak, because when the
function is first called, the navigation point is
going to be equal to null. So at the very least, this
one is going to trigger. So we set the
navigation point equal to a value from the nearby
NAVPoints which is, of course, an array, and we
use the Randy Range function. So Randy Range takes two values, the lower range and the upper
range, which is inclusive. So we actually have to
reduce it by negative one. So we want to start at zero, which is the lowest
index of our array, and the highest index of
the array is, of course, the size of the array size
of the array minus one. Uh, so basically we
want a random number between zero and the last
element of the array. So once we assign a random
array element to our NAVPoint, then basically we're
checking to see, again, is it the NAVPoint
that we've already got or just does it exist at all? So once we've got that value, we return it, and then we'll have a random
navigation point. It's very easy to check to see if we've reached our navigation
point because all we have to do is check the global position of the navigation point that
we're going towards, if the distance between
the global position of our tank and the
global position of the navigation point
is less than 1.1. And 1.1 is an arbitrary value. I calculated it by monitoring the global position of the tank every frame
as it updates, and the minimum number of
units that the tank moves at the speed that we've set is a little
bit more than one. It's like 1.08 or
something like that. So 1.1, if it's less than 1.1, then that covers that range. So check we use the distance two method,
which is, of course, a method defined
within a vector, and of course, the global
position of a node is a vector. So we check the distance
between our global position and the navigation point
target that we're going to. And if we are close enough to it that were less than a single
frame's worth of movement, then we've reached
our destination. And finally, the most
complex one of the bunch. Is facing destination. So what we need to do here is
we need to find the vector between that
represents the angle that we are attempting to face. So let me go back to the game, and we will set this to here. Now, what we need to
do is we need to find the vector that
represents this line, the line that goes from the
tank to the enemy tank, the player tank to
the enemy tank. And the way to get that
vector is by subtracting the position of the tank
from that of the enemy tank, and that will give
us this vector. And we want it pointing
from here to here. So we subtract this or we
subtract this from this. And that is Oops. And that is what we have here.
So the nearest NAV point. Alright, I actually need to
correct myself slightly. So it's not the player. It's the navigational
point that we're going to. So let's say that the enemy tank was going from here to here. We need to get the vector
that represents this path. So the way you get that is
by subtracting the origin, which is, of course,
the tank from the destination, which
is the NAV point. So the NAV points,
global position minus the global position of the tank, and we normalize it. And normalizing it
means that we shorten the length of the vector
so that the length is one, which means that it's
going to be a lot shorter because all we really
care about is the angle. And once we have that
normalized vector, we calculate the
angle using the angle two method for the
transform dot basis Z. And we looked at the transform before when we were
moving our tank around. The Z component of the transform represents the
facing of the tank. So if we calculate
the angle from here, to the way the tank is oriented, we will get the angle
between those two vectors. And as we rotate towards
the navigation point, that value is going to get smaller and
smaller and smaller. And eventually, if the angle between the two vectors
is less than one degree, then it's pretty safe
to say that we're pointing towards
the destination. So what we do is we take the
angle between those two, between the Z component of our basis and the facing
vector, which we just got. And for convenience sake, I'm using degrees to radians, the degrees to radians
method because I like to think in degrees and I don't know what the
equivalent radian is. So we say degrees to
radians one degree, and that'll calculate
the proper number of radians because the angle
two returns radians. So, again, we check
to see if the angle between these two things is less than a
degree and if it is, then it's facing
its destination. So all this should
just work perfectly. Let's start up our game. And we're wrong. So, Rotate turret is actually probably the wrong name of
the function. No enemy Tank. Uh, yeah, it's Rotate
Underscore turret. Alright. Hopefully, that's
the only one I broke that way. There we go. So now the tank is rotating Hopefully towards one of the navigation points,
and there it goes. And now, of course, Yep. So I didn't I didn't set these function
names correctly again. So what do we have? We
have set forward velocity and set rotation
speed equal to zero. So, yeah, it's
rotate turret zero. And set move speed. So what actually happens there is that because
as you can see, here's the collision
the collision sphere of the navigation point. So the tank is going to
rotate till it hits it, and then it goes
right towards it. But now I'm close enough
that the tank has seen me, so it's going to stop moving, and now it is going
to attempt to rotate, as we saw before and
then shoot at me. Let's see if that
actually works. And it doesn't work
probably because I'm outside of the I'm
outside of the range. That probably just requires a bit more tweaking of
the values, though. But yeah, so I'm going to leave this lesson here because
it's already way too long. If you are following along with the project for this chapter, it might be a good challenge for you to attempt
to fix these bugs. If you can, then you will have definitely mastered the concepts that I'm teaching you by being
able to troubleshoot them. But it is most likely
just literally adjusting the radii of the
Area three Ds and the casts. Well, that was a big one.
Join me in the next lesson, and we'll continue on
with more cool stuff.
23. SFX: 3D Audio: Welcome back. We are going
to look at positional audio. But before we do,
we need to make some mild adjustments
to our tank and our state machine such that we can actually get
the audio to work properly. So the first thing we
need to do is go back to our original tank dot gd script, and we are going to add a
variable called destroyed. And that is going to be a Bool. And if you recall, when we destroy our enemy tanks or when we destroy or
when they destroy us, we simply cue free the node and delete the
tank from existence. And that is bad for audio because if you are attempting
to play, for example, an explosion for
being destroyed, the fact that the node gets cued immediately means
that you're not going to hear that sound effect. We're going to do is that
instead of deleting the tank, we're just going to flip its
destroyed value to true, and then for the player, we'll ignore any further input. And for the enemy, we will switch them
to a destroyed state, which we will create before we do all the
positional audio stuff. So, let us add a function at the very bottom
here and we'll call it Hit. And right now, hit is
just going to be a pass. And then in the shell, when it hits a shellable object, instead of freeing it, we're going to call its hit function. And now in the hit,
we will simply flip destroyed to true. And in our game, we can go up to the top here
and basically say, I player destroyed return. That means that none
of the key presses will be processed after
the player is dead, which is just a drag
for everybody, really. And for the enemy
tank, as I said, we are going to need a new
state because basically, when the tank gets
destroyed, we want it to go to a state where it
will no longer process. So we will create a new script. It's going to inherit
from a state, and it's going to be called
we'll call it dead state, but it's technically destroyed. Open that dude up,
give it a class name. And, of course, we will give it we go to its change state, and that way, it can report
what its current state is. And then, of course, in
the enemy's state machine, we need to add a new
state to the machine. String destroyed. The value is, of course, an object, and then we drag our dead
state over to here. Add key value pair,
and now we are good. Now we have to modify our
existing states to go to this state in the event that the destroyed
flag has been flipped. And fortunately, the code
is the same for both. So we go into firing state, and in process, no,
not in process. I determined next state, no, uh I should change state, we return, we don't
need an extra on. We return either monitored
object target equals null or monitored
object destroyed. In either of those cases, then we want to change states, and we need to do this in
our hunting state as well. Then in the determined next
state, for both of these, we check if the monitored
object has been destroyed, then we go to destroyed. Otherwise, we go to firing, at least in the case
of the hunting state. And then in firing state, it's either going to be
destroyed or hunting. And what does the dead state do? Well, it does absolutely
nothing. At this point. Well, it actually
does one more thing. We are going to unconditionally
stop all rotation and all movement once the
object is in this state, that way, it will truly
have stopped moving, and it will be dad. Alright, so we got
Rotate turret, we got set move speed, and we need rotate turret. Well, I got them both already. Okay. Rotate Rotate, move
speed. There's one more. We need turn speed. That's the one. Alright. Once all three of those
values have been set to zero, the tank will no longer move, and there is no way
out of this state. So once the tank is
dead, it is dead, which is a drag for everybody, most of all the
people in the tank. Alright, now that that is done, we are capable of adding
our sound effects. But let's just make
sure that works before we do anything else. So we'll go over here,
we'll shoot the enemy tank, and boom, it's been destroyed. And as you can see,
it was rotating, and now it is no
longer rotating. It is no longer
doing anything else. Perfect. Alright, let's
add some sound effects. So we'll go back to
our original tank. Well, actually, no, we'll start at a slightly
higher level. Well, there are two kinds
of sounds in Gadot. There's positional
sound, and there is what you could
call ambient sound. Ambient sound you will hear
from anywhere in the game, and it's usually used for
things like background music. Our case, we are going to add some ambient
sound to our arena. So we'll add a child node, and we're going to use the
audio stream player node. Now, the audio
stream player with neither two D nor
three D designation is a simple sound player that will always play the sound at the same volume no
matter where you are. So we'll rename it,
call it ambient. And I've already provided three sound effects for
you for this project. So if you download the
project for Lesson eight, you should have these
sounds already imported. If you wanted to
reimport them or import your own sounds to practice importing
into a GodoPject. You can simply grab your
own audio files as long as they're in either wave
Og or MP three formats, and simply drag them into
your project folder, and they should
import right away. So we will go to the Amazon
Jungle Night audio file, and we'll drag it on
over into the stream. And now we are good to go there, and we want to
check the autoplay, which means that it's going to start as soon as the
node enters the tree, which means functionally
straightaway. Now, we have one problem, and that is we want to be able to change the various audio levels of the different
types of sounds. So, for example, we
don't want our jungle noises to be louder than our gunshots and our
explosions, for example. And we accomplish that by
virtue of the audio bus. And there are
multiple audio buses. Well, I mean, we get
one to default Master, which means that all the audio routes through the Master bus. If we add a new
bus, for example, and we call it ambient, and then we go back to our
ambient audio stream player. We can change the
bus to ambient. And now if we lower
the volume here, the ambient will be quieter, even though we haven't
lowered the audio or the volume level
of our overall game. So we're going to add
another audio bus, and this one is going to
be for sound effects. And that one's going to
be at normal volume. So now, if we load our game, Now, it sounds like
a foggy jungle at night with almost
no trees in it. And let's turn off
those collision shapes. We don't need them
for the time being. Okay, so now we need to have both the player and the
enemy tanks be able to make firing noises when they fire and explode
when they explode. So we'll go to our
base tank scene, and we will add two new nodes. We will add the audio stream
player three D node twice. And we're gonna rename one, and we're gonna call it Cannon. And then we're going to call
the other one explosion. We also need to be able to
access these in the script. So we'll go back to
our tank script, and we will export
these variables. And I'll make a new group just because we want to
keep things organized. Export ar Cannon
SFX audio stream player three D. And we need another one
for the explosion. And now we go back to our tank, and we simply well, first, we expand the category,
and then we simply drag these over here so that
we have access to them. And now when we go into
our fire a shell method, all we have to do
is cannon dot play. And when we die,
explosion dot play. And since these are Well,
we got to get them. We got to get the
names right first. It's Cannon SFX
and explosion SFX. And since these are audio three D nodes, they
are positional, which means that
they will adjust for distance from
the audio listener, which in this case, is your
camera by default. Oh. Alright, that didn't
work. And part of the reason for
that is because, well, they're going
through the master bus, which we don't want. We actually want them to
go through the SFX bus. That's a little bit big.
Let's drag that down. Touch. Okay, now
this should work. And it doesn't, let's
see what I broke. Ah, I see what I broke. Clearly, I didn't drag the
sound effects in there. You guys probably caught
that before I did. Alright, explosion Cannon. Okay. Now that we've actually got audio,
this should work. Clearly, I need a cup of coffee. There we go. Much better. Okay. And as you can hear the
kaboom from the enemy tank. And now we will also I'll move closer so that you can hear
the enemy tank firing at me. And you can see it's
going to be not as loud as it was before. And there you have it. We
have positional Audio, three D audio in Gado. And that's the end
of this lesson. I told you it would be a lot
quicker than the other one. So feel free to play around
with adding your own sounds. And if you want,
take what we learned by adding NAVPoints
and maybe add some map entities to
your arena that might play sounds and loop them
when they get near to you. Otherwise, I will see
you in the next lesson.
24. Basic UI Layers: Welcome back. In this lesson, we're going to learn the
basics of user interface, and there's going to
be no coding involved. So it's a bit more
of a vacation from the amount of work we've been doing over the
last couple of lessons. So, IGADo one of the most
useful things that you can do is to combine two D and three D assets
in the same scene. And one way that
you can do that, obviously, is with the
use of control nodes, which will allow you to overlay a two D user interface on
top of your game field. So here's our three D view. And also we have another
tab here for two D. Now, of course, we haven't done anything with two D at all yet, so it's going to be empty. But when you switch
over to that tab, you'll see that you have a two D coordinate space with the origin in the upper
left hand corner here. And this purple rectangle will be the boundaries
of your screen. And you can change the size of this rectangle by going under
project project settings. And then window, and it
is specifically mapped to the viewport width and
the viewport height of your game window. GADo uses a one for one coordinate to pixel scale when it does
its user interfaces. But it's also possible to
scale them for your window. But we're not really
going to do that. What we're just going to do
is put our assets directly into our user interface and go from there.
So let's do that. We've got our game scene here, and of course, we've got our
three D assets within it. So we're now going to
add a user interface by adding a child node and
by adding a control. A control is the most base
level node of user interfaces. And purely by virtue
of being a control, it is always going to render on top of the three D. So what we want to do here is
we actually want our control to be aligned to
the bottom of the screen. So we're going to click on
this anchor presets and we are going to click on this
one, which is bottom wide. So what it's going to
do is it's going to force the alignment
and anchoring of that control to the bottom of the screen and stretch it
across the entire screen. We could grab we could
grab these handles and drag it upward to make
it bigger or smaller. We could even move
it around because a control is not
locked to anything. A control can be
whatever size you want it at whatever
position you want it. It's just that in
a lot of cases, you actually want
to anchor it to the corners of the screen
for various reasons, usually so that if you were
to change your resolution, whether it be on the fly or if you're going to be making different
versions of your game, you might have issues with the user interface not
scaling correctly. So for example, if I here are the anchor
points, actually. If I changed these so
that they were like so, and then I made the
control like this, well, it's anchored to
this particular spot. And if we were to make
the screen bigger, then it might not
align correctly. It might actually be like this because everything's changed. So we are going to orient. But fortunately, we're not going to have to worry
about that for now. We're only going to be
building for one resolution. So we're going to realign it to the bottom of the
screen like this, and we are going to add
a texture wrecked node. And a texture wreck does exactly
what it says on the tin. It holds a texture. And in this project, I've provided you with
a singular texture and tou fonts that
we're going to use to create our very basic UI. So we're going to
drag the PNG file over to the texture,
and there it is. And now, because of the
orientation that we've done, it's actually off the
bottom of the screen. So let's see if we can't
realign this thing properly. No, you're gonna be
like that, are you? Alright. Let's go like this. One of the glorious things about working with user
interfaces in Gadot is that even though it's infinitely
easier to use than most other game engines and has a lot less quirks that
you have to work around, the quirks that it
does have, sometimes you find yourself
fighting with it. You're like, Oh, does this
work the way I think it does? Yes, no, maybe. I don't know. Okay, so let's change the
texture rectangle to that, and it should actually work. Actually, this Okay,
yeah, let's go back. Let's try this differently.
We'll go through the control and we do not that. We'll do full screen
or full window rather. And then that way, the
texture rectangle, if we set it to bottom wide, it will now properly scale and should be the
way we want it. And we don't have
to worry about the expand mode or anything, but we will change that. Actually, no, we
won't disregard that. But if we were to
change the size of this texture or the
size of the control, we could change the
texture scaling here. And we are also going to
use a margin container, which in the long run
is probably one of the most useful containers that you have available to
you for user interfaces, along with the VBox and
the HBox containers. Panel containers
are also amazing. And what we're
going to do here is the margin container is
going to be full wrecked. But since I put the
margin container as a child of the texture rect, when I say full wrecked, for the margin container, it's going to be the full
wreck of its parent. So, in the case of the control,
when I said full wrecked, its parent was the screen, so it was the full
size of the screen. But the margin container
is going to be the full size of
the texture wreck. And what a margin container does is it allows us to provide margins for
our user interface. And that's under layout
theme overrides constants. So let's go with
20 for the left, 20 for the right, ten for
the top, ten for the bottom. Again, these are pixel values. Now, of course, we're not
going to see anything because the margin container
doesn't have any children. So we're going to give
it one. We're going to give it the VBox container. VBox container, as
the icon shows, will take all of its
children and arrange them such that they are
vertically oriented. So if I were to add, say a bunch of labels,
we've got a label here. Let's put some text. And then if I were to
duplicate this a few times, you can see that
they automatically stack on top of one another, which is incredibly
useful for layout. However, within our
VBox container, we are going to use
a HBox container. And the HBox container does the exact same thing
as the VBox container, but it does it in the
horizontal direction. Now, also a word of note, most containers
will resize all of their children such
that they take up all the available
space in them. So as you can see, the margin
container is this big. And then when I put the
VBox container in it, it automatically resized itself to take up as much space as the size of the margin
container less the margins. So here's our 20 pixel margin, and I don't really
like that ten. I think I'll change
it in a second. But here's our 20 pixel margin and here's our ten pixel margin. If we didn't have those margins, then the VBox container would be the size of the
margin container. And we would not be able
to change that size. We wouldn't be able to
make it smaller than that because that's just
how containers work. So, we will go back to our
margin container and we will increase these
margins just because. And now, within the
HBox container, we are going to provide a label. And the label, as you can see, you can't actually
see anything in it, so we're going to
give it some text. What this is going
to do is we're actually going to create
an indicator here, which we're going
to hook up to code in the next lesson that's going to show whether
or not our tank is ready to fire or not. So we've got status,
and we're going to change the font color and
all that other good stuff. So we want to go to
theme overrides, colors, and we want to change the font color
so that it is black, and we're going to
change the font itself to the stencil font that I provided for
you in the project, 'cause it's nice and
military looking. And then we'll go to font sizes, and let's make that 25. And that's not good. Let's
make that 45. Much better. Now, it's left justified
in the upper left, and we actually want
it over to the right. So there's two ways to fix this. The first is that we
are going to tell our HBox container
to align to the end, and that solves our
problem, mostly. Actually, yeah, it does
it solves the bulk of our problem because our label
is where we need it to be. And now, instead of
adding another label, we are going to add
a rich text label. Rich Text label is a fancy version of the label that has a lot of
extra functionality. You can use them almost
interchangeably. There are some advantages to using one over using the other. The biggest disadvantage I found of using the
rich text label is that it doesn't always
vertically size accurately, depending on the control
hierarchy that you use it in. But as we're about to see, it has a lot of other abilities that just make it really cool. So the first thing that we're
going to do is we're going to go down to layout
and transform. No, actually, we're not.
We're going to go to layout. And right here, you can see
the custom minimum size. Now, in most controls, this will default to 00. What Gadot does is it will
start with this minimum size. It's exactly what
you might think. So right now the
minimum size is zero. So both in the horizontal
and vertical direction, this control is treated as zero. However, vertically, it's
actually extending to the height of the
parent container, of course, the HBox controller. But vertically or horizontally,
there's nothing in here. So for horizontally
in the X direction, let's say that our
minimum is 200. So now you can see, at the bare minimum expanded
to be 200 pixels. And we're going to
get a little fancier. We're going to go down
to theme overrides, and we have a lot more options
for the rich text label. And the one we want
is styles, normal. Alright, we can't check it
because we have nothing there. But if we extend this, we have the option
of style boxes. So we're going to go
to style box flat, and now you can see that the background of the
label is colored in. We don't want that
great color, though. Let's change it to black. And let's put some text in here. And, of course, that text is the wrong font and
the wrong size. So first thing we're gonna
do is we're gonna change the where is it? Fonts. We're gonna
change the normal font. And once again, we can't click on it cause we
have no font in it. We're gonna use the LCD N font, which is really cool looking. So now you can see we've got
a nice LCD looking font. We're gonna change
the size, normal. Oh, I'm using the wrong one. No wonder. Normal font size, 24. There we go. It's a little
too big. That's good. Now, we have a slight
problem here in that the stencil font is kind of off kilter in the
vertical direction, and the LCD font is
perfectly centered. And there is absolutely
nothing we can do about that. So we're just kind of going
to have to tolerate it. We would be able to
if we were just using manual layout with every control directly
under the control, we could nudge the X
and the Ys perfectly, but I want to in this lesson, I want to show you how
containers interact. So now we want to
go under colors, and I think the default color, we want it to be yellow. So it's nice and
computery looking. And now, this is the main
power of the rich text label. We have what's called BB code. And if we check that, BB code allows us to use HTML like
formatting within our label. So, for example, even though we set our label color to yellow, if I were to put a pair
of color tags here, and they use brackets and not
angle brackets like HTML. So if you try to do
this, it won't work. So just go with this. Color I got two of them there.
Color equals red. And now we have red
text. And there is a lot of formatting
that BB Code can do. Unfortunately, I will not be
able to go into all of it, but if you are curious, you can simply Google
BB code Gadot four, and it will take you right to the Gado documentation and show you all the tags
that are supported. The one that we are going to use is going to justify our
text within the label. So we're simply
going to say, right. And now the reloading is
where it needs to be. Fortunately, it's kind of crammed up against the
edge of the thing, so I'll pad it out with a
couple of extra spaces. And now that looks pretty good. Obviously we can add
a whole bunch of other indicators and doodads
to our user interface. But this is enough
to get us going. So if we run the game now,
we have a status bar. And in the next lesson, I will show you how to hook
the status bar up to code and use signals to update
its values. See you there?
25. UI Events and Signals – Scoring: Mm hmm. Mm hmm. Welcome back. Before we begin, we are going to duplicate the HBox container for our status indicator with Control D. And the reason
that we're going to do that is because
we want to have a second indicator
for our kill count. Even though we only
have one tank on the board right now,
we're going to have more. And now that we've got multiple HBox containers here,
we're gonna rename them. So you load status
and kill count. And it's also a good idea to
rename the rich text labels themselves because
we're going to be using them as direct references. So we need to know what they are to be able to tell
the difference between. And the naming convention
I usually use in such a case is the name
of the control and value because that
differentiates it between that
differentiates it from whatever label
we're using to also designate the thing
because we've got a label, but we've also got a label. So how do we tell the
difference between the two? Well, this one is static
and this one is of value. And then, of course, we change the reloading the
reloading text to a zero, and we should also change
the reloading status of the other one to ready because that's what we're
going to start with. Although it might be
a little smarter to refactor this
afterward to have it set to whatever the current or the starting status of the tank is, but we're not
going to do that. We'll just set it
to ready. Okay, so now that all that is ready, we need to add a
couple of scripts, and then we can hook
up all of our signals. So the first script
we're going to add is one to the actual
control, which, of course, should
be renamed now that I think about it
because it is our UI. And we will attach a script, which can, of course, be
done from here or here. And we don't really
need to give it its own class name, but
we're gonna do it anyway. And within the UI, we should get references to the values that
we're going to change. Which is a rich text label. Okay. And then as usual, we will drag these over here. We need these labels to respond to signals from
two different places. The kill count value
needs to respond from a signal from any one
of the enemy tanks, and first of all, we've only got one
enemy tank here, but we're going to be
restructuring the scene in the near future so that the enemy tanks are
in different places. It's only going to go under a
secondary node for enemies, most likely, or
maybe the spawner, we'll burn that bridge
when we come to it. The problem is, is that if
we change our hierarchy, then however we got our
enemy tank may change unless we put a reference
to the tanks in the game, we don't
really want to do that. Likewise, we need to get the reloading status
from the player, and the player where
he is is fine, but, you know, even so. So what we're going to do is we are going to add
what's called an auto load. So we're going to go
to our Scripts folder, and we're going to
create a new script, and we're going to
call it Messenger. And that's just what I
call all of my auto loads. You can call it
whatever you want. So the messenger, there it is. The messenger does
not need a class name because we're going to go
under project settings, and we're going
to go to Globals, and then click the folder icon, scripts messenger to add it, and then we hit the ad button. And now, what has
happened is that Gadot will load this script and instantiate it as a child of the root scene in the game along with the
scene that we've created. And the easiest
way to illustrate that is to go right
ahead and do it. So if we run our game,
and if we go to remote, we can see that we've
got the root scene. Here is our game scene, and now we've also
got our messenger. This means that we can
access our messenger from any script in our game
purely by using its name. So we are going to do that. Before we do, though,
we need to set up a few helper functions
within our UI. So what do we want to do here? What we want to do
is we want to have the UI respond to two
different signals. One, when the player's
reload status changes, and one when the kill
count value changes. So we're going to need to provide a pair of
functions to do that. And within this method, all we want to do is we want to change the reloading status as text based on the status text or no, based on the status. The
status is a boolean. So if it's true, that
means we're reloading. If it's false, it
means we're not. And normally, we could
just say I status here, but it's actually a little bit more illustrative of
what we're testing for. In fact, we could change
this to reload status. And that would simply clarify
it even further, really. So if reload status equals true, then the reloading status value has a property called text. And what we want to set that to is going to get a
little complicated. So let's go let's dial it
back up here for a second. So we have multiple strings
that we're going to need. So let's start
here for a second. Either going to be reloading
or it's going to be ready. However, if you recall, we had BB code in here. And we don't want
to have to type this BB code every time. We could easily
just go like this, but we're going to have to
do that for both strings, and it's just a little
bit irritating. So what we're going
to do is we're going to define a constant. Now, constants are
like variables except you are not allowed to change their value after
they have been set. And just as a naming convention, I always like to put my
constant names in all caps. So our const is
going to be reload. Text format. And that is, of
course, a string. And what that is going to be is it's going to be our BB code. The two spaces we need to make sure everything is
properly spaced and a percent s. And this is a token that we're going to use for string formatting, and we will see how
that works in a moment. So we've got right
right and that. So now what we want to do
here is we want to set our text to this
reload format string, and then we use the
percent sign to say, we are going to
format this string with whatever string we give it. So we got the
reload text format, and then it is Godot is automatically going to
see this symbol and then replace the percent s
with the word reloading. So that means we're going to get this string as our result, and we'll do the same
thing down here. But, honestly, this is also this could also be
squished up a little bit more. I mean, technically, we
can do it like this. But Now we only have to do it once. And then we will do likewise
for our kill count. Now, in this particular case, we do not need to provide
the new kill count. We could easily put it on the player and then pass the value here as
part of the signal. But just to keep things simple, we'll leave it as part
of the UI itself. So the kill count is an integer, it's equal to zero. And then when the
kill count changes, we are simply going to
bump up our variable by one and then we'll set
the kill count value. Equal to the reload
text formats, and we'll substitute
the kill counts. And we're gonna do it correctly with the proper. There we go. Okay, now let's wire
up our signals. The first signal that
we're going to use is the enemy tank
destroyed signal. So we go back to our
messenger and we will define a signal And it doesn't require any parameters. And then if we go
to our enemy tank, the enemy tank so if you recall, our base tank has a
function called hit, and that function gets called when any tank
gets hit with a shell, and it will therefore destroy it and play the explosion
sound effect. We want the enemy tank to also
emit this signal, as well. So this is where we make use of inheritance because
the enemy tank, which is of class AI
tank, extends tank, which means that it's already got its tank method defined. So we don't have to if we don't redefine this
and we simply call it, the enemy tank is going to
have this functionality. But if we redefine it, we can now add our
own functionality. What we want to do is we want the base classes
functionality. So we use the super keyword. So we say super dot Hit. And that we'll call the
base classes Hit method. Then in addition to that, we want to have messenger, enemy tank destroyed. Dot emit. Now, anytime any enemy
tank gets destroyed, it will tell the messenger
class to emit that signal. Now, our user interface
in its own ready method, can connect to that
signal because, again, that messenger class
is available to any class anywhere at any time. So we just do messenger,
enemy tank destroyed, connect, and we provide the method that we
want to connect. And now for the player, we want to do two things. So we can do this We can
do this in two places. We want the player to
emit a signal that indicates that their
reloading status has changed. However, the player is
a tank, not an AI tank. So if we were to
put this in tank, then it could be available
to any tank in the game, which is actually okay
because we only have to connect to the player's
emission of that signal. I don't know why my cap
slock likes to turn itself off when I use my
underscore, but there you go. Now, we want to connect
to this signal, and we will do it in game because game has access to
everything that we need. So we've already connected to the player shell fired here. We will now connect to o. I don't know why it's not auto
completing, but whatever. And what is the method that
we want to connect it to? Well, we need our UI node, so we will do what we did
here to get the enemy tank. We could also provide a
reference to the UI in game. And actually, we're gonna be doing some other stuff
with the UI, as well. So let's just do an export. And it is a control. Yes, we know you're
broken right now. Okay, so now the player is
going to connect to the UIs. Actually, this is not correct. It should be UI because we
actually have a class for UI. All right. Both of
those should be fine, and now we can use Auto Connect. So now we've got on player
reload status changed. And here's something you
have to be careful about. Whenever you attempt
to use or whenever you let Gadot do an auto complete of a function name in
the connect method, it always helpfully adds the call parentheses
to the method, and you don't want that
because it breaks things. And then if you attempt
to delete them, Gadot deletes all
of the parentheses. Okay, so now both of those
should be connected. So if we go into our game, You can see that our
status is ready. If I fire, nothing happens. Alright, we're gonna
have to debug that. But if I shoot the enemy
tank, I should get a kit. There it is. Tank destroyed. We've now got to
kill count of one. Ah huh, I see the problem. We never actually
emitted the signal. So we go back to tank should have been the
first thing I did. Then we go to Fire Shell, and the very last thing we
do after the shell fires is simply emit the signal with the value of the
reloading variable. Now we should have correct. Yep. Actually, no,
no, I was wrong. I wouldn't be the first
time. So the problem here is that when the
reload timer times out, we need to change we need to tell the UI that the
status has changed again. And this is annoying because
now we would have to go everywhere in the
game that we would change this variable
and emit that signal. So we need to do it smartly. And that is why once again, we need a setter variable
or a setter method. So we define a setter
for the reloader. And, of course, reloading
is equal to the value, and then we emit a signal, and now it should be great. Perfect. We now have a fully
functional user interface. So the next thing we're going
to do is take a look at how to utilize some clever tricks and user interface components
to create a minimap.
26. Creating a Minimap: Welcome back. In this lesson, we're going to add a
minimap to our in game UI, and it's a lot simpler
than you might think. We are going to use the
incredibly useful Gado nodes known as sub viewports. If you're familiar with
previous versions of Gado, they used to just be
called viewports, but I guess I confused
too many people. So the first thing
we're going to do is we're going to go back to our two D view so that we can see our user interface here. And we want to add a minimap in the upper right hand
corner of the screen. In order to do that, we need the user interface control known as the sub
viewport container. As the name suggests, this is a container, which is basically
just a control that will hold a sub viewport. We are going to stretch it out to the size that
we want it to be, and then we are going to up rightly justify it with
the correct anchor presets. We are also going to make
sure that it is square, lay out Transform
size 230 by 190. That won't do. Let's say
200 by 200. Much better. And then we will slide it over a bit such that
it is perfectly justified. There we go. Now, in order to use a sub viewport container,
as you can see here, we've got a little
warning that says it doesn't have a sub viewport,
so let's change that. We will add a sub viewport. A sub view port is basically a new window
into your game world. It will render whatever is visible within that
little subspace. And in our case, what
we want to be visible there is a secondary camera
view of our existing world. And don't worry, it's actually a lot less
complicated than it sounds. So what we're going to
do is we're going to add another camera three D
to our main game world. And this one does not
have to be current because we're already
going to have a current camera on our player. However, let's rename this. We'll call it the
spy Cam because it's going to float
above our game world. So let's bring it up here
and let us not do that. Let us go back here. We'll
go to view two viewports. So now we can see
what our camera sees. Come on. Click. There we go. Sometimes my computer is slow
and grumpy and doesn't like to do things. Okay. If we now go down and
rotate the camera, such that let's do it
this way. It's easier. If we rotate the camera, such that it is facing downward, 90 degrees, I don't
think I did that right. Rotations always confuse me. Where are we looking at here? Oh, I'm looking at the sky. Okay, it's negative 90.
Gets me every time. Alright, now we just drag
this up until we can see the entirety of the map or at least as much of
the map as it will allow. And that's good, I think. Or we could always
go like this so that we can just see
that stuff there. That's good enough, I
think. You'll notice by default that it is rendering
our navigational points. So, of course, we
have to go back up to our call mask and click the NAVPoints layer off so that we don't see
them within the camera. Now, all we have to do is we drag our spy Cam into
our sub viewport. And now, if you go to two D, you can see a bit
of an ugly mess because what's happening here
is that the sub view port, which is 512 pixels by 512 pixels is not being correctly stretched to the size of the sub viewport container. Fortunately, we can fix that simply by checking
the stretch option, and now we have a tiny
little view port. So the only other thing
we have to do now is update the spy cam
when our player moves. And normally you
would think that you would just parent the
spy cam to the player. But if you do that,
then the player would have to be
in the viewport, and we don't actually want to
change our hierarchy here. So what we can do is simply give the camera its own script. And since the player is
always going to exist, all we have to do is export
a reference to the player, and we'll call it target
and we'll make it slightly h more generic in that it can take any
physics body three D, but we're only ever going
to use it for the player. And then we'll drag
the player over here. And now, in the Spy
CAMs process method, which apparently, I can't
spell. There we go. All we have to do
is update the X and the Z positions of the camera
to be that of the player. We don't update the
Y value because the Y value represents
the height, the up or down, and we want
that to stay consistent. We literally just
want it to go in the X or the Z directions
based on the tank. So the global position
of our camera, both X, And Z are equal to the Targets global
position dot X and the Targets
Global position Z. And that should do the job. Let's see. Yes. Now, if
I move my tank around, you can see it's
updating all of those. One other adjustment we
should probably make is to orient the camera such that when the player
rotates, the camera rotates. But I will leave
that as an exercise to you to see if you've
mastered this lesson. Viewports are incredibly
useful in three D. You can even use them to render onto the surface
of another object. And if we have time at
the end of the course, maybe I'll go into that as a little bit of a bonus material. I will see you in
the next lesson.
27. 3D UI with Label3D nodes: Welcome back. This lesson is
going to be fairly short, and what we're going
to do is look at a quick way to add a
three dimensional, also known as a
diagetic user interface into our three D environment. And we're going to do that
by putting a World of Warcraft style name label
above all of our tanks. So as you might guess, that requires adding
a child node, and the child node we're
going to be looking for is the label three D.
Now, of course, we need to properly
orient our label three D, so let's bring it up here, and we will move it back a bit so that
it's over our turret. There we go. And then we
are going to open its text. And as you can see, there
is some similar settings to what you would get in your
label and rich text label. So we're simply going to throw some placeholder text
in here, tank name. Now, as you can see, we can only see the Tank's name from the
front and from the back. If we look at the side,
then we're not going to see anything because this is
a truly three D object. And sometimes you
might want that, sometimes you might not. We are in the might not variety. So what we're going to do
is we're going to extend flags and we're going to
change Billboard to enabled. Billboard means that the
object is always going to face the camera no matter
what its orientation is. Now, we also want to extend
our tank script a little bit, and we're going to do that
by adding a export variable. Mm. And, of course, we're going to drag our
label three D in there. And in our game object, we are going to change
the player's name and the enemy tanks name
to appropriate values. Since we've already got since we've already got a
reference to our player, we can simply grab the tank name label property and set its text
equal to player. And then we grab our enemy
tank the same way we did when we connected as signal and do the
exact same thing. But with the appropriate number
of periods, there we go. So now you can see that
the player has a Well, both the player and the enemy tank have a label above them. Now, I've been noticing in playing around with
the build at this point, that there is something
within the enemy tanks user enemy tanks
artificial intelligence that is causing
an infinite loop. So you may have
noticed this yourself. I'm going to investigate it, and before we move on
to the next lesson, I'm going to fix it
and then let you know how to fix it yourselves
before we carry on. But this is the end
of Chapter nine. So in spite of that
bug, well done.
28. Start Menu: Welcome back. As promised, I debugged the navigation
point system a little bit and discovered that
basically we didn't have enough navigation points within the movement range of
the tank so that when it got to a point where
it could only select from one particular
point, it got stuck. And we never want
that to happen. So I added a couple
of extra points in the map just to keep
that from happening. Generally speaking,
you want to fine tune your navigation point layer such that objects will not
move through one another, and also there'll be enough points that it
won't get stuck like that. Uh, I also provided
a little bit of extra code within the get
random NABPoint function, basically, and this should never happen if you set up your
navigational points correctly. But if it gets to
the point where the tank only has one
point to choose from, it's basically stuck
near the point that it is currently closest to and has no other
targets to go to. So I printed out a warning and I set the navigational point that it was going
to select equal to its existing
nearest NavPoint. And this is not an
ideal solution, but it keeps the
game from locking. And at that point,
you're going to realize that
something went wrong and you need to add
some more nodes to your navigation grid. Okay, with that out of the way, let us now talk about what we are here to talk
about in Chapter ten. In this lesson, we
are going to start fleshing out our game and adding all the game like
components that will make it a game and not
so much a prototype. And the first thing
that we're going to need is a start menu. So, of course, we will go
back to our game scene. And we've already
got an in game UI, which is great, but now we can
add a start game UI to it. And we're going to be fairly
simple and lazy about this. We're basically going to let the main game scene
handle all of the internal and external user interface components
and simply turn them on and off as they're
needed rather than switch to external scenes. For a larger, more
complicated game, that would definitely
be a good idea, but we're keeping things simple. So if we add a child node, we could add a control, but instead, we are going
to add a panel container. And what is a panel container? A panel container
is a container, similar to the VBox, H box and margin containers
that we've used before. However, it contains
a background image that will scale based on
the size of your control. And we can change
that background image to make it actually look
like something textured. But for what we're doing here, it defaults to a semi
transparent black background, and that is exactly
what we want because basically we just want the game to fade out when
the menu shows up. So we can do that as a full wrect and get what we've got there.
We will rename it. And again, make sure you're in the two D tab when you're
editing user interfaces. So now we are going to use
another new container, and this one is called
the center container. And what does a
center container do? A center container, takes
everything within it, squishes it to the smallest
possible size that it can be, and then forces it to be centered within whatever
control it's attached to. So in this case, it's
attached to the start menu, so it's going to center all the controls within
it. Right about here. And it's going to
keep that force to that particular size no matter what size we resize
the start menu to. So within our center container, we are going to use our good
friend the VBox container, and within that, we are
going to add a label. This label is going to be
the title of our game, which is Zone Battle. We'll make sure
that it's centered, even though the font
that we're about to use does not center
particularly well. Font size will be 100, and the font itself will be
our friend, the stencil. So instead of locating
it over here, we can simply go to
Quick Load since we've loaded it before and then
click on it right here, and boom, we have a stencil. Now, I'm going to show
you a really neat trick. Within your project folder, I have provided a very horribly
named camouflage texture. And we're going to use that for a special effect on our title. So the first thing
we're going to do is we are going to add a texture wreck as a child of our label. And we're also going to rename that label just so we can or
just so we know what it is. And our texture wreck, we need it to be the
size of our label. So as we noted before, since it is the
child of the label, if we say full
wrecked, it's going to force itself to the
size of the label. Now we need to
provide a texture. So let's drag our camo texture over to the texture slot,
and now it's too big. So we go to expand mode
and we say Ignore size. Unfortunately, it is squashed. So we change stretch
mode to tile, and now looks pretty good. But we will flip it a bit just to see if we can get a
slightly better orientation. Uh, we can also
change this to Yeah, that's not gonna
work. A, Tile it is. Okay, this looks pretty good. And now here's the fancy bit. If we go down we
go back to if we reselect our game title and
we go down to visibility, we have an option
called Clip Children. And if we change that to
clip only, how cool is that? It clips the underlying
texture to the label itself. Now, of course, it's not
perfect because some of these dark values kind
of obscure a little bit, but we can change the color of our start
men's background by going to theme overrides styles and changing it to a
new style box flat, which is ugly looking. So we will change that
and make it darker. And we will also drop the Alpha a little bit so we can see the
background through it. It's not gonna solve
our problem perfectly. The darkness of the E is
still there a little bit, but, you know, it looks
pretty good anyway. Actually, don't try this. Let's move it to, like,
a darker green ish. Yeah, it's not perfect, but it looks a little bit
better. I don't know. I can't say it really Anyway, close enough. You get the idea. So from here, we need to
add a couple more items. We want to let the player configure the number of enemy tanks that they
start the game with. So in order to do
that, we need to add another HBox container, which will provide another
row for us to work with. And within that HBox container, again, we're going
to add a label. And that label is
going to say enemies. And, of course, we will have to change the font
and the font size. Let's make the font 50, and we'll do another quick
load to get our stencil back. We could also define a theme
here to use for the menu, but given that we're only
going to be changing the text, and it's only one
extra item to change, use normally we have to drop the theme onto
the label anyway. So what's the difference
between dropping a theme on the label and dropping the font and the font size
on the label, you know? So, in addition to
that, we need to have another element in
the HBox container, and this one is
called a spin box. And we will also so we don't
want the spin box here. And actually, now that
I'm looking at it, it's almost completely
invisible against the green backdrop, so
we'll change that again. But with the label highlighted, let's go to layout
container sizing. And then we have both horizontal and vertical values here. So, in general, a control will only take up
as much space as it needs to. And this can be changed. And one way to change it
is by clicking Expand, which means that it will take
up as much space as it can possibly take up within the
space it has available to it. So in this case, the VBox
container that we're using is only going to be as wide
as the text for the title. So that means we have this much space available to work with. And then, of course, vertically, it's going to be the
HBox is going to be as tall as the text and the
control, whichever is larger. But horizontally speaking,
if we didn't do this, then neither of these objects would take up the entire
width of the control, which is okay, even though
the control takes up the entire width of
the parent control. So what we want
to do, as we saw, is widen this so that it takes
up all the space available to it and leaves us the
little spin box right there. Now, unfortunately,
the only part of the spin box that we can change is the color of the
text and the arrow buttons. And we can only do that
through defining of theme, which is kind of obnoxious. So we're just going
to leave it as is. But we will make a couple of changes to the spin box itself. We're going to
change the alignment of the text to center, and we are going to
change the minimum value to one because otherwise
it would be a boring game. And we're going to
change the maximum value to seven because that's about as much as our map
can comfortably handle. We could always change
that if we wanted to, and we'll do rounded
so that it will only step in whole
integer values. Value is one, maximum value is seven. Okay, that looks good. Now let's change this color again because it's not
working for us now. I always do that.
I always try and drag the arrows instead of the Okay, that's a bit more like it. And finally, we're going
to need two buttons. So add child node again, and we use a button. The first button is going to
be our start game button. And we will rename it as such. It's always a good idea to rename your important
user interface controls, because as you can see here,
the user interface hierarchy tends to get really
cluttered really fast. So it's always good
to be able to see what you're doing at
a moment's notice. And we will add one more button. And this one will allow us to
quit the game. God forbid. And now, of course,
we will have to go to the them overrides
and change the fonts again. So the font size is 50. The font itself is,
again, stencil. And then we'll do
likewise for start. If we were doing
anything more involved than just changing the
font and the size, I would definitely have
created a theme by now. But, yeah. Alright. So this is our title screen. And in the next lesson, we are going to utilize what
we've learned here to create a pause screen to come up
in the middle of the game. And then in the
lesson after that, we will wire them
up to code so that they work. I will see you there.
29. Pause Menu: Welcome back. In this lesson, we are going to construct a pause menu that we can
use to pause the game. As you may have guessed, our user interface is getting
a little cluttered here, so we're going to click
on the eyeball next to the start menu to toggle
off its visibility. Now we can work unimpeded. We're going to add
another child node. And this one is going to
be a center container. And the reason we want a
center container is because our pause menu is not going to take up the entirety
of the screen. So we want it centered in
the center of the screen. So if we do full wrecked here and we're going to
change this to pause menu. Now, within this, we're going to use another panel container. Now, of course,
notice that you can't see the panel container,
and that's because, as I mentioned in
the previous lesson, the center container squishes everything to its
absolute minimum size. So there's two ways to fix this. The first is that we can go
under layout and transform. No, it's not under transform. It's under layout.
Custom minimum size. If we were to change this,
then you can see that the the control would be enforcing an
absolute minimum size, but we don't need to do that. Click on this and reset it back to zero because
everything that we're going to put inside
the panel container is going to size it for us. And then that way, we don't have to worry
about readjusting that custom minimum
size every time we change the size of
our panel container. So the first thing that
we're going to add is a margin container. And as we've mentioned before, a margin container literally
just provides the ability to add margins to the outskirts
of our existing content, which will adjust once we actually get some stuff in
there because there are actually ways to deal with
that nonsense whereby the stencil font that we're using is a little
bit off kilter. We can't do anything
about it on the buttons, but we can do
something about it for the menu header, which
we're going to use it for. We're going to add
another child node, and this one is going
to be a VBox container. And within the VBox container, we are going to
add another label. And of course, this label
is going to say Pause menu. And we'll center it,
and then we will go down to hemovides, of course, font size gonna be 45 and font, again, is stencil. Looking kind of decent. Now, we are going to
get a little fancy, and we're going to
grab a new kind of control called
the H separator. And the H separator is incredibly useful because
it basically provides the ability to add lines that
will separate your content, and you can control the appearance of those lines
in a lot of different ways. So the way we're
going to do it is we're going to go
to themoide again, and we are going to change
the separator style, and it's going to be
a new line style, which is a type of style
we haven't seen yet. And then as we open it,
the color of the line, we're going to
change it to white so that it matches our text. And we're going to give it a thickness of two
because why not? And we are going to change
the content margins. And we're going to change
the top content margin to about 16. And as you can
see, it raises up. Even though the control
is technically here, it raises the lines
so that it looks like it is closer to our font. And now that we've got this now that we've got
the font in here, we can actually alter our margins a bit such that we can make
it look a bit better. So if we go back to
our margin container and go under
Themoides constants, we can now change the margins. So let's start with a nice
ten pixels everywhere, and that looks
pretty good so far. So we can adjust it further once we have
our other buttons, and we are going to
add three new buttons. Or are we going to
add two new buttons? I think we're going to
add two new buttons. Originally, I was thinking we
would do a quit to desktop, but we can do a quit to title. So our first button is simply
going to be a Zoom button, which will take us
back to the game, and our second button will
be a quit to title button. So, of course, the
Zoom is going to say, Zoom, and quit to title is
going to say quit to title. And now, here is a
really clever trick. If you hold down Control and left click so that you
select multiple nodes, if they have
properties in common, you can change them all at once. So with these two selected, we now go over to
them over rides, and we can change
the fonts and the font sizes without having
to do it individually. So quick load, stencil. Boom, how cool is that?
And now we'll go to here. And let's go with 40. Looks about right. And we'll double click here
to recenter it. And that actually
looks pretty good. Uh, the margins are, the margins are good. Okay. That is our pause menu. So we can click
visibility to hide it. And now in the next lesson, we are going to wire
it up with code and add the ability to
start and pause the game. And yeah, I'll see you there.
30. Game Manager: Begin/End States: Welcome back. In this lesson, we are going to write
the code that will wire up our start
and pause menus, as well as add the
ability for the player to die and get kicked back to the start menu so
that they can try again. In order to do this, though, we need to set up a
bit of framework. So the first thing we
have to do, obviously, is create scripts for both
the start and the pause menu. And now that our script folder is getting a little cluttered, we'll add a new folder to
put our UI scripts in it. And we should also create references to our start and our pause menu within
our game, as well. And obviously, we
want the start menu to be showing when
the game first loads. So in the ready method
for our game object, we can tell our start
menu to show itself. Now, we have a slight problem. Even though the start
menu is showing, the player can still move, and the enemy tank
can still move. And this is because we haven't
actually paused any of the processing that would happen while the game is running because the
menu is showing. And we want to do that for both the pause menu
and the start menu. Now, we could go into the process methods for our tanks and for our
game and for everything else and for the
unhandled key input and basically check to see if either of the
menus are showing and then prematurely return
from those functions. But that's a lot of
work. And the mark of a good game programmer is a
heightened sense of laziness. So what we're going to do
is we are going to use what is called the paused
property of the scene tree. Whoops. We are also
going to hit a bunch of random muttons that
have absolutely nothing to do with what we're
doing. Alright. So, in order to get
access to the scene tree, we use the get tree method. And there is a property of
the scene tree called paused. Now, if we set it to true, that means none of the
processing is going to occur. So now if we were
to run our game, you can see that absolutely
nothing is happening. I I I press any of the keys, the game will not run or the
tank will not move around. The only problem is that if
I click either well, I mean, we haven't put any
code behind them yet, but let me just do that
for illustration purposes. So we go to our Start menu, and we'll wire up
the quit button, and we'll do that
by going over to the signals tab and getting
the pressed signal. And if we click Go to Source, then it'll go right
to the object that is broadcasting the signal. We want to scroll up a
bit because we actually want to attach it to
the Start menu script. So now let's just say
print, quit pressed. So now if we attempt
to quit to desktop, you'll notice we're
not seeing anything in our corner here, and that's because, of course, our user interface is
not processing either. So the way to change
that is to click on the user interface
component, the control. And this works for
any node, really, but we're only going to use it for our start and
our pause menus. And you want to
go under process. And then we change
the process mode from inherit to always. And this means that even if
the scene tree is paused, this object will
continue to process. So now if we start
our game again, and we attempt to
quit, you'll see that the quit pressed method has fired and the message has
appeared in the console. So in order to quit our game, we just have to get a
reference to our tree. And then simply say quit. Now, in a more polished game, you would want to add a dialogue that says, Do you
actually want to quit? Yes or no. You
actually should have enough tools at your
disposal to create one. So if you decide that you want to do a little
extra programming to do some learning, I would ask you
for this lesson to add a confirmation
dialog that pops up when the quit button is pressed and we'll only exit the game if the yes button of the confirmed dialogue
has been pressed. So now we also want to wire
up the Start button as well. And we might as well
give both menus, class names and spell them
correctly, of course. And of course, we want
to wire up both of the buttons on the
pause menu, as well. And in the case of
the pause menu, we want to resume the
game when it resumes. So naturally, in this case, we're going to resume
it by and actually, we we need to set the process on our pause
menu as well to always. So, of course, when we resume, pause is equal to false, and we will hide the pause menu. Now that we've got our
stubs all wired up, we need to actually add
functionality to them. So in the Start menu, we have our on Start button
pressed method. And as you can see, the Start menu is a
child of the game, and we're going to
need the game to react to the start menu's
button pressed because we want the game to do all
the bookkeeping required to start the game when this button
has been pressed. Godot has a motto that is a guideline to dictate how parents and children
should interact. And that guideline is
called call down signal Up. What that means is that
the game can manipulate the start menu directly as we saw here by the game calling
Start Men's show method, but the start menu
should send a signal and let other nodes decide
what to do with it. And since the game is the
parent of the start menu, then it would naturally react to that signal because we're essentially going up
in the hierarchy. So the start menu should fire a signal up for
the game to react to. Now, the problem is, is
that the game will be paused when the start
menu is showing, so the game menu will not
actually be able to react. So we actually have to put
we've got to do two things. We actually have to
put the um unpausing of the tree in the start button object itself,
which is fine. And then we have to fire
a message to let the game and any other interested objects know that a new game
has been started. And so we will do that. We
get tree paused, equal false. And then we will go into our messenger and we will
define a new signal. Mm hmm. And our start menu
will fire that signal. And actually, one other thing it needs to do is hide itself. So, currently, the game is not really going to do
anything when the game starts but will connect
the signal anyway. Ooh, did that wrong.
It is connect Like I said, right
now, it does nothing. So let's see if that
actually works. Oop, we got an error. And I ran into
this error before. I'm not entirely sure
what it's all about, but basically what's happening
is that for some reason, the NAVPoint is
turning up null when the tank is coming out
of its idle state, and that's a problem. So if we go back to
our hunting state, so if the monitored
object is idle, we check to see if
there's a NavPoint. We'll get the NAVPoint and then the monitored
object idle is false. But that presumes that
that actually works. Now, if that doesn't work,
it's going to fall through to the point where it assumes
that the NAPoint has been set. So what we got to
do here is we'll just do a little
safeguard that says, If monitored objects nearest
NAVPoint is equal to null, well, actually, no, we
don't have to do it here. We'll do it up here. So, if monitored objects
nearest NAPoint is not null, can set idle to false. Otherwise, on the next
cycle, we want to try again. Now, it is also possible that we need to adjust our
navigational grade again. I will look into that with
a little bit more testing after this lesson to
see if that's the case. But this will definitely save us some issues because if the
tank never actually moves, then we know that
that is the problem. That is not able to
find an Av point. This might just be
a glitch that has something to do with the
game pausing. But yeah. So let's go back to this, and we will see if that
works, and it should. And it and the enemy tank is moving and so
on and so forth. Alright, now we want to bring up the pause menu when the
escape key is pressed, and we're currently doing all of our key input in the game's
unhandled key input, but we could also do it
in the pause menu itself. If memory serves just because it's not visible does not mean it's not going
to get keypress events. So let's test that theory. And if I'm wrong,
then we'll just put it where we were
originally going to put it. If input is physical keypress, escape and not visible, then we want to pause the game, and we simply do that
again by get tree, pause as equal to true and show. Okay, I just realized I
just realized a slight bug. So we're not actually checking to see if the
game is running yet. So if I hit escape now, we're gonna get a pause menu.
And we don't want that. So, we only want this to
happen if it's not visible, but also well,
actually, instead of, if not visible, let's check to see if the tree
has already been paused. If the tree is not paused,
then we want to do that. And there we go.
So now we'll start the game and now we can pause. So we've already handled
our Zoom button, so next we have to handle
our on quit to title button. And, of course, the
easiest way to do that is to add another signal. And we will emit that
signal from our pause menu. And we want to have the start
menu monitor this signal. All right. Where is my
start? There it is. So in the ready method of our start menu, we
will connect to it. Actually, we can do a
bit of a shortcut here. So what we would do is we would provide a
function name here, and then we would provide
a function down here. But all the function is going to do is simply show
the start menu, and there is a much
quicker way to do that. We're going to use what's
called a Lambda function. And a Lambda function
is literally just a function that is defined
in line without a name. So we can provide a full
function definition here instead of a function name. And we do that
simply by providing the funk keyword and the arguments of the function
like we would have here, but we don't give
it a name, and then we simply add the
code afterwards. So in this case, the code is literally just going to be
to show the start menu. Now, We're we're in pause
or we're in the Start menu. And we go to Start.
Game is running. Pause. Quit to title. I forgot to hide the pause menu. But, yeah, that's
how that works. And now if we were to well, we can't a new game because
the pause menu is still. Alright, so quit to title, emit. Hide And now we
should be golden. And we are. It's pretty cool. Alright, when we quit to title, quit to desktop. Game is over. Okay, now that we can have a
start menu and a pause menu, we need to set up the game states such
that the game will quit the game will show a
message and then quit back to the start menu
after the player dies. And, again, the
easiest way to do that is to provide a global function. Actually, no, hasn't
the tank already No, we did that we did
that in shell. Well, we can put it here. So we can provide a signal for when a tank has
been destroyed. And if we open up
our shell script, since we're already handling
the collision of the tank here, yeah, we could do it. We can do it here. We could either do it here or we could do it within
the hit method. Either one is
perfectly acceptable. But if we actually,
you know what? The most logical way to do this. Sorry, I keep
bouncing around here. But if we go back into the tank, we have a destroyed
variable, and once again, setters Destroyed equals value. Messenger, actually, we need to change this
because it's for any tank. Messenger tank
destroyed, emit self. Self is a special keyword that indicates the object that is currently running the script. Okay. Yeah. It helps if I spell things correctly.
Boom. There we go. Okay, now, again, the only
tank whose message we care about is the player's tank. Although this is actually
kind of redundant, given that in our enemy tank, we have, uh huh. Okay. Alright. Yeah, we've got some
redundant signals here, which normally you want to
avoid, but in this case, we do want to differentiate
between the enemy tank and being destroyed and just a tank in general
being destroyed. So in this case, we want to connect to the
player's tank destroyed method. Although, you know,
if that's the case, we don't have to put it here. Because we've already got
various signals up here. And then we'll go back down here and it's just
destroyed a bit. And then that way, the
game can connect to the players destroyed method. Which will trigger the end game. And, of course, that
means we're going to need an extra bit of user interface. So we will create that now. Let's go to game, and this is actually going to
be part of the UI. So we can throw this on here. It will be a let's make
it a panel container. Yeah. It'll be about
the size give or take, and we'll center it,
which is another way. This is another way of
centering things other than using a center container. However, if you change the size of it later, you're gonna
have to recenter it. So if I go like this,
now it's off kilter, so I would have to recenter it. Game over dialogue. Child node label. Actually, no. We want a panel we want
a margin container. Gonna put those
margins in a bit. Themoides constants. Let's give them all fifteens. Margin container. Label. Horizontal alignment
is now centered. And them overrides. Quick load our stencil font, change the size of the
text to much bigger. There we go. And now we can add the code to throw this up and pause for a few moments and then go
back to the start menu. So, of course, we're going to need to go back to our game, and we'll export
another reference. All right. And once we've got our game
over dialogue showing, we need to pause the game
and then end the game after, say, about 2 seconds. So in the on player
destroyed method, we use the Awet keyword. And what that means
is that it's going to pause processing of
this particular script, in this case, game until whatever signal that
you indicate has fired. So what we want to do is
we want to get our tree, and we're going to call
Create Ti which is the equivalent of creating a timer node like we did
for the tanks reload timer, but it's kind of done invisibly. It basically creates
a new timer node and attaches it to the main tree with this number of
countdown delay in seconds, and then it starts it. And we want to indicate
that we're waiting for this timer's timeout
method or timeout signal, which is called when
the timer runs down. And we also want to connect to that signal our
endgame handler method. Now, unfortunately, this
does not freeze the game. It does not do a get
scene tree paused, like we did in order
to pause the game. And we want that because we
don't want to pause the game because if we were
to pause the game as soon as the game over
dialogue came up, then it would cut off the
playing of the sound. So the player would die. The explosion sound would occur. But then the dialogue
would come up and the tree would pause and we wouldn't actually
hear the explosion. So that is why we
do not want to do our universal Getree dot paused equal tree call when
we destroy the player. However, we do need to put a couple of
safeguards in play to keep things from happening while the player
is dead, because, for example, if we don't tell the enemy tanks to stop
shooting at the dead player, they'll keep shooting at them, which just adds
insult to injury. So under firing state, we fix that by instead of
unconditionally firing a shell, we add a check to see if the monitored object,
which is, of course, the enemy tank, if it's target, which is the player is destroyed or if
it's not destroyed, not destroyed, then
we fire a shell. And if it is destroyed,
we ignore it. We also need to fix a mild bug in our Tank's destroyed setter because what was happening here was that we were emitting the destroyed signal regardless of the status of the
destroyed variable. And we only want to admit the destroyed signal when the tank has actually
been destroyed, which means when destroyed
is equal to true. So we threw a check in here. And the reason that
matters is that if the player were to
die and we were to go back to the main menu
and then go right back to start a new game, the
player would still be dead. So now in on game Start, we add a player destroyed
Eagles False to flip the player into an active state so that we can play a new game. Unfortunately, none of
the other variables that we've set will be equal to
what will have been reset. So the player will keep his
old Kill count and such. And we can actually change that. So if we go under UI, Kill count, we can
reset that to zero. Might also be a good idea to
simply Yeah, let's do that. So a better idea is
actually to have the Kill count or have the user interface connect
to the start game method. Because multiple things can
connect to the same signal. And actually, we don't
want to do it here. We want to do it within
UI itself because then that keeps everything
self contained. So messenger, start game, connect on Start game. And then in onStart game, we want to set the kill
count back to zero. Now, unfortunately,
the player tanks and enemy tanks starting positions
will not have been reset, but we are going to fix that in the next lesson when we implement
an actual spawn system. Now, let me make sure that
I'm not forgetting anything. So the firing state is good. The tank destroyed is good. We've done our stuff in game. So, of course, we're going to connect endgame
and in endgame, we hide the game over
dialogue and simply emit the quit to title signal. And, of course, We need to freeze the game again when it goes back
to the title screen, and I don't think
I've done that. Let's check. Okay, Cart game. Let the enemy kill me. Okay, so the player
is not going to move, but as you can hear, we haven't
actually paused the tree. So we're going to
need to do that. So in endgame, we have
Messenger quit to Title Amit. So that means that
the game Well, the start menu has connected
quick to Title it Funk Show. And here, so we
actually want to add another line to our Lambda here, which will pause the tree. So we can format this a little bit better by simply
hitting Enter there. Godot is not gonna care. And then we'll do Get
Tree Almost equal true. And that should
solve the problem. And it does. Okay. So now we have, there is one more thing that
we need to do, obviously, and we need to check to see if the player has killed
all the enemy tanks, and if they have, then the game should be
over in that regard. Or at the least, it should restart and respawn a
set number of tanks. But we are not going
to do that now. We are going to do
that as part of developing the enemy spawner, which we're going to
do in the next lesson.
31. Enemy Spawn System: Welcome back. In this lesson, we are going to code up a
spawning system that's going to handle inserting both our player and our enemies into the map. But before we get to coding, there is some housekeeping
we need to do. So the first thing
that we should do is we should go to our arena, and we should add a new NAVPoint because we need to indicate where the player
spawns, as well. So we've already got
our NAVPoint scene, and we'll drag that
into the list. Once it's there, we'll
rename it player spawn. We're going to use the name
of the spawn to indicate that that is the spawn point
the player should spawn at. In addition to that,
we want to change the spawn points color so that we know it is
specifically for the player. So if we right click on it
and select Editable children, we now have access to the
children of the object. As I mentioned in
a previous lesson, the mesh is a resource, and since all of the spawn points come
from the same scene, they all share the
same resource, which means if I
change this mesh, it's going to change all of
them, so we don't want that. So we expand the drop down and we say make
unique, recursive. And the reason we say recursive and not just make
unique is that we also want the material within the mesh to
be unique, as well. So now we can expand
this and go to the material and change its albedo and make it
whatever color you want. I chose green. And then we have to move the players
spawn somewhere else. I'm going to put it in the
very corner of the map just so that the player does not spawn on top of the opponents. And I am also going to change the rotation of the spawn point so that we can indicate
the origin that the player is going
to spawn in at. So they'll spawn at the location with the rotation of this particular spawn point. And then the next thing
that we need to do is we need to actually
modify our game to take into account
the fact that we are going to be using
a spawner node. So the first thing we should do is delete the player tank and the enemy tank
because the spawner is going to be adding
those to the scene. And we also will need
to add a spawner. And also, it would
be a good idea at this point to subdivide the game object into the playable section and
the user interface section. So we'll add a child node, and we're going to
call it playfield, and it is just going
to be of type node. Node is the most low
level default type of object you can have in Godot. And it's very useful for
when you want to say, I want something in a scene, but I don't want
it to be anything. Nodes are great for grouping things as we are about to see. So we'll rename this
node to playfield, and we will drag the arena under it such that it is a
child of the playfield. And the playfield is also
going to need a spawner, which is also going
to be a node. And of course, the spawner is going to need a
script attached. And will change its
class name to spawner. And now we are ready to start
creating our spawn system. The first thing we'll need to do is to flesh out the spanor. The spawner needs to
handle multiple things. It needs to set up some signals. So, of course, we'll give
it a ready function. It's going to spawn enemy tanks. And it's going to not only
spawn the player tank, but it's also going to
return that player tank to the calling node because we want to be able to put
it into the game world. And not only do we want to
put it in the game world, but we also need to
hook up some signals and stuff to the game object. So it's slightly easier to do it by returning
the player object. But we can also pass in
the connecting object, which we're going to do for
the enemy tanks anyway. So now we've got our three
methods, and of course, this is going to
complain because it wants to return a value, and we don't have a value yet. So now we've got
those stubbed in. And of course, we
are going to need references to the scene files that we're going to
be instantiating, which, of course, are the
tank and the AI tank. So player tank prefab
is a packed scene. And the enemy tank prefab
is also a packed scene. We also need to know the number
of enemy tanks that we're going to spawn because we have that spinner on the start menu. And it's going to default to one And that should be
enough to get us started. So if we go into the game, actually, we should go
into the game script. So we've already got a bunch of stuff here that we
did in the ready for the game script
that presumes that the player and the
enemy tank are already in the scene
when the game starts. That is no longer the case, but we still need this code. So rather than attempt
to remember it all, we're just going to control
K and comment it all out. And in our on game start, we now have information that
needs to be dealt with. So let's pass there. And then we'll
come back to that. You can ignore this error
if you're getting it. It's some kind of weird
bug that Godot throws up. It didn't appear in
earlier editions, so, presumably,
it will be fixed. It doesn't affect anything
that we're doing now. Okay, so in the spawner,
what do we need to do? Well, again, we need to
spawn the player tank, and the easiest way to do that, of course, is to
create a new one. So var player is
going to be a tank. And it is going to be an instance of the
player tank prefab. So player tank
prefab instantiates and just to be overly
specifying about it, we can cast it by
saying as Tank. And we now have a copy of a tank that we can
use as our player. So we can return player. But we're going to need
to do more than this. We are also going
to need to provide a reference to the playfield, specifically the arena
object because we're going to need to be able to
query its spawn points. And we don't want to just grab the spawn points node
directly because we're also going to need to access the
parent of the arena, as well. So we'll just make the arena
A variable within here. Spawner. Okay, so we also
have to assign these values. So the playfield terrain
is going to be arena. The player tank
prefab is, of course, tank, and the enemy tank
prefab is enemy tank. So among other things
that we have to do for the player is we
have to set their name, their rotation, and
their position. So the name, both the node name and the label value
are pretty easy. If we want to set the
name of the node, which is what appears over
here in the scene tree, we simply say player dot name, and we'll call it
player because if we were to leave it as what
it is for the tank, it would be tank, and
we don't want that. So we want to indicate
that this is the player. Now, if you recall, the
tank has a three D label, which I believe we
called Tank name label, according to the auto complete. Okay. There it is. Tank name label. So yes. Text is also equal to player. Next, we need to get the spawn point that the player is going
to be spawning from. And the easiest way
to do that is we will simply take our
playfield terrain. And we will get the
Nav Points node. Oh, actually, there's
a slightly easier way to do this than I
originally did. So what I did the
first time that I did this was I grabbed
the NAV Points node, and I spelled it correctly, which I never do on filming. And then I used the
find child method and gave it the
name player spawn. But we don't need
to do that because we know there's
always going to be one player spawn attached
to the NAVPoints, so I should just be able to directly specify
its path like this. And we'll know shortly if
that doesn't actually work, 'cause we'll see a crash. Alright. Once we've
done all this, then we need to add the
player to the playfield. Because if you recall, we weren't adding any of the movable objects
to the arena, we were adding them
to the root of game. I mean, we could add
them to the arena, but I like to keep my terrain meshes separate from
movable objects. So that's why we have playfield. So oops. So the playfield is the
parent of playfield terrain. So we just do get
parent child player. And we have to do this
before we attempt to set the player's position
or rotation. If we don't going to get error, and this one is one that
we shouldn't ignore. So once the player is in
the playfield terrain, we can change their rotation and their rotation
is going to be equal to the spawn
points rotation. And the player's global position is going to be equal to the
spawn points global position. Now, whether or not
you use position or global position usually depends on the coordinate systems
that you're working in. Sometimes it matters,
sometimes it doesn't almost always use
global position just so that I don't
have any rude surprises. But, you know, let's just try position and see if it
actually works. It should. And now that all this is done, we can go back to our game. And, of course, when
the new game starts, we have to actually spawn the player and spawn
the enemies and do a little bit more
setup initialization before the game actually starts. So since we've already
got a reference to the player in our game, what we'll do here it'll
say player is equal to Oh, we have a slight problem because we don't have a
reference to the spawner. So let's get one of those. All right, spater is a node, of course. And we will comment all
of this out so that we can actually assign the
variable of crying out loud. There we go. Okay, Spanor. Boom. Now we have Spawner. Okay, now we can go
back and do this. Player is equal to spawner Dot. So actually, did we set a We did give it a
class name, right? Yeah, we did. So let's actually go back
to the game script so that we can use Autocomplete. Spawner is not a node. Spawner is a spawner. Okay, now we go back down here, Spawner spawn player tank. And once we've got
the player tank, we can connect all of
their signals up here. So we don't need to change
the player tanks label. We've already done
that, but we do need to connect
these three methods. Alrighty. And now we should be able
to when the game starts, we should be able
to see our player. And we cannot. So that is because our spawn
point is null, which means that something went wrong when I attempted
to get the spawn point. So let's see what I did wrong
here. Back in a moment. And of course, the
answer was that I had the wrong name for the
NavPoints node in the arena. So in my original
draft of the game, I had called it NavPoints. And so, of course, that's
where my brain was. But in this version of it, for the lesson, I had
called it Path nodes. So I simply renamed the
node, and life was good. So we have one more thing
that we need to do here in on GameStart to keep the game from crashing and
being angry at us. And that is, of
course, setting up the target of our spy cam, because if you
recall, our minimap uses a secondary camera
attached to the player. So since we removed the
player from the scene, we need to add the player
back to the Spy Cam. So the spy Cam is we don't have a reference to the spy Cam because we've never
needed it before, so we'll add one
of those as well. And if you're scratching
your head wondering, Hey, is it really that common to have this many exports in a
class? Yes, yes, it is. In some of the past
professional studios that I've worked in
that utilized Godot. Oh, you would be surprised
at how many exports we had, especially where user
interfaces were concerned. That was back in
the Godot three dot O days where it wasn't possible to drag and drop. So even though we had the
exportable variables, we still had to
do like GetObject based on node on top of it. So it was actually even worse. There are other ways to
access nodes directly, like using the unique name. But in practice, I found that unique name breaks
more often than not. So the most reliable way to get an object regardless
of where it happens to be, because especially when you're
developing your hierarchy, you're going to be moving
your objects around a lot. So it's usually not good to use object paths like we're
doing like we're doing in that spawn method in
order to get the object because object
references are updated when the object moves and
hard coded paths are not. So it's usually the case of
right tool for the right job. Anyway, our spy Cam and I never actually gave
the Spicam a class name. Here we go. Game. Spy Cam. Game. Oh, of course, now that we've got
an error, it's going to is it
gonna be an issue? Well, Yes, it's going
to be an issue. Alright, let me
reload the project, and I'll be back in a second. Okay, through the magic of post processing editing,
we are now back. Now we go back down to UI
subview port container SpyCaM. We drag that over
here so that we have our SpyCam and we can
remove these now. And then, now that the
player has been added, SpyCaMt Target is
equal to player, and now everything should be perfectly fine from a
player point of view. And it is. We have a player. However, I'm not sure
if the player is actually spawning
where he should be. Okay, so I started looking at those two objects. Well,
there's one way to tell. If I rotate all the way around, I can see if I'm actually
at the corner of the map, and it doesn't look like I am. It looks like I'm in
the center of the map. So let's go back to the arena, and we will double check where our player spawn happens to be. And we did put it there. Check the transform. Okay, let us go back
to the spawner. And instead of position, we will put it in
global position. This may be one of those cases
where it actually matters. Oh, I see the problem. Player global position is
equal to player position. It is shaped like itself,
as Shakespeare would say. We want the spawn point position in addition to the
spawn point rotation. That should solve the problem. Much better. Now the players actually at the edge of
the map where they belong. Looks like they're facing in
the wrong direction, though. All right, play your spawn. Yellow rotation. We
want it this way. It's probably a matter of the fact that the Y
rotation is going this way, but the tank has
rotated sideways. So we will simply rotate the tank in the
opposite direction. We could also flip the
sign of the rotation. Uh okay. I don't know why
that's not working. Leave it at zero, let's say, 180. Okay, that's better. Anyway, you get the picture. You can add data to the player's spawn in order to change how
the player has spawn. So now the player
is doing its thing. It can fire shells again. But actually, speaking
of firing shells, we do have to change one thing, and that is when
the shell is fired, we're still adding it to the game, and we don't
want to do that. We want to add it to Playfield. And the
game's playfield is called Oh, we didn't Uh huh. We didn't add a reference
to the playfield. So we technically don't need
to since we already know that the playfield
exists under game, so we can just do Gende. Playfield dot Ad child, and then add that'll parent the shell to
the correct place. But you could also
obviously export a variable of type node and then drag the
playfield into that. In fact, that would
be slightly better. It'd be more efficient
because there's still some overhead when you do
get node. So we'll do that. O. Okay. And that's
the wrong script. There we go. Now we have
to spawn the enemy tanks. In order to do that,
we need to know how many tanks we have to spawn. And if you recall, we put a spin box to handle just such a thing
on our start menu. Right here. So we have to connect
that spin box, and we do that by going
under HBox container. And this is why
you need to label your label your nodes
more intelligently. So I'm going to do that. So the spin box, whenever
you change the value in the spin boox either by directly typing it in
or using the arrows, it fires a signal
called value changed. So we want to hook that up and we'll hook that up
to our start menu. And we want that value to go basically wherever
it needs to go. So we're going to provide another signal in our messenger. But That's a little over verbose. Okay, and of course,
we need to provide a value of the amount that it has changed to whoever is connecting
to that signal. So in our start menu, we go down here and we say messenger, and the spa count
changed and we pass in the value that is
passed into the method. And we did that wrong.
It's actually emit, which I can't
spell. There we go. Alright, now, anything that needs to care about
whether or not the enemy spawn count has changed will subscribe
to this message. And that, of course,
includes our spawner. So in ready, messenger
dot Enemy spawn count changed. Connect. And this is another case where the function is so small
that we can use a Lambda. So we'll just say funk
amount enemy tanks equals amount. And that means that whenever
that value changes, the spawner will know about it. So now, whenever we
spawn enemy tanks, so the first thing we
need to do is we need to provide two variables. One of them is going to be for the enemy tank that
we have spawned. And that's going to be
an AI tank, of course. And then we're also going to
need a spawn point variable. And we're going to need
a spawn point variable because each tank is going to be assigned to a spawn point
randomly within the map, except for the player's
point, obviously. Now, it would be a good
idea to cache this value. And by that, I mean, we're going to need to duplicate
the array anyway, but we don't need to
get the array twice, although it's only going
to be done once at a time, so it's not super inefficient
if we don't yeah, let's just we'll put it here. And spawn points is going to be an array of node three Ds. And it is going to be our
playfield terrain. Get parent. Wait, no, not get parent because playfield terrain is actually the arena which has the
Nav points in it directly. Yeah. So what we're just
going to do is we're going to do get Node NAV Points. And we don't want to get
the NAVPoints node itself. What we want to get
is it's children, which is an array that includes
all of these NAVPoints. So we want to get
children duplicate. And the reason we want to
duplicate it is that we want to modify the
list that we get, and that will become
clear in a moment. And we can also probably
do a forccast here as array Node three D, not that that really matters,
but it should be fine. Okay, and we are
also going to need to provide what I
call the callback. I don't know if it technically
counts as a callback, but it's basically
a method that we need to attach to
every enemy tank, and that is, of
course, the shell fired method from our game. So if you recall, we go up here, every enemy tank that spawns, or at least the enemy tank
that we did spawn had to connect to the onsel
fired method of the game. So fortunately for us, in Godot, functions are objects, and they are objects
of type callable. So we can pass the
function directly in here. So let's just call it
shell handler, I guess, shell handler of type callable and now we'll be able to
connect that properly. Alright, so we've got
our spawn points, and we've got our enemy tanks. So the first thing
we're going to do, and we could actually do this in a slightly different way. It might be a little more
efficient to do it that way, but we're going to do
it this way anyway, is before we spawn the tanks, we want to make sure that the number of enemy tanks
that we're going to spawn is less than the number
of NAVPoints in the map. And we also should have we should have capped
the max value of the spinner because it's
currently set to seven. And, I mean, we've got
more NAVPoints than that, but what if we created a map
that had less NAVPoints? And, like, if you're
a solo developer, it's easy to keep these
kind of things in mind, but sometimes you just want
some extra safeguards in it. Probably would be
a good idea, like, as soon as the game
starts up to query the map and then
automatically set that value. And the more I think about it, the more
that's a good idea. Let's take a look as to how
quickly that could be done. We've already got
our start menu. We've already got our spawner. So yeah, let's do that here. Oh, yes, they are accessible
because otherwise, we wouldn't be able
to show Start here. So, let's go up here, and we will set the start menu. And we're going to need
to get the correct node. So we're going to need the path to the node, and we
don't know that. So if we go under game, Start menu, spin Box, right click, where is it? Copy node path. So we can remove Start Menu because that's
where we're starting. Start Menu, spin boox and
the spin Boxes Max value, the property is called
underscore Max value. So let us simply
Max value is equal to playfield dot get Node Oops. Ever put it in quotes. I have points dot get child count because
I'll temas how many it's got minus one to account for the player node because we don't want to be able to
spawn on the player node. So that is a long and
ugly bit of code. You probably should not do
that in, like, an actual game, but just to get things
up and running here with that minimal amount of pain, we're gonna
do it like that. So back in our spawner, we have an error.
What is our error? This is our error because we
haven't finished this line. So first things
first, let's make sure that that actually works. And of course, it does get
Child Count on a null value. Playfield arena. Nav Points. The problem is, is that we
have a redundant path here. We don't need to
start with playfield because we're in playfield. We just need to get
Ana Nav points. Now this should work.
And there we are. So now we should be able
to change this to ten, which is the number of
NAPPoints that we have. Perfect. Now we
will never go over, which means that in the spawner, we can ignore this line.
We're not going to need it. And just so that we
can validate that, we'll just put this
in here for now. So, we want to loop through the number of enemy tanks that
we're going to spawn. So we're going to
do that with Tank. We're going to
define a four loop. The variable is
called Tank index, and it's in and there is a very handy
function called range. And if we provide the value, we provide a singular
quantity as a value, it's going to give us an
array of numbers from zero to that number minus one, which is incredibly useful
for looping through arrays. So if our enemy tanks is
actually equal to 11, range is going to
give us zero to ten, which is exactly what we want. Or at least close enough. It's the right number of values. So enemy tank is equal to, and this is the same thing
that we did for the player. So enemy tank prefab
dot instantiate. As AI tank. And, of course, you got to spell
the word As right. I think that's a new record for me misspelling a
two letter word. Hey. Well, that's why I'm a computer scientist and not
an English teacher. Alright. And once we've got
an enemy tank, then we need to set up
some of its details. And, of course, those
details are the name, the node name and
the spawn point. And since we already have a reference to the
playfield yes, okay. So at the bare minimum, we can simply say
play a field terrain, get parent, add child enemy tank, and
that would be great. But it's not enough. So the first thing we
got to do, obviously, is we've got to attach
the shell fired signal to our call and then we need
to rename the enemy tank. Enemy tank dot name is equal to. And we're going to
call it enemy sub or enemy with this token. And, of course, we saw
in a previous lesson that that token allows us
to do string replacement. So since we're attempting to
replace it with a number, Oh, actually, it should
work without a string cast. Let's try it. And
the enemy number is simply tank index plus one, because we want
them to be from one to whatever and not
zero to whatever. And then we're going to
do likewise for Well, so the enemy tank we'll
call enemy tank with that. But the display name We'll just be enemy number. And these are arbitrary. This is just me deciding that
this is what it is. You can make them whatever
you want. And now, of course, we have to
find a spawn point. But before we do, it
would actually be slightly more efficient or
at least more, I guess, less complicated
because the spawner and the playfield or the
playfield terrain have the exact same parent, so we can just say
get parent, a child. Alright, now that
the tank has been added to the playfield,
we can set a spawn point. And of course, when the tank
first spawns into the world, its position is equal
to vector dot zero, which is a constant
that indicates that the vector is
zero, zero, zero. So, for as long as
that is the case. So as long as enemy while enemy Tank position
is equal to vector 30, this means that it's unassigned. And what we want to do
here is we want to keep picking new spawn points
until we get a valid one. And the only time the
spawn point is not going to be valid is if it's
the player spawn point. So, spawn point Whoops. Curt curse you auto complete. Spawn point is equal to, and we've already got
our spawn points array. So it's equal to spawn
points with the index of a random number from zero to the size of the
spawn points minus one. So that will give us any
index from zero through the end of the
spawn point because the spawn points maximum or an array's maximum index is always equal to
its size minus one. So once we have a
spawn point set, we want to remove it from the spawn points array because
we've already picked it. So we simply say spawn
points, erase spawn point. We want to erase it whether it's valid or not
because what's going to happen is that since we're
already looping for the tanks, after we set this
tank spawn point, we're going to loop
back to the top, create a new tank,
and then we want to select from the
remaining spawn points. And we don't want to include
the one we just picked. So if we always delete the spawn point that
we just picked, then we're never going to
get a duplicate spawn point. And this is why we
duplicated the G children array of the NAVPoints node because we're going to be
deleting stuff from it. And if we used the
original array of the original children, then we'd be
deleting points from NAVPoints from our map, and
we don't want to do that. So for something
like this, always work on a duplicate copy. So spawn points erase. And we want to check the
spawn point if the name of the spawn point is equal to players start
because if it is, or was that player
spawn, I don't remember. Let's look. Player spawn. Uh, they say memory is the first thing to
go when you get old. At least I think
they do. I forget. Alright, so if the
spawn point name is not equal to player spawn, then what we do is the enemy tank position is equal to the spawn
point position. And that should do
us. Et's take a look. Well, actually, no.
We won't be able to test this because when
we're starting the game, we're not actually
spawning any tanks. So we have to go back to game. And now that these have been dealt with,
we can remove them. And then we go back
down to Start game. So we've spawned our player. We've set our spy cam. Now we have to tell the
spawner to spawn enemy tanks, and we have to pass in the function that
we're going to attach, which is, of course,
on shell fired. And now we should be able to spawn a set number of
tanks into our world. Let's start with two
and we have an error. All right. Trying
to assign type, blah, blah, blah, type Oh, okay. So the problem here is that it's trying to assign
a type of array node to a variable of type
node three D. We've specified our spawn points
array as a node three D, but because of the
magic of polymorphism, it's actually attempting
to return a node and you can't cast
upward only downward. So if we change this such that, well, we don't have to
say it's a node three D, we can remove that and we
will change this to simply node Now, let's try that again. Spawn two tanks, start
game. All right. We've got a player, and
we've got two tanks. And of course, they're
individually moving around. And as you can see, Godot is handling the
physics for them. So you don't even have to worry about them steering
around one another, even though if they're
both attempting to do it at the same point,
they'll just collide. So we have a working game. The only thing that we are missing is a game
over condition, a win condition for the player. So that is really easy and quick to add given everything
that we've already set up. I will challenge you to do it as a supplementary
to this lesson. But you pause if you
want, pause the video, try it yourself, and then
continue watching the video, and I'll show you how I did it. Alright. But before
I get into that, we have a pretty huge
bug that has to be fixed unless you like your
game to be really challenging. So if you notice or you may have noticed if you're playing
around with this, if you start a game
and then you die, and then you start another game, there's gonna be more tanks spawned than you
told it to spawn. And that's because none of the objects from the
previous game are being removed by the spawner before
we actually start the game. So the quickest way to do that and we can either have the sponor do it or we can have the game do it. We can just do it in the
game. It's easy enough. So all of our objects, all of our tanks are being
attached to the playfield. So we want to go through the playfield. And we
don't want to do that. So four child in
playfield Get children. This will loop through
all the children of the playfield and put it in the variable child for
us to do something with. And all we have to do
is we have to see if the child is in the
sellable group because we put all the objects that can be removed from the game in that group since
they can be destroyed. So if child dot is in group Shellable child dot free. And that should
solve our problem. All right. Now, let's set up
our game over conditions. So the first thing that
we need to do is we need to keep track
of the number of tanks that have been killed
versus the number of tanks that are still left. And the quickest and easiest way to do that is to go back under the user interface because the user interface is already keeping track of the kill count. So all we have to do is also keep track of the
value from the spawner. And the easiest way
to do that is to add another variable called
Kill count target. Which is also an integer. And since we've already
got a signal setup, we can simply monitor if the enemy spawn
count has changed. And once again, we can
use a Lambda function, which will simply say kill count target is equal
to the new amount. And now, every time the
kill count changes, we want to check this value. And if the kill count is equal to this target
value, then we've won. Obviously, we're gonna
change that in a moment. But the next thing that
we need to do, obviously, is we need to provide a game over state for
the player having won, and we also need to be able to report to the player
that they've won. So we are going to change
up things a little bit. We also have an old bug. Let
me see if I can find it. So the problem here is that
whenever a tank is hit, whether it's been
destroyed or not, it will emit the enemy
tank destroyed signal, which is bad because
that means you can just keep racking up kills by
shooting the same tank. So if we go back to our shell, if the body is in group
shellable and body is not destroyed, then
we can call hit. To indicate that the
shell has hit the tank. I mean, it's hitting regardless. That's kind of a
misnomer, I guess. It's already checking and
firing if there's a collision. It's just this is basically the bookkeeping that happens when the tank is hit. And we don't have
to keep doing that over and over if the tank
has already been destroyed. So that will solve that.
And now we just have to add the framework
to end the game. So under game, we can
provide a new function for showing the game over dialogue because what we
can do is we can have the game over dialogue report whether or not the
player won or lost. The easiest way to do that
is to provide a function. And this function basically will show the game
over dialogue, and it will either show it
with a success message or a failure message depending on the value of this
success variable. So if it's success, then we grab our UI game over dialog
that we've already got, and we grab the margin
container label, which is, of course, this label here. And we change its text based on whether or not the
player wins or loses. And then, of course,
we do the same code that we did here where
we show the dialogue, and then we wait 2 seconds
and then connect to end game. So now in on player destroyed, all we have to do is show the game dialog with
the false variable. And we need to provide a way for the player to show
that dialog and win. So we need another signal in our messenger And we need to fire that signal from
the user interface here. And before we carry on, there is a slight
optimization we can make. So we actually want to update the display whenever the kill count changes. So again, we'll need a setter. Because when the game starts, the Kill count is going
to be equal to zero, but at that point,
we haven't called the code that was originally here to change the Kill count. So yeah, we'll do it whenever that
value actually changes. So that should solve
that problem. Okay. And now we need to listen
for the player one signal. It would normally
be slightly more logical to have the
GameOver dialogue listen for the
player one signal, but we never actually created a script for the
GameOver dialogue, so we can do it here as well. There are a lot of ways
that we could optimize and refactor this code to just
make it better overall. But I'll actually leave that to you because that's the kind of thing that you should
be practicing, looking at your code and being like, How can I
make this better? How can I reduce this? How can I get rid of these redundancies
that kind of thing? So we're going to
use another Lambda. And in this case, we are simply going to show we're gonna show a show
our game over dialogue. And we want to pass
it value of true. Now, there's two
ways to do this. I think that this should
work it's within a, we're missing a, it's
within a Lambda function, so that should be fine. Alright. This should
do the trick. Let us spawn against
a single enemy. Give them the business and
see if we win the game. P. Alright, let's
see what's wrong. So since we never set the kill count target
equal to anything, it is equal to zero. And then, of course, when
we check down here to see whether or not
the kill count is equal to the
kill count target, the kill count is
going to be one. And the reason why is even
though we connected it with the signal is that if you start the game
with a default value, well, this signal never fired because the spawn
count never changed. So we need to initialize
the kill count to one, which is the default
minimum number of enemies that spawn. So now this should work. Yeah, we got a crash.
Alright. UI GameOver dialog, and that is because the
user interface does not have a reference to
the GameOver dialogue. We can fix that real quick. And there we go.
Now if we change the enemy count to four. Oop. Now we got four enemies.
Things are dangerous. And they're all moving independently and
so on and so forth. Okay. So that was a
lot of programming, and we are now at the point where we have
a fully functional game. However, it kind of looks well, it could certainly
look a lot better. So in the next lesson or
maybe the next lesson or two, depending on how much
time we have left, I'm going to show you all
sorts of ways in which to take your game to the next
level and improve its graphical fidelity
by revisiting materials, impo
32. Multiple Camera Angles: Mm. Welcome back. We are going to look at creating
a dynamic camera system, or I guess the better way to put it would be a multiple
camera system. So it has gotten to the
point now where we have extended our tank functionality enough that a simple
tank is no longer going to cut it because we want to add a camera
system to our tank, but we don't want to add
it to the enemy tank which is derived from tank. So we're gonna have to create
a new inherited scene, and we're going to inherit from Tank and we're going
to save this one, and we're going to call it player Tank and
player tank is, well, we got to go back
to our spawner and update our player tank prefab to actually use player tank
instead of tank now. And right now, nothing
is going to change because they're the
exact same class. But in the player tank, we want to add a camera rig. So we've got our existing camera three D, but we want more. So we'll go back here and we will change or rather
we'll add a node, and this is going to
be a node three D. We're gonna call it. Cameras. And we're gonna move the
existing camera under cameras, and that's not gonna work. And there's a reason for
that. So we will simply add additional cameras
directly here instead of caring about making it fancy
and adding an extra rig. Can I rename the camera? No. Okay. And that all makes sense. You don't want to you can't
actually change any of the underlying information
of the node. So that's fine. So we will simply add a
couple of extra cameras. Well, I add another camera three D. And this one name will
give a name to or rather, we'll give an
additional index two. So we got Camera three D two
and Camera three D three. So camera three D two, I've always kind of
wanted a camera on the turret so you can see where the camera is actually rotating, although that's not really
gonna do us any good, is it? Actually, no, we can parent the We can parent the
camera to the turret. We did that with the
marker three D earlier. So add camera three D there. And then we'll make sure it's facing in the right direction. Yeah, that looks good. Preview.
Ooh, it's upside down. And for the record, that's
what that purple arrow is to show you the correct
orientation of the tank. So, in this case,
we want it at zero. And now we can see our
turret on our turret. And we want the third one to be, let's say, Well, it's
fine where it is. It's a rear facing camera. And actually, you
know what? We can add so we'll have to
do this slightly different than the way I
originally planned it. But let's add a node
instead of a node three D, and this will be a camera rig. And it is literally
just going to have a script with references
to our existing cameras. And now, we're not
creating a new node. We are adding a
script. And we're gonna export var cameras. And cameras is going to be
an array of camera three Ds. And, yeah, it helps if you don't add your own
silly little notation. Okay, so now we've got an array, and we can indicate
the size of the array. So we've got three total
cameras. One, two, three. And now we can drag
the references to our existing cameras
into this array. And all we need is a single method that will
process unhandled key input. And we're going to check
to see if the one, two or three keys
have been pressed. And if they have, then we'll switch to the
correct camera. Is physical key
pressed. Key one. And we're going to
create a method called switch to camera, and we're gonna provide it
with the correct index. So in this case, we can call it we can use the
same index as the camera, but we're going
to need to change the indices because it's
gonna be off by one. And then we'll just do else. Mm. Actually, let's go
with an LF here. F. All right. L F. Camera one, Camera two, camera
three, Camera three. And we've got a
redundant I in there. Delete. Alright. And of course, we don't have switch to
camera. So funk Whoops. And this is pretty
simple. All we have to do is we have to say cameras camera index minus one because we have
to compensate for the fact that the
indices start at zero, but we're starting at one here, and we could just as
easily make this zero. I mean, right, why not? Less confusing
that way, I guess. Okay. Current equal true. And since Godot will only care about the last camera that
has been set to current, then we should not have to worry about keeping track
of which camera is current. So let's see if that
actually works. And if it doesn't, then we'll
make some modifications. Game player And there you go. We now have a multi
camera system. And that was really easy. Okay, we're done coding
for the time being, so let's move on to
the next chapter, and we'll start talking
about graphical upgrades. We'll revisit materials and look at meshes and all
that other good stuff. See you there.
33. Better Explosions with Particle Effects: Welcome back. In this lesson, we are going to
remedy the fact that when any tank gets shot, it just kind of stops.
It just lies there. It makes a noise, and
it's really boring. So we're going to spruce up our tanks explosions with
some particle systems. Now, the great thing
about particle systems is that they look complicated
on the surface, but once you learn one or two neat little
tricks about them, you can basically Play with
them to your heart's content without even really
understanding what the vast majority
of the features do. And since all of it is updated in real time in
the GadoEditor window, you can basically just play
with all the settings, and when you get
something you like, you can roll with it. So a particle system is a node, just like any other
node in GADO. So we're going to
add a new scene. We're going to
select other node, and we're going to go with
GPU Particles three D. Now, there is a difference between GPU particles
and CPU particles. GPU particles are processed on your graphics
card in your GPU. CPU particles are processed by your computer's
core processor. The difference
between the two of them is that GPU particles are more performance on a
three D accelerated system. In addition, and this is kind of some behind
the scenes stuff, the Godot team is basically
leaving CPU particles behind in the sense
that they're not prioritizing them
over GPU particles. So they're not adding
any new features to it, but they are willing to let people bring it up to
parity with GPU particles. So basically, go with
GPU particles unless they simply do not work on the hardware that you are
attempting to target. It's a good rule of thumb. So let us create a new
GPU particles three D, and of course, it does nothing. Because we haven't actually
set up anything yet. So the two main
things and you'll see a little you'll
see a warning and you'll see an
error over here. It says nothing is
visible because meshes have not been
assigned to draw passes, and a material to process the
particles is not assigned, so no behavior is imprinted. That means that we
need to assign both of these things in order to get our particles
to do anything. The first thing that we will
add is the draw passes. The draw passes,
and you have to add at least one will determine
the look of your particles. So we need to give it a
new mesh of some kind. And we are going to be using bitmapped textured particles. So let's go with a quad mesh. And now you can see that we actually have a particle here. Actually, we have a
bunch of particles here, but since they have no behavior, they're not actually moving. Also note that I rearranged I did two things to the project in this lesson. I rearranged it so that we
have a bunch of subfolders, we're getting to the
point we're going to be adding a lot more
resources to our project, and we don't want things
getting cluttered up. So I put all the
fonts, the graphics, and the scenes and the sound effects in their own folders. Speaking of which I have added a couple of
particle textures into the project for you to use when you're making
your own particle systems. These are all freely
available from opengameart.org or ken dotn. There are other places
you can get them on the Internet or even make
your own if you so desire. Once we click on the pass
and the mesh and extend it, we now have the opportunity
to change what it looks like, same as we would for the other
meshes we've worked with. In fact, as you can see, we can use any kind
of mesh that we want. So if we wanted a box or
a capsule or whatever, to get a more three D look to our particles,
we could do that. But we're going to
go with a quad mesh, and then we have to
provide a material, and we should be experts
at that at this point. So we're going to go with
a new standard material, and we can open it up. Now, there are a number
of extra settings for a particle material than there
are for regular materials. And there are also a
couple of extra switches that if you don't flip them, three quarters of your particle system settings are
not going to work, and you're going to spend two or 3 hours banging your head against the wall wondering why none of your settings
are taking place. And I am definitely not speaking for experience
on that one. So, first thing we're going
to do is go to Albedo, of course, and we're going to throw in one of our textures. So I'm going to show you how to make two different
particle systems, an explosive one
and a constant one. And I also have provided
the particle system that I created for the tank and attached to the
tank in this project. So you can follow
along with this lesson to see how all of
these settings work, and then you can try
and create your own, and then you can also inspect the ones that I
created for the tank. I will also show you how to
use the scripts to trigger the explosions to use GD script to trigger the explosions at the
end of the lesson. So now that we go back here, we need a texture, again. So this is going to be
a fire kind of yeah, kind of a fiery texture or a fiery
particle system, rather. So we're going to
use the explosion oh eight texture and
bring that over here. Now, as you can see,
there is no transparency, so we need to enable
transparency. And we also need to
expand vertex color, and we need to click and
turn on use as albedo. And this is what allows us
to change the colors and the transparency and all that
good stuff of our texture. And since this is
a three D texture, but we're using a texture, you can see that when
you rotate around, the texture skews and goes away because it's mapped onto
a thing in three D space. So in order to change that, we need to billboard
the texture, and we'll enable
particle billboard. And what that does is that
always it's going to make the texture face us no matter what orientation
the camera is in. And in this case, that's
exactly what we want. And we also need well, we don't need, but it
would be a good idea to click keep scale that way, if we want to change the
scale of the particles, and we most likely do, that will allow that
to happen, as well. If not, and we changed
any of the scale curves, none of it would take effect. Alright, so we've
got a material. We've got a pass. Now we go
to the process material. Process material
dictates what actually happens to the particles over time and a lot of other things. So we need a new particle
process material. Now that we've got one,
you can see by default, our particles are spawning
and falling downward. And that's because
the default particle process functionality is to simply slap it with gravity and call it a day.
But we don't want that. What we actually want
is a couple of things. So let's go back up to the GPU
particles three D section, and we'll leave
emitting on for now. But what we're going to do
eventually is we're going to turn on one shot
because one shot basically means that one
set of particles are going to emit, and then
that's going to be it. That's exactly what we
want for an explosion. So we'll turn that off for now just so we can see
what's going on. Then we have what's
called explosiveness, and this is exactly what
it says on the tin. The more explosive it is, the more instantaneously
the particles will spawn. And it's kind of hard to see
right now because, again, they're all spawning with the same velocity and
they're all being affected by the same direction. So let's crank up the number
of particles to, like, 25. And explosiveness is fine, and randomness we don't
have to worry about. Randomness if we weren't
using explosiveness, randomness would determine
the randomness of how often the
particles would emit. So we don't need to care about collision, drawing or trails. Those are fancy options that we're not
going to deal with. So normally, particles don't collide
with the environment. If you wanted them to,
you would need to add a special node called a GPU particle collider
to your particle system. And this is related to that. And we don't need to care
about drawing at all. So one of the things about particle systems is that
they're extremely nerdy, and there are a lot of
settings that you are never going to need unless you absolutely know that
you're going to need them. So if you look at a
particular setting, you go, why would
I ever use that? Then you don't have
to. It's great. So under process material, this is where we
can start making our particles do things. So we go under particle flags. And we don't really have to
care about any of these. So these will dictate how the particle aligns to
its various directions. We can also add
damping as friction, which slows the particles
over time until they stop. Spawning and velocity
spawning velocity and display are like the
three most interesting ones. So if we go under position, you can see that we
have the opportunity to set the shape that the
particles spawn from. So right now they're
spunning from a point, which means they're all spawning at the exact same
point in the world, but we can change it so that
they spawn within a sphere. So now you can see it's spawning within a circular area here, and we can change the size of
the sphere to get much more spread out particles or a box or so on and so
forth, even a ring. Ring might be fun,
especially for fire. Kind of hard to and then you can change the ring axis to
change the size of the ring, ring height, ring
radius, ring erratus. Yeah, I don't know if I actually want to do that.
Let's leave it as a. Then we have angle and velocity, and these two are
extremely important. So you're going to
get very used to this control in Gadot least when you're using
the particle systems. This is the only place I've
actually seen it used in Gdo, and it basically provides
a range that you can expand by dragging on these particular little
thingies arrows. That's the word I'm looking
for. And you can also shift the entire range itself by changing by clicking and
dragging on the rectangle. And that indicates the range, minimum and maximum that the
various settings can have. So, in the case of an angle,
when a particle spawns, it can have an angle that ranges anywhere from this
value to this value. We don't want to be this
particular or crazy, though, so let's just set it
0-360, and that's fine. That means that the particle can potentially spawn in any
angular orientation. The fun one is velocity. Velocity dictates how fast your particles are going to explode out from where they are, and the spread determines
their direction. In an angle around it. So if you want, like, a more fountain
looking thing, you'll lower the
spread, and if you want a more explosion looking one,
you can raise the spread. Unfortunately, right now, it doesn't look like
anything because, again, we don't
have any velocity. So let's add some velocity. Let's make our
velocity like two. So now you can see we
have a bit more of that. And now if I were to
change the spread, you can see that
they're exploding out into a wider angle. Okay, so we don't want
our particles to be going down because that's not
how an explosion works. So is it under animated? No, it is under
accelerations. Okay. So in order to keep the particles from
just falling downward, we have to turn off gravity. And gravity is under
accelerations. And as you can see, it's
already set to negative 9.8, which is, of course, Earth
gravity pulling downward. If we change this to zero, Boom. Now we have particles that just explode out in any direction. You can now see how
spread works a little bit better because of the fact
that gravity is turned off. So we're going to
leave it at 180, and now we've got an
explosion that goes outward. However, the particles
themselves don't look so good. So we've got two problems. The explosion goes
away too quickly, so let's raise the lifetime of each particle to 2 seconds. And another great thing
about this system is that almost every property
in a particle system, along with every
property that exists in Godot in general has a
very informative tool tip. So if you don't know what
a particular setting does, just hover over it,
and it will tell you. Unfortunately, when
you start getting down to Things like this, you're
not going to get anything. It's just going to
say, This property can only be set
in the inspector. Well, I'm in the inspector,
so let me do it. So some of them you kind of
got to play around with. But Godot actually has incredibly good documentation
on the particle systems, and I will link that in the supplementary
materials for this course. So we have gravity, and we've also got the
ability to change the linear radial and tangential accelerations
of the particles, but we won't be using those. However, we could. We
could just up this, and it would change how the particles
actually accelerate. I don't know, I kind
of like this one. Let's leave it like that. Radial acceleration
basically determines how the particles will accelerate
out from their radius, which doesn't make a lot of sense unless you
see it in action. So, here it is. And let's up the damping just a little
bit to see what happens. Basically, damping
will gradually slow your particles
until they stop. Yeah, not a fan
not a fan of that, actually. I'll turn
off dampening. Rise. Now, the fun
one is display. Display is how you
can change and tweak the overall appearance
of your particles. So I'm going to show you how basically the color
curves and the scales work, and then you can apply that to the bulk
of all the other ones. So, generally speaking,
the particles will be controlled by
an individual range. So in this case, scale means that the literal
scale of the texture. So if we raise this, then some of the whoo,
that's too big. Some of the particles can be bigger than others because
they'll spawn with a scale value between
this between this range. So let's actually
make that 0.25. So now we can get some
small ones. Ca bloom. Then we also have what is called a curve, and curves are fun. It's not very illustrative
to do the scale curve, so I will show you the color. I will show you
the color curves. More specifically,
the Alpha curve. And again, none of
these will work unless you turn on
the albedo color or use a albedo and
the vertex color in the material settings
for this texture. So if we go to Alpha curve, we can select a
new curve texture. And, of course, for some reason, my inspector scrolls all the way back up to the top whenever I expand any of these. I don't know why that is. But then if we click on it, we now have the opportunity
to set a curve. So if you change
this to a new curve, now we have a
curve, and we click on a curve, and we
can see the curve. Over time, the textures
normal setting for this value will be multiplied by the
value in this curve. Now, of course, given that
I just added a curve, you can't see my
textures anymore because they are all
being multiplied the Alpha is being
multiplied by zero over the lifetime of the
texture, and that's not what we. If we drag this up to one, now we're back to
where we were before, which means that the base
Alpha of the texture, which is, of course,
one, is multiplied by, again, one over the
course of the lifetime. So this is where it starts. This is where the
particle is born. This is where the particle dies. There's not a metaphor
in there at all. And so if we change this, if we click over here and add another point and then
drag this down to zero, now you can see that over time, the particles will fade out. So over their lifetime, the Alpha will get gradually
lower until it goes away. And we can even add more points. So what I like to do to make
the textures not, like, pop in so quickly is to bring my initial value to zero and then drag this middle point up to here so that
they actually fade in over time and then
gradually fade out over time. And that's really neat. And you can even do
this with the colors. So if you want to change
the color of the texture, you can add a well, you'd add a gradient
to the color ramp. So let's do that gradients are slightly different
than curves. But a lot of these features have curves available to them. So as you can see here, we
have an angle curve and so on. So right, let's close
that where were we? Okay, we have a
color ramp gradient. Boom, so we open this, and
now we have a gradient. And if you've never worked with gradients in Godot before, basically you can add
points within the gradient, and we're about to
do that and then change the value the color value at each point so that
the colors smoothly blend between them over the
distance of the gradient. So here, we've got black at one end and
white at the other, which gives us a nice
fade in property. Which is why now you can see that the
texture is starting out black and then
fading to white over the course of the
lifetime of the texture. So let's add a couple
more points here, and we'll double
click on this one. And all I did was left click
here to add these points. Now, if I change this
black to say yellow, That means the texture
will start at yellow and then fade to
kind of blackish. And then let's change this to orange to, like,
a bright orange. And then this one to a red. So now you can see
the textures are basically it's starting
with a yellow tint and then going to an orange tint and then going to a
red tint and then just fading to the original
color of the texture. Now, for an explosion, we
don't really want to do this, but if we were doing fire, which I'll show you
how to do in a moment, something like this
comes in very handy. So this is actually kind
of a crappy texture for an explosion. So let me give you a better one. I actually was able to come
up with some settings to make this just kind of puff out a little bit to look like
an actual explosion, but it took forever, and I don't remember
what the settings are. Um, I could double check them, but it would be better
for me to actually change the material because I
want to show you actually, let's turn this
one into smoke and then and then I'll do
the explosion one. So we will change
the texture again. Let's change it to black smoke. Oop, got to open it first. Here we go there, material. Texture black smoke. Boom. And we'll clear this by simply going
drop down and hit clear. We'll leave on the Alpha curves. We'll turn off explosiveness. We will up the amount to about 1:50 and we will change
the angle spread to, like 20, and we'll change the direction
from X to zero to Y one, which means that now
it's going to go up. So now we have a nice nice
angry smoke particles. They're kind of going
up a little too much. So let's go with the
initial velocity of 0.5. How's that look? Kind
of sort of better. Oh. Okay, could be worse. Not bad. And now we'll do a second one
that is kind of explosive. And I'm going to actually
parent it. No, no, I'm not. I'm going to add a child node, and I'll add a node
three D because this is how I did the
original particle system. So I had a node
three D, and Oops. You can't do it that way.
What you've got to do is change this No. Node three D, right
click Make scene root. There we go. That
flips them around. Now we add a so we want this
one to always be running. And then we add another
GPU particle system. And this one is going
to fire off some debris in explosion when
the tank explodes. So we can go back to time, and we'll set one
shot eventually. But we want our
explosiveness to go to one. We want to turn this off for the time being so that we
can see what we're doing. Randomness is good. Then, of course, we need
another process material and a draw pass with
a new material. This material we're
going to do as a prism because they look suitably,
uh, shrapnel like. So we're gonna change
how it looks like that. We'll reduce the size just so that it's
not a giant block. Then, of course, we
need a material. Now, in this case,
we're not going to use transparency or crazy
colors or anything, so we simply use an albedo. I'm not gonna give it a texture, but what I will do is I'll
make it gray so that it looks like a piece of metal that launched off of the tank, and they don't need to billboard or anything like that, either. And now we go to our
particle processor. Particle flags are
fine, spawn position. We'll have them
emit from a point. The angle is going to be
good question, actually. What is the angle going to be? Well, the direction is
again going to be upwards. And we're going to do
a spread of about 75. And let's give it a
initial velocity. Let's say the velocity. We don't want any to
not have a velocity. So let's go from,
like, five to 20. And now, without
any changes at all, we've actually got a pretty
decent looking explosion. So we're going to
change this slightly. We want to change the
potential angles of them. So we'll go 0-360. And then that way,
whenever they spawn, they'll spawn with
a random angle. And we can align the Y axis of the particle
with its direction, and that is also pretty cool. Actually now they actually
turn in midair, kind of. Alright, so if I go back to emitting and I
turn on one shot, you can see that emitting
will have turned off. And that's because a one shot is exactly what it
means. It is a one shot. Let's bump up the
number of particles here. Boom. There we go. Now, a one shot
is literally just going to fire all of its particles at once
and then call it a day, and then it won't fire anymore. So if you indicate, say, 200 particles here, and you didn't have explosiveness turned
up to one like I do, it would just kind of leak
out those 200 particles, one, two, three, four,
five, six, seven. And then once they
were all done, that would be the end of it. With explosiveness
turned up, like we have, they all fire at once, and
then they don't fire anymore. So this is what will allow us by mixing all these
different effects or these different
particle systems, this is what allows us to
make explosion effects. So let me show you the one
that I did for the tank. So emitting so here's the
initial explosion, Kaboom. And then here's the debris. Whoops. Kaboom. Literally
the one I just showed you. Smoke also similarly. And then I also added one for fire that doesn't
actually have a texture. It's literally just literally
just the square particles. And that's because I don't have a decent
fire texture on hand. But anyway, I have
them all turned off because we want to only have them all enable and do their thing when
the tank explodes. So I added this particle
system to my tank, and within the script for the
tank in our hit function, I grab a reference to
the explosion particles, children because we
want the Children, which are the actual particle systems and not the node itself. And then we loop through each child and we said it's
emitting property to true. And then once we've done that, we will have a nice explosion. And I will show you how it looks in action because
I really dig it. So, add a couple more
enemies because otherwise, we won't get to really see the explosion before
the game ends. So now if I sneak up on
this fella here, very neat. And that is much more rewarding than just
watching the tanks stop. And now it's just going to burn and smoke for all eternity, at least until the game is over. Okay, that was particle systems. And in the next lesson, we will be taking
another deep dive or a better deep dive into materials to make our tanks not look so flat looking.
I'll see you there.
34. Re-texturing Your Tanks: Materials Revisited: Welcome back. In this lesson, we're
going to take a look at the additional options you
have available to you when creating a material for
the various parts of your tank or any other mesh or material available
in your project. I have provided all the
relevant files as part of the project file in the graphics slash Metal
Textures directory, but I will also provide links in the supplementary materials for this course in order to get some yourself because
you can either make these maps yourself
if you know how to do or you couldn't get them from various repositories on the web or even use online
tools to make them. So a good place to get these textures would
be ambientcg.com. Again, I have provided a link to that for the
supplementary materials. And if you wanted to
make them yourself from a individual texture
that you created, you could go to
normalmpline.com as well. And again, I've
provided a link to that in the
supplementary materials. Oh, as you can see, I've already started playing around
with some materials, but we're going to create one or rather modify one directly. So let's go to the front of our tank, which is, of course, mesh in since 387, and we will expand the mesh, and we will expand the material. Now, right now, it's kind of boring because it is literally just an individual
singular color. So we want to change that. So we will go to albedo, and we have a slot
for texture here. So let's drag a
texture in there. We'll drag the color file
from the ones provided. And now you can see that
actually overrides or overlays a texture onto our material tinting it with the
color that we provided. So let me just grab this color. If we were to change this and put it all the way
back to white, then you could see that the texture itself is
not really affected. And then if we want to tint it, we just give it the color again. But we can do more
than that because we have a bunch of
files over here. We can change the metallicness. And, of course, that
has a texture as well. So if we provide the
metalness texture, that can change the metal
look of the of the material. We can also change
the roughness, which is the roughness texture. And you can see now
that this is giving a bit more depth and
feel to the texture. So before these bumps were not really they didn't
really look three D, and they didn't
really exist at all. In fact, let me
clear this texture, and I'll so you can see the
difference now is that, Okay, it just looks like a
bunch of colored splotches. And now, if we put the
roughness back in here, you can see that it actually
looks like something, you know, you could run
your hand over and feel. Then we also have normal maps. Now there are two different
kinds of normal maps, normal maps, either in
a DX or the GL format. Godot works with the GL format. So we're going to
use the normal GL. And this one's a
little confusing. So Godot has support
for a height map, and in other engines and
in other types of tools, that's usually called
a displacement map. And you can't really see
much of a difference with this particular lighting
setup, but it's there. Now, if you don't
like the way that the texture stretches on the particular object
that you're working on, you can go again,
under the material, and you'll go to the
UV scale option. And let me reset this one just so that you
can see the difference. So 'cause sometimes because we're not actually using, like, actual models that have the UV mapping done within the
three D modeling software, so Godot basically just
stretches the texture across the entire surface of the object,
however it sees fit, but that may not work for us, so we can reduce it by changing
the zoom of the texture. Alright, so now we have a well, we have a much different,
more textured looking tank. And if we go into our game, You can definitely
see the difference, especially how the light is playing across it and
how different it looks. And of course, since we did
this in our base tank scene, the enemy tanks look
exactly the same. And you can also see
the way the light is changing due to the
reflectiveness of the tanks. Oh, we got an error. All
right. I broke something. So this is something that will be fixed
for the next lesson, but whatever it is,
I guarantee it is irrelevant to this
particular lesson, so we won't worry about it. Anyway, that was materials
and their various maps. We'll see you in
the next lesson.
35. Decals: Welcome back. We are
in the home stretch. Before we continue, I just
want to mention that, yes, I did fix the error that came up at the end
of the last lesson. Basically, when we reorganized stuff in the chapter where we
created the enemy spawner, the base enemy tank did not have a shell prefab set because
the tank that we had put directly into the game was where we had actually
set that prefab. So, for some reason, it
never got propagated. And then when we moved it
into the to the spawner, of course, since we were
working off of the template, and the shell prefab was null. And then, of course, I
never actually allowed any of the tanks and the lessons after that to fire back at me, so it never came up. Anyway, the long and short
of it is that I've gone back and fixed the enemy tanks scene
for all the lessons from, I think it's 104 Chapter
ten, Lesson four onward. So the error should be
retroactively fixed, even though it showed
up in the video. Hey, onto more
interesting things. Let's talk about decals. Decals are really cool. They are a way that you can add additional texture detail to your game without actually having to bake it
into your models. So, for example, I have created a little explosion shell crater that appears as a decal on the ground here
where the shell hits. Now, I didn't get
fancy enough that I put it on trees or anything. So if you shoot a tree,
you won't see it. But this is decal at
its most basic level. And let's see how to make one. Decals are nodes, In Gado. So if you create a new scene, and you give it a
base of type decal, and we'll just create a new one real quick
so you can see how that's done, other node, decal. So if you create a new
decal, get rid of that. And you give it a
texture for its albedo. At the bare minimum,
that is all you need. So in our case, we don't
need to do anything else. What we would normally do is rotate the decals
orientation such that it matched the surface normal of the mesh that
we were attaching it to. But we don't need to do that because we're only
attaching it to the ground, so its default surface
orientation is perfectly fine. So we go to our shell
script, and of course, within our shell, as we've done before for other similar things, we added a export variable of type packed scene
for the decal prefab, and then we dragged in the shell crater that
we just created. And then when the shell
impacts with something, we instantiate a copy
of the decal prefab. We add it to the
shell's parent as a child because the
shell's parent is the playfield and then we
set the crater the decal, which is crater, the
craters global position to the global position
of the shell. And we have to obviously do it in that order
because if we were to set the global position
before we added the child, we would
get an error message. But, yeah, that is decals. You can use decals for
things like blood splatters, dirt, all sorts of
stuff like that. Um, we're doing it
dynamically here because of the way
that the shells work, but you could also use it to
add texture to your terrain. And when we upgrade our
terrain in a later lesson, which may actually be the
next lesson, off the check. But anyway, once we
upgrade the terrain, then we'll do it there to
see how to add some variety. Anyway, that is decals. I will see you in
the next lesson.
36. Importing External Models: Welcome back. In this lesson, I'm
going to show you some ways to import external
models into your Godot. Unfortunately, given
the fact that Godot supports a fairly wide
range of model formats, and also given that
a lot of times, if you're going to be grabbing free models off of the Internet, which I can almost guarantee you will
for your first couple of games unless you either are or happen to know
a three D modeler, you are often going
to have some issues. At this point for GADo 43, it is possible to almost
always painlessly import the file
types GLTF and FBX. But sometimes the assets you want are either not in those
formats or even if they are, the artist did not take
all the steps required in order to make the resource
available correctly in GADO. So what we're going
to do is we're going to import some assets, and I'm going to show you
some common ways to fix some basic errors that may be cropping up
during your imports. So all the resources will be provided as part of
this lessons project. And also, I have provided some
unfixed assets for you as well for you to play
with and attempt to fix yourself after I
show you what to do. So first, let me close
a whole bunch of these scenes because we're
not going to be using them. And the first thing
we're going to do is fix our rock because it's
very round looking. So we have a set of
rocks available to us, and these were downloaded
from Open Game art. And as you can see,
they were provided in a number of compatible formats, including Kalata, which is
DAE OBJ and even a Godot. But if you open the Godot, you'll see that there are
some missing dependencies and other things for
various reasons. So we're not going to fix
that broken dependency. What we're going to do is
we are going to create a new scene from
an existing file. So we've got our DAE file here, and we'll right click on it
and do new inherited scene. So that will give us a new Godot with that mesh as a mesh
instance within it. And actually, you
know, this is good. So let's copy the mesh instance. And actually, let me
see if this will work. Let me go back to the rock here. We've already got a mesh. And we've got an OBJ let's see if we can
pull that in there. Will that work? No.
How about that? Yes, that will work. So
mesh Instance three Ds will take dot OBJs
as a mesh resource. And if you don't have an OBJ, if you just have, like,
a DAE or whatever, then you can just
do what I did and do a right click and
get an inherited scene, and then you can copy that
Mesh Instance three D. What's the path here? Yeah, it's still the DAE. Interesting. Anyway, so Godot will do some importing
behind the scenes. Anyway, we can right
click and copy this node. And go back to our rock, although we don't really need to because we already imported it. So yeah, so we've got our mesh. The problem is, is that the mesh textures were not linked. Fortunately, the textures
were provided for us, so we can manually set the
material for our mesh. Unfortunately, for a DAE, it does not indicate the
mesh resource specifically, but a lot of the imported mesh file formats will have their material hidden under what's
called a surface. You can also provide
an existing or a new material under
surface material override. So the surface is the actual
material for the rock. Now, what we can do is we can make our mesh unique and
then say unique recursive, and that will allow us
to change the material. And in this case, they've
already provided a material, so we can just drag that over. And for whatever reason, that didn't update the textures. So okay. But it did provide us with
some material settings, and we do have the
textures ourselves. So let's drag our rock
PNG into the albedo, and that's already
looking better. And now we've got a, it doesn't look like we have
a metallic over here, but we do have a roughness
and we do have a normal map. And we have a specular, which may actually
go under metallic. Let's try that. That
looks pretty good. So now we've got a pretty
decent looking rock here, and we can close
this. Do not save. Now, if we save
our rock and we go back to our arena scene, we should see some much
better looking rocks in here. And there we go. We got
some good looking rocks. So, we're going to do
likewise for the trees. And in this case, the trees. So again, I've provided
multiple kinds of rocks for you to play with
to do a similar thing. Now, for the trees, we
have a similar problem in that the trees that were
provided are in FBX format. Now, as of Godot four dot three, you can import FBX
files directly into Godot to that around
the four dot two era. And if you're
working in four dot two, you may still
need to do this. But there is an external FBX
converter that Godot uses. And for example, if I
double click on this, so if you double click on
this, you can see that its material was not
set up correctly. And you can also
see that you had the option to use a
specific importer. Now, UFBX is, of course, the importer that now comes bundled in as of 43 with Godot, so you should just
be able to import. So the problem here is
that, again, the material, even though they've
provided a material, it doesn't have a texture, but they have provided
the texture for us. So what I've already
done is I've created a new standard material, which in order to do that, you simply right click
create new resource, and then standard material. So we've been creating
standard material files within our existing
models up to now. So this is the first time
we're actually using a external material file. But what I did was I took
the existing the skin provided and dragged it
over here into the albedo. So, fortunately, the tree
itself was properly mapped, so all that was
required was relinking. So if we go to Young Tree and we do a new inherited scene, and we multi select so
that we get all of these. And then we open the meshes, we can Again, we have a
material under surface, which is not what we want. So we can set these to make
unique recursive again. And then under surface, we can change the material to
our new standard material. And now Okay, it looks like that particular
model is not working well. But anyway, here's
one that I followed that entire process earlier with one of the other
models, and here it is. So that actually worked. So the moral of the
story is, unfortunately, sometimes you're gonna
have to do a bit of massaging in order to get freely available
models to work in Godot. But the most common problems are broken materials
or broken textures, and I just showed you
two ways to fix that. So good luck. Let us, um, let us actually put this tree that currently works
into our tree scene. So we'll double click
that to open it. We will get rid of these
two mesh instances. And then we will
Where was our tree? Let's drag that tree into
here now we have a tree. So if we save this and
we go back to our arena, again, the trees are
looking pretty groovy. So let's get rid of that
cause that doesn't work. Okay, so that is how to export or import
models into Godot. And in our next lesson, we're going to pretty
up the arena a bit, and that will be the
end of the course. So I will see you there.
37. Upgrading the Level Terrain: Mm hmm. Mm hmm. Welcome back. In this lesson,
our final lesson, we are going to do
a couple of things. The first thing that
we're going to do is we are going to
change our Skybox. So you may recall,
and I've actually deleted it already
here that we had a skybox that came from the default sky settings
produced by the Godot. We can change that. So if we go back to our
arena and we go to the World Environment
node that we created many, many lessons ago, we can click on it to expand it, and then click on the sky And I've already
expanded that here. Now, before it had a
procedural sky texture in this box, which I've
already cleared out. We can change that to
any number of things. So let's give it another new
sky, and we'll open that. And now we have the option
to set a sky material. Now, before it was set to
a procedural sky material, and that's how we had this here. But we can also provide what's called a panorama sky material. And panorama skies are how you add actual graphical sky boxes. Now, creating a panorama texture is beyond the scope of what
we're trying to do here, but I do I have
provided one from the All Sky pack by
Richard Whitlock, which is available in
the Godot Asset Library. He provides a bunch of
existing Godot Skybox scenes and ten different
skybox textures. So I've provided one here. And if you click on
the Skybox to open it, you'll see that you
have the option to provide a panorama. Now, for some reason, well,
okay, now it's going to work. Great. But before I had a
problem dragging this over. And so if you drag the texture into that slot,
now you will get a skybox. The other option,
of course, is to click and do either
load or quick load. But once you've done that, you can see now that you have
a beautiful panorama sky, and I need to Woop there we go. Beautiful There we go. Well, you get the idea.
But anyway, yeah, this sky is now it covers the entirety of our
environment scene, and it looks really good. Looks much better than
the original one. So next up, let's
fix the serena. The first thing that
we're going to do is we're going to add
actual boundaries. So if you may recall from when probably testing things out and playing around before. It is possible to drive
off the edge of the arena, and since we're not
applying any gravity, that means that our tanks are going to float off into space. It won't happen to the enemy
tanks because they can only go or they can only go
from NavPoint to NavPoint, but it can definitely happen to the player, and that is sloppy. So let's fix that.
The easiest way to fix that is to simply provide some collider hills all around
the border of the mount. So we are going to grab a hill. We are going to right click
and duplicate that hill, and then we need to
Editable Children. And then we need to
make the meshes unique. And the collision unique so
that we can change them. Now, let's let's
rename this Hill to border border Hill North. And we'll move this up here. We will Whoa,
that's interesting. We will change the orientation
of this hill such that Where is our transform.
Where is our transform. We need the 90 degrees this way. Yeah. Okay. And let's yeah, let's
bring that up a bit. Bring it forward a bit. And now we can change
the actual mesh. So if we go here, we've got XYZ. We'll change the X
direction to 100, which is the Whoa,
that ain't right. We'll change the dire,
it's because it's rotated. Alright, we'll change
the Z direction there. We'll bring this over here. And we've got one
of those. And then we will duplicate
this entire thing. Change it to South. Drag it down. Oops. Border Hill South. And we can simply
duplicate both of these and rotate them such that they are east and west. And I forgot to
change the collision, so we'll fix that in a moment. Do that rotate. Negative 90. Orientation's a little off. We can fix that pretty easily. Can also just stretch
these out so that they are better Z one oh five. Yeah. And then we'll do
the same for East Hill. Yep, okay, I guess they are. Alright, looks like
we got a little gap there. That ain't right. Okay. That's better. And now we have to
fix the collisions. So we go back to our
collision shapes, and fortunately, we can
simply edit them here. And, of course,
we're going to have to reset their transforms. And the orientation is a
little off, but that's okay. We'll just drag
that out like that. Drag that over here and
drag that over here. And then do likewise
for the other three. That one's correct. We just have to
re rotate it now. And reorient it a bit. Do likewise for the other two. Yeah, it looks like
they're both good. We just have to
change the rotation. Zero. And they are
off in terms of Z, so we'll fix that. Okay. Now, we should be able to no
longer drive off into space. Now, let's let's fix this terrain it's
kind of ugly looking. So, similarly to
how we did before, I have provided extra set of textures for this project in the Graphics Desert
Textures folder. So now we can simply
create a new material, create new resource
standard standard material. Yeah, we'll call it.
Desert. Where'd that go? There it is. Alright, and now we can we won't
need shading, but we will need not
the Vertex color. We will need our albedo. And it won't drag the
Rock 29 in there. Okay, you're gonna give me
you're gonna give me grief. Rock 29 Albedo Rock drag. There we go. And we don't we
don't really need metallic. We do need roughness
and we do need normal. So here is our roughness. Why does this keep disappearing? Normal map. Enabled. And again, we have to make sure
to use the right one, which is the normal GL. And we've actually got one
for ambient occlusion, so let's turn that on
and see what happens. Stop. The joys of
open source software, sometimes it just
wants to act silly. All right. And we do have a displacement map, so
it's enable height. And I'm going to do this
the normal way this time. Graphics, desert
textures, displacement. Okay, Dan, we'll go
back to our arena, and we want to set
the material of our ground mesh Instance
three D. So open our mesh, and we will change the material. Can we click load it? No. Lod. Desert tress. There we go. Okay, so it's kind
of big looking. And the quickest way to fix that is to change the
scaling of the UV. So if we open the texture
and go down to UV one, we can change the scale here. So let's set it to 0.5. And that is not good.
Let's set it to 1.5. That's a little bit better. The lighting is kind of weird. Probably has
something to do with the sun setting, I'm guessing. Let's turn this off.
Nope, it's not the sun. Hmm. Okay, there's so we can see, actually, there's something
interesting going on here. So, what have we got? Okay, so it looks like the
Rock 29 texture was bad. Let's go with the Rock 29 color. See if that solves it.
Yeah, much better. Okay. I like that. Alright, so now that we
got that looking good, we can provide the same
material again to our hills. And let's just do it
directly in the hill itself, which is why using inherited
scenes is wonderful. So we'll go back to
Hill, expand our mesh. And replace our resource, and now we can quick load because we've already
used it, open, boom. Alright. This hills
are looking better. At least texture wise.
I mean, obviously, we're still using a
very unsuitable mesh. But, um, Alright,
and, of course, our border meshes are not using the same material because
we made them unique, so we have to set
those directly. And of course, they
look terrible. So we have to change
our UI scaling again. We reset that to one. It
still looks like crap. Let's go to No. Okay, so at this point, we're going to have to change the texture scaling in
only one direction. So there's a little
link icon here. So if you click
it, that means if you change and make
sure that it's white. If you change all of them, then that means all of
them get changed. But if you don't want
that to be the case, you click it again so
that it looks broken. And in this case,
I think we just want to change the X and the Z. So let's Oh, it's
changing everything, isn't it? And we
don't want that. Oh, right, obviously,
because we're using the same textures we used before or for the other meshes. So we're gonna have to
make these unique again. And fortunately, we can do that simply by right clicking
on all of them, expanding, going to material, and then doing make Unique. And now we should be able to fix them without breaking
everything else. But let's go back to
our original desert. Make sure that the
scales are correct. Yeah, they were originally
1.5, which was good. And now we can change
all these, hopefully. B material. Now these materials
should be unique. UV one. There we go. That's the thing
five. There we go. That's starting to
look a little better. Alright. It's not perfect. Maybe we can do 15? Yeah, that looks
infinitely better. Alright. Now, let's run our
game and see how it looks. All right. I think
at this point, we might want to turn
him off the fog. But where's the enemy
tank? There he is. The texture scaling
is still a littleify. We would for the material. Alright, let's turn off the
fog on the camera or for the environment
environment. Fog. Oh, that's right. Cause it's enabled on the
camera. We did that. So let's go back to our
original tank scene and go to the camera
and turn off a Z fog. Alright, now let's try
this again. Right. Looks much better.
Obviously, we want to play with the directional sun because now everything
is in total darkness. So let's do that. Let's go
back to our game scene. And it's actually in the arena world Environment
directional Light. And we can raise this Alright, so where is
the Oh, there it is. There's the little
arrow. There we go. So if we rotate it downwards, so now the map is more
directly in sunlight, let's drag that over
here so we can get some shadow going on. Okay, this should look
infinitely better. Yep. So at this point, you can
play with it to get actually, I feel like I feel like that texture is still
pretty nasty looking. Let's go back to here. And we'll change the
UV scale to three. Okay. It's looking better. At this point, it's
merely a matter of tweaking until it looks the way you would
like it to look. As you can see, the texture looks infinitely
better in the minimap, but it's kind of
flattened out and skewed here because of the
size of the arena. But if you actually
go to the hills, it looks a lot better. Although, yeah, it's still
kind of weird down there. Anyway, that brings us to
the end of our course. Feel free to continue to
play with the settings of the textures and lighting and everything until you get
something that you like, because at this
point, as I said, it is literally just
tweaking to taste. I hope you enjoyed this
course and joining me to look at the basics of
three D development in Godot, and I will see you
the next time.
38. Exporting Your Game: Let's take a quick
look at how to export your game so that other people
can play your masterpiece. You'll export your game
going under Project Export, and you will need to download the relevant presets
for your system. So, for example, if I wanted to export to Windows desktop, I would click the Add button
and select Windows Desktop. And then, of course, if we don't have any
presets available, it'll tell us that there are no export templates available
at the expected path. So we would have
to download them, manage exports templates, download and install from
the best available mirror. And once that is done, you should be able to
export your project. You can change any of the settings available
if you need to. For example, you can add you can add an icon or change
any of this other stuff. But if you don't actually know what any of
these settings mean, it's perfectly okay to leave
them as a as their default.
39. Class Project: Create Your Own 3D Game: It's time to put everything
you've learned into practice. For the class project, you'll
build your own version of the Zone Battle game using the systems we developed
throughout this course. The goal isn't to copy
everything perfectly, but to apply the core concepts and make the project your own. Your project can include a playable tank with movement
and turret controls, a three D environment
with lighting, enemies with basic AI behavior, sound effects, and UI elements
like score or minimap. You're welcome to
customize the project. In fact, you're encouraged to. Change the level layout,
adjust enemy behavior. Experiment with materials or
add your own small features. When you're ready,
upload screenshots or a short gameplay clip of your project to the
project gallery. You can also include a brief
description of what you built and what parts you found the most interesting
or challenging. I'll be checking the projects
and leaving feedback. I'm looking forward
to seeing your games.
40. Congratulations! What’s next?: Congratulations. You've made
it to the end of the course. You've learned how
to work inside Gdo, navigate three D space,
build environments, implement physics, controls, AI, audio, UI, and game
systems. Certainly a lot. And you brought all those pieces together into a
complete three D game. More importantly, you now
understand how GIDOPjects are structured and how different systems communicate
with each other. That foundation is
what allows you to keep learning and
experimenting on your own. Thank you for taking this course and for creating alongside me. I'm excited to see what you take your game development
journey to next. Good luck and happy creating.
 Skillademia Academy, Creative Skills for the Future