Transcripts
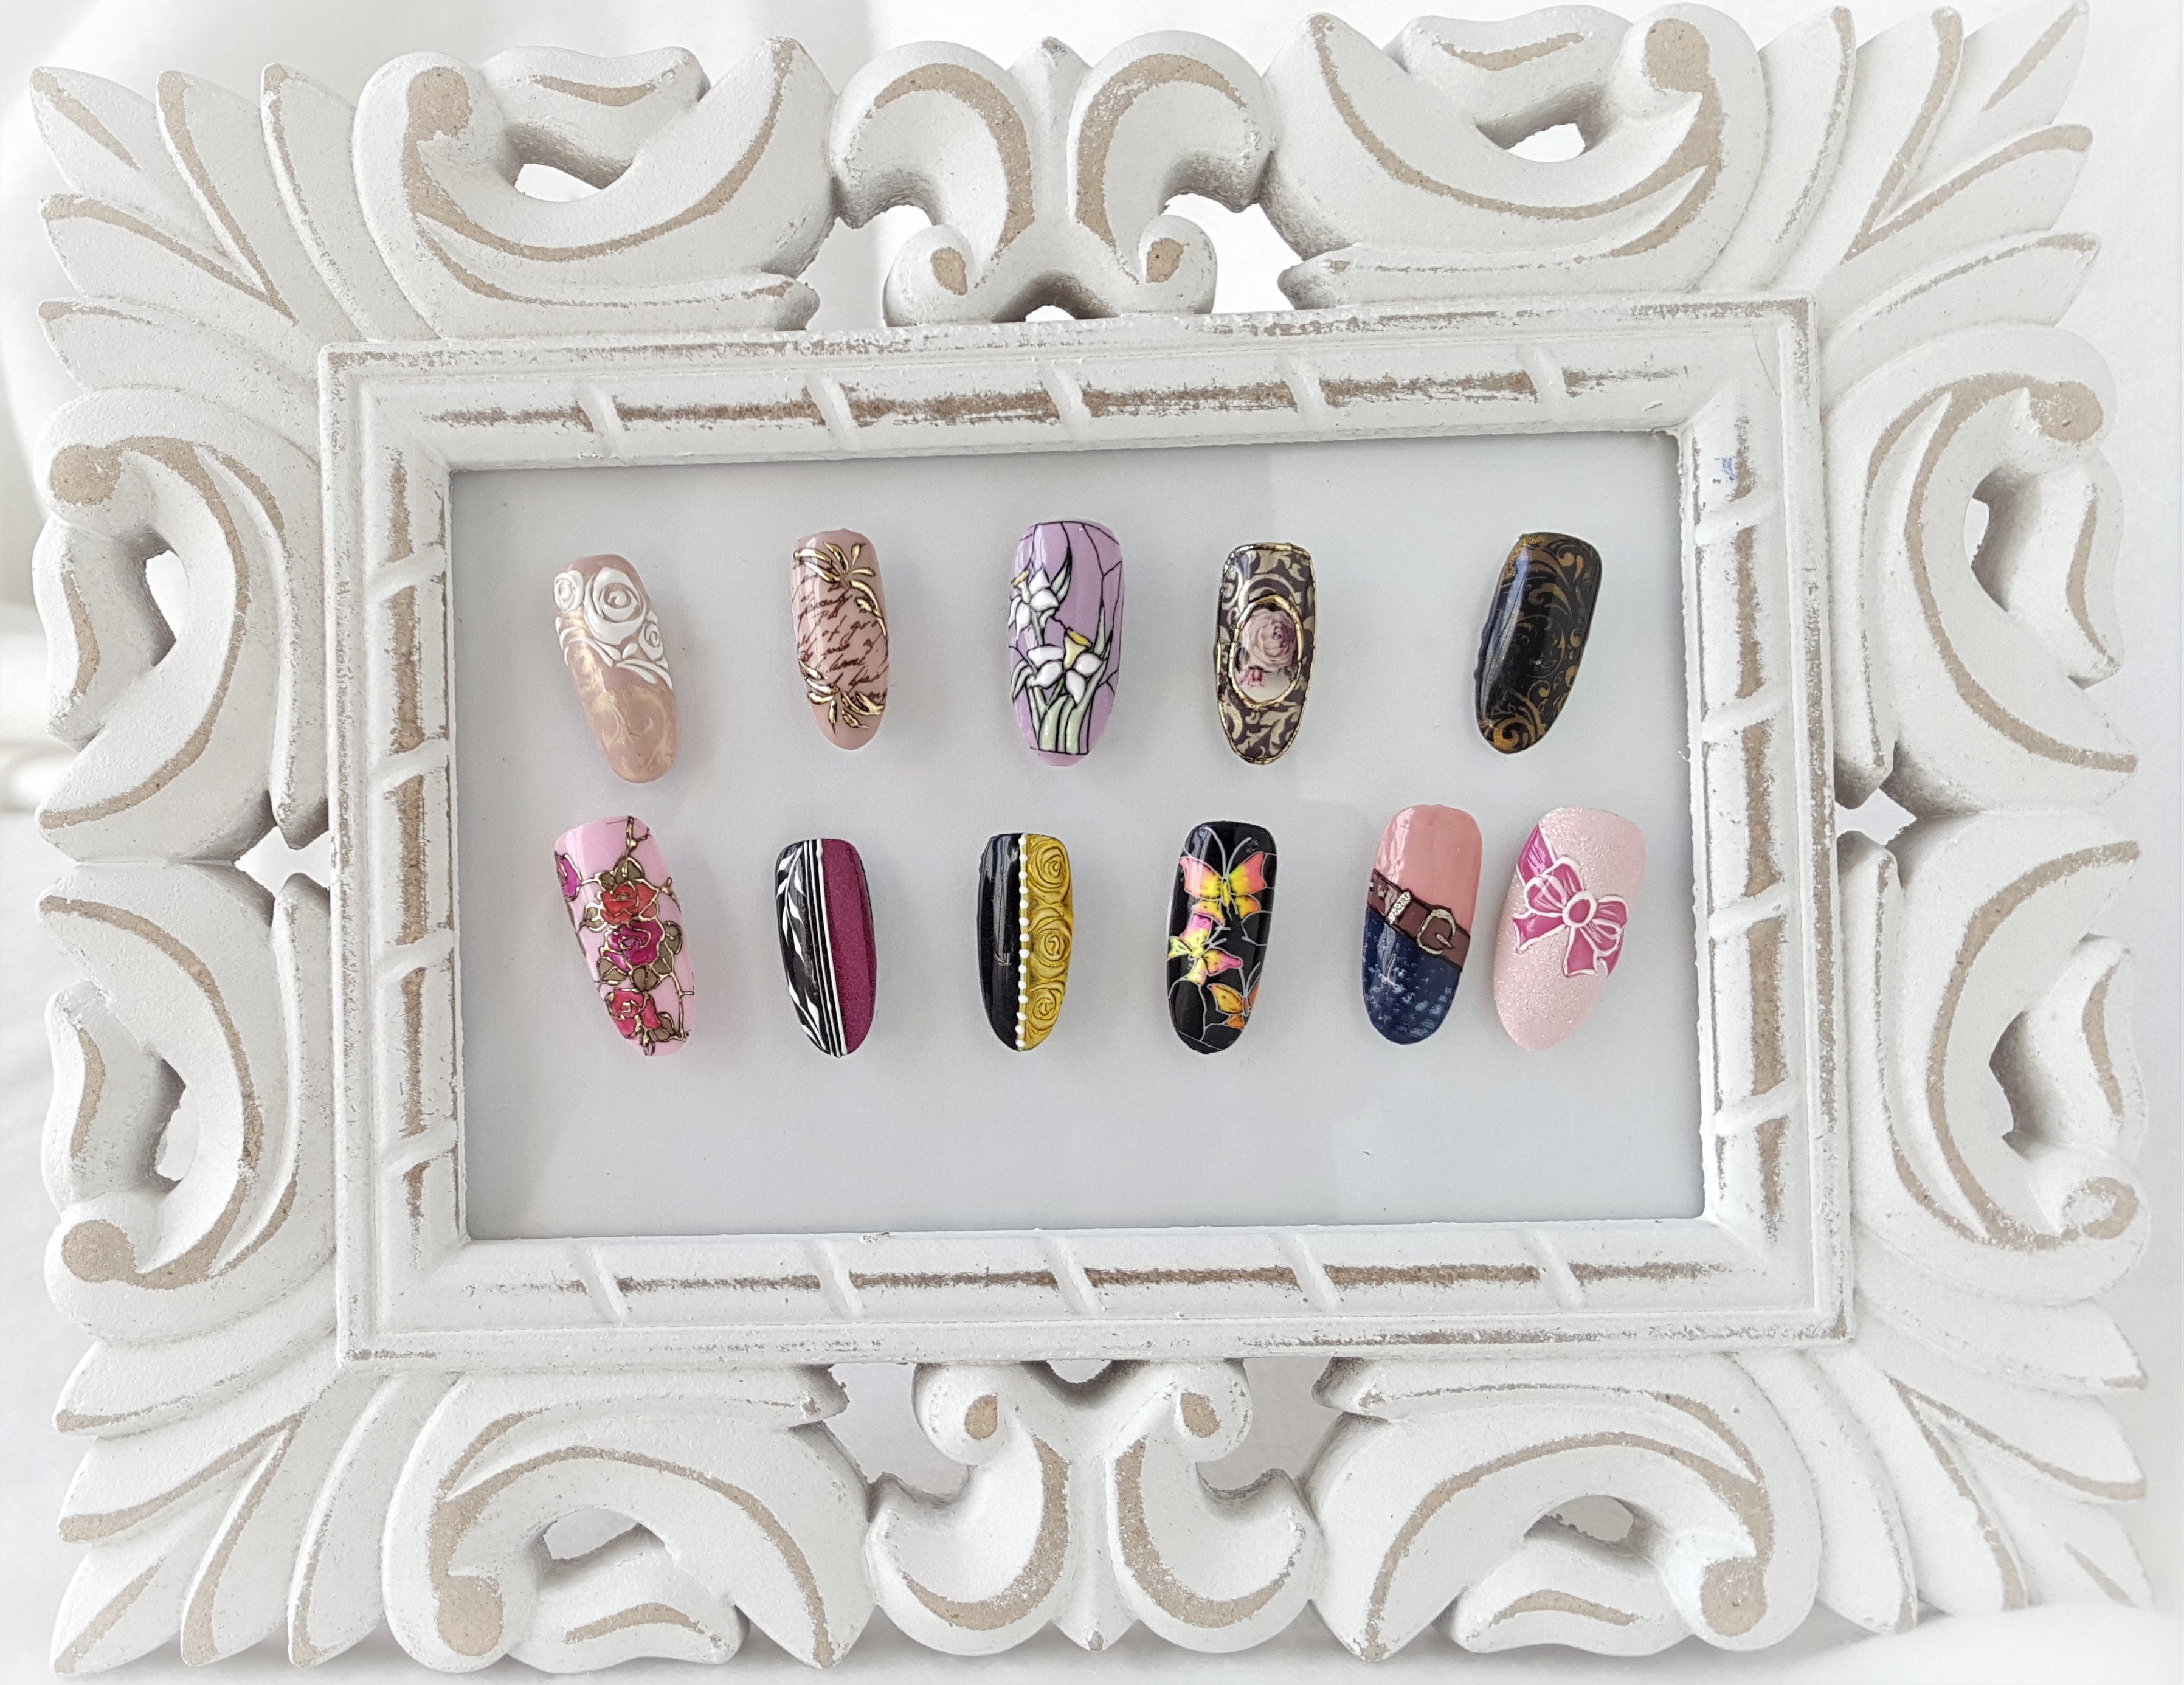
1. Introduction: Nails is a different canvas to do art on, and a different way to express your creativity. My name is Imarni and I'm a Nail Artist from London. Today I'm going to be showing you some of my most popular designs that I've done on amazing, talented, people. Clients like Asap Rocky, [inaudible] FKA Twigs, Lily Allen, Karlie Kloss, Emeli Sande, and many more. Some people look at what I do and find it really hard, but once I show you the techniques in this class and break things down to make things simpler, it'll be much easier for you to do. I'm going to be showing you some basic designs that you can build on. You'll learn basic nail prep, some dotting techniques, and then we're going to be moving on to more advanced but these designs, you can practice yourself at home, until you feel confident enough to get better and better. You can take this class if you have some experience with nails, or no experience at all. I think this class would be good for someone that knows that they're creative, but haven't found their creative outlet. It is a fun way to express your personality, and also if you're really into fashion, having something that would go with your outfit. I would love to see some of the designs that you've come up with in the project gallery. Thank you so much for taking my class. Let's get started.
2. What is Nail Art?: Gel nail art is literally art on your nails. It's a great way to express yourself or enhance an outfit. Today, we're going to be creating art using gel and we're going to be curing it in a UV lamp for durability. I really like expressing myself with nail art because I feel like I have my own style and clients are really happy when I've created something on them, and twisted it and made it into my own style. I started working with celebrities to start off, then I opened a salon in Shoreditch, London. It soon became more popular, like a cult salon. We used to have celebrities walking in and out, all the time, getting their nails done. Then from there, the business has just grown and grown, and I've been working with more celebrities, more musicians, creating more complex nail art. Today, I'm going to be showing you some of my most popular designs that I've done on some celebrities and the most popular designs I've had in my salon. I'm going to break it down for you so you can learn how to create them yourself at home. I'm going to be using my Bio Sculpture UV lamp. I recommend you get a brand UV lamp rather than any generic UV lamp that you find online. These are my go-to prep tools. This is my metal pushback tool, from Bio Sculpture. You can get this, again, online or in a local nail wholesalers. I have my cuticle nippers here. Again, online. This is my nail brush that I use to remove any dust from my nail plates but you can use these nail brushes. My stalk scissors. These are very popular for cutting nail foil. This is my dotting tool. These are used literally for just applying dots on your nails. This is my fineliner brush. As you can see it's very fine hairs there. This is what I use to create more detailed designs. This is my upper arch brush. This is a nail striper. You might use this to create your flames or to create some straight lines going down the nail. This is my go-to nail brush. This helps me to clean up any mess I've made when doing my designs. Any gel that I've spilt onto my cuticle, I can just remove with this and some acetone, so you would need some acetone. This also helps you remove any gel from the nail when you need to soak it up. We have nail cleanser that we will be using to cleanse the nail before applying our designs or applying any gel to the nail. Everything you need is linked in the resources. Now that we know what tools we need, let's get started.
3. Preparing Your Nails: The first thing I'm going to do is, I'm going to cleanse my nails. I'm just going to wipe over my nail plate with my cleanser. Then I'm going to use my metal pushback tool, so I'm just going to gently push back my cuticles. You're removing any skin from the nail plate as well. That's really important because you want the gel to bond well to your nail, and you want to get the edges as well. If you do have any hangnails, you might want to nip at your hangnails. Just be careful not to nip too much. I come in with my 8,000 nail buffer. With this, I'm just going to open up the cuticle outline. I'm coming in and I'm buffing the nail, and I'm making the nail plate rough. We want to do this to create a rough nail plate, so your gel bonds to your nail. This makes a better surface for creating your designs. You want to make sure you're getting the tips as well, don't leave out the tips. I'm on pushing back the skin around the cuticle, this is removing skin as well. My nail plate is rough now, and that's the perfect nail plate to apply gel to. I'm now going to come in again with my cleanser and wipe away at the nail, and that's removing all the dust that you've just created when buffing your nail. I'm going to come in with my nail brush and just remove any dust from the nail plates, because any dust is going to create a barrier for your gel. Next, I'm going to file and shape my nails. I'm using a 15240 gripped file, and I'm just going to go around the free edge. Whether or not you're doing your nail's or client's you might want to ask what kind of shape your client would like to go for? I like to do an oval shape on my nails. see it's my hands. Now, I'm shaping the nail. This now I'm giving a squoval shape to it, so I'm just flattening the tip and then coming in and rounding the edges. My clients mostly have oval, but squoval is very popular. Most common mistakes when people are painting their nails, is having seepage of the gel product or the polish product around the cuticles. This could be because you haven't prepped properly. So it's really important to pushback the cuticles and cut away any skin, any hangnails so you don't get seepage on your nail plates.
4. Basic Painting Techniques: Now that my nails are prepped, I'm going to apply my base coat. You want to keep your base coat very thin. I'm just wiping my brush along the neck of the bottle, so I've hardly got any gel left. Then I'm going to come in and apply a very thin layer starting from the cuticle, and pull it down to the free edge, along the sides. Remember to brush it along and cap your free edge like so. When I say free edge, it's the parts of your nail that just extends over the tip of your finger, the very edge. Now I'm going to cure my base coat for 30 seconds in my gel lamp. I'm going to apply scarlet, this is a very bright red, and red is quite a difficult gel to apply. It's the worst for messy seepage around the cuticles. I'm going to wipe my brush along the neck of my bottle so I haven't got too much gel on. I'm going to start at the cuticle, and you're going to bring your brush down to the free edge, along the sides, and I'm going to cap my free edge. A really good tip when applying gel is to have some acetone to the side. This is a cleanup brush. This brush is what I use to remove any gel that's hit my skin around the nails. You can see that I have a little bit of gel along my skin, so I'm going to take my cleanup brush and dip it in acetone. You can use normal polish remover, nail polish remover as well, and I'm just going to come in and clean that up. Also, another quick tip, if you have any seepage, I'm just going to make a bit of a mess there. I've hit my cuticle a bit there. I'm going to use my cleanup brush. I'm going to come in and remove that red that has just seeped into my cuticles. I have a little bit here on my skin, I'm going to remove that as well. It's nice and clean. You don't really want to get any polish or gel on your skin, but it happens. It happens to me all the time, so yeah, clean up brush. Now I'm going to cure my gel for 30 seconds. I'm going to do my second coat. I'm going to start at the cuticle, and drag to the free edge, the sides, and I'm going to cap my free edge. Then I'm going to cure for another 30 seconds. After my nail has been cured for another 30 seconds, I'm going to apply my topcoat. We're going to do the same thing. Start from the cuticle, edges, and then we're going to cap the free edge, and we're going to cure for 30 seconds. If I was going to do a design over the top of this red nail, I would not apply a topcoat. You want your nail to be mapped when applying your design, and I'll show you more later. Now my nail has been cured for 30 seconds, I'm going to cleanse, and there you have how to paint your nail.
5. Beginner Designs: Dots: I'm going to start with a very simple, easy design using my dotting tool, I have applied of natural base color to my nail. I've cured it for 30 seconds and I'm going to cleanse that so it's ready to go with my design. I have some colors here that I've just decant it onto my palette and I'm going to start at the cuticle and I'm going to start just off of the center. You're going to hold your tool at a 90 degree angle for this. If you hold it at a 90 degree angle, you're going to get the same circle, the same dot each time. You can also cure in between dots if that helps. It doesn't have to be 30 second cure, you can cure it a quick cure just to make sure that your gel is not going to move. But at the end you're going to need to cure it for a full 30 seconds. Like that, I cure that one. I'm going to add two more colors. You can always do a test on your palette as well. If you have too much on, you can just take some off. I feel like this one is too close to the center, so I'm going to clean that off with my clean up brush. Any mistakes that you make with nail arts, take off really easily and start again. Rotate your finger as well, so you can see all sides and I'm really happy with that. I'm going to cure that for 30 seconds. Now that my gel design is cured, I'm going to apply top coat. Be careful not to seep your top coat into the cuticle. Because this will make your design rift and peel. I'm going to seal my free edge with my top coat, and if you do get any seepage, you can always clean up like this. Any seepage you can remove with your clean up so this is amazing. That's my very simple dotting tool design. With the dotting tool techniques, it's very much open to interpretation. You can always have a play. This one's really popular. Small dot at the cuticle. You can add more dots. It's similar to when people have tattoos here, some people have that tattoo at the cuticle like that. You can change up on each nail, so you can have one dot there, you can have two here. Very simple but very cool design. You can do that on a new nail, you can do on any base color. You can also do cherries, I'm going to use this high pigment jell for my cherries. You can use a normal color, but I like this one is slightly thicker, it's easy to draw lines with. You're going to need a fine liner brush to draw your stems. Start with your two dots, like so and then you cure that. Then I'm going to take my fine liner and I'm going to come in and add my stokes. This looks really cute with a French manicure as well. You do a French tip with a cherry, it's very popular. That was quite simple design to do using a dotting tool. Sorry, that's [inaudible] snoring, I didn't actually realize he was doing that. You can always use your dotting tool to create a heart. You're going to need to use a fine line for this as well. I've just done two dots, bring my sides in. You see you've got a tiny little heart using a dotting tool. It's all about playing. The more you play with your tools, the more confident you'll get. I like it when each nail looks different, it's not exactly the same design on each nail. I like it when one nail has more designs on and then one nail might have like just something really simple. I think that looks coolest when it's like that.
6. Beginner Designs: Rose Quartz: Now that we're more confident with our tools, I'm going to show you how to create a rose quartz pattern like a stone-like design. You can do this with different colors. For instance, if I used more of a green and a blue for this design, you'd get more of a jade nail. This is really simple and easy to do. This design doesn't need to be perfect. It can be quite messy, so it's one of the simpler designs. For my rose quartz I have a base gel on, and I've left it with a sticky-tacky residue layer. I'm not going to cleanse that. I'm going to apply a nice natural pink that I have here. This can be any brand gel, but this is a color that I use quite a lot for my rose quartz. I'm going to cure that for 30 seconds. Now, you're going to apply a white. This is going to create the stone effect that you see in rose quartz. When you apply your white, you want to make sure that you don't have too much on your brush. So I'm just going to wipe the brush on the neck of my bottle. Then you're going to take your brush, and you're just going to make a messy line across the nail. You see it doesn't have to be perfect. We want it to look quite messy. Then I'm going to come in with my clean-up brush, and I'm using this brush because it got quite rough brittles. I'm just going to clean-up brush in acetone, and then I'm going to dry it off on my lint free white. So I've got a very dry brush. Then I'm going to come in and I'm going to push on my white line. This is texturizing the line. You're almost making a fade of the white line here. Once I'm happy with that, I'm going to cure it. This is just a quick cure. This is a couple of seconds. Then I'm going to take that out, and I'm going to do another line across here. You can do it in the same direction, but to make this look more realistic I probably do it in a different direction. You want to make sure you get right in at the edges, like that. Then you're going to come in again with your dry clean-up brush, and you're going to push and part and texturize the line. You want to be careful that you don't take too much away. Sometimes you might do a mistake here, but then it will make the design look nicer. It really does not have to be perfect. I'm going to cure that for 30 seconds. I'm going to apply another layer of pink, but this time I'm going to mix it with a little bit of base coat. You can use base coat, or you can use a soft gel. The reason I'm doing this, is because I want to make the pink more translucent. When I put it over the top of the white, you're not going to lose the white. When you're happy with that mix, you're just going to drag it over the top. If you apply to much pink now you're going to lose your white. This design is all about layering. I'm going to cure that. I'm happy with that. I'm now going to add some more white. Looking at the design, you can workout where you want to add more white. You can also overlap your white now. Because you've added that layer of pink that's cured when you go over the top of your white, and add more whites, and start to take it away, you're not going to remove the bottom layer of white because you've already applied your pink and cured it. Then you can cure. I'm going to add one final layer of pink here, and I'm going to mix that up with some base. You can see that the layers that I've built up have made this stone effect. If you're happy, you can cure it. Finally, I'm going to apply my top coat, my shine. Be careful not to hit your cuticles. If you do, you can always come in with your clean-up brush and just take it away. Then I'm going to cure that, final 30 seconds. I'm going to show you the same technique, but with a green. Then that's going to make the jade effect stone. Now for jade, exactly the same technique, but I'm going to mix my gel colors to make it more translucent. Now I'm going to apply my final white line, and then cure for 30 seconds. When you're happy, you're just going to cleanse off your sticky residue of top coat and then you're left with a nice shiny rose quartz and jade nail.
7. Beginner Designs: Clouds: Now we're going to move on to the cloud design. It's the same technique that we did with the rose quartz. We are going to mix up a blue to create your sky. This is going to need to be translucent, so I'm going to add some soft clear gel. But then you can use any brand base coat for this. But I am going to use my soft gel, and then I'm just going to mix them together to create more of a translucent blue. Then I'm going to apply that to my nail. When you're happy with that, you're going to cure it for 30 seconds. Then you're going to take your white for your clouds, and you're going to apply it straight to the sticky layer. Although now you're not going to need to cleanse this nail. If you can imagine a cloud, it's got a higher tip and then it comes down. You're going to start with the higher part of the cloud and then you're going to take it down to the sides, down and out like that. But then this is too sharp for a cloud, so then you're going to take your acetone and your clean up brush. This needs to be nice and dry like we had it with the rose quartz. I'm going to try off like that, and then you're going to press and you're going to pat, at the bottom of the cloud to fade that bottom out. That's going to give your cloud more texture and you can take a little bit of white at the top, but not too much. I just did a little bit there. You want to keep your top nice and sharp and then you want to keep this bottom bit nice and soft. When you're happy with your cloud, you're going to cure it for 30 seconds. Now I'm going to add my next cloud, and I'm going to have this cloud a little bit off center over here. Again, I'm going to start with a higher point, and then I'm going to take the cloud out and down at the sides. If you're happy with your shape, you're then going to use your clean-up brush, and soften the bottom of the cloud. You come in a little bit there. If you take too much of white at the top, you're going to lose the shape of your cloud. I like that, that's really nice. You also want to have your clouds straight, by getting across straight. You really want to tip to the side, very nice and straight. That looks nice, I'm going to set that 30 seconds. I might add one small one here and that's off-center again. You've got one cloud further here, one here, and then you're going to balance it out. You can tuck it right in at the edges, and if you do get any on your skin, you just going to take it off with your clean-up. Get your brush nice and dry again and then pat. When you feel like it looks realistic, when the cloud looks like a real cloud, that's when you're going to want to cure it. Sometimes you might want to add more if you think, "I'm not sure whether I've lost the shape a little bit." So you can add some more. Sometimes you'll do like a little mistake here, but then you'll go, "Oh, that looks nice." It's a nice, easy design, so I like that. I'm going to cure that for 30 seconds, and then I'm going to get my translucent blue and mix that up again. If you're going to add on too much blue, you're going to lose your white cloud. It needs to be nice and translucent. Any brand-base coat for this you can use. You don't really want to use a top coat. Top coat is not really sticky enough. Top coat is just for the top, but for mixing colors, I'd use a base coat. Now I'm just going to go over the top here. I feel like that's a bit too much of a heavy blue there, so then I'm just going to add some more clear. Once you feel like you've got a nice consistency, you can then cure for 30 seconds. Once you've cured, you're then going to apply your final shiny top coat on the free edge. Then you're going to cure. See all the artists, so you want to have a play around until you feel comfortable doing these techniques. The next step I'm going to show you some more intermediate designs.
8. Intermediate Designs: Festival: These designs are a little bit more intermediate, so just make sure that you're feeling super confident with our beginner's designs before moving onto these. For our first design, I'm going to show you my festival design that is always popular in the summer. I'm going to start with mixing up my base color. You can use any brand of gel for this. You want a nice natural, translucent pink, so very natural. This is a negative space design. This is when you have a nice natural base with a design on top. It's very simple but effective. I'm going to start by mixing my clear soft gel. Again, you don't have to do this mix. If you have a gel brand, it already has a nice natural translucenty base without having to mix anything up, then you can do that. I'm going to apply say, starting from the center and then the edges, and then I'm copying. You can do two coats, and that's one coat. I'm going to cure that for 30 seconds. You really want to cleanse your nail before applying your design, you want to remove the sticky layer from the nail plate. This makes a better grip for your design. If you paint a design on top of a shiny gel base, you have a sticky residue left on the nail, and it's not very nice to paint your design on top of it, it can move and shrink. Best thing is to wipe the nail plate off the sticky residue before applying your design. I'm going to use a nice bright orange. You can use any color for this. It's really important to shake your gels before you apply them. If you don't shake, the colors can be a little bit more translucent. You want them to be ready block color. For my design I'm going to use my upper arch brush. You can use a nail striper. I'm going to start by creating a triangle on the nail, and I'm going to start by drawing a line. You want to hold your brush at a 45-degree angle, starting from the cuticle, aligned from the side, and you're creating your point here, then you're going to come in and you're going to go around the cuticle. Now you're going to color in these two points here. We're just breaking down the design, you're going to color in. Turn your finger or your client's finger so you can get a better view. If you have any gel that you need cleaning up, you can bring in your clean up brush, a little bit of acetone, just a tiny bit, and just go down and wipe away any gel from the sides. Then I'm going to cure that for 30 seconds. Depending on what gel you use, you may not need a second coat over that triangle. It's best not to, but if you need to, you can always do that. You can always apply second coat. Just be careful not to spill over the edges of your triangle. Now I'm going to apply some leaf glitters to my design. I'm just going to tap them out onto my palette. These are festival now. You want something more glitzy, something that's going to reflect and hit the light. Now I'm going to apply a gloss top coat. Again, this can be any brand top coat. I'm going to apply a really thin layer of this top coat. If you apply too much gel to this now, when you apply your leaf glitter, they're going to move. So really tiny amounts of top coat here. This is just to add the glitter, this is going to create your grip. I'm going to come in with my dotting tool, and I'm going to pick up a little bit of top coats from the nail, so I just apply it onto the tip of my dotting tool. I'm then going to come in and pick up some glitter. I'm going to start at the tip of my triangle, so there's an equal amount of glitter. You can see there's a small space I've got here. You might want to move them a little bit depending on how much space you have left. I've got enough space to put one more glitter just at the cuticle, like so. If you find that when applying your glitter here, that it's moving on the nail, that's because you've got too much top coats. You can see I've got an equal space between each glitter. That's mainly because I started here so I could work out how much glitter I need. Just running along the center of the nail. Once you've done that, you're going to cure for 30 seconds. Now that I've cured the nail, I'm going to apply my final top coat, and this can be thicker. This doesn't have to be thin like before. You're just going to coat the nail with your shiny top coat and you're going to seal your tip. I've just noticed that there's a tiny bit of glitter that I missed there, so it's not perfect, but I'm going to leave that like that. For the next nail, I would do a different color. So I do maybe a blue and a yellow, nice hot poppy colors, a nice red. I'll always improvise a design. A lot of times, clients will come to me with an image of, it could be someone else's blog or something from Pinterest or Google or maybe some artwork that they've come across. I would normally take that and much of it with a twist on it. So it's not exactly the same as the first image that they showed me. You can always change the colors or the pattern, make it more your own.
9. Intermediate Designs: Fade: Now we're going to start with the fade out. I have my base coat on, and I'm going to choose two contrasting colors. I'm going to go with these two, and you're going to start by applying your fast shade to half of your nail. You can start with the cuticle, and then bring it round to the edge. If you feel like you've got too much on your nail plate, you're just going to wipe it off here on your lim free wipe. When you're happy with that, you're going to move on to the next shade. You're going to apply that to the side, the cuticle, and your colors are now going to meet in the center. You want to make sure you don't have too much gel on your brush when you're fading the center. Your brush needs to stay quite dry for this. I'm going to bring in my cleanup brush because I think I have a little bit around my cuticle so I'm going to take that off. You can see that fade already. When you're happy with your fade, you need to cure it for 30 seconds. Exactly the same again, start the cuticle, bring it down to the sides. Stir the sides to make sure that's nice and neat. Then you're going to wipe your brush along the neck of your bottles, so it's nice and dry and then you're going to run it through where two colors meet. When you are happy with your fade, and when it's nice and cleaned up the sides, you're going to cure that for 30 seconds. Now we are going to come in with some gloss top coat. The top coat also gives it an airbrushed look. You'll find once you've applied the top coat that the fade looks better. Now I'm going to fade these two shades. The colors that you're choosing are already nice contrast. Let's start. The cuticle, and then I'm going to go around the sides. Same again, and I'm going to drag it through as many times as I like to make sure that it's nice and faded. You can always add some more color before you cure. Then when you're happy with your fade, clean up any mess with your clean up brush. So you just want to trust yourself and judge yourself when you're happy with your fade.
10. Intermediate Designs: Shattered Glass: Now we're going to create a encapsulated nail design using these holographic foils. You can encapsulate anything to the nail as long as it lays flat. I'm going to cut up my holographic foil. You're going to need some stalk scissors for this. The design is called shattered glass. You won't a shattered glass effects, almost like you've laid it over the nail and then you've shattered the glass. The way I'm going to cut these up, I want them to be quite long like this. This shape is perfect. You don't really want it like this. I mean, this is fine, but you want a bit slimmer than this, this is a bit too thick, so you ant them nice and thin. You want to make sure your scissors are nice and sharp, you don't want it to be blunt. I think that's about enough for my nail. I'm going to apply a nice natural base to this nail here before applying my holographic foil. Then you're going to kill that for 30 seconds. We are going to stick the foils into a base coat, any base coat, I'm going to use my bio sculpture flex space. We want this base coat to go on very thin. If it's too thick, your foils are going to move once you've placed them. That's nice and thin and I've coated the whole nail plate. Then you're going to take your dotting tool and you're going to take a little bit of tacky base coat from your nail plate and you're going to start applying your shattered glass. I'm going to start from the center. When you place it, your glass should just lay flat to your nail plate, these corners, if they lift up out of the gel, they are going to lift up from the gel completely, way just like a jigsaw, it's finding the best pieces to fit in place. Once you've placed them, it can be quite tricky to move because it really does stick to the base. But if you do find that any of your foil is overlapping onto the free edge, it's actually okay because we can file that at the end. We can file these little bits of foil that's overlapping. Now that I'm happy with my placement, I'm going to run my dotting tool along the foil just to press down any edges I've lifted up. I'm happy with that, so I'm going to kill that for 30 seconds. Once that's set, I'm going to apply another layer of base coat. But this is going to be thicker, not so thin now because we are trying to encapsulate the shattered glass. We want it to be nice and thick, but not to thick that you're going to see into the cuticles. Once you've set that, you're going to cleanse it. We are now going to buff over this whole design. I'm using an 80100 grit block buffer and I'm going to go around the very edges of the design, and as you do this, your shattered glass is going to lose its shine and it's not going to look as nice. But we're going to bring back the shiny thing. I'm just going around the cuticles, the edges and the free edge. This is when I'm taking away any shattered glass that's been poking out of the free edge. Now that you've buffed that and it's smart, you can run your fingers along, making sure you don't have any oils actually on your fingertips. You're going to feel that there's nothing poking out of that, it's completely encapsulated. Then you're going to take your brush just to get rid of all the dust that you've just created while buffing the nail. Finally, you're going to apply a glossy top coats and that's going to bring back your shiny shattered glass look. Then this manicure is just going to completely grow out, with nothing piling up. Am going to kill that top coat for 30 seconds. Finally, you are going to cleanse the nail, and their you have, your shattered glass.
11. Advanced Designs: Flames: We are now moving on to our more advanced designs. I'm going to cleanse my nail. I have applied a natural gel color that I like, and I'm going to create some red flames. For this design, you can use a narrow stripe, so you want quite a long brush for this. I actually really like using these narrow stripers for my flames. I have acetone in this bottle, so I keep dipping in and out to clean my brush. First of all, you're going to start by drawing a C in the center of the nail. This is going to give you your starting point when drawing your flame. You're going to take it up and flick it out. You want to start with this, and it doesn't have to be perfect because you're going to neaten this up. Then you're going to draw a line from your curve straight down the nail. Then you're going to add more gel to your design to make your flame thicker. This part of the design is going to be thick and then you're going to want to end up with like a thicker tail here, and you're going to flick that out. You want to be careful that you're flame doesn't look like a fork. You are just going to take your time to go back over until you're happy with the shape of your flame. If you do make any mistakes, you can just clean it up with your clean up brush. Now I'm going to move on to this side, and I'm going to add more gel to make this part of the flame thicker, I'm going to bring it in. I'm happy with that. You're going to finish off your flame by coming in and round, and you're kind of creating another C on this side. You're going to bring that C in, like that. Then you're going to add more gel here, making it thicker and if you get any on the skin, don't panic because you can take that off with your clean up. You always want to end up with a thinner point here. You might use another brush that you prefer. You might prefer this type of brush, you want to have a play with different brushes, yes. When you're happy that you're going to cure that for 30 seconds. When you do your first layer of gel, if you mess up, you can always come in with your clean up brush and just take it away with acetone and start again. It's only when you cure that you can't really make mistakes, so now that that's cured, I can't remove that. But anything I do now before it's cured, I'll just remove. You really do have time to get it right. I'm just going over it now. I'm just going to make it a lot tighter. Going over in the wobbly edges, you might want to be adding more gel to the design to make certain parts of your flames a bit thicker than others. For flames would be for someone that's already a little bit confident in nail art, but again, anyone that practices this design, eventually you'll get it. Also it's good to refer to other peoples flames, so if you have a look on Instagram, there's lots of nail artists that have created some amazing flames that you can have in front of you, a picture of it, and then just copy. This takes practice, but so does any kind of art. You just going over and over until you think that looks good. I have applied my shiny top coat and now I'm going to cleanse the nail and there you have a flame. You can do any color of flames, you can pastel flames, fluorescence, you can even create a fade on a flame. The more that you practice the shape of the flame, the more you can start adding more techniques to it.
12. Advanced Designs: Old English Lettering: So for this one, we are free hunting this design but it's good if you have a reference. So I've put up on my iPad some Old English and I'm going to be copying from this. To do this design, I always think it helps to have a matte base. It just gives you a better grip. Say for this design, I've added a matte top coat and I'm going to paint on top of this with some HP gel that I have here and this is a slightly thicker gel. So you can play more with it without it moving on the nail and the matte base always also helps when drawing straight lines because it's not going to move or spill out onto the nail. When I was learning how to do this, the more that I tried, the better I became obviously, but then just referring to the design on an iPad or your iPhone is the easiest way to get the Old English effect. So I'm going to start with an O and I'm going to start with this top bit here which is straight across. With the Old English, what's really important is some parts of the design are thicker than others. So this is a nice and thin and straight part of your O. Then the next part is slightly thicker. So I'm going to come round. I've made that slightly thicker. You can always go over what you've cured. If you think some parts could be a little bit thicker, you can always go over that now, before you add any more details. Okay, happy with that. Let me cure that. I'm going to copy this part and it's like a J and we've got a thick part here and then it goes thinner here. This J sits in the very center of the thin line that I created here. That makes sense. You can keep your pinky pressed here for balance. Now we are going to copy from this section. So this is thin. So I'm going to draw this thin line fast and you want to work out whereabouts this thin line is starting from the design to make sure you get a exact. You want to draw a very thin line. Again, is not easy drawing lines free hands, but the more practice that you do, the more that you'll perfect it. Then you're going to do two more of thin lines. It's normal to be a little bit shaky when painting things like this as well. There's lots of different stripers that you can use for this. So wherever you're most confident with, you might want to use like a fine liner, which is this one here, it's like a shorter one. I'd prefer a longer brush when doing Old English. Yeah, if you're going to go over any of the thinner lines, you want to be careful that you don't stop making them thicker because then you start losing the thin lines. Quick cure, just to make sure that your gel is not going to move. So I'm going to top coat this now. Once you've applied your top coat, you want to make sure you're ceiling your free edge going all around the cuticle and then you're going to cure that for 30 seconds. So now I am going to draw an F. So as you're doing your lettering, you just choosing each section so you're breaking it up. Now that I am happy with my F, I'm going to top coat it and I'm going to use a matte top coat because it gives it that real canvas effect and it just looks cooler.
13. Final Thoughts: Well done, you've finished. This is the end of the class. I would love to see some of the designs that you've come up with in the Project Gallery. Thank you so much for taking my class. Hopefully see you next time. Goodbye.
 Imarni Nails, Nail Artist