Transcripts
1. Cabinet Painting Welcome!: Hi, I want to take a
moment to welcome you to the cabinet painting masterclass and to break down how
this is going to work. First the modules or an order, one video leads to the next. So do them in order. Each step is necessary
and tackling the project one step at a time will really help you
avoid overwhelm. Second, you have a workbook
download to print up. It's nice to have all the steps written out in
advance so you can follow along in case
you forget anything. Third, you'll have a list of supplies needed for each module. So when you actually
do the task, you'll have everything
you need ahead of time. So once you get started, you will have to
stop for anything. If you have any
questions or comments, please leave me a message
in the discussions below, I'm happy to answer any
questions you've got. Thanks and good luck.
2. Cabinet Painting Module 1 Tear Down: Welcome to the first step of our cabinet
painting masterclass. The first step is taking
down our cabinet doors. First, we're gonna go ahead
and look at the cabinets and plan out in what order we're
going to take them down in. Normally I start top
row, left to right. I'll take them down and
number them as I go. So in this case it'll be 123456. Then continue on down
with the bottom row. I do the same things
with the drawers, whether it's the drawer
front or the full drawer, depending on the kind
of drawers you have. And I number them as well. So when we go ahead and we're
all done, we re-install. It's gonna be a breeze
and you're not gonna be guessing which cabinet
door goes where. So that's how we break it down and we can go
ahead and get started. I do want to give
you a tip though. Getting a little
handheld screwdriver is probably the best
thing you can do. They're very inexpensive
and to do it by hand. And there's a lot of
screws that is exhausting. And this is a nice light one. So it's very easy to
just go on through. So that's my tip for the start. I'm gonna go ahead
and kick off this. As I take off nabs, like if you're gonna be using the exact same ones after
you're done painting. I take off the
screws and I leave the screws and the hinges
right there on the shelf. So they go right back to using the exact same
screws and hinges, right back to where
they came from. I know that they're all the
same and it's all uniform, but for some reason, it can really mess you up if
you start changing them out. So I use the exact
same screws and hinges exactly where
they were before. So that's just my little thing. But I'm gonna go ahead
and take this out. And I go ahead and get this one. There we go. Again. I'm leaving that
screw right up there. Now I'm gonna go
ahead and set this down and take out
the other screws. I always go ahead
and number inside of this and then I'm
putting tape over it. So when we paint with a
brush or roller or spray, that number is protected. And then when we go ahead
and go back and install, remember, That's gonna be
completely covered by that. So no one will ever see
our system for drawers. I'm going to show you both
ways to number the drawers. Can go ahead and take yours out. You can see on this
one that there are screws here as well
as the knob screw. This one. We can go ahead and pop the
front off and you can take the front of this out
to the garage to paint. It's nice because
then you can leave all your silverware or whatever
in the drawer in there. And that's great. But there's a lot of
drawers where there aren't screws and you
can't pop that off. And I wanted to show you that's when you have to
empty out the drawer. And then I go ahead and
I number way back there. I don't even bother
to cover that with tape because that's
at the other end. So I'll show you exactly
how I go ahead and wrap this with paper to
make it easy for spring as well as
brushing, rolling. But that's where I number it. If you can't take off the front, but if you can take
off the front, I just unscrew it and I'll
number right behind here. Normally, I would just
number the back of this, but because this is dark, I'm just going to
put a piece of tape here and I'll number it here. I'll cover it with clear tape if I were to
go ahead and spray it. But I'm not concerned
about this part because this is the part that's gonna be going right back on the front. So again, it's fine
to have this and then just peel it off right
before putting it back on.
3. Cabinet Painting Module 2 Prep Part 1 Cabinet Doors & Drawers: I have all the products that
we're gonna be using here. And just to reiterate, you want to have
all this stuff in advance because once
you get started, you want to be able
to focus on this job and get it done before
going to the next one. So what I've got
are rubber gloves. I don't do anything
without gloves on. Everything is basically
safe on your skin. But I don't like any irritants, so I always wear gloves when it comes to any sanding
and primary, I always have my mask. So I'm going to put that
putting this on for when I stand every Cabinet, no matter how clean
you feel like it is. There's some grease
and there's some cred. So I always use crud
Kotter degreaser. So that's going to help strip
those oils out of here. The main thing is is adhesion and we got to
clean it and sand it. And the best adhesion is it has to be completely decreased. Of course, paper towels. I've got scrubbing toothbrushes because believe it or not, sometimes you run into where you really need to get in there, into the grooves of some of the more detailed
cabinets. Scrubby. Same reason, always use a
scraper when filling holes. And I always use this too
because sometimes you unfortunately need
it to scrape out some grooves if something
is really filthy. Can-opener sanding pads
always use the 220 grit. And this is a combination, 5050, I call it 50% water and
50% denatured alcohol. That further strips down any grease and oil
on the project. Of course, I've got
tape and paper. This is going to be used for cabinet drawers that you
can't take the face off of. And we're gonna be
covering that in a bit. And I use Fondo party. It's got a hardener in it. So when you're filling holes, it's going to harden,
it's gonna be perfect and it's easy to sand it
dries fairly quickly. I have used other would parties would fillers and they
actually have been okay. But I love this just because of the durability and then you
don't have to worry about it. So there's that. So now we have to get down
and dirty and start cleaning. So let's get started. When I do kitchens, I have to tell you I
loved the first day of tear-down and cleaning because then once that day is done, that's the hardest part of
the whole job and it's done. And then it's like more of the fun stuff and the
super satisfying stuff. But the beauty of doing this kinda minute kind
of stuff and you know, probably the least
glamorous of all of it. Is it you really get to
know these cabinets, you can see any damages in there that you
want to correct. You can see great details
that you may want to bring out with doing a special special effects to
it or specialty finishes. These cabinets are from restore, which is Habitat for Humanity. They're usually a dollar each. And it's great to practice on, especially if you're thinking
of a specialty finish. But what's interesting
about this one is that these supposedly had a specialty finish of pinpointing and it
literally just wiped off. So somebody who had done the treatment did it really was like a cheap paint
because it came right off. Don't forget to get rid
of any little felt pads. You want a nice,
perfect smooth finish. And while it's not
perfect and smooth now, it will be by the time
we finish sanding. A lot of these have all
sorts of little chips. And next, and of course
they do their cabinets. It's the busiest
part of your house. So that's to be expected. But we're going to
fix all of that. Right in here, is where that pin striping
was that wiped off. And actually we'll see how that comes off and
these all come off. We'll see if it comes
off. Because some of them maybe they'll
say maybe they won't. Oh, this is a good one. There's a nice
crack on that one. That's going to be
one of the ones we're going to want to smooth over, fill and sand until
it's nice and smooth. All the cabinets have been
cleaned at this point. And now what I want to do is go ahead and fill some holes. If you're using your hardware
or painting your hardware, you absolutely don't
need to do this. But if you're changing hardware and you need to fill these,
this is how I do it. So first, I'm going to
sand just to smooth. Everything I do on the outside, I'm doing on the inside. Now I'm gonna turn it over. So we've filled these holes. Now we're going to let it sit. Technically, it's supposed to
just take about 15 minutes. I always give it a
little longer because we do put a fair amount in there. What I do want to mention is that I do this and it does well, just doing one time. But there are some times where
you'll sand it and you can still see a little bit of a little ditch
or a little curve. Go ahead, do it a second time. Let it sit and
then sanded again. Sometimes it takes
two times and that's fine because it's the end
result that we care about. So these are filled, so we're set with that. And what I wanna do now is go back to a drawer and go
ahead and get that ready. So now that everything
is cleaned infield, Now we're going to sand. So even if basically it's in really good shape and technically it doesn't
need to be sanded. We're going to give
it a light scuff sand is with it to 20 grid
that I mentioned earlier. And that's just going to
help get rid of that veneer. So that what happens
with the primer, it can really penetrate and that paint can really hang
on to that primer. And that's what's gonna
make the difference with good long durability. So I am going to
turn on my sander. So I'll turn off the
volume. So here we go. Now that we're
done with sanding, I do want to mention, obviously, I've got what I think is an amazing
sander and vacuum unit. You don't need this for what you're doing
in your kitchen. So what, I will have a list of resources below for
some really affordable, great sanders that have
the little vacuum bag. Because as you can see,
as I was doing it, it was vacuuming
up all that dust. And the last thing you want when you're painting, priming, whether it's spraying
or with brush enroller, is for all that dust
to crud things up. So again, don't be disappointed that you don't
have a beast like this. Because I'm going to recommend some great ones for
you that are totally affordable and that
you can easily get at Home Depot or Lowe's
or on Amazon. So I just want to mention
that I'm going to wipe everything
down with my 5050. Remember that is 50% denatured
alcohol and 50% water. And you know what, We're
in the homestretch of this whole prep thing.
So bear with me. So now I'm literally,
I'm wiping off. This is getting rid of any
traces of the sanding. If God help us if there's
any of that grease left. We're stripping that away with that denatured alcohol and
that will strip it away. If you feel like at
this point that there's anything gummy or tacky
or anything like that, anything other than
perfectly smooth. I want you to go back
to the crud cutter, spray it on there,
let it sit for five minutes and then reclaim
it and see how that goes. Because you don't you
can't have anything. Gummy your sticky
because then that tells you that there's Greece or old product or when people use pledge to wipe
down their cabinets, There's all sorts of waxes and oils and there are mineral oil. You gotta get all of that off. So this is the time you're really going to feel if
there's anything there. And if, like I said, if there's anything other than
basically smooth, go back. So again, no gummy. This is also the time
you probably saw me while I was
sanding occasionally, like put my finger over the
part where I had the filler. Now, I didn't feel all of these because I
just wanted to show you how to fill if
you need to fill. But I'm feeling
and also wherever there was like little chips and dense and that
sort of thing. I'm feeling to make sure
it's perfectly smooth. Because obviously you can see
that it doesn't look great. But if it's perfectly smooth, it's going to cover
fine with the primer. You can use that fill or wherever there are
dense or things that are things that just
wouldn't easily sand out. Or we're going to be putting
on two coats of primary, two coats of paint. That's going to fill
little tiny things, but something that's more than just a slight dent or
something like that. You can use that
bond going to fill it to make it look
perfect and smooth. Because then your end
result is gonna be nice. Now I'm going to wrap it. So whether you've got
narrower or wider, I'm still going to be using
like the double tape method. You'll see what I mean. Let me take these off. Here we go. So this is how I tape it. You can use narrower
tape or you can use thicker probably are wider tape. See, I have it right up
against that drawer. And I'm going write
down the sides. And then just to keep it easy, I'm coming around the back
doing the same thing. And let's see where
I am over here. Perfect. Now, if you are going
to brush enroll, this is probably just fine. I'm just kinda, kinda loosely measure this doesn't
have to be an exact science. So I've moved this down
just a little bit. Now I'm going to read
tape onto the other tape. So it kinda gave me a
little bit of space, something that kinda hang onto. And now I'm just going
to wrap it around. Just like I did with
the regular tape. I know some of these steps seem like they're
slow and frustrating, but if you do these steps, the other parts fly by.
4. Cabinet Painting Module 2 Prep Part 2 Cabinet Boxes: Now we're gonna go ahead
and prep the cabinet boxes. Cabinet boxes are
the built-in parts of the cabinets as opposed to the cabinet doors which we remove and go ahead and
paint in the garage. So these are the cabinet boxes. We're basically doing
the exact same process that we did outside, but with just a
couple of new ones. We're going to
definitely go ahead and clean them with
the Krug cutter. Now the nice thing
about painting, the cabinet boss
says is that now is your opportunity to use
the word filler and fill. Little like nail marks and grooves where the wood
doesn't match perfectly. You can fudge all that with
just some would fill up. So now is the time
you'd go ahead and fill that fill in the little nail
marks, the nail head marks. And also like on trim
on the upper cabinets. There's a lot of
times where there's little gaps between cabinets coming together or the little nail holes of the trim
being nailed in at the top. Now's the time to go ahead and fill that in, smooth it out, and let that dry because
after that, we sand. So remember what
the cabinet doors we cleaned with the degreaser, fill, sanded down and
wiped down with the 5050. We're doing the exact
same thing here. So I'm going to pretend as
if I had sanded this down. Things are filled sanded. Then I go ahead and
wipe with the 5050. So this is all in
perfect good shape. And I'm gonna go ahead and tape. So I'm gonna tape along here, and I'm also going to
put some paper down. So let me show you
how I do that. Wow. So that's taping. Now. I also add a little paper, but I'm just gonna do this on the floor. Let me go
ahead and do that. I'm just going to tape it
right on top of that tape. And I'll go ahead and
I do this all the way around the kitchen or the cabinets that I'm
painting. This way. If there are any spills at all, it's not a big deal.
It's right here. And this is how I go ahead
and tape the cabinets. So I tape just these areas and I've pushed the
contents back a bit, usually three or four inches. If it's right up to the edge, go ahead and take it
out of your cabinet. But go ahead and push it back. Go ahead and tape it. Tape also comes in
wider roles as well. But I taped just these areas because we're going to go
over it with the roller. And you can see, you can
just go right on by. You don't have to worry about using a
paintbrush or anything. You can just get in there, cover what you need to cover. It's okay if you've got a little overlap because
you've got that tape. And then when you go ahead and peel it down and
it's going to be a nice, perfect, crisp line. But that is how I
take the drawers. So we've degrees filled, sanded, wiped down with 5050
taped and put paper down. Now ready to prime. That concludes this video. So thankfully, you're
done with prep. The worst is over. And now we'll next video. We're gonna go on to priming.
5. Cabinet Painting Module 3 Prime Part 1 Doors & Drawers: This video, we're priming. Let's take a look at the products that I'm
using for this one. As always, my 5050
in the paper towel. This is first sanding
in between coats of primer and wiping down. I use been primer that we're
going to do two coats. It's excellent. It blocks any staining that might come out on
your wood cabinets. And it's freakish with how it helps with adhesion.
So that's awesome. Of course, I've got my
gloves and I've got my app. Here's my mask because
this smells awful. So you're going to want the mask and because we are
going to be sanding, we're going to need that too. We're also going to
use aluminum foil and Saran wrap and you'll
see why in a minute. I always use the
four inch roller and I use the potty microfiber. And I'm going to have all
those details obviously down below and also
in the workbook. So you know exactly what I use, but I also use this at an
angle and there's that. And then there's this
cute little tray. So before I get
set up with that, I want to show you these, these are sold their
little pyramids. They're sold at hardware
stores everywhere they come, pyramids are triangles in
it makes things a little easier for when you go ahead
and you paint or prime. You can set this on. You can do your thing and
you can slide it around. It just makes it easier. Do you have to have it? No, but it's going
to save you time. And if you've got
20 or 30 cabinets, It makes a difference. It also because it's raised up, it makes it easier
to get the sides. And that's huge. I do have a professional
spinning table. But I wanted to
let you know that what you can use
your Lazy Susan, cover it with foil so it's
going to stay perfect. So you can still have that
whole spinning motion. So there's that because I don't like going
through a lot of trash. I don't like having to buy a whole bunch of plastic things are going to end up in landfill. I use this and again, I use the tin foil. And I line up this way. When I'm done with priming, I just pull this out, pull out the tin foil
and throw it out. And then I still have
this black prey. It's perfect and I can use the exact same
tray for painting. Honestly, even if I'm
spraying, I mean, you're definitely
gonna be priming and painting with the tray inside. So this way you buy one tray and that's
it. So there's that. I'm going to go ahead
and put my gloves on because I'm a freak
about the gloves. You always wanna make sure
you have plenty of stirs. Even if paint or primary looks like it's fine
in a stirred up, always stood up. It always settled. Now, Ben isn't thick. It's really quite watery. So don't feel like It's not going to work
because it's too thin. It's not thick like a paint. It's an oil shellac. One tip I want to give
you before we get started is these cabinets have
a finish on them? A lot of cabinets that you
like probably yours at home is wood and
you see the grain. Now, if you don't like to see the grain or if you've
got real deep pitting, I always just go
a little heavier. Really work that primer into those pits in it fills it in, it really softens it a lot. And if it still bothers you, maybe you end up putting
on an extra code. But it just, it feels it, it smooths it out. And then you can get onto the next step and it really
creates a nice finish. So let me go ahead and get
started with this Ben. I'm gonna do this on a
stirred up and then pour it. So now I'm ready to go ahead
and get painting or priming. I've got my angled
two-inch brush. I like an inch and a
half to two inches. Now take off some right there. And normally, I am
just going to go in the grooves where the roller isn't really going to get there. And I do that because I
don't want any brushstrokes. I want the roller to
do most of the work. But there are times where
this is pretty deep. So that's why I'm gonna go
ahead and hit that now. And then I roll over
it and that's going to kind of blend away
any brushstrokes. So I've got my
primer on the brush. I'm not going to start in
a corner because I don't want that to pool
all in that corner. I'm going to start
halfway through takeoff or offload
some of that primer. Now that it's off, I can go into those corners. Again, starting in that middle. Then now that some of that
primer is off the brush, now I can go to the corner. And because we've got
some deep grooves here, I'm just going to do
the same thing here. I've offloaded it. It's not pooling. I know a lot of professional
cabinet painters that love using the brush, brush and roller and
they still do it. Alright, So I've
worked at through. So I've really got
it good and covered. And on the end, because that's the
beautiful part. Now I'm kinda running off. I'm pressing down and
getting rid of the excess. And now I'm going to go ahead role now the beauty of
this Knapp and again, it's all listed is
that it holds a lot of paint and it can get
into the grooves. Now you're seeing how this, I actually didn't even
need to use that brush. And you're also seeing
there's a couple of fibers here and
there. That's okay. This is one coat we're
going to sand in-between. So if you see a couple
things, don't get bummed out. And it's this nice side
because it's raised up. This makes it nice to
be able to do that. Now, we're gonna go
ahead and let this dry. You don't want to overwork
the primer on this. It dries fairly quickly. And if I keep going over it, I'm going to start
picking up chunks of it and it's just
gonna become a mess. So this has the first codon it. I'm gonna go ahead and put
it on our drying rack. And I'm gonna go
to the next one. When you do need to take a break and you're priming or painting, this is where Saran
Wrap comes in. So let me take these off. I cover the brush, the roller and the Ben. And I'll tell you I do it just like they don't call it the
double snare for nothing. I hate Saran wrap. But if it wasn't
so great at this, I know you gotta deal with it. If you've made pudding or
crumbly layer flow-on, you know how you've gotta get
that Saran wrap right on, have contact with the surface
of it so it doesn't get, kinda get a film. That's what we're doing.
It's press down in it. It's all going to
stay nice and wet. And it's going to be
perfect for when I come back and, you know, when I'm doing the
inside of a house, I'll go ahead and do that, take care of something else, come back 45 minutes
later, peel it off. We stirred up and get
right on back to work. So it's a perfect little tip and that's why I
have Saran wrap. So when you're doing a drawer
that is still attached to the drawer or a drawer front that's still attached
to the drawer. What you're going to want to
do is you're gonna go ahead and prime this exactly like
we did the other ones. But with this, you can go ahead and do the
undersides as well. And then when you dry it, you're going to dry it
standing up like that. And the reason is, is this isn't going to
happen with primer, but it does happen with paint. The weight of the paint. If it's drawing like this, it's gonna be weighted in, it's going to pull, it
might pull a little bit and you don't
want that. This way. You paint it and you let
it dry just like that. And then you don't have to
worry about trying to find little paint cans of
dry those fronts on. I'm going to go ahead and
get underneath first. All done. We have one
coat of primer on. So now we're gonna do
a light sanding to smooth it out and
apply our second coat. So let's get started with that. So now we've sanded that
first coat of primer down, so it's nice and
beautiful and smooth. I'm giving it a light spray. The 5050. That's just
going to wipe off any dust that we just
created with the sanding. And because it's
alcoholic dries very quickly and it's just a
little white light mist. So now I'm going to give it
that second coat of primer. And then when that dries, I'm going to give it one more
standing and wiped down. And I'm going to go ahead
and do that to all of them. And that's going to help with
the adhesion of the paint, as well as create bullet, creating that bond, as well
as smoothing anything out. Again, I'm going to do this
exactly like I did it before. I'm going to start
in the middle, can get offload some
of that primer. Hate that when that happens. Thankfully, this is just paint. When things like that happen. The worst that's going to
happen as like, alright, so you have to either
pick it out or you have to sand it down and
give put another coat on. It's really not a big deal. And you never have to
get that stressed out. It's just paint. So if you're a furniture
painter and you learn to that, not to really stress
yourself out over it. This is the exact same thing. Worst thing that's going to
happen is that you'll just have to sand it and
put it on a New Coke. While it's frustrating,
It's not a big deal. So there is our second coat. We're going to let that dry
and then we're going to sand it and wipe it down and then
it is ready for painting. I'm gonna go ahead
and take care of all the other cabinets and drawer fronts and do
the exact same thing. Get them second coats
sanded and wiped down, and then we're going to
be ready for painting.
6. Cabinet Painting Module 3 Prime Part 2 Cabinet Boxes: Now we're ready to prime. I always start out by using a
boot tray or a cookie tray. And I lay out everything
I need on it. I've got the tray with
my roller, my brush, I've got filler for just in case I happen to
come across anything that doesn't look as
good as I want it to look or something I didn't
even notice before. I can go ahead, feel it precedent in there and give it a few
minutes and go back. Sand lightly sand to wipe
off and keep on priming. I've got my 5050 spray and I've got paper towels Just in
case I have any kind of spills and I have a
damp paper towel just to wipe up any little spills
just in case I need it. So now I'm ready to go. I go ahead and fill this up outside and I bring
the whole tray in. This way, it can scoot
around the floor with me and up on the counter
when I'm doing the uppers. So normally what I would
go ahead and do now, I'm not doing the boxes just because I'm
not painting them. This is a rental, but I want to show you the whole process. So with primer on the brush, I'm going to angle it right into this groove right
here to get in there. You go right along. Again. I'll just
change that that way. Same thing with
this bottom part. That way. Then I change it. And
notice that this, I met this angle. I'm not going like that
because that's going to smear a lot of paint along here. And I'm also not like that. Just right there in that groove. All the way. Same
with doing the sides. And then I go ahead and roll. Now remember, this
has paint on it too. But I get as close
to as possible because I want to blend
out any brushstrokes, like over here, I wouldn't
even need to brush because in this little lip
here, this will fill it. So go like that, that right along
here, nice and close. And the paint you use is
going to be self-leveling. But again, you know, I like to cover up any
kind of brushstrokes. Move that out. You get right along here. You've got the tape down that's going to
protect your floor. If when you go to
pull up everything, you can always wipe it down
with the 5050 right up close. Or I've also used
this and just chipped up that little spot if there's
any kind of paint that happened to seep underneath the tape because
that does happen. But that basically
covers the priming. So you've done one
coat of priming, you're going to let that
dry and as you know, been primer dries very quickly in most of
the other ones do. So you're going to want
to follow what it says on the can, let that dry. You're going to sand it lightly
with the 220 grit sander. You're going to wipe
it down with the 5050, just like with the
cabinet doors. And then you're
gonna go on and do a second coat of primer. You're gonna go in
and at that point, it's going to be solid white, just like the cabinet doors. It's going to look perfect. It's primed at second time, sanded and wiped
down with a 5050. Then you gotta be
ready to paint. I wanted to show you how I set things up for when I'm
doing the upper cabinets. So I've got my trusty tray for when I'm priming
as well as painting. But I've got just
plastic sheeting and that will protect
the counter-top just because I don't want to
have to clean this later or worry about any primer paint
and then shipping it off. And honestly, I just use this one strip and I use and I move around
with this strip. I don't worry about covering everything and taping it down. I'll do this section
and then I slide this down with all my stuff and then I take on
the next section. So I really, this is the only bit of this plastic wrap I'm going
to use for the entire job. So get the absolute smallest one they sell because you're
only going to use a little, I don't even fully unwrap it. So this is how I do
this and you know, I've got my tray which I love, and I'm on my way.
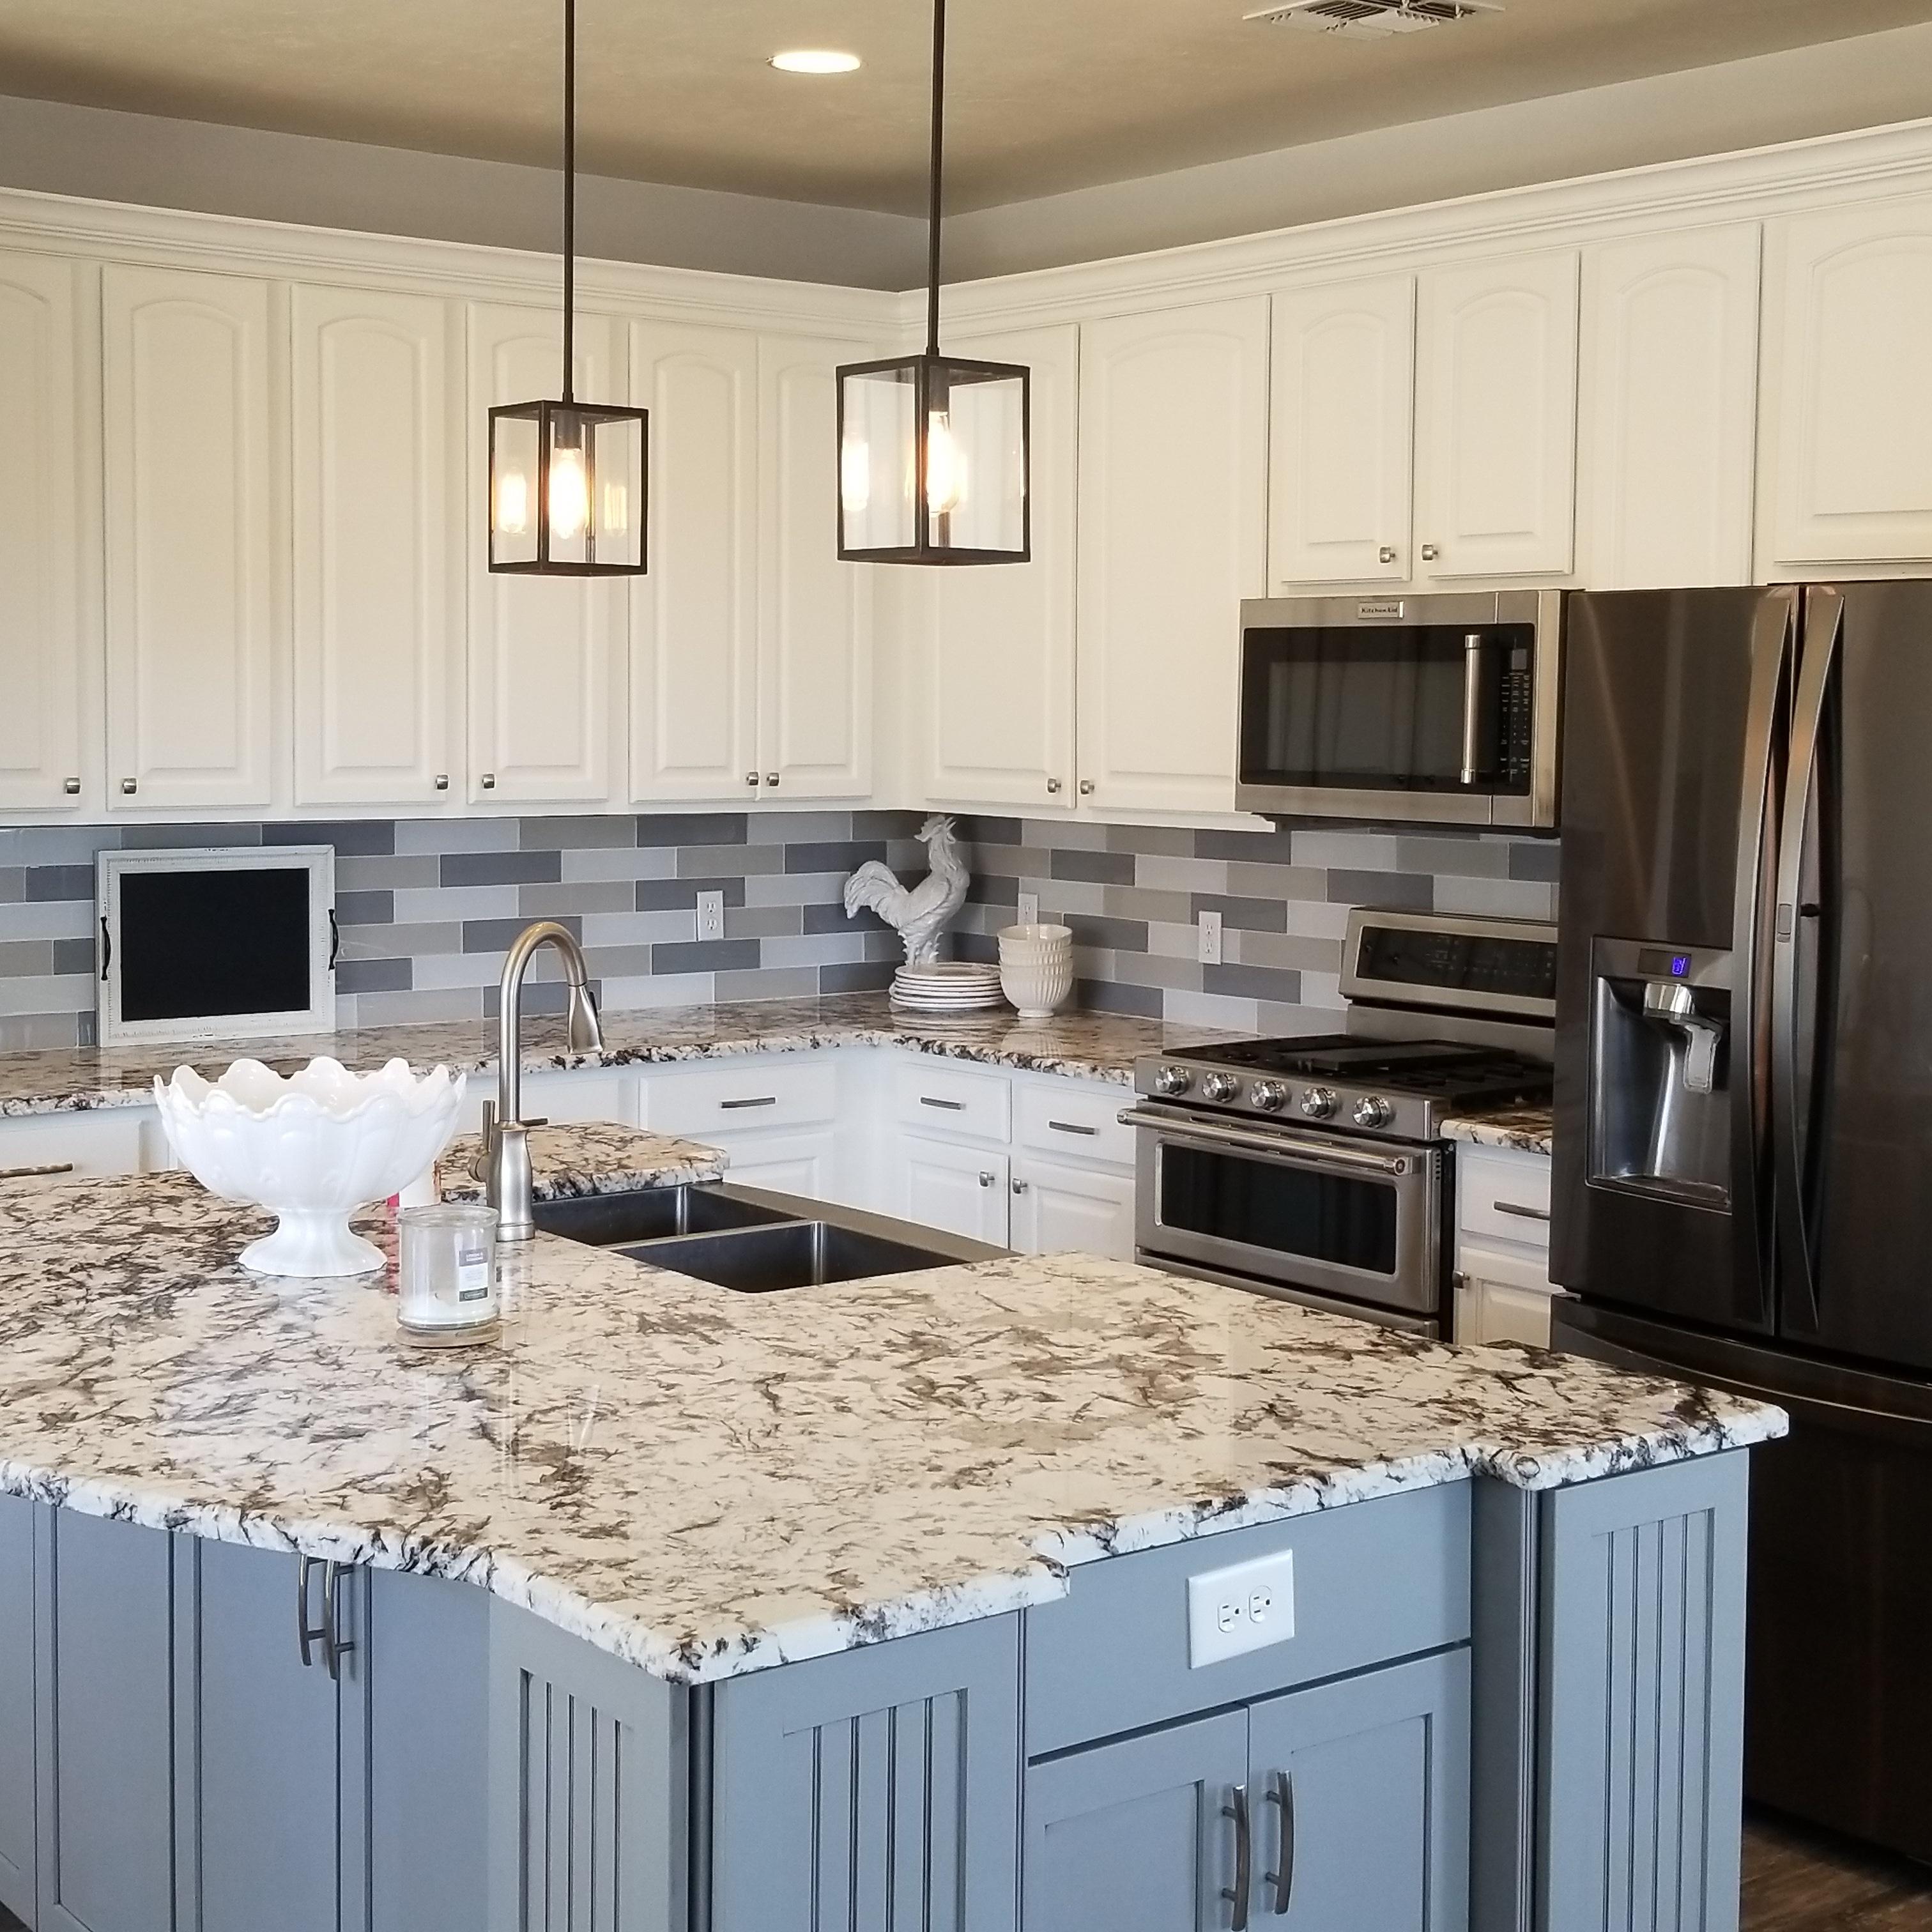
7. Cabinet Painting Module 4 Paint: We finally made it to
the painting part. This is when it gets good and
you're in the homestretch. So we're going to
go ahead and paint. Now if you're going
to brush and roll, we're going to approach
it the exact same way that we did
with the priming. I want you to start
on the underside. You're going to go ahead
and put a coat of paint on, let it dry however long the manufacturer specs
say it takes to dry, do a light sand and then
wiped down with the 5050. Then you're going to do
the second coat of paint, and then you're done and
you're going to let that dry twice as long as what
the manufacturer says, then you're going to flip over and do the
exact same thing. So the one coat of
paint let it dry, light sand, wiped
down with a 5050, and then that second coat. And then you're
going to put it on the drying rack and
you're all done. But if you're going to spray, I'm going to show you my
technique for spraying. And that is again, you'd start with the backside. I go side to side. And then I turn and
I do side-to-side. I turned it just Twenty-five
degrees. This way. I'm going that way, and that way I'm getting
perfect coverage and I'm getting all
the inner grooves too. So I'm gonna give
you a few examples of that on the
cabinets themselves. And I'm also going
to do the drawers, drawer fronts because remember
sometimes you can pop off that front and then
other times it has to stay attached
to the drawer itself. So I'm going to show you
how I do both of those. So you just give me a second and I'm gonna
get my sprayer out. So remember, whenever
you're gonna spray, you've got to wear
a mask because even though you don't
really see that spray, you'll notice that
afterwards because it's kind of all over the area. So definitely play it
safe and wear the mask. And I always wear
eye protection, as it turns out, I'm gonna
be wearing my glasses. But if you don't, just wear some kind of
clear to protect your eyes. So I'm going to
start side-to-side. And I'm going to get the
edges that I'm going to turn it Twenty-five degrees, go side to side again. And then I'm going to spin
around and just make sure the inner details are done
so you'll see what I mean. There's at twenty-five percent. And now I'm just
gonna do the details. So I'm just going to get in
there and I'm going to go and that one is done. It seems like a lot, but it's going to
end up perfectly. So now I'm done with the cabinet doors and the
drawer front which you saw. Now I'm gonna give you
an example of how I do the drawer that's attached
to the whole drawer. So what I've got is I've
got it on my table. I'm gonna go ahead
and I'm going to spray the backside first, then I spin it around
and then I do the front. So I'm going to show
you how I do that. And then I'm also
going to show you how I let this dry because it's different than the others. So let me get started. So now we're done
with the drawers. And let me show
you how I draw it. I turn it up and I set
it up just like that. Because remember,
we want it to be standing up and not on its side. Because like when I
said with the primer, the weight of the wet
primer or in this case, paint is going to weigh down. It's just kinda, kinda puddle towards the bottom and
you don't want that, so everything dries face up. So now at this point, cabinets would be all
prepped and primed. In. The next step is the painting
part, the good part. So again, my tray is gonna be exactly the same only with
paint, not the primer. Everything is fresh
and ready to go. The primer had been primed, sanded, and wipe down. So now I'm ready to just
go ahead and paint. This process is exactly
like the priming process. We're gonna painted coat, let that dry for however long the manufacturer's
specified. Do a light sanding
of the 220 grit, sandpaper, wipe it
down with the 5050. And then you're gonna
go ahead and put on that second coat of paint. After that, you're not going
to sand or wipe down at all because that second
coat of paint is that we do two coats of primer, two coats of paint
and you're done. So everything I said
before about the priming, about getting in there at the right angles and
going over everything as close as you can with the roller is exactly the same
as it was with the primer. So when you're all done
and the paint has dried, you can go ahead, peel off the tape and you'll be able to see if there was anything that
sits underneath. And it happens because
especially with the primer, this very thin and that can
seep underneath the tape. You go ahead and peel that up. And if anything
did see, go ahead. You can ship it off or you
can go ahead and use the 5050 with the paper towel
and go right along the edge. You may find that it could
be actually a little easier to chip that off. But do it gently. You don't need to dig in there. But then it would be all
perfect and ready to go. And then your boxes
are all painted. Congratulations, you're
all done with painting. Now just let it all wait 24
hours before installing.
8. Cabinet Painting Module 5 Install: Now I'm going to
show you how to go ahead and re-install
your cabinets. Obviously, these have
not been painted, but I wanted to go
ahead and show you exactly my system of going
ahead and installing them and also applying
the little felt tabs to keep them from banging
against the boxes. So let me go ahead
and get started. I'm picking up my little screws
exactly where I had them. So there's no guesswork there. Now hinges normally have little grippers on them so
you can really see exactly where it was on your
cabinets and you can line it up so they're all set
in the same positions. At this point, you
would have peeled off your tape so you know exactly the order
that you're going in. There we go. Sometimes you have to
jiggle it in a little bit, but it gets there. I go ahead and get that started. There. Yet the bottom. Go ahead and get
the knob on there. And then now is when I go ahead and I put the
little felt tab on there, these tabs come in a dark brown as well as
white and light gray. So regardless of what paint, your color, your painting, your cabinets, you'll be able to find some tabs that
will be fine for it. I go ahead and I
basically just put it wherever that door is
gonna hit the wood. Or you can go ahead
and put them in the top and bottom,
whatever you like. There you have it. When we go ahead and
re-install the drawer, if you've got the whole drawer, you'll know where it goes
because we wrote back here. Or hopefully if you've got just the fronts
that just pop on, you can go ahead and do that. And I'm gonna go ahead
and do that now. And that's it. It's that easy. I go ahead and slide it in. I'll put a couple of felt pads
on it and you're all set. And because you numbered
your cabinets as you took them down and you've got your screws in
hinges right there. It literally that's all the time it takes to put it back in. So start to finish
when it comes to installing them is going to
take you an hour or less.
9. Cabinet Painting Bonus Best Screwdriver: Hi, Today I wanted to talk
to you about screwdrivers. When you're growing
your cabinets, you're dealing with
a lot of screws. And I just want to tell you, you might be tempted to just
use a regular screwdriver. But on each cabinet door you're dealing with like eight screws. So I want to tell you the most efficient way to do it without killing your risks, without having to use these
big heavy ones because this is going to get
tiring after taking down like a handful of cabinets. Never mind if you've
got 20 cabinet doors. So this is going to be
heavy and take its toll. What I love are these little inexpensive
electric screwdrivers. They're usually
like $10 or less. You can just pop the little
screw right in the screw tip. And they're all kinda universal. So whatever once you
happen to pick up, they always fed them.
So they're perfect. Their core lists, you
just recharge them. So that's kind of a big deal. Make sure you're charged
that the night before. The other thing I
like about it is that this one has a little light. And at first I
thought that would be of no use at all to me. But actually, in some areas when unscrew and cabinet doors
it can get a little dark. So that actually came in handy. This and I actually use
a little handle thing. This was actually my peck. It will make taking down or even installing those
cabinets a whole lot faster, smoother and it won't be so tiring on your
wrist and fingers. So that's my take.
10. Cabinet Painting Bonus Must Do: Hi, Today I want
to share with you a tip when you're brushing
and rolling your cabinets. My favorite role for rolling is the party
microfiber, ultra finish. So this is my favorite. But regardless of
whatever roller you use, you want to lint off because there's always there's usually some little fibers on
there that you don't want it in your paint because
that's just irritating. So I just roll it off, gets rid of any excess hairs and length and little fibers. Don't forget the end. And now it's perfect and
you're ready to roll. So that's today's tip.
11. Cabinet Painting Bonus Painting Hardware: In this video, I want to
show you how I go ahead and clean and spray
navs and hinges. I use all the same stuff. The degreaser, as well as the 5050 denatured
alcohol and water. But go ahead. I put it in here. I set them in and I'll
go ahead and spray them and let them soak for awhile for at least
a good ten minutes. I put them in here. I've got a few of them in
their spray them down. After about ten minutes, I'll take out a toothbrush, scrub them down, rinse
them really well. And then I go ahead and I
wipe them down with the 5050, the denatured alcohol and water. Then I normally like
set them out in the sun so they really
get good and dry. Now when it comes
to the spring part, I go ahead and I put
the knobs on cardboard. It's screwed in in the back so they're standing
up perfectly. This way. When I go to spray them, I can get the sides, I can get the top, I
can move it all around. I can do two coats
and it's all perfect. It's on the cardboard,
nothing's getting ruined. And then when they're all
good and dry and perfect, I can unscrew it and then I can just recycle the cardboard. So that's how I do the knobs
or pulls in for hinges. I'll just go ahead and put
it inside a box, cardboard, spray it, turn it over
and spray the other side, and then I always let
them all dry in the sun. So you've seen how I set it up now I'm gonna
go ahead and spray them. Whenever I spray,
whether it's with my paint sprayer or a can, I always have a mask on because it's airborne and it's a mist
and you don't even see it, but you really
should wear a mask. And I always cover my eyes. I've got glasses for seeing, but if I didn't use these, I would definitely put these
in because you don't again, you just don't want
that in your eyes, especially if you're
doing your spring outside and there's
a gust of wind, you just want to be careful. I'm gonna go ahead
and spray now. So now we're all done
with our spraying. And you can see they're
all good in evenly done. And it was nice and easy
and they really look cute. So now at this point I just
put them out in the sun, let them dry out, and then they're
gonna be ready to install after I
install the cabinets. So we're all set.
12. Cabinet Painting thank you: Hi, I just wanted to take
a moment to thank you for taking my cabinet
painting masterclass. And I hope that you have
the confidence now to go ahead and tackle with
doing your cabinets. Also, I've included a how
to care for your cabinets. You're newly painted
cabinets guide below, so don't hesitate to print
that up and have that on hand. If this class was
helpful to you, please give me a thumbs up or leave me a review down below. I appreciate it. And thanks again.
 Beth Gilman, Professional Cabinet Painter