Transcripts
1. Intro: Hello, there. My name
is Carminys Guzman. I was born and raised
in Dominican Republic, and now I live in Portugal. I am the Co-founder of
Operary, an animation studio, where I work as an Animator, Illustrator, and Script Writer. We've been producing top notch
videos for over a decade. We had the pleasure
of working with incredible companies
such as Intel, Deloitte, Bayer, Port, and many more. Now, we are excited to share
our knowledge with you. Fire, smoke, water, you will have to use
these animations often throughout your
career as an animator. In this course, you
will discover how to animate them as a
professional in record time, and without using plugins. We will start getting
in touch with the after effects interface and see the keyboard shortcuts we
will use during the course. Next, I will show you how
to easily animate fire, smoking water with three
different projects. Of course, without
using any plugins. To finish, I will
teach you how to give the final touches to
the animations simply. You will be able to download all the files that we will
use during the course. In this way, you will be able to follow the
instructions in real time and it will be much easier to apply everything
you are learning. This course is ideal for animators, illustrators,
graphic designers, creative artists, and generally, anyone who wants to bring
their illustrations to life. With patience, a
positive attitude, and perseverance,
you will succeed. Your time is now.
Join the course.
2. Project: Hi there. I'm so glad you've
decided to take this course. At the end of this course, you will be prepared to animate the three projects of
the course like a pro. If you don't have time
to create your design, don't worry, you can use my artwork to practice
and experiment. After each lesson, I will
provide guidelines to ensure you get the
best results possible. So make sure to follow
them and practice. I'm excited to see your work, so please upload your projects to the course project gallery. If you have any
questions or comments, feel free to post them
under the questions bar. I can't wait to see
what you come up with. Let's have some fun creating
awesome animations together.
3. First Steps: Hi there. Before we start
animating the projects, let's get in touch with the
after effects interface. We will work with the
standard workspace, but you can choose
your preferred option. The first step is to
create a new composition. Go to Composition,
New Composition. Open a new 1920 by 1080
composition at 24 frames, give it 10 seconds, and name it. As a second step, we will import the Adobe
Illustrator design. We will import the design
you see on the screen. We will use this design for the first project of the course. As you can see, it is a very simple design
with only three layers. Let's go back to After Effects. To import the
design, go to File, select "Import File", and select the desired file. When we import a layered file
in the imports as option, we must select
Composition-Retain Layer Sizes. As you can see, a
composition and a folder with layers
have been created. We are going to work
on the composition. With a double-click, we enter the composition that
we have imported. Now let's take a quick look at the after-effects interface. The panel where you see the
illustration is the viewport. This panel will show you the results of your
designs and animations. At the bottom, we can
see the timeline panel. This panel is where
we will spend more time creating
the animations. From here, we can easily modify the transformation
properties of the layer. If we look to the left, we can see the project panel
where all the compositions we create and all the files
we import will appear. At the top, we can find
the essential tools. Now, I will show you the keyboard shortcuts
for this course. The shortcuts refer
to the layers, properties, and the
commonly used tools. Let's see how to open the layer properties
with a single click. Press A for the anchor point, P for the position, S for the scale, R for the rotation, and T for the opacity. Also, if we hold
down the Shift key, we can open several
properties simultaneously. Now, we will see how to access the main tools with
the touch of a key. Press V for the selection tool, Hold, space for the hand tool, Z for the zoom tool, W for the rotation tool, and Y for the pan behind tool. It's about practice. At projects and resources, you have a PDF
file available for download with the most
helpful shortcuts. See you in the next lesson.
4. Fire Animation: In this lesson, we will create the animation you see
on screen very simply. With a double click, we will enter the
composition fire animation created in the previous lesson. To begin, we will create a very simple shape with
the help of the pen tool. We'll color it yellow. Perfect. Now we will apply
the wave warp effect. To do this, we go to Effect, Distort, Wave Warp. From effect controls, we
adjust the properties. We set the direction to zero, wave width to 150, and wave speed to 1.5. Finally, in the pinning option, we apply bottom edge. I have used this configuration, but you can play with
different values until you get the result
you like the most. Perfect. Now, with the help
of the pan behind tool, we will place the
anchor point at the base of the shape
we have created. The anchor point will be the axis around which
our layer will rotate, and it will also be the reference point when we
modify the layer's size. I almost forget, if you can't see the
effect controls window, you can activate it from window. Now, with the layer selected, we duplicate it four
times by pressing the key combination Control D or Command D on Mac four times. Place them to your liking, adjusting their size
and rotating them. You can modify the layers from the viewport as I have
been doing so far, or from the timeline panel, whichever you feel
more comfortable. In my case, I feel more comfortable adjusting it
directly from the viewport. Let's preview it to
see how it looks. It still needs improvement. Right now, all the layers
move at the same speed, making the animation
boring and unrealistic. Make the animation
look more natural. We will modify the wave
speed so that the effect has different speeds on each layer and achieve a more organic look. We simply select the layers and modify the speed of the effect. Perfect. Now, it
looks much better. Now to work more efficiently
and be more organized, we will select all the layers while holding down
the Shift key. We right-click and
select pre-compose. We give it a name
and click on Okay. By doing this, we create
a new composition. With a double click, we can enter inside
and access the layers. Let's go back to the
main layer and we duplicate the layer with
Control D or Command D on Mac. The idea is to change the color of the layer we have duplicated. To do this, we go to Effect, Generate, Fill and we apply
an orange color to it. We modify its size and place
it in the desired place. Perfect. Again, we
do the same process. We duplicate a layer
and change the color. We modify its size and
place it in its place. Now we have our
wonderful animated fire. To finish, we will enter into
the composition Project 1. We drag our animation below the first layer and place
it in the desired place. If we preview, we
can already see the fire integrated
with the scene. In future lessons, we will
see how we can improve the look of our
animation very simply.
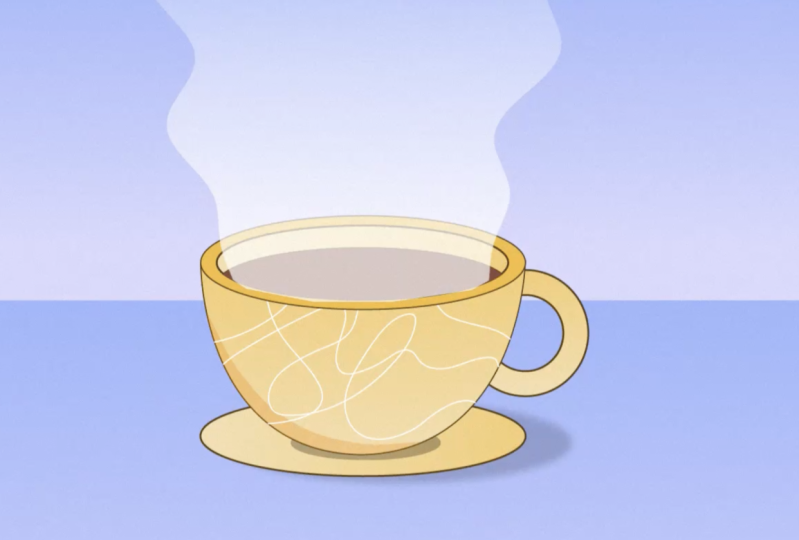
5. Smoke Animation: Hi there, it's time
to animate smoke. But before we begin, let's
organize everything. From the project panel, we will create three
folders by clicking here and we name them fire, smoke, and water, for example. Next, we will drag all
the materials from the previous lesson into
the fire folder perfect. Now yes, we can start creating the animation
of the smoke. With the smoke folder selected, go to composition,
new composition. Like in the previous lesson, we create a new 1920 by 1080
composition at 24 frames, give it 10 seconds and name it. We will reduce the window size
to work more comfortably. Now, with the help
of the pen tool, we create a very simple shape. Then we click on "Fill," we select the linear
gradient option. We go into the color settings
and color both ends white. Now, we are going to
set the opacity to 0%. Why? Because we want that
as the smoke moves away, it disappears in the same way
that it does in real life. Great, we already have it. We are going to activate Toggle Transparency Grid
to work more comfortably. Now we enter the
properties of the layer. We go to contents, shape, gradient, fill, and we modify the values of the start point and end point. It wasn't a good idea to enable
Toggle Transparency Grid. I will disable it, again to work better. To apply the final touches, I will modify the start
point and end point directly from the view part with the help of
the selection tool. It's pretty good. Now, we only have to
animate the smoke. To do this, we go to effect, distort, wave warp. From effect controls, we adjust the properties. We said that direction to zero, wave height to 30, wave width to 300, and wave speed to 0.5. Remember that you can modify
these values to your liking. It is a very
intuitive effect so I encourage you to play with the values of the
different properties. In the pinning option, we apply bottom edge. Very good. We can see that we are
on the right track, but we can still improve it. We will duplicate
the effect with control D or command
D on Mac to make it look more natural and we modify the value of wave width to 150. Let's see how it goes. Great, it looks good. To finish, we're going to
integrate this smoke into a. Let's import the
layouts of Project 2. With the smoke folder selected, we go to file, import file and select
the desired file. Remember when we import a layered file in
imports as option, we must select composition, retain, layer sizes. With a double-click, we
enter the composition. Now we just need to drag the smoke animation
we've created, scale it and placed it. To finish, we are
going to apply a mask. The mask will help
us hide the parts of the smoke that we
don't want to be seen, in other words, we will
only be able to see the smoke that is inside the mask that we are
going to create. To apply a mask, we ensure we have the smoke layer selected
and with a pen tool, we create a closed path. I will adjust the mask a
bit to make it look better. We already have it. We can already see our wonderful animation
finished and integrated. See you in the next lesson.
6. Water Animation: Hello again. Now it's time to create the animation
you see on the screen. As always, we'll start by
creating a composition. We will name it and leave the same values as in
previous projects. Perfect. Now let's
create a solid. To do this, we'll go to Layer. New solid, we'll have
it as it is now, black and we click "Okay". Next, we'll go to Effect. Noise and Grain, Fractal Noise. This is an effect I
like and we can achieve very interesting results with adjusted values to get
the desired result. In fractal type, we'll choose the strings option and
a noise type Spline. Next, we'll increase the
contrast value to 500. We'll open the
transfer options and uncheck the uninformed
scaling box, which will allow us to modify the dimensions of the
effect with more freedom. I am going to increase the
scale width up to around 300. We can leave scale
height at 64 or 65. Later when we integrate
it with the scene, we'll see if it looks good or if we need to adjust
these values a bit. Now with the layer selected, we'll go to Effect,
Color Correction levels. The idea is to give our
effect more contrast, to give a catch and
look to our animation. To do this, we'll place the input black and
input white values in the center of the histogram. We'll give input
black a value of 120 and we'll give input
white a value of 130. The arrows now
appear in the center and our scene has a
much more fun look. Let's add a little
color to our scene. To do this, we'll go
to Layer, New Solid. We'll color it blue
and click on "Okay." We've dragged the new
layer underneath. For the solid that has
the effect applied to it, we'll apply the mode Add. To finish adjusting the
scene's appearance, we will lower the
opacity to 20%. Great, we're almost there. Let's soften the scene's
appearance a bit. It's not convincing to me. We can solve this in
a very simple way. We'll go to sub-settings and lower the value
of sub-influence. Now, it looks much better. Great. Now it's time to add animation with a
simple expression. Within the fractal noise effect, we'll go to the
evolution option, and while holding
down the Alt key, click on the "Stopwatch." We'll write the expression
you see on the screen. Thanks to this expression, we don't need to create
any key frames to create the animation, and we preview. Wonderful, I like it. By modifying the time value, we can make the water
move faster or slower. The higher the value, the faster the water moves. Let's leave it at 50. Next, to give our animation
a more organic look, we will apply an effect that
we all know, Wave Warp. We'll increase the wave
width value to 400, for example, and we will
reduce its speed to 0.5. Let's see how it goes. Great, I like it. We have our animation
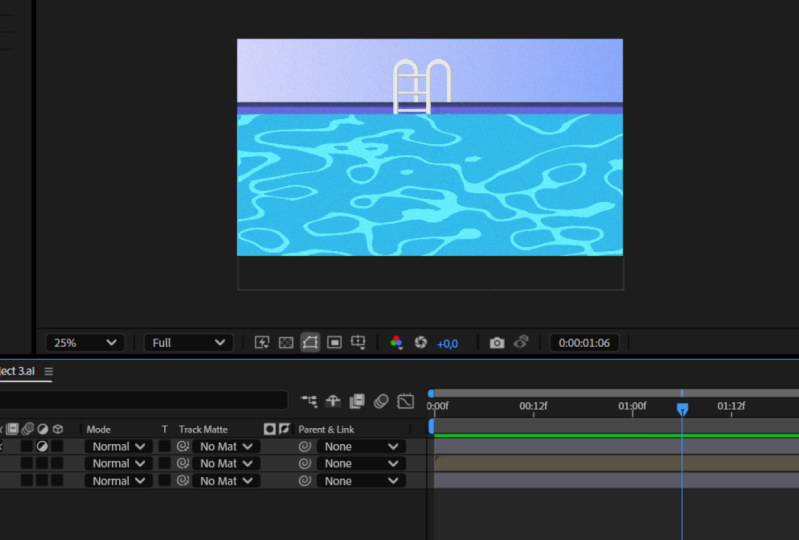
ready to be integrated with Project 3. Let's go to Project panel. With the water folder selected, we'll import the
illustration from Project 3. I will place this composition in its corresponding folder to
keep everything organized. With a double click, we enter Project 3. As you can see, it is
a super simple scene. We drag the animation
of the water we have just created and place
them in this scene. Let's take a look.
It looks good, but I think we can
improve it a bit. I will adjust it
to scale so that it integrates better
with the pool. We simply place the
anchor points at the top and adjust the scale. Let's see. Now the
animation is more integrated with the perspective
of the illustration. In the next lesson, we will see how we can
improve the look of our animations in a very
simple way. See you there.
7. Final Touches: Hi there. In this lesson, we will give the final
touches to our animations. Let's start with
the fire animation. We are going to
apply a glow effect on the fire animation. We select the layer and go
to Effect, Stylize, Glow. In glow threshold, we apply 80%, leave the glow radius at 90, and set the glow
intensity to 1.5. Let's take a look.
Perfect. I'm going to leave it like that. Again, I recommend you play with the effect
properties and use the values you
like the most to create a unique and
different look. Next, we are going to
create an adjustment layer. To do this, go to Layer, New, Adjustment Layer,
and make sure to place it above all
the other layers. The magic is that when we apply effects to an adjustment layer, we apply to all the
layers below it. With the adjustment
layer selected, go to Effect, Noise & Grain, Noise, and apply 10% noise. By adding noise, we add a little texture to our
animation that I like. Finally, we'll apply
one last effect. Go to Effect, Time, Posterize Time, and lower
the frame rate to 12. By applying this effect, we aim to imitate the
style of traditional to the animation that is usually worked with at this frame rate. Let's preview. The animation
will be completely finished. I think I'm going to reduce
the amount of noise a bit, 7% is enough. Let's take a look. Great, to save time, select and copy the
adjustment layer with Ctrl C or command C on Mac. Next, go to Project 2 and paste it with Ctrl V
or Command V on Mac. It's that simple. We don't need to
repeat the process. To finish, go to
Project 3 and paste it. A very simple way to give the final touches
to our projects.
8. Rendering: Now that we have
our projects ready, we can export them. Keep in mind that the
composition that we currently have open
will be exported. For these, we go
to composition and select Add to Adobe
Media Encoder. Media Encoder help us export
projects more efficiently. First, which was the codek? In this case, we will use H264. It exports the video in MP4, the most used
format for the web. Regarding the output resolution, we can choose the Match Source, high or medium bitrate
option to avoid mistakes and export it in the same size we
have worked on the project. Finally, we choose
the location to export the video and
give the file a name. To finish, click on
the Play button here. With this, everything
will be ready. Once the process has finished, you can open your
video and share it with all of us in the
course project gallery. I'm looking forward
to seeing your work.
9. Final Thoughts: Congratulations on
completing the course. It's been a pleasure to guide you throughout
this journey. I can't wait to see you
apply everything you've learned by creating your
animations from scratch. Please share your projects in the project gallery or tag
me in your Instagram posts. I'm excited to see
your creations and provide feedback
to help you improve. Remember, practice
makes perfect, and mistakes are part of
the learning process. The process of learning
animation can be challenging, but it's incredibly rewarding. Check out my profile
for updates on new classes and other classes related to the
world of animation. I value your feedback, so please take a moment
to leave a review of the course and share your
experience with others. Thanks for being part
of this class and I'm excited to see you in
my other classes soon. Keep up your fantastic work.
 Carminys Guzmán, Motion grapher