Transcripts
1. Introduction: Hello, my name is
Tio, and welcome to the third course in this
sketch booking series. The first course
was an introduction on how you can use a sketchbook. In a second course, I showed you some mixed media,
art, and supplies. In this course, I want to
share with you more tips, and techniques when it
comes to sketching. Basically, the things that
I've learned over the years, such as making mistakes, simplification,
using perspective, composition, proportion, light and shadow, color mixing. Some of these topics actually deserves a whole
course on its own. I do have dedicated courses on, for example, color
mixing, and perspective. If you want to learn more
about those topics in depth, or in detail, you can check
out those other courses. In this course, I want to give you an
introduction to some of those drawing fundamentals
on something that you can use to improve
your sketches. You can download the
reference for those provided to follow
along with the lessons, and don't forget to live
this course a review so that you can let other students know what you think
about this course. Let's get started
with the first lesson on making mistakes.
2. Making Mistakes: In this lesson, we're going to talk about making mistakes. Don't be afraid to
make mistakes because making mistakes is part
of the learning process. For beginners, making
mistakes usually come from the lack of confidence or your technique
or even the tools that you are using is not
suitable for the paper. Let's take a look at some of my early sketches
from 2012 and 2013. This is around 3-4 years
after I picked up sketching. Here the color mixing
isn't that great. One way you can learn
about color mixing is you can go back and redraw the whole scene and
just recolor the scene just to test out
different color palettes and color combination. This is a sketch
that I drew during a gathering at my
friend's place. This was drawn in a cafe. The more you draw, the better you will get
because you got more practice, and also the more
mistakes you make, the more and the
faster you will learn. This is a mistake that still
haunts me to this day. This sketch was drawn at a
life figure drawing session. I used pen, ink, and
watercolor for this. I probably completed
this in 30 minutes. I didn't just draw
the nude model but I also drew the other
artists in the room. Some were using watercolors, some were using oil, some were using charcoal, and some using pastels. After I completed this
and I looked around, I could see all the other
artists still working on their art and I realized that life
figure drawing is probably hard for me because I tend to
draw really quickly. After completing this sketch, I didn't know what else to draw, but at least I learned that I don't really enjoy
figure drawing. That is the thing with art. You can try different things. Go for art sessions like this to find out
more about yourself, find out about the
style that you like, the tools that you enjoy using. Here the mistake is
actually this line. I cannot remember why
I drew this line, but it's obviously a mistake
because this line was drawn where the line
shouldn't be drawn. It could be because I was
impatient trying to draw really quickly and I
accidentally added a stroke. What this taught me is, try to be more patient, concentrate, observe
and draw what you see. Don't be too impatient. To this day, I still cringe when I look at
this sketch and I just realize I did not draw
the eyes for this model. It's fun to look back at
these old sketches to see how you have improved
over the years. This sketch was drawn on location and I was
looking at the front of the buildings and the
perspective is quite flat. If I can actually
draw this again, I will probably walk
around that area to look for a better view because
right now it's very flat. Here I was testing out some Kuretake Zig
markers and I found out the ink was water-soluble,
it's not waterproof. I prefer to use waterproof ink, so this mistake happened
on this sketchbook which I'm actually using
to test out composition, to test different supplies. I'm actually quite glad
to make this mistake here rather than on my more
expensive watercolor paper. Here I use a lot
of vibrant colors. I realized that if you use
too many vibrant colors, nothing will stand out. If you want something
to stand out, you can make certain
areas more colorful and the rest of the other
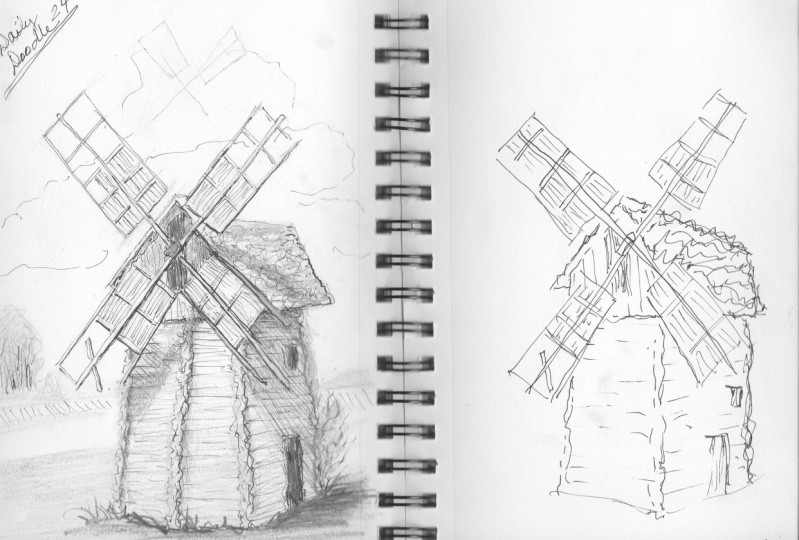
areas less colorful, so you get contrast from colors. Here I was trying to come up
with different designs for jugs and I tested different
materials like pen, ink, watercolor, color
pencils, gouache, or pink markers and also I
tried out different designs. Making mistakes here is part of coming up with
a better design. Also through this process, I also found out what type of materials that I
enjoy using the most. Here are some sketches
from the earlier course, and I was mixing and matching
different media just to see what works
and what doesn't. Making mistakes here is part of the exploration process to
find out what works for you and certain media will work better with each other or one and other
compared to others. For example, with pen and ink, it looks well with watercolor, but pen and ink doesn't
work as well with pencils. In this lesson, we are going to make some mistakes on purpose. We are going to make
several quick sketches of this building to identify
possible mistakes that we may make before we draw or
paint this in greater detail. This is the Basilica
of Superga in Turin, Italy and you can download the reference for that provided. I'm going to start by drawing a rectangle to
represent the page. I'm going to try out
different compositions. Let's draw this triangle here. Actually, I shouldn't say try
out different compositions because we are working
from a reference for that. The composition has
already been decided but if you were to
draw this on location, you can actually walk
around the area to identify or to find out what are the better views for
this particular building because depending on where
the sunlight is coming from, the best view will change. Here I'm just trying to draw this building in
a very simplistic style. Here I identified a problem. I have run out of
space at the top. By identifying the
mistake at this stage, later on, when I'm drawing
this in greater detail, I can avoid making
the same mistake. That's how making mistakes
can help us improve our art. At this stage, I can
actually just stop because I found out I ran out of space. Let's draw another rectangle here to draw the
same subject again. This time I'm going to draw it a bit smaller so that I can fit this subject onto the page. Once again, I'm drawing
the same thing. This time paying
more attention to the height of this dome here. Perhaps I want to draw the top first so that when
I draw the top, I will draw inwards and I will
not run out of space later on compared to me drawing
from the center upwards. Again, when you are doing these quick exploratory
sketches you can identify all these
possible mistakes or challenging things to draw. Things that you need
to pay attention to when you are making
your actual painting. Here I may have run out
of space at the bottom. It looks good now
because I'm able to fit this building onto the page. For sketches like this, you don't need that much detail. What I'm trying to
do here is actually to see whether or not I can fit this building onto the
page and also see if I have managed to get the
perspective accurate. For this sketch, maybe we will just focus on
the dome itself. I will not draw the bottom part. I'm just going to draw this
particular section here, just a close-up
on the dome here. I just realized I ran
out of space again. That is all right. Here, I'm testing to see
whether or not this composition
will work for me. Let's draw the window
here and here. The dome is actually
cropped off. If we are going to
draw something like this with our more detail
watercolor sketch, it may not look that rate. It's good to spend
just one minute to test out your composition
here rather than to spend half an hour to an
hour later on to find out that this composition or
this view doesn't work. There are a lot of columns here for this part
of the building. When you are drawing, you can
also identify or find out how many columns they actually are and also the distance
between each column, because they are not
equidistance apart. There are other columns
behind the columns that are in front and there
is some perspective going on. When you're drawing this,
you can get a good sense of the proportion
for the columns, where the columns
should be placed. This will really help you avoid making those placement or
proportion mistakes later on. You can see the sketch, it's actually more detail compared to the earliest sketch, and here again, ran
out of space again. It seems like running
out of space is a common issue that
I'm facing here. When I'm drawing, I need to make a mental note to
myself to actually draw smaller or use a pencil to mark out the top and
bottom boundary and draw the details
when within rather than drawing from
the center out to the edge of the peach. Next thing I want
to do is to use this gray and black
colored brush pens to test the contrast. For the photo, I can
see the sky is blue, so maybe I want to make
this a gray wash perhaps. Maybe for the other sketch, I'm going to leave
the sky as white just to see how it looks. This is actually to
test out contrasts. Later on, when I
paint with colors, I will need to create the
same level of contrast. Let me see what color this is. This seems like a
darker gray color, so let me just paint over the darker areas
like the shadows here and the grass here, and also the trees
here, the back. Drawing a sketch like
this is not going to take more than five minutes. I can see some orange
color for the beauty, so maybe I can use
this light gray to represent the orange here. There are some shadows
on the right side of the column because
the sunlight is actually coming
from the left side. Here, I'm not sure if
I should add the sky. Maybe let me add the sky
and see whether I can get some good contrasts with the
sky against the dome here, and it looks all right. [NOISE] When I paint
with watercolor, I just need to make
sure that I have good contrast with the
dome against the sky. Next, I'm going to make the
trees much darker here. I can see some
trees here as well, and the shadows here
seem to be quite dark. There seems to be a
really dark shadow there, some shadows here, and
also on the ground. This looks all right, so I'm going to create
another wash here. This is not dark enough.. This is black. I made a mistake here. Never mind. I actually put the cap on the
wrong brush pen. Let me switch to this
darker gray brush here. What I'm trying to do
here is actually to paint the same building except leave the sky white just
to see how it looks. It seems like if I leave the sky white or with a really
light colored wash, later on, I will get
that there are contrast. This is the watercolor
sketch that I painted after making
some quick sketches, not this but in this
particular sketch book. With this sketch, I found
out the column should continue from the top
all the way down. They should be
aligned vertically. Same applies to the window here, to the window beneath. Here, you can see this window is slightly misaligned to the left. It should be directly
beneath this window here. By making the mistakes here, I avoided making the mistakes
here on this sketch. When you are looking for
mistakes in your own sketches, you will definitely
find some mistakes, so don't be too
hard on yourself. Even for this sketch, which I drew and
painted after making several small town
near sketches, there are still some mistakes. For example, this area here, if you look at the photo, there is a much larger lit area, but here I've painted
the shadow area too big. This is a mistake, but you probably wouldn't know this is a mistake unless
I tell you it is. Anyway, when it comes
to hand-drawn sketches, there is a lot of leeway. Because it's hand-drawn, there is going to
be imperfections, and that's part
of the charm when it comes to creating sketches. What happens when
you are drawing and suddenly you make a mistake? Should you correct
the mistake or should you leave it alone and
start on a new page? Sometimes it depends
on the mistake. Sometimes you can make the
mistake first by fixing it. Some mistakes are actually
not that important. For example, let's say
there are six windows on this row but maybe
I've only drawn four. This is a very minor
mistake unless someone has a reference
photo to compare, or unless someone actually knows the place or the
subject that you're drawing, he or she is not
going to be able to identify the mistake. I may draw an extra balcony
somewhere because I lost concentration and
added this structure here which shouldn't be there, I will just leave it alone. Even for this balcony, you can see I have this
unwanted line on the latch, and this line is not
exactly at the corner. For the next balcony I draw, I will remember my
mistake and try not to make the same mistake again. Now it looks better. Sometimes I may just leave
the problematic area alone and draw somewhere else
first and continue drawing. Hopefully, when it joins
back to the mistake, that mistake will be less
prominent or the mistake would just disappear
into the background. Or sometimes I would just leave the mistake alone and draw a totally different subject
somewhere else on the page or just redraw the same thing again this time
without the mistake. A sketchbook is a place
for you to explore. It should be a place
for you to make mistakes and learn from
your mistakes as well. Some mistakes are easier to
correct and some are not. For example, with
watercolor mistakes, such as mistakes when it comes to mixing the correct color, depending on the
color that you use, you may or may not be able to scrap out the color
and paint again. However, if you do
screw up out the color, it's going to affect
the paper quality and subsequent wash is not
going to look as nice. Here, the mistake is that
skin tone is way too orange. To prevent myself from
making this mistake again, you can actually write down the name of the colors
that you've used to mix this color so that
you can avoid using the same color mixes
in the future. Let me show you a
few more mistakes. This is actually
more vandalism than mistake because while
I was drawing this, my two-year-old
daughter was holding her marker and forcing
her way on the pitch, which is why you see
all this squiggly marks here and there, everywhere. I like this two pages even
though it looks like crap, because I enjoyed art making process with my
two-year-old daughter, and here as well. Even though this looks like
nothing, it's just rubbish. I do remember this
sketch very fondly because of my interaction
with my daughter. Sometimes when it
comes to making art, it's not about the art but
about the actual process, about the time, the fun that you had when you were creating
that piece of art. This is my
two-year-old daughter, the one who vandalized my pages. You can actually
keep a sketchbook just for making mistakes, just for exploring ideas
and another sketchbook for more proper beautiful sketches. The more mistakes you make, the more you will learn, the faster you will learn. Making mistake is just part
of the art making process, the learning process as well, so don't be afraid
to make mistakes.
3. Creativity: In this lesson I want to
talk about creativity. Creativity is something
you can actually learn, so you can learn it by
creating something, by making something, you can learn from books, you can learn from
other artists, other creators by studying
their workflows or their art, and everyone is creative
in their own way. In the art or visual industry, it's quite common for creators to think of themselves
as not being qualified, or their work is
not as good, now, all this self-labeling and self-doubt is actually
not important. The most important thing is actually the creation process. Creativity is the byproduct
of the creation process. If you don't create something, if you don't make something
for yourself how do you know that you are not creative? If you have been following
along with the classes, the lessons, and the
drawing exercises so far, I'm pretty sure by now you know you are a creative person, just by looking at the
drawings that you already have in your sketch book. Now let me talk a bit more
while I draw something, you can find inspiration almost
everywhere even at home, so I'm going to draw this box of toys that belong to my daughter, it's going to be a
really quick sketch , nothing too fancy. I just want to draw with my colored ink pens that
I've grown to really love. Let me just switch
to different colors after I've drawn with black ink. Here I'm not thinking too much, I'm just drawing what I see. We have some patterns here. I'm going to use my
artistic license to change the patterns. Let me switch to a
different colored pen to draw these
little hearts here. You can learn a lot from
your own drawing process. This is learning by
trial and error. You will make mistakes, but you will learn. The more you draw the better you will get
because you're going to get more comfortable with
the creation process. Your lines will appear
more competent as well, and when your lines are more competent they will look better. This color is not
great on white paper. Let me make a mental
note of that myself. The thing with learning
from trial and error is it can be a slow process, but it's a very crucial
process because you have to learn about yourself because you have to learn
what you are good at, what you are not good at, what you can improve and what are the
things you can change. Learning through trial
and error is crucial. However, you can actually learn faster if you learn
from other artists. For example, I've got learning certain
painting techniques, you can spend weeks or months to discover new techniques
which have already been discovered by
painters a long time ago. We can actually save
a lot of time just by learning from other
artist that way. There is a limit to
how much you can learn just through trial and error which is why
I like to look at the art books from
other artists as well just to get inspiration. Sometimes when you
are looking at the art created by
other artist you will also think about how you can actually create
that piece of art. One thing you can do to be more creative is when
you are drawing, try to change things, try to vary things. For example, if
you're using pen, maybe switch to pencil, if you are using a lot of
colors maybe just switch to using a limited
color palette, and just do different things each time just to
change things up. You will discover in the process different
ways of achieving the same results or just different ways of
doing the same thing. Here I've drawn this
same box again, this time with
pencil and I intend to paint this with watercolor. This has drawn very hastly. It's one thing to visualize
something in your mind and create it on paper and
to see the actual results. Sometimes the result may be the same as what
you visualize, but sometimes it
may not and it can result in happy surprises. The thing is sometimes
you wouldn't know how the art is going to look until you have created
that art itself. You may not know whether
a certain style would look good or not until
you see it on paper. All you have to
do is to test out the different concepts
or ideas that you have on paper and see
how it actually looks. This is the creation process. It's a fairly a wonderful
feeling that you will get when you see your beautiful
artworks appear on the page. Right now as I look at
these two sketches, I can see that I prefer the watercolor one
because of the shapes, the shapes are more obvious, and solid colors are just more eye-catching compared
to just the line art. You can draw the same
subject over and over again, but very different
things each time, so here I've varied
supplies that I used, I could also try and draw this with maybe gouache instead
of transparent watercolor, the look will be very different because with
gouache it's opaque so the line art is not going
to stand out or it's not going to be as
important compared to the shapes and colors. Drawing is just one of the many creation or
creative process. Creativity can
apply to sculpting, flora design, textile design or even T-shirt design,
certainly graphic design. Here I have letters
with sharp corners, maybe for these few letters here I want to have rounded letters. That's a sharp corner as well. Let me make the corners round. All these are lines. Let me try and vary
the letters again, this time by adding maybe some colors to some
of the letters. Let's paint this and
see if it looks good. This looks nice. Let me switch to a
different color. When I paint there is a lot of oops because
things happen, even when you draw the
same subject over and over again there are many
things you can change, you can change the tools
and the supplies you use, you can switch to using a different technique or instead of drawing the whole box here, for example, you can focus on a specific area or just
zoom in to draw details. Here's something I saw recently. Now portraits in the
art world is very common so how can you make
your portrait stand out? In this case, the
artists actually used stones and
pebbles to create this portrait instead of the
usual dry media and paint. This stands out
because it's very different compared
to other portraits. It's made with stones and pebbles that we
find on the street. There is this
element of surprise, and when people look
at this they don't expect art to be created using stones so it makes this
portrait very memorable, and you can see there are so many examples of
stone portraits. That's where people
get inspiration by looking at the art
books from other artists. You can learn a lot
from books as well, these are just some of the
many art books that I have, I have art books for inspiration as well as instructional
art books. When it comes to
learning from books or video tutorials or
art courses it's very important to not
just consume the content, but also try to find things
that you really like, find the art that you like
and recreate that art. Creativity is the byproduct
of the creation process, so go create something. You are going to learn a lot
from the creation process. Everyone can learn
to be creative, however just remember this, before you can be creative
you have to be creating.
4. Simplification: In this lesson, I want to
talk about simplification, what to draw and
what not to draw. When it comes to drawing, we don't have to
draw everything. Sometimes it's impossible to
draw everything maybe due to the limited picture
size or maybe we just don't have the time
to draw everything, or sometimes we may just want the viewer to focus
on certain areas so we add more details
to those areas and we remove the details for
the less important areas. Sometimes it comes down
to artistic choice. Let me show you how to
simplify your drawing. Let's use this reference photo
for our drawing exercise. You can download this
photo to flow along. This is a photo of a
building with many windows. There are a lot of details
in the background. We can see all these
small windows in the background as far
away due to perspective. When we take a photo, the photo will just
capture everything. But when it comes to drawing, we don't have to
draw everything. When I look at a
scene like this, the first thing I would do is
look for the main subject. In this case, it's very
obviously the building. Then I look at the background. Is the background important? In this case, it's
not that important compared to the main building. Also, we can see due
to the perspective, this part of the building
seems to be in the foreground, whereas this part
of the building seems to be in the background. When we draw, we
can try to include more details here and not draw all the details
in the background and we may not even need to
draw all the windows. Generally speaking, if you
cannot count the windows, don't draw all the windows. This is going to a
very simplified sketch because I just want to talk about the process
of simplification. I won't go into the details
of drawing details. Here I'm trying to measure
the height of the building. Let me just put this
vertical line here, another vertical line beneath. This is the base of the
building and this part here is maybe two units
compared with this. Let's draw this here. What I'm doing here is to
draw the big shapes first, then we can view in
the little details. If my sketch does not
look very accurate, it's because I'm
drawing really fast. We have the front of
this building here. Next, let's draw this side. We actually have quite a
number of cars parked here. Maybe I want to just
draw our car here just to give this sketch a sense of size so when we have a car or people
walking on the street, we know what the sizes for
those little objects are. Immediately just by comparison, we know how big the
building will be. Let's continue
with the building. This is the part where I can start to simplify
because I may not want to draw the buildings in the background or this part of the building that's
in the background. I'm just going to
draw the shape, but I am going to
leave out the details. Also, I'm going to
add a few more cars. My cars are extremely
simplified. This is the building in the
background. You can see it. There's not much details. This actually
continues all the way back and the photo
actually just stops there. I'm just going to leave
my lines open like this. Next, I'm going to divide
the buildings into different sections so that
I can draw all the windows. We have this part here, it's a big oops, because the perspective
is totally off. This line here is
actually tilted in this direction but I actually
drew it in this direction. Anyway, I'm going to
use my knowledge of perspective to try and fix this. I can count 1, 2, 3, 4, 5, five windows or let me just
draw the one in the center first and put two
more on the side. There are windows
aligned vertically. For the buildings here on the left side
which are in shadow, I'm just going to draw
maybe the outline of the shape of the buildings. I am not going to draw the windows or maybe I can
just draw a few windows. Maybe I should just draw a few windows and maybe
there's one here, one here, one here, one here, and one here. There are four floors. At this stage, I can actually just stop drawing the windows. For someone who is
looking at the sketch, he or she will be able to fill
in the details himself or herself because these are actually repeating patterns so even if you don't
draw everything, the person looking at the
sketch will get a sense that this is repeating so all the windows are
supposed to repeat. That's just one way you can simplify by not
drawing everything, by leaving out some of
the details so that the person looking at
the sketch can fill in the details themselves. Next, I'm going to draw all
the windows on this side. I'm also going to
add more details to the doors and windows
here on the front, on the ground, I'm also going to
add some people. My people are very simplified. I'm just drawing their shapes. My people are just
made with dots, rectangular shape, and two
lines beneath for the legs. Next, I'll continue
to draw the windows on this side of the building. I count 12 windows and the windows are
actually not evenly spaced. Let me just try and draw the
12 windows and see if I can actually fit 12
windows in this space. Let's draw the
window here first. This is one. The windows
are not evenly spaced. This window is further
apart compared to these three windows
which are closer apart. The next window
is further apart. Then we have 1, 2, 3, 4, 5, 6. I've only drawn 11 out of the
12 windows and it's fine. Unless you are the architect
who designed this building, you are probably not
going to know that I missed out on one
column of windows. Here I'm just drawing
really quickly. [NOISE] For elements that
are in the foreground, you should definitely
add more details, but as the element or your subject moves
into the background, you can actually skip the
details if you want to. I may be drawing buildings here, but you can apply this simplification technique
to other subjects as well. For this part here, it's going to look
a bit weird if we just leave it as totally blank. What I want to do is to
actually include some windows. Just a few windows will do, not all the windows. I'm just going to include
a few windows here and maybe I will keep
this diagonal shape here. I'm just going to
leave this blank. Maybe I'll add some
little details here as well, but that's it. I'm going to stop here. I'm not going to draw
the windows anymore. I will, however, continue to add more details to
the main building. At this stage, I will consider
this sketch complete. I can add more details if I want to but I can also choose
to stop right now. Personally for me, when I don't know what else
to draw on the page, that's the point where I
will just stop drawing. The same would apply
to painting as well. For this quick sketch, you don't have to
paint over everything. I'm just going to paint over the top of the building here. The brush that I'm using is
actually quite small for painting this huge area, but since I'm already
using this I'll just keep using this. The problem with this small
brush is if you paint with multiple strokes the
strokes will be obvious, whereas if you pin with
a big brush the sky or this shape will appear
to be continuous. You won't be able to see
the individual strokes. I've painted the top of the building together
with the sky. I'm going to mix this
ultramarine with some shadows for the buildings
here on the left. I have this nice shadow that
contrasts with the building and I'm going to use this same
blue to paint the windows. I'm working really quickly. Next, for the buildings
in the background, I'm just going to
leave it as it is. For the bottom here, I'm just going to paint it with a very light wash or rose. Just like that. This is almost dry now
and I'm going to just add some more depths of colors
to create more details. Next, I want to add
shadow areas down here and here just to
make it much darker. With that, I'm going to use ultramarine with burnt sienna or some earth color to
make this darker. Does this look all right to me? I think it looks all right. It looks fine. Could be better. This is just a
really quick sketch. Maybe I can add some pattern
to the windows above. This is actually quite fun. I will consider this
sketch to be complete. It's just a really simple
pen and ink sketch with watercolor without any details added to the buildings
in the background. Let's work on another sketch. This is a photo of Times
Square in Manhattan, New York City in 1919. This is a black and white photo. We don't have to
focus on the colors, we just have to focus on drawing the details or not
drawing the details. I like this photo because it has a very nice silhouette of the buildings against
a cloudy day. Also, you can see the
buildings in the background. They are faint. They are not in detail. They are washed out. When we draw, we again draw details for the
buildings in the foreground. We draw details where
we want people to see. For this sketch, I'm
going to start by drawing the tall Times Square
building there first. This sketch is challenging in the sense that the
prospective is challenging. I'm just going to draw this
building in front first. I would just want to get the height of this
building right. You can see in the photo, there are many people
on the streets. You won't to be able to draw
all of them because it's, in this case, impossible. I've already drawn the main
Times Square building. I'm going to just divide
the building into smaller and smaller sections
using vertical lines. I will not be drawing the
individual windows because there are just too
many windows to draw. Maybe I'll just draw one or two important windows to remind me of the side that has windows. But I don't have to
draw every window. For the buildings in the
background, in this case, I'm just going to
leave them as shapes. I will not be drawing
any windows on them. I will just be drawing the
shapes of those buildings. There is one here. There is this building
with a little tower. I'm not sure if I can
call that a tower. A little structure that
comes out like this. I will draw that. This building is actually also considered to be
in the foreground. I will want to draw some
of the windows in details. But for the buildings that
are behind this building, I'm just going to, again, draw those buildings
with shapes. You can see this building
that is behind is just a block, a
three-dimensional block. For this building
in the foreground, I'm just going to
draw some windows. I feel like maybe I can actually just stop right here. I can just stop right here. I don't even need to draw the
windows on the left side. I may want to include
a few windows here, just to suggest that there are
windows here on this side. When we simplify, what
we're actually trying to do is to find some ways
to suggest details. This is done because the
main building is actually this Times Square building here and there's a
light there at the top. For the people on the street, I'm just going to draw them
with little dots like this. There are a few structures
which I want to draw. There are also a few vehicles. We can identify the vehicles
by the rectangular tops. But here what I really want
to do is to just use dots to represent all the
people on the street. Maybe there's a bus
or a tram here. This is a really old photo, let's just continue
to add the dots. I may need another
line here because there's too much space there. I may want to add some little
vertical lines to represent windows and just continue
to add dots to the sketch. We want to add more
details to this part here. [NOISE] Now, sometimes
when you want to simplify or you don't want a certain
area to be too obvious, draw those areas with much
thinner lines, if possible. In this case, I'm holding my
fountain pen more vertically to draw the little details. For this Times Square sketch, I want to preserve the shape of the silhouette of the building. I'm just going to paint
the buildings with this mix of primary colors, blue, yellow, and red. Very neutralized color. I'm going to leave
certain areas white, so that those white areas
will be able to stand out. I want to paint this here. This part at the bottom is
going to be gray except for the tops of the
vehicles and structures. When painting something, I just make sure that
the shape is strong. It's very recognizable. For the windows, I want them to be white, so I don't want to paint over. Basically, I'm just using a really limited color
palette to paint this. Maybe I can have a small billboard sign here which is
represented in white. I also want to have
some white here for the windows and maybe
for this window as well. This is coming
along very nicely. For this building
in the background, maybe I can have a
billboard behind as well. This is how the sketch looks. Even though the photo
showed a lot of details, you don't have to
draw all the details. It's really up to you how much
details you want to draw. Sometimes it's good to have
white space on the page because it can make your
page feel less busy. It can also make your subject stand out against
the white space. In this case, you can see
the colors against white. But here, this building, it doesn't stand out
that much because here is just this
big color shape. Perhaps if this is white, then the building may stand out. When you try to fill
your page all the time, it can make your
page feel very busy. Sometimes it's
really nice to have white space just to let the viewer's eyes rest or let the viewer fill in the
details themselves.
5. Composition: In this video, I want to
talk about composition. Composition in simple terms
is just how and where you place your
subject on the page. You can also think
about it as how you frame a particular scene. Composition can be quite
important when it comes to storytelling because with art, it's always about what you show and what you do not show, and depending on what you show, you can actually
change the perception of the person
looking at your art. For example, here I have a digger and drawn
on this tablet. I'm using a tablet because
I don't have to draw this digger repeatedly to show you different compositions. Based on this view
that I'm showing you, it seems like this
person is hard at work, trying to remove some
rocks in the foreground. The focus here is actually
on the person and on this digger that he is driving. However, if we are to zoom
out to see more of the scene, now the story is different. It seems like it's going to take a few hours for this guy to clear all these rocks
whereas in this scene, it's only going to
take this guy may be an hour to remove
these few rocks here. By changing the composition, you are actually
changing the story. This could be a scene at a
construction site and we only see the digger and
the rocks here. Now, if we are to zoom
even further like this, now the focus is no longer on the digger and no
longer on the rocks. You get to see a lot of space, and if you actually have
some background drawings, maybe it's some buildings in the background or maybe it's just an empty piece of land, the focus is now on this solid and digger in
this vast expanse of space. The story again
is now different. Or maybe in this scene
as you zoom out, there are actually other
diggers that are around. Maybe this is not the only
digger that is around. Maybe he has some
other colleagues who are also working nearby. If we are to zoom in like this, it would seem like he's
just working alone. But if we actually zoom out, we can see that there are
other colleagues at work. This is a busy
construction site. But if you only have this view, then you cannot tell how busy
the construction site is. Composition is quite important and you should always think of composition before
you start your drawing. You have to think about the
story that you want to tell, what do you really want to tell the viewer who is
looking at your sketch, or what do you want to
tell yourself when you look back at your sketch. When you're sketching,
you can actually make several small thumbnail
sketches just to test out different
compositions. Now I'm going to
draw some rectangles to represent pitch sizes. Let's see if we are working with a wide format rectangle, you can draw the
scene like this. If you have a scene like this, it's going to feel
like there is a lot of whitespace wasted, but sometimes having
much space can be good. Again, it really depends on
the story you want to tell. With a scene like this, for example, it seems like this
person has a lot of space to work with. He can drive his digger
all around this space. However, if we are to draw this subject or this scene much larger on the pitch by cropping out some
of the rocks here, it's going to be a tighter
scene and focus is going to be stronger because the subject
is fueling the pitch. The subject takes up a huge
proportion of the pitch, so the focus is stronger. We can just do like really quick pencil
sketches just to test out the composition. Let's say our sketch book is a portrait sketch book where you open up and
it looks like this. If your subject takes up just a small
portion of the page, you can see the
focus and emphasis is no longer on the subject. In this case, it's actually on the space around the subject. Some compositions will work, some definitely
not going to work. For example, if you
are just drawing this on a vertical pitch, I'm not sure if this
composition would work. It could work. It
could also show that this digger is working
with a lot of space. The working environment is
very spacious, it could work. It really depends on the
story you want to tell. However, in this case, the subject or the scene is
actually more suited for a wider aspect, wider pitch. Because you can see
it's a white scene, it's a white subject. This is something you could
have drawn on location, or you could have drawn
this from your imagination. If you're drawing
this on location, you can move around
the scene to choose your composition to
tell your story. If you're drawing this
from imagination, you can also do the same thing. In this case, you can
actually just move the rocks around the scene just to
tell different stories. If I move the rocks
here, for example, maybe the guy hasn't started work yet because
he is quite far from the rock and we
anticipate based on this scene that
he's going to walk on the rocks very soon. Let's say I'm working on
a vertical pitch again, and this time I want to put the digger at the top
of this vertical page. It's going to feel
like the focus is now actually on this
base here because again, the digger is not taking
up a lot of space. It feels like it's
claustrophobic. The space is very tight because this scene is actually supposed to
be a white scene, but we have chose
to draw this on a vertical page so it
feels really tight. It's like something is off. There is some tension, and you can even
make this even more claustrophobic by again,
changing the composition. There are actually
many rules and guidelines on how you can
create good composition, and there are several books just written on this topic alone. The most common rule is
actually the rule of thirds. This is a rule that is
also used in photography. Let's say you have a page. You can actually
divide a page into this three-by-three grid, and all you have
to do is to place your main subject at one of the four intersections here. Here I actually
have the digger at this top left corner and the rocks at the
bottom left corner. This actually, on this rule, this thing actually
creates visual interests. What you should
avoid is to place your main subject just right smack in the middle of the page. Sometimes it can work
Sometimes it definitely works. For example, let's say
your focus is the digger. You can obviously place
the digger right smack in the middle of the pitch because the
focus is on the digger. So it can take center
stage, it's all right. But if there are other
elements in the scene, that's when you
have to think about how you can compose or frame your scene in a better way to tell a better story,
a clearer story. Let me show you another example. This is a sketch drawn on
location inside this cafe, and I could have chosen different compositions to
tell different stories. In this case, I chose to draw the whole interior just to
show how cozy this cafe is. I want to show all the books
that are on this shelf. There are a lot of details, a lot of elements in this cafe. However, if I were to just focus may be on a selected area, let's say I just
want to focus on the front here, the entrance, there's actually not much
focus because there is no focal subject, there's no main focus, there's no main subject. So the focus will be lost if I were to just choose
this particular scene. Let's move down. Let's see if I have selected to just draw this section here. We have a person seated
that on this sofa, maybe reading a book or
checking his or her phone. If I were to draw this, it could create a
perception that this cafe is not very busy, there aren't many
customers because it's just one person seated on this single chair here and there are so many
empty chairs around. So it could create
a perception if I chose to show you this scene. However, the actual
scene is this. It's quite a crowded cafe, it's a popular cafe, and there are actually a number
of customers in the cafe. There's actually
this group here of friends chatting
among themselves. They took up all
the chairs here. Also, we have this
bigger composition. We can get a sense of
the space of this cafe. There are actually
several sections. This front section here
where the entrance is, there are some paintings
hanging on the wall. This is the section where the sofas are the
seats are served, and this section here we have the plastic wooden chairs here, the seats are hot, and this is where the books are. So by choosing
different compositions, you can tell different stories. Let's say I want to focus on this group of friends
here who are chatting. Now, it feels like the
cafe is quite tight. It's claustrophobic
because we are zooming in so close to all
these people here. We don't know how
big this cafe is, so it could be a really
tight, claustrophobic cafe. We wouldn't know because this is the scene that I
choose to show you. As you can see, composition is important and composition will apply to all types of
hand-drawn or hand-painted art, such as landscapes,
architecture, interior, still life portraits. Basically, anything that
you create on paper or Canvas can be made better
with good composition. Here are some good books on composition that I recommend, should you want to learn
more about composition.
6. Sizing Your Subject: In this lesson, I
want to show you how you can size your drawing, so that it fits
properly on the page, so that your drawing is not too small and there is
too much white space. Or your drawing is too
big and you don't have space to draw anything else. This is the reference
photo we will be using. There are a few techniques
that you can use to size the subject you're
drawing on your page. The way I usually
do it is to find a top and bottom boundary of the biggest subject
that I want to draw. In this case, it's this tall
building in the background. The top edge is actually here, and the bottom is
somewhere here. But there's this additional
building in front, so the bottom is actually here. I usually would mark out
the boundary on the pitch, so when I draw, I just need to draw
within the boundary. In this case, I will
not run out of space. Let me show you how to do it. I'm going to leave some
space here on the left for the building that's in
the absolute foreground. I'm going to mark
out the top boundary here with my pencil, and bottom boundary here for the building
that's in front, that triangular top building
that's in front here. I can see there is this
horizontal line here. I am marking up the boundaries with very faint pencil lines. This is one I have. It may not be clear, but after I ink the drawing, it's going to be much clearer. Now, when I'm
drawing a location, sometimes I would just keep the penciling stage because I'm already quite used to using
this particular technique. Let's draw the top first. Make sure to draw
the diagonal line at the right angle using
observation skills. We can draw the extension at the top and add a
small extension. Now, after making
a few drawings, you will know your tendency
when it comes to drawing. Do you usually draw
bigger than usual or do you usually draw
something that's too small? After you find out
your tendency, you can then adjust your drawing to account
for your tendency. Say if you're always
drawing too small, then draw slightly bigger. If you're always drawing very
big, draw slightly smaller. This midpoint here, is actually the corner
of that triangular roof, and I wanted to draw that
triangular roof here. I'll come down here
at the bottom. This is the bottom
boundary of this building. There is a lady here. I'm going to draw
that lady later on. Let's continue to draw
this building here, on the left side. At this stage, you
can see once you have fitted your main
subject onto the page, everything else is going
to fit onto the page, and if they cannot fit onto
the page, it's all right. You can let them be
cropped off the page because those are not the
main focus of your drawing. The main focus is
actually this part here. You need to fit your main
subject onto the page. All the rest of the buildings, the rest of the background, they are not as important. Here, I'm trying to fit
the rest of the street, the rest of the buildings onto this page after I've drawn this. Let me just draw this little window here,
another window here. The head of the lady is at the midpoint of
this height here, so the lady is actually
wearing a hat here, and bottom, the dress
is actually here. When we draw, we need
to make sure that this height is in
proportion to this height. It is very important to
actually make sure that you get the right size drawn at
the start of your sketch. For example, if you
have drawn this house too small than the lady, then all the other people
will have to be drawn smaller in proportion
to the house. If you have drawn
your house too big, then everything else is
going to be drawn bigger. Everything that you draw right at the start
of the sketch, that size, you have
to get it right, so that later on,
whatever you draw, you can draw those other
subjects relative to the size of whatever that you have already drawn at the start. Now, one way to practice this
technique is not to draw, not to include too many details, just draw the big
shapes here first, to get a sense of the size, to get a sense of how you
can use this technique. This is what we have so far. After drawing this,
the rest of the sketch is really easy to draw. You just have to continue
drawing or filling the space. You can use this technique to draw any other subjects as well. Next, let's draw
some human subjects. This photo has a
square aspect ratio and this composition was used because the photographer wanted to include this
notice in the photo. These two ladies and
their children take up a much smaller portion
of this photo. For my drawing, I
actually want to focus on these two ladies and the children sitting
on the steps. Once again, I want to find
a top and bottom boundary. There are two key subjects here, this lady here and
this lady here. So the top is actually here and the bottom
boundary is actually here. But there is also the top and bottom boundary for
these two ladies. When I draw later on, I'm going to draw elements
in the foreground first, in this case, I'm going to
draw this lady here first. I need to make sure that I size this lady at
the correct size. If I draw this lady too big, then this lady here in
the background will have to be drawn much bigger, and you may run out of space. It's very crucial to size this
lady at the correct size. Let's go back to
our sketch book. The space that is taken up
by the lady is actually in this rectangle. [NOISE] A thing like this. The space taken up by
all the human subjects is actually in this
squarish shape here. For this sketch, I may
actually want to include the staircase on the left side and also on the right side. Let me just mark out the
top of the head here first. I also want to mark out
the height of the head relative to the
height of the body. It seems like the
height of the head is about one fifth of
the total height, so it's going to
be somewhere here. That's the bottom of the neck. I also want to mark out
the general shape of the body and legs here, and for the second lady, which is seated here, I want to mark where
the hands are. The hands are actually above
the head of this lady here. I just want to mark out
the hands and where the head is for
this second lady. After I mark out
the general shape, the top and bottom boundary, the important elements
like where the face is, where the hands are and
degeneration of the body, I can start to draw
on this sketch. Try and follow the
contour of the lady, don't be too caught
up with getting the right features
in this exercise, what we're trying to
do is to focus on getting the size right. I want to draw the hands here. One quick way to drawing people is you can draw the head
and draw the hands, and if the person
actually moves, if you're drawing
this on location and the person actually moves, you can then connect the hands to their shoulders
or yourself later on. It's actually quite
difficult for me to see what's the details here
in this shadow area. There is a purse here, we have this dress
that comes down slightly and we have the legs. The width of the leg is almost same as the width of
this section here from the hand to the
edge of the truss, so when we draw we need
to make sure that we get the correct
length, the width. I can't see the details
here very clearly. It doesn't matter, we'll just draw what we can see. It seems like the shoes
are merged together, it's not very clear
from the photo, so let me just draw
something like this. I'm just going to place the
nose here and the eyebrows, just to put some features here. The features are
not that important, it's the size that
we want to get. Next, we can draw the
second lady here, which is seated on top, I may want to place or
draw the hands first, the hands are actually
slightly above the hair of this lady here and
the hands are above the purse of this lady. Notice that when I'm drawing I'm thinking off
the positioning, so let me just draw the hands, make sure the hands are
at the correct size. Let me draw the other hand, drawing hands is difficult. If you're drawing
this on location, just focus on observing, capturing the lines
that you see, but don't think about it
as you are drawing hands, think about it as your drawing her lines, drawing the shapes. Next, let's draw the face
for the second lady, the size of the head is similar to the size
of the head here. The head is about one
head away from the hands, so what I'm going
to do here is to just draw the head like this, and we can see is
on hair, that's it. After that, we can just fill
in the rest of the body. After you have drawn their
hands, it's really easy, you just join hands to the
elbows, to the shoulders. For the bottom of the dress, I want to place it here. The bottom of the
dress to the hand, I'll say it's one unit here, and this is one unit. We need to make sure that
they're sized correctly. The dress has some really
beautiful folds that you can draw to create
three-dimensional effect. There is a small hand
here belonging to the little girl on
the right side, I had forgotten to leave
the space for that hand. Next, I want to draw the feet, this feet is directly
beneath the head here. Let me just draw that, my shape is a bit off and
I think it's all right. Next, let's draw the
children on the left side. The head for these children is lower compared
to this head here, and it's to the left
side of this head here. Let's draw a smaller
head here for the kid. Again, the focus here is
really on cutting the size, don't be too caught up
with getting the details. You can redraw this
photo over and over again to get the details. On next, I want to draw the other kid seated
on this side, the face is also smaller, let me just put
small eyeballs here. That's the nose and
that's the mouth, is this the hands of the kid? I think so, I'm not sure if my shape
is correct or not. Let's draw the shoes here, there is one shoe
here, the socks here. The socks are directly beneath the left each of this kid here, and we have the shoes. In the photo, the shoes are actually
behind this code here, so my placing is off slightly. Also notice I'm actually
drawing the socks and the shoes first rather than continue
to draw from here, because what I'm trying
to do here is to draw at the boundary and
draw towards the middle. Sometimes I will just jump
around in my drawing, by drawing from the boundary
towards the center, it makes it more difficult
for you to run out of space. My socks are not looking
exactly like socks. Maybe these are just shoes. For this kid here, I'm just going to leave
this area here undrawn. I don't want to draw
this because I cannot see the details here
in this shadow shape. Next, let's draw the
features on this mom here. Let's put a smile on her. This is not a portrait, so I'm just using a very
cartoony features here. Next, let's draw the kid
here on the right side. The shoulder is
almost horizontal and the elbows here and their
small hands are here. We can see the feet here. Notice that I'm drawing
at the bottom again, the base here, the boundary here and just join this up like this. I am not able to
see the other feet, so I'm just using
my artistic license to add the other feet. Let me add some more
details to this clothing that this little
girl is wearing so that it looks more detail. Now that the main
subjects are drawn, you can then fill in the details for the background,
the staircase. For this particular drawing, you can also mark out
the staircase first, use the staircase
as some framing to frame your subject
within the frame so that you wouldn't draw your drawings bigger than
what it needs to be. That's another way. Just draw the staircase. This is rectangle here. I think I may have drawn this too far into that left side. Yap. This line is not vertical, it's at an angle, and this line is
almost vertical. I think it's all right. Let me just create
more space here. There is this metal
real thing that is here and we have this
staircase landing. Very difficult for me
to see what is here. This lady is actually leaning against the staircase here, the side wall here,
so I've drawn that wall too far
on the left side. But it's okay, we make
mistakes sometimes. We have another line here and
I can draw the steps here. As the staircase goes
into the background, the steps will become
smaller and smaller, and also the width will
become smaller and smaller. What you can do here
is you can actually draw the right boundary, in this case I'm drawing
the right boundary. Again, after you have
drawn the boundary, just draw into the shape, into the space there. I'm definitely messing
up right here. The photo, [inaudible] a photo? There is. We have this line that comes down here and there's this staircase that
is here like this. [NOISE] We have
some railings here, metal railings. I'm just scribbling some
shapes here that I see, it may not even be the same
design from the photo. The main thing here is to make sure you get the angles right. This angle, this line here, this horizontal line
here is not horizontal, is tilted down slightly
and this line here is tilted up slightly
due to perspective, so you need to get that
perspective right. When I'm drawing,
I'm always thinking about the angle of the line, is it going up or
is it going down? Here, I'm just
drawing some details. [NOISE] I'm drawing
the big shape first and filling in
the details later on. Notice how after you have
drawn the main subtract here, you can fill in the shapes, all the other details later on and they will fit properly. They will fit correctly. This is the completed sketch. Very loose, very sketchy. I like it a lot, even though there are mistakes, but I still like it. I like how sketchy
this sketch is. Maybe later on I will
erase the pencil marks. This is how I think about
sizing when I am drawing. Draw the main subject first, find a top and bottom boundary. If you are unsure, you can always use
a pencil to mark out a top and bottom boundary. You can also mark out
some important areas, important points for
reference in your sketch. In this case, the
top boundary's here. The other important
point is actually this corner here for
the triangular roof. Here I've drawn the
phase to help me locate, to compose the scene. I've also drawn the hands first to basically tell me position
of the other elements. I have provided you with additional photos you can
use for more practice. While you are drawing, focus on the sizing, the proportion, that placement. Don't worry too much
about the details, focus on sizing,
proportion, and placement. After you have drawn
the big shapes, then you can fill in
the details later on.
7. Light and Shadows: In this lesson, I want to
show you how you can use light and shadow to make
your sketch look better. Light and shadow
can be very useful because they can make the
subject you are drawing, look and view
three-dimensional instantly, it can provide more
information to your drawing, it can make your drawing look
clearer and easier to read. Let's take a look at
this reference photo. This photo was probably taken on a very cloudy day and there is no obvious
light and shadow. With this scene, if there
is light and shadow, we will be able to get
a sense of the time. Also, with light and shadow, we will get a better sense of the physical form of the
buildings in the background, and also for this statue
in the foreground. This is the sketch I drew of
the scene you saw earlier. Without a light and shadow, it's difficult to separate
the foreground element, which is this statue
from the background. In this case, you can actually
use a thicker lines for the foreground elements
and the inner lines for the background elements to
create this sense of depth. But if you are using
the same line, it's going to be difficult to see what is in front
and what is behind. Let's see what's going
to happen when we paint or add some
shadows to this scene. I'm going to use water
soluble graphite to paint the shadow. I'm going to have
the light source coming from this direction, so we are going to have some cast shadows
on the left side. This is a very quick and
easy way to add shadows. Usually do black and
white sketches to test out my composition. Okay, so we have some shadows
on the ground as well. Because the light source is
coming from this direction, we can paint the
buildings here as well, and we can add some
shadows on the ground as well, some long shadows. Perhaps, it's during
the evening time, so the shadows are very long. With the shadows on the ground, we get more information, we can guess what time it is. The statues are, well, in this case, quite dark. Because the statues are so dark, it's difficult for me to
see what I was drawing. There are actually
two people here, one is on the horse and one is actually standing
beside the horse. While I was drawing, I didn't realize that
there were two people. Anyway, let me just
paint this statue black. This what am painting here, this is actually not the
shadow is just that the statue is black or in just
a darker color. I also want to add some
shadows to the bottom here because this part
actually extrudes out, so there will be some
casts shadows beneath. With this shadow
that you see here, the person who's
looking at this cash will be able to tell at a glance very quickly that there is something
protruding out, that is casting shadow beneath. Let's put some
shadows here as well, just a very thin line of shadow. Here you can see the
shadow is quite thick, so that means the thing
that is protruding out here is quite big. However, the shadow line
here is very small, so it suggests to me that
maybe there is no protrusion, but there is actually
a small gap between this part here and
this part here. For this part of the building, I can add some shadows as
well because this is facing away from the light source. The roof here is dark, so let me just pin that. This is not a shadow, this is just a roof being dark, and also the roof top
here is also dark, so let me just
paint this darker. On the ground, there is a
shop with this awning here. This is probably going to cast some shadows on the ground, so I can just paint some shadows here to make this
whole area darker. It's very settle but it provides this
additional information that there is this awning here, and I can have the shadow come
down at this sharp angle. This scene is now easier
and clearer to read, thanks to the shadow effects. You can see this white area
here, there is nothing. However, if I paint
some shadows here, immediately you get this
impression that there may be a building or something on the right
side casting this shadow. That's how shadows can
give you more information. When you are painting shadows, makes sure the
consistency is there. What I mean is, all the shaded
areas should be in shadow. If you take a look
at this side here, which I did not paint over, this part is not facing
the light source, so it should be
painted with shadows, so let me just paint this. If you fail to paint all
the areas in shadows, then it's going to break the consistency or
the believability. For this statue, I'm going to add another layer, just to mix certain
areas darker, even though this statue
has a very dark color. It's in black and
white actually, photo, but there are still
areas which are darker, so I want to paint
those areas to create this additional sense of depth, to make this statue look
more three-dimensional. This is how you can use light and shadow to make your sketch look three-dimensional
very quickly. Here's another sketch I drew with the help of
another reference photo, which was also taken
on a cloudy day. Here I want to show
you how you can mix shadows using watercolor. Now you may have a box of
watercolor with many colors. My recommendation when it
comes to color mixing, especially for beginners, is to just stick with a
limited color palette. Just choose one yellow, one red, and one blue from
your box and use those three primary
colors to mix all the colors that you
need for your sketch. This includes the
shadow as well. Let me have my water
color box here so they can see how I mix the colors. With yellow and red, let's choose this one, red, you're going to get orange, and when you add blue, it's going to become darker. Let's have the
light source coming from the right side again. This side of the building will
be in shade and they will cast some shadows on the ground. If you want beautiful
looking shadows, try not to mix your
shadows completely here, and then mixing well. Let the colors mix on the paper. Let's maybe paint the side
of the building first. Here I've just
painted the side of the wall and the
wash is still wet. When the wash is still wet, you can actually
charging another color, just to shift the colors around. You can see I've just
added some red to the wash. You can only charge in color when
the wash is still wet. By not mixing your shadows, your colors completely
in the mixing well, you can get very beautiful
watercolor washes that have color transition. Let's see, what do
I want to here? Okay, we have the
light source coming from the right side, so I want to paint some
cast shadows on the ground. When you paint a
large area of shadow, make sure you have enough paint, you don't want to run
out of pin halfway. Here you can see I
have this little gap of unpainted area that gives me the impression that there
is this gap between the building and
sunlight can go through. Let's have some shadows
here beneath the shelter. This is the power pole. This building here is dark, so I want to paint
it in this shape. This is not a shadow, this
is just a building darker. While the wash is still wet, I can paint in this
additional color to shift the color around. This is the shadow
beneath this roof here. This building is quite tall, so I want the shadows
to be much longer. It may even go
across the street. Now, it's important to
pin this whole wash in a single wash. Don't wait for it to dry and then
paint a second layer. You will see very hot
each line on that way. While the wash is still wet, and you paint, you can get very beautiful
color transitions. Let's say it's evening time and the shadows are very long. The shadows are so
long that you can actually see the cast shadow on the side of this
building here. Maybe this shadow is so
long that it's casting shadow on the side of
the building here. It's going to look like this. This part here, it's not painted with shadow, so we suggest to as that
this part of the building is actually on a
different plane, it's not facing the same side as the walls that you see here. I can also paint the buildings
here and background. As you can see, the colors
that you use in this case is actually not that important. You can go on to add other colors later
on for the buildings, but this is just a very
quick way for you to practice creating shadows,
painting shadows. The roof is not in shadow because the light
source is pointing at a roof. However, I'm painting
this shade here because the roof is dark color. I can use this watercolor
brush to add more details. Maybe I can use this to
paint the windows as well. Remember what I said
about consistency. Here you can see
this lit area here. The light seems
to be coming from the space between
these two building. However, there is no light here and you can see this wall
is actually lit by light. If there's actually space
between the two buildings, there should be a wall
here that is lit by light. If there is inconsistency, the sketch is going to
feel or look a bit weird. In this case, I may
want to correct this sketch by painting
this area with white wash. This is correction. Before you paint it's better to take a few
minutes to actually plan all your sketch to see what are the areas that
you should not paint over, because when you make
corrections like this, it's not going to look as nice. White paint is not going to
look the same as paperwhite, in his case, paperwhite
still looks better. Try to avoid painting over
white areas if you can. The other area I want to
point your attention to is this shadow edge here. If you take a look at
the reference photo, you can see this part of the
beauty is actually curved. If it's actually curved, the shadow edge
should not be sharp. Now, when I look at this
sketch based on this wash, it suggests to me
that the wall here is perpendicular to the wall
here on the right side. If you want to
create the illusion that this area is
actually curved, you would have to create some gradation here for the shadow. The edge here should
not be sharp. Let's see if this mistake
can be corrected. I'm going to add some
clean water here. Basically what I'm trying to
do is to paint the shadow, to extend the shadow
over here slightly and have the shadow blend into
the white of the paper. Let's use the same shadow
wash that I have earlier. As mentioned earlier,
you should always try to paint your wash
with a single wash. Here I'm painting
a second layer. This second wash is going
on top of the first wash, it's not going to
look continuous. You can actually still
see the edge there. This color is also
not the same as the earlier color
because I actually ran out of the earlier wash, so I had to re-mix
or mix this color, try and mix the color in, so it's not going to look the
same as the earlier wash, which is really nice. But now this is what I have, it doesn't look that great. Also, when you paint over your initial wash
the second time, it's going to
affect the vibrancy of the earlier wash. I'm not sure if this
is good enough. This is what I have. I'm going to use this tissue
to soften the edge to try and create this
illusion that this part here is actually curved. This side here is
actually curved. I'm not sure if I am able to
create that illusion here. It's definitely easier to paint the shadows with the help of a reference photo or paint
shadows on location. Now, if your reference photo
doesn't have any shadows, and you try to create
your own shadows, you may not be able
to get the angle of the shadow or the length
of the shadows right. That's the challenge when
you create your own shadows. In this case here,
I'm not sure if my illusion of this
curved edge or curved corner actually works because this part of the sketch is actually on the right side. If I fit the water color here, it looks as if I'm trying
to fade the watercolor, not because of the curve edge, but because I'm at the
edge of the pitch. Painting shadows
can also make your subject look more crowded. For example, with this
earlier sketches of vehicles, you can see some
of the vehicles, they have shadows beneath. Shadows don't always
have to be black, they can be black, or they can be
some darker color, but you can also use colors like vibrant
colors for shadows. When you have shadows
beneath the vehicles, it makes the vehicle
feel crowded. It shows that a vehicle
is on some surface, it's on the ground. But if you don't have
shadows beneath, you can make it seem
like the vehicle is floating in space, it's not on the ground. Not all subjects require
shadows though, for example, if you are drawing or
painting food, fruits, vegetables, sometimes
you may not want the shadows because you want the colors to appear
more vibrant. Even if you want to add shadows, you should not add those
very dull shadows. You can add colorful shadows, in this case a colored
wash as a shadow.
8. Light and Shadows bonus lesson: Let me show you how to mix
shadow colors with watercolor. So here I have three cubes, painted with yellow,
red, and blue. I'm going to mix the
shadow color for yellow. To make it easier for
you to mix colors, just stick with three
primary colors. Just choose any yellow, red, and blue and use
those three colors to mix your shadow colors. So I have a yellow cube here. To mix the shadow color, I would just mix
the three colors together and paint
over the yellow. Let's add the shadow
to the yellow. I'm going to have some water
in this mixing well here. Just add a tiny bit of paint. Don't add too much paint. Just see how vibrant or how strong the color is
before you add more paint. I'm adding some red here, and I also want
to add some blue. These are the three
colors that I use to paint the cubes, and now I can use this wash here to paint over the cube here. Now for this to work, make sure that your
cube is already dry. If your paint is not dry, the colors are going to blend and it's not going to look nice, it's going to look very messy. Here I've painted the
shadow's side for this cube. I'm going to have a sharp edge here that comes down like this. You can change your shadow
color to whatever color you want just by adding more color into the wash. You don't
have to add more water. You just have to add some
color into the wash. You can have it red or you
can have it blue. It's up to you. Try to minimize the
number of colors. Try to stick with a
limited color palette. Otherwise, your colors
are going to look very messy because there's
just too many colors. Here you can see I've
used too many colors. If you mess up your color
mixing, don't worry, just draw your cube again and draw more cubes so that
you can get more practice. Once you have mixed your colors, you may want to write down the names of the
paint you used and also maybe the proportion of the paint you used
to mix the shadows. In the future when you see
the shadow color you like, you can remember the proportion of the paint you used because
you have written it down. Next, let's paint the
shadow color for this cube. I have already mixed color. I'm going to have
more blue for this. Is this too dark? It
looks like it's too dark. It looks all right.
But I've mixed the colors to complete
in the mixing well, that's why this wash
is kind of dark. I think it looks all right here, except this part here which
should not be painted, this should be white. So I tried to
correct the mistake, but I cannot lift the
colors completely. I may have to clean
my brush and wet this area here to see if I can
actually remove the paint. So this is one way you
can correct a mistake, but whether this will work will depend on
the paint you use. Certain paint will
be very staining, as in the pigments will
go into the paper so it would be impossible to
scrape out the pigments because they are
inside the paper. I guess it looks all right. Next, I'm going to use
the same shadow here to paint over the ultramarine. Maybe I can have a
bit more red here. Oops, too much red. That's why I tell you to not add so much paint
in the first place. This is definitely too much red. If the color that you see is not the color
that you want, so in this case, there
is too much red, what you have to do
is to just add more yellow and more blue
to neutralize this. So if I add more yellow here, it's going to turn orange. But I've also added
too much water, so it looks like I'm
messing up this wash here. The right amount of water
to use is quite important. Not to worry, we have
a few more cubes here. So let's see what
will happen if we paint the shadows while
this cube is still wet. For the shadow color, I'm going to use pyrrol
scarlet and ultramarine. The thing is when
wash is still wet, when you paint the edge, the color is going
to go over the edge, which is why I tell you to paint the shadow wash the second
layer after your wash is dry. This is a pyrrol scarlet
with ultramarine. This looks nice, but I've used too much
ultramarine here, so the red is actually lost. You can have a green
cube as well mixed with yellow and blue
and for the shadows, I'm just going to add some red. This is not dark enough because I did not wait
for the paint to dry. If I add more water now, the water or the shadow is going to spread into the green. Here I have an orange cube. To paint that orange shadow, I'm adding some blue
and perhaps I've added too much blue that's
why it's turning green here. So these are now dry and let's analyze the colors
and the shadows. If you have a lot of
examples painted, you can very easily
compare and see what are the shadow
colors you like. In this case, I actually
prefer the shadow here because the shadow here looks
like the shadow of yellow, whereas here it
still works because I have this layer of color
painted over the yellow cube. This shadow is interesting
in the sense that there are color mixes
within the shadow shape, so it looks nice as well. For these two cubes, they are painted in red, but here I've used
more ultramarine. For this shadow here, I have used the mix
of the three colors, which is why the color
here looks brown. Here I would actually
prefer this shadow color because the shadow is more
vibrant, it's more colorful. It looks more interesting. Here we have a blue cube
with orange shadow. I actually like this part here. I think this looks very much
like the shadow of blue. However, when the
shadow comes out, when you see the cast shadow, it doesn't look
harmonious side by side. For the last two examples, the shadows are not very clear because you don't get the
sense of light and dark. It's just different colors. When we talk about
light and shadows, we are actually referring
to the contrast created by the light
and the shadow. Here we actually have more of a color contrast rather
than light and dark. Here the color contrast
is not that obvious. Here we can see
very clearly that we have something
that's lighter and this additional layer makes it darker so that we have
good light and dark. These are the colors, the mixes, and the shadows you
can get by just using three primary colors. There will be some limitations when it comes to using
unlimited color palette. So the limitation here for this particular color palette is it's difficult to
mix a vibrant green. If you want to have
a vibrant green, I will probably swap out French ultramarine and
use pale blue instead. For beginners, I highly
recommend you use a limited color palette because when you are mixing
with too many colors, it can get very confusing. Certain colors will
work well together. There are certain color
combinations that work really nicely
together to produce very colorful or vibrant mixes or very beautiful
grays or neutrals, and you have to find
that out yourself. You have to discover which are the color combinations
that work best for you.
9. Mixing Colours: In this lesson, I want to teach you the absolute basics when it comes to mixing colors
using watercolors. More specifically, how do
you get the colors to work well together and how
to mix vibrant colors. You may have many colors
in your watercolor box. However, you don't need
to use that many colors. My recommendation is to just
choose three primary colors and stick to using those three colors to mix whatever colors
that you may need. If you are a beginner, when you try to mix colors, we have so many colors. It can get confusing very fast, and you also want to learn much about the
characteristics of each specific color
because each color actually has their own cooks. In this box I have, there are three yellows. This looks like an orange, but it's considered
a warm yellow. I have five reds, and this looks like a
purple or a magenta. This can be considered
a cool red. These are warm reds, and this is like a mean red. I have two blues, one cool blue, federal blue, and one warm
blue, French ultramarine. I have some other
convenient colors like raw sienna for
mixing skin tones, federal green, so
that I don't have to mix greens with yellow and blue. I also have some oeuvre colors. When I mix colors,
I would just choose three primary colors and stick to using those three colors. For example, I may choose, Hansa yellow medium, French ultramarine,
and this warm red. Occasionally I may need
to paint with purple. You cannot get a
nice vibrant purple by mixing them this warm
red and French ultramarine, so I may add a little bit of magenta or this
purple color here. But since I've already chosen these three
primary colors, I would use these three colors for the majority
of the painting. All the colors that I use, that I may add later on, those will be used in
much smaller portions. Sticking to using a
limited color palette will make it so much easier for you to learn
color mixing and understand the colors
more thoroughly. How do you mix vibrant colors? Let's say you want to
mix a vibrant orange. The easiest way is
actually to choose primary colors that are
close to the orange. In this case, you
should choose a warm yellow and a warm red. If you want to mix
a vibrant green, you should choose
a yellow that has this cool bias or green
bias and you should choose a blue that is cool in terms
of color temperature or has this green bias to
mix that vibrant green. For purple, you should
choose a blue or a magenta or a red that is close to looking
like a purple. If you choose the wrong
colors for mixing, you may not be able to produce
the colors you expect. For example, in here we know blue and red
would give us purple. However, if you choose the
wrong blue and a wrong red, you won't be able to get purple. For example, let me
use this warm red here and I want to use
this phthalo blue. You can see, I don't
have a purple here. When you have a warm
red and phthalo blue, this is the color
you get when mixing. You can see the trace
of phthalo blue here. After you test out
your color mixes, it's good to write out
the name of the color. I actually don't know what's this red because
I have left that red in the box for too long
and I forgot the color. Doesn't matter. It looks like a warm red to me. Warm red with phthalo blue. This is how it looks. You write down the name so
they can remember the mixes. To mix a vibrant purple, as mentioned earlier with
the help of the color wheel, you should choose a blue that is really close to
looking like a purple. This is French ultramarine. It doesn't look like a purple, but on the color wheel it's
actually close to a purple. Next, just choose a magenta or a cool red and you will be able to produce
this very beautiful, more vibrant looking purple. Same thing, just write
down the name of the mix on the paper so that you won't forget
the colors you used. This is with magenta. Actually, I can not remember the name of
this color as well. It looks like a
[inaudible] purple. It could look like
that. I really cannot remember the
name of this color. Let's say you want to mix
a vibrant green and you choose a warm yellow
and French ultramarine, this is what you
are going to get. This is new gamboge, this is the warm yellow and when you add
ultramarine to it, you can see this green here, it looks very muted. This is the wrong combination to use when it comes to
mixing of vibrant green. To mix a vibrant green, you have to use a cool yellow, cool in terms of
color temperature, and a phthalo blue. Here you can see this green. It's very vibrant, more vibrant compared to
the green you saw earlier, mixed with new gamboge
and French ultramarine. Now, let's mix a warm orange, a really vibrant orange. This is new gamboge
with warm red. This looks quite vibrant to me. If you want to mix a
dull orange, again, just use colors that are further
away on the color wheel. In this case, I'm
using this yellow and maybe this cool red here. Now, sometimes the colors you use for mixing may
give you surprises. In this case, actually I have
no idea what this red is, but when I compare this two, both orange, they look
vibrant enough for me. If I remember correctly, this red could be rose
madder permanent. You may notice I can't remember some of the colors
I have in this box. There are a few reasons. Some of the colors
have not been used for very long time and I forgot
what those colors are. This is not the primary box
that I use for painting. I actually have another
water color box that I usually use. There are just too
many colors for me to remember what some
of these causes are. If you have many colors and you want to remember what
those causes are, I highly recommend you paint out the color swatches on your page so that you can
remember the colors. Well, it's nice and
convenient for you to have so many colors to use
and to choose from. The thing is you don't actually
need that many colors. All you need are the right colors and the
right color combinations. Now, let's paint these sketches
that I've drawn earlier. If you want to a paint
over the same subjects, you can use reference
photos I have provided to draw this. Let's start with
the plant first. Unless you are
going for realism, there is no need for
you to mix the color to match the exact color that
you see in real life. We know that the plant is green. All we have to do
is to use a yellow and a blue to mix the plant. In this case, I'm going to use Hansa yellow medium,
and phthalo blue. Notice, I actually painted the yellow first on the paper. I'm doing these so
that I can have the water color
mix on the paper. Sometimes you don't
want to mix the colors completely in the palette. When you see color variations, it will make your wash
look more interesting. I just paint this
green part first. Next, I want to wash my
brush completely to make it completely clean
before I paint the red. For the red, I'm just using the color straight from the pen. If you want to get the
most vibrant colors, you can use the colors
straight from the pen. But sometimes when you use the color straight from the pen, the colors can be too vibrant and too glaring
because in real life, colors are not that vibrant. Here I want to add
some new gamboge here to get some variation so
that it's not just red. We have some orange that
blends into the red. Let's have a red
here as well and some taps of red here as well. Maybe some orange. Let's put some water into
this transparent vase. The blue that I used earlier,
that's phthalo blue. Let's use the same blue. In this case, I
want to make sure that the initial wash
has actually dried. Otherwise, if I paint
over the plants, the colors me actually blend. This is the same
blue that I used to paint the green earlier. Here's the second sketch that
I painted and you can see the colors here are
all over the place. The colors also
not that vibrant. The problem here is, I chose the wrong
colors to begin with. I chose Hansa yellow medium, French ultramarine, which
actually works well together. However, I have added
this purple magenta, which doesn't work well
with the other two colors. That's the result. If you choose the wrong
colors at the start, it's really going to
mess up your sketch. Next, let's paint this swing. I'm going to use the
color that I don't like, which is the purple or
magenta color that I used earlier to paint the sky here. I'm going to have this
blend into some rose color, like the rose madder
that you saw earlier. Then I'm going to fit this color into the
white of the paper. We have to do this
with a clean brush. I think this looks all right. Once the colors are
set on the paper, I'll try not to disturb
the wash again. We'll wait for this to dry while we work on some other sketch, so next I want to paint this, I want to paint some skin tones. To make skin tones, you can use raw sienna or yellow ocher and mix it
with a little bit of red. Here, I'm testing my
color mixes on this side. Just add a bit of color, just add a bit of red, don't add too much red, otherwise, it makes
me become too red. Here, I have this
beautiful skin tone. If you look at the
reference photo, this lady is wearing a dress that is lavender or
purple in color, but I already have
purple on the side, so in this case, I just want to maybe
have this in orange, because it would compliment
the purple very nicely. You can brush here. This is color straight
out from the pan. I want to add some red, just a light wash of red, just to maybe make some of the areas more interesting
with this color blend. For the hair, I'm going to use a new gum
brush with that red that you saw earlier and mix it with some ultramarine and
see what we have here. I think this works, so let's paint here. I'm painting the hair using
a limited color palette. The hair looks red to
me, but it's okay. We have to contrast of
the light against dark. Next we have a photo of this buildings in
the far background. We have some green here in the foreground,
and some flowers. For this sketch, I'm
thinking of whether I should use the warm red
or the rose madder color. Let me try rose madder. Let me try this color. I think it looks all right, it looks fine, it looks good. I can use this to paint
the flowers as well. You can have more paint
and well, less paint, more water, to make the
wash look interesting. I'm going to have
some depths off colors in the
background as well. Next, let's go
back to the swing. I'm jumping all over the place because when you
paint watercolor, you have to wait for
the paint to dry, and while waiting for
the paint to dry, I usually work on
something else first. This is the purple
that we used earlier and to mix the black,
the much darker color, I'm going to use maybe this
yellow here and see how it looks, and phthalo blue. If it's too green then, you should add more red to it, or purple in this case. Does it look to green? Let's test it. Actually, I should be testing this
on a scrap piece of paper, but let's just test it
and see how it looks. I think it looks all right. You definitely need to use the purple that you used
earlier to mix this color. I just realized that there are
some lights here which are supposed to be in white, I accidentally painted over the glowing white
lights earlier. This is the black
that we can get. This is not exactly black. To mix a black, you can mix three
primary colors together, but depending on the
primary colors you use, depending on the
three colors you use, you may or may not
get a true black, but most of the time you
don't want a true black, like a black black
because it's very boring. What you want is to have a color that is dark enough
to represent black, but you can still see some
colors within the black. That type of black
would be nice. I think this works. Next, let's jump back to
painting this area here, so for the green here, I'm thinking of using hansa yellow medium and
French ultramarine. Let me just test
it at the bottom here first and see how it looks. The green does not
look that great, so let's stick with hansa yellow medium,
and phthalo blue. Once again, I have
more hansa yellow on the paper and I'm going
to add some phthalo blue. I'm just painting the leaves, the greens, this part
here is not dry yet. There will be a lot of oops moments when I'm painting because I'm
quite impatient. Sometimes I just can't
wait for the paint to dry before I go in
with the second layer. That's why there are a
lot of oops moments. Here you can see the
contrast of the red, the rose madder, against the green and it
works really nicely. Some of the greens
will be really dark and to mix the
really dark greens, we can mix this green with the rose madder color
that we used earlier. For this sketch, I'm still using three primary colors
hansa yellow medium, phthalo blue, and
this rose madder, so this is the mix
of the three colors. This still looks
too green to me, so I may want to add more rose madder to make
it even darker. You can see once I
add the rose madder, it becomes much darker now. I will want to use this to paint around the shapes,
the flower petals. This will create more contrast. Here you can see
the color contrast, we have green against
this pink or magenta, but here we have the
light and dark contrast. There are different ways
to create contrast. When painting, be sure retain
the shape of the flowers. Some of the white looks nice, so I'm just going to
leave those areas white. The last thing I want to do is to paint some
shadows over this area. Let's have the light source
coming from the left, so we have shadows on
this side of the wall. This is a mix of hansa yellow medium with
the rose madder color. I think it looks all right, I just need to add some
more green behind. Make sure the wet paint
don't mix together. This green as you can
see, it's too blue, so I need to add a bit more, yellow, a bit more hansa yellow. By using just this
three primary colors, you don't have much to think about when comes
to color mixing. You only have three
colors to choose from, which makes color
mixing so much easier. The last thing to
do is to write down the names of the colors
that you have used, so that you can remember
the colors in the future. If you see the color mixes
or the combination you like, you can reuse those
colors again. Out of these sketches, this is the one
that I do not like because the colors
are very dull, very washed out, colors are not vibrant
compared to other sketches, and I even wrote the
name of the color wrong, so I have to cross that out. I like this, even though
I've used just magenta and rose madder and phthalo
blue, it still works. It can work if you use a
limited color palette and this, the skin tone mixed with
raw sienna or yellow ocher, with red, and this is hansa yellow medium
with a warm red. Here, this color combination of hansa yellow
medium, phthalo blue, and rose madder is similar
to this color combination. The only difference is
here I've used warm red, here I've used cool red. This is rose madder, and that's probably pyro
scarlet or pyro red. This color combination
also works. You really have to find out the color combinations
that work for you by exploring all the
different possible mixes with the colors that you
have in your watercolor box. All right, to conclude, using a limited color
palette really helps to simplify the color
mixing process, and I highly recommend
you test out as many color combinations
as possible using the colors you already
have to discover what are your favorite color mixes because not all color
combinations work well together.
10. Perspective: In this lesson, I'm
going to teach you how to think of perspective, and how you can use
perspective to make your drawings look more
three-dimensional and believable. I won't to be able to
cover perspective in great detail in such
shorter lesson. I'll just be covering the absolute basic fundamentals of perspective you should know. If you want to learn
more about perspective, you can check out my other
comprehensive course on perspective for beginners. Let's start with some basic
rules of perspective. Perspective we will change
depending on your viewpoint. For example, right
now I'm standing in front of my table, looking down, and I can see top of the table and the
front of the table. If I were to squat down, now I can see the bottom
side of the table. If I were to move to the right side of the
table while standing, I can see the top, the front, and the
side of the table. Depending on where you
are looking at the table, the perspective will change. There are two ways
to draw this table. You can draw this
from observation, or you can draw this from
imagination by constructing this table using the
rules of perspective, which is what I'm
going to teach you. First thing I want
you to do is to draw a horizontal line on your
page using a pencil. The line will be about one-third of the page
away from the edge. Just draw that
horizontal line with very faint of a
minimal pressure. Now this horizontal
line is the line where all the vanishing
points will be. The vanishing points are the points that affect
all objects in space. Let's place a dot, maybe here on the page. This will be the
vanishing point. If we are drawing boxes, we're going to be drawing a
lot of boxes and rectangles. Let's draw a rectangle first. All the diagonal lines will
point to the vanishing point. Let's draw this diagonal
line to the vanishing point and we have another
diagonal line here to the vanishing point. Let's close this up and let's
draw this diagonal line, two-dimension point as well, and close this up. Now we have a block
in perspective. If we have our rectangle here, we can draw the diagonal line to the vanishing point as well. If we have a block
right up here, we can draw the
diagonal lines to the vanishing point as well. As I am drawing, you can see I am
using this movement, you point the diagonal lines
to the vanishing point. For this particular block
that I'm currently drawing, the horizontal line is
actually behind the block. This is one-point perspective because there is only
one vanishing point. Let's say I want
to draw the table that I showed you earlier. Let's draw the top
of the table first. This edge here will point
to the vanishing point. This line here will point
to the vanishing point. We can close up the
top of the table. Let's give this table
some thickness. We have the legs
of the table here. We have legs behind as well. For the legs behind,
they are also affected by the
vanishing points. If we draw this imaginary
line to the vanishing point, the bottom of the leg
should be around here. For this other leg, the bottom should be here. This is our table from earlier. We have this connector. This connector will also
point to the vanishing point. You have to draw
that diagonal line to the vanishing point. Now let me show you
two-point perspective. As the name suggests, there are two vanishing points. Let's place the other
vanishing point here. Now I want to draw this block, this rectangular block again. Let's draw it at
the same height. This time we have the bottom line here pointing
to the vanishing point. Next we have the
line here pointing to the vanishing point as well. For the other side of the cube
or this rectangular block, it's actually not a cube, it's a rectangular block, we have the diagonal line pointing to the vanishing point. This can be an office building
with a lot of windows. It can be an office
block, for example. All the windows on this building will be affected
by the vanishing point. When you draw all those windows, you have to draw
the lines pointing to the finishing point. Let's have another rectangular
block here, a flat one. For this flat rectangular block, we have the diagonal line here. This one will go here. This will be here. That diagonal line will be here. This line here will also point to the finishing
point on the right side. This line here will point to the vanishing point
on the left side. Now we have this floating
rectangular block above the horizon line. Next, let's redraw this table now using
two-point perspective. We are going to draw
the top of table first. Let's draw the long edge here
to the vanishing point on the right side and the short edge will go to the vanishing point
on the left side. We have the other long edge here and the other short
edge of the table. Let's give the table some thickness and we
can draw the legs. For the other leg, we need to find out
where the leg will end. If we draw an imaginary line
to the vanishing point, it seems like it's going
to be somewhere here. I made a mistake here
with this thought, but the leg is actually higher. For this leg here, let's draw the bottom
edge here first. It's like this. We can draw the leg like this. Again, we can have
the connector here at the bottom and the connector
here at the bottom. Here we have a table
and perspective. This is the very
basics of perspective. We have the horizon line, and we have all the vanishing
points on the horizon line. Let's say I have
another chair here, which is placed at an
angle from the table. The vanishing point
for this new chair is going to be different
compared to this table. However, the
vanishing point will still be on the horizon line. This will be the vanishing
point for the chair. Let's use this
vanishing point and maybe this vanishing point for the new chair that
we are going to draw. Let's draw this chair here. That diagonal line will go
to the vanishing point. This line will go to
the vanishing point. This is just a very
simplified chair, so this diagonal line here, this is the top of the chair. This will go to this
vanishing point, and this line will go to
this vanishing point. We have the legs, make sure the legs end at the correct distance away from the edge of the chair here, and we have this chair, this leg is behind the table. We have another leg here. Using the help of this
VP, the vanishing point, we know that the leg
should end somewhere here. I've just marked out two
sets of vanishing point. We have VP and VP2. If the objects share the same vanishing
point they are going to appear parallel to one
another in the space. For example, if I draw a
cabinet here beside the table, and this cabinet shares the same vanishing
point as the table, and it will look as if this cabinet is placed
beside the table. It's parallel to the table. You can see these two
lines, they are parallel. How can we use perspective
in our drawing? Let's take a look at some
of our earlier sketches. For this sketch here, which is of this
very tall building, the vanishing points are
here and somewhere here, they are very wide apart, very far apart, and if we are to draw this on-location we don't need
to know perspective. We can just draw all
these angles from observation by measuring them. However, is going to be
quite challenging to get the angles accurate. To help make your sketch more accurate when you're
drawing this on location, you can find the
vanishing point, and when you draw those
diagonal lines you just have to point those diagonal lines
to the vanishing point. You don't have to measure
the angles individually. This will make it easier and faster for you to
complete our sketch. It's also going to make your
sketch look more accurate. For this building, the vanishing points are
also quite far apart, in this case, outside
of the pitch. If I draw this from imagination I would have to visualize where the
vanishing point is outside of the pitch, and when I'm drawing
this I will always be thinking about the
vanishing point and how I can join the lines, draw the lines to
the vanishing point. There are two sets of vanishing points for this
particular scene. One set belongs to
this building here, and the other set actually belongs to this building
in the background. We can see as we point the diagonal lines they will
converge somewhere here. This is one of the vanishing points for
this side of the building. Let's look at this doodle that I drew in an
earlier course. For this standalone building, there is actually no
perspective because when I measure angles here you
can see these lines are just horizontal, and for the diagonal lines here, these two are horizontal, this points down, so the perspective
of this building is not very obvious or there is
just no perspective at all. Now I'm going to redraw this using perspective to
show you the difference. Generally speaking, if there
are two vanishing points, they are usually
quite far apart. If you draw a subject with two vanishing points
that are too close together the subject to your drawing will
appear very squashed. Before I draw the
two-storey building, I want to draw the
horizon line first, and in this case,
I want to place the horizon line nearer to
the bottom of the pitch. The horizon line remember is where all the
vanishing points are. The horizon line can
sometimes be used interchangeably
with the eye level. If you place the horizon
line nearer down the pitch, it will mean that your eye level is quite close to the ground. If you place the horizon line
near the top of the pitch, it would mean that
your eye level is very far away from
the ground level. It can mean that
you are at the top of a tall building, for example. In this case, I want to
place the horizon line near the bottom here and I'm going to extend this horizon line to
the left side here. For this two-storey shophouse, I'm going to have one
vanishing point right here, another vanishing
point right here. I've placed a vanishing
point quite far apart, and I'm going to have
their vertical line, each of the building here. Let's just start
drawing straight away. By having the edge
of the building here and the two
vanishing points here, I will see more of the front of the building and less of
the side of the building. Let's draw the top. Let's draw the big
shapes first before we divide this building
into two stories. This diagonal line at top
will go down like this. Make sure this line points
to the vanishing point, and we have the
second floor here. Make sure this line points to the vanishing point as well. All these angles are
actually different. If you measure the angles, they are actually different. They may look very similar when you look at
the drawing up-close, but when you look at the drawing from far away they are
actually different. Next, I wanted to
draw this extension, this line here, because this is something
that protrudes out. This line here will
actually go to the VP here, and this will come down. We have this little
extension here, and I did not allocate enough. I actually drew a line here, which should not be the case. Anyway, let's continue. This line here
will go down here. I should have used the
red pencil to mark out this and leave this white. Anyway, let me continue. This angle is already wrong because it's pointing at
the wrong vanishing point. It should be like this. If you draw the wrong angle when you have already placed
your vanishing point, it's going to look weird, the angle is going
to look off if you draw the angle inaccurately. Let's draw this
side here pointing down, another wrong angle. Let me just switch the VP to this point here since I keep
drawing the wrong angle, now we can draw this
vertical line down, and we can draw this diagonal
line to the VP here. This line here will
go to the VP as well, and there is this awning here. This awning will go to the vanishing point
on the left side. We can draw another [inaudible] here and this will be the
base of the building. This line will join dimension
point on the left side. Now that you have the
big shapes drawn, you can actually just
fill in the details. It's going to be way easier. Let's draw the
windows for example. Let's divide this rectangle into a few blocks and for
the windows we've pinned. Once you get the perspective, right for this shape or the details within this shape will follow the
same perspective, so it's going to be much easier. You have to draw the
big shapes first before you draw the details. [NOISE] Let's draw an
air conditioning unit here that comes out. This air conditioning unit
will go to the diagonal lines, would go to the
vanishing point and this diagonal line here will
go to this vanishing point. Everything you draw in this scene will be
affected by a perspective. Let's continue. This line here will go down
to the vanishing point. I'm going to use some
corrections to correct this. Should I correct this
line to erase this line? Maybe I don't need to, but I do need to erase
this particular line here. I'm only doing this because
I am not going to be applying watercolor
over the sketch. If you do this, the watercolor is not going
to work well over the white. That's why it's good to
have some drafting lies on your pitch first
before you ink it. Let's say there is this sign that comes
out on the right side, so this sign is going
to look like this. This diagonal line
will go to the VP on the left and this will
go to the VP on the left as well and this diagonal line here will go to the
VP on the right so that we can have some
thickness for this signboard. We can write the letters here. Oops, I spelled
that incorrectly. Let's draw another window here and this window has this blind. It has this blind. We have this window in
the background and we can draw the [inaudible]
here on the awning. We can place some
plants on the ground. When you are drawing the
lines near the vanishing, when you're drawing lines
near the horizon line, those lines you see
this line here. Those lines are going
to be horizontal, so this line is going
to be horizontal. If you draw the lines higher than the vanishing
point, for example, let's say there is a
vending machine here, then this line here is
no longer horizontal. This line will go to
the vanishing point and this line here
on the right side will go to the vanishing
point on the right side. This line will go to the
VP on the right side. Here we have a vending machine. Let's say there is a trash
bin on the right side. Let's place a trash bin here. This line here will also
be affected by the VP on the left side and this line will be affected by the VP here. Place a lot of wheels
for the trash bin. I'm going to draw the interior
of this shop as well. This will be the
edge of the wall, the ceiling and the wall inside. There are some shelves and
the shelves will also be, let's see, am I doing
this correctly? This line should be like this. This line should follow
the top of the ceiling, We can have some shelves inside. There are some items
on the shelves. Everything you draw inside
the shop should follow the VP on the left and on
the right side as well. Let's have another shelf here. This sketch is almost done. I just need to add some details. If you want to
practice perspective, you don't have to
draw so much details. You can actually just
draw the blocks. Just practice drawing the block so that you don't have to waste time drawing all these
details like what I've done. This will allow you to get more practice with perspective rather than practice
with drawing details. This is the sketch that I have. Let's put a window here on the right side and make
sure the perspective line, the diagonal lines go to
this VP on the right side. All these individual lines
here are all affected by perspective and
you have to draw them pointing to the VP, the [inaudible] point
on the right side. This is the sketch that I have
and you can see it's more dimensional compared
to the earlier sketch. The last thing I
want to do is to add some values because this
is now just all line art. It looks flat, so I'm just going to add
some black to create contrasts in certain areas to make some of the
areas thin out. The letters now are
not very clear. Let me just make this
whole thing black and write or draw the
letters with white later on. Maybe a touch of color with this sketch may make the
sketch look more interesting. This is Posca opaque marker. With light and shadows,
tonal values, contrast, perspective, you can get your sketch to look three-dimensional
and more believable. This is how this two-story
building looks now compared to the earlier sketch
without any perspective, and it doesn't look
much better here.
11. Bye: So far we have filled up 3/4 of this sketchbook and
that's quite amazing. I hope you have
enjoyed this course as well as the two earlier courses. Feel free to share
me pictures of your sketchbooks if you
want any critiques. I can give you suggestions on how you can improve
your sketches. Don't forget to leave this
course a review and see you in the next and the last course in the
sketchbooking series. Bye.
 Teoh Yi Chie, Sketcher, watercolour lover