Transcripts
1. 01 Introduction: Welcome to this class. In this class, I am going
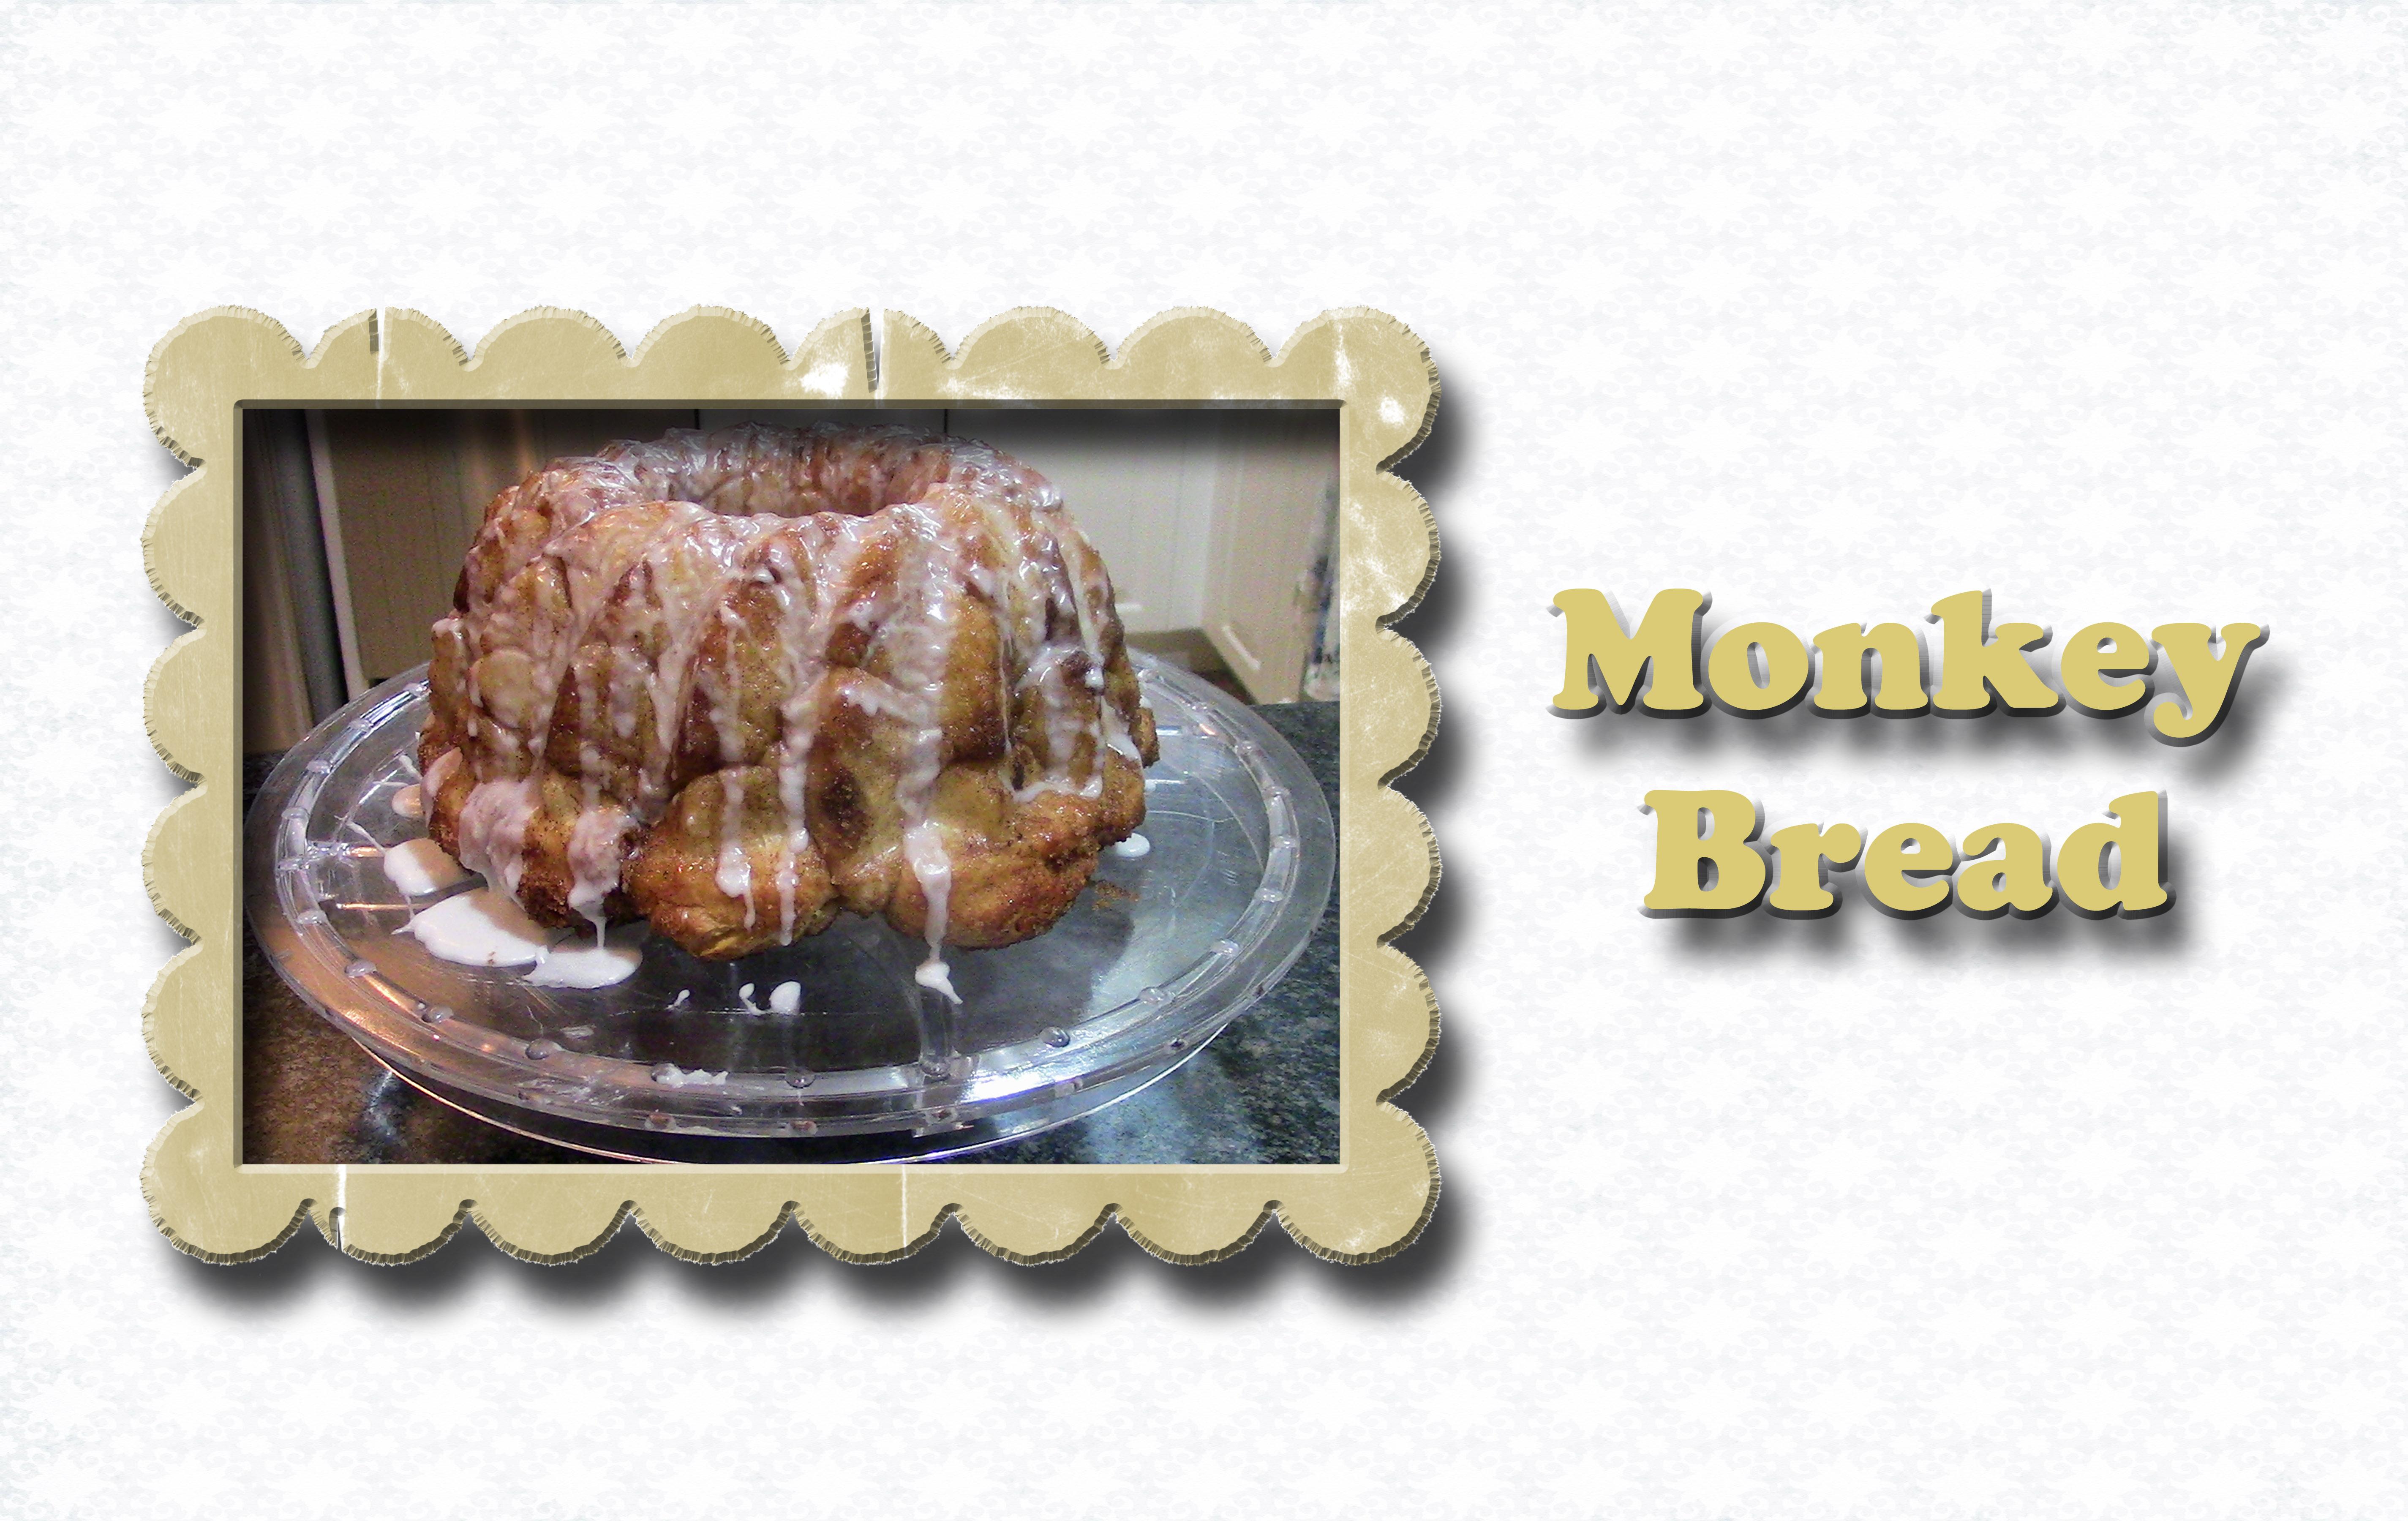
to teach you how to make this monkey bread
made with a yeast dough. First I will teach you
how to make the dough. Next, I will teach you how to prepare the dough
for the first rise. And then we will let it rise
while the dough is rising, we will make the sugar coating that's going to go on the dough. After the first rise, we will form the
dough into balls, coat them with the
sugar coating, and place them into the bunt
pan that we have prepared. Next, we will let the
bread rise again, and then we will bake
and cool the bread. While the bread cools, we will make the
glaze for the top. Finally, we will drizzle the
glaze on top of the bread. I am a self taught baker. Many years ago I decided I wanted to open up
my own home bakery. Part of this bakery was to make breads and brunch items to sell at farmers
markets and festivals. Anyway, I had this business
for several years, until my husband got a job
offer in a different city. We felt like this was
a good move for us, and so I closed the bakery
and we moved to the new city. Now here I do not want to
open up another home bakery, but I still love baking, and as a retired teacher,
I love teaching. I have decided to share my skills with you
on skill share. This is aimed at the baker that would like
to learn how to make a yeast bread that is sweet and delicious for
brunches or breakfast. I look forward to teaching
you the skills in this class. Let's move on to lesson
number one, Making the dough.
2. 02 Making the Dough: We are ready to start making
our monkey bread dough. I have one cup of water that I cooked in the microwave for about 1 minute to make
it nice and warm. To that, I'm going to
add my lukewarm water, my butter, my sugar, and my yeast, the 2.4 teaspoons. Then I'm just going to stir this up and set this aside so
the yeast can do its thing. While I prepare the dry
ingredients in this large bowl, I'm going to dump my three
cups and my one fourth cup. I also want to add two
teaspoons of salt, and we're just going to do a quick mix to mix
that salt into the salt. I'm now going to
have this on low. We're going to add this milk and yeast and buttered as
break out that sugar, you'll see it's
forming a nice stove. We're going to increase
the speed to medium, and we're going to let this
lead for six to 7 minutes. We'll be back in six to 7
minutes when the break is done.
3. 03 First Dough Rising: My dough needed for
about 6 minutes. I'm going to take this heck out. As you look at this dough, you can see it's already a
nice, soft, smooth dough. I'm not going to put this on the counter and
knead it anymore. I do want to prepare my bowl that I'm going
to let the dough rise by spraying the sides
down with the spray. I then want to just take my dough out of this bowl
and place it in this bowl. I'm going to take my dough and place it on
this proofing mat. Spray the top and cover it. I'm going to let this rise one to 2 hours on
the proofing map, it might be done in 1 hour. If you don't have
a proofing map, you're going to go
ahead and spray down some plastic
and cover the bowl or use a flower sack type
of a towel to cover it. Basically a towel that is not a terry cloth towel so that the little fuzzies don't
stick to the dough. It may take closer
to 2 hours at that. What we're looking for is to
get it to be double in bulk. We'll be back when the dough
has risen to double in bulk.
4. 04 Making the Sugar Glaze: Our dough is almost done rising. I have my 12 cup of butter
in my microwave melting. I'm doing it at 50% power, and I have cut the butter into chunks so that it will
melt more evenly. Well, that's melting.
Let's go ahead and mix together the brown
sugar and cinnamon. Here's my one cup brown sugar and my two teaspoons
of cinnamon. Now, I just want to break
the sugar up and mix these together so that when I
roll the dough in it, I'm not going to have too much cinnamon in one spot and not enough
in another spot. This is ready, and here's
my butter that I melted. As you can see, it is
completely melted. In our next lesson, I'm going to show you how
to form the monkey bread.
5. 05 Forming the Monkey Bread: I'm ready to start forming the monkey
bread with our dough. As you can see, it has
risen quite nicely. Let's show you how
we form the bread. First, we want to
get our pan ready. Now in my pan, I have this silicon cover which is going to help the
bread not stick. I still want to spray this stem. This is a spray
with flour in it. I want to make
sure it gives them all those nicks and crannies. Now our pan is ready to accept
the balls as we form them. We want to flour this surface. We want the surface,
it's going to be eight by eight size, so we want to make sure that
we have flour to size stick. Then we're going
to take our proto, we're just going to put it on our flowed surface
and we're going to try to form this into about
an eight by eight rectangle. Or I should say eight
by eight square. We're not rolling it out, we're just gently
molding the dough. Then we're going to
take this pizza cutter and we want to get
like eight by eight. So I'm going to start
by going there and cut there and then cut there. Cut there. And then I
can cut that right now. I'm just scoring it. I want to make sure
I get it about right there, there and there. With that scored, no, see that's way too big there. That one's too big there. Now we're just
going to cut this. This doesn't have to be
exact because it's all going in the same Pan 123456. Well, only have
six. That's okay. Because as I said, it
doesn't have to be exact. Hey, you can see this corner
piece is not very big. I'm taking it and I'm combining
several. I'm rolling it. Once I have it rolled, I'm going to dip
it in the butter, roll it in the sugar, and drop it in the pan. And I'm going to do
that with all of them, but because it's messy dipping, I'm going to go ahead and roll
all of my balls out first. But I wanted to
show you with one, the process, go ahead
and roll yours out. And if you find one small, that's okay because they're
all going in the pan. But if they're really small, just combine it
with another one. I'm going to combine that one. You go ahead and do yours and we'll be
back when we're done. I have all my balls formed, so I'm going to push
them to the side, bring my bowls here where
you can see my pan. And then we're just
going to quickly roll it in there and
drop it in the pan. And we're going to do it
with all of them and we want to evenly distribute
it amongst the pan. I'm actually right now, just forming a ring
around the bottom. When I get that ring done, I'll go ahead and
pile them on top. As you can see, I have
a complete ring there. I'm actually going to take
one out because I really do want these to have
room to spread out. I want to give a
little bit of space. Now you can see there is a ring. And then I'm going to
stick the next one in between the row, the row that I just did. We're going to continue to
build it in the pan with each row being placed in
between the other row. That gives it some support and it also is going to give it room to grow or rise
for the second rise. The pan does get bigger, you may not be able to fit
all of them in between, but basically you're just
trying to leave a little bit of space as you feel in
with the pin here. I'm going on the inside. And then the next
row, I'll probably go a little bit more
on the outside, which be the same row as this
one but on the outside and a little bit higher up But you can see how I'm feeling the pin. And you're going to get
several rose of balls. I did not get 64 balls total because some of them I felt were too small, so I combined. But if you cut it more evenly, you might have 64 balls that you're trying
to get in here. You might not, you
might have a few less. Either way is going
to work fine. As you can see right now. I'm just filling
in the gaps there. You have all of the
rolls in the pan. I'm now going to stick my pan on my pofy map. Cover it back up. We're now going to let this raise about an hour
to an hour and a half until it's just an inch or so
from the top and the poofy. We'll be back at that point.
6. 06 Baking and Cooling the Bread: Our bread has been raising
for about an hour. Let's take a look at it. You can see it is pretty
much raised to the top. I have preheated the oven, and we're going to
go ahead and bake this in the oven for 30 minutes. On the middle rack, you can see the rack
is in the middle. We're just going
to place our bread and bake it for 30 minutes. We'll be back in 30 minutes when the bread is done baking. The timer has just
gone off on our bread. Let's take a look at it. As you can see, it's
browning and caramelizing. We're going to take it out. We're going to let
the bread cool in the pan for about 5 minutes. And then we will remove
it from the pan. Our bread has been cooling in the pan for about 5 minutes. Now we're ready to take
it out of the pan. I've taken the liner
out of the pan, and I'm actually going to put my platter on top like this, then dump my bread out, and hopefully it'll just
come right out like that. Look at how nice that looks. We're now going to let this
cool for about 7 minutes, and then we'll put
the glaze on it.
7. 07 The Glaze: We have the monkey
bread cooling and we're going to make the glaze that we want to drizzle onto the bread. While it's still
hot in this bowl, I want to dump my one cup
of confectioner sugar and my two tablespoons of milk. I just want to whisk it. I'm using a little bit
bigger whisk because I want the bigger whisk for
when I drizzle it onto the monkey bread. We're just going to whisk
it until it's completely smooth and we see no
more powdered sugar. You see how that just drizzles. We're now going to drizzle
this onto our monkey bread. Here's our monkey bread. I'm just going to take
my whisk and just drizzle it onto
the monkey bread. We don't want too
big of a drizzle. That's why we use in the whisk
and we want to go inside, and we want it to go outside. If we don't use all the,
that's going to be fine. We just want to glaze
it until we feel like it's glazed enough. Then we'll stop bit
more on the inside. We look around a
little bit more here, I think that looks perfect. Here we have our monkey
bread ready to serve.
8. 08 Final Thoughts: Thank you for taking this class. We had fun making
our monkey bread. We first learned how
to make the dough. We then let the dough rise
until it had doubled in bulk. At the end of the rising
time of the bread, we made a sugar and cinnamon
mix and melted some butter. We then form the rolls, rolled them in the butter
and the sugar mix, and put them into
our buntcake pan with all of the rolled
balls into the pan. We covered it again
and let it rise. Once it had risen again, we baked it in a preheated oven at 350
degrees for a half an hour. We then removed
it from the oven, let it rest in the pan
for about 5 minutes, and then we turned it out onto our platter and let it cool
for another about 7 minutes. While it was cooling, we made the glaze for the top. We then, while it
was still warm, used our whisk and drizzled the glaze on top of
our monkey bread. We have then let it
completely cool and now our bread is ready to serve. I hope your bread turned out the way
that you wanted it to. The recipe for this bread
is in the project section. And your project for this
class is to make this bread. Please post a picture
of your bread on the project page and let
us know how it went. I look forward to
hearing from you from my kitchen to your kitchen. Happy. Thank you.
 Nadine Thomas