Transcripts
1. Intro HDC: Hi, it's me, Jessica, your crochet teacher. I'm the owner and maker behind, but first crochet, kinda like but first coffee only for yarn. I've been crocheting since my teen years. And when I'm not crocheting, I'm working in health care and taking care of my family of six. I started crocheting for stress relief and I fell in love with it so much. I want to teach you how to do it. To. Crocheting is a skill. You don't have to be born with a fancy creative gene to do this craft. All you need is practice and patients. I'm here to make crochet. So you can join the fabulous maker community that I love being a part of. You can find me on all the social channels and on Etsy at, but first crochet. In this class, I'll be teaching you the half double crochet stitch, one of the most used basic stitches in crochet. This class is the second in the series, modern car shade for beginners. So if you haven't already check out my first class where I take a deep dive into the very basics of crochet. This class builds on the foundation laid in the previous class, but is still very beginner friendly. No previous experience is, sorry to join in the fun today. And by the end of the course, you will know how to make the half double crochet stitch, what gauges and how to apply it to your work, and how to analyze a crochet pattern. After you've practiced your half double crochet stitch, you'll be ready to dive into the class project. Today's project is a modern, simple half double crochet twist headband. It's a perfect beginner project because it's simple, short, and fun, not to mention trendy. I hope you're just as excited as I am to work through the class together. So let's jump straight into the first lesson.
2. Materials Overview: Hi guys, Welcome to Modern crochet for beginners, half double crochet twist headband class. And in this first video I'm going to be talking about the materials that you're going to need for the class today. Number 1, you're going to need a crochet hook. I'm using a size j, 6 millimeter clover, a more crochet hook. Any crochet hook we'll do, ideally you'll want it to be a J hook or a size very close. If you don't have a J hook, that's okay. Grab the next closest size. We're going to talk about gauge later on in the class and how you can adjust the pattern to be similar as if you were going to be crocheting with a J hook. The next item you're going to need is some worsted weight yarn. This is acrylic. It's Erin wait, it's from Hobby Lobby. It this is I love this yarn in the color gray beard, but any acrylic, worse or weight yarn won't work. It's up to you. You will need some craft scissors. Scissors. I just like my cute little unicorn scissors. A tapestry needle, and an optional tape measure. But we're going to use that when we talk about our gauge swatch. Oh, and don't forget to go into the resource section of today's class and you can print off the PDF. This will be really handy as we go through the class today. All right, So here we go. We're gonna get started with learning the half double crochet stitch.
3. Half Double Crochet: HDC: In this next video, we're gonna learn how to create the half double crochet stitch. For this particular lesson, I'd like you to just watch. And shortly here I'm going to have you practice when you make your gauge swatch. But for now, just sit back, relax, enjoy, learn how and watch enlisting how to create this stage. I'll let you know when you need to pick up your yarn in your hook. So I'm going to take my yarn, we're going to create a slip knot. Loop over your finger. Pull the tail through the opening. Slip knot is made. Insert your hook through the loop. Tighten it. Don't tighten it too much. You still want to make sure your yarn can move freely up and down your hook. I'm just going to chain 10. Actually, I'm going to chain 11 because in half double crochet, you want to chain an extra chain as your turn change. So if I want ten stitches, I need to chain 11. So I'll begin by holding my yarn. I'm going to yarn over, pull through. That's my first chain. Yarn over, pull through. That's my second chain. Yarn over, pull through. That's 34567891011. When you complete a half double crochet, you're going to start by creating your first half double crochet in the second chain from the hook. So here's the hook. Here's the first chain. Here's the second chain. So our first stitch is going to go right in here. In half double crochet. We yarn over first. Then you're going to insert your hook. Two-year chain. You have three loops on your hook. 123. The next step, yarn over again. Pull up your loop. Three loops on our hook. Yarn over, pull through all three. That is 1.5 double crochet made. We're going to repeat that three. Our last one, yarn over, insert your hook. Yarn over, pull through the loop. Three loops are left. Yarn over, pull through all three. Now we need to turn our work. To turn. We're going to chain one in like turning the page and I'm going to flip this over. We're now ready to start the second row. When you have double crochet. Unless your pattern tells you otherwise, your first stitch is going to go in the first stage from the previous row. So that is going to be right here, right here. So you have a loop on your hook. This is the turning chain. This is the first stage. So we're going to place our first stage in this stage here. Under the front loop. In the back loop, we're going to yarn over. Insert your hook. Yarn over again. Pull through the stench. Three loops remain on your hook. Yarn over again. Pull through all three loops. There's 1.5 double crochet finished. We're going to repeat that all the way across. So that was number one. Yarn over. Insert your hook. Yarn over. Pull through your stitch. Three loops on the hook. Yarn over. Pull through the last three loops. Repeat. With practice. It's going to become a fluid motion like that. Let me slow down again. Yarn over. Insert your hook. Pull up a loop. Yarn over, pull through the three loops on your hook. Yarn over. Insert into the stitch. Pull up your loop. 1, 2, 3 loops on your hook. Yarn over. Pull through 33 loops. When you get to the end of the row in half double crochet, It's really easy to lose the last edge. Let's count our stitch as I like to start counting back from the stage with the hook on, I find it easier. So here's 1, 2, 3, 4, 5, 6, 7, 8, 9. So it looks like we're done. But this is what happens. Your work can end up shrinking, expanding. You always want to count your stitches and in half double crochet, the last stage of the row kinda hides. So if you turn your work to the side, this is the last step. That's right here. So we're going to go right in there. So complete our last stitch. So I'm going to yarn over, insert my hook, pull up a loop, yarn over, pull through all three loops. So now we should have 10 stitches. 1, 2, 3, 4, 5, 6, 7, 8, 9 and 10. So that is two rows, a half double crochet completed. We need to chain one. Turn your work. For this last row. For my demonstration, I'm going to show you how to work in the third loop in half double crochet. So if you take a look here at a stitch, so here is our loop on the hook or turning chain. This is our first stitch. If you hold it up. Here is your back loop. Your front loop. And if you tilt it forward slightly, there is another row of loops in the front. We're going to call this the third loop. For this row, we're going to have double crochet in this third loop here. And that's what gives this ribbed effect that I love. It kinda looks knit, but it's crochet. Yarn over, insert your hook into the third loop. Yarn over, pull up a loop. Yarn over, pull through all three loops over. Insert your hook, pull up a loop, yarn over, pull through all three. All the way across. Here. The last loop again is kind of tricky. It is over here. We should have our 10 stitches. 1, 2, 3, 4, 5, 6, 7, 8, 9, 10. So now that you've watched a few rows with the bigger yarn, I think it's a little easier to see. Let's practice making our gauge swatch. So I will see you in the next video.
4. Half Double Crochet: Left Handed: In this next video, we're gonna learn how to create the half double crochet stitch. For this particular lesson, I'd like you to just watch. And shortly here I'm going to have you practice when you make your gauge swatch. But for now, just sit back, relax, enjoy, learn how and watch enlisting how to create this stage. I'll let you know when you need to pick up your yarn and your hook. So I'm going to take my yarn, we're going to create a slip knot. Loop over your finger. Pull the tail through the opening. Slipknot is made. Insert your hook through the loop. Tighten it. Don't tighten it too much. You still want to make sure your yarn can move freely up and down your hook. I'm just going to chain 10. Actually, I'm going to chain 11 because in half double crochet, you want to chain an extra chain as you're turning chain. So if I want ten stitches, I need to chain 11. So I'll begin by holding my yarn. I'm going to yarn over, pull through. That's my first chain. Yarn over, pull through. That's my second chain. Yarn over, pull through. That's 34567891011. When you complete a half double crochet, you're going to start by creating your first half double crochet in the second chain from the hook. So here's the hook. Here's the first chain. Here's the second chain. So our first stitch is going to go right in here. In half double crochet. We yarn over first. Then you're going to insert your hook. Two-year chain. You have three loops on your hook. 123. The next step, yarn over again. Pull up your loop. Three loops on our hook. Yarn over, pull through all three. That is 1.5 double crochet made. We're going to repeat that three. Our last one, yarn over, insert your hook. Yarn over, pull through the loop. Three loops are left. Yarn over. Pull through all three. Now we need to turn our work. To turn. We're going to chain one in like turning the page and I'm going to flip this over. We're now ready to start the second row. When you have double crochet. Unless your pattern tells you otherwise, your first stitch is going to go in the first stage from the previous row. So that is going to be right here, right here. So you have a loop on your hook. This is the turning chain. This is the first stage. So we're going to place our first stage in this stage here. Under the front loop. In the back loop, we're going to yarn over. Insert your hook. Yarn over again. Pull through the stench. Three loops remain on your hook. Yarn over again. Pull through all three loops. There's 1.5 double crochet finished. We're going to repeat that all the way across. So that was number one. Yarn over. Insert your hook. Yarn over. Pull through your stitch. Three loops on the hook. Yarn over. Pull through the last three loops. Repeat. With practice. It's going to become a fluid notion like that. Let me slow down again. Yarn over. Insert your hook. Pull up a loop. Yarn over, pull through the three loops on your hook. Yarn over. Insert into the stitch. Pull up barely. 1, 2, 3 loops on your hook. Yarn over. Pull through 33 loops. When you get to the end of the row in half double crochet, It's really easy to lose the last edge. Let's count our stitch as I like to start counting back from the stage with the hook on, I find it easier. So here's 1, 2, 3, 4, 5, 6, 7, 8, 9. So it looks like we're done. But this is what happens. Your work can end up shrinking, expanding. You always want to count your stitches and in half double crochet, the last stage of the row kinda hides. So if you turn your work to the side, this is the last step which is right here. So we're gonna go right in there. So complete our last stitch. So I'm going to yarn over, insert my hook, pull up a loop, yarn over, pull through all three loops. So now we should have 10 stitches. 1, 2, 3, 4, 5, 6, 7, 8, 9 and 10. So that is two rows, a half double crochet completed. We need to chain one. Turn your work. For this last row. For my demonstration, I'm going to show you how to work in the third loop and half double crochet. So if you take a look here at a stitch, so here is our loop on the hook or turning chain. This is our first stitch. If you hold it up. Here is your back loop. Your front loop. And if you tilt it forward slightly, there is another row of loops in the front. We're going to call this the third loop. For this row, we're going to have double crochet in this third loop here. And that's what gives this ribbed effect that I love. It kinda looks, but it's crochet. Yarn over, insert your hook into the third loop. Yarn over, pull up a loop. Yarn over, pull through all three loops over. Insert your hook, pull up a loop, yarn over, pull through all three. All the way across. Here. The last loop again is kind of tricky. It is over here. We should have our 10 stitches. 1, 2, 3, 4, 5, 6, 7, 8, 9, 10. So now that you've watched a few rows with the bigger yarn, I think it's a little easier to see. Let's practice making our gauge swatch. So I'll see you in the next video.
5. Gauge: In this lesson, we're going to practice our half double crochet stitch by creating the gauge swatch for our twist had begun, which is the class project today. So let's start by grabbing our J hook and our worsted weight acrylic yarn. Or whichever yarn you plan to use for your headband, you'll want to use for making your gauge swatch. So in crochet we use gauge in order to make sure our stitches are going to turn out like the pattern. And you're, you turn out with a design that represents what is actually made. So for example, if I am a crochet or in, I hold my yarn really tight and make my stitches very tight. If I follow the pattern exactly like It's writen without making a gauge swatch, I might end up with a child size had banned instead of an adult size had banned. So we make a gauge swatch so we know that our tension and how we create our stitches is going to match up with the designer, the pattern designers. And if it doesn't, you can go up or down in hook size or you can loosen your tension or tighten your attention a little bit. There's usually some give, at least with my patterns anyway. This twist had ban is very stretchy. So if you're off by a tiny, tiny bit, like a half inch, give or take, you're still going to end up with something that's roughly the same size. But we're going to practice making our gauge swatch. Start by making your slip knot. Tighten your slip knot onto your hook. Not too tight. Make sure you still have room for that loop to move up and down your hook. Looking at our gauge swatch instructions, we're going to start by chaining 14. There's one yarn over, pull through, two. Yarn over, pull through three. Make sure you're chaining loosely, not too tight. Yarn over, pull through, yarn over, pull through. 5, 6, 7, 8, 9, 10, 11. 12, 13, 14. If you're not there with me yet, no worries. Just pause. Take your time. I thought my 14 chains, 123456789, 10, 11, 12, 13, 14. And then I've got my yarn that is on the hook. Half double crochet in the second chain from the hook and in each chain across to end with 13 stitches. So now we're going to practice our half double crochet. Our first stitch is going to go in the second chain from the HUC. Here is our loop on the hook. Our first chain from the hook, our second chain from the hook. So our first stitch is going to go right in here. Yarn over, go in the second chain from the hook. Yarn over, pull up a loop, yarn over, pull through the three loops. Repeat. Yarn over, insert into the chain. Yarn over, pull up a loop. Yarn over, pull through all three loops. Again. Need some more yarn. Keep going. In. Take your time. Don't try to keep up with me. Pause the video, slow the video down. Meet me at your own pace. All right, so now I'm at the end of the first row and we should have 13 stitches made. Let's count them. 123456789, 10, 11, 12, and 13. Rows, two through ten, chain one in turn, half double crochet in each stitch across. And after you've completed 10 rows, you should have a square that is four inches by four inches. So this is my finished gauge swatch. So if I measure it. It's about 4.5 inches wide by four inches. So it's slightly wider than what the gauge instructs. So I could be B, go down a hook size. I could tighten up my tension. Or if you're really good at math, which to be completely honest, I am not. You can reconfigure your stitch counts and maybe subtract a stitch because if to get to four, we can if we lost a stitch that would be closer to four inches wide. So that if I gauge is important, you want to make sure your gauge swatch is measuring about a four-by-four. This one's 4.5 by 4. So when I make this one, I might make my stitches a little bit tighter. I'm going to stick with my J hook. And I'm also going to give myself some grace. And no, it does not have to be exactly perfect. It doesn't have to be perfectly four inches wide. But let's let's take a look initially here to see if I need to tighten up. Now. So here I am. Bright dot dot for when we turn it this way, we'd be a little bit easier to gauge. See what I did there. That is pretty darn close. I could go a little bit tighter with my tension, which I think I will do here on out. Let's chain one turn. And now we are going to work our 13 stitches back across. Your first stitch is going to go right here. There is your loop on the hook, your chain one, your first stitch. So that is where the first stitches going. Yarn over, pull up a loop, yarn over, pull through three. Continue all the way across. One more, slowly. Yarn over. Insert into the stitch. Yarn over, pull up that loop. Three loops on. Yarn over. Pull through all three. Yarn over, insert through the entire stitch, front loop, back loop. Yarn over, pull up a loop. Yarn over, pull through three. Continue to the end of the row. At your speed, not mine. You might be faster, you might be slower. As long as we all end in the same place. That's the goal. Last stitch. It's hiding out here. So it's right there on the end, right there, front loop, back loop. There's that third loop. Yarn over. Insert. Coulter. Finished with row to keep going till you get to row 10. And I will meet you at the end. Now that we've finished our 10 rows will take a measure here. And that is about four inches by four inches. So that is looking good for our gauge swatch. If yours is a little bigger. What you can do to tighten your attention or to make this part shrink, is to go down to an eye hook or even in a check if you don't have that readily available. The other thing you can do is tighten up how the yarn moves through your fingers. So if I wanted some tighter tensions and set of looping once over my fingers like I typically do. I can loop over twice. And that is going to make this part tighter. So as we move across, my stitches are going to end up being tighter. You can even do it a third time. This is how I like to control my attention, is by how many times I have the yarn wrapped around my pinky. So if you needed to make it looser, you can have it once on there. See how much more give there is on the yarn there versus two times. That's a lot tighter. So if he need looser, maybe just once, just hold your yarn lightly on your fingers. And if once is even too much, maybe just let your yarn go through your index finger and your middle finger. That'll give you a lot of extra. You can even see how tight these are and then they get looser and looser. So how tight you pull those stitches through that we'll adjust your attention. Go up or down a hook size. Those are ways that you can modify so that your pattern turns out the way you want it to. And that is how gauge works. If you have questions pop in the discussion and ask away, I'm happy to answer. And if you need to keep practicing the half double crochet stitch before we get started on the twist headband, keep going and keep practicing as much as you need to. You want to make sure your sides are nice and straight. If they look like they're heading in and then back out. Just remember to always count your stitches to make sure that you still have 13. It's a good habit as a beginner to after every row count your stitches and every couple rows. Even as an experienced crochet or I like to still count my stitches every couple of rows to make sure I didn't lose any. And if you're wondering, how do I know if I'm at 10 rows? You can count the rows here, and there's 123456789 and 10. So that is gauge. I will see you in the next video lesson when we get started on the class project.
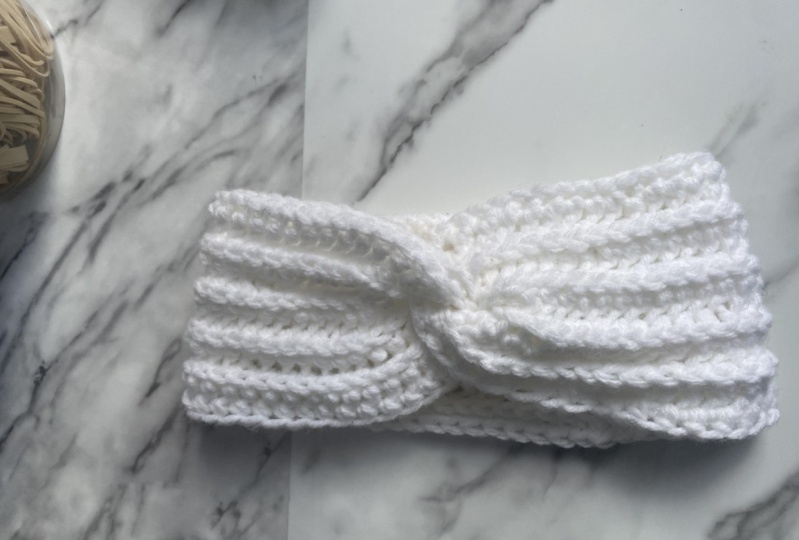
6. Class Project: The Pattern: All right guys, Now that you've had plenty of practice with your half double crochet stitch. It's time to move on to our class project. And the class project for today is this gorgeous half double crochet twist head band. So these are really integrate now, very trendy. I sold a ton of them at a market over the holidays. They went like hotcakes. So if you can get the hang of making these, you are absolutely more than welcome to sell them. I sold mind for $18 a piece and like I said, I completely sold out of them. So these are a hot trending item. Great for you, great for friends, great for gifts. So it's simple, it's fine. Let's get started. You'll want to make sure you go to the Projects and Resources tab in the class. And in that section there are a few PDFs available for you. The first one is of course, the pattern. Print that or keep it up on your computer screen or iPad. So it's handy for you to access throughout your project. And there's also some other handy resources there for crochet terminology abbreviations just for you, but everything you do need to know in order to complete this project is in the PDF here. So first let's talk about the materials you're going to need. You're going to need some more stool weight yarn. My favorite yarn is, I love this shot. I do. I actually love it. It's from Hobby Lobby and it is a worsted weight yarn, super soft. This is in the color gray beard. But you can use any medium weight acrylic yarn that you wish doesn't matter what Brian just, you want it to be this weight so that your gauge turns out similar to mine. And I'm going to be using a J hook today. This is my clover, a more j 6 millimeter crochet hooks. They have some scissors. And lastly, a tapestry yarn needle, needle with a blunt end. So once you have all your materials gathered, let's go through the pattern. So those were the materials. These are the abbreviations I'm going to be using today through this pattern. Ch stands for chain. St, parentheses, S will stand for stitches. H, dc stands for half double crochet. F slash o stands for finish off. In patterns. If there are special notes, special stitches there usually discussed before the pattern starts. So the special stitch we're going to be using today is a half double crochet in the third loop. So we talked about that third loop in the first half of half double crochet video. But I'll go over that again once we get started with our headband. You should have already made your gauge swatch. So that was our practice round. So to get the four by four inch square, this is the pattern I used with my J hook and my worsted weight yarn to end up with a four by four inch square. I like to note that the chain one does not count as a stitch. The first stitch goes in the same stitch as the chain one. There's a good graphic there. This is what always, always trip me up when I started crocheting, and honestly, it's still trips me up today when I'm reading other people's patterns. I really like to know where that first stitch goes. So does it go, sometimes the first stitch will not be in the same stitch, Azure chain one, it will be in the next one and vice versa. So for today, your first stitch is going to go in the same stitch, Azure chain one. So without further ado, let's get started on our twist headband.
7. Twist Headband: We are now going to get started with 40. Number one. Take your yarn. First. We need to create our slipknot. Yarn over your finger. Make like an X. Pull the loop off your index finger. Take your yarn through that circular opening. Place your hook inside the slipknot and tighten it. Not too tight. Make sure that you have some give. You wanna make sure you chain your chain, your foundation row is pretty loose because you don't want your headband to fit too tightly. And you want to maintain that same tension throughout the entire project. So the first step in the pattern says to chain 61. So hold your yarn, however it feels comfortable. Hold your hook however it feels comfortable. I use the knife hole. If you haven't tried the pencil hold, see if that feels more comfortable. There are different types and you might find one that works better with your technique. I prefer these clover and more hooks. All right, so we're going to yarn over, pull through. There's our first chain. Yarn over, pull through. That's two, yarn over, pull through. Three yarn, oval, yarn over, pull through. That's 456789. Ten, I will meet you at 61. Okay. And now I have my chain of 61. The headband is 60 stitches, so we add that extra stitch at the end for our turning chain. So 61 chains. Next we're going to have double crochet in the second chain from the hook and in each chain across to equal 60 stitches. So here is the loop on your hook. There's the first chain, there's the second chain. So we want to go in the second chain from the hook. So not this one, but this 1.5 double crochet, yarn over, insert into the chain. Yarn over, pull up a loop. Yarn over, pull through all three loops. There's your first half double crochet. We're going to repeat that same stitch all the way across till we get to the very end. Yarn over. Insert your hook into the chain. Yarn over. Pull up a loop, three loops on the hook. Yarn over, pull through all three loops. Again. Continue half double crochet chain all the way across to the end of the chain row, and I will meet you there. We are ending the first row and replace my last stitch in the chain, yarn over. Insert through the chain yarn over, pull up a loop, yarn over, pull through all three. So here is our first row of half double crochet stitches. Let's move on to row number two. We're going to chain one and turn our work. So flip it like the page in a book. And now if we look at our pattern, rows two through ten, we're going to chain one, turn half double crochet in the third loop and in each stitch across for 60 stitches. So we're just going to repeat whatever we do on this row two. And so we're going to do that 10 times. So we did our chain wine and we turned our first step, which is going to go right in here. So this is that third loop. So here's our loop on the hook. There's our chain one. If I turn my work up slightly. This is the back loop, the front loop. And this line down in front is our third loop. And we're going to be placing all of our stitches in this third loop for the rest of the pattern. Right in there. So on the top, those are the front and back loops. And then that third loop is in the front. So yarn over, insert your hook. Yarn over, pull up a loop. Yarn over again. Pull through all three. And repeat that all the way across. Yarn over. Insert your hook in the third loop. Yarn over, pull up a loop, three loops on your hook. Yarn over, pull through all three loops. Again. Yarn over. Insert your hook in the third loop. Yarn over, pull up a loop. Yarn over, pull through all three loops. We're going to continue that until we get to the end of the row. When you get to the end of the royal, it can be a little bit tricky to find that third loop and also to see where the last stitch of the row is. So I will show you because if you miss that last stitch and you're not counting, your head bands gonna start to get smaller and smaller and it's not going to be even so you want to make sure you maintain your count of 60 stitches the whole time. If you're new to crochet, I really encourage you to count your stitches at the end of every row. So once we get to the end of this row, we're gonna count and make sure we still have our 60 stitches. But take your time. Go at your own pace. Slow the video down, slow it up. Mutiny. If you don't like hearing me talk in the background and you just like to watch. Totally understand. I'm not offended. Take breaks to redo that one. Because this is supposed to be leisure the infant, it's not strict. It's not to be stressful. It is to be enjoyed, It's to sooth, it's to relax. So if you're not in that right mental state or you feel relaxed doing this. Come back later. If you have questions, don't forget to pop into the discussion section of the class. I'm here and willing and able to help so you're having trouble. Please please please send me a note. Here we are. At the end. I have two stitches left. There's one here. And then the last one we're going to put here. So there we go. And then the last stitch and hangs out on the side. So you got to be careful. So take this out for a second. On the edge. If you turn it forward, there's the front loop. I'm sorry. This is the back loop of the for the last stitch of the row. The back loop, the front loop, the third loop. So our last stitch is going to go right there. Yarn over, insert your hook, yarn over, pull up a loop. Yarn over, pull through all three loops. So let's make sure we have 60. You should have 60 when account mine really quickly here. So make sure you have 60 stitches. You've just completed row 2. Good job. All right. We're ready to chain one. Turn your work when we're going to start row 3. So double crocheting in that third loop creates this ribbed effect where the stitch kind of pops out at you. I love it. I think it looks so pretty. So you can see how they kinda pucker out. Looking more knit like I'm not saying that I like knitting. I don't, I like crochet, but you can have the best of both worlds and have something that looks knit while you're actually crocheting. So we're going to repeat the same thing for row number three. We're going to yarn over. Our first stitch is going to go right here on the very edge. In that third loop, yarn over, pull up your loop, yarn over, pull through all three loops. Again. So again there's the back loop, the front loop, the third loop, we're going in the third loop. Continue this all the way across till you reach the end of row 3. And I will meet you there. Here we are at the end of row number three. No one to show you one more time or that last stitch goes right here. So there's your back loop. Your front loop. In that third loop. If you don't look carefully, it can appear that your finished, but this is the last stitch right there on the very end. It's so easy to miss. So just make sure your last stitch is right on the super edge of your work. Yarn over, insert your hook. Yarn over, pull up a loop. Yarn over, pull through all three loops. Time to turn our work. Chain. One, turn your work around. And for the remaining rows, rows four through ten, just repeat the same process. So once you have 10 rows, head to the next video lesson where I'll show you how to create the twist and close up the headband.
8. Closing the Headband: We are getting close to the end of row 10. Wondering how everyone's doing checking. Hop on that discussion board. Let me know how it's going. What questions do you have? Do you have any questions? Are you loving the class? Watching a little bit more out of class? Please let me know. Got the last stitch here. So now you have this gorgeous piece of fabric here that we are going to make into this lovely had banned. And this is a great time for you to snap a picture of your whip, aka work in progress and post it up on the board so I can check it out and give me some feedback. We're going to finish off. To finish off, you're going to chain one. And you're going to leave a decently long tail. I said about 18 inches. So a SNP area are in there. You can pull through. Just give that a nice little tug to secure in that is finished. So next I'm going to show you how to close your head band. You'll need to grab your tapestry needle. You're going to thread your needle through the long tail that you just cut. Like. So. Just leave that off to the side. You're going to pick up your work. One thing about this stage is it is reversible. Both sides look the same. So it doesn't really matter which side is facing up. But you're going to pinch, we're going to fold this in half. So I like to pinch each side. So there's one side. Then we're going to pinch the other side here, kinda hold net like this. See that? And then just kinda open it a little bit. And this end is going to go right in the middle here. So it's going to go right inside. Kinda crinkle in, sandwich it together. Like that. Make sure it's even. Across is kinda play with it. So it's all situated in their evenly like so. So we're going to stitch back and forth across here in, all the way in and out, back and forth in a zigzag motion. So then when we flip or had been inside out, it's going to make that twist in the middle. So again, let's do that one more time. Hold that together. Bring the other side up and fold it open and slightly they just kinda like trumped down on each other, like an alligator chomping. There we go. Find her tail. Your yarn. We're just gonna go through all of the layers till you get through to the other side. And go back through. Make sure you're catching all the layers with your yarn tail. All the way through. Keep going. Get through all the layers, all the way to the end. And just to make sure it is extra secure. So when you're stretching the headband over your over your head, I would like to go back through a second time for extra security. Can't hurt, right? So we're going back through all the layers. Nice and secure, back and forth. Almost there. Getting ready to grow and markets and birds outside. And then secure it. Just grab a loop anywhere in there. And we'll just pull your needle through that loop. Make a little knot to secure. Trim your tail a little bit so you can weave in your end. So you don't have this giant tale that even. So just pick a spot that is going to be in conspicuous. Weave in that tail. I like to go back and forth three times. Hey, hey, that's enough. Sorry about the dog barking. If you've been working at home during COVID, you know how it is. You've got the kids and you've got a dog barking. Let's weave in that last tale. Let you say hi to chase in a second. Chased the Kaba CPU. Even in my other tail. All bark. Let me tell you. A little poll. So it should look something like this. So now all we have to do is flip it. We're going to take this and you're going to flip it. And it is complete. Here we go. If you wanted this to be taller, all you would do is add more rows. If you want it smaller, shorten the rows. That's it. It's easy, it's fine, It's simple. It's a gorgeous. Your friends and family will love wine. They make great gifts. Please don't forget to show me your finished projects. I'd love to see them, post them to the discussion board. So I hope you really enjoyed this class. And I will see you the next time. And I'll see you in the yarn aisle.
9. Outro: Thank you so much for joining me for today's class. I hope you loved making your half double crochet twist headband. Again, they make awesome gifts, so make them for your friends and family. Sorry that chase, the camera crew got a little carried away there at the end. But just like you would like to say, Hey, until you goodbye and thank you for taking my class. I will catch you friends. Take care.
 Jessica S., Crochet Made Simple