Transcripts
1. Welcome!: Hello. Do you watch other artists doing their
artworks and think, man, and I just
really want to be able to do what these guys do. They are loose, they are free, they're working in
their sketch books, they're doing beautiful
artworks, you think. I just can't do that. You can. Let's do this together. We're going to be working in
a small sketch book today. The good thing about
a small sketchbook is that it's not going
to be a large image. That's going to take
you a long time to do. We're going to be
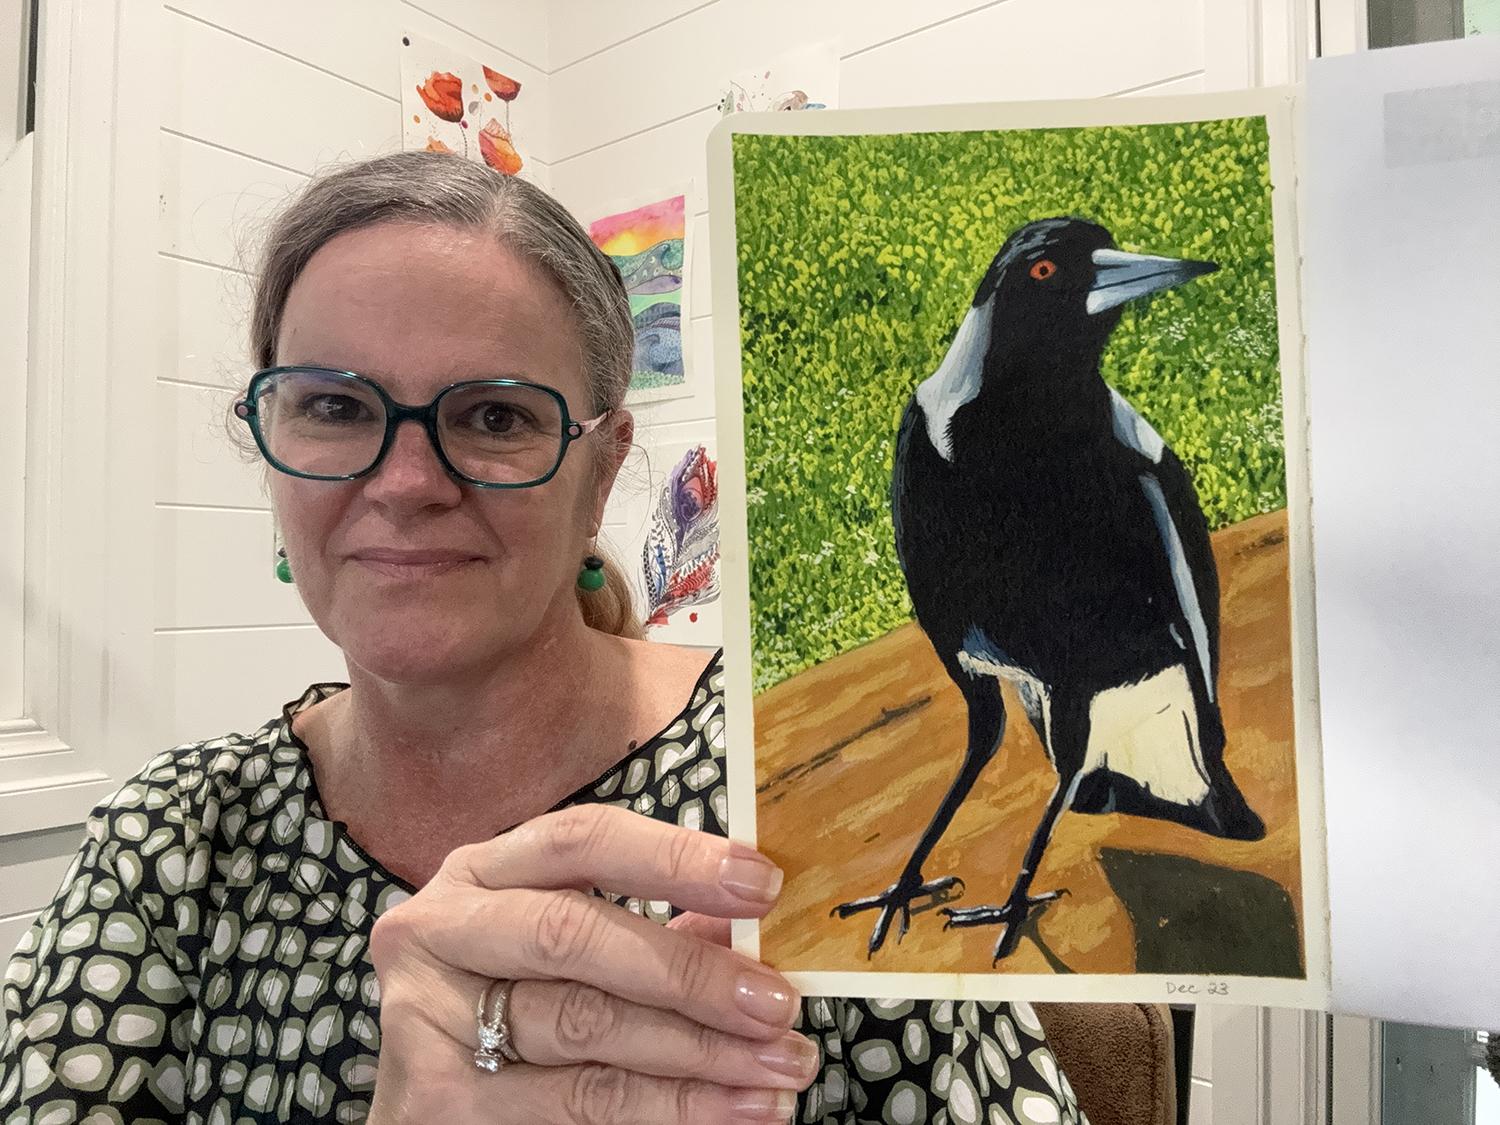
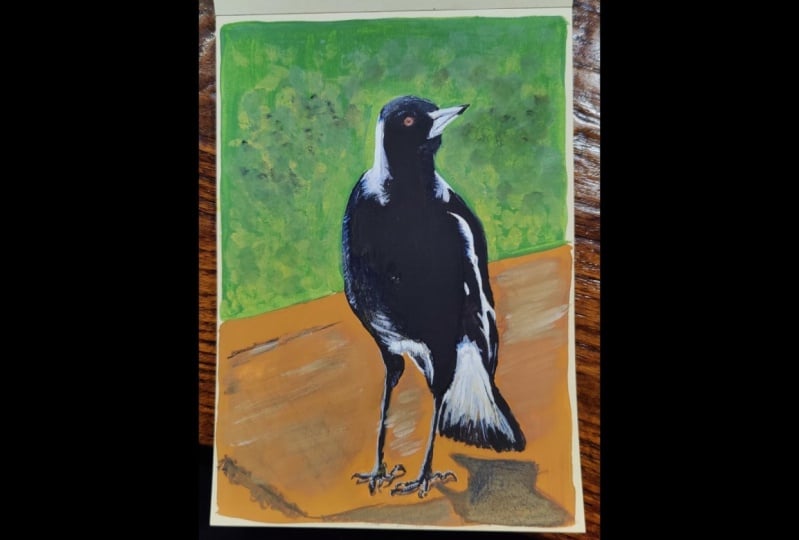
doing a magpie, which is an Australian
bird, black and white, and they have a
beautiful song that they sing when the sun
comes up every day, we're going to be
doing the magpie in gas and watercolor pencil. You can use watercolor paints
as well if you want to. If I haven't met you before. My name is Jane from
Mrs. Red's art room, The multi million colored
art teacher and illustrator. So let's get started
on this magpie.
2. What's the project Mrs Red?: Okay, onto the class project. Now I am wearing
something different to the last video
because it is a new day. We're going to be painting
the Australian magpie, which is a iconic
Australian wild bird. They do tend to get very
aggressive around mating season, which in Australia is
September. That's our spring. In Australia, it's
not uncommon to find people riding a
bike or walking along the street wearing spikes like electrical cable
ties coming out of their bike helmet or a hat with big eyes sitting right
on top of the helmet. And the reason for this is
because they are really protective of their
eggs or their young? Yeah, they can get
very aggressive and nip you behind the ear. That's where they'll go
for you. I do have a scar. I can't remember which year it is. It's that one.
I can feel it. There is a little scar there
where I got done when I was probably about ten years
old, riding down the street. But the good thing is,
the season only lasts for around four to six weeks. Then you fall back in love
with magpies once again. For this project, we're
going to be using gas and colored pencils. You can use watercolor. However, when we get
to the final layers, watercolor will feel too sticky. It's better to have G with you. It is also intended that
you have a little bit of G knowledge to
do this project. If you don't, that is okay. You can still do this project. Just remember that it is a medium that has its
own unique qualities. If you are new to
it, please don't be disappointed with your results. If you're expecting
something of say, watercolor or acrylic, it
is a water based medium. It is an opaque
watercolor, let's say. It can be watered
down with water, just like watercolor, but
you can also use it neat. It won't be as sticky as
say water color would be. Okay, in regards to your paper, if you're using a
sketchbook and five side, just like mine is probably
best for this project. Or a five watercolor
or mixed media paper. If you go too big,
it's going to add more time for you to actually
get this project done. In regards to how long the
project is going to take you. I don't like to give an
actual time frame because we all work very differently
at different speeds. And I, for one,
work very slowly, it took me around 3 hours
to do this project. If we break that down
into 45 minute spots, you're looking at around
345 minute sessions. You should be able to get
it done at that size. Of course, I would like you to upload your project
in Skillshare. If you go to the Projects and Resources tab on a web browser, you'll be able to do this. However, on the Skillshare app, this isn't to be used. You will have to use
a web browser to go to that project
and resources tab. Go in there and upload your work so that others
can see it and you can comment and like on the
other students work as well see it as your own virtual
classroom for this project. I'll see you in the next video.
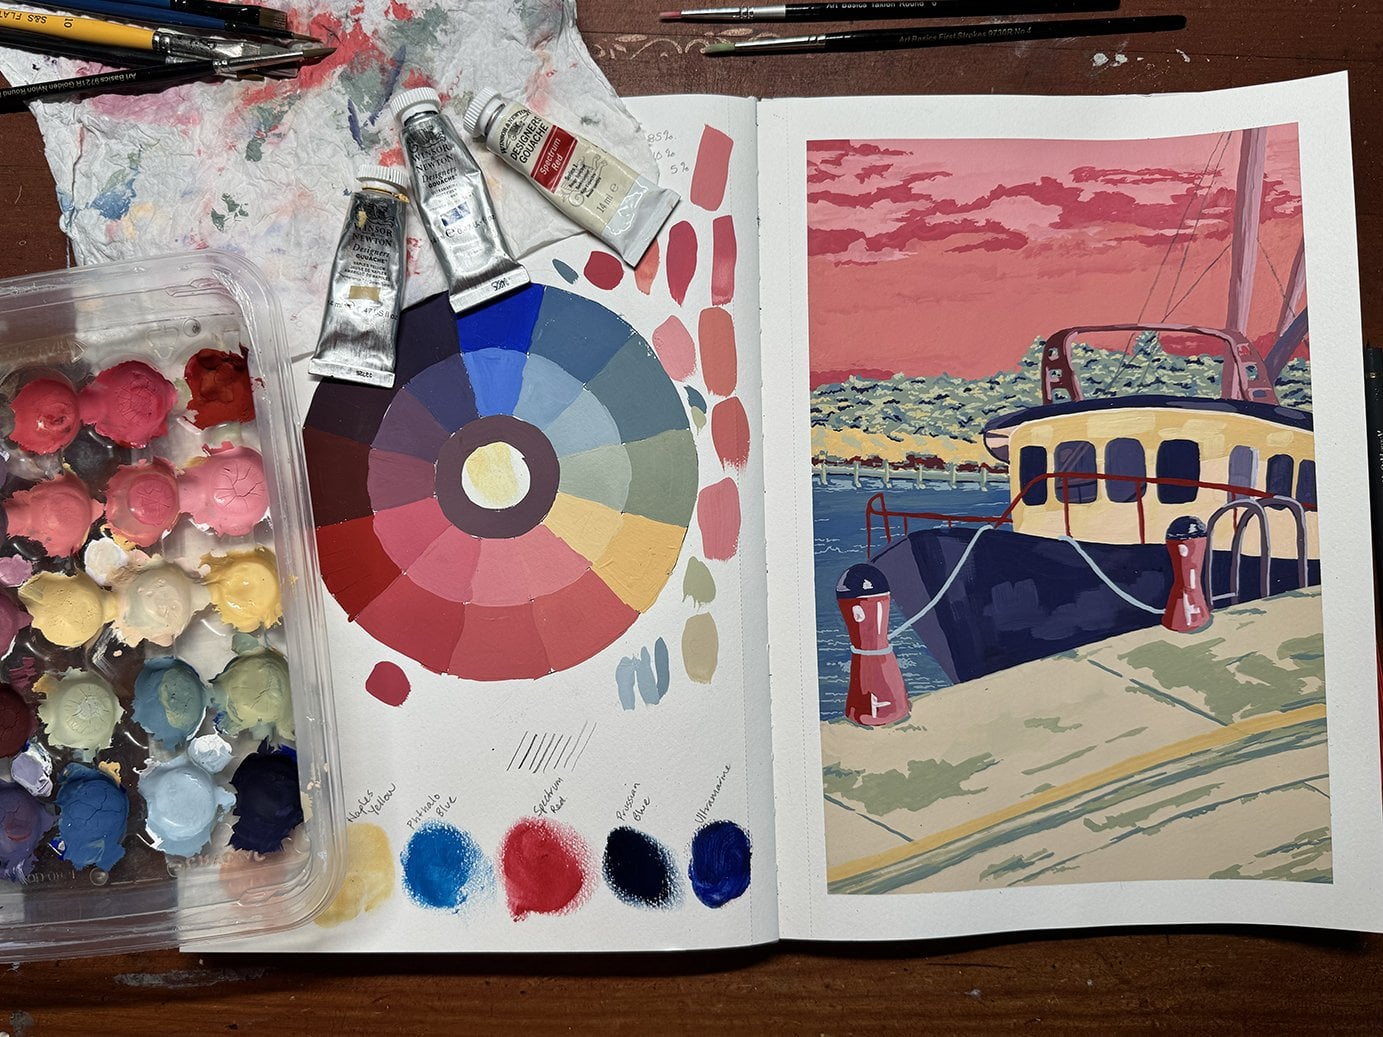
3. Materials list for Magpie: All right, let's have a
look at what materials we're going to be using
for this project. Like I said before, you
probably want to be around an, A five size piece of paper. Sketchbook or single sheet. Doesn't matter, but it does matter what
type of paper it is. You want it to be
watercolor or mixed media. This one is a steelman
and close to an A. Five. Not completely five, but it is stillman and burn a mixed media paper and it
would be around about 240, 300 GSM each page. So it all lies flat. That's the most important
thing you want. You want to make sure that
regardless whether it's your sketchbook or it is
a single sheet of paper, it will lie fat and
you won't flat not fat and you won't
get any of that buckling that happens either. All right. Let's have
a look at our gas now. I have only one
brand here which is the Windsor and Newton
designer Gash that there. This is the only one
that I've ever used. So, I have been
using Guache since I started graphic
design back in 92, 1992. Very long time ago. I'm not sure why I went with Windsor and Newton most probably because that's what was
available at the time. It is a good quality gua it's not unreasonably
priced either. And they last you a long
time with all your paints. You've got to go for
a professional brand. So it doesn't matter
if you're doing oils, acrylics, water color, or Ga, you pay for what you get, especially with your water
colors, your water colors. If they're cheap water
color, they'll be powdery. You'll feel it when
once it's dry, there'll be like a
powdery texture to it. And also the color, it will
be very washed out gas. I've never tried a cheap guache, so I can't compare them. I just know that Winsor
Newton is a really great one, has been stood the test of time, the colors that I've used. I would say that we are doing a limited palette by
looking at the colors here. Because this orange here
is barely even used. It's really only
used in the eye. I have put a list of the colors down in the notes of this video. Sap green, ivory,
black prussian blue, permanent white, raw sienna, lemon yellow and
orange, lake light. If you don't have these colors, try and grab some that
are close to that. The ones that are important
will be your blue. That Prussian blue
is a very dark blue. If you don't have a dark blue, add black to your
blue when you're mixing the way that you'll get
that. Same with the green. The green is the only green I've used in all of
that background. I've added the blue
and the yellow to it. Possibly a little bit of
white here and there. Possibly even a
little bit of black. But I doubt it, I'd say it
would have been the dark blue. I do a lot of color
mixing as I go. I don't think about it too
soon before I get into it. We'll go into color
pencils as well. Let's discuss the brushes first. In here, we have three brushes that have been used
throughout this project. You don't need to have the exact size brushes
that I've got here. Also, when it comes
to your brushes, I'm not one for fancy,
expensive brushes. These brushes, I take
good care of them, I wash them, I lie them flat. But I don't think any of them are expensive
watercolor brushes. So we've got a flat ten, a six, round one, Little one is really
important to have. Always good to have a size one
or even smaller than that. You're only going to
be using this one at the end for
little highlights. All right, so we'll
put them down there, then we go on to this. This is your water jug. Barrel bucket, whatever
you like to call it. I recommend that you find a large vessel over a small one, especially like a glass
that you drink from. They can be with a
small bait in them, so they're easily to tip over. And the other thing
with a glass is that it will happen,
you will drink from it. It will happen. It's
happened to the best of us. I can tell you that for now. So this is actually a
Tupperware container which lost its device that was on the top here and they
didn't make them anymore. So I love this one because
it does have a surface on the bottom so that it's a bit of a non slip as well,
but it's just wide. It's wide, it's never
going to be tipped over. All right, and then when
it comes to palettes, palettes is really
a personal choice. I don't recommend you
using a large plate or a large palette that
you would use for your oil paints or
your acrylic paints. And the reason for that is
because just like water color, guash will dry out very quickly. These are recycled. They were holding little
meat balls in them. I buy them regularly
for our dinner. The thing I like about
these is that they have those little wells in there where you've got a
little bit of a dish, a little bowl that you
can put your colors into. I've never really used
two on one project. I haven't like spread out
the colors that much. I can easily get more because I do use these almost weekly. The thing I like
about having these too is that I can lay that one in there while I'm not
working on the project. The colors that
are in here right now are for a different project. They're obviously
not for the magpie, but once I've finished I
just throw that one on top. It helps just seal it enough so that it doesn't
get too much air. And it also makes sure that it doesn't get dust
in it as well. And you're doing a little
bit of recycling as well. So that's what I
like about that. Think about that when you see those little meat balls
in the supermarket. All right, let's get on
with the next video. I almost forgot about the last art supply that
is used in this project, which is colored pencils. Now it doesn't matter so much what colored
pencils you use. The ones I use are Faber
Castell polychrome. These pencils I've had again
since I started art school, which was back in 92. So the problem with my
Faber castells now is that the large timber box
that they came in, beautiful large timber box, the plastic insert that held all the pencils in
place has deteriorated. It's disappeared. I
still have the box, but I don't know what
to put in the box. Just one moment. All right. I just had to tell my
husband to be quiet. He's just got home and he's got a very loud voice and
he was on his phone. So yes, the box is no longer
with us for its purpose, but this is now replaced it. So I think there's 72 colors or 82 colors that
I've got in total. Now, I'm not going to tell
you which colors to use because that is up to
you and what you've got. But I'm not using a
water color pencil, I am using the polychrome, which is your colored pencils. It doesn't matter so much
about the quality of them. So you can go a student brand,
if that's what you've got. Don't worry too much
about your pencils. Yes, colored pencil is very important to finish
off our magpie because that is
where we'll do a lot of the little fine details. I don't know if you can
actually see it in here, but you can almost
see like a texture that the colored pencils, yeah, you can see it there. So they actually
give the feathers a little bit of a texture.
4. Drawing your Magpie: Okay, so we are into
the exciting part. Now we're going to
start our magpie. Now if you've noticed, I am again in different outfit and probably different
glasses as well. It is a different day that I'm recording this and it's
always going to happen. So just let's go with it. All right, so the magpie, there's two ways
going to show you to draw your magpie onto your piece of paper regardless of whether you're using
paper or sketchbook. Now you've watched
the video on the, on what we're actually doing. We're doing the magpie
in gas and water color. You should have watched the
material video so that if you've got the guache in the colors that I have
listed, that's awesome. But if you don't,
as long as they are similar colors
to what I've done, then we're going to be mixing
colors all the time anyway. You've got that, you've
got some color pencils and you are ready to go. You need a graphite pencil to
do your sketch up as well. There's two ways
that we can do this. One is you can draw free hand drawing it up
depending on your skills, and if you want to
tackle it will be dependent on whether you
draw it up by yourself. You can also trace the drawing. Here is a print
out of the magpie. You are not cheating by
tracing your magpie. Never believe that at all. You're doing this as a project
to practice your skills. And why mess around
trying to draw the image and getting
a realistic drawing. It's just not your thing. Please don't feel
that you are cheating at all by doing the
tracing method. You can also do a grid method, but I'm not going to show
you that in this video. While I have this
image up with me, please don't use it as
your color reference. Use the image that's in the digital file that
you've printed this from. The reason for that is because all our printers are different. They all have different colors. One color might be running out. I can I have a good printer that this image is a
little bit lighter. The graph in the
background is just not as bright and defined
as the actual image. One. All right, so you
can use this to trace, but don't use this as
your color reference. So let's get on with getting
our magpie onto our paper. So if you're not
interested in trying to draw the magpie up yourself, which is totally fine, then this is the
tracing way we do this. Print out that photo
of the magpie, make sure it is the size
of your paper as well. This was the size that
I've printed out for. What was the magpie
artwork which is there. But I drew this up. You'll see that video next. All right, so you've got your print out of
that and you've got your sketchbook or your piece of mixed media paper,
watercolor paper. I am just using a piece of printout paper to
show this example. You're also just going to need a graphite pencil to or
darker, not too dark. If it's too light, you
won't see the transfer. And make sure it's nice and sharp because
you're going to be using the side of the pencil. So this is how we'll
do the tracing method. We are basically turning over a magpie and put it down
on a white surface. It doesn't have to be on
top of your sketchbook, But if I put this
magpie down onto here, or you still can kind of see it, I wonder if it goes onto there. Okay, it's making a liar of me. But anyway, it's a
lot easier to see if you've got white
in the background. Now we're just wanting
to get the outline of the magpie so that when
we go to paint it in, we've got a pretty
accurate outline of it. Put your pencil onto its
side so that you get this really nice, messy scribble. You just want to make
sure that you are getting all those
important lines. I don't know what that is there. I don't think that matters. Maybe it's the where
the papers meet. Okay. It's that easy. That's all we have
to do with that. You can check to make
sure that by holding up to the light to
make sure that you have actually got
all your outline. Then place it down into your sketch book
where it's going to go onto your piece of paper. And then it is simply
with the same pencil, go over that outline and this is going to
give you a nice accurate Outline to start your painting. Don't spend too much
time on doing this. You can keep checking with
your less dominant hand. Keep that down. Turn it over.
It's a little bit bright. I'll wait until
I've finished it, then I'll show you
the finished bit. I'll just go a little
bit quick here because this is just purely an example. But yes, if you keep your less dominant hand
down on the paper, it's not going to move around. If you want to check for bits, let me just put some
marks in there. And all important
little that goes in there and a bit of a
shadow there as well. All right. Without
lifting it off, just check and go, Yep, everything is there. I know you can't see that,
but we'll be able to soon. If I bring this up there, you can see a very faint
outline which is enough for me to you could go over this very lightly
that if you want to, but you don't really have to have those
pencil marks there. If you do go over
it, just make sure that you do it nice
and lightly like that. You're not going to see the
pencil by the end of it. Yeah, I do recommend
making it visible. That's the reason
why you need to do a two B at the
probably six at the darkest and the nice and messy shading
technique over there because then that
pencil transfers onto your sketchbook or
piece of paper. Now of course, you can
also sketch your magpie into your sketchbook or
onto your watercolor paper. This is obviously me doing mine. The lines are very light at the moment
because I really am putting down the shapes more so, making sure that the
proportion, the head, the feet all in proportion, then I start to get darker. Obviously, this is
being sped up as well. We don't want to sit
here, I don't know. I think it would have
been about for 15, 20 minutes perhaps
to sketch this up. I think I got a pretty
accurate in the end. But do remember your
practice at sketching up. The more you do it, the
better you're going to be at being more accurate
with your proportions. I am not a 20 something anymore. I have had many years of experience drawing
up from an image. Something else that's really
important is the pressure that you are putting from
your pencil onto the page. A technique I used to use when I was teaching
kids was I would get them to tickle
their forearm with their pencil and it
would make them giggle. I said imagine if you pressed really hard into your skin,
what's going to happen? You're going to scream
because it's going to hurt. Paper has feelings, you
have to tickle the paper. If you tickle the
paper, listen out. You might be able to
hear the paper giggling, and that's what we want to do. That way. They wouldn't press hard anymore because they
didn't want to hurt the paper. It's just a little mind
trick that I used with them, but it worked very well. You want to make sure
that the pressure that you're putting down
is not too hard, especially because
you're going to be erasing little bits
here and there. Okay, we're ready for the
next video now, outside ing.
5. Painting the background: All right, welcome back. I think I have solved my
microphone issues as well. Everything should
be a lot better. Now, this video, I have recorded without the intention of
talking while I was painting. I am now doing the voice
over over the top of it. Basically, we are into the. All right, the first guash that we're using is the sap green. Now remember I said in
the materials video, if you haven't got
these exact colors that I'm using, find
something close. Keep looking at your reference. We're putting the gas down
fairly thick at the moment. If my hand goes to o right, I am dipping the
paint brush into the water just to add a little
bit more water to the gas. You don't want it to
be too thick with gas. You can start with very
thin layers and build up. The only time you're
doing that is if you actually are adding
a lot of layers. And you know you're
going to add a lot of layers to your artwork. Whereas this one I know that what's going over the
top of this is going to be mottled greens and yellows
that will be going down. And they'll be more like
little brush strokes. Rather than painting another
layer on top of this green. This green will be a
little watered down. You will be able to see the
paint strokes afterwards. You don't want it to be too thin because you're going to
have to paint another layer. And you don't need it to be just guache without any
water added to your brush. You'll notice also the thickness of the brush that
I'm using here. This is best to keep a nice thick brush
for these big areas. You don't want to
be sort of spending a lot of time painting
with a small brush. I do tend to stay
with this brush for the bottom layer as well, which is the rock wall that
the magpie is standing on. You can hear what sounds like a sacara in the background.
I'm not too sure. I guess I can hear it if I
actually think about it. Okay, so we're now
onto that rock wall. We are using raw sienna. Again, if you don't have raw sienna, find
something close. It's just that sands, stony looking rock wall that
the magpie is standing on. And as for myself, I haven't actually
mixed any colors yet. I don't think I do a great deal of mixing
with this painting. Usually I'm all about mixing, but not for this fun, which will make it a
lot easier as well if you don't have to
mix too many colors. Again, just like I did with
that green background, I'm just adding a bit
of water to my brush and then dipping it
back into my palette. And staying with that
larger brush as well. Just like with the
green background, this is going to have mild texture put over the top of it, both with paint and
with colored pencil. I think there's colored
pencil, I can't remember now. It's been a while since I
actually videoed the magpie. As opposed to uploading. Yeah, same thing. You can see that the green has dried and there's still a
lot of paint marks there. Do not worry about
them because they are going to create depth and light, and color and texture as we move on to the
next layer of it. But for now we're just
really in the background. And then we'll block
in the magpie as well. All right, so I'm
just going to put on some nice calming music for
the rest of this video. It's about another
3 minutes worth. I'm not going to speed it up, it will just be me
blocking in and hope that you're doing the
same on your artwork as well.
6. Painting Magpie P1: All right. We are now
getting on with our magpie. Let me look at the colors that we were using
again. Hang on. I'm just going to go
back through my notes. We have we've got the blue, you can kind of see
Prussian blue is really, really, really dark blue. And I've used it with
black to get a little bit of a bluish look to the black. Because the feathers are, they're not like 100% black, can look a little gray,
especially on the young. And they can also look just
like that midnight blue. Add a smidgen of
your Prussian blue, or a really, really dark
blue like an indigo. And indigo's another good
one with the black so that you get a tone of the
blue coming through. Now, this is probably
the easiest part of the whole painting. Well, the background was
still easy, wasn't it? Because you're basically
painting in just black. Yeah, we're just painting all the areas of the
magpie in black. And then we will go to the gray. So I'll be adding a
little bit of white to it for highlights
and the beak area. All right, so I lost my
train of thought there, but basically what I'm saying is that we start with the black, then we add white, then we go to the highlight, so there'll be light
and darker gray areas. We finish with the shadow
from the legs and the tail. Putting the shadow in really, really brings the image to life. With any artwork, if
there is a shadow, when you put that shadow in, all of a sudden it is
a different painting. So yeah, that's what this
video is going to be. I'm going to put it back over to music At least for a while. I'm just doing this black bit. And then I might pop back
in when we start mixing the gray and then put on a bit more. Music Again, you enjoy. All right, we are onto
the beak and the eye now, just using that combination of the Prussian blue and the black. Just look at your reference and fill in the tip of the beak. Make a little line where the bottom and the top
part of the beak join. And then we'll go on to do, I guess the pupil of the eye, I guess that's what they called, we've all got a pupil. Yeah, so that is just
still just one color. We will start doing the blending more when we hit the 2 grays
light and the dark gray, then we blend a lot with
the colored pencils. To be honest with Ga, Ga is not a paint that
blends very easily. That's why I prefer to use
pencils to finish an artwork off because the blending can happen so much easier with
the right colors of pencils. Remember what I've
said about the shadow, how it really, really
brings a artwork to life? Nothing brings an animal or a person to life like
actually adding an eye to it. It gives it so much character. Look at that. Now we
definitely have a magpie. Okay, onto the color of the eye. Use any orange that you've got. You don't have to have a
certain type of orange. It's a yellowy orange
eye that they've got. I've used orange lake light. Just use one of the oranges. It is like the tiniest
little bit that we could even if you don't have an orange and
you can't mix an orange, which is just red and yellow. But you could do it
with colored pencil as well if you really have to, if you don't have those colors. But I think we're going
to have a yellow anyway. So if you don't
have the red, yes, I would just use
colored pencils.
7. Painting Magpie P2: Okay, I have left me
mixing as part of the video because it's important that you see how
much paint I use. I'm making the gray now
for the back of the neck, I think is where I
first start with this. Just making a midtone gray by mixing that black and
blue with the white. I will use this color on
the back and the wing. I think I actually use
it in the beak as well. But with guash you
don't mix a lot. Especially for what we're mixing the gray for you're not
having to scoop huge amounts. You just need a wet brush. Put a bit of, of
each color onto you into a new mixing area
and make that new color. It's really, really light blue. You can see a really light blue. I might zoom up a bit for you now that you've mixed
this new lighter blue, just put this down. You still not doing
any blending. We're just filling in
the white areas so that they don't stand out
as pure white anymore. Again, the magpie
is not pure white, always looks a bit dirty. Those white feathers, they
can look quite clean, but we still don't want to
paint them as Chris white. We want to give them
a little bit of a grubby look to them, like they've been working hard to find some worms
for their breakfast. Oh. Okay, we're back to
color mixing again. We're making the darker gray. This is going to be just going over areas that
we've just been in, but just adding a darker value. This is our guess what we're doing because we can't blend. We're just laying down
more of a block color. And then we'll let the
pencils do the blending for adding a little bit more black to your white and dark blue. And it's just it's still a
gray blue that's happening? Yes, it looks like I'm doing
a really bad job here, but we cover all that up
with the colored pencils. Yeah, it's not going to look
right, It's going to look. We're really not doing
a great job of this, is this is how G
works very hard to blend and easier to use the
color pencils afterwards, you can blend with guache, but you literally
have to add tints and tones very gradually and
keep building up the layers. And gah will only let you
put so many layers down too. I don't know how many it is. It depends on how
watery your brush is. All the paint is. Yeah, you
can only do so many layers in Gua I do know that it actually happens
in the shadow of the bird. When I'm going over it
with colored pencil, some of the paint will chip off. This is because it's
had enough layers. It doesn't want to
do any more layers. And because I'm putting a hard
pencil down on top of it, the paint is dried and it just doesn't want to adhere
to the paper anymore. The paper is a mixed
media sketchbook. It will definitely
paint, but gas. It doesn't like to
have too many layers. I obviously had put down a little bit too
many layers for it. Anyway, I'll turn it
back over to the music. Actually, no, I won't
put it back over to the music because I'm literally about to do the little
high lights on the feet, and this is again
where the bird is starting to not have
that flat look about. Oh gosh, I got to add. There we go. I've
put it back in. Okay. Yeah. The bird goes from that
two D flat look to a more realistic
three D looking bird by just adding these little
highlights as we go along.
8. Painting Magpie P3: Oh, gosh, we've got dogs and Lawn Miles in
the background now, probably because it's
a clear afternoon. Anyway, you can see
that I am now painting over the blue on
the bottom of the, the inside part of
the tail feathers and also the inside
of the belly. I'll do that as well. So it is like the
tiniest little bit of the raciena the
reason I'm using the raciena is because
it's a reflection from the sandstone ledge that
the magpie is sitting on. So we just want to
reflect a little bit of that warm color coming up onto the magpies belly and the inside part of
his tail feathers. So yeah, I do this. Then, of course, we go over
the top with colored pencil. Just to give it a little
bit of texture as well. All right. So pretty much for the next 20 minutes
of this video. I am just adding bits of
color here and there. I'm not introducing any
new color to the palette. I'll be going over some black
areas might be darkening or lightening that gray Tad just pretty much going
all over the magpie. I do the little toenails,
I guess they're called. I add them and a few marks in the feathers to make them
not so straight edged. I'll put the music back on and there's about 20
minutes worth of this. I'm not going to
speed it up because I want you to be
painting with me. I don't know if I actually said that at the beginning
of this video, but the idea behind this video is that we
actually paint together. All right. So enjoy. And if you don't want to listen to the music that I've chosen, just turn it down. And just enough so
that you can hear me come back in about 20
minutes time. All right. Enjoy.
9. Painting Magpie P4: Okay, how are we going
with our Magpies? It's starting to look like
mine on your artwork. You'll notice that I've just
grabbed my pencil again. I am just marking in where those shadows are of the Magpie. You don't have to do
this with pencil. You can do it free hand. I just have preferred to do it. I think the lines were down
there before the raw sienna. A Sienna, yeah. Raw Sienna went down, and maybe they've disappeared. More so for the shadow as well. So I'm not going to be
using any new colors. I'm just mixing with the
colors that I've already got in my palette to
make this shadow. All right. So I'm going
to put the music back on now for the rest
of this video. It is about another 10 minutes. It's not sped up, so it
will be in real time. Basically, I'm doing
the shadow of the magpie and then the
texture on the sandstone. There's no new colors
that I'm adding, so I'm only using the colors that we've already been using. Just keep popping your head
up and watching myself mix those colors because
you'll just see myself get those little
tone differences, et cetera in them. All right. Enjoy. M. M. Oh.
10. Painting grass: Alright, so we start
to wrap things up now. We've got our magpie down, we've got the shadow down, and we've got a bit of texture happening in the sandstone wall. We are now going to
start on the grass. So like I said earlier, it doesn't matter that you
can see so much brush work in that green background at the
moment because we're about to paint over it
in little strokes, so very impressionistic style. I have turned my
artwork upside down. I do recommend that
you do this as well, because the brush strokes, you want them to be
your brush lifting at what will be the top of the blade of grass,
not the bottom. You can see I am mixing different greens now just with the colors that
we've already been using. So you want to watch that again, just go back and listen again. But basically, I'm
just going to start adding little bits
of grass color. Keep looking at your
reference picture to see just the areas that are a little bit darker and
lighter, et cetera. There's no right or wrong as to what part you put down first. You can go light to
dark or dark to light. It doesn't really matter and just nice little
brush strokes. And just enjoy it. It's not going to go too quickly because you're not
really putting down a lot of color on
the surface too quickly, but it will look
effective in the end. All right. So I
will flip over to some music again and
enjoy this process. All right, I do tell a lie. I am going to come back when I start doing the white
highlights on the grass. So in case you're
not listening to my music and you're
listening to your own. When I start painting grass, might be good to tune back in because I've got a little
bit more to say. Thanks. All right, so I have turned
my magpie back around because the next
lot of strokes that I'm doing are very, very tiny. They're more just like touching the surface and putting
adding little dabs. So we've done the highlighted
grass and the mid tones. I did say at the beginning of the video it doesn't
matter which way you go, but I guess I'm hoping
that you've all gone with me because I basically
do the white now. Tiny bits of white
here and there, and I do some green. So I just wanted to let you
know that that's happening. Just keep looking up
at your reference or however you're looking
at the reference. And yeah, these are you're just touching the paper
with your white. And it's not really
making a stroke. It's just little highlights
that are being added. Okay, so we are now just doing the shadowed blades of grass. Again, not really putting
too much of a stroke down. And you can see that
I am mixing a bit of that deep blue and I think it's the deep blue
rather than the black. Yeah, don't touch the black. The deep blue, making
a darker green. You don't have to
mix too much of that blue to make that color. You should be able to see
turning out in your palette, just how I'm mixing it here. Actually, I'm
adding quite a bit. I'm obviously after a green. And then, yeah, just
adding it like we did the highlighted white
areas of the grass. Okay, so this is the end of the painting part of our magpie. Next up, we will start working
with the colored pencil. There is one little video that I've added to the beginning
of the colored pencil, which is just touching up
a few bits of the guash, and then we go straight
into color pencil. So enjoy the next video where we start on the next medium.
11. Magpie Coloured Pencil: Oh, we are getting so
close to the end now. Now, like I said
in the last video, just at the end, I've got just this little
bit of touch up. So I'm pretty much just
sticking to the black. And just adding a cow, little bit of black areas, probably where gas pain has
just gone over the top of it. And I think I put
a bit more detail into the gray on the birds. Hang on, let's see,
on our left side. I just add a few more little black dashes
in there as well. So this will finish and then we'll get into
the colored pencil. So with the colored pencils, as I said at the
beginning of the project, It doesn't really matter what
colored pencils you use. You don't have to stick to
a certain brand or quality. So if you've only got student grade colored pencils
at home, that is fine. The really, really dirty, cheap ones are
probably not great. They will be either
super waxy or they'll be really hard pencil lead, and they will chip the paint. So in regards to that, you will get a few
little chips of paint because you're
working over guash. You shouldn't have
too much problem. It depends on how many
layers of guash are down. So I do know that in
that tail shadow, I have a little bit of paint that chips off and you start to see that orange come
back through again. But it's not a biggie. Like, it's not a
big deal for that to happen. I'm okay with it. This pencil, sorry,
this project I have done with my polychromo
faber castle pencil. I do have theory, the faber castell bc dura, which is the watercolor pencil, and I do tend to use
them a lot as well, but I didn't do that
on this artwork. There's not a great deal of colored pencil
that goes down. You basically just adding a little bit of tone
here and there, as you can see me doing. So have a go. Just add a few little
highlights here and there. Add some shadow with
the colored pencil. You do want to try and get color correction
happening with it. You don't want to be going over a dark blue area
in a royal blue, you know, a bright blue
sky blue kind of pencil. So yeah, I can only really be guidance as to ideas
from this stage. You really got to
approach this yourself. So this video will be in two parts as well because I
don't speed the video up. And then I think the next
video is the last video, so that will be the wrap up. Exciting. I can't wait to
see all of your magpies. Oh. A A
12. Finishing touches to our Magpie: All right, everyone. If you
have made it to this video, you have made it to the
end of the project. So well done and
congratulations. I hope that it hasn't
taken you too long to do. I'm pretty sure I've
already said that I am a pretty slow painter
and sketcher. So I Yeah. I haven't really I think
I sped one video up, but so marginally that
you wouldn't even notice. So it's all pretty much in
real time that I have done this and hope that you have been able to do it
around the same time. While this is going, what I'm actually doing
here is I'm putting black pencil over the
black guash paint, and that actually is
providing a really, really nice texture, which I think I show at the
end of this video. Um, and it kind of gives
a little bit more of a feathery look to it just by you can see that there's a little
bit of difference. It's like a a lighter
black that's going down. And yet, it's just providing a really, really nice texture. So this is all this video is. It's just literally just
touching up a little bit more in the colored pencil.
And then that is it. So please make sure that
you use your project and resources tab and photograph your work even halfway through, put posted in there
so that I can see it and be able to let you know, how you went, like
critique it for you. If you don't want a critique, but you still want to
show your project, then please just do that, just let me know that
you're happy just to show it and show everyone
else what you've done. And maybe can let me
know if you are here in Australia and whether or not the Magpie is a
common bird to you. They've been in
the news recently a Magpie called Molly
on the Gold Coast, who's actually a boy, Maggie, but they
didn't know this. And she has a really strong bond with a staff Molly and Ruby. I think the name
of taffy was Ruby. And anyway, so Molly is
allowed to stay now, and she comes in and plays
with the dog, and it's really, really sweet to see a wild bird be so playful with
a domestic dog. All right. Well,
thank you again. And I look forward to
seeing your magpies. So I'll put some music on now
till the end of the video, and it is just me
finishing off my coloring. All right, lovely.
Thank you. Bye. A. As
 Jane Whittred, Art Teacher and Illustrator at Mrs Red's