Transcripts
1. Introduction & Course Overview: Art is all about to get the freedom to explore
the creative world. It's also about make some
simple things joyfully. It's not about making
always big masterpieces. So let your inner child enjoy the process of making instead of focusing on
perfect masterpieces. In this class, I'll
teach you how to make simple and mindful mans with a lot of positivity
and creativity. I'll teach you how you can use your handmade mandalas
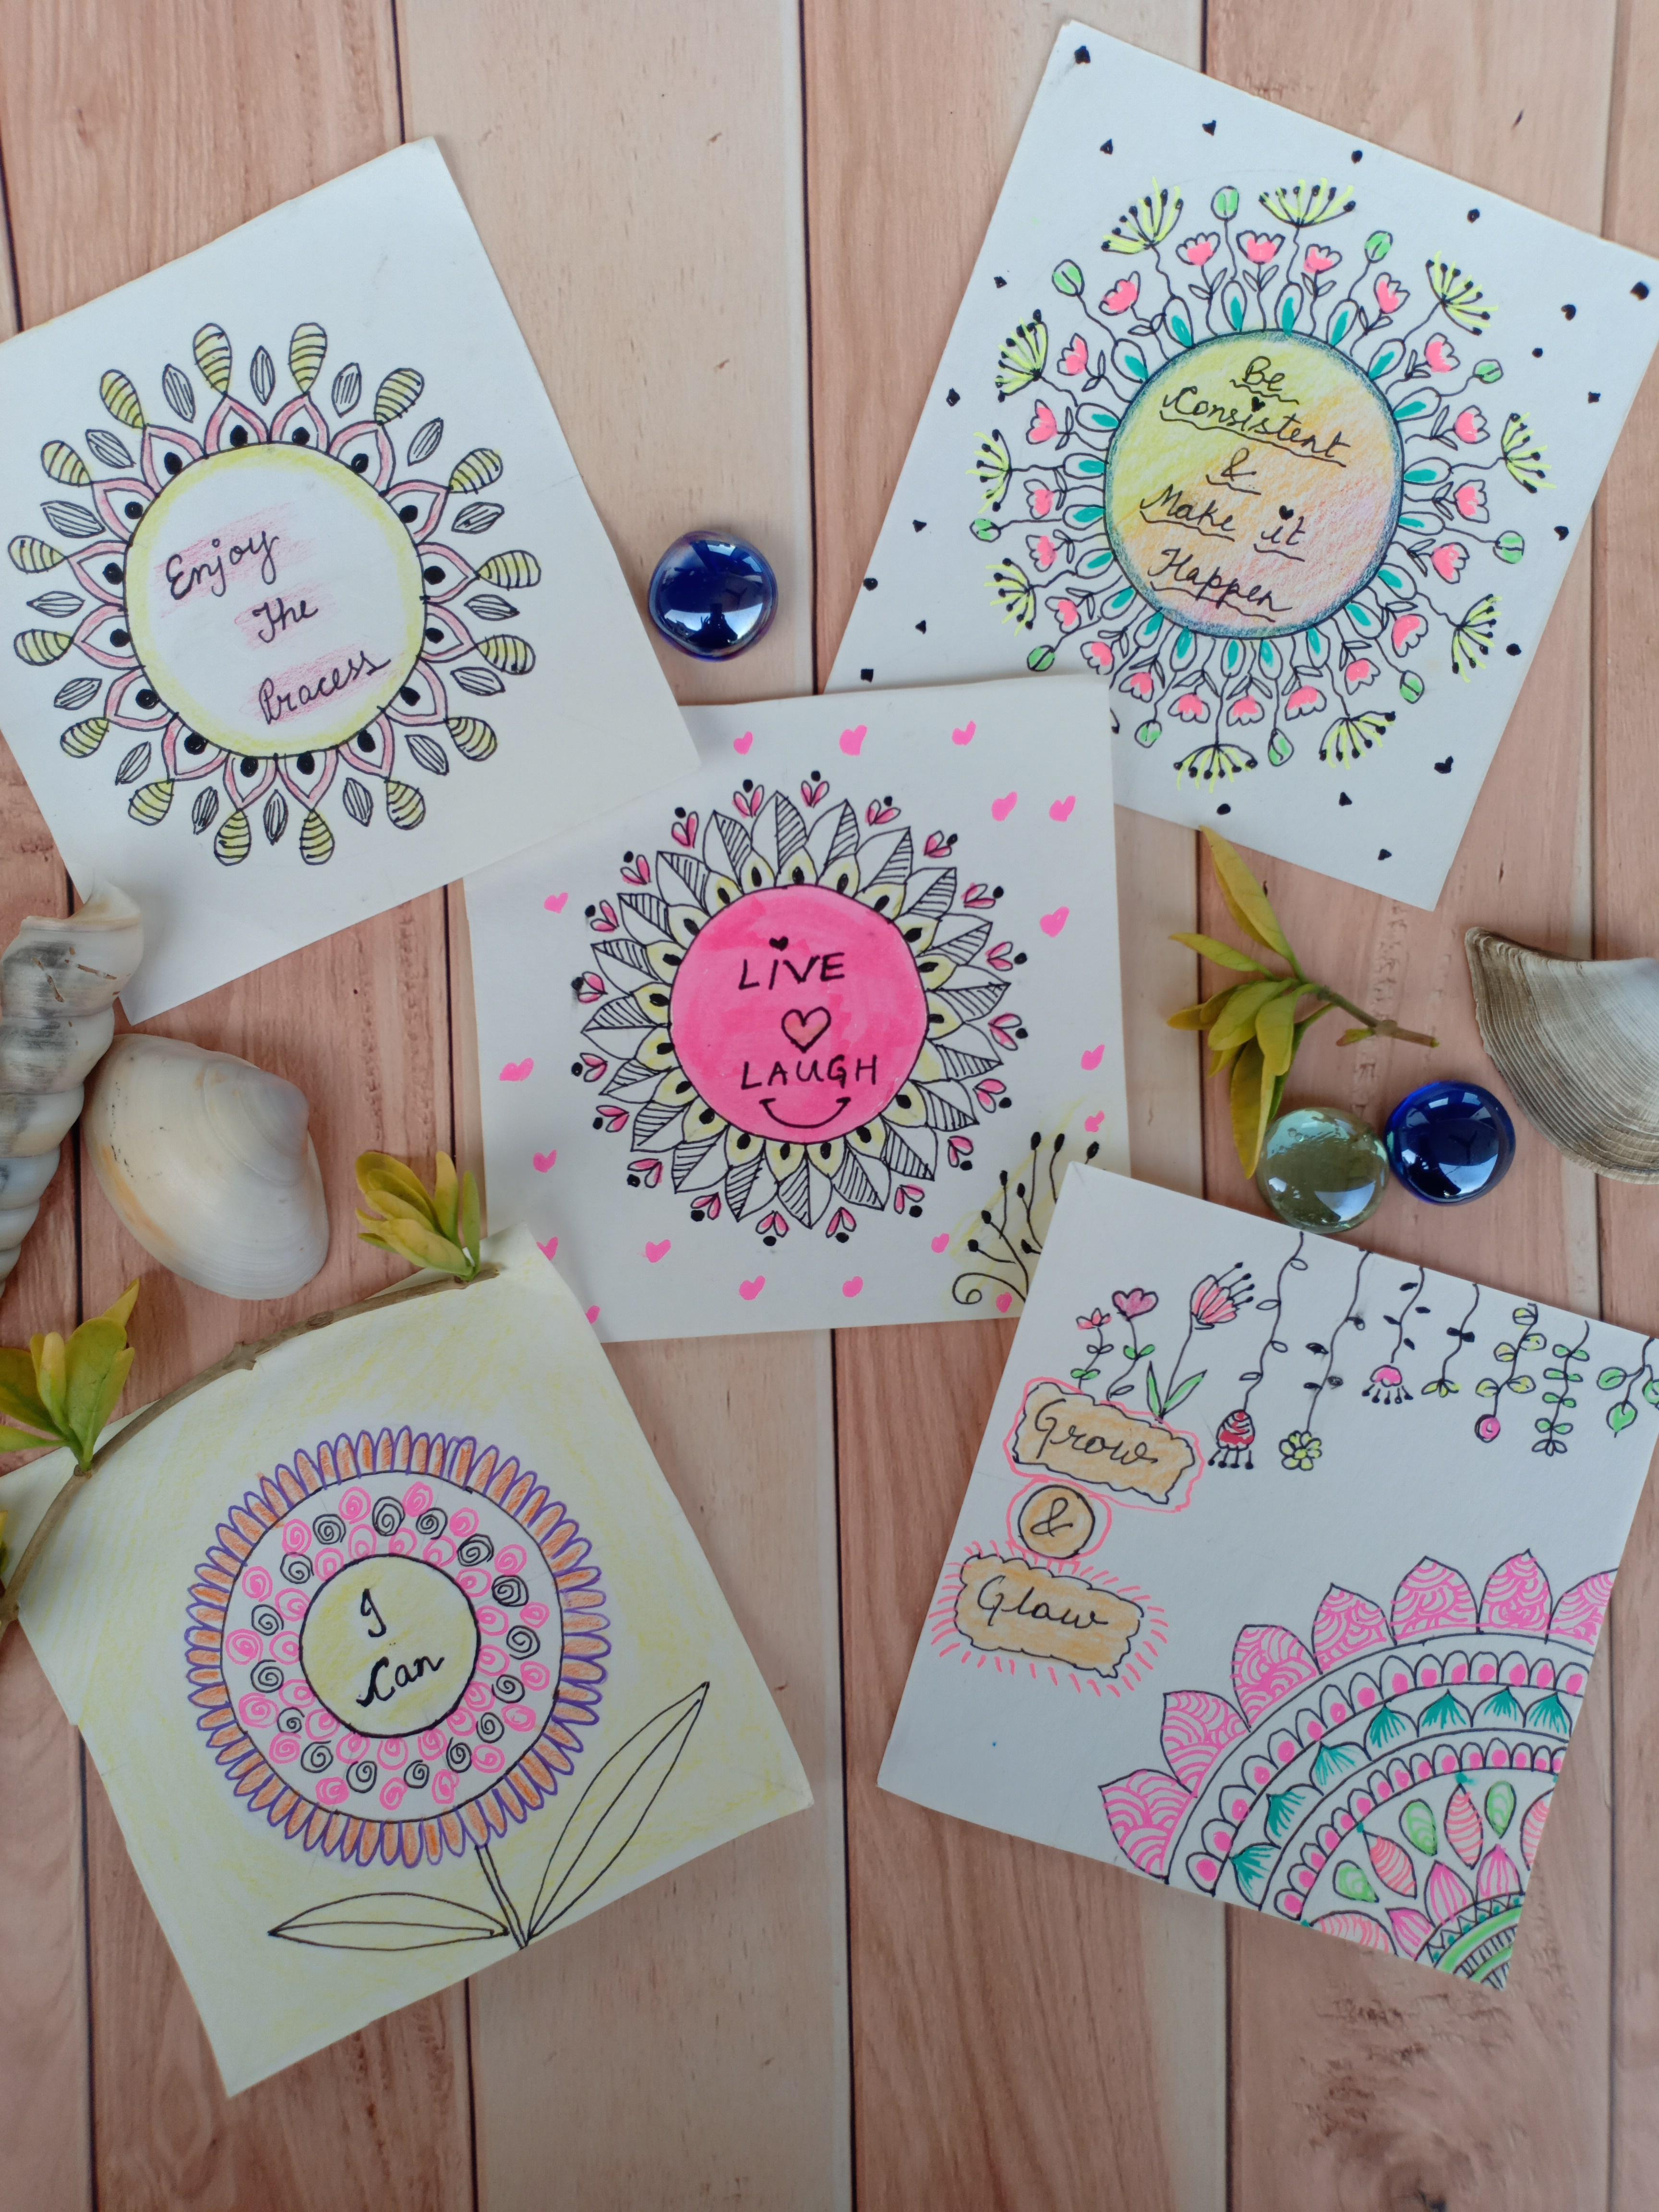
in day to day life. We will create five mindful
mandalas with very, very simple process and readily
available art supplies. Hi, my name is Shalini. I'm an artist, illustrator, and art educator from India. By making mandas, you can
not only relax your mind, but you can also boost
your creativity. You can increase
your confidence. You can learn the skill
of getting patience. You can increase
your focus as well. So, guys, why to waste
our precious time? Just let's start this creative, mindful and relaxing
journey. Thank you.
2. Essential Art Supplies: Let's talk about the art supply. I'm using this Bristow
drawing sheets. These are 200 GSM. Can use any of the sheet
which is available to you, but make sure it should be
th like 150 GSM onwards. Here I'm using micron
pens for doodling. These micron pens comes
in different sizes. And here I'm using UIBLPen. This is also a black gel pen. These are some jelly roll
pens of sakura brand. You can use any of
the colorful pens, whichever is available
at your home. Here I'm using a highlighter, a pencil, and razor. And I'm using compass. Whatever is available to you, you can use any kind of
compass teaser, ruler. And these are some
pencil colors, which is of stdler brand. You can use any of
the pencil colors, whichever is available
at your home. So these are from
Stadler brands. So that's all about
this stationery. So let's learn how to make beautiful mandalas
in our next class.
3. Basic Mandala Patterns & Practice Strokes: Let's take a plain paper and start making our
mandala patterns. So here I'm making
a pointed patel. You can draw in the same manner. Go easily and now I am making round petals. So you can make it easily. These are just hand exercises, so don't worry
about the accuracy. Just try to draw it. And now I have made some herds. These are very basic shapes. Now, long pointed petals. You can practice it
as much as you can. These are pointed curved petals and making half
semicircle from inside. Same way, you can
make more patterns as per your creativity as well. Just give it a try. You can do it, I know. The more you will practice, the more good outcome
will come out. Always try to use your
own creativity and make your own new patterns. All right. These are
some basic patterns. You can make more patterns
as per your creativity. We will be using these patterns. So let's meet in our next
class for making mandalas.
4. Drawing Grids & Section Guidelines: So let's start making our
mindful mandalas for that. We just need a paper, and I have divided this
paper into six sections. So I have ten by ten
centimeter lines. After marking ten
by ten centimeter, you will have these
six sections. Now we are going to cut it
with the help of Caesar. For that, I have just divided
these sections by folding this paper so that we will cut it easily by
checking these marks. Now we have these
six small squares, and we are going to
make mandala grid. So make sure to make your
grids with the light hand. Don't make dark
marks, otherwise, because we have to erase
them at the these are just the guidelines
so that we can make our mandalas
perfectly. All right. So here I have
joined two corners, and I have made X mark. Now, we will have a
one middle point. And by intersecting
this middle point, we will make one
plus sign like this. All right. These are
our mandala guidelines, and same way we will make these guidelines
in five squares. We will left one square plane as we will make
patterns on that. Next meet in our next class,
5. Advanced Grids: Concentric Rings & Angle Guides: So now we are having one
plus sign and one X sign. So these are our
mandala guidelines. And now we will make circles by using any compass whichever
is available with you. So now I'm taking 2.5 centimeter radius
and making a circle. And then you can increase
approx half centimeter, and then you can make more cocentric circle and then approx one more half centimeter, you can make one more
cocentric circle. That way we have
made three circles. Same way we will make these cocentric circles in
three other papers also. And and now we will make a circle from the
bottom, like I am doing. So randomly, you can make five circles and you can increase the radius
approximate 1 centimeter. I have made total five
circles from the bottom. You can see how it comes out. Same way, you have to draw it. So now we have completed
our mandala grids, and in the next class, we will learn how to draw
mandalas. Thank you.
6. Design 1: Outlining the Layered Petal Frame: Start making R mandala here, I'm using the UNIPOL pen and you can use any of the gel pen
whichever is available to you. If you find these pens, that will be great. Now I'm making a circle
over the pencil mark. And now I will make
pointed petal. I'm directly drawing
with the pen, you can use pencil also. Here I'm making dot marks. To divide it. And same way you can make
these pointed petals. Make sure to be in the grid
line to get the symmetry. And now I'm making a patel just go easy
and have patience. You will draw it. And now I am making
one more curved petal. You can use more patterns as
per your creativity also, or you can make same
which I am making. Now just take a eraser and erase all the guidelines which we have made earlier with the pencil. Our mandala outlines are ready. Let's learn in the next class
how to fill these outlines.
7. Design 1: Adding Details & Color Fills: So let's fill our
mandala outlines. Here, I'm using
the micron pan or detailed pan and making petals. If you don't have this pen,
don't worry about that. You can use any of the pen
whichever is available to you. Now making a semicircle and filled it directly
with the pen. Now filling these petals, you can also draw lines
like I am making. Or you can use your
own patterns as well. Now I'm just
randomly shading it. You can make like that or you can fill it
completely with the pen. Now I am writing a positive code in the
center of this circle. You can write any of the code, but it should be
obviously short code, and I'm using some motivational
code in your handwriting, just write it in the
center of this circle. So here I'm writing,
enjoy the process. All right. So now I will use this pencil color and just
highlight these words. Now I'm using this
yellow pencil color and making this circle from
the inside highlighted. You can make it like that. And also using
this pencil color, the outer petal, I'm filling
with this yellow colour. Oh. So this cute mandala is ready with a positive
at inside this. So let's forward to our next class and we
will make other mandalas.
8. Design 2: Sunflower-Style Mandala & Swirl Details: So now we are making
our second mandala by using these jelly roll pens, making a circle over the pencil mark and using
this bright pink color, and you just try to
make spirals like this. So same spirals I'm making. Now, make spirals in between two spirals with
the help of black color. And now I'm making
the spirals with pink color and making a circle over the
pencil mark like this. Making round petals with
the help of purple color. And just erase your
mandala guidelines and write your positive quote inside this circle
in the center. Here I'm writing, I can. So now I am using this orange color and
filling these petals. And by the help of this
yellow pencil color, you can fill the center circle. And I am filling this space also with the
help of this pencil color. Alright, so I'm making
a stem like this and making two petals like this. So you can see how
we have converted this mandala into a flower
with a positive code in it.
9. Design 3: Heart Motifs & Geometric Radiant Sunburst: So let's start making
our third mandala, and I'm making the circle
over the pencil mark. And now just make curvy pointed petals and make
sure don't come out from the grid lines
so we can get the symmetry and now
make petals like this. Go slowly and have patience. You will get the
symmetrical petals. Now make two little
petals like this. Now, do the middle partition of these petals and make
slanting lines like this. Now making a semicircle, and filling this with the pen. Now, just making dots. Erase your mandala guidelines. Here I'm using a highlighter to highlight this middle circle. If you don't have this, you can use pencil color also. Make sure this highlighter don't come out from this
circle outline. So making colors with this highlighter in
the outer petals. So here I'm writing live, love, laugh. Making a smile. You can write any of
the at which you want. And now making some steps
now making some branches. And so now I'm making some
botanical petals like this. You can make these leaves or
different kind of leaves. It's wish. I have also a
class on botanical line art, where I have taught so many different kind
of petal flowers. So you can take that class also. You can get the details of that class in the description
section of this class. Here I'm using the
yellow pencil color to fill these petals. And I'm highlighting
this botanical pattern, and now I am making small, small herds, with the help of this
fluorescent pink color. So now it's ready, and you can see how
beautiful it is looking. So let's forward our next
class and learn new mandala.
10. Design 4: Half-Mandala Corner Layout & Hanging Vines - Part 1: So let's start making
our fourth mandala. This mandala will
be different as we are using the guidelines
from the bottom like this. So now making some petals. You can make petals like this, and now I'm making circle over the pencil mark and making
rounded petals like this. So you can make your own
patterns as well if you want to draw something else or
you can make like me. All right, so now we are making some botanical patterns from the upper part of this paper. Like this. These
are so cute leaves. Make it slowly. I'm trying to make different kind
of leaves here. I wanted to give a nature
look to this mandala. So here it is. Making some flowers,
leaves like this. Alright, now I'm
erasing the guidelines and by using this pink colour,
colouring these petals. Now using this green
fluorescent pen color. If you don't have these pens, you can use pencil colors
or any other colors. Even you can use
sketch pens as well. So I'm just giving it
a shading like this. Now, I'm just filling
these petals like this, or you can make something else. It's just we are just
filling that petals part. All right. So now we are
coloring these flowers. And now coloring these leaves.
11. Design 4: Half-Mandala Corner Layout & Hanging Vines (Part 2): Now here I'm writing my
positive coat, grow and glow. Now just doing a
doodling over it. Give it a shape of
boxes like this. All right, so I'll make some
more botanical patterns. Make some leaves,
petals like this. Now, just highlight this area with the help of
this yellow color and coloring the flowers with pencil colour or even you can
use these jelly roll pens. Now, I'm highlighting
this glow area. So now you can see how
beautiful and cute it is looking with
the positive note, with the nature patterns, and with the mandala. So we have drawn so
many things in it. You can gift it to
your best buddy, or you can decorate it. You can get it frame. So let's forward
to our next class.
12. Design 5: Botanical Sprouts & Dotted Floral Wreath: So let's make our fifth mandala. And here I am making a circle over the pencil mark with
the help of black color. Now making some
patals like this. Try to maintain the similar
gap between the patterns. Now I am making some
stems and flowers. Randomly, I'm just dulling. No need to draw some
perfect stems and flowers. You just draw like I am
drawing and it will look nice. Now making some small leaves. Now here I'm making more
botanical patterns, and I am making it
after two flowers. So that way, we will have a
similar kind of gaps between our new flowers. Right. So now I'm making more leaves Just be creative and use
your own patterns, use your own creativity. And now I'm erasing all the mandala guidelines
so you can also erase it. Here I'm using my
green jelly roll pen for coloring these petals. Now I'm using this
pink jelly roll pan to colour these flowers. Now, I am highlighting these flowers with
the help of yellow, with the help of yellow pen. And again, I am filling the green colour with the
help of this jelly roll pan. Now, from the inside, just use a light yellow color and give it a shade like I
am doing, but not the full. In the middle, you can use
orange color and at the end, you can use dark pink color. So that way we will get a good mixing of colours
and it will look beautiful. Now, here I'm writing
my positive quote, which I really think
anyone should follow, be consistent and
make it happen. So now I'm telling you guys, be consistent and
make it happen and try to make more
and more mandalas. So see how beautiful it is looking with a
positive note in it. You can do some variations
like I'm making t on the eye. Now I'm making small, small different geometrical shapes like
circles, triangles, hertz, squares and coloring with this black pen. All right. And with the help of
this dark blue color, I'm highlighting this
circle from the inside, so that way, it will
give us a three d look. So you can do it like that. See how beautiful it is looking. So, guys, be
consistent and make it happen and try to make
more and more mandalas. You can use it in
different ways. Thank you.
13. Practical Uses: Bringing Your Art to Life: Now, the fun part begins. Let's see how to use mandalas. Here I'm taking the double
sided tape and I'm sticking it on my wall in
front of my eyes. That way, I will
get a good vibes. See how beautiful it is looking. You can use them as
a bookmark also. You can use it in your
diary or in any book. You can also use them
as a table record. Here, I'm taking a
old wedding card and double sided tape. I am using the backside of this old wedding card and I have removed all the
names and written things, and I'm just sticking it. Now it is enhancing
the look of my table. And also giving me
the positive vibes. Now I'm using a deck calendar. So I'm using the backside of this calendar because
it is all plain. And here I will stick my cute pandas with the
help of double sided tape. You can place them
as per your wish. And here it is ready to
enhance the look of my table. So see how beautiful
these all are looking. So here, I'm using
a old photo frame, and I'm sticking it in the
center of this photo frame, and I will place it as a photo. Now our photo frame with
positive code is ready. You can keep it
anywhere you want. All our work is looking so nice. Now it's your turn to
share your creativity. I would love to see
your creative projects. You can share your work in the project section
of this class. I'll be happy to see your work. See you in the next class.
14. Final Thoughts: Congratulations to you for
completing your class. You have created
five mini mandalas with a lot of positivity. And now you are skilled enough
to create more mandalas. I would love to see your work. You can upload your work in the project section of
this Skillshare class. You can also tag me on
my Instagram handle. Creative underscore kalakari so that I can share your
work with my audience. If you really like my class, then do not forget to leave
a feedback about my class. That will really motivate me. Do follow me on Skillshare so that you will get the
update of my next class. Thank you so much for
taking this class.
 Shalini Bisht, Artist | Illustrator | Surface Pattern Designer