Transcripts
1. Class Introduction Imaginary Leaves: Have you ever wondered about the possibilities at
your fingertips when using nature as your
source of inspiration for art projects as a tool
for grounding yourself. Welcome to my first
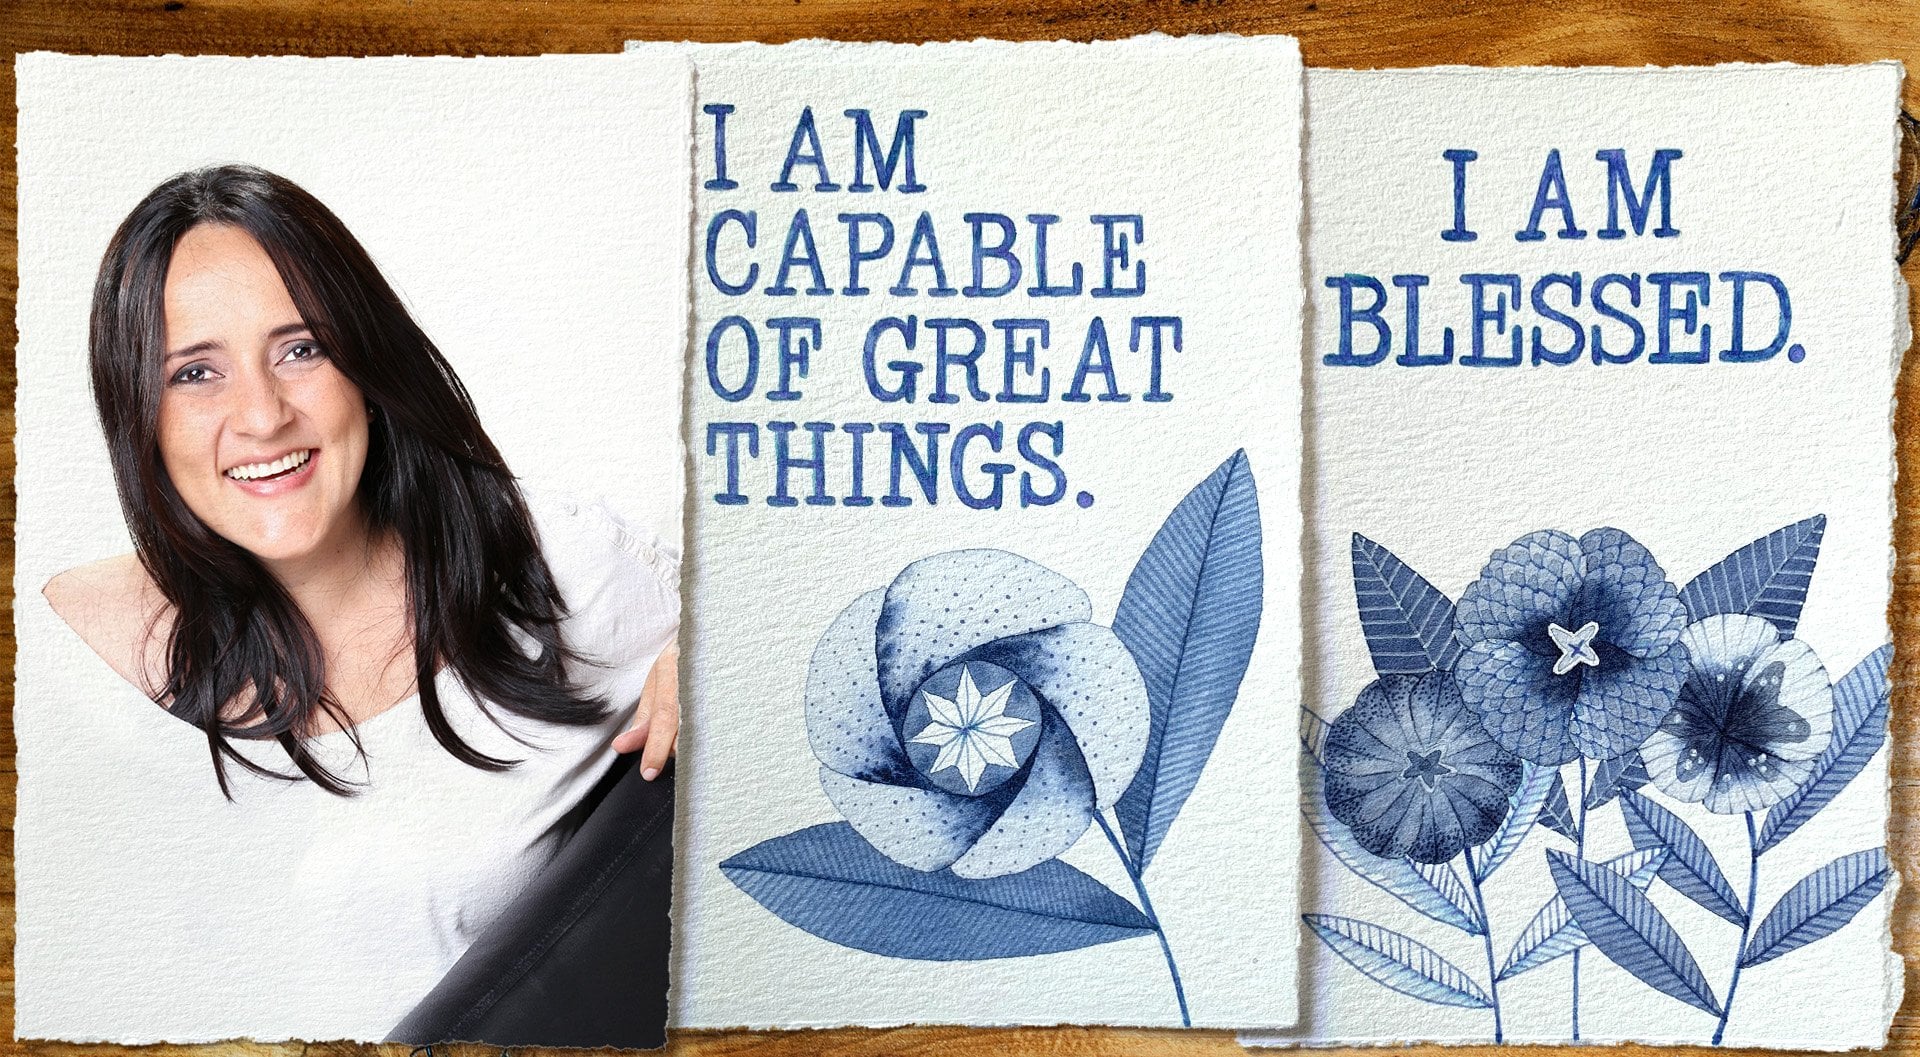
class. My name is Emma. I'm a surface pattern designer exporting my work
from El Salvador. I'm also a firm believer in
the healing power of art. I believe it can
help us process and navigate challenging concepts
in new and empowering ways. This class is suitable for both beginners and
seasoned artists. My teaching philosophy is
centered on simplicity. We'll use basic materials
and follow simple step by step instructions to make projects approachable
and enjoyable. This focused approach
fosters a sense of accomplishment and encourages
creative exploration. This class is ideal for
you if you're looking for a gentle and
supportive environment to quiet your inner critic, cultivate a sense of flow, and nurture your creativity
while building confidence, you'll discover how
effortlessly you can interpret patterns and
marks found in nature. Each day for a week, you'll create six
small leaf drawings inspired by photos I've taken. You can watch the
entire lesson or pause after each individual drawing
and move forward with me. For the full experience, I recommend you complete each day's exercise before
moving on to the next. Download the workbook PDF from the Projects
and Resources tab. It includes the photos
of your subject alongside the isometric
paper for you to print, as well as individual
photos you can download onto your device
and work in your sketchbook. After a week together
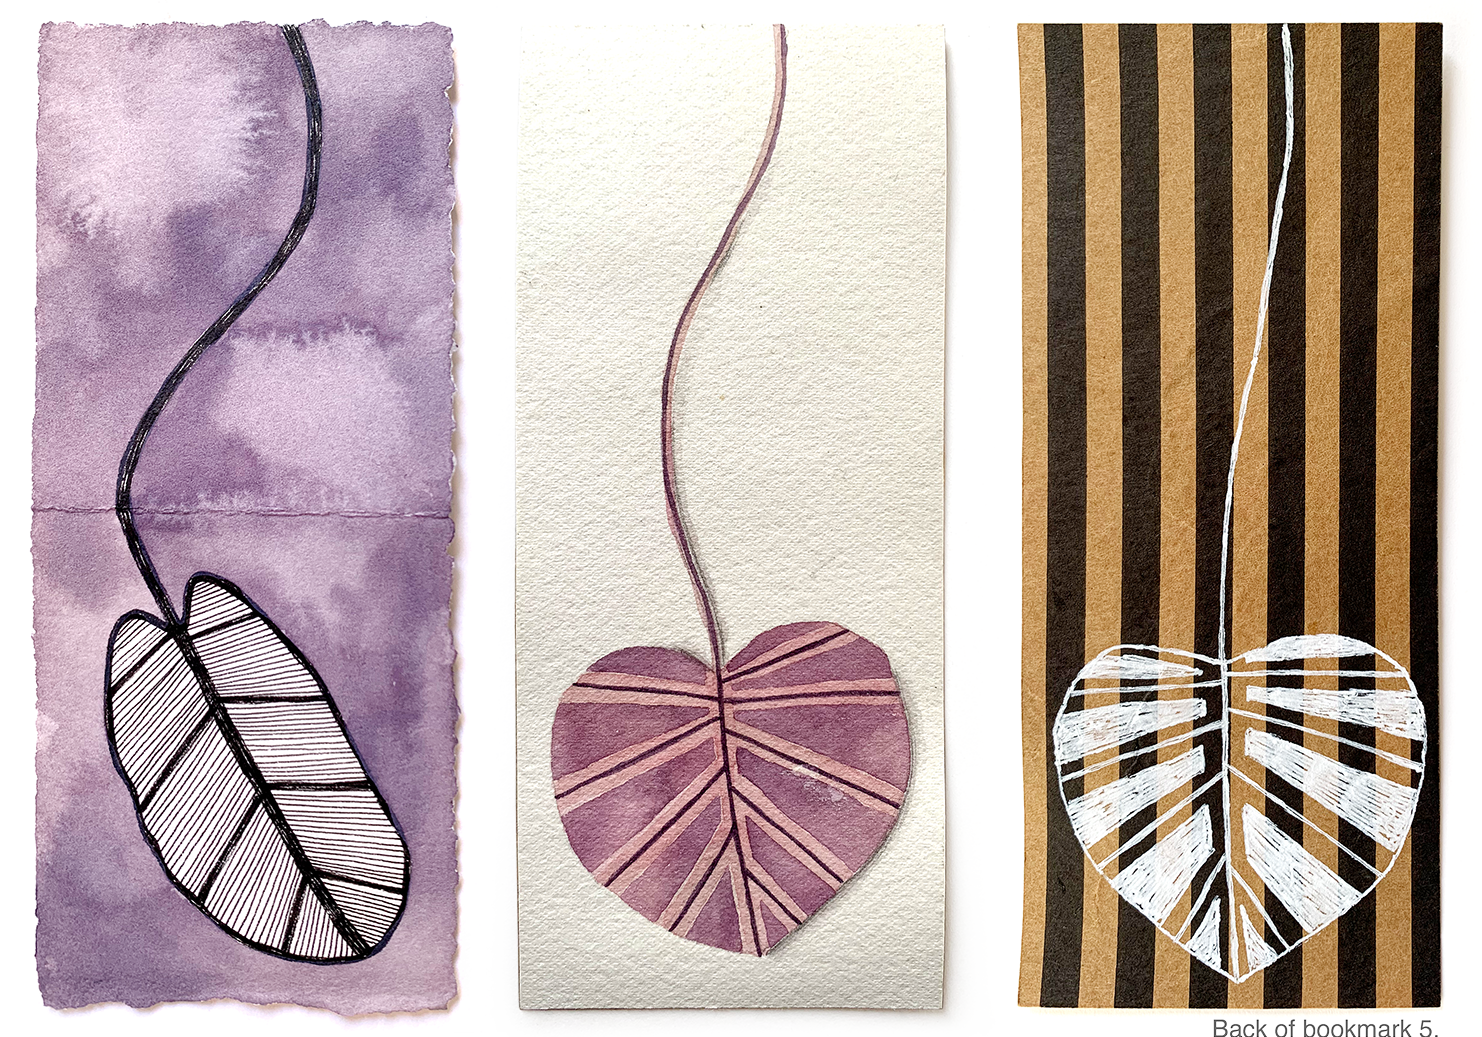
drawing leaves, you'll apply your
newfound skills by creating five bookmarks
for yourself. Or, why not? Is thoughtful gifts for
book loving friends. But most importantly,
you'll acquire the tools to expand your
library of imaginary leaves, enabling you to incorporate
them into future projects. From the bottom of my heart,
thank you for being here. I hope you join me, and
I sincerely hope you enjoy this class as much as I have enjoyed
creating it for you. See you in the next lesson.
2. Project Overview: I begin each lesson
with a brief intention. This simple practice
helps me center myself, shift focus, beyond the art, and consider personal goals
and desired emotions. It's a quick yet
valuable exercise that I encourage
you to join me in. These intentions serve
as gentle reminders to practice self kindness throughout
our lesson and the day. You'll see me making decisions spontaneously
throughout each lesson, and I encourage you
to do the same. This is a chance to embrace
your unique artistic voice. I often observe my
subject quietly. That's why I do voiceovers. Allowing my intuition to
guide my artistic choices. I love to share this
approach with you, encouraging you to connect with the details and nuances
of your subject, and trusting your gut feelings. You'll see me
encounter challenges, making mistakes, and adapt, demonstrating that the
creative process is often filled with unexpected
twists and turns. I've seen students
thrive when they follow their own path,
creating inspiring work. Extra photos are included
to fuel this exploration. Let's celebrate our
collective progress together.
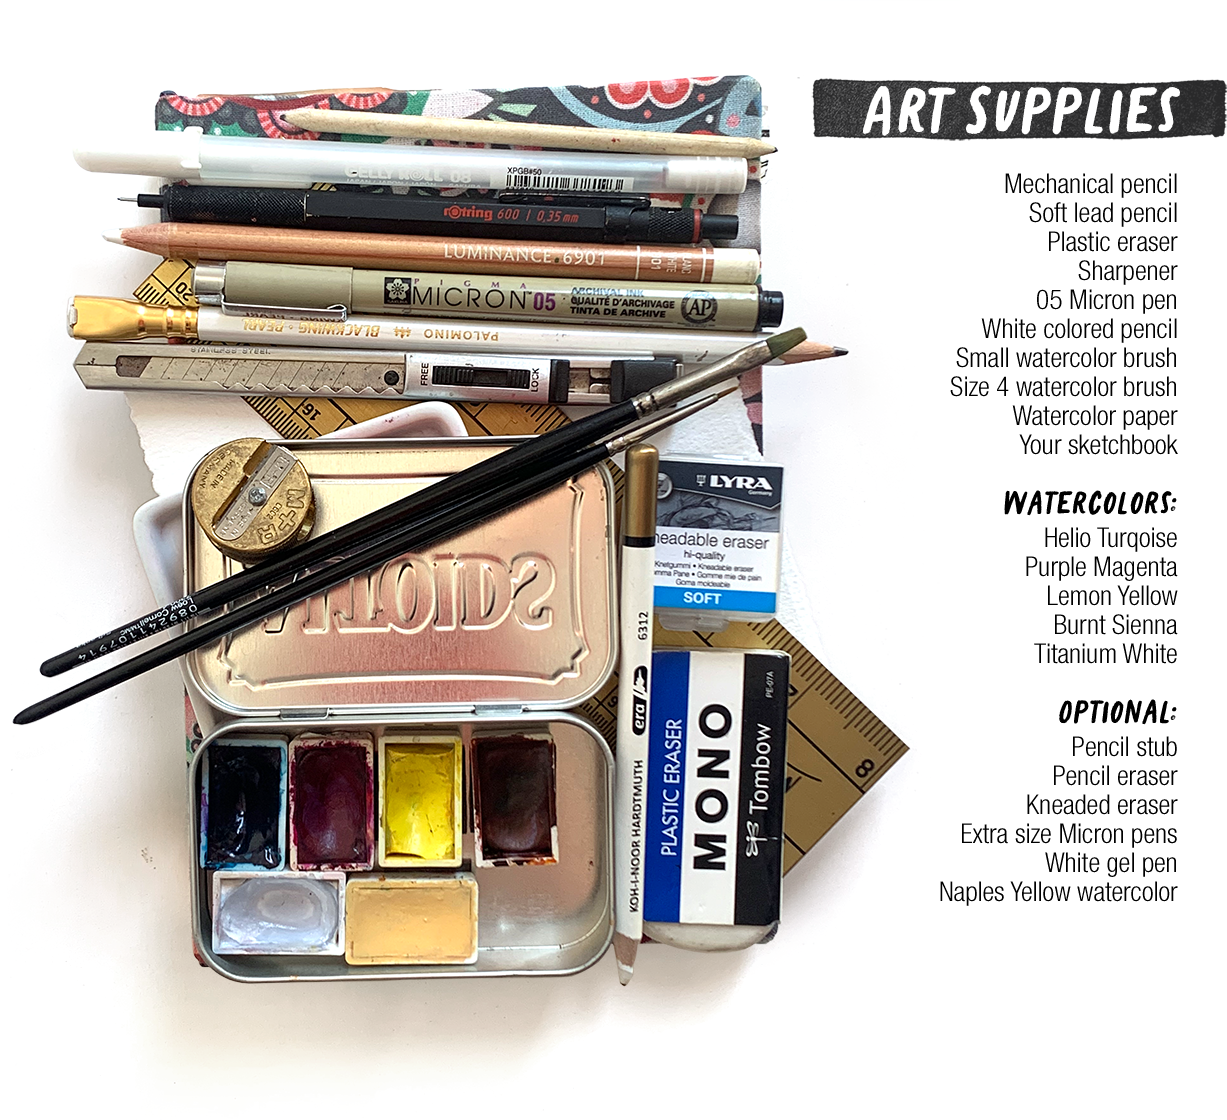
3. Class Tools: In this class, we'll be
working with simple tools. Our main objective is to unleash our creativity by sketching and designing imaginary leaves. So let's start with our pencils. I do 90% of my work with my 03 mechanical pencil and for obvious thicker parts with my Palomino or a
soft lead pencil. The interesting
thing about Palomino is that it usually
is waterproof. The erasers I recommend,
a pencil eraser. The brand I use is Koinur a regular soft eraser and a
needed eraser for sketches, where we need to lift
graphite before painting. Of course, a sharpener. And we can blend
graphite with a tip, but I prefer a pencil stub. If you have them, three
size of micron pens, a 02 for thin lines, a size one for thicker parts, and a 05 option, one that works, if you prefer. The one I had was running out of ink, but that
was fine with me. Any size of white pen, the one that worked for me was a jelly roll pen from sakura, a 08, not a five and a size ten. A white colored pencil, the one I used was
luminans from carandash. An exacto knife and a cutting mat for
trimming or bookmark, if necessary, or a
pair of scissors. A small and a bigger size brush, I use for this class
a zero spatter and a well loved
filbrit in size four. Of course, a cup for water and a palette for
mixing your paints. The watercolors I'm
using are SminkaHadam, Helio turquoise and
purple magenta, tenia lemon yellow,
burnt sienna, titanium white, and
Sminka naples yellow. Watercolor paper, any brand
you prefer I use arches, hot press and cold
press watercolor paper. Both are 100% cotton
and work beautifully. Oh, and scraps of
paper to recycle. Finally, your sketchbook to store your library
of imaginary leaves. You can also download the isometric paper
grid I've made for you, included in the work of PF found in the Projects
and Resources tab. With all that, include the
curiosity of your inner child, resilience, patience and
kindness towards yourself. And this is a small time lapse, just to show you
all the colors I explored with my basic
watercolor palette.
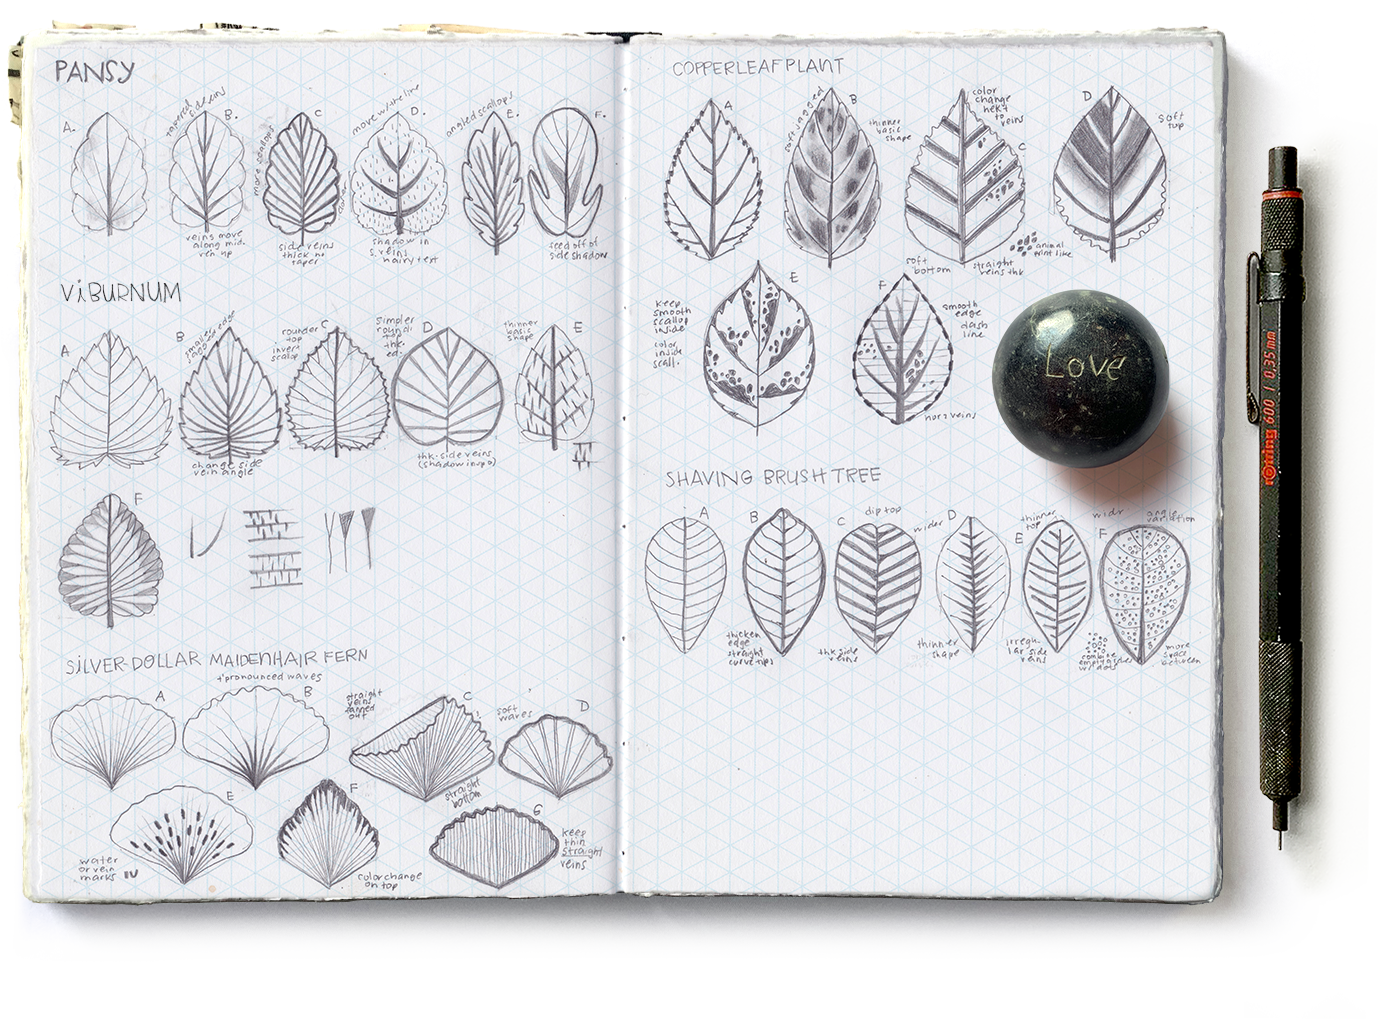
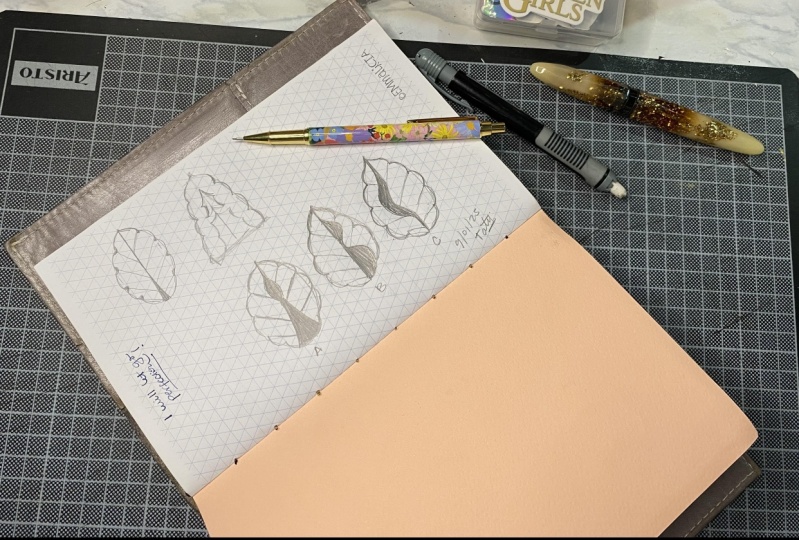
4. Day 1: Pansy Moonlight: Let us begin with a
moment of stillness. Ask yourself, what do
I hope to gain today? Is it a sense of calm, a spark of creativity or
something else entirely? Write down your
intention and keep it nearby as a gentle reminder. This simple act can
help you approach your art with a clear mind
and a compassionate heart. Today, let's embrace curiosity. Welcome to day one and our
first subject, Pansy leaves. Let's explore their
unique shapes by mindfully observing one of the leaves in our
photo reference to establish their
very basic shape. Estimate the height and width first by drawing vertical lines, having the angular lines from the isometric paper freely
soften the contours, forming a leaf shape. Spot something you
see that catches your attention like the
bottom part of the leaf, then gently sketch it in. The next thing that pops
is a scalloped edge. Using this detail, you can slowly start priming
your boundaries. Once you're happy with
this soft sketch, reinforce your boundaries
on both sides. Keep observing, looking for inspiration to fill in
your prime leaf shape. Ask yourself, what do I notice about the veins? How
do they branch out? We slowly draw them in changing the angle in each one
as they travel upward. Now, notice how the
middle vein stands out, tapering towards the
tip of the leaf. Let's draw that in.
Finally, for this drawing, freely and loosely depict some of the shadows
in your leaf. Determine where to put them as you experiment with
new tools like this pencil stub and finish
your leaf as you breathe. For the second leaf option, we'll vary some things slightly. You'll be able to see how
small tweaks are meaningful. Using the same leaf reference, follow the same steps to determine the very basic
shape of your leaf, priming and reinforcing
your boundaries until you have your previous
scallop silhouette. Then pencil in the same vein
from your first drawing. We will tweak two things. First, draw in the side veins with the same angle variation, but space them out
a little more. And second, apply the
tapered effect from your middle vein to all of your side veins for
this leaf alternative. Once more, follow the same steps for
the third basic shape. As you analyze your subject,
spot something else. Can you see how the scallops on some of the edges are
closer to each other? Proceta plan how to draw them
using simple guide marks so you have a reference for where to start and
end each curve. Once that's established,
gently prime your boundary. And when you're happy with
the sketch silhouette, reinforce your boundaries. Once you're done with that
step, draw in the middle vein. Tweak it by not making
it tapered this time. Now play with thickening the leaf edge by
layering strokes with your mechanical pencil or using a soft regular pencil to
create a thicker line. Let your reference photo
guide you to your next step. And always remember
your sketchbook is a place for creative freedom. Let's keep the soft angle
change from the first drawing, but instead of tapering them, make them thick and uniform
to create a new design. Consider the tool that
makes the task easier. Use the soft lead
pencil layering your strokes for an
even bolder look. To add a final touch, experiment with
bringing the side vanes closer for a more detailed
intricate appearance. Let's create your fourth leaf. Follow the same steps to
outline your basic shape. But this time, try a wider option for a
fresh perspective. Refine the contour until you achieve your desired silhouette. Take this moment to breathe, relax, and enjoy the process. Remember, here you get
to practice acceptance. Do so by welcoming and celebrating the unique
quality of your lines. For a new approach, revisit
your reference photo, find a new interesting detail and draw it within
your silhouette. Continue referencing
your subject, identify in the next
detail and add that in. As you continuously
study your pansy leaf, identify details and
shadows that interest you. Since we can and must
experiment in our sketchbooks, you're free to interpret
what you see, so why not? Let's block out the soft shadows above the side veins and fill them in to create a new
thick, papered curry vein. As you complete
your fourth leaf, remember to explore the
expressive potentials of your tools by varying your pressure to create
different stroke effects. A single photo can transport you to a universe of
creative potential. So mindfully observe
your reference until you find
something brand new. This time we will use a new
leaf for your fifth drawing. As you become more comfortable
with these initial steps, practice priming and reinforcing your new leaf boundaries
as you breathe in, finding stillness in these
simple yet meaningful steps. Every step is key. Each one helps you move forward. Now remember, you can
interpret things freely here. Use simple language and take creative
liberties, for example, the scallops on the photo
look somewhat angled, so simplify and reorient them. You see me hesitate there
a little, and that's okay. Just take a moment,
return to your subject, find a detail that inspires you, and go back to your drawing. Now you can also draw inspiration from
your previous work. For example, look at
the drawings next to your new leaf and notice the thicker edge on
the third drawing. Use that detail in
this new version. Now return to your leaf. See how some shadows make
the veins seem bolder or more angled and how they
branch out at the tips. Use your soft pencil to
draw in the middle vein, not worrying so much
if it's tapered. Then for the side veins, start from the inside, applying more pressure for thicker parts and less
for tapered ends. Now, the veins in
this leaf are closer together and remember some
branch out at the tip. Breathe. And don't worry about
drawing every single vein. Just try to capture the
overall pattern freely. Take a closer look at your
reference photo and zoom in. You'll notice the scallops are more recased into the leaf edge. Complete this drawing by
adding small pencil marks on the ends of some of the scallops to depict the small detail. I hope by now you feel more confident in your
ability to identify basic shapes and smoothly prepare your leaf silhouettes
for further development. For this last option, choosing something
very different from what we've been working
on can be daunting. But remember, to
enjoy the process, keep breaking down
your project into bite size manageable steps. You keep analyzing your subject. Loosely mark the width
and height you want. Once that's done, lightly
soften its contour. Constantly review your subject and focus on the
step you are taking. As many times as needed,
return to your leaf, locate where the most
prominent detail is, and gently mark that in your drawing as you continue
priming your boundary. Return to your photo and spot a second detail
to sketch in. After making those soft marks, you're ready to smoothen
out the edge to the right. You could flip or mirror the curvy line from the
right onto the left side, but let's check the reference
again just to be sure. The curves on the
left look similar, but the deep recess there is slightly higher up than
the one on the right. As you've already
practiced the right curve, confidently sketch
the left contour, ensuring the deep recess
is slightly higher up. Once you're satisfied with the lightly sketched silhouette, go ahead and start
reinforcing it. We've used the detail in
almost all our drawings. If you like, add the bottom
dip as you reinforce your last leaf silhouette and remember to breathe
as you do this. Let's finish this silhouette. Grab your soft regular pencil
and trace the outline. If your line wanders
a bit, that's okay. Just bring it back and
remember to breathe. Now, examine the middle vein and notice any color change
or lighting effect. You can interpret
this colored change with your pencil by using the pressure
technique we've been practicing to bring
this detail to life. Once you're done, focus
on the next step, drawing the side veins. Always remember we are in
a safe place where we can experiment like
finding inspiration in the shadows near
the side veins, block them out and use them as a new detail for this leaf. To complete this drawing, incorporate some of the delicate side veins we see in the photo. Draw these faint
veins playfully. Don't worry about their
exact location or angle. Finally, one more run through your reference photo
is a good idea. To see if you've
missed something, you can add to make your
drawings more intriguing. Do them in very close. Observe the hairy
texture in some of the leaves and choose
the leaf you'd like to apply this new
found detail as you finalize this first mini
collection of imaginary leaves. A fun side note. When I know
the name of my subject, I always write it down. I also like the
number or index them to make my sketch
collection more organized. It's like a checking
off to do list for me. When you finish today's lesson, take a moment to
appreciate your hard work. You've done an amazing
job. See you tomorrow.
5. Day 2: Doublefile Viburnum: Let's close our eyes and take a moment to
center ourselves. Inhale slowly, and exhale fully. Think about your
intention for today. I'm very grateful, but
sometimes I tend to forget how much art
helps me relax. So today, if you like, let's focus on creating with a
relaxed frame of mind. Welcome to Day two. I love
that you're here. Thank you. Thank you for making
time for yourself. Our second subject is a
double file viburnum leaf. The steps remain the same. Analyze your subject and define its height and width by
drawing vertical lines, followed by angular lines
to form a rough trapezoid. Continue using
straight lines and lightly sketch in the
bottom part of your leaf. Once you're satisfied
with the initial shape, soften the contours
until you reach the first basic shape of
this mini collection. Part of priming your boundaries involves eransing
unwanted lines, so go ahead and remove them now. Return to your leaf and notice the jagged edge
all around its edge. Gently sketch this detail
onto your silhouette, paying attention to
its overall pattern, rather than counting
every little peak on it, and remember to breathe as you
softly complete this step. Now that you've established your initial boundary,
let's reinforce it. Take a moment to breathe
and center yourself again. Once the boundary is reinforced, let's turn your attention
back to your reference photo. We can complete this
leaf by adding veins. Identify the most prominent
ones and sketch them in. If you're not sure how to do
so, notice their direction, or if they seem
straight or curvy, gently draw simplified lines
from the outer edge inward. Inspired by our light
guidelines, why not? We're allowed to experiment
in our sketchbooks, so let's not overthink it. Simply trace over
the soft lines. And even if our guidelines
didn't show it much, take notice in your photo how the veins shift direction
toward the bottom. For our second drawing, we will follow a
similar approach. Remember, we have the freedom to tweak things at any stage. This time, let's make the basic
shape a bit more slender. As you continue to practice, you'll develop the skill
to simplify your process. Soon, you will be able
to sketch a few lines and effortlessly soften
the contours quickly. With consistent practice, these steps will become
automatic to you. Remember, even the
smallest adjustments can have significant impact. We can explore these
subtle changes by lightly sketching
or testing them. Notice in your photo that the jagged edge isn't
uniform in size, so let's try making
it slightly smaller. The edge also has some shadows. We used a similar
technique yesterday. With practice, we'll be able to identify more efficient ways to create variety in our drawings by simply changing our tools. We reference our subject as needed, identifying key details. To build upon your silhouette, I find it helpful to start with the
prominent middle vein. And given the clear
structure of the veins, we can confidently choose the most suitable tool to
interpret these details. Next, applying what
we learned yesterday, we'll focus on the side pins. We'll use the
pressure technique, varying the length and form
of the veins this time. We proceed from the
center outward, considering their curvy
nature and direction. In the past, I
would erase what I considered a mistake,
such as a crooked line. As a former perfectionist, I now practice acceptance by letting go of
these imperfections. In our art practice, we can embrace our essence, recognizing that there is no such thing as
perfect or imperfect. Constantly and mindfully
observe your subject. Treat each drawing as a
small independent project. Follow the same steps to define, soften, and prime your
third basic shape. At any stage, we can make meaningful adjustments such as rounding the top of the leaf. Write these changes down to
solidify them in your mind. This will help in
future decision making. What else can we
see in your photo? Describe the details
in simple language. Notice how the jagged edge resembles inverted
scallops in some areas. Take note of these details, creating a glossary you
can use at any moment. Once again, we're in a creative space where
we can experiment. We can isolate details from your leaf and test them
out in your basic shape. If you're happy with
the look, confidently reinforce your
boundaries while using a tool that mimics the shadow in your reference as you finish
your desired silhouette. To continue its
focus on the veins, mindfully observe how the veins branch out at the edge
resembling a V shape, then travel down to
the central vein. So for these details, use your soft pencil to
first draw the middle vein. Next, draw the side veins
using the same pencil with soft pressure or with your mechanical pencil
for a finer line. Draw the V shape first, then the single line
down to the middle lane. Take your time to draw them, keeping the angle shift
seen in your reference. As you become more
comfortable, you breathe. And don't worry
about perfection. Feel free to adjust the curvy veins to a
slightly straighter option. We've discussed how decisions
can be made at any stage, even before you sketch
your fourth basic shape. Given this leaf's
strong details, we can opt for a
smooth overall look. As usual, start by
determining the height and width and then smoothen the
contour of your basic shape. We can also be bold and
experiment with isolated details. For instance, we can apply the smooth edge of the bottom of the leaf to the
entire silhouette. As we do this, take a
moment to breathe deep. We can later decide if we'd like to thicken
the outer edge for a more dramatic effect by going over the line
we've just drawn. To help you remember
the adjustments you make, take quick notes. This will reinforce
your learning. Now, this is a super
reinforced boundary, and as you finish
your silhouette, remember it doesn't
have to be perfect. Just focus on the overall shape. We decided to make this fourth drawing a
simpler version of the bernaf after drawing the middle vein and being inspired by their
strong shadows, we'll draw straight lines, mindfully observing
the angle shifts. To help us stay on track, jot down the changes you make. This will be useful if we
encounter any challenges and help us remember potential
options for future reference. Now, go over each
vein to darken them. Breaking down a project into manageable steps often reveals how simple each step can be, making the process
more enjoyable. Let's continue making
bold decisions. Establish the height and an even more slender width for
your fifth leaf variation. In your initial guidelines, include your vertical
and angular lines. Remember to take notes
to help you recall these options we are discovering as we walk down this road. Soften your contour
slowly and lightly, remembering to breathe until you achieve your
desired basic shape. Let's keep being bold. Let's space out the
jagged edge peaks and strengthen the leaf
silhouette at the same time. Follow the gentle guidelines
of your basic shape. Take your time and breathe. Next, dry thick
middle vein and add straight veins using pressure to achieve a tapered effect. Use the jagged edge as a
reference for placement, ensuring ample space
for the next step. Now, let's delve into the intricate details
between the veins. This leaf has a
beautiful texture. How can we capture its essence? Analyzing the texture, the lines start
from the side veins and either ascend
or descend towards the next vein,
gradually fading out. To capture the texture
in its simplest form, we can use the
pressure technique we know to carefully
render the lines. Feel free to use
your soft pencil, but I'm sticking
with my mechanical pencil for more precision. To create a subtle
fade out effect, go over the short
lines a few times, changing your pencil
direction with each stroke. Be mindful of where you place the faded lines to create
an interwoven pattern. Since we are experimenting
with different tools, let's try using a regular pencil and always vary the pressure. We can see that this
technique can also achieve the desired look
even in tight spaces. In addition to written notes, I recommend creating
visual notes also. This helps isolate
intricate details, making them more
visible and easier to incorporate into
your visual vocabulary. The steps remain the same. Take time with each one to establish a solid foundation
for your desired silhouette. Also, use this time to breathe. We build complexity
one step at a time. So keep observing your
subject for inspiration. Let your observations
guide your next move just as they have guided
me in my creative process. Trust your instincts. Now, don't worry if you
miss a step like I did by drawing the middle vein
too early, simply go back. Use the detail you
spotted that dip on the right side of your leaf
and sketch it in lightly. Then use a scalloped section to reinforce your
entire silhouette, focusing on the overall look for your last leaf for today. Also use this time to breathe. We've been inspired by
your previous work, and today is no different. Let's use our third leave
as a starting point. Begin by lightly
sketching guidelines to ensure we maintain
the angle shift. Once those are in place, start adding your
V shaped veins. First, the V shape, then a single line that travels
down to your middle vein. As we continue to practice, we'll find that this process becomes increasingly intuitive. Take a step back and see if you need to add a
few more veins. Keep refining your leaf until you're happy
with the result. Now, coloring is a wonderful way to reconnect with
your inner child. Through your inner child, you're able to let
go of judgment and allow yourself to
play to be you. Embrace your true self
and have fun coloring in parts of your details to depict the shadows
you see in your leaf. To add a finishing touch, take a pencil stub and blend the shadows to give your
drawing depth and dimension. Once more, take a deep breath as you finish today's collection of imaginary leaves and
be proud of yourself. You've done a great
job. See you tomorrow.
6. DAY 3: Silver Dollar Maidenhair Fern: We'll continue to
pay attention to details and connect with our
subject through drawing, practicing mindful
observation and allowing our creativity
to flow freely. Your reference photos
brim with inspiration. Today, let's embrace a more
experimental approach to capture the spirit of our subject rather than
its mere likeness. To keep it short
and sweet, today, I will experiment.
Welcome to Day three. Thank you for showing
up. Today's subject a silver dollar
made in hair fern. Even if the leaf you'll be drawing seems
somewhat different, remember to deconstruct
your mini projects, each individual drawing into manageable and
uncomplicated steps. Let's review them again.
Mindfully observe your subject until you
find something that speaks to you like one
of the fresh leaves. Draw your vertical
and angual lines as you decide on your
leaf's height and width. Now, prime your boundaries
by softening the contours, going back to your
reference if needed, until you arrive at a basic shape that
resembles your subject. Feel free to erase lines
that you're not using. Once you complete those steps, you are ready to start
reinforcing your boundaries. Go at your own pace, remembering to review your leaf often to spot the next thing that catches your attention and include it in your final
leaf silhouette. To complete your first drawing, revisit your reference and find a detail that
interests you. This leaf has an
unusual vein pattern. They don't split in the middle. Using simple language, they form a pinstripe texture that
converges at the base. Also notice how
the veins are more defined at the bottom and
fade towards the top. To depict this detail, use your mechanical pencil applying pressure at the
bottom like we know how to do and gradually release it to achieve a lighter stroke
as you move upward. And as you navigate these
steps, remember to breathe. As familiarity settles
in with your steps, take a deep breath and
savor the process. Soften your contours
and keep breathing. Prime your boundaries
and take another breath. Reconnect with your subject, make a note of your plan, and
let your breath guide you. Notice the colored change
on the bottom rim. Now slowly reinforce the bottom
of your leaf boundary to depict the colored change we
saw and remember to breathe. Having our intention in mind also applies to a
creative process. We can experiment
with how to get to our destination by taking a
different road, for example, to achieve the tapered defect, use a soft pencil to
make thick lines, stopping halfway, then switch to a mechanical pencil
to complete your veins. Make sure the veins
you draw are more spaced out or a different
look for your second leaf. Begin your journey with
deliberate strokes, then let the steps guide you
to your final silhouette, breathing as you
work through them. If an idea pops in your head, make a note of it and continue softening and priming
your basic shape. Trust your instincts and
slowly take the next step, knowing that as you practice, the process will
become second nature, allowing for
spontaneous decisions. This takes courage,
but showing up consistently will
boost your confidence. Now the possibilities
are endless. That's why I suggest
you write down the variations you embark
on for better retention. Embrace simplicity. Use a single tool and gentle pressure to create
the pin stripe pattern. And anytime you can breathe as you slowly fill your
leaf with strokes. To achieve a somewhat even
space between the veins, eyeball the distance between the strokes and place
your lines midway. Work at your own pace, methodically calculating
half spaces. Add more lines and watch
the pattern emerge. Follow your initial steps
in dry smaller leaf shape. Opposite to the strong waves
of your previous drawing, take note of softer
waves this time. Now reference your
subject and notice the color or lighting change
at the bottom of the leaf. Interpret this detail by reinforcing the leaf's
boundaries with a heavy contour. There are moments of uncertainty when I question my progress. This happens when
I feel I've made a mistake. Yet I persist. I make a small note of it, knowing that these perceived
mistakes hold potential. For this fourth drawing, we can transform
the uneven spacing into a deliberate design choice. So our next step is then to be very obvious in placing
our lines in pairs, ensuring a noticeable
gap between each duo. When faced with a
perceived misstep, embrace it as a
learning opportunity. There's always something to learn and keep moving forward. Okay. For your fifth variation, work through your
steps until you get to a silhouette similar
to your first drawing. Once you get there, review
your photo until you find something intriguing
like the pin stripe pattern. But this time, notice the subtle markings on top
of the fanned outlines. Go through the steps
you took to replicate the pin stripes on
your first drawing until your leaf is full. After you complete this task, use your soft pencil to add in marks to depict this
newfound detail. As you finish, write down
where the idea came from. It always helps to know
the source of inspiration. For your sixth drawing, choose one of the leaves
in your photo that has a colored change like those dried up sections
at the top edge. The shape is a bit different, but walk through the steps you
are now familiar with with confidence until you get to
a final silhouette you like. Next, add the Pin
Strack pattern, estimating the space
between the lines. Experiment with a new
approach by placing the lines freely rather than
calculating half spaces. Finally, interpret the
subtle color shift at the top edge with small strokes to achieve
little organic shapes. Engage in your senses
by listening to the sound of the pencil as
it scratches the surface, grounding you in
the present moment. I bet you're wondering
what this is about, but bear with me, please. For your last drawing for today, go through the steps you now know to get to the
silhouette you like. I chose the third one
with a thicker contour. And as usual, whenever
you get a chance, remember to breathe as
you work through them. So this, I love
cooking chicken soup, and one ingredient
I include is corn. Looking at it one day, the corn husk caught
my attention, and I thought, why not? We're in a place where
exploring is encouraged. We must use it as inspiration, even if it's in a small way. So to finish off our
mini collection, use it for your leaf veins. And as you translate
the corn husk texture onto your leaf silhouette, once more, breathe and savor
your creative journey. Before we wrap up today, let's explore a gentle
way to fold leaves. Using tracing paper, trace
any leaf you prefer. I chose the third leaf
for its simplicity. Turn it over and trace
the leaf on both sides. Then fold the tip of the trace silhouette and
align it with your drawing. Mark the folded edge
on your drawing. Lift the tracing paper and
erase unnecessary lines. Fold the tracing paper
backward this time, flip it over and align the mark you just did with
the folded edge. Now transfer the shape below the crease onto your sketchbook. Finally, reinforce this
new folded section and add the veins gently
fanning them outward. Now one more deep breath
and admire your work. Nice lead then.
See you tomorrow.
7. DAY 4: Copperleaf Plant: Come to this place where being
you is all you need to be. Write a story creatively through your lines, explore
their beauty, the wobbles, the curves, the unexpected turns, celebrate your beautiful
self through them. Today, embrace the uniqueness
of each stroke you make. Welcome to Day four. Today's subject is
a copper leaf plant full of color and details. Reference your photo, sketch vertical lines to establish
height and width, also adding angular lines
to define your basic shape. Gently soften the contours to create a smooth
preliminary silhouette. Keep referencing your photo to identify details
that stand out. We have a familiar jagged edge. Erase unnecessary lines and confidently reinforce
the lease boundaries, drawing on your familiarity with this feature
from previous days. Remember to take a
moment to breathe and center yourself as you
work through these steps. Continue mindfully
observing your subject and begin drawing the
middle and side veins. As we've practiced before, you can use a soft pencil and
the pressure technique or a mechanical pencil building up the tapered
effect with strokes. At the end, choose the tool you prefer to draw
the veins with. As you progress, you'll
notice recurring details. Though they may vary in
length, form, and strength, we can safely approach them with the confidence
familiarity brings. Now keep observing your leaf. It's a rich source
of inspiration. But contrasting colors make it easy to identify
prominent details, draw them in with conviction. Add a final touch by creating
small organic marks to interpret the
beautiful color change on the peaks of
your jagged edge. As you complete
your first drawing, take a moment to breathe and relax the grip
on your pencil. It's a simple but
powerful way to reduce stress and improve the
enjoyment of your journey. Your second leaf variation and the steps continue
to be the same. Observe, establish
height and width. Make notes for better retention, draw your angular lines, breathing, softening contours, erasing unnecessary lines until you achieve a basic
shape you like. This plant is a joy to
behold at this stage. Sometimes the possibilities
can be overwhelming. When I'm indecisive, I need to remind myself to focus
on the next step, which would be
reinforce boundaries. And as you can see
in your reference, the jagged edge of the plant
offers a lot of variety. So let's choose to soften the edge this time and
make a note of it, then continue drawing
this detail all around your basic
shape as you breathe. Now, let's add some veins. For this second drawing, keep your middle vein tapered. Don't worry if your line
wobbles a bit like minded. Just guide your
pencil back and build up the strokes to achieve
the desired effect. Review the leaf you're
using as a guide to see how the side veins travel
through the leaf surface. Use some of the indens of your jagged edge as a
guide for placement. Remember to draw them loosely, focusing on capturing the
overall look of your veins. This leaf looks like someone
actually painted it. Let's break it down into
simple manageable steps. We'll take five easy steps. One, start by analyzing it. Two, use your soft pencil to sketch the dark
organic shapes. Focus on capturing the overall
feeling of the pattern, placing your shading loosely as you reference
the original image. It's important to breathe and
focus on the step at hand, especially when tackling
new unfamiliar techniques. Concentrate on the
marks you're making. Three, soften the dark
marks you just did. Use your pencil stub or
finger to blend them. Think of these steps as small projects within your
larger drawing project. Take your time, invite
your inner child. Remember to breathe and focus
on the step you are in. Enjoy the process. For, use your regular
or pencil eraser around the veins to gently
remove the blended graphite. You don't need to erase
it completely just enough to create a
lighter shade for volume. Let your inner child
come out and play, enjoy this creative process, and remember to
take a deep breath. Five or last step. Use your pencil to reinforce some of the veins
that were erased. Also strengthen the dark
marks you did initially. And once more, breathe deep. Let's keep our third
drawing simple. Breathe as you follow
the familiar steps to create the basic shape. Refer back to your photo to
refine the leaf silhouette. Once you've achieved that,
examine the leaf's edge. Simply put, the edge looks like pronounced
wobbly scallops. You can name the details on your own using words
that resonate with you. Make a note of the smooth
edge on the bottom of the leaf to keep in mind
for future drawings. Then continue refining and strengthening your
leaf silhouette. Let's tweak our veins a little. Straighten them out and boldly emphasize the color
shifts around them, playing with thick
and thin lines. This is a great technique to remember for future drawings, so make sure you
make a note of it. Allow your inner child to play, building up bold strokes
with your soft pencil. Define the color shifts
with a double line using your mechanical pencil.
Breathe as you work. Embrace wobbly lines.
They add a unique, natural touch to your work. One final touch for your leaf. This is one of the details
I like the best, small, medium organic speckles dropped on top of leaves and petals. It's like adding a unique
animal print to your drawing. Take a deep breath and loosely cluster them to the
side of your leaf. And add a visual note if you
like them as much as I do. We know the steps to take to create our fourth
leaf silhouette, so breathe as you
work through them. Before reinforcing
our basic shape, let's remember we are in a place where we are encouraged
to experiment, where we can draw inspiration
from previous work. So swap the edge details from
your neighboring drawing, then add the middle vein. We will approach
this fourth option slightly different in the
steps we take to build our leaf reference your photo and start adding the strong
colour changes you see. Block them out loosely, allowing your inner
child to guide you, focusing on capturing the
overall look of your reference. Breathe as you play coloring
and enjoy the process. Once you're satisfied
with the dark blocking, grab your pencil stub and blend the shades into
your silhouette. Go back and forth using
your mechanical pencil, adding darker shades and
strengthening your middle vein. Play with your eraser to create
lighter shades of lines. Return to your mechanical
pencil to add crisp veins, embrace the irregular lines and place them freely using
your photo as a guide. Before we called it
finished, why not? Let's channel the boldness of your previous leaf
as you breathe, thicken the veins,
and take a moment to appreciate your
completed fourth leaf. Follow the steps to create a fifth leaf silhouette
similar to the previous ones. We will experiment
with a new approach. Instead of jagged
or scalloped edges, let's turn the pattern inward. After you have reinforced the basic shape and
drawn the mid rib, gently place the scallops
within the leaf shape. Then color the space between
the edge and the scallops. Remember to take a deep
breath as you work. Similarly, draw the side
veins as you did in your second drawing using the patterned edge as a
reference for the placement. When you're done,
revisit your reference. Use a beautiful colored
change as your next detail. Remember to capture the
essence of the marks. Once you're happy
with the large marks, add the animal print
randomly and keep breathing. Our final drawing for today follow the usual steps to
create the basic shape. Now, let's try
something different. Inspired by our previous work, instead of textured edges, we'll use dashes along
the leaves edge. Breathe as you slowly
place each small line. Now notice the strong
colour contrast on your subject using
multiple bold strokes, emphasize this detail by reinforcing your veins
with your soft pencil. Ground yourself by focusing on the tactile and auditory
sensations as you draw. Some final touches.
And you know, I have a soft spot for this one. Draw the animal print pattern
on the side of your leaf, then go back to your photo. Notice the interesting texture. It seems like it travels
across the leaf. So skipping some sections, use your mechanical pencil and the pressure technique we've practiced to interpret
these interesting veins. Now, one more deep breath. And admire today's work. Superb. See you tomorrow. An
8. DAY 5: Shaving Brush Tree: Sometimes less is truly more. Today we'll embrace the
beauty of simplicity. Through it, in my opinion, the process of learning run smoother and is more enjoyable. We'll continue practicing mindful observation,
breathing deeply, staying present with
each mark we make, and breaking down our
project into simple steps. We'll focus on the joy of
interpreting our subjects in their simplest form and following uncomplicated
instructions. Let's create with intention and keep things simple
one stroke at a time. Welcome to Day five. Today's subject is an
interesting shading brush tree. And for your first drawing, continue following the
same steps to establish your basic shape until you get to your reinforced
leaf silhouette. Once you've
strengthened your leafs contour and drawn the mid rib, let's add the side veins. Looking back at your photo, observe how the
veins slightly curve upward and are somewhat
closer together. Take a deep breath and
finish your first drawing. For a second drawing, we'll choose another leaf
from your plant. Go through the steps
you are familiar with. And as you prime
your silhouette, refer to your photo to see if there is something
you'd like to add in, like the tip protruding
off the edge. Once you're happy with
the prime silhouette, proceed to reinforce it. Mindfully observe the
leaf we're working with. Notice the shadows on the side. We can use this as inspiration
to tweak the silhouette, thickening the leaf's edge. Then add a bold middle vein. Zoom in and analyze the
next detail, your veins. Notice how they curve outward, especially near the edge. To emphasize this, tweak
the veins to be straighter, curving only at the very edge. And take notes. I love them. They're really
helpful, especially when working without
a photo reference. Proceed to add your side veins
as you take a deep breath. The next detail is inspired by another leaf from your
shaving brush tree. Add small triangular shapes at the ends of
some of the veins, creating a tapered effect. Complete the second drawing by going over the leaf's
edge if you need it. Take a closer look at this small leaf in
your reference photo. Because of the angle,
the tip seems to dip into the leaf rather
than protrude this time. Use this as inspiration, add an extra tweak and
create a third silhouette. Once we conclude priming
the basic shape, breathe and reinforce
your boundaries. Creative license is
encouraged our sketchbooks. And since our intention for today's session is
to keep it simple, we'll add bold,
straight side veins. Use a tool you feel
more comfortable with and breathe as
you fill in your leaf. Let's draw inspiration
from your previous drawing again and apply the tapered end to some of these thicker veins. This is a great example of how small changes can
make a big difference. We've made subtle adjustment
to these two leaves, and they look quite different. Keep breathing as you
complete this third drawing. Inspired by your photo, explore a slender leaf shape
for your fourth drawing. Follow your usual process
to create a basic form. Document your steps by
taking notes and choose a detail to bring back and
incorporate in this drawing. Enjoy the process of creating a refined silhouette and take a deep breath as you
reinforce your boundaries. Before adding details, clean up your leaf sketch by
removing unnecessary lines. While your reference
shows a thick mid rib, you'll sometimes see me jump from thin to thick middle veins. I do this to add visual interest to my collections, and
you can do the same. In this spirit of our intention, let's simplify the process. The side veins close to the
midrib are very noticeable and tapered using simple
words and instructions, just draw the shape
of the veins, which look like long triangles. Consider the drawing
tool you like best and breathe as
you add them slowly, being mindful of their placement and the empty spaces
between them. Now, use your mechanical
pencil to add some delicate veins that
branch out from the tips of the tapered sections you just drew and breathe as you
finish your fourth drawing. As you work through the steps to construct your basic
shape and strengthen its silhouette let's talk about the photo references
I've taken for you. In my heart, these images are a valuable resource for
current and future projects. You can follow my
lead by any means and use the sections I
am using as inspiration, such as the folded leaves we'll explore in
your fifth drawing. But don't feel confined to the plant or to
the leaf itself. The surrounding
environment offers a wealth of creative
possibilities as well. As I mentioned at
the very beginning, the ultimate goal of this
course is to empower you to develop your
unique collection of imaginary leaves. Once again, keeping our
intention top of mind, we can see in our subject
inside that folded leaf, strong veins that seem not to
touch the edge of the leaf. They also seem irregular, and they seem to shift
direction softly. So as you breathe, fill in your leaf and
complete your drawing. For your final leaf for today, breathe as you work through the steps to establish
your basic shape, prime and reinforce
your leaf silhouette and erase unnecessary lines. Now, take a moment
to breathe as you begin to thicken the
outer edge of your leaf. With the leaf as your guide, dry tapered middle
vein down the center of the silhouette and
take another breath. Inspired by your earlier work, add delicate side veins, taking note of angle shifts, and be mindful of the wide
spacing between them. Finally, zoom in and examine the delicate
texture of your leaf. Imagine it as a collection
of tiny little circles. Place them in your
drawing irregularly, adjusting their size and filling in some of
the smaller ones. Breathe deeply as
you lose yourself in this rhythmic process
completing your final drawing. Add your visual side note and take a moment to
appreciate your progress. Outstanding job.
See you tomorrow.
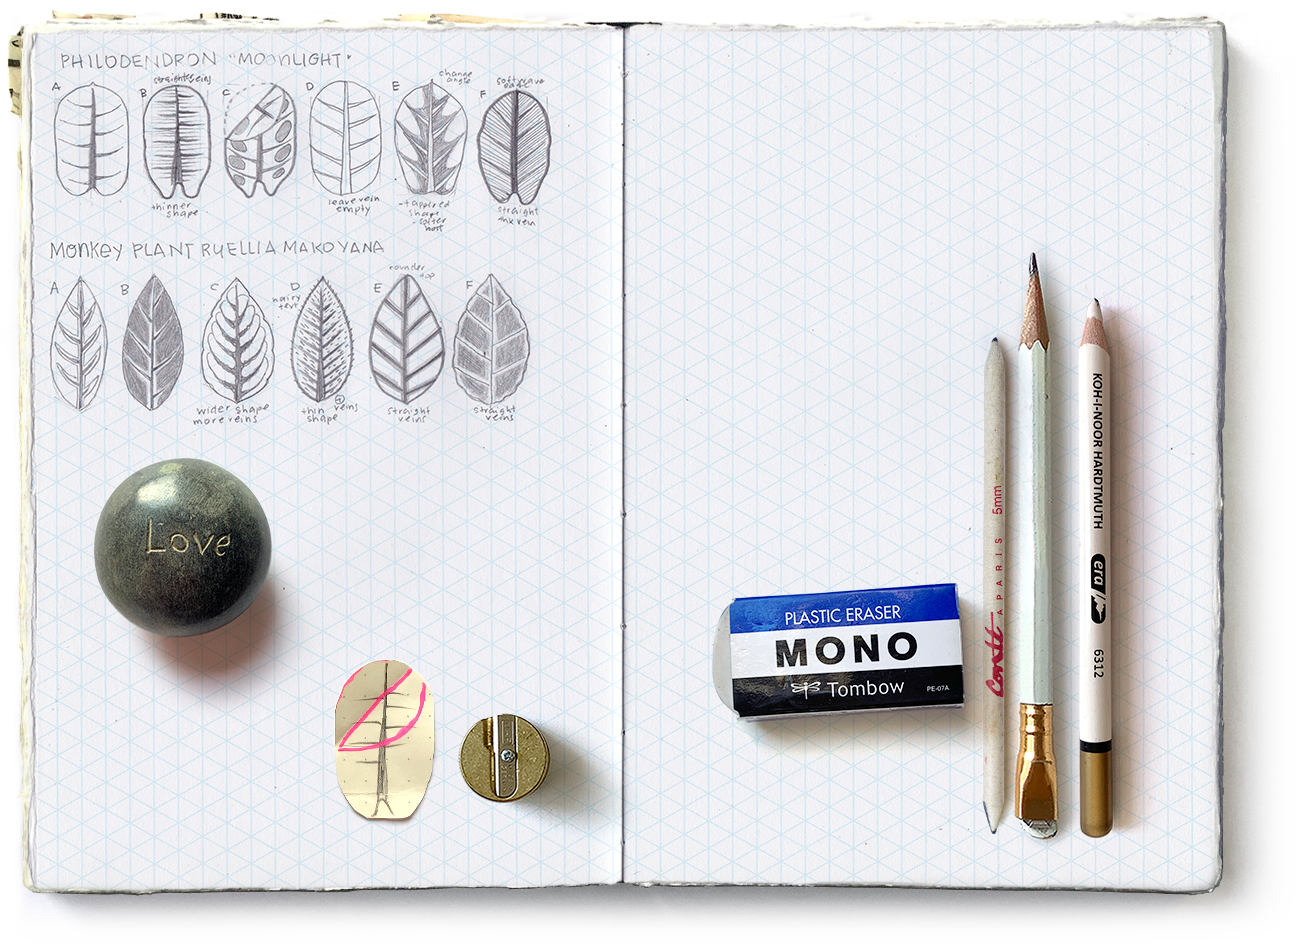
9. DAY 6: Philodendron: We are all born with
instincts that we tend to tune down or turn
off throughout life. Here we can practice
listening to our souls, words of wisdom,
whispers of inspiration. Today, let's trust
our intuition to lead us to unexpected and
inspiring directions, releasing control and
embracing the unknown. Welcome to Day
six, and thank you for continuing on this
artistic journey with me. Today we'll be drawing
inspiration from this big, bold and beautiful
philodendron plant. Seeing this
magnificent plant that Fips filled my heart with joy. Is sheer size and bold
presence were awe inspiring. Yet it exuded a friendly
and welcoming energy. I will confess all plants
have this effect on me, but this one in
particular is special. So once you have established
your basic shape, prime it by adding
visible details, erasing unnecessary lines, and reinforcing the
leaf silhouette. Remember to breathe deeply
throughout this process. Mindfully examine the leaf
we're working with to see if you spot another
detail you'd like to add. We can see a very
small tip protruding. Go ahead and include
it in your silhouette. The details for your first
drawing are straightforward. Add the strong middle vein with your soft pencil
and the side veins, which will feel familiar. This is a good example where
you can appreciate how some details in nature and the way we interpret
them repeat. The difference in this drawing
will be in the size of the tapered part of the veins and the tool used to draw them. Breathe in slowly and net sale fully as you finish
your first drawing. I might sound poetic,
but I cannot help it. Nature is so wise and so perfect and beautifully imperfect
and so generous. It offers so many options
for us to find inspiration. So after reviewing your photo, selecting a second leaf, and finding intriguing details, breathe as you soften
your contours. Remember to take notes
so that over time, making adjustments on the
fly becomes second nature. Also remember to pause to review your subject to be sure
the step we're taking, priming your basic
shape runs smoothly. Tweak your basic
shape if necessary, adding the interesting details we've seen at the
bottom of our leaf. Prime your basic shape until you feel satisfied and ready to reinforce the boundaries of your leaf and breathe as you
walk through these steps. Once more, mindfully
observe your subject. I identify your next
detail, the middle vein. Be bold when placing
your mid rib, making the bottom extra thick. Now, use your soft pencil and pressure technique
for the side veins, taking notes to keep them
straight, and horizontal. Breathe as you place each one, making sure they are spaced out. To interpret the soft
texture between the veins, use the same pressure
technique and your mechanical
pencil to fill in the extra space between
the strong veins. Once more, breathe as you complete your drawing with
this rhythmic pattern. Allow me to show you another
easy way to fold a leaf. Dry a leaf shape in
your sketchbook and a second one in a
cut out silhouette similar to the one we just did. Include a draft of
the same marks you drew without worrying about
making them the same. This is just to show you another method for folding leaves. Fold the side tip of
your cutout and mark the folded piece that falls
over the front of your leaf. Then dry line over
the folded crease. I've used a different
color just to make the lines we are going to be
transferring more visible. With this cutout, you'll see that it resembles a folded leaf. So after erasing
unnecessary lines, breathe and start drawing those pink lines over
on your sketchbook. Turn your cut out over and
lightly trace the details to use as guide for the folded
section of your drawing. Finish off by adding those in. This new subject from your reference photo has a
completely different bottom. So breathe and work through your steps to get to
your basic shape. Carefully draw in your
middle vein and take notes. Why not explore
the possibilities of leaving your veins empty? All these notes we
take can also serve as a guide for future projects
where we can include color, for example, to use light colors on our veins
where we have empty ones. Remember to breathe again as
you complete your drawing. Notice how the
rectangular feel of the leaves in our reference
influence our drawings. That's why you've seen me draw rectangles for our
first basic shapes. However, the right side
fold in our subject now suggests a more
angular tapered shape. Sketch this out, making notes of any other adjustments
you'd like to make. And since this leaf
is incomplete, draw inspiration from
your previous work, incorporating details
that interest you. Take a deep breath, continue refining your silhouette
until you're satisfied. Remember how small adjustments
can have a big impact? That impact can also be that they help us
keep moving forward. Let's take inspiration from a previous drawing and make a subtle shift in the
angle of the side veins. Breathe and slowly
fill in your leaf, slightly tilting them
for a fresh look. Take another look at
your reference photo. Are there any elements
that spark new ideas? We've used shadows
between veins in previous drawings to create
new details and textures. Since the shadows in this
leaf are quite prominent, let's incorporate them
into our drawing. Using simple lines, start blocking them out
loosely to define them. Then breathe again as you invite your inner child to playfully
fill in each section. Use the same tapered
basic shape from your previous drawing to start drafting your next
leaf silhouette. Lightly draw your
guidelines, soften contours, start reinforcing your
leaf, if you wish, and integrate the dent that flows into the bottom
of your subject. One technique I enjoy
selecting a small section of my subject and incorporating
it into my drawing. In this leaf, I'm
drawn to a section of the edge that
shows soft waves. This effect may be due to the leaf size rather
than its inherent shape. Regardless of the cause, I find this detail intriguing. Instead of questioning
its origin, I allow it to guide my next move and reinforce my boundaries. Place a bold middle vein using your soft pencil and
straight solid veins, similar to the ones
we drew before. Take a deep breath and
complete this step. Now, let's add a final detail. Incorporate a familiar element,
the pinstripe pattern. This pattern will add visual
interest and complement the soft organic texture
of your philodendron leaf. Continue adding your fine veins as you finish this drawing, taking a deep breath and
centering yourself again. To conclude our drawing session, let's explore the
concept of detachment. While this may seem daunting, practicing this in a
safe place can open our minds and hearts
to new possibilities. If you feel comfortable, erase the drawing
of the folded leaf. By letting go of this image, we open up space for a new idea. Not all is lost
if you decided to erase the image.
I know it's hard. The faint lines left behind
provide a guide for you to easily create a reinforced
leaf silhouette If you like, draw a dashed line to show
where the original edge was. This may serve as
a visual reminder for the steps you took to
create the folded leaf. After you add your mid rib, reference your subject
and place the side veins similar to the ones
in your first drawing. Breathe as you complete
this familiar step. The large leaf has
many beautiful gentle waves and subtle wobbles. Select one of these
details and use it. By isolating a specific detail and exploring its potential, you can create a new
unique imaginary leaf. To complete your drawing, add the side details to the
folded part of the leaf. Then embrace your inner child, breathe once more and softly
fill in the oval shapes. To wrap up, sit back and admire the wonders
of your progress. Pat yourself on the back. Fantastic job. See you tomorrow.
10. DAY 7: Monkey Plant : Breathe in slowly
and exhale fully. We come here to release the pressure of creating
perfect masterpieces. Allow your hand to move
freely across your drawings. Trust your intuition and
let go of self doubt. Celebrate every stroke, every line, and
every imperfection. Feel gratitude for
the opportunity you're gifting yourself, to connect with your creativity and express yourself freely. Today, embrace the
joy of the process. Welcome to the final day of
our drawing journey for now. Above all, thank you for your
commitment and hard work. Today we will be exploring
a fun monkey plant. We'll use two photo references to capture its
distinctive features. Let's review our steps quickly. Begin by carefully observing your leaf and taking
note of its shape. Establish the basic structure by sketching in your vertical
and angular lines, defining your preferred
width and height. Then, soften the contours of your basic shape and
erase unnecessary lines. And, of course,
remember to breathe. Before continuing,
review your subject to double check for details like softening the tip of
your leaf and take a deep breath as you
reinforce your basic shape. Simplify the details
you see in your photo and slowly start adding
in your tapered mid rib. Take notice that the side veins have somewhat of a steep angle. Breathe as you continue decorating the
surface of your leaf. Take a closer look at
your reference image. You'll notice a distinct colored
change around the veins. Let's incorporate this
into our drawing. Begin by mapping out the areas where the
color shift occurs. Focus on capturing the
overall look of this detail. Confidently, add
individual lines to define the color change. Continue adding strokes until you've fully covered
all the veins, and the color
variation is visible. And you can see clearly
my lines aren't perfect. Take your time and breathe as you complete
this first leaf. For your second variation, we'll explore a
different interpretation of the same subject. This will be another good example where we will be able to appreciate how making
subtle changes can make a big difference. Follow the steps you've been
practicing for almost a week to establish a similar leaf silhouette as
your first leaf. Remember to breathe
and relax as you work. Confidently and
softly, sketch in the white colored change that runs around the
veins of the leaf. You can make a small
tweak for the side veins, drying them slightly steeper and breathe as you
complete this step. Focus on the negative
space in your drawing. Let go of any expectation and welcome the joy of coloring
with your inner child. As you color,
embrace the texture that emerges with each stroke, take a deep breath, come
to the present moment, and enjoy the process. Now grab your pencil stub and begin to gently
blend the strokes. As you do so, pay attention to the sound
your pencil stub makes. The auditory feedback will help you stay present and focused. Take a deep breath to
calm your mind and body. Continue blending until you're happy with the desired
level of smoothness. Let's take a moment to clean
up any excess graphite now. Gently erase any smudges that blended into
the white areas. As you erase, take deep breaths
and savor every moment. H. When you're done cleaning up, use your pencil to
carefully darken the gray tones that
surrounded the veins. This will help to emphasize and define the colour
change around them. Also, review the leaf
we're working with and notice the dark veins
inside the white areas. Take your time and enjoy
these familiar steps. By becoming better
acquainted with them, you're creating room for new
knowledge to come along. Slowly and confidently, add your veins as you breathe in
and finish your second leaf. Experimentation is at the
core of our creative process. Sometimes decisions emerge
from the heart just because make a small tweak by slightly widening
your basic shape. Embrace spontaneity, as it often brings
delightful surprises. And as you navigate
your familiar steps, breathe deeply and relish in the process of priming
your silhouette. Once you're happy with
your basic shape, take some time to observe
your subject mindfully. Notice the very delicate scallops on the
edge of your leaf. Breathe once more as you integrate this detail and
reinforce your boundaries. Begin tracing your
middle vein slowly, but refer to your photo
to closely observe the subtle texture at the
edge of the color change. Fill in your mid rib and
once you complete that step, breathe as you incorporate the textured detail
into the veins rim. Now sketch the guidelines to mark where your side
veins will be placed. Then proceed with each one, creating curvy tapered veins, and then adding the
textured rim to each one. Have fun with this and invite
your inner child again as this detail does not require
perfect or smooth lines. So take your time, breathe and
delight in the experience. As you build your leaf, continually reference
your subject, a spontaneous decision, add more textured side veins
between the existing ones. And if you get lost in a step, don't forget to loosen
the grip on your pencil. I know I need to
remind myself of this. So let's breathe, relax, and fill our silhouette
with textured veins. To finish up your
third leaf variation, take a close look
at how the tips of the veins curl up and
touch the vein above. Once again, breathe and
complete your drawing. For your fourth imaginary leaf, we will keep it simple. Walk through your initial steps, defining the height and
width, softening contours, erasing unnecessary lines, and reinforcing a
silhouette similar to the ones we drew all along, breathing through each step. Once you have
completed those steps, place a bold middle vein. Feeding off of your past work, use the pressure technique to add strong angular side veins. Make sure they are placed close to each other
for a different look. Carefully study your
reference photo. Zoom in, pay close attention to the hairy texture all
around your subject's edge. Experiment adding these marks, creating a fuzzy surface as you breathe and relax
in this rhythm. Nature is so, so
beautiful and mysterious. Is wonders often go unnoticed. If we aren't mindful
of what surrounds us, if we don't pay close attention, we might miss its majesty. The backside of
this monkey plant has beautiful light shades, and though we're
working with graphite, it can easily serve as
inspiration for our fifth leaf. Work through your steps to come to a reinforced silhouette similar to the ones we've been drawing with smooth,
strong edges. After you've completed
your basic steps, begin adding the veins. To keep it simple, we will
stick only to interpreting the two shades of lilac from your reference to create
soft thick veins. We'll work in two phases. For the first phase, use a wide straight shape for the mid rib and angular
shapes for the side veins. Breathe and hold your pencil loosely to get the
soft shades of gray. Now for your second phase,
draw the veins again, but make them
thinner and darker, placing them on top of the light gray veins
you just drew. Take a deep breath as you
finish your fifth drawing. Once more, go through
your initial steps and breathe as you rise to
your final basic shape. Closely observe your new monkey plant leaf
and analyze what else we can use as inspiration for a completely
different variation. Soft waves show up again. So inhale and exhale using this detail to
reinforce your boundaries. Channel your inner child again and softly shade your
entire leaf silhouette. Personally, I love this
as it's a time for me to really relax and let
go, breathe and play. With your pencil stub, smooth out the graphite. Don't worry about making
the surface even. Having texture gives
your drawing warmth. To help you come to
the present moment, connect with you
and your senses, breathe and listen
closely to the sounds. Embrace the unexpected. As you experiment
with different tools, your pencil eraser can become
an instrument of creation. Welcome this new perspective as you open up space
for your veins. Also, add highlights around your leaf by softly
cleaning up the edges. Finally, take your mechanical
pencil and gently draw thin veins in between the white space as you
opened up with your eraser. Breathe one more time as you finish your last
drawing of the week. And after every art
session, you conclude, sit back and admire
your journey. Phenomenal job. See you tomorrow.
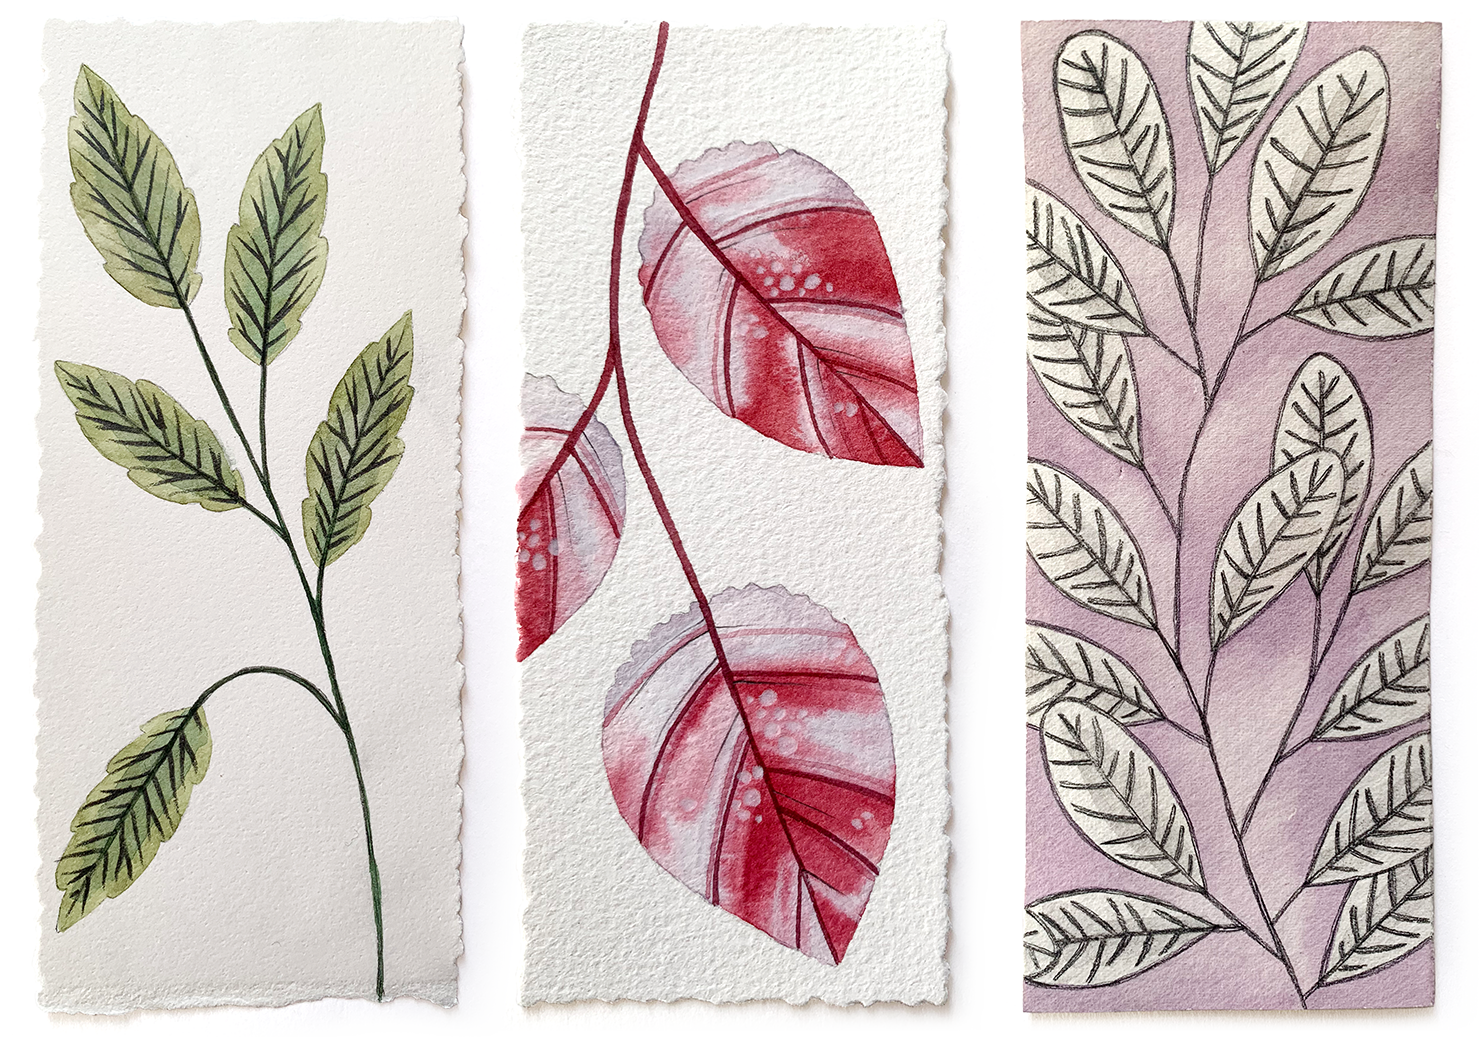
11. DAY 8: Playing with Green Leaves: It is time to put
into practice what we have learned creating leaves
and giving them color. But first, we will take
a moment to breathe, center ourselves, and
set our intention. Let's make our
intention even more powerful by writing
it down, like always. Use this class as another
opportunity to reconnect with your inner child and rediscover the magic of play with your
newly acquired knowledge. Remember to set your intention
aside and have it visible. It's your gentle reminder. Use a variety of tools. I will explain with
each bookmark we make. You can watch the
entire video or pause, take each step and
advance along with me. Please feel free to
select a leaf you prefer. I understand this can be
a challenging decision. Over time, I've learned
to trust my instincts. When I encounter a leaf
or flower design that appeals to me for a project,
I don't overthink it. I simply make the choice. For this lesson selecting
the same leaf as me will help you follow
along more easily. Use your preferred
watercolor paper, but this one in particular
is Arches Hot Press. It's probably the brand
I enjoy the best, but use whatever you prefer. Now, all bookmarks
will be 2.5 by 6 ". And sometimes I use
a decald edge ruler to cut my paper, but
that's optional. Since we're working
on watercolor paper, trace your leaf
outlines very lightly. Personally, for tracing
the drawings I paint, I prefer using a
mechanical pencil for its delicate lines
and easy erasing. If you use a regular pencil, please ensure you keep a light
touch to avoid smudging. We'll continue following
the same steps you've practiced thoroughly
during the week. You'll find that the familiar
steps flow easier now. Trust your instincts
and enjoy the process. Remember today
we're here to play. Create a composition of five leaves for your
first bookmark. If you feel more comfortable tracing the same
composition as me, please use your workbook PDF found in the Projects
and Resources tab. It's there for you. I enjoy demonstrating the speed at
which I draw in real time. You might perceive my
lines as flowing smoothly, but years of practice
are behind that. Rest assured, I still make mistakes and you've
seen me make some. It's part of the
human experience. Learning and growth
come from missteps. So you might notice I was applying a bit more
pressure than usual, but thankfully a needed
eraser can easily fix that. Remember to stretch it after a few uses to maintain
its effectiveness. Now we play some
more with color. I've often heard the
saying you can never have enough watercolors or
any kind of art supply. That's been true
for me, but I have found the fewer colors
I have or art supplies, the more I enjoy the process
and the more my skills grow. And I'm not only speaking
of the artistic skills, like right now preparing
a green color, skills like patience,
acceptance and resilience are developed
in our art practice. And for sure, our confidence is strengthen every
time we show up. For this piece, I've mixed
Helio turquoise, lemon yellow, and a touch of burnt sienna to create a light
shade of green. Be sure to dilute the mixture
to the consistency of milk. Let's dive in. Grab
a small brush. I'm using a size one spotter and select a leaf silhouette.
Don't overthink it. Just start filling it
with your watercolor. For our bookmarks, we're
embracing a loose style. So don't worry about a
perfectly even color. One helpful tip though, try painting along the
direction of the leaves veins. This will be helpful if we accidentally get any hard
edges on our leaf surface. The nice thing about this is that it will create
a more organic look, so we're all good, especially
as we add layers later on. As you paint, you might find you need to replenish your
brush with more color. Simply dip it back into water, pick up more paint, and continue layering on your bookmarker. You may notice a color on your leaf will start
to shift and change. This is perfectly fine
and, in fact, desirable. In nature leaves display a
beautiful variety of colors. So don't worry about these
slight colour changes. You can clearly see the one I'm painting has different
shades of creams. Embrace these subtleties. As we've done in our
drawing lessons, go at your own pace, breathe, and enjoy the journey. Continue this process
for all your leaves. It's pretty straightforward. And if you think about it,
an easy step to focus on. It's one overall
color in each leaf. Try painting along the direction of the veins in your
reference image. Remember, we drew the veins
at quite a steep angle. Paint one side of
the leaf first, dipping your brush
back and forth in the water to pick up more of
your mixed color as needed. Continue until you have painted all your silhouettes
and breathe. Once your watercolor
is completely dry, reinforce the stem you
initially sketched in. You can use any tool you prefer. As you get to know
me, you'll see that I enjoy my mechanical
pencil plus. I like the look of graphite. Take a moment to breathe
and quiet your mind. Now, strengthen the
middle veins of your leaves in the same
way you did your stem. Enjoy these steps. Let them become a
mindful practice. With each stroke, bring
your attention to the sensation of your pencil
moving across the paper. Notice the sound the tool makes, the texture of the paper
beneath your hand, and the way the light
falls on your artwork. If your mind wanders, gently guide it back to
the present moment. Observe your thoughts
without judgment and then return your focus
to the task at hand. This mindful approach to these
steps can help you relax, center yourself, and appreciate
the process of creation. Have your drawing handy to consult as we begin
adding the lateral veins. You'll find that the
techniques we've practiced this week will
naturally guide you. Let's review them
together as you see me draw the first
leaf side veins. Use your regular soft pencil, start drawing the veins
from the center outwards, maintaining a
slightly steep angle. Apply pressure for
the thicker parts of the veins and lighter pressure
for the thinner ones. Don't forget to
branch out some of the side veins at their tips. Embrace the confidence that
comes with familiar steps. Keep going and keep breathing. If you need to reinforce the middle veins as well
and take another breath. Time lapses, though I like them and are
visually appealing, can sometimes give
the impression that artists create artwork
effortlessly and quickly. However, the reality is
often quite different. I find watching other
artists work in real time to be
incredibly inspiring. It's a valuable reminder that
the creative process takes time and that each artist has their own unique
approach and pace. Watching me complete
this leaf will give you a better understanding of the
time I invest in each one. I truly enjoy taking my
time with each piece, as the process itself is
very relaxing for me. Make a little helio
turquoise with the leftover green and make
sure to water it down. Then loosely add some
brush strokes onto the leaf centers for added
texture and dimension. Go about it very lightly. We do not want to overpower
the work you have just done. For the final touch,
blend lemon yellow, hela turquoise, and burnt sienna to achieve a
deeper green tone. It's okay if your shade differs. Using your finest brush, I'm using my zero spotter,
reinforce the stem. Apply successive strokes to gradually increase
the stem's thickness, mirroring the
initial pencil work and strengthening the stem. When you're done, take
a deep breath and allow yourself to fully appreciate the work
you've created. Celebrate your progress. This is just the beginning.
See you tomorrow.
12. DAY 9: Playing with Contrasting Color: Before you start your
second bookmark, take a couple of
deep breaths and remember you are here for
the creative process. The intention for all our
bookmarks will remain the same. Remind yourself
you are allowed to play and invite your inner
child to come along with you. We'll use the fourth
drawing we created on our fourth day using
the copper leaf plant. To explore different
color interactions, we'll switch to cold
press watercolor paper. This paper's unique
texture will add another layer of interest
to the colour transitions. You'll see what I mean when
we get to the painting phase. Let's review the steps
together as we pencil the leaves onto the watercolor paper for this book marker. Begin by lightly sketching
in the vertical lines to determine the height and width of each leaf silhouette. Introduce angular lines to capture the leafs
shape and direction. Gently soften the contours of your initial lines to create a smoother more
organic leaf shape. Carefully erase stray or
unwanted pencil marks. And once you're satisfied
with the leaf silhouette, lightly reinforce
its boundaries. We'll approach all leaves
similarly to how we did before. The process will become
familiar as you draw, and you can also lightly sketch in guides for your
lateral veins. You've practiced
these steps before, so trust your
instincts as you draw composition of three leaves
onto your watercolor paper. Feel free to create your
own arrangement or use the composition outline
provided in your workbook PDF, found in the Projects
and Resources tab. Once again, that guideline
is there for you to use. Be first color mix a rich red using purple
magenta and burnt sienna. For the second,
titanium white with a touch of burnt sienna
and helo turquoise. You can barely see
the one I premixed. It's underneath the one
I'm mixing right now. For both colors, aim for
a milky consistency. Before you begin painting, use a kneaded eraser to gently remove any
excess graphite from your drawing and
remember to stretch your eraser to improve
its effectiveness. Now we're working
with the drawing we did inspired by the
Copper leaf plant. For our painting,
we can also use the same photo reference to determine where to apply
our deep red water color. Loosely interpret the shapes and patterns of your
photo reference, paying close attention to where the color
changes dramatically. Then apply the red water
color to your painting in the areas that correspond to the darkest shade
from your reference. Remember, it's an
interpretation. It does not have to
be exactly the same. Dance between the red
and gray water color using water to soften
the edges as desired. This back and forth
technique will create a seamless transition
between the two shades. But remember, nature itself is full of soft transitions
and defined edges, so don't worry about hard edges. They can add depth and
dimension to your painting. In fact, if you look closely
at your photo reference, you'll likely notice areas
of distinct contrast. The lateral veins you've sketched will serve
a dual purpose. First, focused painting. By breaking down the leaf
into smaller blocks, you can tackle each
area more easily. If you encounter a hard edge near these lines, don't worry. The veins will paint later
will naturally cover them. And second,
directional guidance. These lines will help you establish the direction
of your brush stroke, ensuring a more organic look. Let's keep painting
one stroke at a time. Transform each brush stroke
into a moment of mindfulness. Listen to the soothing sound of the brush rinsing in water. Observe the colors blending
and dancing across your leaf. Feel the texture of the paper beneath your hand and
the brush is movement. Take deep slow breaths, anchoring yourself in
the present moment. Let go of expectations and
embrace the joy of creation. Allow your inner child to explore freely without judgment. Focus on the journey,
not the destination. Embrace the process of creating rather than
striving for perfection. By practicing mindful art, you'll be cultivating patience, resilience, acceptance,
presence, and self care. And as a bonus, you'll refine your artistic skills while
nurturing your well being. Just as I'm breaking
down this leaf into smaller manageable steps, apply this approach and technique to your
own art practice. By focusing on one small
section at a time, you'll be able to break down larger projects into smaller
less daunting tasks. You'll be able to concentrate
on one area at a time, improving your
attention to detail. You'll also be able to celebrate each small
accomplishment, building momentum,
confidence, and motivation. Remember the journey of creation is where
the growth happens. Enjoy the process
one step at a time. And let's not forget about
the power of our breath. It's a simple yet profound
tool we are all born with that can help us stay
centered and inspired. As you create, take a moment to notice the rise and
fall of your chest. Feel the air, filling your
lungs, and then releasing. It's an easy tool to incorporate into your practice
as it's automatic. This simple act of awareness can calm your mind and
refresh your creativity. Though I love sharing my process in real time,
as you already know, this time lapse
offers a glimpse into the final painting stage
for the second bookmark. If you need a refresher, feel free to rewind to the painting phase towards the third minute of this lesson. O. I love all stages
of the process, but there's something
extra satisfying about the final stage. This is where we add in details, and it's where I consider all our hard work
comes together. It's a phase where personally I can start feeling a
sense of accomplishment, the victory of
completing a task. Let's continue our bold approach
in our color choices by adding a touch of helio turquoise
to your deep red paint. This will create a
strong aubergine color that will make your stems
and veins stand out. Mix it to a milky
consistency as well, and use a fine brush like a zi so or smaller to paint
your side veins. You can create them with small, precise strokes or
longer flowing lines. Remember to dip your brush
in water and pick up more paint to keep the
paint flowing smoothly. For larger and thicker sections, build up the thickness gradually with small brush strokes. This repetitive motion can
be a meditative experience, allowing you to relax and focus. Complete the stem
parts and continue to add more veins
in the same manner. Go at your own pace and
remember to breathe. Once you add the veins
in your dark color, revisit your copper
leaf plant drawings. Even in this stage,
we can experiment, and I encourage you to incorporate details from
your other sketches. Can start practicing by adding the idea of the double
line in option C. Use a diluted
aubergine mix to add interest and depth to your composition
with lighter veins. Embrace every brush stroke, breathe and cherish the time you spend with yourself
in your art practice. Also experiment with
different shades of the same diluted mixture to create subtle
more faint veins. As you add these
secondary veins, remember to be open to change. You can adjust the
placement as you go, allowing your
creativity to flow. Keep going until you feel happy with the look
of your leaves. When you're done with
your faint veins, introduce a new tool like a white colored pencil to add in what would seem
like a white vein. Include some of these
in your leaves. Use your white pencil to accentuate some of the
lighter areas as well, and start adding the animal like pattern we added in
our option C drawing. Add this pattern in clusters, placing them randomly
on your leaves, allowing them enough
breathing space. Finally, add a few
fine pencil lines to your leaves for more detail, using your pressure technique. When you're done,
take a moment to admire and feel proud
of your progress. You've embraced unique lines
and expressive brushstrokes. You've demonstrated
resilience and trust in your intuition. Remember this
journey is personal, and each time you
show up to create, you grow as a beautiful
human being and, of course, the
brilliant artist that you are. See you tomorrow.
13. DAY 10: Repurposed Paper and Negative Space: Before you start your third
bookmark, close your eyes. Just for a few seconds. Take a moment to
breathe and relax. Acknowledge your presence
in the here and now and in the reason why you are showing
up here today to play. I became a fan of
repurposing material, especially paper for
different reasons. First, I live in a place with limited art supplies,
but most importantly, I find that creating
on repurpose paper is incredibly calming
and rewarding. To me, using recycled paper adds a unique character
to the artwork. I believe there's a special
connection between the artist and the artwork when you use
materials with a history. For this book marker, I encourage you to
use recycled paper. For the front, I am using Arch's Cold Press
watercolor paper, the one with the flowers to my left and leftover packaging of a Lustrom notebook
for the back. Both are cut to 2.5 by 6 ", though the backing runs
a tad small because of the torn edges,
but that's okay. Even better, as it enhances
the handmade quality, it adds a touch of imperfection, which is often the
most beautiful part of a handcrafted piece. We'll be using option E from
our shaving brush tree, and we start off by, of course, sketching our
composition onto paper. Look complexity step by step, similar to how we color the leaves in our
second bookmark. This is a simple stem which will eventually become a thin
branch of imaginary leaves. Next, start adding
leave silhouettes, placing them randomly
along the stem. You've practiced
drawing leaf shapes, so I'm confident you can add
your leaves in one move, move slowly and give it a try. Also try to create your
own composition today. But if you feel more comfortable using the same
composition, by all means, trace the guidelines provided in your workbook PDF found under the Projects
and Resources tab. Take your time and
enjoy the process. Whether you choose to create your own composition or
trace the guidelines, remember to work
at your own pace. Use light pencil strokes, so you can easily erase and adjust your
drawing as needed. If you desire to overlap leaves, literally draw on top
of other leaves and then erase unnecessary lines
as you see me do here. Each bookmark has
its own complexity. Today, complexity
presentth itself in the composition, and
we're done with that. So now that you've lightly
sketched your composition, you can start
preparing your paints. Feel free to use any color you like either straight
from the tube or pen. I'll be using a soft
lilac color which I'm creating by mixing a small
amount of purple magenta, burnt sienna, with plenty
of titanium white, and a hint of helo turquoise. We're going to color the empty
spaces in our composition. To do this, we'll divide the negative space
into smaller blocks, similar to how we color the leaves in our
second book marker. The lines we drew for the stem and leaf edges will
serve as our boundaries. Once you complete one
section, move on to the next. Take your time and enjoy the process of
painting each section. Keep your water color mixed
to a milky consistency. This will allow you to create smooth transitions as you dance between your
paint and water. Even working with one
color using water, more diluted paint
gives you a chance to explore the beautiful
nuances of this medium. You see the upper left corner. Don't worry about painting
outside the lines. I've made a few mistakes myself. We can cover these areas
with details later on. You some sections will
wrap around your leaves. Work methodically, completing
one section at a time. To prevent the
paint from drying, work your way around the leaf, dip your brush and water, and then back onto the paper
to create lighter shades. Return to the milk you
paint to darken the color. This technique will allow for
smooth colored transitions. Though you know I like to
demonstrate in real time, this time lapse provides a quick overview of the
final painting stages. If you like to review
the earlier steps, rewind to the third
minute of this lesson. This stage, you
know I like a lot. And in this particular case, it will be perfect and easier to turn it into
a mindful practice, not only through the
tectile sensation of the thick paper under your hand or the feeling the
dry paint has on the paper, but especially through the sound the pencil makes as we
start drawing our details. Be mindful of these sensations to help you come back
to the present moment. You can use any drying
tool you prefer. I'll be using graphite to
add fine lines to the stems, leaf contours, and veins to
build up their thicknesses. This will help maintain the soft delicate feel of
the composition. As you work on this project, let's break it down into
smaller manageable steps. Right now, focus on adding
all of your leaf contours. As you continue working, remember to take deep breaths and relax the crip on
your drawing tool. Once you complete all
leaf silhouettes, add your middle veins and
stem in the same manner. Keep breathing and focusing
on completing this step now. If your wine wobbles, acknowledge the feeling and either bring your pencil
back or use an eraser, there is always a solution. Now it's time to add
the lateral veins. While this might seem
like a big task, let's break it down
into smaller steps. Make each step as easy and
rewarding as possible. This will help us stay
focused and productive. Concentrate on
completing one leaf at a time or even one
side of the leaf at a time. Remember to breathe. Remember to listen to the sound your pencil makes against
the cold press paper. Bring your memory
to the present. As you remember when you drew
these veins on day five, they did not have
a specific angle. It was a fun, stressless detail, due to its playful nature. Bring that into this phase. As you work on your side veins, remember that you're not
just creating something. You're also practicing
important skills. You're adapting to
different challenges, finding creative solutions, and exercising patience as you
focus on one vein at a time. By consistently showing up and following instructions,
you're building resilience. I also like to think you're practicing being
brave by coming to your art practice and by embracing spontaneity and
accepting your lines, you're opening yourself up
to endless possibilities. Now using a bigger brush, let's add some subtle
shading to your bookmarker. Mix a small amount
of burnt sienna and purple magenta and helo
turquoise with plenty of water. Apply this light gray wash to the middle section
of each leaf, taking your time,
enjoying the process, and admiring what you
have just created. Outstanding job.
See you tomorrow.
14. DAY 11: Playing with Ink and Simple Details: Make mindfulness a part
of your art practice. Pause for a moment
before you begin, even just a few seconds. Take a deep breath and
reflect on why you show up. Speak your intention out loud. It will help you approach your lesson with
kindness and focus. Today, I will play. For your fourth bookmark, use smooth watercolor paper. Felt tip pens work best
on a smooth surface. I'm using 300 GSM
Arches Hot Press paper. Our reference for today is
from our fifth day option F. Lightly sketch the
silhouette of relief, recalling the steps you
took to build its shape, work slowly and carefully using light pencil strokes and erasing unnecessary
lines as needed. Make mindfulness a part
of your art practice. Pause for a moment
before you begin, even just a few seconds. Take a deep breath and
reflect on why you show up. Speak your intention out loud. It will help you approach your lesson with
kindness and focus. For your fourth bookmark, use smooth watercolor paper. Felt tip pens work best
on a smooth surface. I'm using 300 GSM
Arches Hot Press paper. Our reference for today is
from our fifth day option F. Lightly sketch the
silhouette of relief, recalling the steps you
took to build its shape, work slowly and carefully using light pencil strokes and erasing unnecessary
lines as needed. If you prefer, you can trace the leaf shape from
the guidelines in the projects
and resources tab. Observe your reference image. Notice the thickness
of the leaf's edge. Since we're working
on a larger scale, let's use a micron pen size
one for the first pass. Take your time, breathe, and I struggled a little with building up
the thickness of the leaf. My pen running low on ink, but I like the scratchy texture
of the lines it produced. I like for the
mechanical pencil. This experience taught me to be adaptable and to embrace
unexpected results. However, if I hadn't been
satisfied with the look, I would have switched
to a new pen. It's important to be
honest with yourself. Decide without guilt, and give your choices a chance to
see if they work out. I'm using the same worn out
pen, and I'm okay with that. If you're using a
thin pen like me, build up the thickness
of the midrib using short controlled strokes. Go one stroke at a time. Be patient and kind to yourself. And remember to use these rhythmic steps
to mindfully breathe. If you folded the bookmark, unfold it now and lightly
sketch the leaf stem. If you trace the guidelines,
the stem is already there. Use the same technique
you used for the mid rib to
incorporate the stem. Remember to take your time
and focus on each stroke. Breathe and appreciate
the process. It's taught in design
school to strive for perfection with flawless
lines and solid colors. While I value my
education and lessons I learned it also made me feel
a bit rigid and stressed. Over time, I've learned to
embrace and I've realized that perfection is
subjective and that true beauty lies in the
eyes of the beholder, and often it's found
in the imperfections. After your mid
rib, continue with the decorative details of
your leaf. Draw the lat. Take a moment to breathe and sent to yourself as you work. As you add the thin
parallel veins, notice the gentle shift in the angle of
the thicker veins. Mimic this shift in your thinner veins for a
smooth flowing effect. Again, focus on one
section at a time, one stroke at a time, and breathe with this rhythmic step. But along the way,
I changed my mind. I started off by
mixing purple magenta, helio turquoise,
and burnt sienna. Then I added titanium white. I continued playing with
color, adding purple magenta, burnt sienna, and
more white until I was happy with a
dirty mob shade. Take your time and
enjoy every step, even the process of choosing
and mixing your colors. Once again, feel free to use colors straight
from the tube or pan or mix your own like I did. Just make sure to
mix your color to a milky consistency and that you have plenty to cover the
area around your drawing. We'll follow a
similar process as our second bookmark by
painting the background first. Since we have a
larger area to cover, we'll use a larger brush. Use small brush strokes
to apply the paint, dancing between your
water and color, blending them to create
different shades. Micron pens are a great
choice because they won't play into the water.
See you tomorrow.
15. DAY 12: Playing with Two Styles: It's natural to strive
for excellence. But remember, progress comes
from consistent practice. Let's keep our intention
of playfulness in mind, freeing ourselves from judgment, opening space for kindness
towards our inner children, and embracing mistakes as opportunities to learn and grow. For your final bookmark, we'll use recycled paper again. I'll use another section of the previously painted piece of Arches cold press
watercolor paper for the front and a piece of
a craft bag for the back. To glue them together,
I'm using Much podge mat, and we will trim the excess
paper once it dries. Be patient and let the
bookmarks dry completely, preferably overnight under heavy objects to
prevent warping. Let's keep embracing playfulness and experiment with
different combinations. Mix and match the
veins and leaf shape from option D Day two, with the details from option F, day seven, to create
something new. Take your time and enjoy the process of drawing
your leaf silhouette. Trust your instincts. The steps you followed will come back as
you start to draw. You can free hand your shape
or trace the guidelines from your workbook PDF sometimes we come across a detail or color combination in nature
that captures our attention. We'll use as inspiration
the unique colors found on the backside of the monkey plant leads for our last bookmark. The colors you mix do
not need to be exact. Our photo serves as
inspiration only. So from my small set, I chose purple magenta, naples yellow, and a hint of helourquoise for
the darkest shade. Then purple magenta,
naples yellow, and titanium white for
the lighter shade. Now for this bookmark, use more watery consistency
for your paint. I'm using my smallest brush because I know I'd like
some texture to come out. This small brush pushes me to work slower and with less paint. While this might not
create hard edges, it results in interesting
little blooms of color. Use a lighter shade to
paint the entire leaf, work within the blocks defined
by your lateral veins. Stop painting at the end of each block if you
need to take a break. Any hard edges will be hidden when we add
the veins later. While painting this section, I noticed something unusual
on the paper surface. The paint was
resisting absorption. I really don't know
what happened, but I decided to embrace
not only the unexpected, but also the things that
are beyond my control. This experience reminds
me that in life, there are many things
I cannot control. I can only focus on my own actions and allow the
rest to unfold naturally. Feel free to gently shift
the color at any point. Introduce a subtle touch
of magenta, for example. Breathe, work at your own pace, and use enough water to soften
any colour transitions. Adding a hint of helo turquoise will create a nice muddy shade. Trust your instinct and choose a color shift
that feels right to you. Before we keep
working on our leaf, to give it more time to dry, place your stem with your
lighter water color. Build your stem with small
precise brush strokes, adding water as you go
to create a smooth flow. The next logical step is
to add a darker shade. In option F, we use the
erasing graphite to create lighter shades and emphasize the darker ones later. Similarly, we can use
watercolor to achieve this. Since we don't have predefined guidelines for the darker areas, let's use our lighter
color to create them. By blocking in the lighter
color around the main veins, we slightly darken the
area and establish clear boundaries for where
to apply the darker color. I encountered some resistance
again here, which is okay. It reminds me of the
beautiful nuances found in nature and life. So I decided to let
go and continue. Use your light colour
to reinforce your stem. This is a pretty
straightforward step. So take your time,
enjoy the process of filling in each block
with your darker shade. Remember to blend
with water to keep your brush strokes flowing
and color shifts blooming. Loosen your grip on the
brush and breathe deeply. And once more, I encountered
resistance here. This time is more obvious due
to the shade being darker. This is still okay with
me, so I carry on. Continue painting
your dark sections, using water to create
different shades of purple until it's complete. Now with an even darker purple, using your smallest brush, paint in your mid rib
and lateral veins. Breathe as you desire,
whether to place them using small
strokes or large ones. It's up to you with what you
feel more comfortable with. Include a fine line with the same deep purple on your
stem to finish up your leaf. Now mix a faint gray
using purple magenta, helo turquoise, Benciena
and a lot of water. Place in a little shading
on the side of your leaf. Move in little sections,
adding your paint, rinsing your brush,
and blending your gray into the paper for a
smooth colour transition. Apply the same colour and technique to some of the
sections of your stem as well. Okay. Finally for
added dimension, grab your pencil and reinforce a small section of the shadow, the one right next to
the edge of your leaf. This is optional, but let's
have fun. Let's play. The back of our
fifth bookmark has craft paper backing.
This can be decorated. To keep it simple, we'll use the same drawing
and details, but with a new tool, I had to experiment with three
different white gel pens. They can be unpredictable
and their performance varies depending on the
surface we're using them on. This final exercise
is a good one because we can practice
drawing a leaf freehand. The advantage of this
new leaf version is that since we'll be filling
in some of the sections, any wobbles can be easily
covered up later on. Proceed in the same
manner you drew your leaf originally and map out the colored change around
the veins afterwards. Keep breathing, focusing
on the step you're in, either tracing your
leaf silhouette or drawing your veins. Whichever phase you're
in stay in the moment. When you're done mapping out the colored change between
the lateral veins, color in these sections. One more time, invite
your inner child. Personally, I
needed to let go of the texture I was achieving
with the colored sections. In the end, I was pleased with the appearance and happy to have created a reversible move mark. And just like that, we're done. You've gone beyond cultivating
patience and resilience to overcome challenges
and the kindness to extend compassion
to yourself. Be proud of what you
have accomplished. Be proud of yourself.
16. Conclusion: Congratulations on
completing your class. Now take a moment to
reflect on your journey. From the initial sketches
to the finished bookmarks, acknowledge the
effort, the patience, and the creativity you have
invested in each step. Feel a sense of
accomplishment and pride in the beautiful work you've created and how far you've come. Before we wrap up, I'd like to share a few
final thoughts. These lessons have been
a journey of discovery, not just in art,
but in ourselves. We've explored new
techniques and found inspiration in
the beauty of nature. Along the way, we've also cultivated valuable life skills, embracing the unexpected,
cultivating patience, building resilience, and
practicing self compassion. This journey is about
more than creating art. It's about self discovery. Embrace the process,
celebrate your successes, and never stop exploring the boundless possibilities
of your imagination. I truly believe these
skills can empower you to navigate life's complexities
with more ease and joy. Remember consistent practice,
mindful observation, and taking action are essential for nurturing
your creativity. As you continue to
explore and experiment, you'll begin to see the
world with fresh eyes. I know my own perspective has broadened significantly
over time. Allow your creativity
to flow freely, open your heart to your
intuition and trust in yourself. Your inner guidance
will lead you to unexpected and
rewarding discoveries. The most crucial advice I can
offer is to pace yourself, to be kind to yourself
and stay present. Find joy in the
process of creating and savoring each line
and each mark you make. Engage in your senses, they anchor you to the
present moment and help you quiet those
distracting thoughts. When my inner critic
gets too loud, I pause, I breathe, I acknowledge her presence, and I invite her to
observe me as I continue. Overcoming those
uncomfortable feelings can be one of the most
challenging things to do. But I've consistently
found that pushing through those moments lead to unexpected moments of
growth and self discovery. Now, the sketches
you have created during the first
week and those you continue to add here library are more than just exercises. They serve as a testament
to your artistic growth and are a valuable resource
for future projects. These sketches can
spark new ideas and even become the foundation
for more complex work. Take a chance and
upload your work at the end of the day
to the Project Gallery. Experience the thrill of seeing other
students' reactions. You might even inspire someone else in their
artistic journey. And please use the
discussion tab for any questions
you might have. I'll do my best to answer them. Now consider following me
here on Skillshare and on my social media so it can
meet up again in the future. Thanks so much for the time you have invested in yourself. May this experience inspire you to continue on
your artistic journey? See you in our next class.
 Emma Schonenberg, Designer & Therapeutic Art Facilitator