Transcripts
1. Class Introduction: Hi everybody, and welcome to this Skillshare class. Today we will be doing mimicry to mastery, drawing a portrait from reference. My name is Kyra and I am a professional illustrator and graphic designer. So today, a little disclaimer, we are not doing a how-to draw class, we will not be going through how to render with a specific medium, or how to draw a specific character or thing. However, we are going through some pivotal techniques that you need to be able to understand what you are drawing and how to take what you see and put it on the page. For all our beginners out there, don't worry, I said it wasn't how-to draw class, but I promise you these are the fundamentals you need to get started. Beginners, I recommend you start at our first class, and work all the way through the lessons. Don't worry if you have to repeat a class, that's perfectly fine. I've designed this course as a set of separate projects, so you can keep going back and forth and grow each time you do the class. For intermediate artists out there, I recommend skipping the first two classes, as they are really a warm up for beginner artists, and go to the third one to really get into the lesson we're doing today and to get started. Before we get started, I want to make sure that everybody has all the tools that we need for this assignment. So, for everyone who just wants to work traditionally by hand, a piece of paper with a pencil or a sketchbook with any medium you like is perfect for this. I also recommend that if you are doing traditional medium, that you have printouts of the person or thing that you want your draw from reference, as well as access to the internet, or a book with some cartoon characters in it because we will be using our favorite cartoon character in the first three exercises. If you're doing digitally, like I will be today, you can pick up your tablet, or your iPad, or computer, and just work your way there. Today, I'm going to be using the iPad Pro with the Apple pencil, and I will be using the program Procreate. If any of you are interested, just look it up on the App Store, I find it as a really great alternative to using Photoshop. I pretty much take it everywhere with me. It is my new sketchbook. I'm really excited to get started, and I hope you are too. How about we get into our first class?
2. Warm Up : Welcome to the first unit of this class. This is a warm up peanut, so we're just going to be doing a simple exercise to get ourselves ready to be drawing from reference. Now this exercise is great for beginners and I recommend doing it multiple times. What we're going to be doing is we are going to be taking our favorite cartoon characters, in my case, that is Mickey Mouse. We are going to be tracing them. Now this is purely an exercise, it is not for your finished art work and I don't recommend tracing if you plan to claim this artwork as your own or to sell it. This exercise is simply for us to understand the shapes that are involved in drawing. Now I've decided on cartoon characters first because they are a lot, simpler and less sophisticated in drawing a realistic lesson. How about we get started with our tracing? I just popped into Procreate to start my tracing, and of course it's of the famous Mickey Mouse. Now with your tracing don't stress about being neat. It's all about understanding the shapes and the lines which are involved in the character that you are drawing. It is just an exercise to get our hands moving and our minds working, and it's a great way for us to be able to memorize the proportions and the shapes within the characters that we're drawing for future exercises where we will actually be drawing our character directly from reference, no tracing. Two tips I have here, one is trace your character in a distinct color separate from the image which you have underneath. In this case, I'm using red so I can clearly see what is my illustration and what is my reference underneath. Another tip is to trace in the medium which you are going to be using for your final artwork. Because this way, you can kill two birds in one stone. You can memorize the character which you want to draw in the future from reference, and you can also practice the medium which you're going to be using in the future. I hope you guys earned during this exercise analysis with bit of a relaxation for you because we don't have to exercise our imaginations or our skills in anatomy. But don't worry, we'll be getting to the more challenging parts in future exercises. I can't wait to see what cartoon characters you guys have chosen for this warm up. Hope you guys enjoyed that task. If you did it, please leave it down in the projects so the whole community can see it. That way, you can see what other artists are doing and you can also get some feedback on your own work. I myself would be looking at every single piece and giving feedback where I can. Don't forget to get this part of the project done before moving onto the next video as it is a continuation of what we've been doing now. I hope you enjoyed it and I'll see you in the next assignment.
3. Shape Skeleton: Welcome back to unit two of this class. Now we've done tracing, we're going to figure out what our cartoon characters are made off. Using this name references we did before, we are going to be making ancient shapes skeleton. Let's get started. The first thing I do and I'm trying to find a shape skeleton is figure out what shapes the actual character is made of. In this case, Mickey Mouse is made of circles, and ovals, and variations of that shape. Your character might be made up of triangles or rectangles, just figure out what your main shape is and then trace over the top of your drawing and find it as many times as you can within the character. Now it might look quite messy at the end, but that's perfectly okay because some characters can be really complex, especially in this case, because here you have a crouching position, which means all our ovals and circles which Mickey Mouse is made up of, are really getting confined to a small area. Don't worry about, be messy with your line work, of course, this is not a finished artwork, this is really just a basis for our future drawing. Talking about being a basis, you can also use this method to actually design and draw your own characters. Maybe give it a go using ovals and circles to create your own [inaudible] and I will do a tutorial online if you would like. I hope you guys really enjoyed the assignment for this unit. Please don't forget to put it down in your project and share it with everyone. That way, again, I can give you feedback on what you've done so far, and if you're having any trouble with the techniques, just put it down in the discussion and I'll get back to you. Shape skeletons can be a tricky thing to get a hold of, especially when you're a beginner. But I promise, with practice and repetition, those shapes inside your characters will be easier to find. Better yet, once you've got the grasp of finding a shape skeleton in a cartoon character, you can take this method and apply it to anything you want to draw, whether i be a [inaudible] and still alive, a portrait, an animal, a building, a tree, absolutely anything, you can find basic shapes to work a skeleton to then base your drawing of. Now I've got our skeletons underway, let's get started with what we're all been waiting for, drawing directly from reference. See you in the next class.
4. Character From Reference: Hey everyone, welcome to the third unit of this class. We have gone through tracing your character and making a skeleton of your character. Now comes the big task, actually drawing your character from reference. Drawing from reference means you have the picture of your character to look at, separate from the surface you're drawing on. But don't worry, we can still use the technique we learnt in the last class. On the surface you're drawing on you can draw out a skeleton that you believe is identical to the one you drew before, and then you can go in and draw in all your lines of the character, and then just erase the skeleton lines after. I'm going to go through and just show you me drawing from reference, Mickey Mouse, just like I've done the past two lessons, and we'll see what we can do with the cartoon character. If you don't know where to start, my recommendation is to always start with the eye. That is where I seem to always start my drawing and I love doing it from there. If you can see, I'm drawing the same size as I have been this entire time. I'm trying to mimic the character to the best of my ability. The head's a little big but other than that, I think the drawing worked out alright. It's just another opportunity for me to practice and improve. I'm not sure whether you can see here but what I'm actually doing is I will draw in the ovals and circles we were talking about from our character's shapes skeletons from the previous exercise. Then I'll go over them with a darker line once I'm happy and convinced that that's the closest proximity to what I see in my reference image. I'm just doing this as a sketch using the pencil tool in Procreate. If I wanted to have this as a final art work, I could then go over this sketch with my inking and redefine and fix all the little errors which I see myself in my drawing. I definitely recommend if you are doing a finished drawing, please use pencil before you use your paints, or inks, or permanent medium because that gives you an opportunity to fix any mistakes. Here you can see my finished sketch of the Mickey, which I've been working on for these past three units. I hope you like it. I can't wait to see yours and what you came up with. Don't worry if it's not to your satisfaction. You can just practice and try and try again. I promise you will come out with a happy, amazing, reference-based image. How did it go? I hope you guys did really well in this task. Again, repetition is key. So if you found it a bit difficult, just repeat Units 1-3 and you'll get the hang of doing a cartoon character from reference. This, again is a lot simpler than our next stage, which is drawing a portrait, so please take your time on these steps and really get into swing of getting a likeness on simple characters. Don't forget to share your project with all of us so we can look and I can give you some feedback and I will see you in our next class.
5. Facial Anatomy Mapping: Hi everybody and welcome to the fourth unit of this class. Congratulations for getting through all the basics, I hope you now all understand how to make the likeness of a character in your illustrations and that it's really helped you. Now though we're going to get onto the portrait [inaudible] segment of the classes. Portraits, a much more sophisticated and catching characters. We need a bit more of the base understanding before we just go all out and draw from reference. This unit is going to take us through the basic anatomy of a face. I'm going to be using the face I'm going to draw us an example. I'm going to take you through, eye placement and nose placement and how they all fit together in a face. Let's get started. I pick my image from unslash, which is a great website filled with free stock images from fabulous photographers, and I suggest using it if you're trying to find a portrait for this exercise. We are going to start off with outlining the basic shapes of the face, including the shape of the head, the eyes, the nose, and the lips. Then we are going to go on to finding where the ears are and the hairline. These are all really easy features to find. Now we're coming to a little more complex. I want you to find where the brow line and socket is of the eyes, as well as where the upper lip and the chin is. Find where the contour of the cheek is and align the whole cheek as well as finding where the forehead lies, the temples, the tip of the nose, and the nostrils as well as the bridge of the nose. These are all the basic shapes and elements which go into face. You could go into more detail and make a full polygraph of the face, but this is all you need to make a beautiful portrait. Once you've aligned all the planes of a face, you can even go in later and shape them with [inaudible] depending on what those light hits the face in your illustrations, but it's not necessary, it is just a helpful tip. Please pause on this page so you can write down all the areas you need to find on your face and go hunting and find them on your face. Also, I'll just put this back up here so you can see where the lines on the actual image that I'll be using. I hope you guys enjoyed discovering a bit about facial anatomy. Please leave the facial maps which you've created down in your projects, so I can take a look and so we can really get the base of your portrait setup for you. In the final stage of our project we'll be able to make a beautiful illustration. Again, I myself will personally be giving you feedback on every single step of the way. I hope you've really enjoyed these classes so far, and I will see you in the next one.
6. Measuring the Face: Hey everybody and welcome to the fifth unit. You guys are so amazing getting all the projects and throwing it in done. But please, please, please, before we start this class, make sure that you've done the project from the fourth unit because we are going to be using the facial maps we created as the basis for the exercise we're doing in this class. This class is the second stage of facial anatomy which is measurements But don't fear, you don't have to get out a ruler for this. We're going to be using the size of the eye of a person and we're going to be using nut as a reference point to figure out the size of the rest of the faces. That is my eye, the same size as my nose, how big is my mouth compared to my eye, all that stuff. I'm going to be taking you through the basic rules you can use to measure out every single unique face that you want to draw. How about we get started. My big measurement tool is the eye. This is why I start with the eye in all of my illustrations. As you can see here, I'm just using the eye horizontally and vertically to work out. [inaudible] twin-eye which is generally [inaudible] width and the length of the nose which is generally 3-i heights. Now these are all general and to do with my specific face and yours might be a bit different. You might have a really wide nose or really wide-set eyes, perfectly fine. Another tip which I like to use is the center of your pupils is normally where the edges of your mouth will fit if you draw a vertical line straight down the face, as well as the width of the nose is mostly one I width. Another [inaudible] tip to learn is that before they get to draw off the face, the eyes will sit across the horizontal axis of the face and the face is a five Is width. The nose and the ears are mostly the same high and the ear will generally start from the top of the eye and work its way down to the base of the nerves. The eye is the key in all of your measurements. Now, another great tip is to use your hand as you're measuring tools. As I said, [inaudible] with rollers, but it's great to have some perspective. What you can do is you can place your finger on your eye and figure out how much of your finger is the eye for instance, for me, it's the whole first-one of my finger and then travel your finger across the image you're referencing and work out the measurements from there. I recommend actually going through all of the separate sections that we drew on the face previously and writing down the measurements so you are already for drawing your reference image in the next class. I will just go through all these things. The hairline, the temples, the cheeks, the not-self withdraw, etc, and write down the measurements that you find in your face so you can have them next ear when you are drawing your image in the next time. Hope you guys can follow along with that class. Don't be afraid to repeat these videos as much as you like. That's the beauty of doing an online course and also if you have any questions about the measurements which I have given you in this class, or you have an unusual face proportion, just put it in the discussion or just let me know about your project and I will personally come have a look and see if I can help you out. Now, don't forget to put all these measurements again into your project so everyone can see them and everyone could learn and now we're getting on to what everyone has been waiting for and we are going to draw a portrait from reference. I will see you in next class.
7. Drawing Portraits from Reference: Welcome to the sixth unit everybody, we're finally up to the class, which is drawing portraits from reference which is what this whole video series is about. We're going to be using all the techniques we've learned up to now to create our portrait. Please have on-hand your actual reference of the person you want to make a portrait of, as well as your facial map, which we made in unit four, and your measurements which we made in the last unit because they will help you to no end getting the face right. I promise you, you will see much more of a likeness than if you just tried to draw it straight off. I'm going to get started now I hope you guys can join me and I can't wait to see your projects. As you see, I have my reference next to my image and I'll be using that the whole time. I started off with the eye, like I have in previous exercises and I've been using that to measure my entire drawing. Now, unfortunately because I'm doing digital, you can't see my hand and my pencil moving over the canvas. But what I was actually doing is the hand technique which we learned in our previous exercise, where I put my finger over the eye and then I work out the measurement of that compared to all the face and make the proportions correct to my reference. Now I also did put in fine lines to our cat. For instance, the width of the lips in comparison to the pupils of the eye. I put them in really lightly so that way I didn't have to erase them when I went in rendering my image. Now if you wanted to know about the technique I'm using to draw my portrait, I will do a full video series on that if you like. But as a quick recap of what I'm doing, I did my sketch, that under my sketch layer I did, blocking of my colors, which I suggest you do in any techniques. Like in the Apollo's means you just work out where the tones like within your image without doing details so you can make sure that you've got the right light source and the right colors throughout your image. Then what I did is I put a detail layer on top of my sketch layer so I could paint over all those lines, which I had drawn before and I could really add detail in the eyes, including the lashes and the hair, the texture and then show her mole, absolutely everything. That's pretty much my technique, I use in all my painting, but especially in a digital ramp. My painting is pretty much finished. I'm just ending in a background now with a soft brush to give it the depth of field that you see in my photo. A great tip to add a bit of depth into your image. This is the final image I hope you really like it. Here's a bit of detail of the face and here's a comparison of the original photograph to my illustration. I hope you guys get what you're looking for. I hope you all enjoy making these portraits and use the techniques that I have given you to help you create a likeness to the person which you're trying to take a illustration of. Please don't forget to link all your work down in the projects panels, so everyone can see it and give feedback. I personally will look at all of them. If you have any specific problems or anything that you want to learn and didn't see in this video series, please just put it down in the discussion panel and I will try and get to you as soon as I can. Please join me for the next video, which number seven, which is my challenge video, where we will be using more than one reference to make a portrait. That's going to be heaps of fun. If you feel like it's too much of a challenge for you, that's okay, just join along, I'm sure that you'll get up to it in the future and I will see you there.
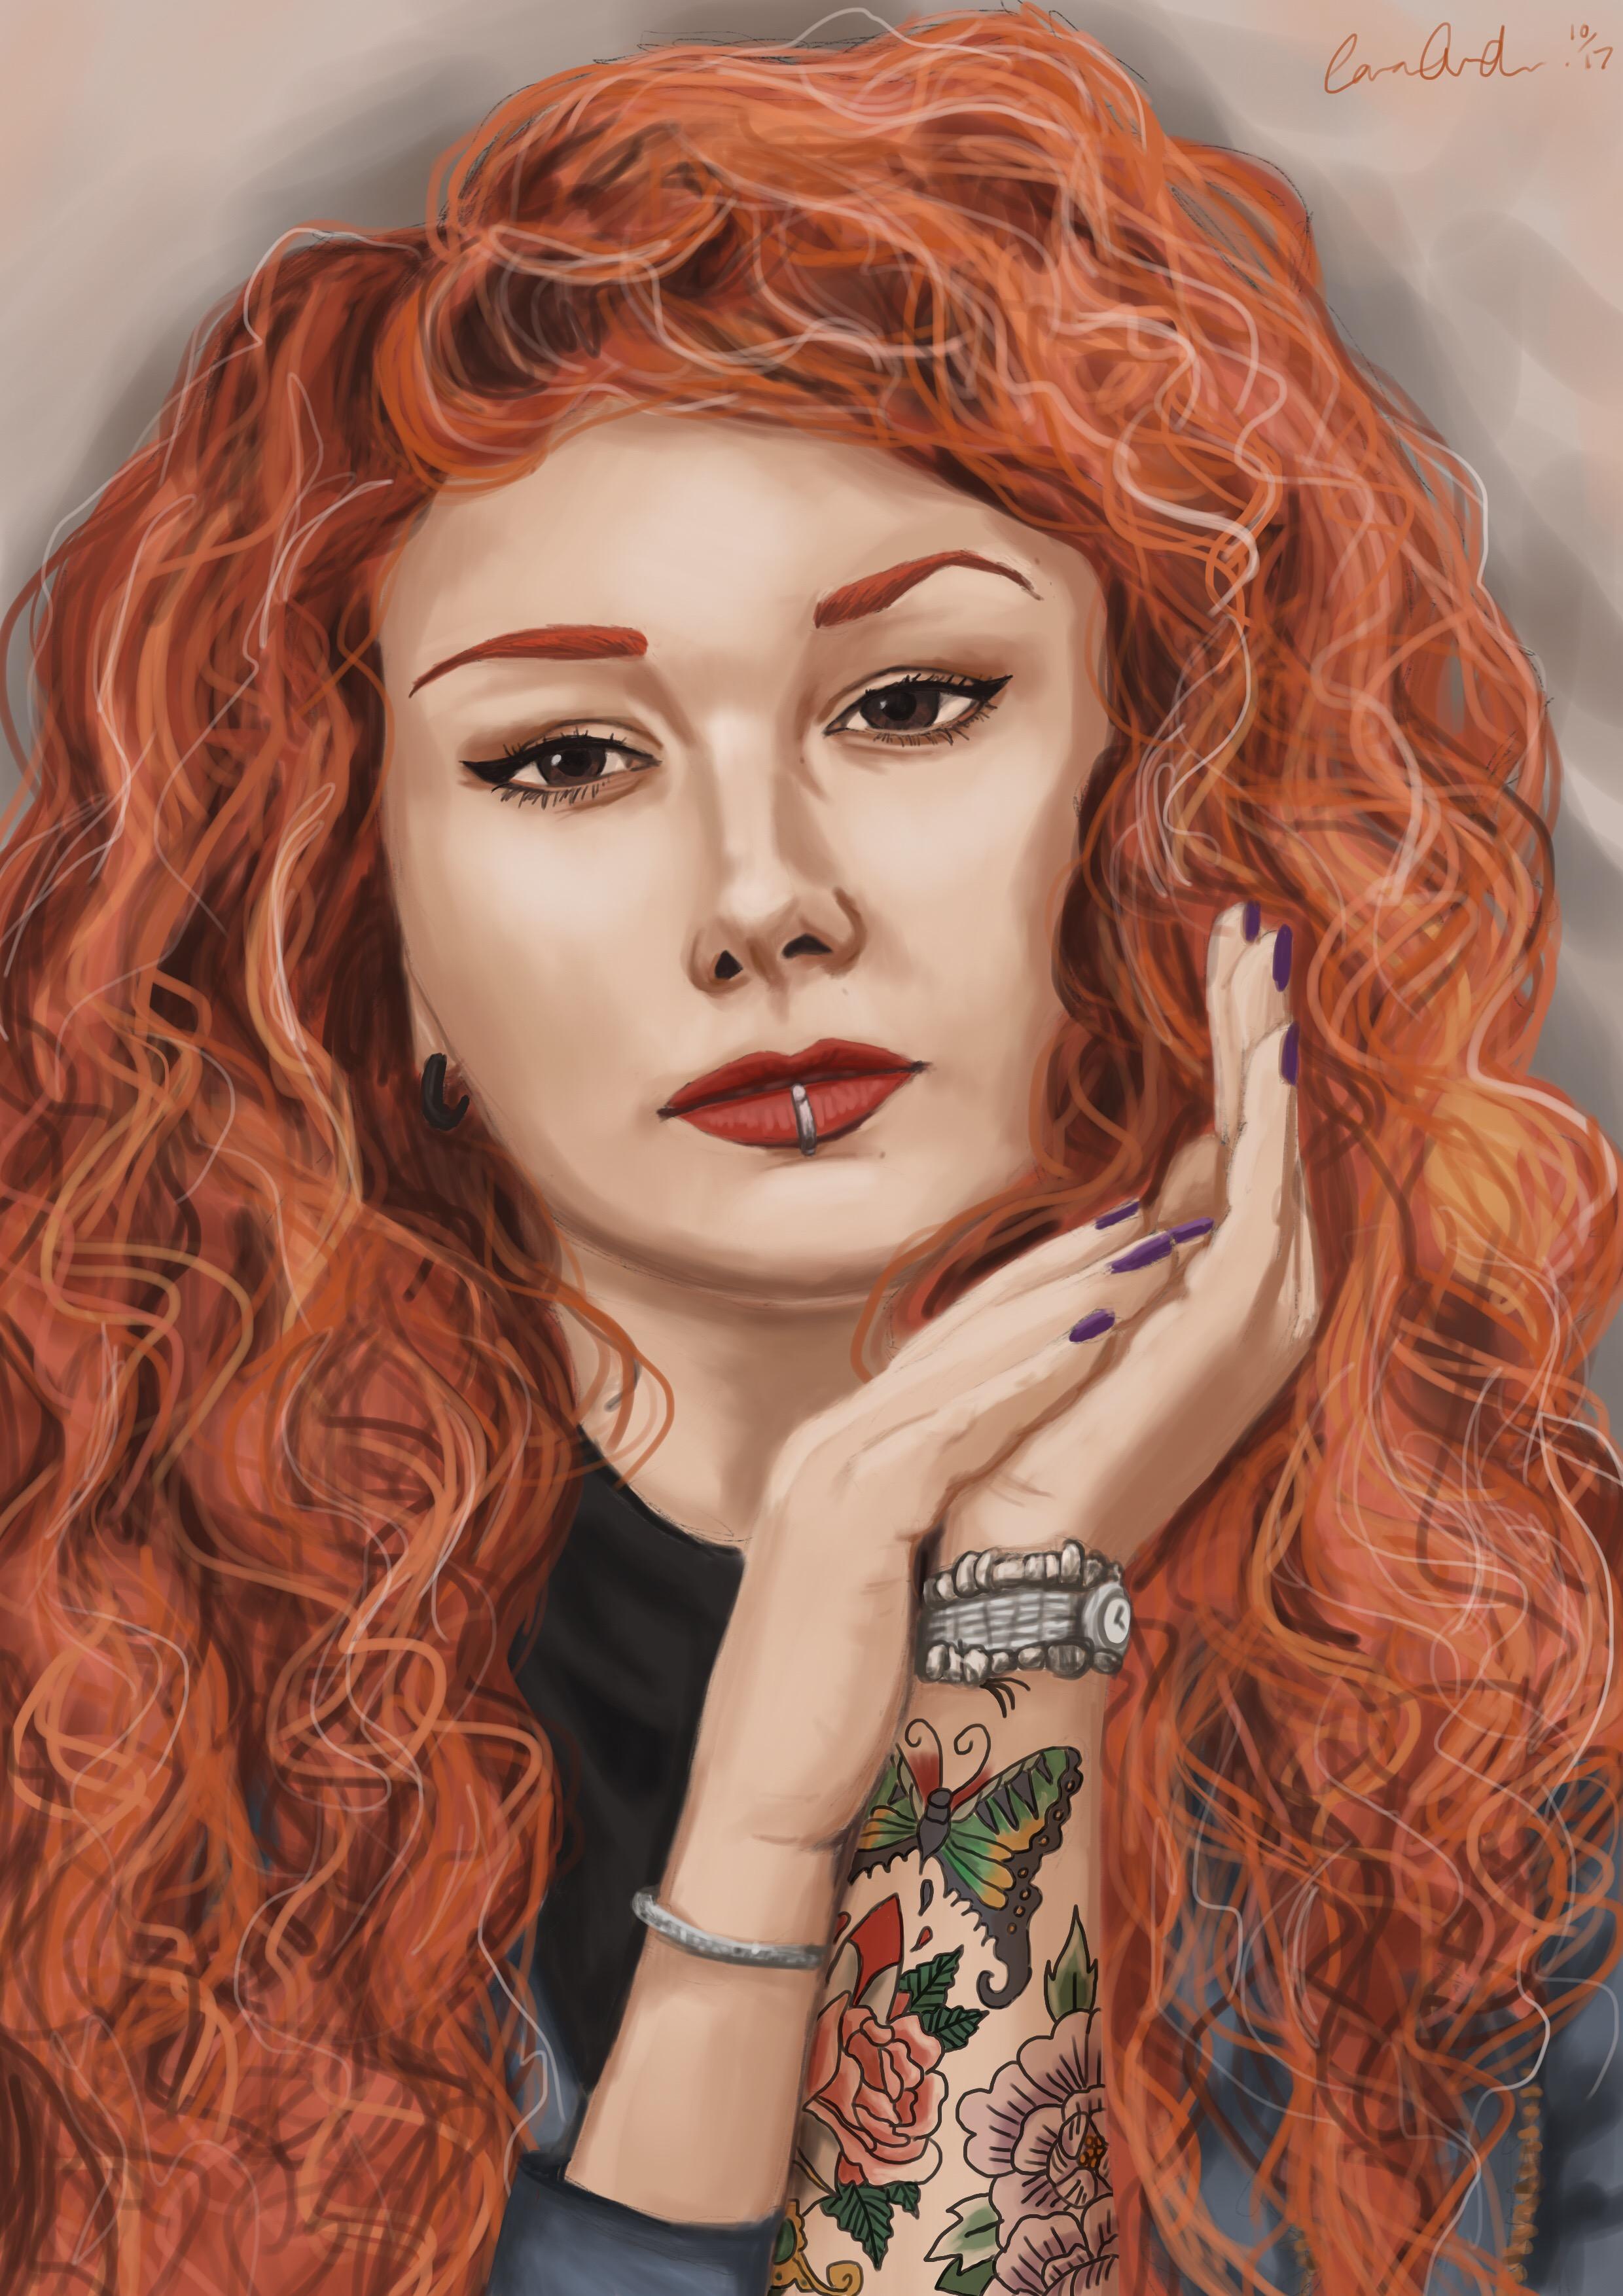
8. CHALLENGE UNIT - Portraits using Multiple References : Hi guys and welcome to the challenge unit. This unit is using multiple references to create a single illustration. Now you might think this is really tricky, but using all the techniques, which I have given you in the previous videos, you can simply just draw all the bits together. But I'm going to make it even easier for you instead of having all your references lined up with your measurements, we are going to use photoshop or scissors and glue and collage all the bits we want together for our portrait. Then we're going to make a completely new figure as our portrait from reference. So how about we get started. For this exercise, here is where I'm getting all my images. It is a site called On splash filled with free, great stock photography. It is all free to download at high quality and you can lead to the photographer if you feel like and actually see all their photos. Another really great site, which I recommend you should get on is Sketchy. Which is actually community where people put on all these references specifically for you to draw. Also you can go on Pinterest. I'm not affiliated with any of these sites, but it's a really great way to get started with the reference drawing. Here are the four images that I have chosen to draw. I will be the combining them all in photoshop. But as I said, you can simply use printouts with scissors and glue to make a collage. So I've done two different collages. One which is this really basic one where I pretty much just chucked and stuck together all the bits of the girls that I liked. Then here is my super details second draft of that, which will make it super easy for me to illustrate because it's pretty much a full photo where I've gone in and changed the tones, the colors, size, everything right, and I can show you how to do that in another tutorial if you like. So I used the face from the first girl, I used the hair from the second girl and I turn it red. I used the arms from the third girl and the tattoo from the fourth girl, because I really wanted a punk style made modern looking character. I really enjoyed the way that this work turned out. I'm using the exact same techniques for the rest of the illustration like I did in the previous exercise. So I am measuring using my hands and of course the eye as my measuring tool. I am making a face map and I am sketching it out and then render nerve at the top. Again, I'm not going to go through how I render my portraits. But if you're really interested in a step by step of how I specifically do my portrait style let me know in the discussion and I will be glad to show you how to do that. Now, don't stress if you find that chopping together all your pictures to be difficult, you can use each of your references separately. But I find this easier to get an overall understanding of how all the bits and pieces fit together. You can use this technique to create a fantasy stapes such as a witch in a forest. If you can't find a photo of that or you can use it to make a mermaid using a fish and a person together. It's really up to you, but it really helps to use references to get a nice realistic portrait. So this is my final portrait. I hope you like it. I really enjoyed drawing this girl and her punk style with her wonderful hair. Here's a little bit of close up of the face. [inaudible] is the most important part of a portrait. I hope you guys really enjoyed this challenge assignment. I can't wait to see what your imagination has bought you. Please, when you put down in your projects the image that you've created, can you also give us a link or show us a picture of your references. Because it would be great to see what you combined to make a really unique portrait. Now, if you want to see more on photoshoping together faces to create unique portraits, let me know and I'll be making a class in the future on that and the basic use of photoshop. But until then I really hope you enjoyed this class. I can't wait to see all your projects and I will see you for the final video.
9. Thank you: Congratulations on completing this class. I'm so proud of you all and thank you so much for submitting your projects. Now, I wanted to reiterate that all of these techniques don't have to just be used for portraits, that can be used for the base of any illustration. I hope that they will help you in the future in creating images for reference or even images from your imagination. Now, slowly as you get better and better, you might even be able to draw upon the steps, for instance, measurements because you'll know it so well in your head and your eyes will get better, but for now, please continue with all the steps and I promise you will get the best outcome you can possibly have. Thank you again so much for joining me. Please, they've done in this discussion, any classes you would like me on the future or any advice you have which you think will improve my videos, I can't wait to have a look at your project and future projects, and I hope that you will join me again in the future video. Bye for now.
 Cara Ord, Illustrator & Graphic Designer